Lionel 7-11000 Ready-to-Play Train Set Owner Manual | Operating Instructions
Content
Introduction of Lionel 7-11000 Ready-to-Play Train Set
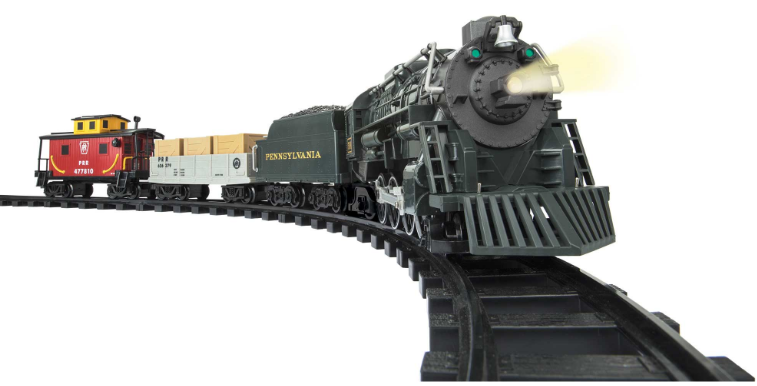
Lionel 7-11000 Ready-to-Play Train Set is a perfect toy for kids and train enthusiasts who want to experience the thrill of operating a model train. This electric train set is easy to operate, set up, and requires minimal maintenance. The estimated price of this product is around $200 to $300, and it is available in the market. The Lionel Ready-to-Play Train Set is a great addition to any toy collection or a perfect gift for any occasion.
Detailed Specifications
The Lionel 7-11000 Ready-to-Play Train Set comes with the following key features:
- Remote control operation
- Three cars and one engine included
- Recycling steel frame construction
- Requires six C batteries (not included)
- One-piece track for easy setup
- Dimensions: 50 x 73.2 x 13.6 inches
- Weight: 14.6 pounds
- Age grading: 4 years and up
Set Inventory
- 1 Steam locomotive with head lamp, bell, and sounds
- 1 Tender
- 2 Rolling Stock cars
- 24 curved track sections
- 8 straight track sections
- 1 Wireless Remote Controller
- 1 Owners manual
Track Assembly and Layout
Joining the track sections
Join the track sections together by placing them on a flat surface and inserting the plastic tabs of each track section into the corresponding openings of the next section. Press or squeeze the ties together to connect. This may require the help of an adult. Recheck all track connection points upon completing your layout to be sure they are secure. To disassemble the track, just lift one of the track sections slightly at an angle where they join together and they will snap apart. See Figure 1. The rails should be kept clean, dry, and free from oil, grease, and dirt. Clean the track periodically with a clean soft cloth.

Layouts
These are three possible layouts you can make with the track provided. See Figure 2.
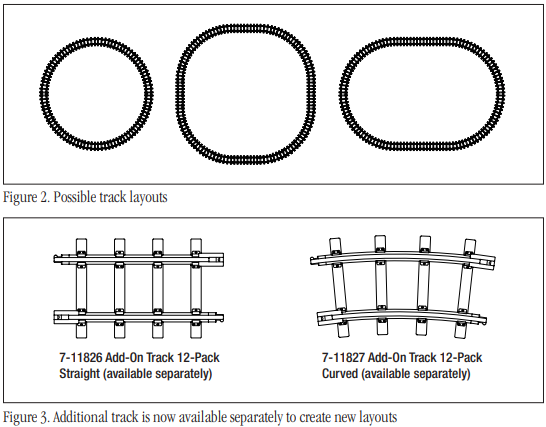
- Circle: Connect all curved track sections.
- Extended Circle: Make four ninety-degree curves by joining three curved sections each. Connect the three-section ninety-degree curves with one straight section in between.
- Oval: Make two half-circles using six curved sections for each. Make two long straight tracks using two sections each. Join the curves using the two long straight sections.
Battery Installation and Options
Installing AAA batteries into the Remote Control
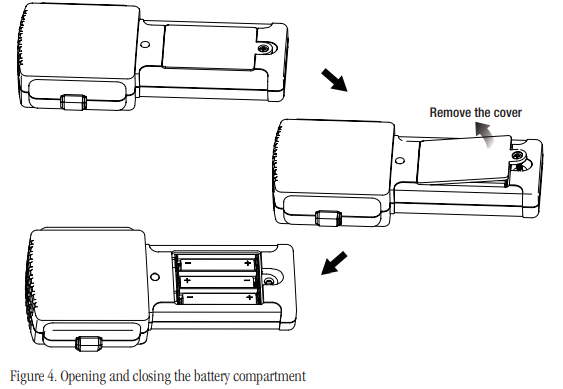
Using a Phillips Head screwdriver, have an adult loosen the screw on the battery compartment cover. Once the battery tray has been removed (as shown in figure 4), install 3 'AAA' Alkaline Batteries (not included). Please be sure the +/- of each battery is positioned properly in the battery compartment. Replace the battery door and tighten the Phillips head screw. Be careful to avoid over-tightening the screw.
Important! Use only Alkaline AAA batteries. Use only new batteries. Never mix new and used batteries or use different types together.
Important! REMOVE ALL BATTERIES WHEN THE TRAIN WILL NOT BE USED FOR AN EXTENDED PERIOD OF TIME. LIONEL'S LIMITED WARRANTY DOES NOT COVER DAMAGE TO YOUR REMOTE CAUSED FROM LEAKING BATTERIES.
Important! When you are not operating the train, move the On/Off switch to the Off position to conserve the battery life.
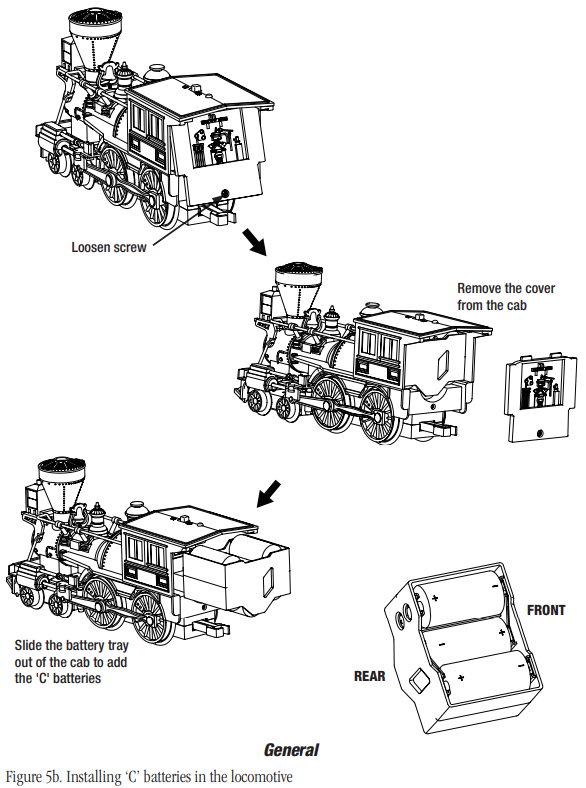
Installing ‘C’ batteries into the Berkshire Locomotive
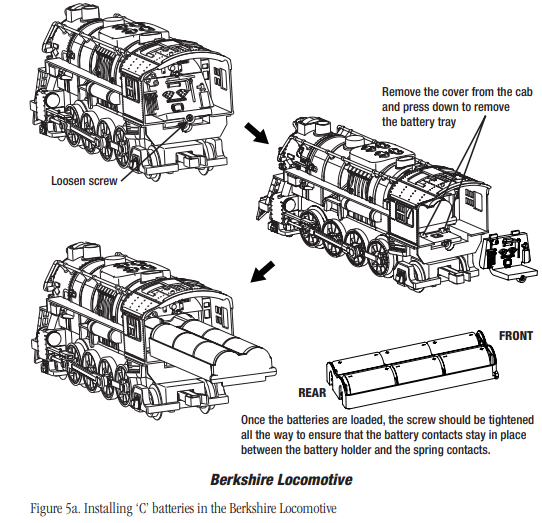
Using a Phillips Head screwdriver, have an adult loosen the screw on the battery compartment cover. Push down on the battery tray locking mechanism to allow the tray to slide out of the cavity inside the locomotive. Once the battery tray has been removed, install 6 'C' Alkaline Batteries (not included). Please be sure the +/- of each battery is positioned as shown in the battery compartment. See Figure 5(a/b).
Important! Use Alkaline ‘C’ batteries. Use only new batteries. Never mix new and used batteries or use different types together.
Close the battery compartment by inserting the slot on the top end of the cab interior lid into the retaining rib. Then close the bottom end of the lid and secure by tightening the Phillips Head screw.
Installing ‘C’ batteries into the General Locomotive
Important! Remove all batteries when the train will not be used for an extended period of time. Lionel's Limited Warranty does not cover damage to the engine caused from leaking batteries.
Description
The Lionel 7-11000 Ready-to-Play Train Set is a high-quality electric train set that is easy to operate and set up. The train set includes three cars and one engine, and it can be operated using a remote control. The frame of the train set is made of recycling steel, making it durable and long-lasting. The one-piece track is easy to set up and allows for a smooth and continuous operation. The train set is recommended for kids aged four years and up, making it an excellent gift for any occasion.
Operating your train
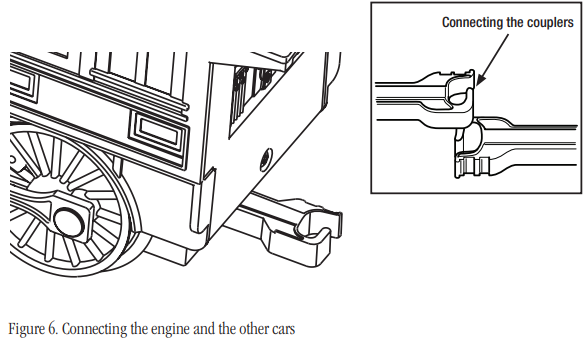
Connecting the locomotive and coal tender
Place the engine on the track first. Be sure that all the wheels are within the track rails.
NOTE: The locomotive will not turn on until the power switch at the top of the locomotive is slid to the "ON" position. Place the tender on the track behind the engine and connect the couplers. Be sure that all the tender’s wheels are on the track rails. See Figure 6.
NOTE: Remove all batteries when the train will not be used for an extended period of time. Lionel's Limited Warranty does not cover damage to the engine caused from leaking batteries.
Wireless controller
Turn the power switch on the side of the wireless remote to the up or ON position. The red LED at the top of the speed dial will illuminate to tell you the controller is on. Turn the power switch on the Wireless Controller to the down position or OFF when not in use. The LED at the top of the dial will go out to indicate the power is off. See Figure 7.
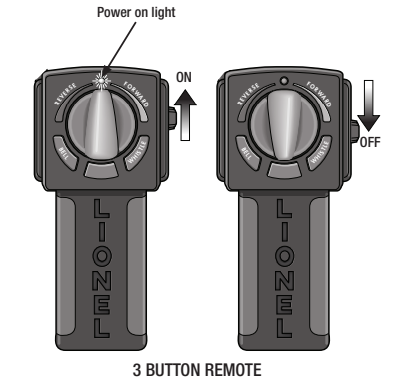
Note! Leaving the Wireless Controller power ON when not in use will drain the controller’s battery.
Pairing the wireless controller to your Ready-to-Play train set
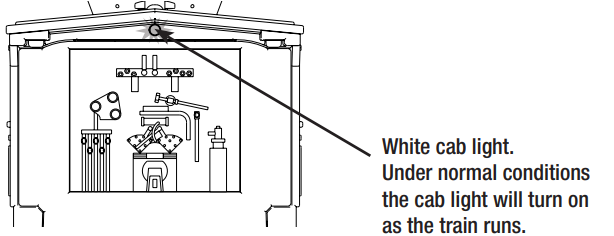
With the remote turned off, turn the locomotive power switch to the “ON” position. The locomotive will produce a loud beeping sound, while the headlight will be off, and the cab light is blinking on and off. Turn the remote on. The locomotive sounds will turn on, the headlight will illuminate, and the cab light will turn off as long as the train is stopped (at idle).
Note! If the remote is turned on PRIOR to the locomotive, the LED on the remote will blink on and off. Once the remote pairs with the locomotive, the LED on the remote will turn solid if the position of the dial is in the neutral/idle position and the knob is facing up. The locomotive sounds will come alive as described above.
Operating your wireless controller
Turn your Wireless Controller to the ON position by sliding the button on the right side of the controller up. An LED on top of the dial will light to indicate the power is on (See Figure 7 on page 11). See Figure 8 on page 13 for button operations.
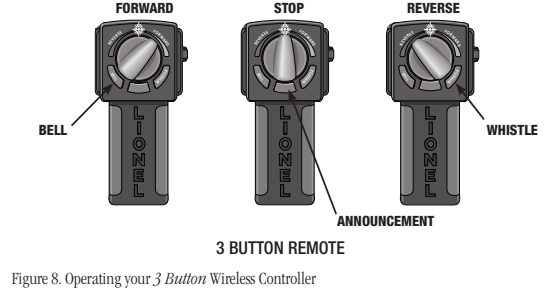
Forward
Turn the throttle dial to the right towards GREEN. There are three speeds in the forward position and the more you turn the dial along the green arrow, the faster the train will run. The flashing rate of the LED will be consistent with the speed. The 3 speeds are slow (slow blink), medium (medium blink), and fast (fast blink). Once the locomotive begins to move, the cab light will turn on and stay on as long as the locomotive is moving.
Stop
Turning the dial to the top will stop the train. Note that it may take up to several seconds for the train to come to a complete stop depending on how fast it was going. Make sure to bring the train to a complete stop before changing direction.
Reverse
Turn the dial towards the blue REVERSE position to have the train move in reverse. Again, there are three speeds in the reverse position. The more you turn the dial along the blue arrow, the faster the train will go. The flashing rate of the LED will be consistent with the speed.
Bell
Pressing the BELL button activates the engine's bell sound.
Center Button (Depending on which set purchased)
Pressing the UNMARKED center button activates a special announcement when stopped and another announcement when moving.
Whistle
Pressing the WHISTLE button activates the engine's whistle.
NOTE: If the locomotive power switch is turned off while the locomotive is moving, it will stop. The LED on the remote will begin to blink slowly, signifying it has lost communication with the locomotive. If the remote is turned off while the train is running, the locomotive will slow down and stop. The headlight will turn off, the cab light will begin flashing, and a loud beeping sound will begin playing (notifying the operator to slide the power switch to the “OFF” position to conserve battery life).
NOTE: Leaving the Wireless Controller power ON when not in use will drain the controller’s battery.
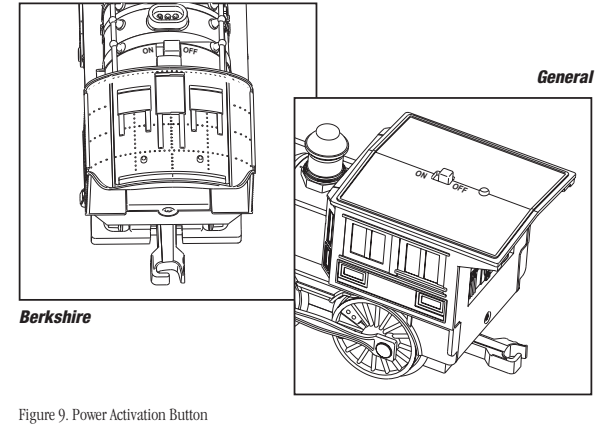
Power activation button on the engine
Slide the engine power switch to the “on” position. The engine cab light will blink and an audible beeping sound will come on to indicate it is looking for remote pairing.
Setup Guide
Setting up the Lionel 7-11000 Ready-to-Play Train Set is easy and straightforward. Here are the steps to follow:
- Install six C batteries in the remote control.
- Connect the track pieces together to form a circle.
- Place the engine and cars on the track.
- Turn on the power switch on the train set.
- Press the button on the remote control to operate the train set.
Maintenance & Operations
BATTERY INFORMATION
Please retain this information for future reference. Batteries should be replaced by an adult.
CAUTION
- Do not mix alkaline, standard (carbon-zinc), or rechargeable (nickel-cadmium) batteries.
- Different types of batteries or new and used batteries are not to be mixed.
- Only batteries of the same or equivalent type as recommended are to be used.
- Batteries are to be inserted with correct polarity.
- Exhausted batteries are to be removed from the toy.
- The supply terminals are not to be short-circuited.
- Dispose of battery(ies) safely.
- Do not dispose of this product in a fire. The batteries inside may explode or leak.
- Non-rechargeable batteries are not to be recharged.
- Rechargeable batteries are to be removed from the toy before being charged.
- Rechargeable batteries are only to be used under adult supervision.
Cleaning the track
It is very important to keep the track and wheels free from dirt and grease. Wipe them with a soft cloth whenever they get dirty. This will help the engine run more efficiently.
Lionel 7-11000 Ready-to-Play Train Set Troubleshooting
The train will not run and the engine light is not on. The engine cab light is blinking.
- Check to see if the remote is in the “off” position.
- After checking the above and if the light is still not on replace the 6 ‘C’ batteries in the engine. Be sure the batteries are oriented as indicated in the battery compartment (see page 8 and 9). After replacing the batteries, slide the switch to the “on” position.
The train will not run but the engine headlight and sounds are on.
- Check to make sure the Wireless Controller power switch is in the On position. This will be indicated by the red LED being illuminated.
- Try moving the controller closer to the engine. Although designed for an optimal range of 10 feet, the signal can be weakened by a metal object or other interference.
- Be sure the controller is not lying flat on the floor and the controller is positioned above the level of the train.
- Replace the 3 AAA batteries in the controller (see page 7). Be sure that the batteries are oriented as indicated in the battery compartment.
The train will not run and the cab light is flickering.
- Check to see if your wireless remote's power light is on. Give the train a new command such as the whistle button. If the lamp remains flickering and the whistle will not sound, either your engine or remote needs repair. If the cab light changes to a steady white glow and the whistle does not sound, your engine needs repair. Please contact Lionel service. See page 16.
The train runs, but the wheels slip on the track.
- Check the top of the track rails and rubberized drive wheels for dirt or grease. Clean with a soft dry or slightly dampened cloth.
- Check to see that all of the wheels of both the engine, tender and cars are located properly on the track.
Pros & Cons
Pros
- Easy to set up and operate
- Durable and long-lasting frame construction
- Includes three cars and one engine
- Remote control operation
Cons
- Requires six C batteries (not included)
- May not be suitable for younger kids as it contains small parts
Customer Reviews about Lionel 7-11000 Ready-to-Play Train Set
Customers who have purchased the Lionel 7-11000 Ready-to-Play Train Set have praised its ease of use, durability, and overall quality. The train set has received an average rating of 4.5 out of 5 stars on various e-commerce websites. However, some customers have reported issues with the remote control's range and the train set's speed.
Faqs
What age group is the Lionel 7-11000 Ready-to-Play Train Set suitable for?
How do you turn on the locomotive in the Lionel 7-11000 Ready-to-Play Train Set?
What is the range of the remote control for the Lionel 7-11000 Ready-to-Play Train Set?
What type of batteries does the Lionel 7-11000 Ready-to-Play Train Set require?
How do you pair the remote control with the locomotive in the Lionel 7-11000 Ready-to-Play Train Set?
How can you clean the Lionel 7-11000 Ready-to-Play Train Set?
What should you do if the sound effects stop working on the Lionel 7-11000 Ready-to-Play Train Set?
Can you use rechargeable batteries in the Lionel 7-11000 Ready-to-Play Train Set?
How long does it take to fully set up the Lionel 7-11000 Ready-to-Play Train Set?
What is the warranty period for the Lionel 7-11000 Ready-to-Play Train Set?
Leave a Comment