Htc Vive 99HASF006-00 Cosmos Elite Headset User Guide
Content
Introduction
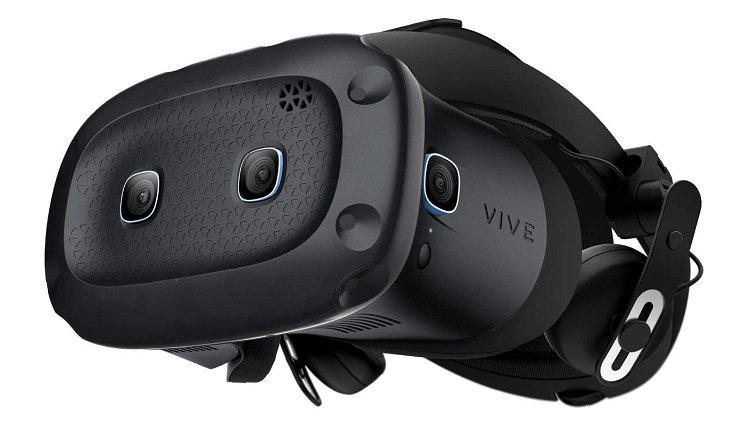
With a broad 110-degree field of view and a combined resolution of 2880 x 1700 pixels, this headset produces breathtaking images. The Cosmos Elite ensures accurate and seamless movement in virtual surroundings by using external base stations for precise tracking. The Cosmos Elite provides a flexible and all-inclusive VR solution for both amateurs and pros, thanks to its compatibility with both SteamVR and current Vive controllers. Learn about the remarkable performance and cutting-edge features that make the HTC Vive Cosmos Elite stand out in the virtual reality space.
Detailed Specifications
The HTC Vive 99HASF006-00 Cosmos Elite Headset comes with the following key features:
- Resolution: 2880 x 1700 pixels
- Refresh Rate: 90 Hz
- Field of View: 110 degrees
- Tracking: SteamVR 2.0 Tracking
- Controllers: Vive Cosmos Elite Controllers
- Audio: Integrated Hi-Res Audio Headstrap with 3D Spatial Sound
- Cabling: DisplayPort 1.2 and USB 3.0
- Weight: 615 grams
- Compatibility: SteamVR, Viveport, and Vive Wireless Adapter
About the VIVE Cosmos Elite headset
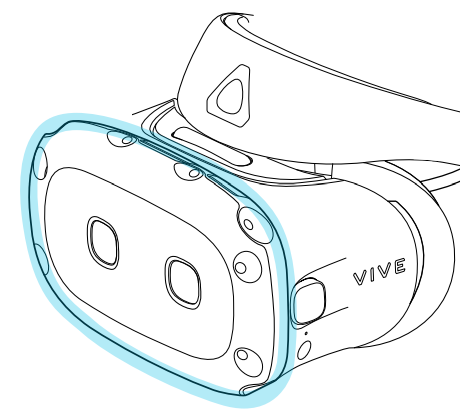
Out of the box, VIVE Cosmos Elite uses base stations to track the headset and controllers. You need to separately purchase a supported front cover to use the cameras for tracking and for passthrough viewing so you can see real surroundings.
Important: The cameras on the headset are sensitive. Do not cover or scratch the cameras.
Front and side views
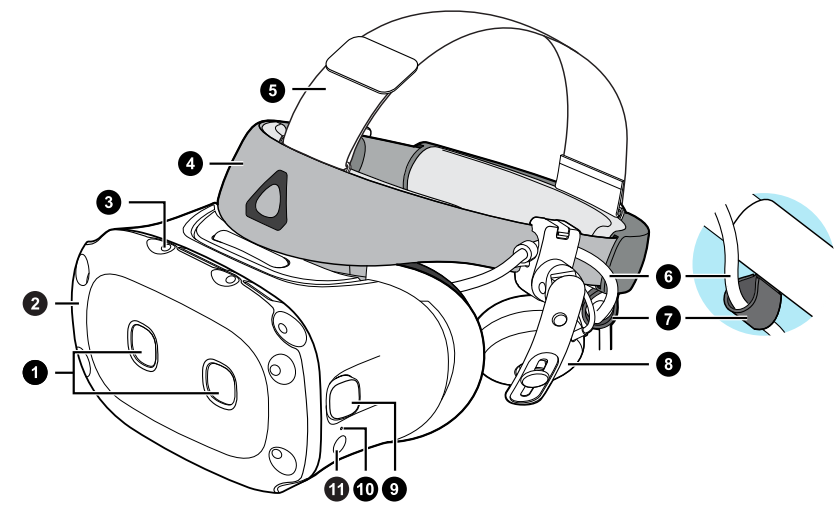
- Dual cameras
- Front cover
- Tracking sensor
- Headset band
- Top strap
- Headset cable
- Headset cable strip
- On-ear headphone
- Side cameras
- Status light
- Headset button
Back and bottom views
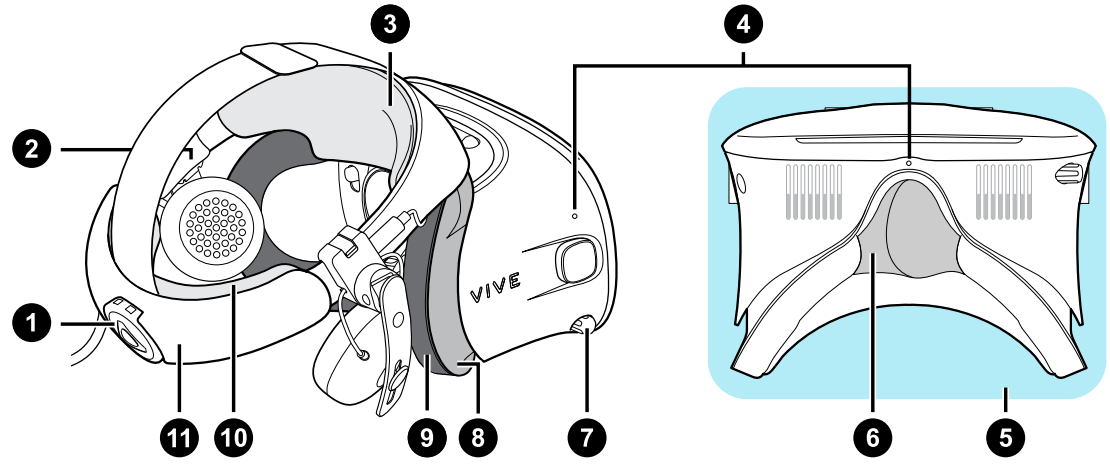
- Adjustment dial
- Side cushion
- Front pad
- Mic
- Visor
- Nose rest
- Interpupillary distance (IPD) knob
- Face cushion frame
- Face cushion
- Back pad
- Headset band
Inner view (face cushion frame removed)
_htc_vive_99hasf006-00_cosmos_elite_headset.png)
- Front cover lock button
- Headset cable
- Audio cable
- USB Type-C cable slot
- Lenses
Putting on the VIVE Cosmos Elite headset
Before wearing the headset for the first time, make sure to do the following:
Peel off the protective film on the lenses.
Fully loosen the band and peel off the protective film starting from the left side of the band.

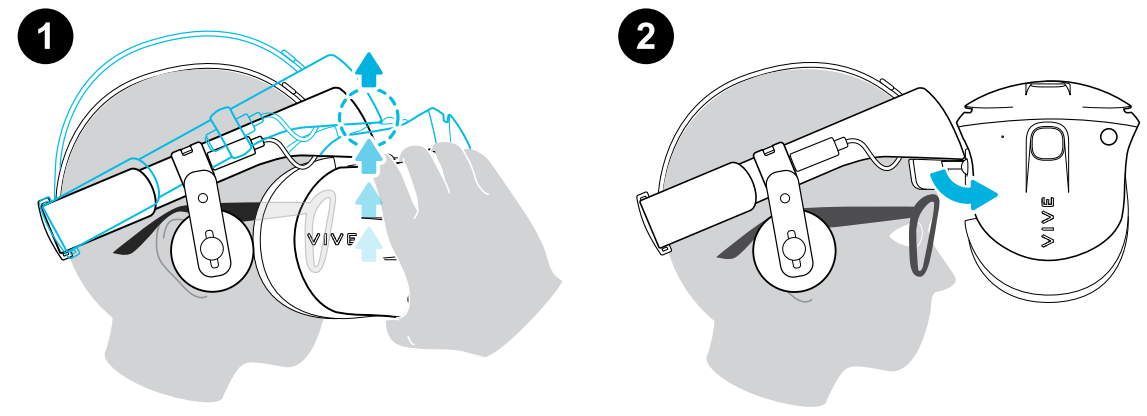
Detach the velcro fastener on the top strap, and then loosen the band by turning the adjustment dial counter-clockwise.
.png)
While holding the visor with one hand, pull up the band.
.png)
Hold the visor to your eyes. Adjust the position of the visor until you see a clear image inside the headset.
.png)
- Pull down the headset band around the back of your head until you hear a click. The click indicates that the headset band has locked into place
Important: When you pull down the band, make sure the headset cable is not caught in between the band and your head. Let the headset cable run straight down your back. Turn the adjustment dial clockwise until the headset fits snugly.
.png)
Make sure the visor faces straight ahead. If the band sits too low or high on the back of your head, the visor will be tilted. It will also be difficult to position the on-ear headphones properly on your ears. If there's light leakage around the areas of your nose or cheeks, adjust the position of the band.
.png)
Adjust the top strap until snug, and then fasten the velcro strap.
.png)
- If there's light leakage around the areas of your nose or cheeks, readjust the strap and reposition the band.
Can I wear prescription glasses while using the headset?
Most glasses fit inside the headset. Make sure that no part of your glasses scratch the headset lenses.
Adjusting the IPD on the headset
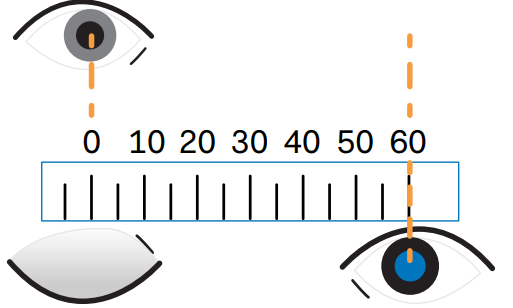
Interpupillary distance (IPD) is the distance between the centers of your eyes.
If you don't know your IPD, see How can I find my IPD?. Use this measurement as a guide to adjust the distance between the lenses of the headset so that you'll have a better viewing experience.
To increase the distance between the lenses, rotate the IPD knob clockwise. To decrease, rotate the IPD knob counterclockwise.

As you adjust the IPD, you'll see a prompt indicating the current distance between the centers of the lenses.
Why is accurate IPD important?
Accurate IPD settings help get a clear image and reduce eye strain.
The headset lenses focus images toward their optical center. This is sometimes called the "sweet spot" in the VR industry. By adjusting the IPD knob, you can tune the sweet spot for the most comfortable view. Misaligned IPD and improperly adjusted headsets are common causes of blurry images, dizziness, and eye strain.
How can I find my IPD?
There are several ways to estimate your IPD.
The most accurate way to determine your IPD is to consult a professional optometrist or eye doctor. You can also estimate your IPD by doing any of the following:
- Use a ruler and a mirror. See below for detailed instructions.
- Through experimentation. See below for detailed instructions.
- Using third-party apps or websites.
NOTE; Third-party apps or websites may collect personal data. HTC can neither guarantee the accuracy of IPD measured through third-party apps or websites nor ensure the security of your personal data.
Estimating your IPD in a mirror
You can estimate your IPD with a ruler and mirror.
This method requires a millimeter ruler.
Stand directly in front of a mirror, and then hold the ruler up to your eyes. Make sure that the ruler is level. If you're using a flexible ruler, make sure not to bend it.

Align the zero mark with the center of your pupil. You may need to close your other eye to get a clear measure.
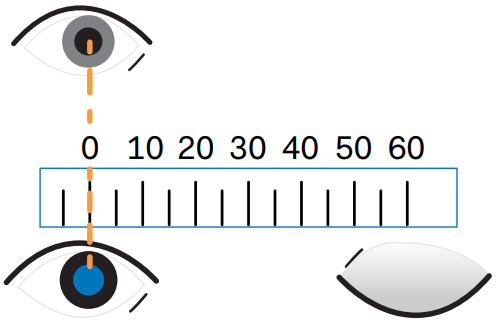
Check the millimeter mark on the other eye. You may need to close the first eye to get a clear measure.
- Make a note of your IPD measurement. You may want to recheck several times to make sure your reading is accurate.
Tip: You can also ask a friend to help you measure instead of using a mirror. Make sure you're looking straight ahead while they measure.
Estimating your IPD through experimentation
You can estimate IPD by trying different settings. This method is very convenient, but might be less accurate.
- While wearing the VR headset, focus on text or lines at the center of view. If no text is present, open a screen in VR with text.
- Adjust the IPD knob until the text is clear. Note the number for future use.
- If the image in one eye is clearer than the other, adjust the headset position. Repeat until images are clear for both eyes
Flipping up the visor
- Take a break from VR to check your surroundings without having to take off your headset.
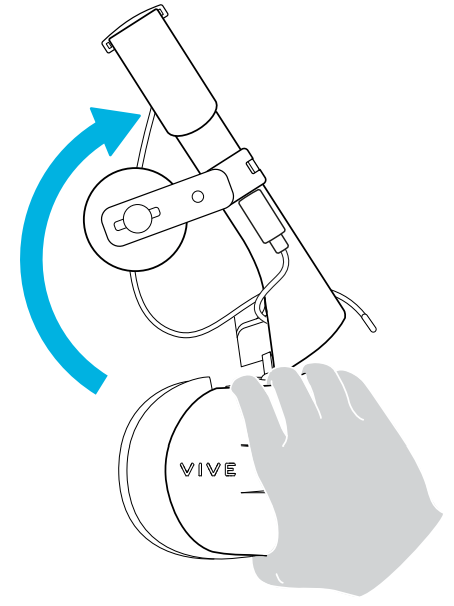
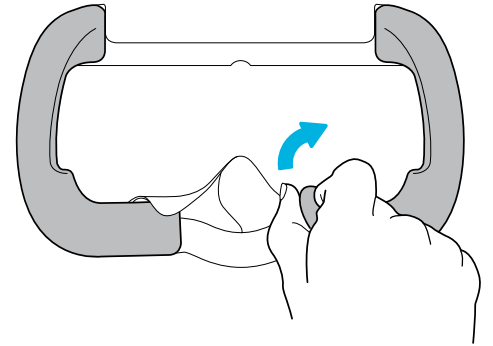
While wearing VIVE Cosmos Elite, hold the visor with one or both hands, and then gently flip it up.
To return it to its original position, tilt the visor down until it completely covers your eyes.
If you wear large glasses, you may need to adjust the headset to sit higher on your head when flipping the visor up or down.
Connecting a USB device to VIVE Cosmos Elite
You can connect a compatible USB Type-C device to VIVE Cosmos Elite using a USB cable.
While holding the visor with one hand, pull up the band.
Detach the face cushion frame from the headset. To release the frame from its latches, gently pull on any side of the frame starting from the bottom, and then pull one side at a time on the top.

Important: Avoid pulling or squeezing on the sides of the face cushion frame to prevent damaging the frame.
Insert the cable connector of the device into the USB Type-C port on the headset.

Align and push the tabs on the face cushion frame into their corresponding slots on the headset. Make sure to position the ridge of the face cushion frame below the headset, audio, and USB cables. You'll hear a click when the face cushion frame locks in place.

- Connect the other end of the USB cable to USB Type-C device.
NOTE: When using the VIVE Wireless Adapter, you won't be able to use the connected USB device. This is normal.
For a better experience with the VIVE Wireless Adapter, the USB Type-C port on VIVE Cosmos Elite is disabled when you're using the headset with the wireless adapter.
Removing or reattaching the face cushions
Remove the face cushions when you need to access the compartment or clean the cushions.
To find out how to clean the cushion, see https://www.vive.com/ca/support/cosmos-elite/category_howto/cleaning-the-cushions.html
To remove the face cushions, gently peel starting from the bottom ends of each face cushion until they detach from the face cushion frame.
To reattach, align one end of the face cushion with the marker on the bottom part of the face cushion frame. Press down the face cushion against the outline of the frame, and then check that the other end of the face cushion lines up with the marker on the top part of the frame.

Make sure that the velcro and adhesive strips attach firmly.
Removing the front and back pads
- You can remove the front and back pads from the headset band for cleaning.
- To remove the front and back pads, peel starting from the ends of each pad until they detach from the headset band.

Reattaching the front and back pads to the headset
Always make sure that the front and back pads are attached to the headset.
While holding the visor with one hand, pull up the band.

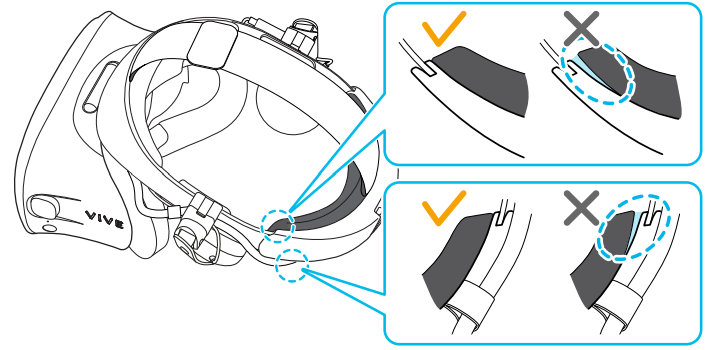
Starting from the middle, align the front pad tabs with their corresponding slots on the band, and then press along the front pad. You may need to gently bend the ends of the front pad to align the outermost tabs with the slots on the band.
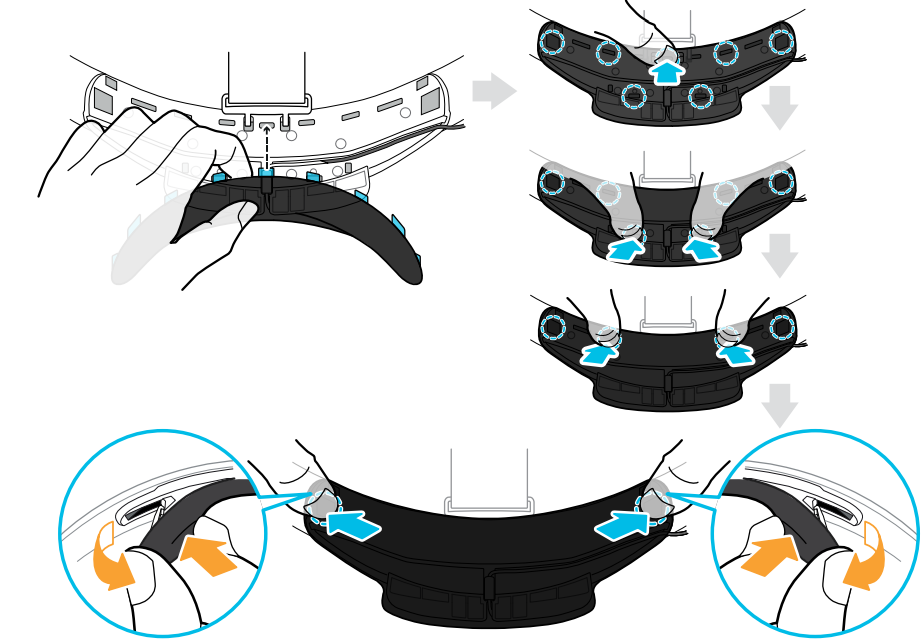
Make sure to minimize the gap between the pad and the band and that all tabs are fully locked into place.
- Align the back pad tabs with their corresponding slots on the band, and then press along the back pad to reattach.
Note: Check that the headset cable strip is properly attached. You'll hear a click when the tabs are inserted.
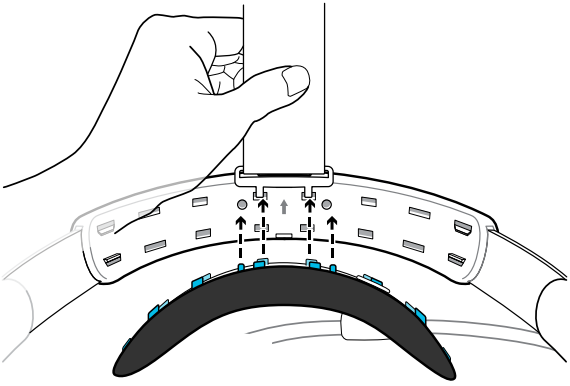
Make sure to minimize the gap between the pad and the band.
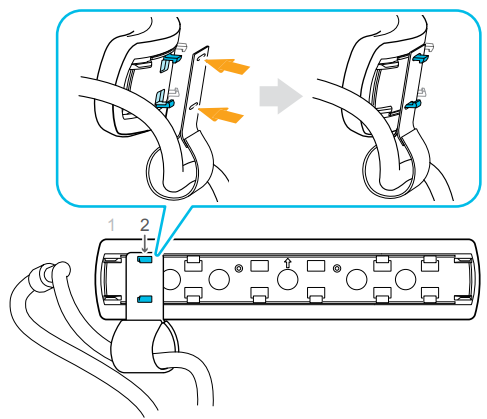
Reattaching the headset cable strip to the back pad
The fabric strip guides the headset cable, and is inserted on the back pad.
Insert the back pad tabs second to the left-most corner tabs into the holes of the headset cable strip with its flap down. Make sure that the strip is firmly attached.
Reattach the top strap to the headset band.
Align the back pad tabs with their corresponding slots on the band, and then press along the back pad to reattach. You'll hear a click when the tabs are inserted.
Make sure to minimize the gap between the pad and the band.
Detaching the top strap from the headset band
If you want to, you can detach the top strap from the headset band of VIVE Cosmos Elite.
- Remove the front and back pads from the headset.
- Starting from the rear of the headset band, pull down the strap to unhook it.
On the other end of the strap, pull down and out the strap to unhook it.
- Reattach the front and back pads to the headset.
Attaching the top strap to the headset band
For added comfort, attach the top strap before wearing the headset. You can adjust the top strap by using the velcro strip.
NOTE: You'll need to first remove the front and back pads on the headset.
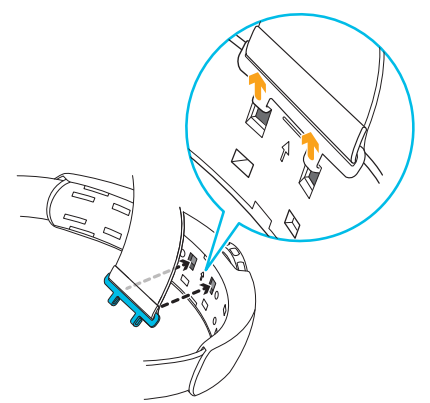
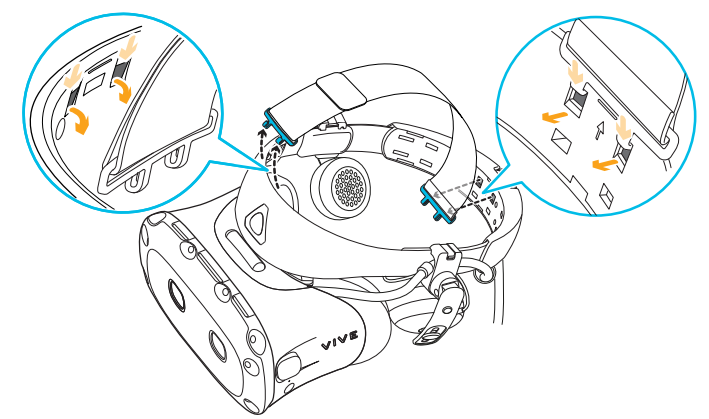
- Starting from the rear of the headset band, align the hooks of the top strap (side without the clasp) to its corresponding slots. Gently pull up the strap to hook into place.
Align and insert the hooks on the other end of the top strap with the inner slots of the headset band, and then pull up on the strap to hook into place.

- Reattach the front and back pads to the headset.
Replacing the front cover
You can detach and swap the front cover of your VIVE Cosmos Elite headset.
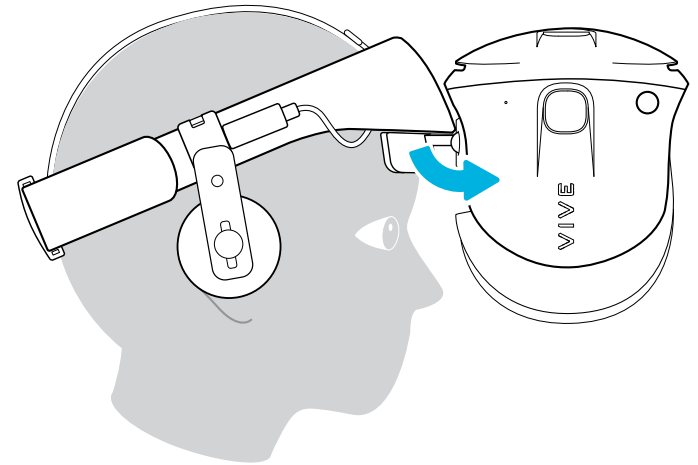
- Slide down and hold the lock button inside the compartment to unlatch the front cover.
- Pry open the front cover starting from the bottom right corner with the visor facing you.
Carefully pull out the front cover until it detaches from the visor.

- Grab the replacement cover.
Insert the tabs on the front cover into the slots on the visor.
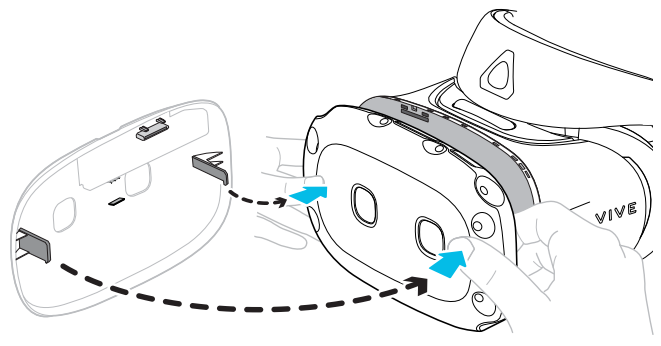
- Press the right side of the front cover first, and then press the left side of the front cover.
With the front cover attached to the visor, press the center of the front cover.

Make sure to minimize the gap between the front cover and the visor, and that all tabs are fully locked into place.
You'll hear a click when the front cover locks in place.
What does the status light on the headset mean?
The status light on the headset turns green or red when one of the following occurs:
- Green when the headset is in normal mode
- Dim green when the headset is on standby
- Red when the headset is in sleep mode
Description
The HTC Vive 99HASF006-00 Cosmos Elite Headset is a premium VR headset designed for gaming enthusiasts and professionals who demand the best in VR experiences. The headset boasts a high-resolution display, fast refresh rate, and wide field of view, providing an immersive and responsive VR experience. The Cosmos Elite also features SteamVR 2.0 tracking, which offers greater accuracy and range of motion compared to the original Cosmos. The headset comes with Vive Cosmos Elite Controllers that provide precise and responsive tracking for a more natural VR experience. The integrated Hi-Res Audio Headstrap delivers high-quality audio and spatial sound, making the VR experience even more immersive.
Controlling System
About the VIVE controllers
NOTE: The hardware may be purchased separately from the Accessories tab on HTTPS://www.vive.com/product/
Use the VIVE controllers to interact with objects in the VR world. The controllers have sensors that are tracked by the base stations.
The sensors on the controllers are sensitive. Do not cover or scratch the sensor lenses.
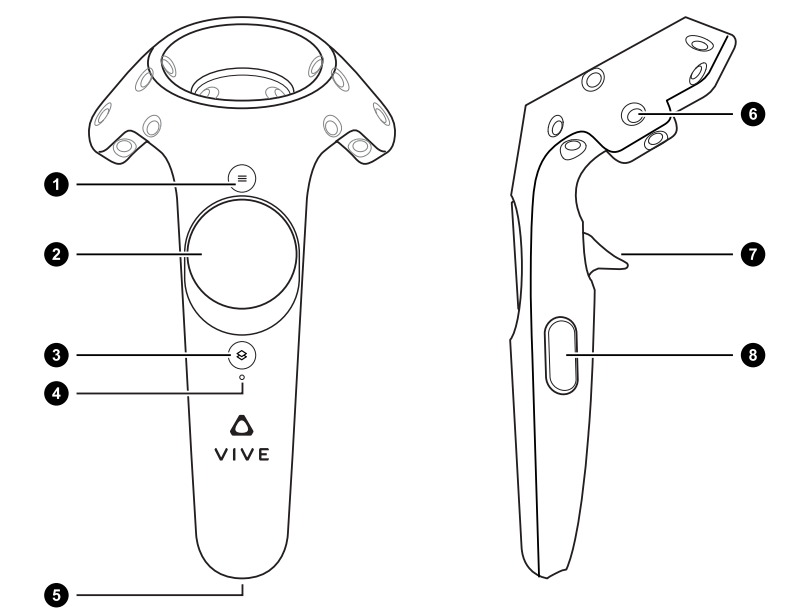
| 1 | Menu button |
| 2 | Trackpad |
| 3 | System button |
| 4 | Status light |
| 5 | Micro-USB port |
| 6 | Tracking sensor |
| 7 | Trigger |
| 8 | Grip button |
Charging the controllers
- You can check the battery level of the controllers when apps aren't running or the System Dashboard is up. When the battery is low, the indicator will show a single red dot
 .
. - You can also check the SteamVR app. If you see
 , this means the controller battery is low.
 - Charge each controller using the provided power adapters and USB cables.
- When the controller is plugged in and fully charged, its status light shows green if the controller is on or white if the controller is off.
Turning the controllers on or off
Turn on the controllers using the System button. The controllers turn off automatically when not in use after a period of time.
- To turn the controller on, press the System button until you hear a beeping sound.
- To turn the controller off, press and hold the System button until you hear a beeping sound.
When you quit the SteamVR app, the controllers will automatically turn off. The controllers will also automatically turn off after being idle for a period of time.
Pairing the controllers with the headset
Once the controllers are turned on for the first time, they will automatically pair with the headset. The status light shows as blinking blue while the pairing is in progress. The status light turns solid green when the controllers are paired with the headset. You can also manually pair the controllers.
Here's how:
- Launch the SteamVR app.
- Click
 , and then select Devices > Pair Controller.
 - Follow the on-screen instructions to complete the process.
Attaching the lanyards to the controllers
Attaching the lanyards can help prevent accidentally dropping the controllers. Don't fling or violently throw the controller as the lanyard may break.
- While holding the controller, insert the lanyard’s thread from the top to the bottom hole.
- Loop the lanyard through the thread, and then tug the lanyard to fasten it in place.
- Place the lanyard on your wrist, and then adjust the lock to tighten the lanyard comfortably around your wrist.
Updating controller firmware
Keep your controllers up-to-date by installing the latest firmware updates.
Here's how:
- From your computer, open the SteamVR app.
- If you see the
 icon, mouse over it to check if the firmware is out of date. If so, click Update Device.
 - Using a micro-USB cable, connect the controllers to one of your computer's USB ports one at time
Once the controller is detected by the SteamVR app, the firmware update will start automatically.
Warning: Do not unplug the micro-USB cable any time before the firmware update is complete. Doing so could result in a firmware error. - When the update is complete, click Done.
What does the status light on the controllers mean?
Depending on the status, the LEDs on the controllers show the following:
- Green when the controller is in normal mode
- Blinking red when battery is low
- Blinking blue when the controller is pairing with the headset
- Blue when the controller is connecting with the headset
- Orange when charging
What should I do if a controller is not tracked?
When a controller appears disabled in the SteamVR app, try the following to troubleshoot the problem:
- Make sure that the controller is placed inside the play area.
- Turn the controller off and on again to reactivate the tracking.
- Restart the SteamVR app. If you still get an error, reboot your computer and reopen the SteamVR app.
How do I know which controller is not tracked?
If one of your controllers is not being tracked and you want to find out which one, follow the steps below.
- On your computer, open the SteamVR app.
- Hover your cursor on the icon of the controller that's not tracked.
- Click Identify controller.
The status light on the controller rapidly flashes white.
What can I do if the controller trackpad is oversensitive?
Check if there's a firmware update available for the controllers, and then follow the steps below to re-calibrate a controller.
- From your computer, open the SteamVR app.
- Right-click
 , and then click Calibrate Controller.
 - Follow the onscreen prompts to complete the calibration process.
What should I do if my controller won't turn on?
When a controller won't turn on, try the following methods to troubleshoot the problem:
- Press and hold the System button for at least 5 seconds and see if the controller turns on.
- Charge the controller using the other cable and adapter, and plug the adapter to a different power outlet.
- On the SteamVR dashboard, check if the controllers are detected. If controllers are detected but the LED light is off, it may indicate an issue with the LED.
- Check if you have a firmware update that failed. To recover from this error, see How do I recover my controller after an interrupted update?.
The controller automatically turns off. What should I do?
If you're experiencing problems with the controller, try these common solutions:
- Make sure that the controller is charged.
- Check that the status light on the controller shows as green, which means that it is paired with the headset.
- Plug the USB cable from the converter into another USB 3.0 port on the computer.
- Manually update the USB driver on your computer. You can also download and install official driver updates from the website of your motherboard or USB port manufacturer.
How do I recover my controller after an interrupted update?
If a controller firmware update was interrupted, your controllers will go into bootloader mode. Here's how to recover them:
- Using a micro-USB cable, connect the controller to one of your computer's USB ports.
- From your computer, open the SteamVR app.
- Once the controller is detected by the SteamVR app, follow the onscreen prompts to complete the firmware update.
Setup Guide
Setting up the HTC Vive 99HASF006-00 Cosmos Elite Headset is a straightforward process. Here are the steps to follow:
- Unbox the headset and lay out all the components.
- Connect the DisplayPort and USB 3.0 cables to your computer.
- Install the Vive software on your computer.
- Power on the headset and controllers.
- Follow the on-screen instructions to set up the tracking system and calibrate the headset.
- Once the setup is complete, put on the headset and start exploring the VR world.
Settings
System Dashboard
The System Dashboard serves as your central point of entry in VR. Here are some of the things you can do in the dashboard:
- Launch or close a VR app
- Control sound volume and mic access
- Change settings, such as style of the collision bounds in Chaperone or the in-headset background
- Turn the VIVE Cosmos Elite system off
To bring up the dashboard, press the System button on either controller.
Changing the Chaperone settings
The Chaperone shows a grid whenever you're close to the bounds of your play area. You can change how the grid looks.
- From the System Dashboard, select
 .
. Select Play Area.
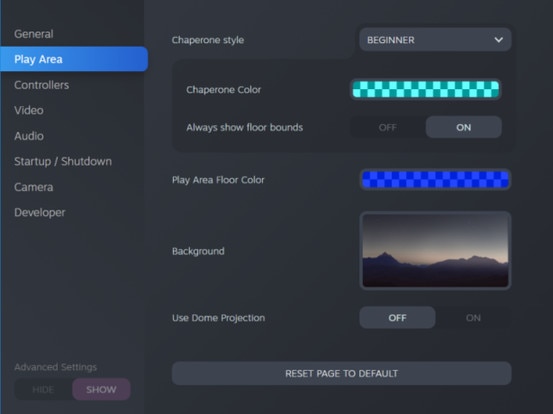
- In Chaperone style, choose the collision bound style you want.
- Click colored box to the right of Chaperone Color to set the color and transparency of the bounds.
- To show a constant visual reference of your floor bounds while in VR, select the Always show floor bounds On/Off switch to turn it on.
TIP: You can also change the Chaperone settings in the SteamVR app.
How can I capture screenshots in VR?
While in VR, press the System button and the trigger at the same time. You'll see a notification when the screenshot is saved.
- You can access screenshots directly from the Steam client by clicking View > Screenshots.
- To find screenshots from apps downloaded in VIVEPORT, navigate to the Steam installation folder.
The default location on 64-bit versions of Windows is:- C:\Program files (x86)\Steam\userdata\[Steam user number]\760\remote\0\screenshots
- If you have chosen a custom installation folder, navigate to it and find the following subfolder:
- ...\Steam\userdata\[Steam user number]\760\remote\0\screenshots
- Screenshots from other apps can be found in their respective folder:
- ...\Steam\userdata\[Steam user number]\760\remote\[app folder]\screenshots
Disabling Volume limit
By default, Volume limit is turned on for safety reasons. If you feel that the headphone volume is not loud enough even with the volume level set high, you can turn Volume limit off.
IMPORTANT: Listening at a high volume for a long time may damage your hearing.
- From your computer, open the VIVE Console app.
- Click
 , and then select Settings > Audio.
 - Click the Volume limit On/Off switch to turn the setting off.
Enabling motion compensation
Turning on motion compensation helps keep the frame rate consistently high even if you have less-than-ideal computer specs.
- From your computer, open the VIVE Console app.
- Click , and then select Settings > Video.
- Click the Motion Compensation On/Off switch to enable it.
NOTE: Some graphic cards may not support motion compensation. To learn more about motion compensation, see What is motion compensation?.
What is motion compensation?
Motion compensation is a feature that helps smooth frame rates in VR applications for a more seamless visual experience. If an app is unable to consistently deliver the needed frame rate (90 FPS for VIVE Cosmos Elite), motion compensation reduces the frame rate by half, and then uses advanced prediction algorithms to synthesize the missing frames. The result is smoother performance without stuttering or lag, while requiring less processing power to render. This can also help relieve disorientation and motion sickness caused by VR lag.
Motion compensation can further reduce the frame rate below half, and synthesize additional frames as needed. However, synthesized frames may have artifacts in some apps.
Here's how to enable motion compensation:
- From VIVE Console, click > Settings > Video. Then, turn on the Motion compensation On/Off switch.
- Supported graphics cards include:
NVIDIA GeForce GTX1060 or better. AMD GPU support coming soon.
Updating the firmware
Firmware updates for VIVE Cosmos Elite may include improved functionality and bug fixes.
- From your computer, open the VIVE Console app.
- If a firmware update is detected for any of the VIVE Cosmos Elite hardware, click Firmware update. You'll see a list of hardware that has an available firmware update.
- Click Update.
- Check that the progress is complete. If the controllers have updated, you may need to turn them back on.
Troubleshooting VIVE Cosmos Elite
If there is a persistent problem withVIVE Cosmos Elite that cannot be solved, you can reset the headset and settings.
- From your computer, open the VIVE Console app.
- Click , and then select Settings > Troubleshooting > Reset headset and settings.
TIP: You can also report an issue or send feedback by clicking Report.
Joining the VIVE Cosmos Elite beta program
Opting in to the VIVE Cosmos Elite beta program lets you receive preview builds and give feedback.
IMPORTANT: Beta software may be unstable and not work as intended.
- From your computer, open the VIVE Console app.
- Click , and then select Settings > Advanced.
- Click the Beta program On/Off switch to enable it. When prompted, confirm whether to join the beta program or not.
NOTE: You can opt-out of the beta program anytime by turning the Beta program switch off.
Seeing real surroundings
Simply press the Headset button to see your real surroundings on VIVE Cosmos Elite. You need to enable pass-through in VIVE Console Settings.
IMPORTANT: Make sure your VIVE Console app is updated to version 2.0.17.2 or later.
- From your computer, open the VIVE Console app.
- Click , and then select Settings > Advanced.
- Under Headset button, select Pass-through.
Note:
- Selecting this setting doesn't require restarting the VIVE Console app.
- This setting enables pass-through only. It's different from the SteamVR Camera option.
What do the error codes and messages mean? What can I do?
Check the error code associated with the issue, and then try to resolve the error with the suggested steps.
Check the error code associated with the issue, and then try to resolve the error with the suggested steps.
| Error code | Issue | Steps to resolve issue |
|---|---|---|
| 001 | Headset is not connected. |
|
| 002 | VIVE Console needs to be restarted. |
|
| 003 | DisplayPort cable is disconnected or no video stream detected. |
If the issue persists, try updating your GPU driver to the latest version. |
| 005 | Make sure front cover is firmly attached to the headset. | Make sure front cover is firmly attached to the headset. |
| 006 | DisplayPort connection is not stable. |
|
| 007, 008 | ROM checksum failed. Try again after updating the software. |
|
| 009 | The USB cable must be connected to a USB 3.0 or higher port on the computer. |
|
| 010 | No audio coming from the headset. |
|
| 100 | USB hub update failed. |
|
| 101 | Audio update failed. |
|
| 102, 106, 107, 108 | Headset firmware update failed. |
|
| 103 | Controller firmware update failed. |
|
| 105 | Headset not connected. |
|
| 109, 110, 111, 112 | Camera firmware update failed. |
|
| 200 | The headset cannot be detected. Make sure that cables are properly connected and then restart the headset. | Make sure the cables between the headset, link box or converter, and computer are all properly connected and then restart the headset. |
| 201 | The headset display cannot be detected. Make sure that the headset cable is properly connected. | Make sure the headset cable is properly connected. |
| 202 | Calibration data is lost. For assistance on how to fix this, contact Customer Care. | Contact Customer Care. |
| 203, 205, 206, 207 | Oops! This should not happen. Re-install VIVE software to fix this. | Re-install the VIVE software. |
| 208 | Update VIVE software and firmware to fix this. | Update both the VIVE software and firmware. |
| 209 | The server is disconnected. Restart VIVE Console to fix this. |
|
| 210 | The compositor is disconnected. Restart VIVE Console to fix this. | Restart VIVE Console. |
| 211 | Check that your GPU driver is updated to the latest version. | Make sure your GPU driver is updated to the latest version. |
| 212, 213,214 | Restart VIVE Console to fix this [error ID number]. | Restart VIVE Console. |
| 215 | Please update graphics card driver. | Update your graphics card driver to the latest version. |
| 216 | Please check that SteamVR was installed properly or has finished updating. | Make sure SteamVR was installed properly or has finished updating. |
| 217 | SteamVR has encountered an unexpected problem. Restart VIVE Console to fix this. | Restart VIVE Console. |
| 218 | The VIVE Cosmos Elite camera is being used by another application. |
|
| 219 | The VIVE Cosmos Elite headset can't be recognized when SteamVR is in safe mode. | Disable SteamVR safe mode, and restart SteamVR. If the problem persists, do the following:
|
| 220 | There is a compatibility problem with the DisplayPort connection (HDCP error) | If you're using an MSI notebook, go to MSI's technical support web page for help on how to update your notebook to the latest V-BIOS. If you're not using an MSI notebook, submit a report using VIVE Console. In VIVE Console, go to Settings > Troubleshooting > Report issue. |
| 221 | The front cover has been changed. Restart VIVE Console to fix this. | Restart VIVE Console. |
| 222 | The headset cannot be detected. Make sure the USB cable is properly connected. | Make sure the USB cable is properly connected on the link box and/or computer. |
| 223 | Make sure the headset's camera firmware is updated to the latest version. |
|
| 224 | You've exceeded the maximum number of monitors. | There's a limit to the number of monitors you can connect to your graphics card. Connect at most 3 monitors. |
Pros & Cons
- Pros:
- High-resolution display
- Fast refresh rate
- Wide field of view
- Precise tracking
- High-quality audio
- Cons:
- Expensive
- Heavier than some other VR headsets
- Requires a powerful computer to run
Customer Reviews
Customers have praised the HTC Vive 99HASF006-00 Cosmos Elite Headset for its high-quality display, precise tracking, and immersive audio. However, some have criticized the headset for being expensive and heavy. Overall, the Cosmos Elite is a premium VR headset that offers a top-notch VR experience for gaming and professional use.
Most Common Complaints
The most common complaints about the HTC Vive 99HASF006-00 Cosmos Elite Headset are its high price, heaviness, and the requirement for a powerful computer to run. Some users have also reported issues with controller tracking and image distortion.
Faqs
What does the Vive bundle include?
What is the refresh rate of the headset?
Is wireless operation possible with the HTC Vive Cosmos Elite?
What type of tracking does the headset use?
What is the HTC Vive Cosmos Elite's IPD adjustment range?
What type of audio does the headset have?
In the event that the controllers are drifting or the tracking is inaccurate, what should I do?
Leave a Comment