Instant Pot Ultra 10-in-1 Pressure Cooker Instruction Manual
Content
Introduction of Instant Pot Ultra 10-in-1 Pressure Cooker
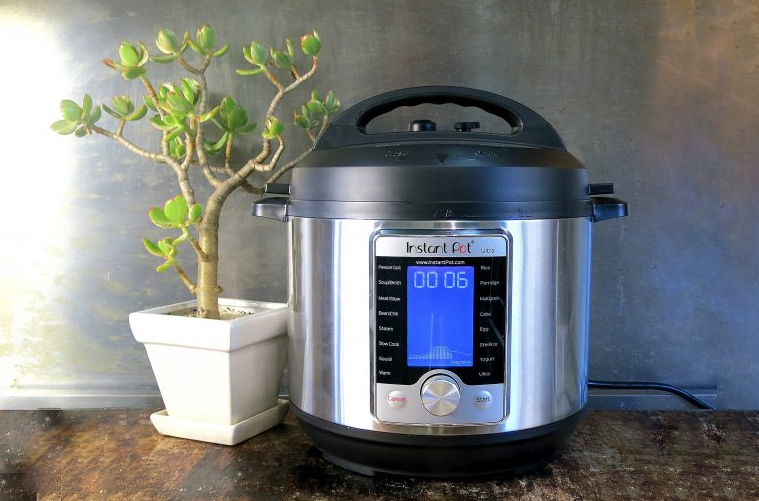
The Instant Pot Ultra 10-in-1 Pressure Cooker is a state-of-the-art kitchen appliance that combines 10 different functions in one sleek and modern device. With its user-friendly interface and customizable settings, the Instant Pot Ultra is perfect for busy individuals and families who want to cook healthy and delicious meals with ease and convenience.
The estimated price of the Instant Pot Ultra 10-in-1 Pressure Cooker is around $149.95, and it is currently available for purchase on various online and retail stores. The product was launched on June 2017, and since then, it has gained a massive following and positive reviews from consumers and experts alike.
Specifications
The Instant Pot Ultra 10-in-1 Pressure Cooker has the following key features:
- 10-in-1 functionality: pressure cooker, slow cooker, rice cooker, yogurt maker, steamer, sauté/searing, warmer, sterilizer, cake maker, and egg cooker.
- 3-ply bottom stainless steel cooking pot.
- 19 programmable settings and customizable temperature and pressure controls.
- Altitude adjustment up to 9,000 feet.
- Ul certified and UL approved with 11 safety mechanisms.
- 11 one-touch cooking programs, including soup, meat/stew, bean/chili, poultry, sauté/searing, rice, multigrain, porridge, steam, slow cook, and keep warm.
- Large LCD display and easy-to-use interface.
- Stainless steel exterior and inner pot, free of BPA and phthalates.
- 13.2 quarts/12 liters capacity, suitable for cooking for large families or groups.
Model | Power Supply | Rated Power | Volume | Inner Pot Dimensions | Product Dimensions | Weight |
Ultra | 120V~ 60Hz |
1000 W | 6 quart | 15.7x 23.9cm 6.2 x 9.4 in. | 33 x 31 x 32 cm 13 x 12.2 x 12.6 in. | 7.12 kg 15.7 lbs |
Instant Pot Ultra 10-in-1 Pressure Cooker Overview
Control and Features
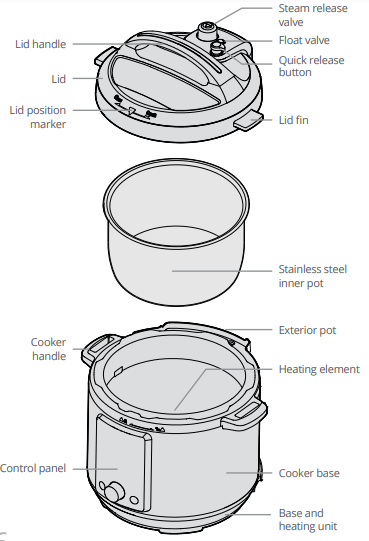
Control Panel
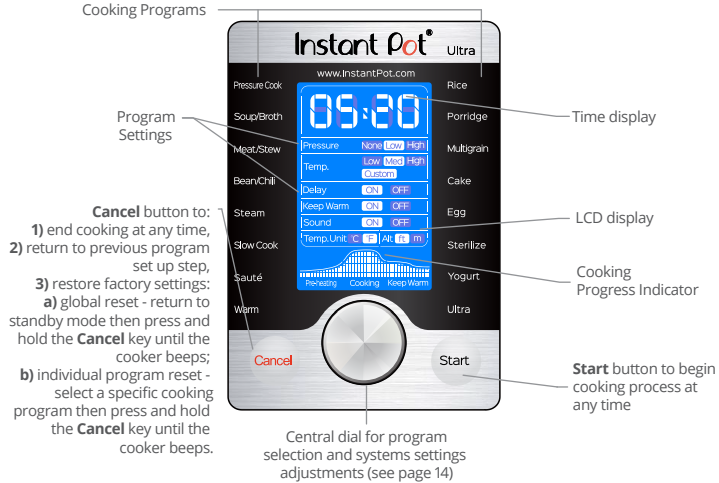
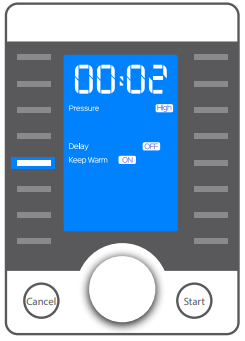
The control panel of your Instant Pot Ultra consists of a large LCD display, a central dial for program selections and adjustments, a Cancel button and a Start button.
Cooking Program Options
Instant Pot is a programmed smart cooker that has preset cooking instructions for different food ingredients and cooking methods. It also remembers your most recent program setting per function for a more personalized cooking experience.
Ultra: The ultimate cooking tool to allow full user control of pressure and non-pressure cooking conditions. You can adjust different parameters based on your favourite recipes.
Programs | Time Range hr:min | High/ Low Pressure | NO Pressure | Temperature for non-pressure cooking | Delay ON/OFF | Keep Warm ON/OFF | Sound ON/OFF |
Ultra | 0:00 - 99:50 | 
|
| Low/Med/High/ Custom |
|
|
|
Pressure Cook | 0:00 - 6:00 |
|
N/A |
N/A |
|
| |
Soup/ Broth | 0:00 - 6:00 | N/A |
N/A |
|
| | |
Meat/ Stew | 0:00 - 4:00 |
| N/A | N/A |
|
| |
Bean/ Chili | 0:00 - 4:00 |
| N/A | N/A |
|
| |
Steam | 0:00 - 4:00 |
|
| N/A |
|
| |
Slow Cook | 2:00 - 20:00 |
N/A | | Low/Med/High/ Custom | |
| |
Sauté | 0:30 | N/A |
| Low/Med/High | N/A | N/A |
|
Warm | 0:10 - 99:50 | N/A |
| Low/Med/High/ Custom |
|
|
|
Rice | Automatic |
| N/A |
N/A | |
|
|
Porridge | 0:00 - 4:00 |
| N/A | N/A |
|
|
|
Multigrain | 0:00 - 4:00 |
| N/A | N/A |
|
|
|
Cake | 0:00 - 4:00 |
|
| N/A |
|
|
|
Egg | 0:00 - 0:30 |
| N/A |
N/A |
|
|
|
Sterilize ** | 0:00 - 4:00 |
|
| N/A |
|
N/A |
|
Yogurt | 0:30 - 99:30 | N/A |
| Low/Med/High/ Custom | N/A | N/A |
|
Description of Instant Pot Ultra 10-in-1 Pressure Cooker
The Instant Pot Ultra 10-in-1 Pressure Cooker is a versatile and smart kitchen appliance that can help you cook various dishes quickly and easily. With its 10-in-1 functionality, you can replace your old and bulky kitchen appliances and save space and money. The Instant Pot Ultra is designed with a user-friendly interface that allows you to select the cooking program and adjust the temperature and pressure settings with just a few clicks. The LCD display shows the cooking progress and time, making it easy for you to monitor the cooking process.
The Instant Pot Ultra is made of high-quality stainless steel material that is durable, sturdy, and safe to use. The inner pot and outer lid are removable and dishwasher-safe, making cleaning a breeze. The Instant Pot Ultra also features 11 safety mechanisms, ensuring that you and your family can cook with peace of mind. The altitude adjustment feature is also helpful for people who live in high-altitude areas and have trouble cooking at low pressure. The Instant Pot Ultra is also UL certified and UL approved, meeting the highest safety standards.
Getting Started
Read warning cards and warning labels. Remove all packaging materials and remov-able warning cards from the cooker and accessories.
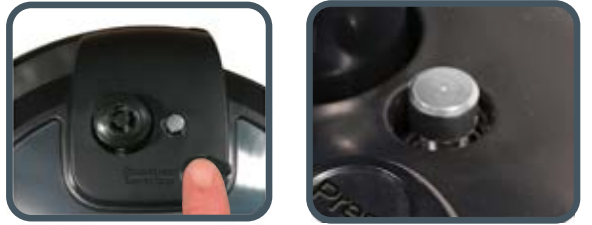
Install the condensation collector at the rear of the cooker by aligning the top of the collector with the guides on the cooker and press in.
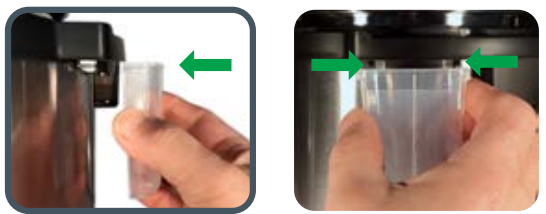
Install the steam release valve onto the lid if it is not already installed.
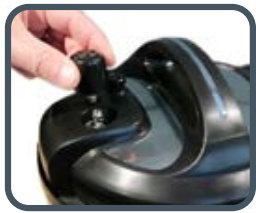
TIP: The steam release valve fits loosely. It does not lock tightly into the lid.
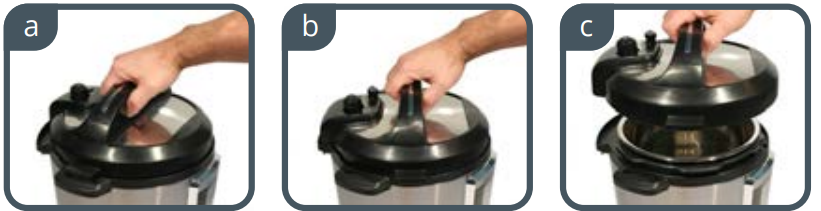
Remove the lid by holding the handle, turning the lid counter-clockwise and lifting the lid.
- Remove the inner pot from the pressure cooker. Add food and liquid into the inner pot as the recipe directs. If steaming, place the steam rack on the bottom of the inner pot first. Always add at least 2 cups (~18 fl oz / 500 mL) of liquid for minimum liquid requirement. See “Cooking and Safety Tips” on page 20-21.
- Make sure the outside of the inner pot is dry prior to placing the inner pot back into the pressure cooker. Make sure there is no food debris on the heating element.
- Make sure the sealing ring rack is completely set in the groove on the inside of the sealing ring. Ensure there is no deformation on the sealing ring rack. Do not attempt to repair a deformed ring rack.
- Place the lid on the pressure cooker, align the mark
 on the lid with the (unlock)
 mark and turn clockwise to the (lock)
 mark.
mark. - The Quick Release button will automatically reset and pop up to the Sealing position when the lid is closed (button up = sealed).
Pressure Cooking
- The following are all pressure cooking programs: Ultra, Pressure Cook, Meat/Stew, Soup/Broth, Bean/Chili, Steam, Sterilize, Rice, Multigrain, Porridge, Egg and Cake.
How the Quick Release button works: when the lid is closed, the Quick Release button will automatically pop up to the Sealing Position (button up = sealed).
For Quick Release: Press down the Quick Release button until it clicks and locks into the Venting position.
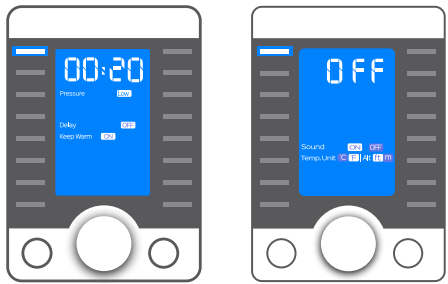
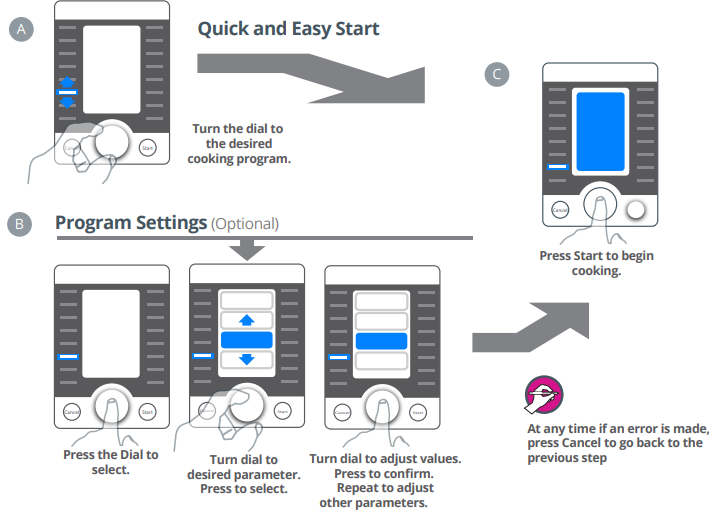
To Stop Quick Release: Slightly turn the Quick Release button counter-clockwise until it pops up to the Sealing position. Connect the power cord. The default cooking program Pressure Cook flashes and the LCD displays the program settings. Press Start to begin cooking right the way, or adjust program settings according to page 13. When the cooker is idle for 30 seconds, the LCD will display OFF, indicating the cooker is in standby mode.
To begin cooking, follow these steps:
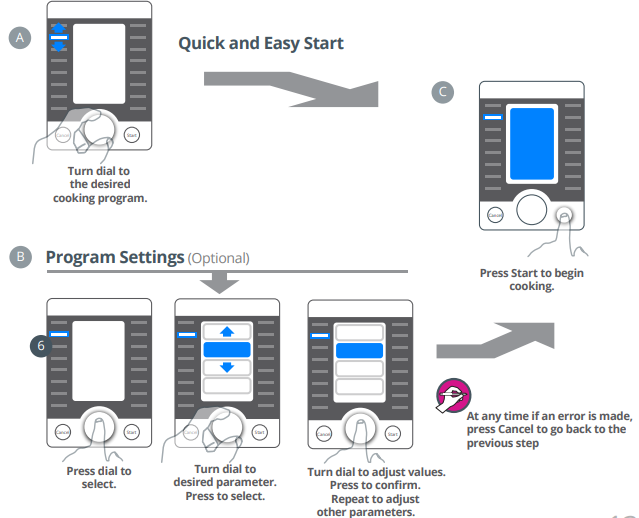
TIP: Systems Settings (Sound ON/OFF, Temperature Unit: °F/°C and Altitude: ft/m) Press the Cancel button to return the cooker to standby mode displaying OFF. Push and hold the central dial for 5 seconds and then release the hold. Rotate to select the parame-ter you wish to change, press the central dial and rotate to make adjustments. Press central dial again to confirm the change. Press Start button to exit.- Initial Test Run (Optional)
Add 3 measuring cups of water to the inner pot (~ 25 fl oz / 750 mL). Plug-in the cooker. Rotate the central dial to Steam, set cooking time to 2 minutes. See diagram below.
WARNING
- Inner pot should not be more than 2/3 full. For food that expands during cooking such as rice or dried vegetables, inner pot should not be more than 1/2 full. Please note that certain foods such as applesauce, cranberries, pearl barley, oatmeal or other cereals, split peas, noodles, pasta and rhubarb can foam, froth or sputter and can clog the steam release valve.
- Make sure the steam release valve, float valve and anti-block shield are clean and free from debris.
- Depending on the amount of food and its temperature, the preheating cycle can last from 10 to 40 minutes. As the cooker heats up and pressure builds, the float valve will rise. When working pressure is reached, the cooker enters the cooking cycle and the LCD displays the remaining cooking time. When cooking is finished, the cooker will either be in Keep Warm mode or in standby mode displaying OFF.
Release pressure using one of the following methods (refer to recipe):
- Natural Release: Allow the cooker to cool down naturally until the float valve drops down. This may take 10 to 40 minutes, or even more, depending on the amount of food in the cooker. Place a wet towel on the metal part of lid to speed up cooling (do not cover the steam release valve).
- Quick Release: Press the quick release button until it clicks into the Venting position. Let steam out until the float valve drops down. Never pull out the steam release valve while releasing steam as escaping steam is extremely hot and can cause scalds. For food with large liquid volume or starch content, use Natural Release instead as thick liquid may splatter. Turn the lid counterclockwise and lift. Make sure the float valve is down before opening the lid.
Non-Pressure Cooking
The following are non-pressure cooking programs: Sauté, Yogurt, Ultra, Slow Cook, and Warm.
Connect the power cord. The default cooking program Pressure Cook flashes.
Slow Cook, Warm and Ultra
An Instant Pot glass lid may be used. If using the pressure cooking lid, make sure the steam release valve is in Venting position.

Sauté
- Choose temperatures between Med (for stir-frying), Low (for simmering or thickening sauce) and High (for pan searing or browning meat).
- When working temperature has reached, the LCD displays Hot.
- Add food to the inner pot and begin sautéing. Do not use any lid for the Sauté program or there will be a warning sound.
- The sauté time is set at 30 minutes as a safety precaution.
Making Yogurt
Heat Milk
- Add milk to the inner pot.
- Connect the power cord. The LCD displays OFF indicating that the cooker is in standby state.
- Rotate the central dial to locate the Yogurt program, and then press to select it.
- Press the central dial again to set the desired heating Time. Set the time and press central dial to confirm.
- Rotate the central dial to Temp and press the central dial. Select High temperature for boiL. Press Start and let the milk heat.
- When the cooking cycle has finished, the LCD displays Yogt.
TIP: To make yogurt in containers instead of the inner pot, modify step 1 (Heat Milk): fill containers to 90% full with milk, add 1 cup (~8.5 fl oz / 250 mL) of water to the inner pot, place containers on a steam rack in the inner pot, close the lid, the quick release button will automatically reset to Sealing position. Use the central dial to select the Steam function and set the cooking time to 2 minutes. Once complete, use the natural release method then open the lid and continue with steps 2 to 4.
Cool Milk
- Remove the inner pot and place it on a wire rack.
- Allow the milk to cool to 115°F/46°C. Test the milk temperature with a thermometer.
Add Starter Culture
- Add starter culture to the warm milk in the inner pot. Stir.
- Place the inner pot back into the cooker and close the lid. Non-pressure cooking, the steam release valve can be in Venting or Sealing position.
Ferment Yogurt
- Rotate the central dial to locate the Yogurt program, and then press to select.
- Press the central dial again to set the desired fermentation Time. Press central dial to confirm.
- Move selection frame to Temp to adjust fermentation temperature. Press central dial to confirm.
- Press the Start button. The fermentation process starts.
- When the cooking cycle has finished, the LCD displays Yogt.
- Remove the lid by turning it counterclockwise and then lifting.
- Store yogurt in clean jars and refrigerate.
Instant Pot Ultra 10-in-1 Pressure Cooker Setup Guide
To set up the Instant Pot Ultra 10-in-1 Pressure Cooker, follow these steps:
- Unbox the Instant Pot Ultra and remove all the packaging materials.
- Wash the inner pot and the steam rack with warm water and soap.
- Place the inner pot inside the outer pot and lock the lid.
- Plug in the Instant Pot Ultra and select the cooking program and adjust the temperature and pressure settings.
- Add the ingredients and close the lid.
- Press the start button and wait for the Instant Pot Ultra to reach the desired pressure and cooking time.
- Once the cooking is done, press the cancel button and release the pressure manually or naturally.
- Open the lid and serve the food.
Cooking and Safety Tips
- Extreme caution should be taken when pressing the Quick Release button. Keep hands and face away from the steam release openings. Failure to comply may result in scalding or serious injury.
- Do not open the lid until pressure inside the pot is completely released. As a safety feature, until the float valve drops down the lid is locked and cannot be opened. Do not force lid open.
- When opening the lid, the inner pot may adhere to the lid. This is caused by vacuum due to cooling. To release the vacuum, press the Quick Release button to the Venting position.
- If the float valve is stuck, press the Quick Release button to the Venting position. Once all the steam is released, push the float valve down with a pen or long stick.
- Follow the recipe instructions for releasing pressure. With the Quick Release method, begin immediately upon completion of pressure cooking; otherwise the food may be overcooked. With the Natural Release method, wait for the amount of time specified in the recipe. Typically, the Quick Release method is used for delicate foods such as custards and fresh vegetables; the Natural Release method is used for meats, soups and grains.
- Always add at least 2 cups (~18 fl oz / 500 mL) of water or other liquids so enough steam can be generated to cook under pressure. Liquids include cooking sauces, wine, beer, stocks, fruit juices and vegetable juices, etc.
- Oils and oil-based sauces do not have enough water content and will not account for the required liquid volume
- For extra flavor, use the Sauté function as you would when cooking with conventional cookware. For example, brown the meat and vegetables for a stew before adding liquids and cooking under pressure.
- Time to pressure and cooking time will vary according to the temperature and quantity of the ingredients. Food that is cold or frozen will take longer to cook than food that is at room temperature.
- When using the Delay program, allow sufficient cooling down time before serving.
- The Delay program is not recommended for porridge, oatmeal or other foamy and thick liquids. Cooking progresses should be monitored when cooking these foods.
Important Safeguards
SAVE THESE INSTRUCTIONS
When using pressure cookers, basic safety precautions should always be followed.
- Do not touch hot surfaces of pressure cooker. Use handles only.
- Do not place the cooker on or near a hot gas or electric burner, or in a heated oven.
- Intended for countertop use only.
- Do not use pressure cooker for other than intended use.
- Never deep fry or pressure fry in the cooker with oil.
- Do not let cord hang over edge of table or counter, or touch hot surfaces.
- Do not use cooker in electrical systems other than 110-120V~/60Hz for North America.
- Do not operate cooker with damaged cord or plug, or after the cooker malfunctions or has been damaged in any manner.
- Do not open the pressure cooker until the cooker has cooled and all internal pressure has been released. If the float valve is still up or the lid is difficult to lift, it is an indication that the cooker is still pressurized do not force it open.
- For all pressure cooking programs, the total amount of pre-cooked food and liquid in the inner pot should not pass the 2/3 line. When cooking food that expands during cooking such as rice, beans or vegetables, inner pot should not be more than 1/2 full. Overfilling may risk clogging the steam release and developing excess pressure. This may also cause leakage, personal injuries, or damage to the cooker. These fill level warnings do not apply to non-pressure cooking programs.
- Make sure the steam release valve is in the Sealing position for all pressure cooking programs.
- This appliance should not be used by or near children or by individuals with disabilities or limited knowledge in using pressure cookers.
- Do not immerse the cooker in water. To protect against electrical shock, do not immerse the cord, power plug, or cooker in any liquid.
- Always attach plug to the cooker first, then plug cord into the wall outlet. To disconnect, turn controls to OFF, then remove plug from the wall outlet. Unplug from power outlet when not in use and before cleaning. Allow the cooker to cool before putting on or taking off parts, and before cleaning.
- For Household use only. Not intended for outdoor use.
- Extreme caution must be used when moving a pressure cooker containing hot liquids.
- This appliance cooks under pressure. Improper use may result in scalding injuries. Make certain the lid is properly closed before operating. Caution: To reduce the risk of electric shock, cook only in removable containers.
- Use of accessories and parts that are neither branded Instant Pot nor recommended by the Instant Pot Company® may cause the cooker to malfunction. Cook only in Instant Pot stainless steel or ceramic non-stick inner pots for best results. Other brands may not have the correct curvature to match the heating element.
- Be aware that certain foods, such as applesauce, cranberries, pearl barley, oatmeal and other cereals, split peas, noodles, macaroni, rhubarb, and spaghetti can foam, froth, sputter, and clog the steam release. These foods should not be cooked under pressure cooking settings unless as directed in an Instant Pot recipe.
- Always check the steam release valve, float valve and anti-block shield for clogging before use.
- When installing the sealing ring, make sure the sealing ring rack is completely set in the groove on the inside of the sealing ring.
- When in operation or releasing steam/pressure DO NOT place unprotected skin over the steam release valve.
- Do not move pot when pot is in operation
- Do not force lid open when the float valve is UP. Make sure the float valve is DOWN when you open the lid.
WARNING: Spilled food can cause serious burns. Keep appliance and cord away from children. Never drape cord over edge of counter, never use outlet below counter, and never use with an extension cord.
Special Cord Set Instructions
As per UL safety requirement, a short power supply cord (0.6 m to 0.9 m) is provided to reduce the hazards resulting from entanglement and tripping. This appliance has a 3-prong grounding plug. To reduce the risk of electric shock, plug the power cord into a grounded (earthed) electrical outlet that is easily accessible.
Care and Cleaning of Instant Pot Ultra 10-in-1 Pressure Cooker
Unplug your Instant Pot and let it cool to room temperature before cleaning.
- The inner pot and lid are both dishwasher safe
- Remove the inner pot and lid and wash with detergent. Rinse with clear water and wipe dry with a soft cloth.
- Wipe the pressure cooker base rim and slot dry with cloth to prevent rusting of the exterior pot rim.
- Remove the sealing ring and anti-block shield from the underside of the lid. Wash with warm, soapy water, rinse with clear water and wipe dry with a soft cloth.
- The sealing ring must always be properly positioned on the underside of the lid.
- Clean the outer body with a damp soft cloth or sponge.
- Never use harsh chemical detergents, scouring pads or powders on any of the parts or components.
- Periodically check that the steam release valve and float valve are in good working order and free of debris.
Troubleshooting
Difficulty with closing the lid | Sealing ring not installed properly. | Position the sealing ring well. |
Float valve in the popped-up position. | Slightly press the float valve downward. | |
Difficulty with opening the lid | Pressure exists inside the cooker. | Press the quick release button to the Venting position to reduce internal pressure. Open the lid after the pressure is completely released. |
Float valve stuck at the popped-up position. | Press the float valve lightly with a pen or long utensil. |
Steam leaks from the side of the lid | No sealing ring. | Install the sealing ring. |
Sealing ring damaged. | Replace the sealing ring. | |
Food debris attached to the sealing ring. | Clean the sealing ring. | |
Lid not closed properly. | Open then close the lid again. | |
Steam leaks from float valve for over 2 minutes | Food debris on the float valve silicone seal. | Clean the float valve silicone seal. |
Float valve silicone ring worn- out. | Replace the float valve silicone ring. | |
Float valve unable to rise | Too little food or water in inner pot. | Add water according to the recipe. |
Float valve obstructed by the lid locking pin. | Close the lid completely, see “Getting Started” section. | |
Steam comes out from the steam release valve non-stop | Steam release valve not in sealing position. | Slightly turn the quick release button counter-clockwise to seal the steam release valve. |
Pressure control fails. | Contact support online. | |
Display flashes “Lid” | Lid is not in the correct position for the selected program. | Close the lid for pressure cooking or open the lid for sautéing. |
Display remains blank after connecting the power cord | Bad power connection or no power. | Inspect the power cord to ensure a good connection. Push the power cord firmly into the cooker base. |
Cooker’s electrical fuse has blown. | Contact support. |
All LCDs flash with a code appearing on screen | C1 | Faulty temperature sensor. | Contact support. |
C2 | Faulty temperature sensor. | Contact support. | |
C5 Code | Temperature is too high because inner pot is not placed properly into the cooker. | Insert the inner pot properly. | |
Temperature is too high because there is no water in inner pot. | Put food and water in the inner pot. | ||
C6 | Faulty pressure sensor. |
Contact support. | |
C6H | Faulty HIGH pressure sensor | ||
C6L | Faulty LOW pressure sensor | ||
Rice is half cooked or too hard | Too little water. | Adjust dry rice and water ratio according to recipe. | |
Lid opened too early. | After cooking cycle completes, leave the lid on for 5 more minutes. | ||
Rice is too soft | Too much water. | Adjust dry rice and water ratio according to recipe. | |
The cooker beeps 5 times and displays the ‘burn’ message after a cooking program has started | Indication of overheating. The cooker has reduced the heating temperature, and may not reach cooking pressure. | Starch deposits at the bottom of the inner pot might have clogged heat dissipation. Stop the cooker and inspect the bottom of the inner pot. | |
Occasional ticking or light cracking sound | The sound of power switch- ing and expanding pressure board when changing temperature. | This is normal | |
Bottom of the inner pot is wet. | Wipe bottom of the inner pot dry before cooking | ||
Instant Pot Ultra 10-in-1 Pressure Cooker Warranty
This Limited Warranty is effective for one year from the date of original consumer purchase. Proof of original purchase date and, if requested by an authorized Instant Pot Company (“IPC”) representative, return of your appliance as IPC may direct at IPC’s expense, is required to obtain service under this Limited Warranty.
The appliance for a period of one (1) year from the date of purchase. In the event that your appliance is replaced, the Limited Warranty on the replacement appliance will expire at the original date (i.e. 12 months from the original purchase date).
Pros and Cons
Pros
- 10-in-1 functionality saves space and money.
- Customizable temperature and pressure controls.
- Large capacity suitable for cooking for large families or groups.
- 11 safety mechanisms for added safety.
- Easy-to-use interface and LCD display.
Cons
- Expensive compared to other pressure cookers.
- Large and heavy, making it difficult to store and handle.
- Some users may find it complicated to use all the features.
- Limited color options.
Customer Reviews about Instant Pot Ultra 10-in-1 Pressure Cooker
The Instant Pot Ultra 10-in-1 Pressure Cooker has received over 7,000 reviews on Amazon, with an average rating of 4.6 out of 5 stars. Many consumers praised the Instant Pot Ultra for its versatility, ease of use, and safety features. They also appreciated the large capacity and the customizable settings. However, some users criticized the high price and the weight of the device. Some also reported issues with the lid and the seal.
Faqs
What are the safety features of the Instant Pot Ultra 10-in-1 Pressure Cooker?
How does the Instant Pot Ultra 10-in-1 Pressure Cooker improve the cooking process?
What are the new features of the Instant Pot Ultra 10-in-1 Pressure Cooker compared to earlier models?
Does the Instant Pot Ultra 10-in-1 Pressure Cooker offer customization for altitude?
What size options are available for the Instant Pot Ultra 10-in-1 Pressure Cooker?
Can I use the Instant Pot Ultra 10-in-1 Pressure Cooker for canning?
What are some of the program settings on the Instant Pot Ultra 10-in-1 Pressure Cooker?
How do I release pressure from the Instant Pot Ultra 10-in-1 Pressure Cooker?
What accessories or containers can I use in my Instant Pot Ultra 10-in-1 Pressure Cooker?
Do I need to adjust recipes for high altitude when using an Instant Pot Ultra 10-in-1 Pressure Cooker?
Leave a Comment