Insteon I/O Linc Low-Voltage Contact Closure Interface 2450 User Guide

Content
Introduction
Monitor and control any low voltage devices such as cont act closures, electric door strikes and alarm sensors as part of your INSTEON h ome automation network. Plus, use the built-in single-pole double-throw (SPDT) switch to connect any low-voltage powered device for continuous or momentary operation. Create your own remote-control door lock using a door strike and power supply or use a security sensor to trigger INSTEON controlled lights to turn on or off. I/O Linc acts as a repeater for all powerline INSTEON signals, is compatible with INSTEON and X10 products and has a pass-through outlet for other AC devices.
Priced at $83.00, it offers seamless integration for smart home enthusiasts.
Overview

Insteon I/O Linc 2450 Items Required
- Sensor wire: 20-22 gauge recommended
I/O Linc Screw Terminals
5V | GND | Sense | N/C | N/O | Common |
5 Volts, 10mA |
Ground |
Sensor input |
Normally closed |
Normally open | Switches between N/O and N/C |
Using a Sensor as an INSTEON Controller
- Plug I/O Linc into an unswitched outlet near your sensor.
The I/O Linc Status LED should turn on. Connect one sensor wire to the I/O Linc GND terminal (see Figure 1).
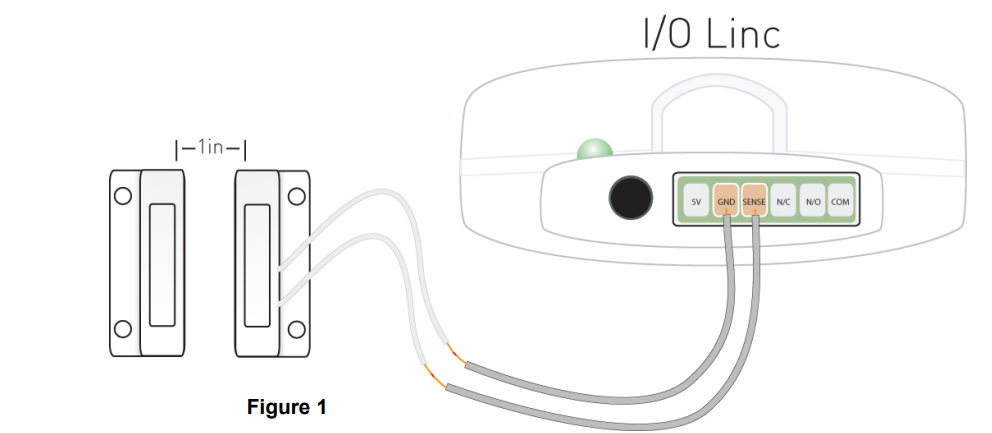
- Connect the other sensor wire to the I/O Linc Sensor terminal.
- Put your sensor in the state that will trigger an ON command from I/O Linc.
The I/O Linc Sensor Status LED should turn on if the sensor is closed or turn off it the sensor is open. - Set I/O Linc to linking mode* by pressing and holding the Set button until it beeps (3 seconds).
The white I/O Linc Status LED should begin blinking. - Press and hold the responder’s Set button for 3 seconds.
The white I/O Linc Status LED should stop blinking and turn on solid. - Confirm that linking was successful by tapping the Set button on I/O Linc.
The responder should respond appropriately.
*Setup modes will automatically time out after 4 minutes.
Detailed Specifications
The Insteon I/O Linc 2450 boasts several key features that make it an essential component for home automation:
- Low-Voltage Compatibility: Supports devices using contact closures.
- Insteon Network Integration: Seamlessly integrates with existing Insteon smart home systems.
- Dual-Functionality: Acts as both an input and output device.
- Reliable Communication: Uses radio frequency (RF) signals for reliable communication.
- Power Requirements: Requires 120V AC power.
- Durable Design: Built with high-quality materials for long-lasting performance.
Description
The Insteon I/O Linc 2450 is designed to be user-friendly and highly functional. This compact device can be easily installed in any location where you need to integrate low-voltage devices into your smart home setup. It features a simple setup process and is compatible with a wide range of Insteon controllers and devices.
The dual-functionality of the I/O Linc allows it to serve as either an input device (receiving signals from sensors) or an output device (controlling other devices). This flexibility makes it a versatile addition to any smart home system, enabling you to automate various aspects of your home with ease.
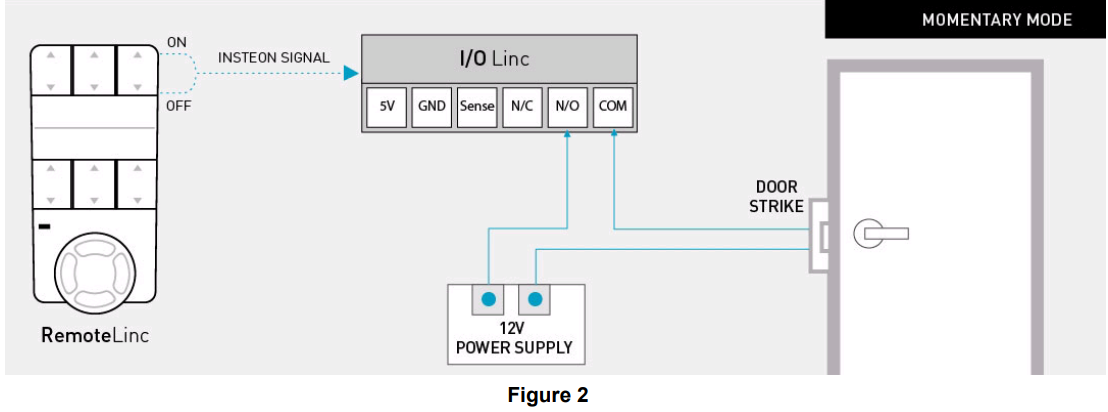
Controlling a Door Strike from an INSTEON Device
This mode is used for controlling a normally open momentary switch or button, such as using an INSTEON controller to trigger a door strike.
NOTE: These instructions assume your output relay set is set to latching mode (default).*
- Plug I/O Linc into a convenient unswitched outlet.
The I/O Linc Status LED should turn on. Using the Set button, ensure the relay is closed.
The I/O Linc Status LED should be bright when the relay is closed and dim when open.Link your INSTEON Controller(s) to I/O Linc
- Set the controller to Linking Mode.** (For most controllers, press and hold an On or Scene button for 10 seconds or the Set button for 3 seconds.)
- Press and hold the Set button on I/O Linc until it beeps (3 seconds).
Repeat steps 3 and 4 for each controller you want to use to control I/O Linc.
Set the Output Relay to Momentary Mode A
- Set I/O Linc to linking mode by pressing and holding the Set button until it beeps (3 seconds).
The I/O Linc Status LED should begin blinking. - Set I/O Linc to unlinking mode by pressing and holding the Set button until it beeps again (3 seconds).
The I/O Linc Status LED should continue blinking. - Set I/O Linc to output relay programming mode by pressing and holding the Set button until it beeps a third time (3 seconds).
The I/O Linc Status LED should stop blinking and turn on solid. Connect the door strike and power supply to I/O Linc (see Figure 2).
- Test by either tapping the I/O Linc Set button or the button you linked to on the controller.
The I/O Linc relay should close and then reopen after a few seconds. - For instructions on how to set up the following features, consult the Owner’s Manual.
- Increase the amount of time the momentary relay is closed (from 2 seconds up to 25 seconds).
- Trigger your momentary closure with an OFF command only.
- Trigger your momentary closure with both ON and OFF commands.
- Use the I/O Linc sensor input to determine whether the I/O Linc output will respond.
- To be sure I/O Linc is in latching mode, tap the Set button and wait a few seconds. If you only hear one click, I/O Linc is in latching mode. If you hear two clicks, I/O Linc is in a momentary mode; return I/O Linc to latching mode or perform a factory reset (see Owner’s Manual).
Setup Guide
Setting up the Insteon I/O Linc 2450 is straightforward:
- Connect Power: Plug the device into a 120V AC outlet.
- Connect Devices: Wire your low-voltage devices to the appropriate terminals on the I/O Linc.
- Pair with Insteon Hub: Use the Insteon Hub or another controller to pair the I/O Linc with your smart home network.
- Configure Settings: Use the Insteon app or web interface to configure settings and link devices.
Troubleshooting
If you encounter issues with your Insteon I/O Linc 2450, here are some common problems and solutions:
- No Power: Ensure the device is properly plugged into a working outlet.
- No Signal: Check that all cables are securely connected and that the device is paired correctly with your Insteon hub.
- Interference: Move the device away from potential sources of interference such as cordless phones or microwaves.
Instructions & Warnings: Always follow the manufacturer's instructions for installation and use. Avoid exposing the device to extreme temperatures or moisture.
Limited Warranty
INSTEON warrants to the original consumer of this product for a period of 2 years from the date of purchase, this product will be free from defects in material and workmanship and will perform in substantial conformity
Pros & Cons
Pros
- Easy Setup: Simple installation process.
- Versatile Functionality: Acts as both input and output device.
- Reliable Performance: Consistent communication with other Insteon devices.
- Cost-Effective: Affordable price point compared to other smart home solutions.
Cons
- Compatibility Issues: This may not work seamlessly with non-Insteon devices.
- Dependence on Hub: Requires an Insteon hub for full functionality.
- No Wi-Fi Capability: Relies on RF signals which may be affected by interference.
Customer Reviews
Customers have generally praised the Insteon I/O Linc 2450 for its ease of use and reliability. Here are some common sentiments:
- "The I/O Linc has been a game-changer for my smart home setup. It's incredibly easy to install and integrate with my existing Insteon devices." - John D.
- "I've had some issues with compatibility, but overall it works well once set up correctly." - Sarah K.
Some common complaints include occasional connectivity issues and the need for an Insteon hub for full functionality.
Faqs
What is the primary purpose of the Insteon I/O Linc Low-Voltage Contact Closure Interface 2450?
How do I set up the Insteon I/O Linc 2450?
Is the Insteon I/O Linc Low-Voltage Contact Closure Interface 2450 compatible with non-Insteon devices?
What are some common issues with the Insteon I/O Linc 2450?
Can I use multiple I/O Lincs in one system?
Is the Insteon 2450 durable?
How does the Insteon I/O Linc 2450 communicate with other devices?
Are there any safety precautions I should take when using the IInsteon I/O Linc Low-Voltage?
Leave a Comment