
Iron Ridge XR Tilt Mount TM-FTL-010 User Manual
Content
IronRidge XR Tilt Mount TM-FTL-010 Product Manual
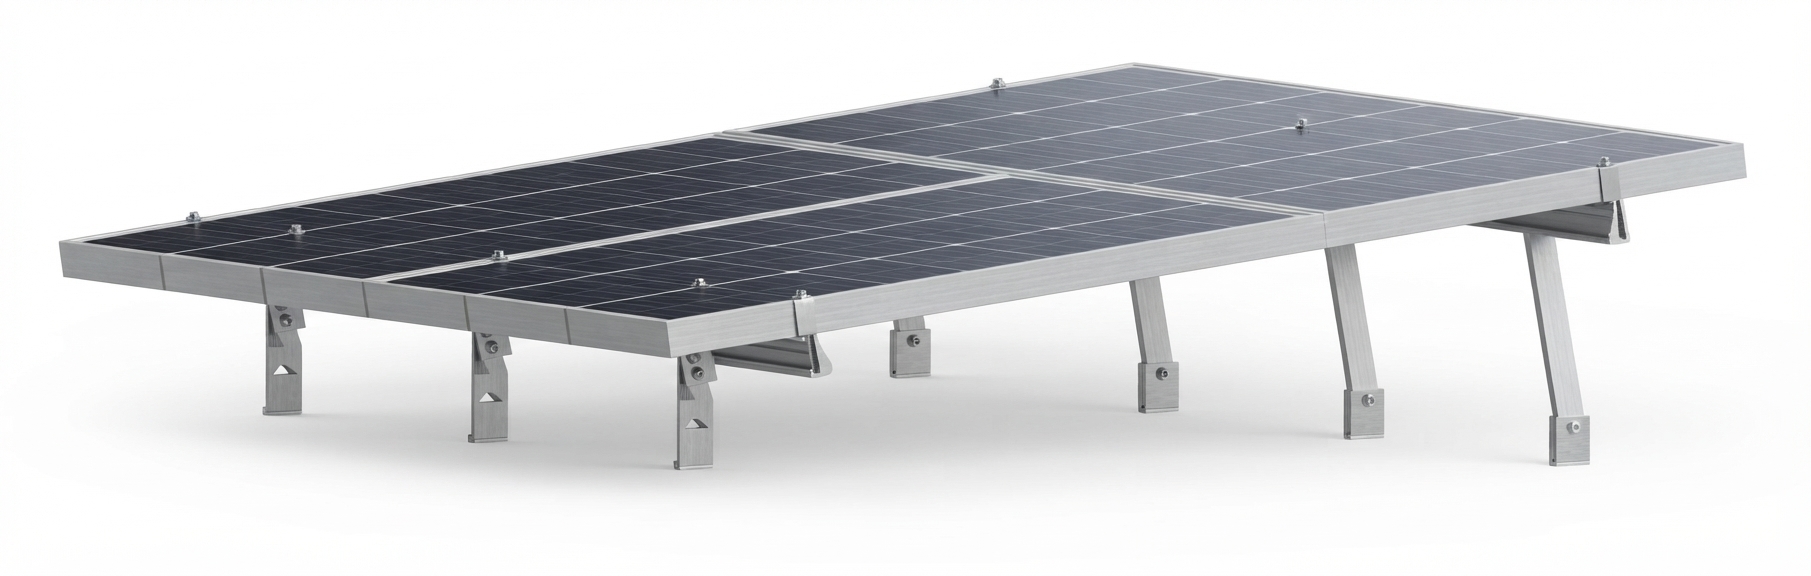
Introduction: IronRidge XR Tilt Mount TM-FTL-010 for Flat Roof Solar Arrays
The IronRidge XR Tilt Mount TM-FTL-010 is a 10-inch fixed tilt leg kit designed to help installers build stable, efficient solar arrays on flat roofs and similar mounting surfaces. It is part of IronRidge’s XR Tilt Mount ecosystem and is built to work with XR Rails, giving users a dependable way to set a consistent array angle while maintaining strong structural performance and corrosion resistance.
This model is especially useful for residential and commercial solar projects that need a compact tilt solution with reliable hardware and straightforward installation. The kit includes a North Tilt Leg and a South Tilt Leg, plus the mounting hardware required to attach to XR Rails. The South Tilt Leg includes angle indicator markings for easier setup, while the North Tilt Leg uses a slotted aluminum tube and pivot bracket for greater adjustability. That combination makes the iron ridge XR Tilt Mount TM-FTL-010 a practical choice for installers who want precision without unnecessary complexity.
Typical use cases include flat-roof solar arrays, low-slope roof systems, and projects where optimizing panel angle can improve energy production. The estimated street price usually falls around $30 to $45 per kit, depending on supplier, region, and stock availability. Inventory is generally available through solar distributors and online racking suppliers, though pricing can shift with freight and demand. For buyers comparing solar tilt leg kits, the iron ridge XR Tilt Mount TM-FTL-010 stands out for its all-metal construction, clean mill finish, and compatibility with IronRidge’s widely used XR platform.
Specifications: TM-FTL-010 Fixed Tilt Leg Kit Technical Details
- Model: TM-FTL-010
- Product type: Fixed tilt leg kit for XR Rail systems
- Length: 10 inches
- Finish: Mill finish
- Material: Aluminum with stainless steel hardware
- Included components: North Tilt Leg, South Tilt Leg, and rail attachment hardware
- Installation assistance: South leg angle indicator markings for quick alignment
- Adjustability: North leg pivot bracket allows full tilt adjustment within system design limits
- Corrosion resistance: Built for long-term outdoor exposure with aluminum and stainless steel construction
- Compatibility: Designed for IronRidge XR Rails and flat-roof tilt mounting applications
- Typical tilt range: Supported system angles commonly reach up to 30 degrees, depending on layout and rail configuration
- Weight: Roughly 2 lb class, depending on distributor packaging data
Compared with shorter tilt legs, the 10-inch version offers a balanced middle-ground for moderate tilt angles and compact array profiles. Versus longer options like 15-inch or 20-inch kits, the TM-FTL-010 is often preferred when installers want lower wind profile and less material cost while still achieving meaningful tilt. For buyers searching for a fixed tilt leg kit for solar panel mounting, this model is one of the most practical choices in the IronRidge lineup.
Troubleshooting: Common Installation Problems and Fixes
Most issues with the iron ridge XR Tilt Mount TM-FTL-010 come from alignment, hardware torque, or compatibility mistakes rather than product defects. If the array does not sit evenly, check that both tilt legs are installed in the correct orientation and that the south leg angle markings match the intended pitch. If the rail appears twisted, confirm that all fasteners are tightened evenly and that the roof structure is level enough for the planned layout.
- Problem: Uneven panel tilt. Fix: Recheck leg lengths, rail spacing, and the pivot position on the north leg.
- Problem: Fasteners loosen over time. Fix: Verify torque during installation and inspect hardware after initial thermal cycling.
- Problem: Misaligned angle setting. Fix: Use the angle indicator markings on the south tilt leg and confirm with a digital angle finder.
- Problem: Corrosion or discoloration. Fix: Confirm only approved aluminum-to-stainless hardware is used and avoid mixed-metal contamination.
- Problem: Incorrect rail fit. Fix: Ensure the kit is being paired with compatible XR Rails and not an unsupported mounting system.
There are no user-facing error codes for this mechanical kit, but installation defects can usually be prevented by following the full IronRidge tilt mount instructions, using calibrated torque tools, and inspecting every connection before module placement. Warranty and support typically follow IronRidge’s standard product support channels through the selling distributor and manufacturer documentation. For help, contact the distributor where the kit was purchased or the IronRidge support team through the company’s official customer support contact route listed in current product documentation.
Pros & Cons: IronRidge XR Tilt Mount TM-FTL-010 Review
Pros
- Reliable construction: Aluminum and stainless steel materials deliver strong corrosion resistance for outdoor solar installations.
- Easy installation: The included hardware and angle indicators reduce setup time for installers.
- Good mid-range size: The 10-inch leg works well for compact flat-roof arrays that need moderate tilt.
- Compatible ecosystem: Integrates cleanly with IronRidge XR Rails and related mounting components.
- Solid value: The price-to-performance ratio is strong for small to medium solar projects.
Cons
- Fixed-length limitation: It is not as flexible as fully adjustable tilt systems for unusual roof layouts.
- Project-specific sizing: Some arrays may need longer or shorter legs to reach the desired angle.
- System dependency: It is best suited to IronRidge-compatible designs, which may limit cross-brand use.
- Higher cost than basic hardware: It may cost more than generic tilt brackets, though the engineering quality is usually better.
Overall, the iron ridge XR Tilt Mount TM-FTL-010 is a strong option for installers who want dependable build quality and predictable performance. Compared with lower-cost alternatives, it offers better materials and easier integration. Compared with longer adjustable kits, it trades some range for simplicity and a cleaner roof profile.
Customer Reviews: What Buyers Say About TM-FTL-010
Customer feedback for the iron ridge XR Tilt Mount TM-FTL-010 is generally positive, with many users rating it around 4.5 out of 5 stars for build quality, fit, and installation convenience. Installers frequently praise the angle markings, sturdy hardware, and consistent part quality. One common testimonial theme is that the kit “fits cleanly and saves time on the roof.”
Common complaints usually involve price sensitivity and the need to choose the correct leg length for the project. Some buyers note that the fixed design is less flexible than adjustable systems, especially when trying to fine-tune array tilt on uneven roofs. Still, most customers recommend it for solar professionals and DIY users who want a trusted, well-made tilt leg kit. If the priority is durability, compatibility, and straightforward setup, this model is often considered a smart purchase.
Faqs
How do I set up the iron ridge XR Tilt Mount TM-FTL-010 for the first time?
What should I check if the iron ridge XR Tilt Mount TM-FTL-010 tilts unevenly or feels stiff?
Is the iron ridge XR Tilt Mount TM-FTL-010 compatible with different panel sizes and roof types?
How can I optimize the tilt angle on the iron ridge XR Tilt Mount TM-FTL-010 for better performance?
Why is my iron ridge XR Tilt Mount TM-FTL-010 shifting after installation?
What maintenance does the iron ridge XR Tilt Mount TM-FTL-010 need over time?
Can the iron ridge XR Tilt Mount TM-FTL-010 handle windy conditions and outdoor exposure?
What are the most common installation mistakes with the iron ridge XR Tilt Mount TM-FTL-010?
Tags
More iron ridge manuals
Leave a Comment