Jumbl Egg Incubator JUMBINCBT12 User Guide | Features
Content
Introduction
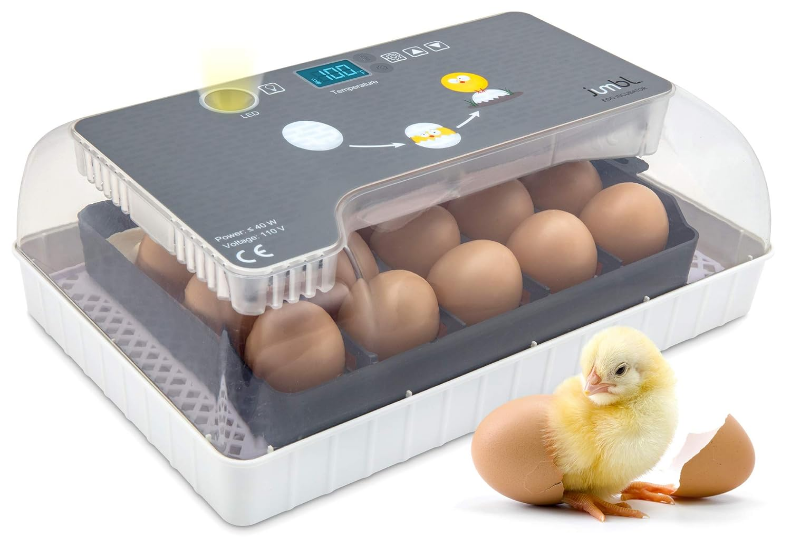
The Jumbl Egg Incubator JUMBINCBT12 is an efficient and user-friendly device designed for hatching a variety of eggs, including chickens, ducks, and quails. With programmable temperature controls ranging from 70°F to 103°F, it creates a stable environment that mimics a mother hen's care. The automatic egg turning feature ensures even heating, while the built-in egg candler allows for easy monitoring of embryo development. The Jumbl Egg Incubator is priced at approximately $39.99.
This User Guide is intended to provide you with guidelines to ensure that operation of this product is safe and does not pose risk to the user. Any use that does not conform to the guidelines described in this User Guide may void the limited warranty.
Please read all directions before using the product and retain this guide for reference. This product is intended for domestic use only. It is not intended for commercial use.
This product is covered by a limited one-year warranty. Coverage is subject to limits and exclusions.
SPECIFICATIONS
- Power: ≤40 W
- Voltage: 110 V
- Net weight: 2.6 lbs (1.2 kg)
- Product size: 12.6" x 8.2" x 4.6" (32 cm x 20 cm x 11.6 cm)
SAFETY PRECAUTIONS
- Make sure to familiarize yourself with the appliance itself before using it.
- Before using this appliance, check all the parts to make sure they function properly, and make sure no components have been damaged.
- Keep out of the reach of children.
- Always keep away from heat or flame, and avoid prolonged exposure to sunlight.
- Do not use in areas of extremely high or low temperatures or humidity.
- Keep away from hazardous chemicals or fumes.
- Ensure that the unit is placed on a stable surface.
- Before incubating eggs, ensure that you have a suitable brooding habitat for the chicks once they’ve hatched.
- Do not leave this appliance unattended for long periods of time in case of power outages or other issues. Doing so could result in the loss of your eggs’ viability.
- Once the eggs are hatched, use care in opening the unit as the chicks could leap out suddenly.
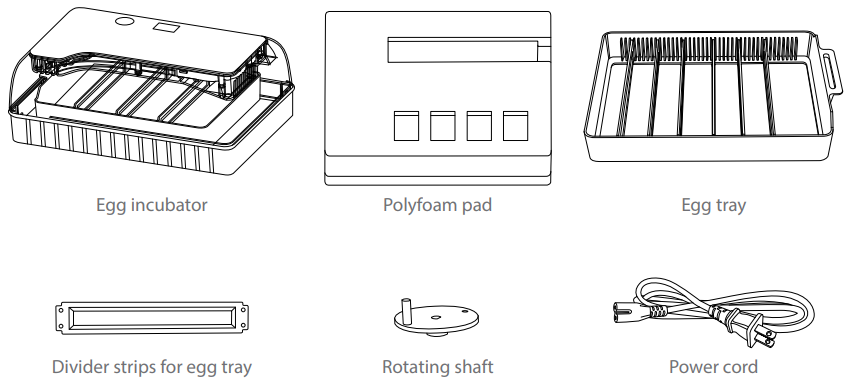
PACKAGE CONTENTS
FEATURES
- Programmable temperature control between 70˚F (21.1˚C) and 103.1˚F (39.5˚C)
- Automatic egg turning at predetermined intervals
- Temperature stabilizer
- Easy to clean
- Built-in egg candler
PRODUCT OVERVIEW
Incubator
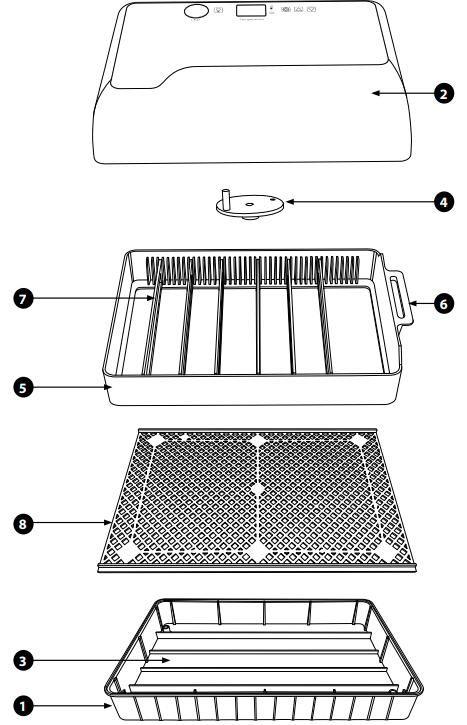
- Main body
- Cover
- Humidity channels
- Rotating shaft
- Egg tray
- Egg tray handle
- Egg tray divider strips
- Grid
Control Panel

- Egg candler
- Egg candler power button
- LED readout
- Heating indicator light
- Settings indicator light
- Settings button
- Up button
- Down button
Description
The Jumbl Egg Incubator JUMBINCBT12 boasts a sleek and durable design, making it a reliable choice for both beginners and experienced poultry breeders. The incubator features a clear plastic window for easy observation of the eggs without disturbing them. It includes a digital display that shows the current temperature, humidity, and turning status. The device is equipped with an automatic alarm system that alerts you to any temperature or humidity deviations.
The incubator also comes with a built-in ventilation system to ensure proper airflow, which is crucial for healthy egg development. The turning mechanism is designed to gently rotate the eggs every two hours, mimicking the natural turning process of a brooding hen.
GETTING STARTED WITH YOUR INCUBATOR
Assembly
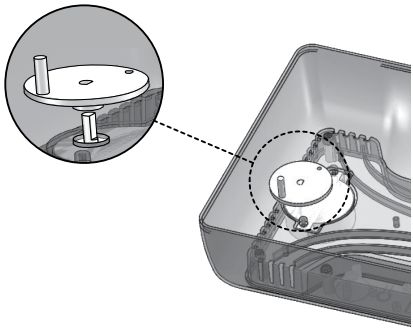
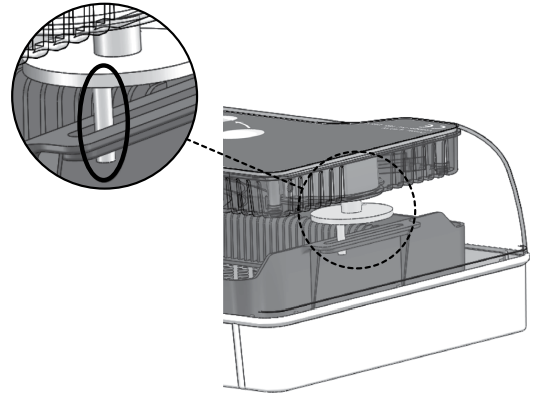
Install the rotating shaft by aligning the opening with the metal prong extending from the inside of the cover and firmly pressing it down into place.
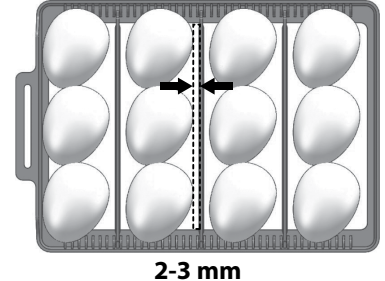
Place the dividing strips into the egg tray so that your eggs will have at least 2-3 mm of space between them. You can arrange the dividers to make wide columns if you’re using larger eggs, and smaller columns if you’re using smaller eggs.
If you’re incubating eggs in an area where the ambient temperatures might fall below 68°F (20°C), place the included polyfoam around the incubator for better insulation.
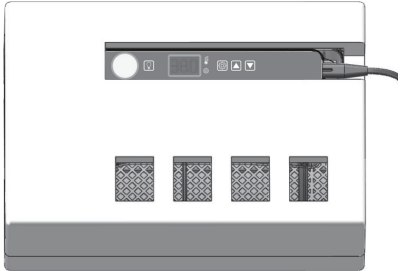
- Add water to the central humidity channel as needed. Replace the grid on top of the humidity channels and place the egg tray on top of the grid.
Replace the lid on the main body so that the rotating shaft is inserted into the open slot on the egg tray handle as shown. This ensures the egg turning mechanism will function properly.
Testing the Incubator
To avoid egg loss, it is important to test your incubator before first use.
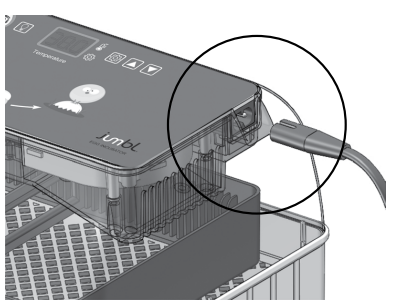
- Ensure that the rotating shaft is properly aligned, as described in the Assembly section.
- Fill the humidity channels with warm water.
Note: when you get ready to use the incubator for the first time, you will not want all humidity channels to be full; this is just for testing purposes. - Plug in the incubator.
- When first started, the temperature will take some time to reach the factory default temperature setting of 100°F (38°C). This may result in a Low Temperature Alert sounding from the incubator. If this occurs, you can cancel the Low Temperature Alert by pressing any button.
- The default Egg Turning Interval is set to two (2) hours by default.
- Leave the cover off so that you can observe the turning action and ensure that it is working properly.
- Eggs should be gently rolled 45° to the right and left for ten (10) seconds, and then rolled in a random direction thereafter.
UNDERSTANDING YOUR CONTROL PANEL

- Egg candler: This light allows you to perform a visual check of what is happening inside your eggs. Do not test eggs within the first four (4) days of placing them in the incubator, as this can cause embryo death. Once the eggs have completed their first four (4) days, you may check them periodically to see if they’re continuing to develop. Check with your egg supplier for details.
- Egg candler power button: This turns the egg candler on and off.
- LED readout: This readout shows the incubator’s interior temperature within one-tenth of a degree. Machine codes will also be displayed on this readout. Consult the table at the end of this section for the codes and their meanings.
- Heating indicator light: Lights up to let you know that the incubator is heating.
- Settings indicator light: Lights up when you long-press the settings button to let you know you have entered the settings menu.
- Settings button: Use this button to set the temperature, as well as to set the temperature at which you would like to be alerted by a High Temperature Alert Sound and a Low Temperature Alert Sound.
- Up button: Increases the temperature value, allows you to navigate between settings options and adjust setting values.
- Down button: Decreases the temperature value, allows you to navigate between settings options and adjust setting values.
LED Display Codes | Corresponding Menu | Default Factory Setting |
AL | Low temperature alert setting menu | 2.2˚F (-16.6˚C) |
AH | High temperature alert setting menu | 2.2˚F (-16.6˚C) |
HS | Upper temperature limit setting menu | 103.1˚F(39.5˚C) |
LS | Lowertemperature limit setting menu | 70˚F (21.1˚C) |
Temperature Settings
The factory preset temperature is 100°F (38°C). If, after several hours of use, the incubator does not reach this temperature, please check the following:
- The temperature has been set to 100°F (38°C), or above
- The incubator’s fan is functioning
- The cover is closed
- The ambient temperature in the room is above 64.4°F (18°C)
To set the temperature:
- Press the Settings button once.
- Use the Up and Down buttons to set your desired temperature.
- Press the Settings button again to confirm.
To set a Low Temperature Alert:
The factory default for this setting is 2.2˚F (-16.6˚C). To change this default and set an alert for when the temperature drops below a specific point:
- Press and hold the Settings button for three (3) seconds until it beeps and the settings indicator light is illuminated.
- Press the Settings button to cycle through menu options until the LED Display reads “AL”.
- Use the Up and Down buttons to set the temperature value at which you want to be alerted.
- Press the Settings button again to confirm.
To set a High Temperature Alert:
The factory default for this setting is 2.2˚F (-16.6˚C). To change this default and set an alert for when the temperature drops below a specific point:
- Press and hold the Settings button for three (3) seconds until it beeps and the settings indicator light is illuminated.
- Press the Settings button to cycle through menu options until the LED Display reads “AH”.
- Use the Up and Down buttons to set the temperature value at which you want to be alerted.
- Press the Settings button again to confirm.
To set upper and lower temperature limits:
The factory defaults for the upper and lower temperature limits are 103.1°F and 70°F, respectively.
To change this default and set upper and lower temperature limits:
- Press and hold the Settings button for three (3) seconds until it beeps and the settings indicator light is illuminated.
- Press the Settings button to cycle through menu options until the LED Display reads “HS” for the upper temperature limit or “LS” for the lower temperature limit.
- Use the Up and Down buttons to set the temperature values for upper or lower temperature limits.
- Press the Settings button again to confirm.
To adjust egg rotation intervals:
Every type of egg needs to be rotated at different intervals, so you should consult with your egg supplier or research to determine how often your eggs need to be rotated.
- Press the Egg Candler Power button
 and hold it down for three (3) seconds.
 - Use the Up and Down buttons to adjust the time up or down in 10-second intervals. The default setting is to turn the eggs every two (2) hours.
HOW TO ADJUST HUMIDITY
Adding warm water to the humidity channels controls the amount of relative humidity inside the incubator. The type of water does not matter; you can simply add water from a water bottle if you want, as long as the water is warm when you pour it into the channels.
Consult your egg supplier to determine the right humidity level for your species throughout the incubation cycle. You may want to install a hygrometer to keep an eye on humidity levels in your incubator throughout the duration of the hatching cycle. General humidity guidelines are given below, but please note that these numbers are approximate and cannot guarantee precise humidity levels.
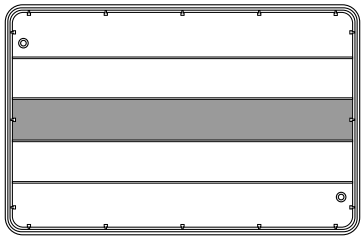
For an approximate humidity level of 45-55%, add warm water only to the center channel as shown. This level should be maintained for the first period of your breed’s specific incubation cycle.
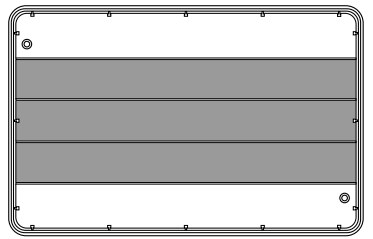
For an approximate humidity level of 55-65%, add warm water to the three (3) center channels as shown. This level should be maintained for the second period of the incubation cycle as the eggs develop further.
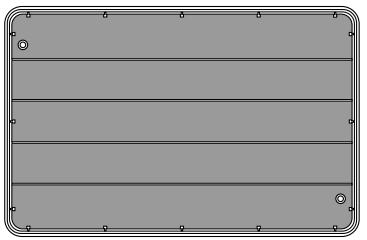
For an approximate humidity level of 65-75%, add warm water to all channels as shown. This level should be maintained for the final few days of the incubation cycle immediately prior to hatching.
HOW TO INCUBATE YOUR EGGS
- Complete the setup process and adjust the temperature and humidity to your desired levels.
- Place the eggs in the egg tray with their pointy sides facing down.
- Close the cover and start the incubator.
- Check the incubator frequently, especially in the beginning, to ensure optimal conditions.
- The humidity channels will need refilling every day or two. Maintain the proper water levels with your point in the incubation cycle, increasing as needed.
- When the eggs are hatching, do not open the lid until they are fully hatched.
Setup Guide
- Unpack the incubator and all included accessories.
- Place the incubator on a flat, stable surface away from direct sunlight and drafts.
- Plug in the incubator and allow it to stabilize at the recommended temperature (99°F to 102°F) for at least 2 hours before adding eggs.
- Gently place the eggs in the egg trays, ensuring they are securely positioned.
- Set the desired temperature and humidity levels using the control panel.
- Monitor the incubator's digital display for any alerts or adjustments needed during the incubation period.
ONCE YOUR EGGS HAVE HATCHED
Congratulations! Your chicks are now fully hatched. Allow the chicks to dry off a bit in the warmth of the incubator before moving them to a brooder unit, where they will spend their first few weeks of life. Before moving them, make sure that the brooder unit has reached an appropriate warming temperature for the young chicks.
EGG INCUBATION BASICS
Consider the Source
You should only use fertilized eggs from a reputable supplier, to ensure that they are from healthy stock and have been handled with care.
Keep it Clean
Proper hygiene can literally be a matter of life and death when it comes to hatching chicks. Clean the incubator thoroughly before placing eggs inside, and use only clean eggs for incubation. If the eggs you receive are not clean, consult with the your egg supplier, as some eggs may be suitable to gently wash, and other eggs may not be washed. Any time you open the incubator or touch the eggs, be sure to do so with clean hands.
Keep the Temperature Consistent
It is important to keep the temperature between 99.5˚F (37.5˚C) and 102˚F (38.9˚C), with as little fluctuation as possible. Keep in mind that the eggs themselves will give off heat as the embryos develop. We recommend monitoring the temperature in the incubator several times a day to make sure it doesn’t rise to unsafe levels.
Humidity is Key
Maintaining the correct level of humidity is essential to the development of the embryos. Humidity should be around 50% - 60% throughout the incubation period. During the last three (3) days of incubation, you will want to raise the humidity to 65%-75% to encourage hatching. The necessary humidity will vary by species, so be sure to check your egg supplier’s instructions.
Turn the Eggs
In order to mimic the actions of a broody hen with her eggs, it is important to turn the eggs several times a day throughout most of the incubation period. Every type of egg needs to be rotated at different intervals, so you should consult with your egg supplier or research to determine how often your eggs need to be rotated. Fortunately, your Jumbl egg incubator comes with an automatic egg rotation feature, eliminating the need to manually turn the eggs.
Guidelines for Different Species
For your convenience, we’ve provided some general guidelines on temperature and timing for different species in the chart below. Please make sure to check with your egg supplier for specific information regarding your eggs.
In general, the time to hatch for a chick is ~21 days. Smaller birds may take as few as 10-14 days; larger birds may take up to a month. Temperatures should generally range between 99°F ~ 102°F (37.2°C ~ 38.9°C), with 99.5°F (37.5°C) being largely viewed as the ideal temperature. For the last three (3) days, you should generally lower the temperature by 1-2°F, as the chicks will be putting off their own body heat. Humidity levels should generally range from 40% - 50% for the first 18 days, moving up to 65% - 75% for the final few days.
Type of Bird | Recommended Temperatures | Typical Incubation Period |
Hens | 99.3°F – 99.6°F (37.4°C – 37.6°C) | 21 days |
Pheasant | 99.6°F – 100°F (37.6°C– 38°C) | 23 – 27 days |
Quail | 99.6°F – 100°F (37.6°C– 38°C) | 16 – 23 days |
Ducks | 99.3°F – 99.6°F (37.4°C – 37.6°C) | 28 days |
Parrots | ||
Amazons | 98.3°F – 98.6°F (36.8°C – 37.0°C) | 24-29 days |
Macaws | 98.3°F – 98.6°F (36.8°C – 37.0°C) | 26-28 days |
Love Birds | 98.3°F – 98.6°F (36.8°C – 37.0°C) | 22-24 days |
African Greys | 98.3°F – 98.6°F (36.8°C – 37.0°C) | 28 days |
Eclectus | 98.3°F – 98.6°F (36.8°C – 37.0°C) | 28 days |
Jumbl Egg Incubator JUMBINCBT12 Troubleshooting
| # | Issue | Possible Cause | Try This Solution |
|---|---|---|---|
| 1 | Too many clear or infertile eggs | 1a. Incorrect proportion of male to female birds. | Check the breeder's recommendation for mating ratios. |
| 1b. Male is undernourished. | Make sure that you feed the male birds separately, as the hens may be eating all the feed. | ||
| 1c. Interference among males during mating. | Don't use too many males in your breeding pen. Raise the breeding males together, erect partitions. | ||
| 1d. Males have damaged combs and wattles. | Ensure housing is comfortable and provides drinking fountains. | ||
| 1e. Male is too old. | Replace elderly birds in the breeding pen. | ||
| 1f. Male is sterile. | Replace with a different male bird. | ||
| 1g. Eggs kept too long or under wrong conditions. | Don’t keep hatching eggs for longer than seven days. Store at 10-15°C, with 75-80% humidity. | ||
| 2 | Blood rings present, indicating very early embryonic death | 2a. Incubator temperature too high or too low. | Check all thermometers, thermostats, and electrical supply. Follow supplier and incubator's instructions. |
| 2b. Fumigation procedure performed incorrectly. | Use the correct amount of fumigant. Do not fumigate between 24 and 96 hours after setting eggs. | ||
| 2c. See 1g. | See 1g. | ||
| 3 | Many eggs are dead in the shell | 3a. See 2a. | See 2a. |
| 3b. Eggs have not been properly turned. | Check that all components and the power cord are connected. Test the egg turning function. | ||
| 3c. Breeding stock's nutrition could be deficient. | Check the stock from whom you’re getting your breeding eggs. | ||
| 3d. Incubator ventilation could be faulty. | Try to increase ventilation by normal means. | ||
| 3e. Eggs could have infectious diseases. | Make sure the eggs come from healthy stock. Ensure hatchery hygiene is sound and regularly carried out. | ||
| 4 | Piped eggs fail to hatch | 4a. Insufficient moisture in the incubator. | Increase the evaporating surface of water or sprays. |
| 4b. Too much moisture during earlier stages. | Install a hygrometer and check readings regularly to ensure proper humidity. | ||
| 4c. Nutritional problems. | Check that flock feeding is sound and nutrition is appropriate. | ||
| 5 | Eggs hatching too soon | 5a. Incubator’s temperature is too high. | Ensure that temperature-regulating gear is functioning and set to the correct operating temperature. |
| Eggs hatching too late | 5b. Incubator’s temperature is too low. | ||
| Sticky chicks | 5c. Incubator’s temperature is likely too high. | ||
| 6 | Malformed chicks | 6a. Incubator’s temperature is too high. | See 2a. |
| 6b. Incubator’s temperature is too low. | See 2a. | ||
| 6c. Eggs set incorrectly, or not properly turned. | Make sure eggs are set with the broad end up, pointed end down. | ||
| 7 | Spraddling chicks | Hatching trays are too smooth. | Use wire-mesh tray floors or cover incubator floor with burlap or a similar material. |
| 8 | Weak chicks | 8a. Incubator or hatching unit is overheating. | See 5. |
| 8b. Eggs being set are too small. | Only set eggs that are normal size for the breed. | ||
| Small chicks | 8c. Too little moisture in the incubator. | See 4a. | |
| 8d. Too much fumigant has been left in the incubator. | See 2b. | ||
| Chicks breathing heavily | 8e. Too much moisture present in the incubator. | See 4b. | |
| 8f. Could be an infectious disease. | Bring the chicks to a veterinary laboratory for diagnosis. | ||
| 8g. Temperature during incubation period is too low. | See 2a. | ||
| Mushy chicks | 8h. Incubator’s ventilation is poor. | See 3d. | |
| 8i. Omphalitis (navel infection). | Carefully clean out and fumigate the incubator using higher-strength formaldehyde, disinfect equipment. | ||
| 9 | Hatch not coming off equally | Eggs being set are too diverse in maturity and size. | Set eggs at least once a week. Don't retain hatching eggs for more than 10 days. Incubate average-size eggs. |
WARRANTY INFORMATION
LIMITED WARRANTY ON JUMBL EGG INCUBATOR
THIS LIMITED WARRANTY GIVES YOU SPECIFIC LEGAL RIGHTS AND YOU MAY ALSO HAVE OTHER RIGHTS, WHICH VARY FROM STATE TO STATE. WE WARRANT THAT DURING THE WARRANTY PERIOD, THE PRODUCT WILL BE FREE FROM DEFECTS IN MATERIALS AND WORKMANSHIP.
WHAT IS THE PERIOD OF COVERAGE?
This limited warranty starts on the date of your purchase and lasts for one year (the “Warranty Period”). The Warranty Period is not extended if we repair or replace the product. We may change the availability of this limited warranty at our discretion, but any changes will not be retroactive.
Pros & Cons
Pros:
- Easy to Use: User-friendly interface with clear instructions.
- Affordable: Competitive pricing compared to other incubators on the market.
- Reliable Performance: Automatic temperature control and turning mechanism ensure optimal conditions for egg hatching.
- Durable Design: Made from high-quality ABS plastic for longevity.
- Clear Visibility: Transparent window allows for easy observation of eggs without disturbance.
Cons:
- Limited Capacity: Only accommodates 12 eggs, which may not be sufficient for larger operations.
- No Wi-Fi Connectivity: No remote monitoring or alerts available.
- Space Requirements: Needs to be placed on a flat surface with adequate space around it.
Customer Reviews
Customers have generally praised the Jumbl Egg Incubator JUMBINCBT12 for its ease of use and reliable performance. Many have reported high hatching success rates and appreciate the clear visibility provided by the transparent window. Some users have noted that the device can be a bit noisy during operation but overall find it to be a valuable addition to their poultry breeding setup.
Common complaints include the limited capacity and lack of Wi-Fi connectivity for remote monitoring.
Faqs
How many eggs can the Jumbl Egg Incubator hold?
What is the optimal temperature range for the JUMBINCBT12?
Does the incubator have an automatic humidity control feature?
How often does the turning mechanism turn the eggs?
Is there a built-in alarm system in case of temperature or humidity deviations?
What materials is the incubator made of?
How much power does the incubator consume?
What are common issues with the incubator and how can they be resolved?
How do I clean and maintain the incubator?
When is the expected launch date of the Jumbl Egg Incubator JUMBINCBT12?
Leave a Comment
