Juplink Dual-Band Wi-Fi Range EC4-1200 Guide
Content
Introduction
The Juplink Dual-Band Wi-Fi Range EC4-1200 is an effective solution for extending your home network's reach, ensuring strong connectivity in areas with weak signals. This dual-band extender supports both 2.4GHz and 5GHz frequencies, allowing for speeds of up to 1200 Mbps, making it ideal for streaming and gaming. With easy setup and two Ethernet ports for wired connections, it enhances your internet experience. The Juplink EC4-1200 is priced at approximately $59.99, offering great value for improved connectivity.
Detailed Specifications
The Juplink Dual-Band Wi-Fi Range EC4-1200 comes with the following key features:
- Dual-band technology with speeds of up to 1200Mbps
- 4 high-gain antennas for improved coverage and signal strength
- 2.4GHz and 5GHz bands for reduced interference and better performance
- Advanced security features including WPA/WPA2 encryption and firewall protection
- Guest network access for secure internet connection for guests
- USB 2.0 port for file sharing and printer connection
- Parental controls for managing internet access for children
- IPv6 support for future-proof networking
Product Overview
Package Contents
You will find the following items in the box:
- 1 x Wireless Range Extender
- 1 x Quick Start Guide
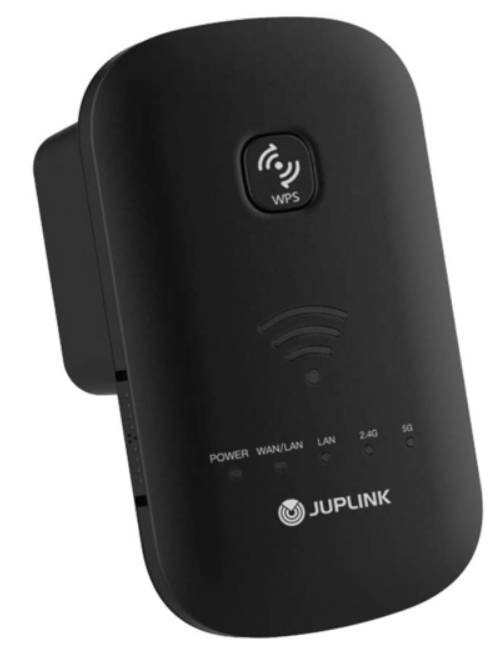
Getting to Know Your Wireless Range Extender


LED
| LED | Status | Description |
|---|---|---|
| POWER | Off | Powered off. |
| On | Powered on. | |
| 2.4G / 5G | Off | No Wi-Fi connection or powered off. |
| On | Wi-Fi connected, but no data being transmitted. | |
| Flashing | Data being transmitted. | |
| WPS | Off | WPS disabled or device powered off. |
| On | WPS enabled and connected. |
| Wi-Fi Signal Strength (3 strips without silkprinting) | Flashing | WPS enabled and connection being established. |
|---|---|---|
| One LED | on | Weak receiving, strength below 25%. |
| Two LEDs | on | Good receiving, strength of 50~75%. |
| Three LEDs | on | Excellent receiving, strength of 75~100%. |
Port & Button
| Port/button | Description |
|---|---|
| LAN/WAN | To connect a PC, switch, or router. |
| RESET | Press it and hold for about 10 seconds. When the POWER LED becomes solid, factory defaults are restored. |
| WPS | To extend the wireless network. |
Placing Your Wireless Range Extender
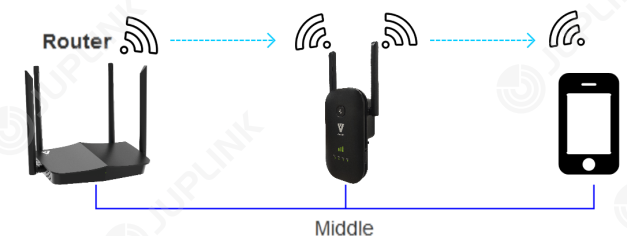
For best performance, refer to the following to place your wireless range extender: The Best Way is Half-Way Generally, the ideal location for the Range Extender is half-way between your wireless router and Wi-Fi enabled devices. If that is not practical, placing the Range Extender closer to your wireless router will ensure better performance.
Solid Green LED
Choose a location that lights up the green signal strength LED AAA
- Less Interference = More Stability
Try to position your Range Extender away from electrical devices that are potential sources of interference, such as ceiling fans, home security systems, microwaves, PCs, refrigerators, the base of a cordless phone, or a 2.4 GHz cordless phone. - Less Obstacles = Better Performance
Try to choose a location that minimizes obstacles between the Range Extender and your wireless router. Open corridors and other spacious locations will typically provide better conditions for performance than a crowded room.
Setup Guide
To set up the Juplink Dual-Band Wi-Fi Range EC4-1200, follow these steps:
- Connect the router to a power source and turn it on.
- Connect your modem to the internet port on the router using an Ethernet cable.
- Connect your computer to one of the router's LAN ports using an Ethernet cable.
- Open a web browser and enter the router's IP address in the address bar.
- Follow the on-screen instructions to complete the setup process.
Internet Connection Setup
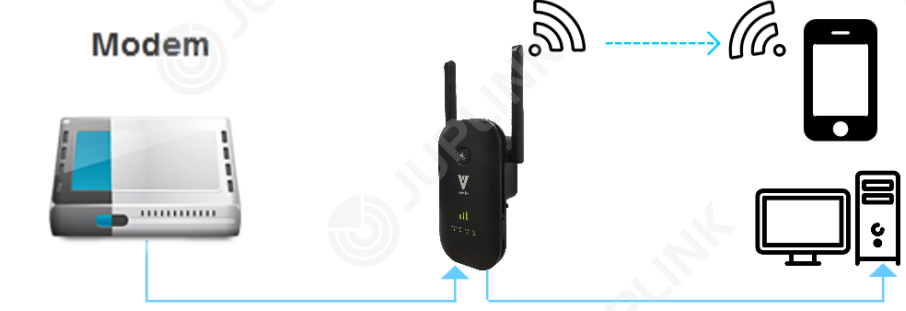
Hardware Installation
- Place the wireless range extender close to a wireless router or access point and then plug it into a power outlet nearby. Please ensure the right side switch is ON
- Connect your wireless clients (such as a notebook, tablet, smart phone, etc.) to the range extender wirelessly. Or you can connect your PC to either of the two LAN ports of the Range Extender with an Ethernet cable.
Connecting Your Range Extender
- Method 1: Wired
Connect your mobile device to the Range Extender with an Ethernet cable. - Method 2: Wirelessly
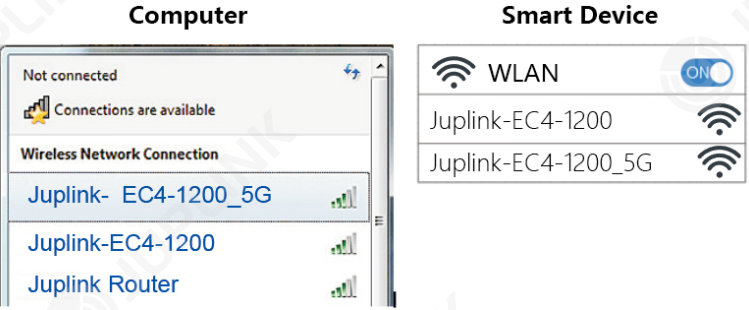
- Find the SSID (network name) printed on the label at the back of the Range Extender.
Click the network icon of your computer or go to Wi-Fi Settings of your smart device, and then select the SSID to join the network.
Method 3: Use the WPS button
Wireless devices that support WPS, including routers, most Android phones, tablets, and most USB network adapters, can be connected to your Range Extender through this method.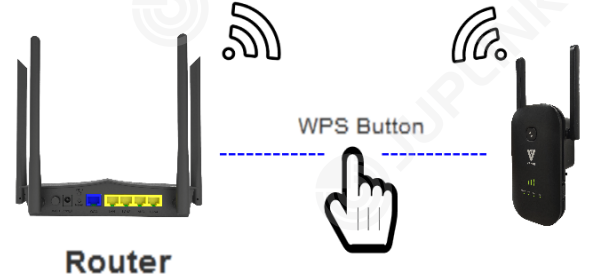
Note: -The WPS function can be configured only if the wireless function of the router is enabled. Also, the WPS function is disabled if your wireless encryption is WEP. Please make sure the wireless function is enabled and configured with the appropriate encryption before configuring the WPS.- Press the WPS button on the Router.
- Within two minutes, press the WPS button on your Range Extender.
Logging In to Your Range Extender
With a Web-based utility, it is easy to configure and manage the Range Extender. The Web-based utility can be used on operating system such as Windows, MAC iOS or UNIX with a Web browser, such as Microsoft Internet Explorer, Mozilla Firefox or Apple Safari.
Follow the steps below to log in to your Range Extender.
- Open a Web browser and enter 192.168.0.2 or router.Juplink.com* (Only for Firmware v1.0.2) in the address bar.
- Enter Username admin and Password admin, then click Log in (You can modify the login password in Page Change the Login Password).
Note: If the Login window does not appear, please refer to the FAQ Section.
Description
The Juplink Dual-Band Wi-Fi Range EC4-1200 is a powerful and versatile wireless router that is designed to meet the demands of heavy internet usage. Its dual-band technology allows for faster speeds and reduced interference, ensuring a smooth and uninterrupted internet connection. The router's 4 high-gain antennas provide improved coverage and signal strength, making it ideal for large homes and offices. The advanced security features of the Juplink EC4-1200 ensure that your network is protected from unauthorized access and threats. The guest network access feature allows you to provide secure internet connection for guests without compromising your network's security. The USB 2.0 port allows for file sharing and printer connection, making it a versatile device for both home and office use. The parental controls feature enables you to manage internet access for children, providing a safe and secure online experience.
Internet Connection
Manually Setting Up Internet Connection - Repeater/Client (default)
Connect your mobile device to the Range Extender with an Ethernet cable or via wireless connection and log in to the Range Extender.
_juplink_dual-band_wi-fi_range_ec4-1200.png)
- Select Repeater (default).
Select an SSID (Wi-Fi network) you want to extend.
-juplink_dual-band_wi-fi_range_ec4-1200.png)
Note: -It may take a few second to scan the network, If you can't find the signal you want to expand. Click Site Survey button search the signal again.Enter the password of the Wi-Fi network you want to extend.
-juplink-dual-band_wi-fi_range_ec4-1200.png)
Scroll to the bottom of the page and click “Save&Apply”.
-juplink-dual-band_wi-fi-_range_ec4-1200.png)
Wait a moment. After the Change setting successfully! page appears, you are connected to the wireless network.
Manually Setting Up Internet Connection - Access Point (AP)
Connect your mobile device to the Range Extender with an Ethernet cable or via wireless connection and log in to the Range Extender.
_juplink_dual-band_wi-fi_range_ec4-1200.png)
Note: Before using this mode, please use an Ethernet cable to connect an Ethernet port on the Range Extender and an Ethernet LAN port of a router. Both ports on the Range Extender are automatically adjustable ports. You can use either port to connect to your router.
Select Access Point (AP)
_-juplink_dual-band_wi-fi_range_ec4-1200.png)
- Select Auto. Configure LAN IP address. Set the Network Name (SSID), Pre-Shared Key (password), and click the Save&Apply button to complete the setup. Your settings are now applied and the Range Extender is ready to serve as an access point.
- Use a Wi-Fi network manager on the computer or Wi-Fi enabled device to connect to the new access point network.
Manually Setting Up Internet Connection-Router
Connect your mobile device to the Range Extender with an Ethernet cable or via wireless connection and log in to the Range Extender.
Note
- Before using this mode, please use an Ethernet cable to connect the Ethernet port on the Range Extender of an Ethernet LAN port of a modem.
- Both ports are automatically adjustable ports. You can use either port to connect to your modem.
- You need Select Fixed IP, Auto Config. (DHCP) or PPPoE Dial-Up according to your actual condition or the mode required by your ISP. Below is the detailed method of setting in Router mde.
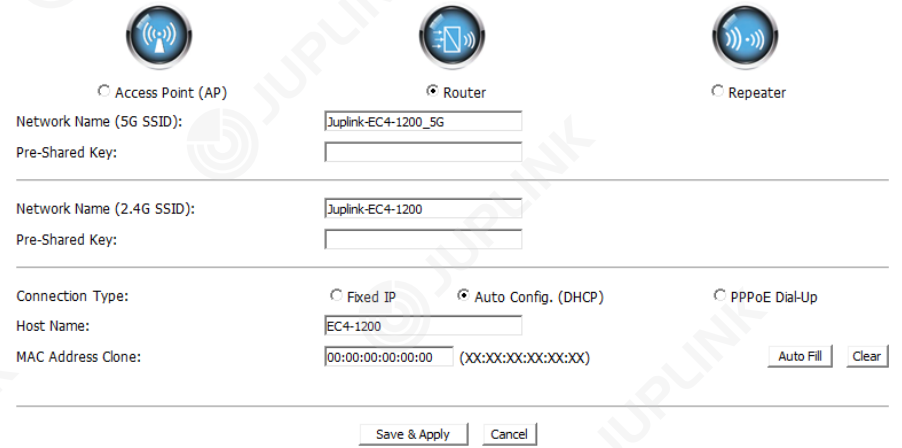
Router-Auto Config. (DHCP)
Select Auto Config. (DHCP). This is the default setting.
_juplink_dual-band_wi-fi_range_ec4-1200.png)
- Set the Network Name (SSID) and Pre-Shared Key (password).
- Click the Auto Fill button next to the MAC Address Clone field, and click Save&Apply., Your settings are now applied and the Range Extender is ready to serve as a router.
Router-Fixed IP
Select Fixed IP.
- Set the Network Name (SSID) and Pre-Shared Key (password).
- Enter the information of IP address, Subnet Mask, Default Gateway, DNS (if necessary).
- Click Auto Fill next to the MAC Address Clone field, and click Save&Apply. Your settings are now applied and the Range Extender is ready to serve as a router.
Router-PPPoE
Select PPPoE.
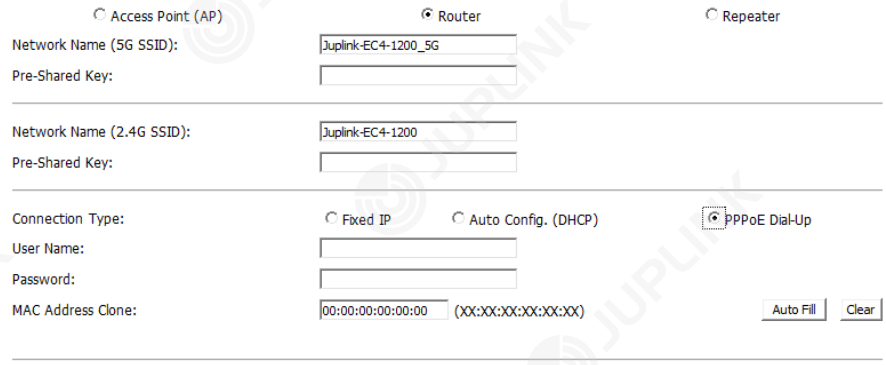
- Set the Network Name (SSID) and Pre-Shared Key (password).
- Fill in the User name & Password which was provide by your ISP.
- Click Auto Fill next to the MAC Address Clone field, and click Save&Apply. Your settings are now applied and the Range Extender is ready to be serve a router.
Maintaining the Range Extender
Changing the User Name and Password of the Range Extender
You can change the user name and password to log in to the Range Extender.
- After logging in to the Range Extender, click Advanced at top of the Web page.
Choose Management > Password.

- Change the user name and password, and then click Save&Apply. Your settings are now applied.
Saving/Reloading Settings
This page allows you to save current settings to a file or reload the settings from a file that was saved previously. You can also reset the current configuration to factory defaults.
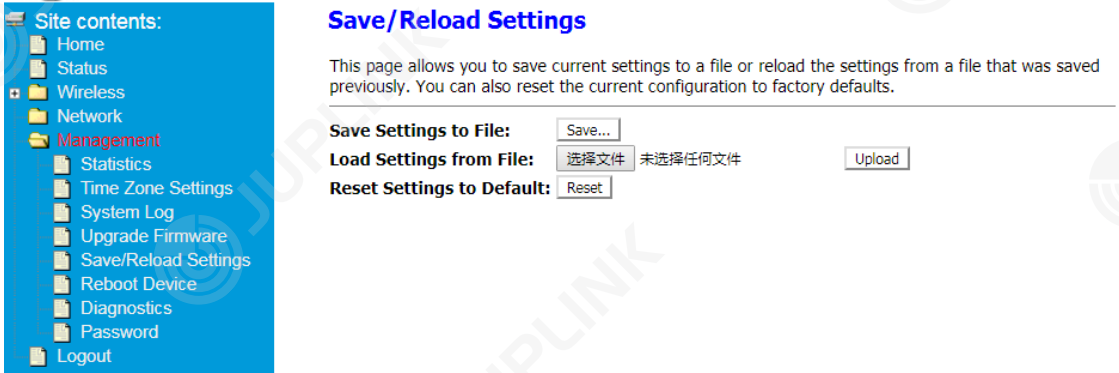
- After logging in to the Range Extender, click Advanced at top of the Web page.
- Choose Management > Save/Reload Setting.
- To save current settings to a file, click Save Settings to File, and then save it to your local device.
The browser extracts the configuration file from the Range Extender, and the name of the file saved is config.dat by default. To load settings from a file, click Load Settings from File, and then click Upload. To restore to factory defaults, click Reset. Your Range Extende is stored to factory default settings.
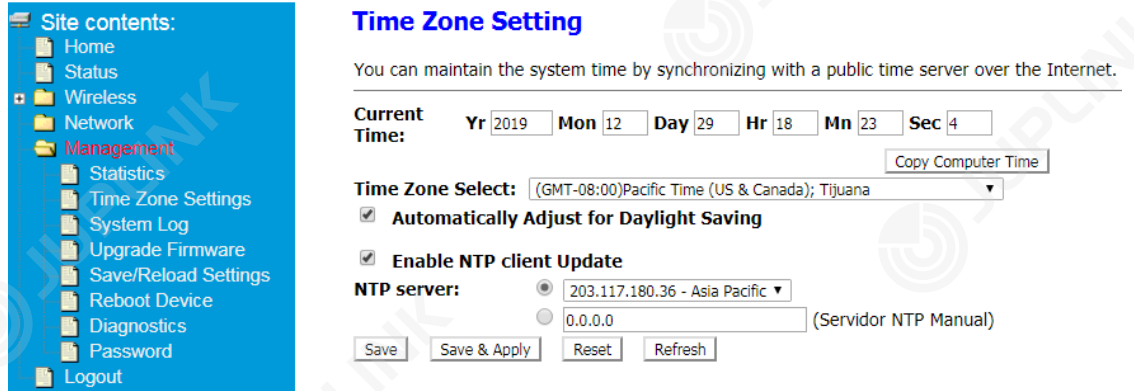
Time Zone Setting
You can maintain the system time by synchronizing with a public time server on the Internet.
Copy Computer Time: It is applicable for Windows devices only, and is not recommended.
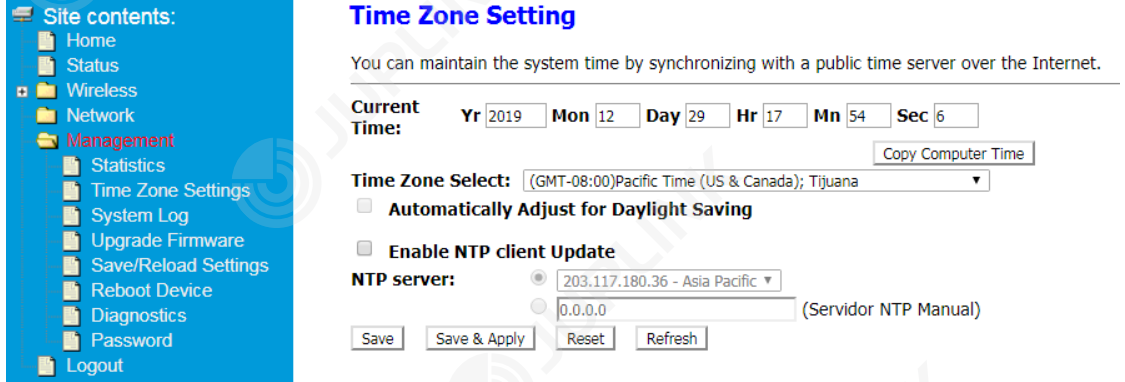
Enable NTP client Update: Select the check box, and select a stable NTP server from the drop-down list or manually enter the address of an NTP server.
System Log
In this page, you can set a remote log server and view the system log.
- After logging in to the Range Extender, click Advanced at top of the Web page.
Choose Management > System Log.
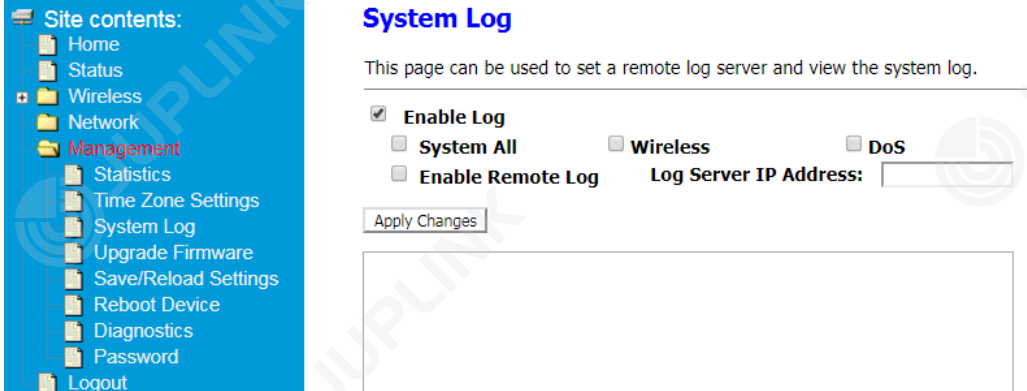
- Select Enable Log, and then select the types of logs you want to record. If you select Enable Remote Log, please enter the IP address of the log server.
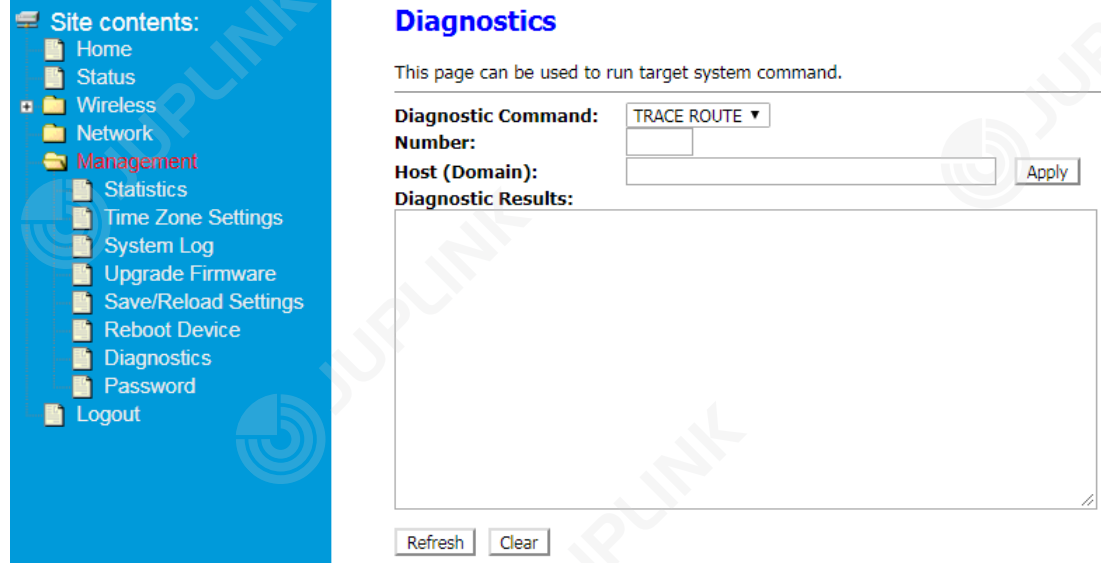
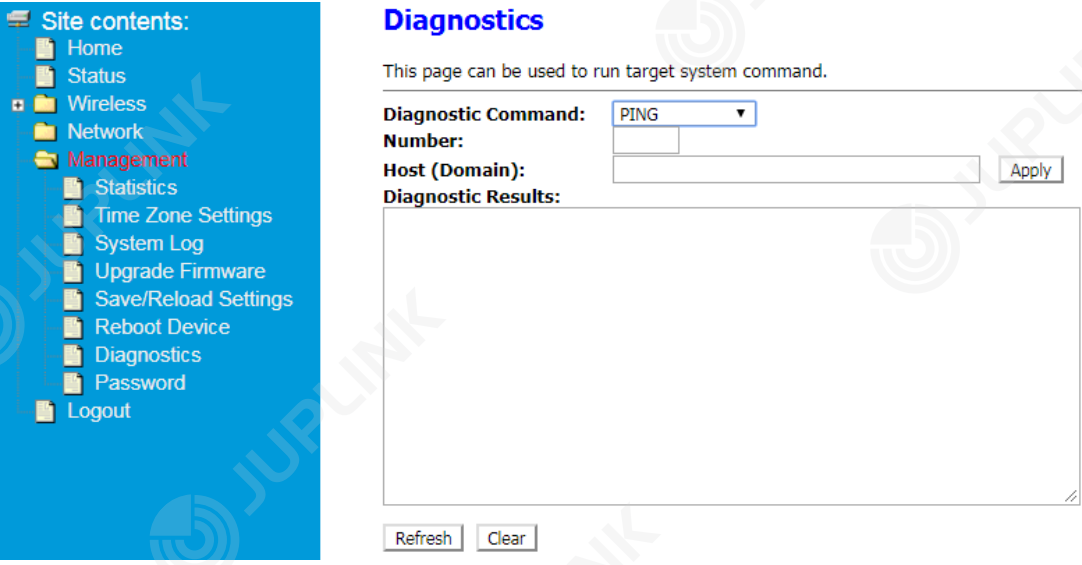
Diagnostics
This page is used to run system commands. 4.5.1 Diagnostic Command - PING
- After logging in to the Range Extender, click Advanced at top of the Web page.
- Choose Management > Diagnostics.
- Select PING from the Diagnostic Command drop-down list.
- Enter the information of Number and Host (Domain). After clicking Apply, you can check the result.
Diagnostic Command - TRACE ROUTE
- After Logging in to the Range Extender, click Advanced at top of the Web page.
- Choose Management > Diagnostics.
- Select TRACE ROUTE from Diagnostic Command drop-down list.
- Enter the information of Number and Host (Domain). After clickingApply, you can check the result.
Change Login Address
To change the default login address, do as follows:
After logging in to the Range Extender, click Advanced at top of the Web page.
- Choose Network > LAN Settings.
Enter an IP Address in the IP Address field. After clicking Save&Apply, you can log in to the Range Extender using this IP address.
Advanced Internet Configuration of the Range Extender
Static DHCP Setup (IP Address reservation)
This page allows you to reserve IP addresses and assign the same IP address to a network device with a specified MAC address each time it requests an IP address. This is similar to having a static IP address except that the device needs to request an IP address from the DHCP server every time.
- After loggin in to the Range Extender, click Advanced at top of the Web page.
Choose Network > LAN Settings. Select Server from DHCP drop-down list, and click the Set Static DHCP button.
_juplink_dual-band_wi-fi_range_ec4-1200.png)
Select Enable Static
_-juplink_dual-band_wi-fi_range_ec4-1200.png)
- Enter the IP address you want to specify and the MAC address of the network device (You can add a comment in the Comment column if necessary.)
Wireless Basic Settings
This page allows you to configure wireless clients to be connected to the Range Extender.
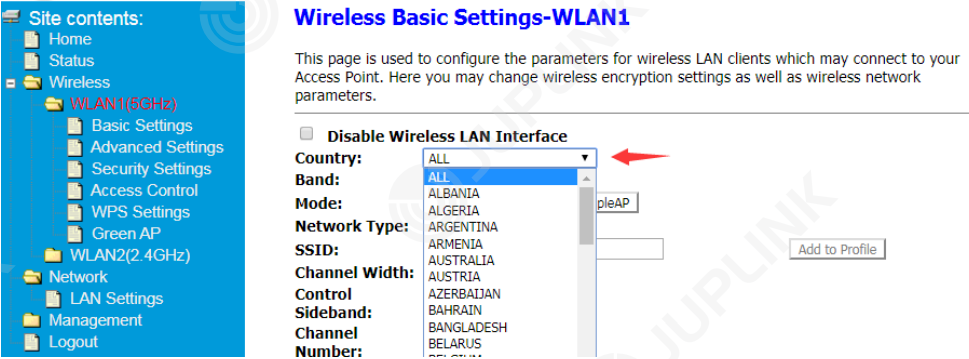
Selecting Country
- After logging in to the Range Extender, click Advanced at top of the Web page.
- Choose Wireless > WLAN1(5GHz) > Basic Settings or Wireless > WLAN2(2.4GHz) > Basic Settings, depending on which band you want to configure.
Select the country from drop-down list and click Save&Apply.
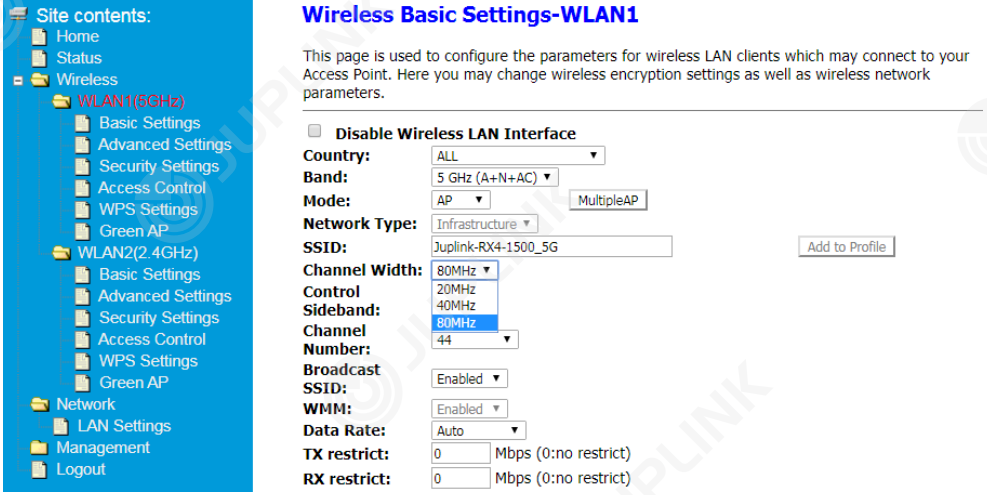
Changing Channel Width
- After logging in to the Range Extender, click Advanced at top of the Web page.
- Choose Wireless > WLAN1(5GHz) > Basic Settings or Wireless > WLAN2(2.4GHz) > Basic Settings, depending on which band you want to configure.
Select another Channel Width from drop-down list and click Save&Apply.
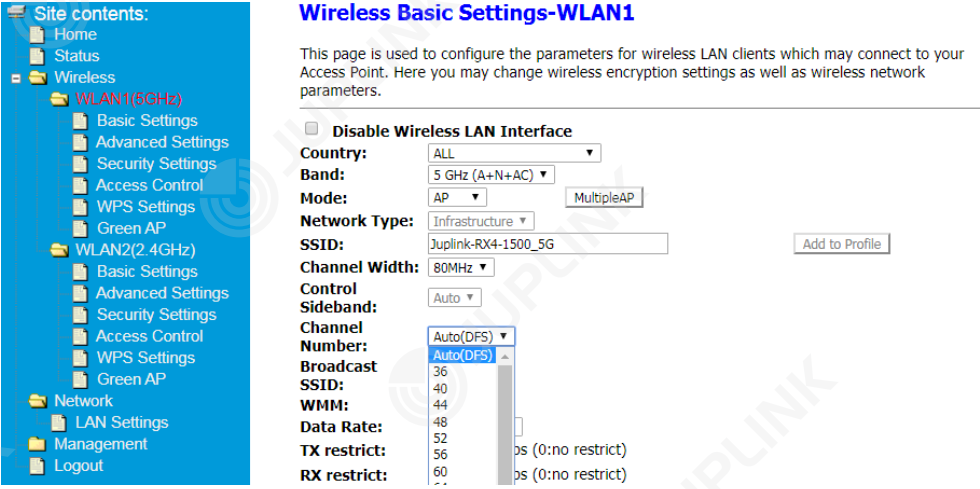
Switching A Channel
- After logging in to the Range Extender, click Advanced at top of the Web page.
- Choose Wireless > WLAN1(5GHz) > Basic Settings or Wireless > WLAN2(2.4GHz) > Basic Settings, depending on which band you want to configure.
Select another Channel Number from drop-down list and click Save&Apply.
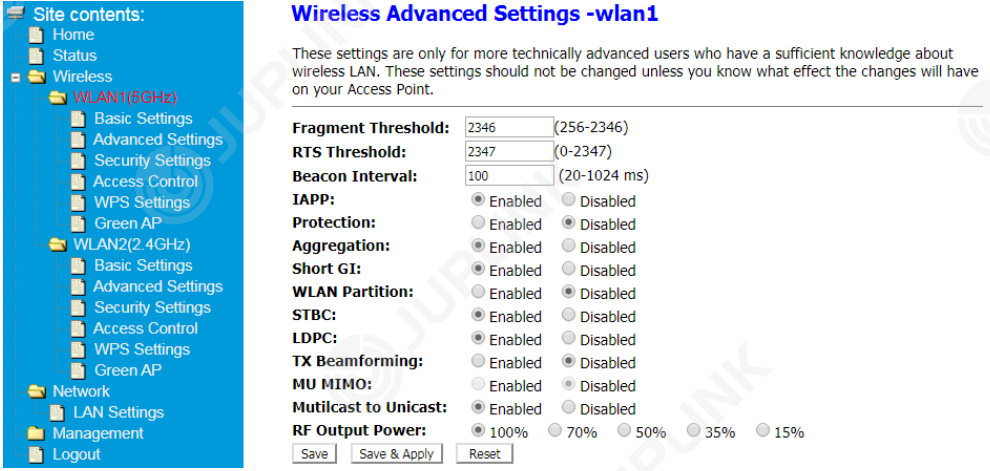
Wireless Advanced Settings
These settings are only for more technically advanced users who have sufficient knowledge on wireless LAN, and they should not be changed unless you know what effect the changes will have on the Range Extender.
- After logging in to the Range Extender, click Advanced at top of the Web page.
Choose Wireless > WLAN1(5GHz) > Advanced Settings or Wireless > WLAN2(2.4GHz) > Advanced Settings, depending on which band you want to configure.
Wireless Security Setup
This page allows you to set up wireless security. Using WEP or WPA Encryption Key helps prevent unauthorized access to your wireless network.
- After logging in to the Range Extender, click Advanced at top of the Web page.
Choose Wireless > WLAN1(5GHz) > Security Settings or Wireless > WLAN2(2.4GHz) > Security Settings, depending on which band you want to configure.
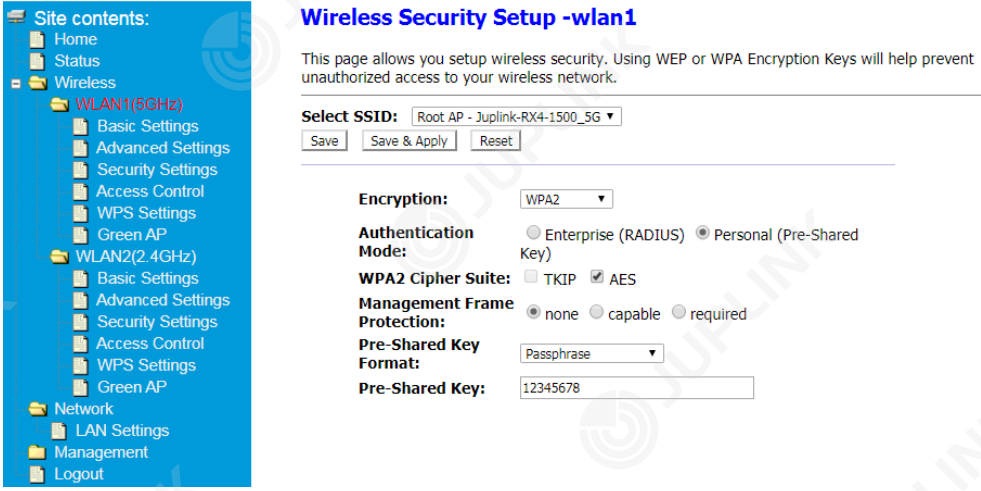
Note: If you cannot connect to the Range Extender after modification, please try resetting to factory defaults.
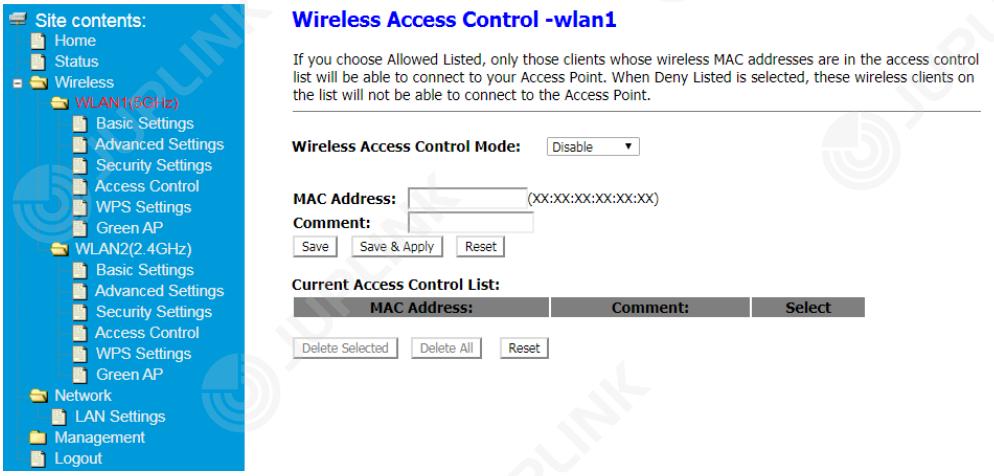
Wireless Access Control
If you set the control mode to Enable, only those clients whose wireless MAC addresses are in the access control list are able to connect to the Range Extender. If Disable is selected, wireless clients in the list are not able to connect to the Range Extender.
- After logging in to the Range Extender, click Advanced at top of the Web page.
- Choose Wireless > WLAN1(5GHz) > Access Control or Wireless > WLAN2(2.4GHz) > Access Control, depending on which band you want to configure.
Enter the information of the MAC address and Comment (if necessary). Then, click Save&Apply.
Wi-Fi Protected Setup-WPS setting
This page allows you to change the settings for WPS (Wi-Fi Protected Setup). Using this feature allows a wireless client to automatically synchronize its settings and connect to the Range Extender in a secured manner.
- After logging in to the Range Extender, click Advanced at top of the Web page.
Choose Wireless > WLAN1(5GHz) > WPS Settings or Wireless > WLAN2(2.4GHz) > WPS Settings, depending on which band you want to configure.
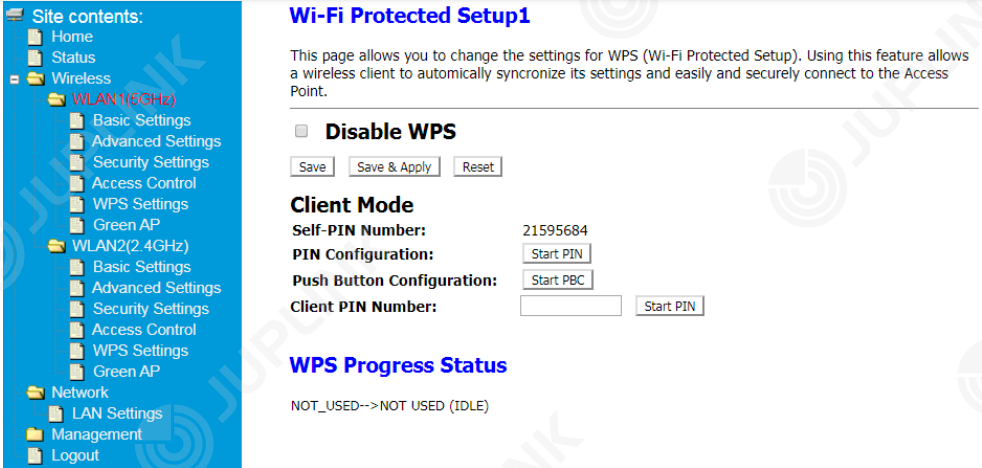
Note: You can enter the Client PIN Number and connect to a specific device.
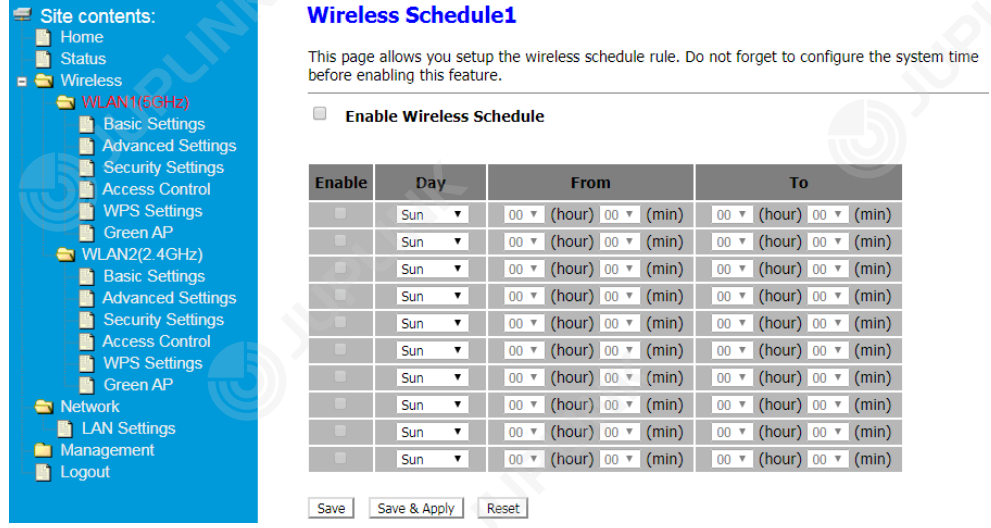
Wireless Schedule - Green AP
This page allows you to set up the wireless schedule rule. Do not forget to configure the system time before enabling this feature.
- After logging in to the Range Extender, click Advanced at top of the Web page.
- Choose Wireless > WLAN1(5GHz) > Green AP or Wireless > WLAN2(2.4GHz) > Green AP, depending on which band you want to configure.
Select Enable Wireless Schedule and set Day and Time.
Troubleshooting
If you encounter any issues with the Juplink Dual-Band Wi-Fi Range EC4-1200, try the following troubleshooting steps:
- Check that the router is properly connected to a power source and that all cables are securely connected.
- Restart the router and try again.
- Check that the firmware is up to date and that all security settings are correct.
- If you are still experiencing issues, contact Juplink's customer support for further assistance.
Pros & Cons
Pros
- Dual-band technology for faster speeds and reduced interference
- 4 high-gain antennas for improved coverage and signal strength
- Advanced security features for network protection
- Guest network access for secure internet connection for guests
- USB 2.0 port for file sharing and printer connection
Cons
- May be overkill for small homes or apartments
- Parental controls feature may be difficult to set up for some users
Customer Reviews
Customers have praised the Juplink Dual-Band Wi-Fi Range EC4-1200 for its fast speeds, improved coverage, and advanced security features. However, some users have noted that the parental controls feature can be difficult to set up. Overall, the Juplink EC4-1200 has received positive reviews, with users highlighting its value for money and reliability.
Faqs
How to reset the repeater?
Why does the repeater fail to find the Wi-Fi network of my router/modem?
Why is the extended signal poor?
Why is the wireless connection to the repeater network interrupted sometime after the extension is successful?
Why does a mobile device lose connection to the repeater after extension?
Why is the network not available after extension?
Why can't I extend Comcast,Verizon router signal?
Why does single frequency extended state after successful extension?
Why is there no Internet access after extension?
Leave a Comment