Kodak EasyShare Zoom Camera DX7440 Manual

Content
Introduction
The Kodak EasyShare Zoom Camera DX7440 is a powerful and versatile digital camera that is perfect for capturing life's precious moments. Launched in 2006, this camera is equipped with a 4x optical zoom lens and a 7.1-megapixel sensor, allowing you to take high-quality photos with ease. The estimated price of the Kodak EasyShare Zoom Camera DX7440 is around $250 to $300 USD.
Detailed Specifications
Kodak EasyShare DX7440 zoom digital camera | |
CCD (charge-coupled device) | |
CCD | 1/2.5 in. CCD, 4:3 aspect ratio |
Output image size (image quality mode) | 2304 x1728 (4.0 M)pixels 2304 x 1536(3.5 M) pixels 2048 x 1536(3.1 M) pixels 1656 x 1242(2.1 M) pixels 1200 x 900 (1.1 M) pixels |
Display | |
Color display | 2.2 in. (5.6 cm) color hybrid LCD, 640 x 240 (153 K) pixels |
Viewfinder | Real-image optical with diopter |
Preview | Frame rate: 30 fps (15 fps @ low lightlevel); Field-of-view: 100%. Automatic black & whitein very darkconditions. |
Lens | |
Taking lens | 4X optical zoom lens, f/2.8-4.8, 33-132mm (35mm equivalent) |
Focus system | Hybrid auto-focus system with continuous control. Multi-, Center-, or Selectable-zones. Working range: 19.7 in. (50 cm)-infinity @ wide 29.5 in. (75 cm)-infinity @ telephoto 3.9 - 23.7 in. (10-60 cm) @ wide macro 9.8 - 33.5 in. (25-85 cm) @ telephoto macro |
Digital zoom | 1-4X with 0.2X step Not supported for movie capture |
Accessory lens thread | Yes |
Lens barrier | Built-in |
Kodak EasyShare DX7440 zoom digital camera | |
Internal storage capacity | 21 pictures for internal flash memory @ standard mode |
Review | |
Quickview | Yes |
Video output | NTSC or PAL |
Power | |
Kodak EasyShare Li-Ion rechargeable battery (KLIC-5000), optional 5V AC adapter | |
Communication with computer | |
USB 2.0(PIMA 15740 protocol) via USB cable,EasyShare camera dockor printer dock | |
Languages | |
English/German/Spanish/French/Italian/Portuguese/Chinese/Korean/Japanese | |
Other features | |
Self timer | 10 seconds |
Sound feedback | Power up, shutter, self timer, error |
White balance | Auto, Daylight, Tungsten, Fluorescent |
Auto sleep mode | Yes. 8 minutes |
Color modes | High Color, Natural Color, Low Color, Black & White, Sepia |
Sharpness | High, Normal, Low |
Date stamp | None, YYYYMMDD, MMDDYYYY, DDMMYYYY |
Tripod mount | 1/4 inch |
Size | 3.9 in.(100 mm) x 2.7 in.(69 mm) x 1.6 in.(40 mm) @ power off |
Weight | 7.9 oz (224 g) without battery or card |
Product Features
Top, Front View

- Wrist strap post
- Zoom (Wide angle/Telephoto); Magnify (when Reviewing pictures)
- Shutter button
- Flash Setting button
- Close-up/Landscape button
- Exposure Bracketing/Burst button
- Speaker
- Flash unit
- Viewfinder
- Lens
- Microphone
- Light sensor
- Self Timer/Video light
Side, Back View
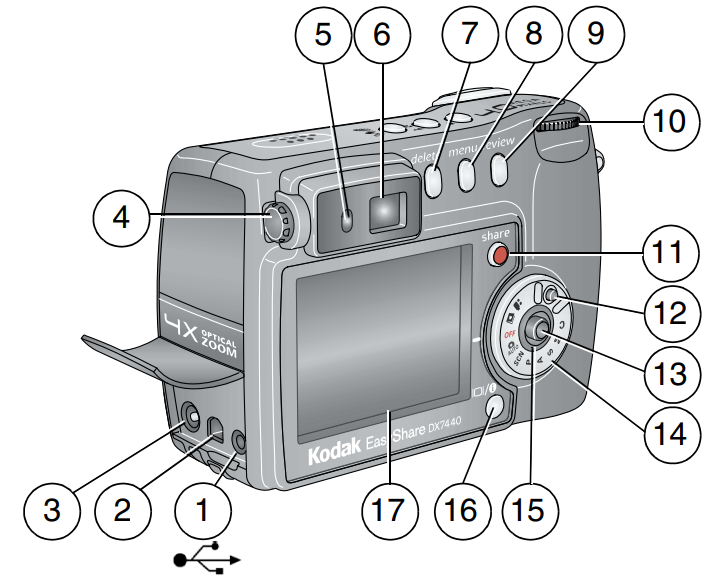
- USB Port

- A/V Out, for television viewing
- DC-In (5V)
- Diopter dial
- Ready light
- Viewfinder
- Delete button
- Menu button
- Review button
- Jog dial
- Share button
- Mode dial lock
- Joystick - move

- OK - press in
- Mode dial
- Power ring
- Display/Info button
- Camera screen (LCD)
Bottom View
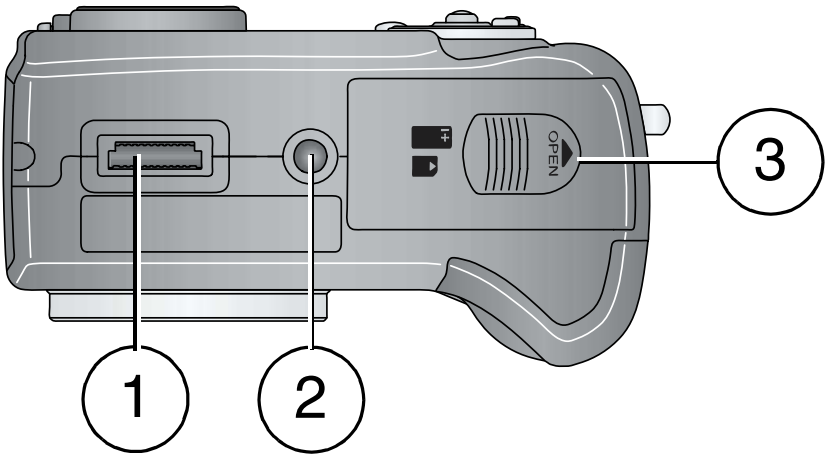
- Dock connector
- Tripod socket/locator for EasyShare camera dock or printer dock
- Battery door, MMC/SD card slot
Getting Started
Package Contents
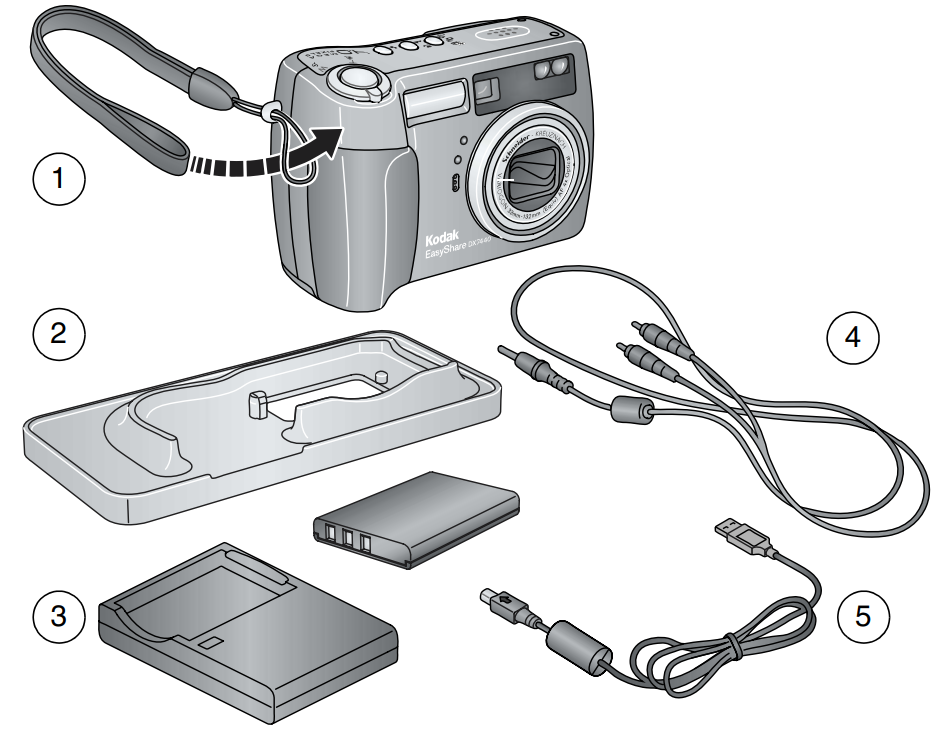
- Camera with wrist strap
- Custom dock insert (for EasyShare camera dock or printer dock)
- Li-Ion rechargeable battery and charger
- Audio/Video cable (for viewing pictures and videos on television)
- USB cable
Not shown: User’s guide (may be provided on a CD), Start Here! guide, Kodak EasyShare software CD. Contents may change without notice.
Installing the Software First
IMPORTANT: Install the software from the Kodak EasyShare software CD before connecting the camera (or dock) to the computer. Otherwise, the software may install incorrectly.
Charging the Battery
The Li-Ion rechargeable battery requires charging before first use.
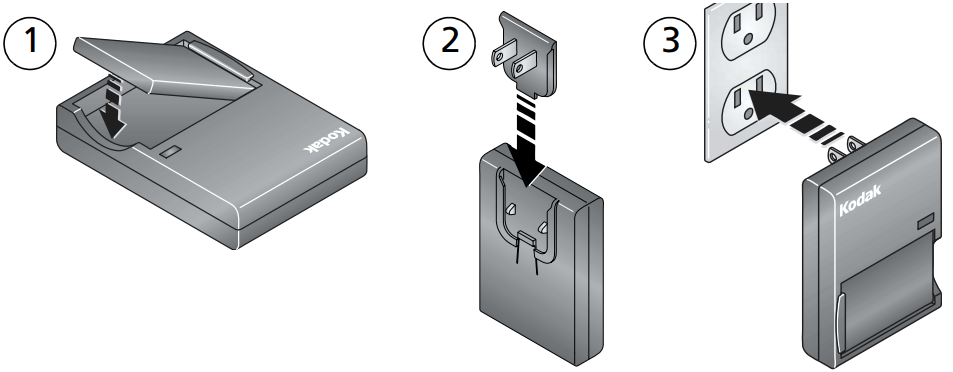
- Insert the battery into the charger.
- Insert the plug that matches your electrical outlet.
- Plug the charger into the outlet. The indicator light turns red. When the indicator light turns green, remove the battery and unplug the charger. Charging takes approximately 3 hours.
Inserting the Battery
CAUTION: Use only a Kodak EasyShare Li-Ion rechargeable battery.
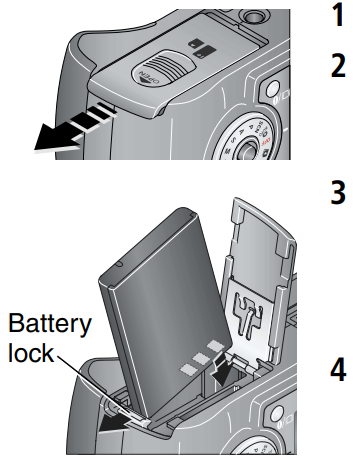
- Turn the Mode dial to Off.
- On the bottom of the camera, slide the battery door and lift to open.
- Insert the battery as shown. Tilt the battery so the battery lock is pushed to the side. Push the battery into the battery compartment. The battery lock holds the battery in place.
- Close the battery door.
Important Battery Information
Kodak battery replacement types/battery life:
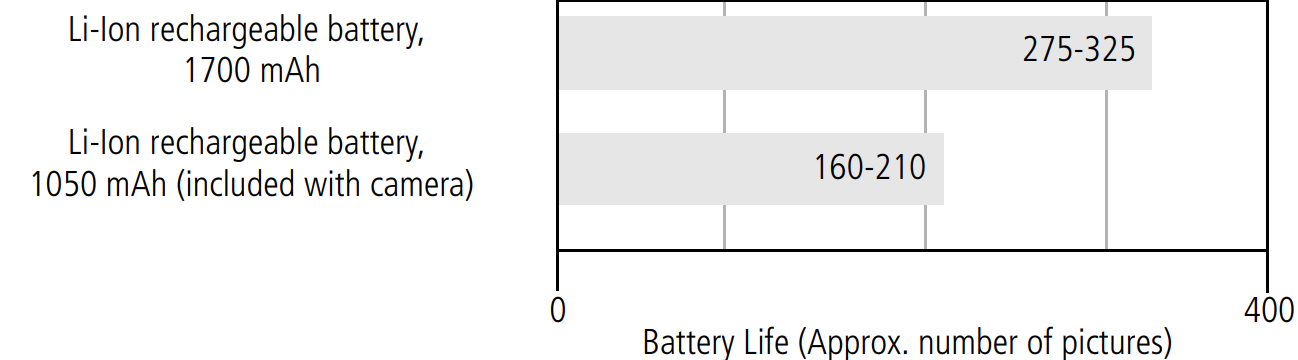
We recommend using only a Kodak EasyShare Li-Ion rechargeable battery. Not all manufacturers’ 3.7V Li-Ion rechargeable batteries are compatible with the camera. Damage caused by unauthorized accessories is not covered under warranty.
Extending Battery Life
- Limit the following activities that deplete battery power:
- Reviewing your pictures on the camera screen
- Excessive use of the flash
- Using the camera screen as a viewfinder
- Dirt on the battery contacts can affect battery life. Wipe the contacts with a clean, dry cloth before inserting a battery in the camera.
- Battery performance is reduced at temperatures below 41°F (5°C). When using your camera in cold weather, carry spare batteries and keep them warm. Do not discard cold batteries that do not work; when they return to room temperature, they may be usable.
- Kodak EasyShare camera dock—powers your camera, transfers pictures to your computer, and charges your battery.
- Kodak EasyShare printer dock—powers your camera, makes 4 x 6 in. (10 x 15 cm) prints with or without a computer, transfers pictures, and charges your battery.
- Kodak 5-volt AC adapter—powers your camera.
Battery Safety and Handling
- Do not allow batteries to touch metal objects, including coins. Otherwise, a battery may short circuit, discharge energy, become hot, or leak.
- For rechargeable battery disposal information, see the Rechargeable Battery Recycling Corporation Web site at http://www.rbrc.com
- For more information on batteries, see http://www.kodak.com/global/en/service/batteries/batteryUsage.jhtml
Turning the Camera On and Off

- While pressing the Mode dial lock, turn the Mode dial from Off to Auto
 . The Power ring glows green. The camera screen turns on. The Ready light blinks green while the camera performs a self-check, then turns off when the camera is ready.
 - To turn off the camera, turn the Mode dial to Off.
Description
The Kodak EasyShare Zoom Camera DX7440 is a compact and easy-to-use digital camera that is perfect for both amateur and professional photographers. The 7.1-megapixel sensor ensures high-quality photos, while the 4x optical zoom lens allows you to get closer to the action. The 2.5 inch LCD screen makes it easy to compose and review your shots, while the USB 2.0 connectivity makes it simple to transfer your photos to your computer or printer.
Changing the Camera Screen in Auto Mode
| If you want to... | Then |
|---|---|
| To turn the camera screen on or off | Press the Display/Info button: |
| ■ Once to hide the icons. | |
| ■ Again to turn off the camera screen. | |
| ■ Again to turn on the camera screen and icons. | |
| The camera screen off when you turn on the camera in Auto mode | See Liveview (Auto), |
Setting the Date and Time
Setting the date & time, first time:
The Date and Time have been reset message appears the first time you turn on the camera or if the battery is removed for an extended time.
- SET DATE & TIME is highlighted. Press the OK button.
- Go to step 4 in Setting the date & time, anytime.
Setting the date & time, anytime:
- Turn on the camera. Press the Menu button.
- Press
 to highlight Setup Menu
  , then press the OK button.
 - Press to highlight Date & Time
 , then press the OK button.
 - Press to adjust the date and time. Press
 to advance to the next setting.
 - When finished, press the OK button.
- Press the Menu button to exit the menu.
NOTE: Depending on your computer operating system, Kodak EasyShare software may update the camera clock when you connect the camera. See EasyShare software Help for details.
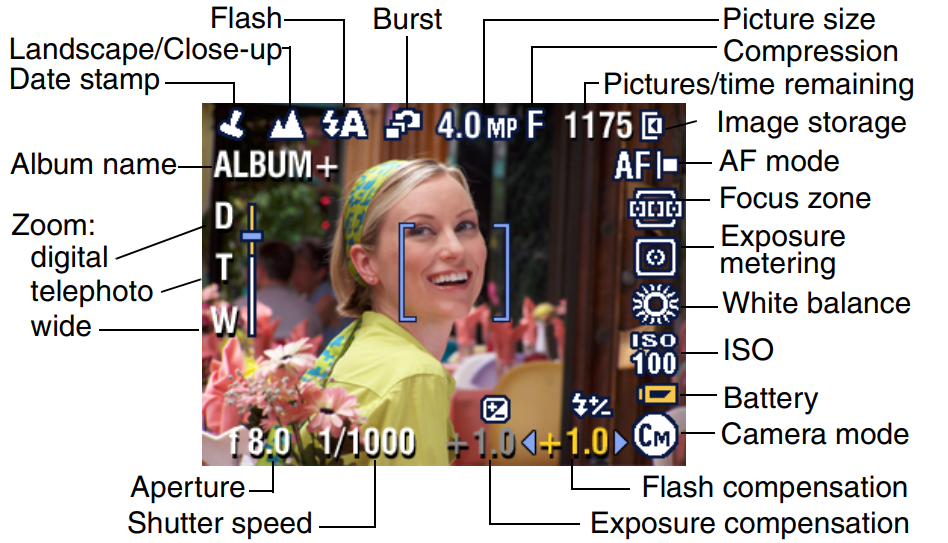
Checking Camera Status in Capture Mode
The icons that appear on the camera screen indicate the active camera and picture settings.
Storing Pictures on an SD/MMC Card
Your camera has 32 MB of internal memory. You can purchase optional SD/MMC cards for removable, reusable storage for your pictures and videos.
CAUTION: The card can only be inserted one way; forcing it may damage the camera or card. Do not insert or remove a card when the green ready light is blinking; doing so may damage your pictures, card, or camera.

- Turn off the camera, then open the card door.
- Orient the card as shown on the camera body.
- Push the card all the way into the slot.
- Close the door.
To remove the card, turn off the camera. Push the card in, then release it. When the card is partially ejected, pull it out.
Purchase SD/MMC cards at a dealer of Kodak products or http://www.kodak.com/go/dx7440accessories
NOTE: When using a card for the first time, we suggest you format it before taking pictures. (See page 26.) We cannot guarantee compatibility with “high-speed” SD cards such as xSD or Ultra-2; these cards are designed primarily for video or audio.
Using Optional Lenses
Expand your creativity with a selection of Kodak accessory lenses, offered in wide angle, telephoto, and close-up.
Reviewing Pictures and Videos
Press the Review button to view and work with your pictures and videos. To save battery power, use the optional Kodak EasyShare camera or printer dock, or Kodak 5-volt AC adapter.
Viewing single pictures and videos:
- Press the Review button.
- Move the joystick to scroll backward or forward through pictures and videos. (For fast scrolling, hold the joystick .)
- Press the Review button to exit Review.
NOTE: Pictures taken at the 3.5 MP (3:2) quality setting are displayed at a 3:2 aspect ratio with a black bar at the top of the screen.
Checking Camera Status in Review Mode
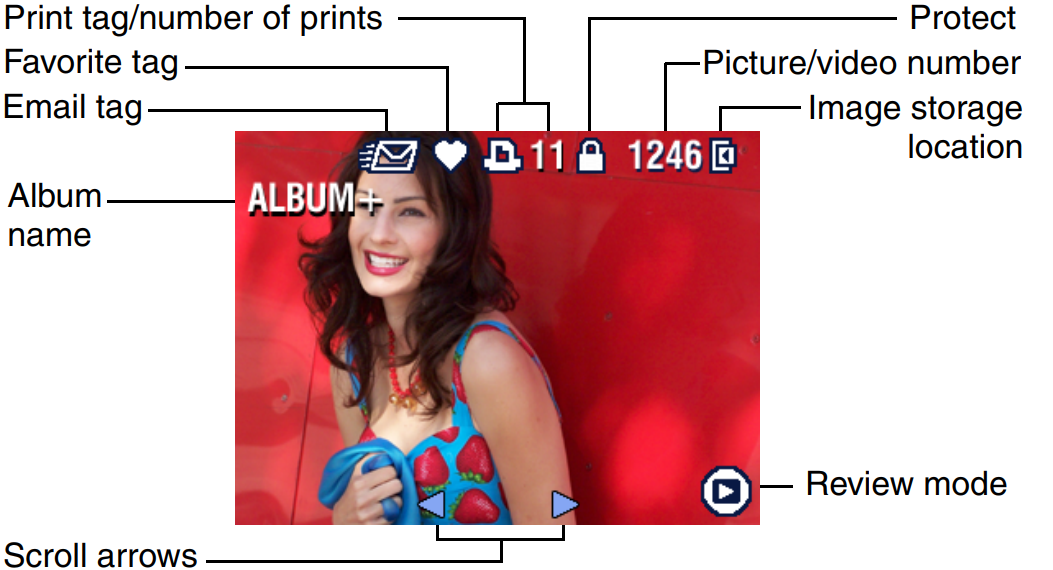
Changing the camera screen:
In Review, pictures/videos are displayed with associated icons. Press the Display/Info button:
- Once to turn off the icons.
- Again to display picture/video information.
- Again to display picture/video with icons.
Viewing multiple pictures and videos:
- Press the Review button.
- Move the joystick
 .
.
NOTE: You can also press the Menu button, highlight![]() , then press the OK button. Thumbnails of pictures and videos are displayed. To display the previous or next row of thumbnails, move the joystick
, then press the OK button. Thumbnails of pictures and videos are displayed. To display the previous or next row of thumbnails, move the joystick![]() . To scroll through the thumbnails one at a time, move the joystick
. To scroll through the thumbnails one at a time, move the joystick ![]() . To display a single view of the selected picture, press the OK button.
. To display a single view of the selected picture, press the OK button.
Playing a video:
- Press the Review button.
- Move the joystick to locate a video. (In Multi-up view, highlight a video, then press the OK button. When a video is highlighted in Multi-up view, the video duration is displayed at the top of the camera screen.)
- To play or pause a video, press the OK button.
NOTE: You can also press the Menu button, highlight ![]() , then press the OK button. To adjust the volume, move the joystick
, then press the OK button. To adjust the volume, move the joystick![]() . To return to the beginning of the video, move the joystick during playback. To replay the video, press the OK button. To go to the previous or next picture or video, move the joystick
. To return to the beginning of the video, move the joystick during playback. To replay the video, press the OK button. To go to the previous or next picture or video, move the joystick![]() .
.
Deleting Pictures and Videos
- Press the Review button.
- Move the joystick to locate a picture or video (or highlight one in multiple view), then press the Delete button.
- Move the joystick to highlight an option, then press the OK button:
- PICTURE or VIDEO—deletes the displayed picture or video.
- EXIT—exits the Delete screen.
- ALL—deletes all pictures and videos from your current storage location.
To delete more pictures and videos, return to Step 2.
NOTE: You cannot delete protected pictures and videos this way. Remove protection before deleting (see page 31).
Magnifying Pictures
- Press the Review button, then locate a picture.
- Pull or push the Zoom button to magnify the picture between 1X and 8X. To see different parts of the picture, move the joystick . To redisplay the picture at the 1X (original) size, press the OK button. To exit Magnify, press the OK button. To exit Review, press the Review button.
Changing Optional Review Settings
In Review, press the Menu button to access optional review settings.
Protecting Pictures and Videos from Deletion
- Press the Review button, then locate the picture or video.
- Press the Menu button.
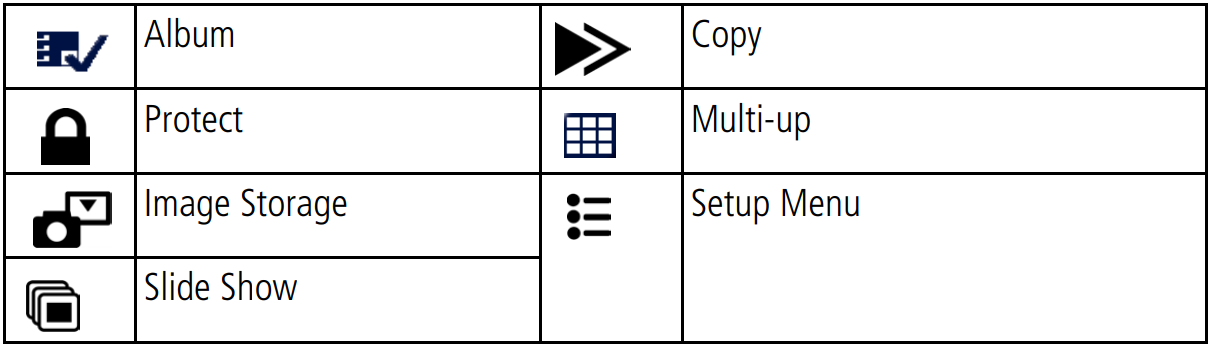
- Move the joystick to highlight Protect
 , then press the OK button. The picture or video is protected and cannot be deleted. The Protect icon appears with the protected picture or video.
 - To remove protection, press the OK button again.
- Press the Menu button to exit the menu.
CAUTION: Formatting internal memory or an SD/MMC card deletes all (including protected) pictures, videos. (Formatting internal memory also deletes email addresses, album names, and favorites. To restore them, see EasyShare software Help.)
Tagging Pictures/Videos for Albums
Use the Album feature in Review to tag the pictures and videos in your camera with album names.
First—on your computer:
Use Kodak EasyShare software (V 3.0 or higher) to create album names on your computer. Then copy up to 32 album names to the camera’s internal memory. See Kodak EasyShare software Help for details.
Second—on your camera:
- Press the Review button, then locate the picture or video.
- Press the Menu button.
- Move the joystick to highlight Album
 , then press the OK button.
 - Move the joystick to highlight an album folder, then press the OK button. To add other pictures to the same album, move the joystick to scroll through pictures. When you see the picture you want, press the OK button. To add the pictures to more than one album, repeat step 4 for each album.
The album name appears with the picture. A plus (+) after the album name means the picture was added to more than one album. To remove a selection, highlight an album name and press the OK button. To remove all album selections, select Clear All.
Third—transfer to your computer:
When you transfer the tagged pictures and videos to your computer, the Kodak EasyShare software opens and categorizes your pictures and videos in the appropriate album folder. See Kodak EasyShare software Help for details.
Running a Slide Show
Use the Slide Show to display your pictures and videos on the camera screen. To run a slide show on a television or on any external device, see page 33. To save battery power, use an optional Kodak 5V AC adapter.
Starting the slide show:
- Press the Review button, then press the Menu button.
- Move the joystick to highlight Slide Show, then press the OK button.
- Move the joystick to highlight Begin Show,
 then press the OK button. Each picture and video is displayed once, in the order in which you took them. To interrupt the Slide Show, press the OK button.
Changing the slide show display interval:
You can set the display interval between 3 and 60 seconds. (The default is 5 seconds.)
- On the Slide Show menu, move the joystick to highlight Interval, then press the OK button.
- Select a display interval. To scroll through the seconds quickly, hold the joystick.
- Press the OK button. The interval setting remains until you change it.
Running a continuous slide show loop:
When you turn on Loop, the slide show is continuously repeated.
- On the Slide Show menu, move the joystick to highlight Loop, then press the OK button.
- Move the joystick to highlight On, then press the OK button. The slide show repeats until you press the OK button or until battery power is exhausted. This setting remains until you change it.
Displaying Pictures and Videos on a Television
You can display pictures and videos on a television, computer monitor, or any device equipped with a video input. (Image quality on a television screen may not be as good as on a computer monitor or when printed.)
NOTE: Ensure that the Video Out setting (NTSC or PAL) is correct (see Video Out, page 25). The slide show stops if you connect or disconnect the cable while the slide show is running.
- Connect the audio/video cable (included) from the camera video-out port to the television video-in port (yellow) and audio-in port (white). See your television user’s guide for details.
- Review pictures and videos on the television.
Copying Pictures and Videos
You can copy pictures and videos from a card to internal memory or from internal memory to a card.
Before you copy, make sure that:
- A card is inserted in the camera.
- The camera’s picture storage location is set to the location from which you are copying.
Copy pictures or videos:
- Press the Review button, then press the Menu button.
- Move the joystick to highlight Copy
 , then press the OK button.
 - Move the joystick to highlight an option:
- PICTURE or VIDEO—copies the current picture or video.
- EXIT—returns to the Review menu.
- ALL—copies all pictures and videos from your selected storage location to the other location.
- Press the OK button.
NOTE: Pictures and videos are copied, not moved. To remove pictures and videos from the original location after they are copied, delete them (see page 30). Tags that you applied for print, email, and favorites are not copied. Protection settings are not copied. To apply protection to a picture or video, see page 31.
Viewing Picture/Video Information
- Press the Review button.
- Press the Display/Info button once to hide icons, again to display picture/video information, and once more to show icons.
- To view information on the next or previous picture or video, move the joystick . Press the Menu button to exit the menu.
Setup Guide
To use the Kodak EasyShare Zoom Camera DX7440, follow these steps:
- Charge the Li-ion rechargeable battery
- Insert the battery into the camera
- Turn on the camera
- Set the date and time
- Select the desired resolution and quality settings
- Press the shutter button to take a photo
Transferring and Printing Pictures
CAUTION: Install Kodak EasyShare software before connecting the camera or optional dock to the computer. Failure to do so may cause the software to install incorrectly.
Transferring Pictures/Videos with the USB Cable
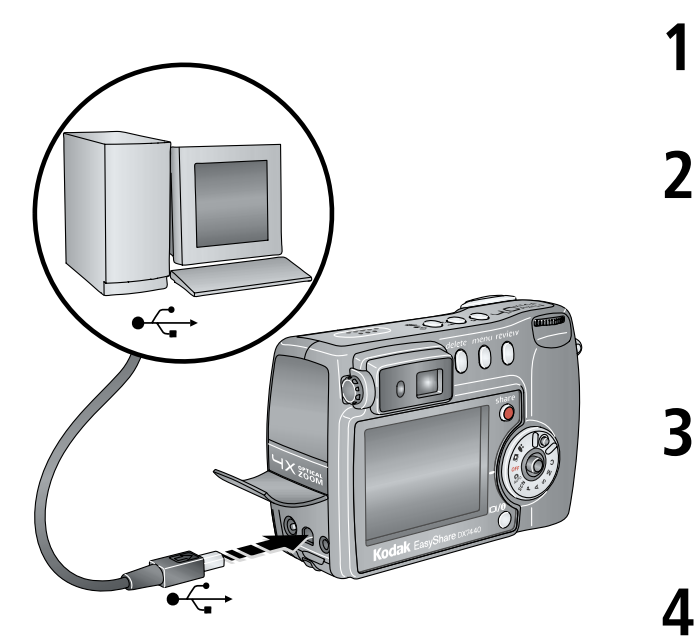
- Turn off the camera.
- Plug the labeled end of the USB cable into the labeled USB port on your computer. See your computer user’s guide for details.
- Plug the other end of the USB cable into the labeled USB port on the camera.
- Turn on the camera. Kodak EasyShare software opens on your computer. The software prompts you through the transfer process.
Also Available for Transferring
You can also use these Kodak products to transfer your pictures and videos:
- Kodak EasyShare camera dock, Kodak EasyShare printer dock
- Kodak multi-card reader, Kodak SD multimedia card reader-writer
Printing Pictures from Your Computer
For details on printing pictures from your computer, click the Help button in the Kodak EasyShare software.
Ordering Prints Online
Kodak EasyShare print service s one of the many online print services offered in the Kodak EasyShare software. You can easily:
- Upload your pictures.
- Edit, enhance, and add borders to your pictures.
- Store pictures, and share them with family and friends.
- Order high-quality prints, photo greeting cards, frames, and albums—and have them delivered to your door.
Printing from an Optional SD/MMC Card
- Print pictures when you insert your card into a printer with an SD/MMC slot. See your printer user’s guide for details.
- Make prints at an SD/MMC-capable Kodak picture maker. (Contact a location prior to visiting. See http://www.kodak.com/go/picturemaker
- Take the card to your local photo retailer for professional printing.
Printing Without a Computer
Dock your camera to the Kodak EasyShare printer dock and print directly—with or without a computer.
Troubleshooting
When you have questions about your camera, start here. Additional technical information is available in the ReadMe file located on the Kodak EasyShare software CD.
Camera Problems
| If... | Try one or more of the following |
|---|---|
| The camera does not turn on | ■ Remove, then reinsert the battery. <br> ■ Insert a charged battery. <br> ■ Place the camera on a Kodak EasyShare camera or printer dock (sold separately), then try again. <br> ■ Connect the camera to a Kodak 5-volt AC adapter (sold separately), then try again. |
| The camera does not turn off and the lens does not retract | ■ Remove, then reinsert the battery. <br> ■ Insert a charged battery. <br> ■ Place the camera on a Kodak EasyShare camera or printer dock (sold separately), then try again. <br> ■ Connect the camera to a Kodak 5-volt AC adapter (sold separately), then try again. |
| Camera buttons and controls do not function | ■ Remove, then reinsert the battery. <br> ■ Insert a charged battery. <br> ■ Place the camera on a Kodak EasyShare camera or printer dock (sold separately), then try again. <br> ■ Connect the camera to a Kodak 5-volt AC adapter (sold separately), then try again. |
| The camera screen does not turn on | ■ In any capture mode, press the Display/Info button. <br> ■ Turn the camera off, then on again. <br> To change the camera screen setting so that it is on whenever the camera is on, see Liveview (Auto). |
| In Review, a blue or black screen is displayed instead of a picture | ■ Transfer the picture to the computer. <br> ■ Transfer all pictures to the computer. |
| The pictures remaining number does not decrease after taking a picture | ■ Continue taking pictures. The camera is operating normally. <br> (The camera estimates the number of pictures remaining after each picture is taken, based on picture size and content.) |
| Picture orientation is not accurate | ■ Set the Orientation Sensor. |
| Flash does not fire | ■ Check flash setting, and change as needed. |
| Battery life is short | ■ Wipe the contacts with a clean, dry cloth before inserting a battery in the camera. <br> ■ Insert a charged battery. |
| You cannot take a picture | ■ Turn the camera off, then on again. <br> ■ Depress the shutter button all the way. <br> ■ Insert a charged battery. <br> ■ Wait until the ready light is green before attempting to take another picture. <br> ■ Transfer pictures to the computer, delete pictures from the camera, switch image storage locations, or insert a card with available memory. <br> ■ If the camera is in Favorites mode, turn the Mode dial to a different mode. |
Computer/connectivity problems
| If... | Try one or more of the following |
|---|---|
| The computer does not communicate with the camera | ■ Turn on the camera. <br> ■ Insert a charged battery. <br> ■ Make sure the USB cable is securely connected on the camera and the computer port. <br> ■ Make sure the EasyShare software is installed. <br> NOTE: This camera is not supported by Mac OS 8.6 or 9.x. You may capture pictures on a card, then use a card reader to transfer them to the computer. |
| Slide Show does not run on an external video device | ■ Adjust the camera Video Out setting (NTSC or PAL). <br> ■ Make sure the external device settings are correct (see the device’s user’s guide). |
Picture quality problems
If... | Try one or more of the following |
The picture is too dark or underexposed |
|
The pictureis too light |
|
The picture is not clear |
|
Camera ready light status
Status | Cause |
Ready light glows steady green. | Shutter button ispressed halfway down.Focus and exposure are set. |
Ready light blinks green. | Picture is being processed and saved to the camera. |
Pictures are being transferred to computer; camera is connected. | |
| Camera firmware upgrade is in process. |
Ready light glows steady orange. | Camera is in Favorites mode. |
Ready light blinks orange. | Flash is not charged. Wait.Resume picture takingwhen the light stops blinking and turns off. |
Auto-exposure or auto-focus are not locked. Release the Shutter buttonand recompose the picture. | |
Ready light blinks red and camera turns off. | Battery is low or exhausted. Recharge the battery |
Ready light glows steady red. | Camera’s internal memory or card is full. Transfer pictures to the computer delete pictures from the camera), switch image storagelocations ), or insert a card with available memory |
| Camera processing memory is full. Wait. Resume picture taking when the light turns green. | |
Card is read-only. Change image storage location to internal memory or use a different card. | |
Memory card speedis slow. Cardcannot be usedto take videos. Change storage location to internal memory. Use this card to take pictures only. |
Pros & Cons
Pros
- 4x optical zoom lens
- 7.1-megapixel sensor
- Easy-to-use interface
- Compact and portable design
- USB 2.0 connectivity
Cons
- No manual focus option
- No image stabilization
- No optical viewfinder
- No RAW image support
- Limited internal memory
Customer Reviews
Customers have praised the Kodak EasyShare Zoom Camera DX7440 for its ease of use, high-quality photos, and compact design. However, some have criticized it for its limited internal memory and lack of image stabilization. Overall, this camera is a great choice for those looking for a simple and affordable digital camera with a powerful zoom lens.
Common Complaints
Some of the most common complaints about the Kodak EasyShare Zoom Camera DX7440 include its limited internal memory, lack of manual focus option, and no image stabilization. Some users have also reported issues with the camera freezing or crashing, but these issues can often be resolved by resetting the camera to its factory settings.
Faqs
What are the key features of the Kodak EasyShare Zoom Camera DX7440?
How do I set up the Kodak EasyShare?
How do I troubleshoot issues with the Kodak EasyShare Zoom Camera DX7440?
What are the pros and cons of the Kodak DX7440?
How do I transfer photos from the Kodak to my computer?
Can I use the Kodak to record videos?
What type of battery does the Kodak DX7440 use?
How do I reset the Kodak EasyShare to its factory settings?
What is the warranty on the Kodak?
Where can I find the user manual for the Kodak EasyShare Zoom Camera DX7440?
Leave a Comment