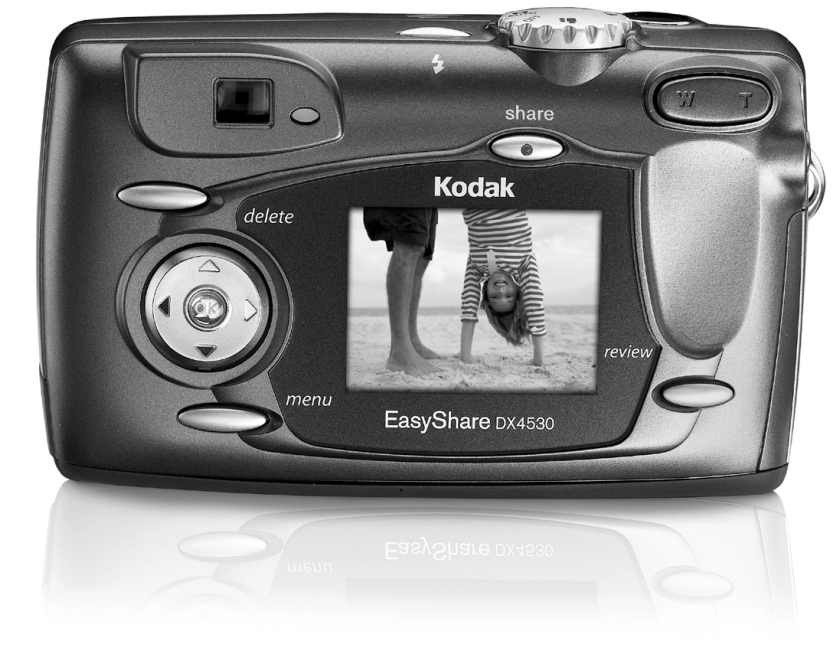
Kodak EasyShare Zoom Digital Camera DX4530 User Guide
Content
Introduction
The Kodak EasyShare Zoom Digital Camera DX4530 combines user-friendly features with impressive image quality, making it a great choice for casual photographers. With a 5.0 MP resolution, this camera captures sharp and vibrant images, while its 3X optical zoom and 3.3X digital zoom allow for versatile shooting options. The bright 1.8-inch LCD screen ensures easy viewing in various lighting conditions. Designed for effortless sharing, the DX4530 is priced at approximately $199.99.
Product Overview
Front View
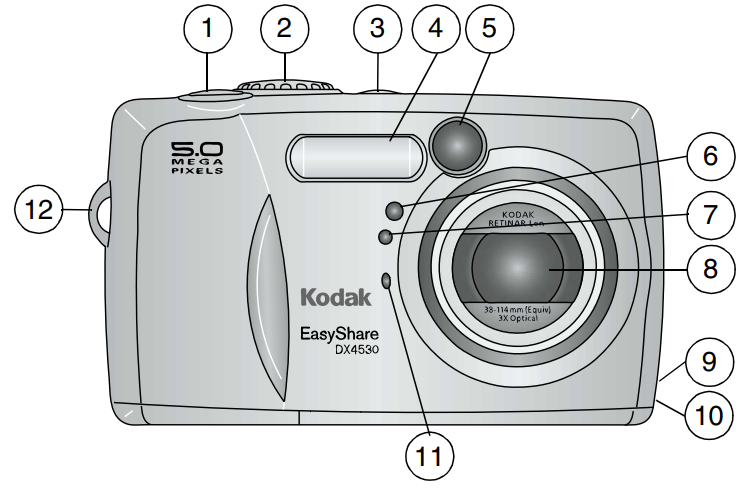
- Shutter button
- Mode dial
- Flash button
- Flash unit
- Viewfinder window
- Self Timer light
- Light sensor
- Lens
- DC In (for optional 3V AC adapter)
- Lens cap strap post
- Microphone
- Wrist strap post
Back View
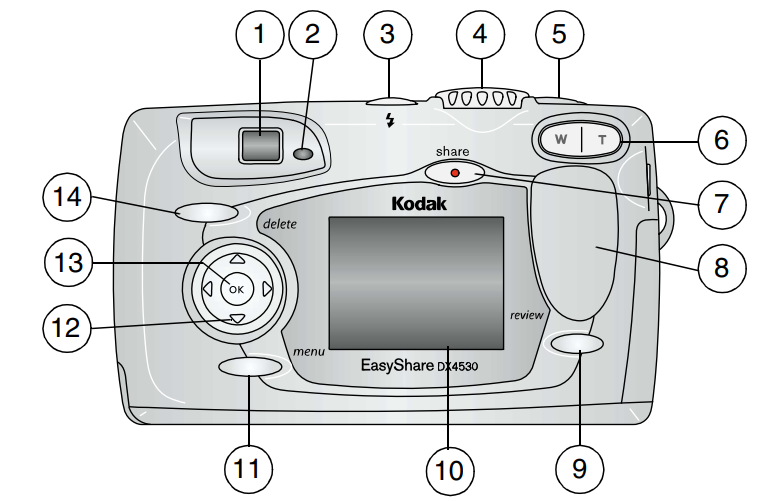
- Viewfinder
- Ready light
- Flash button
- Mode dial
- Shutter button
- Zoom (Wide Angle and Telephoto)
- Share button
- Grip
- Review button
- Camera screen (LCD)
- Menu button
- 4-way control
- OK button
- Delete button
Side View
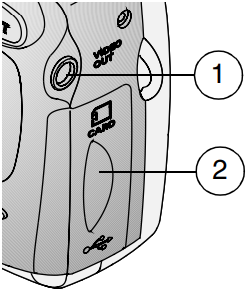
- Audio/Video Out
- Door to:
- Slot for optional SD/MMC card
- USB port (for computer connection)
Top, Bottom View
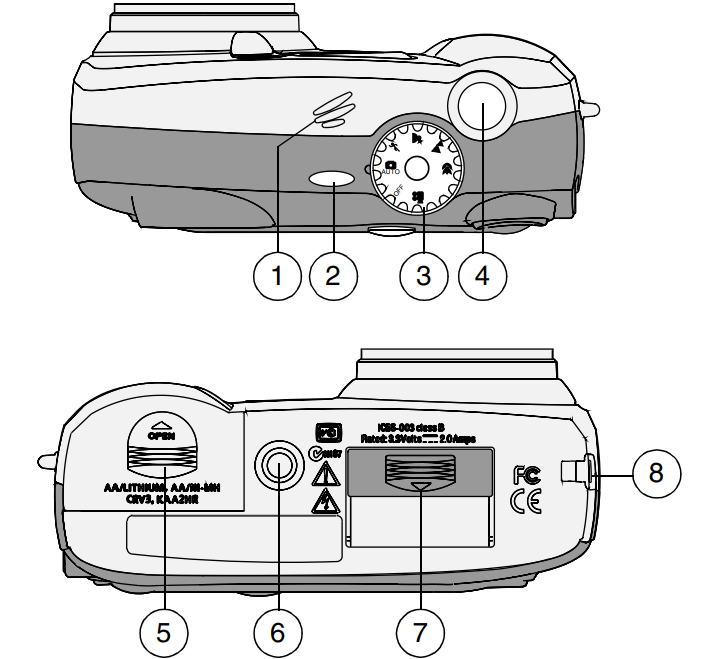
- Speaker
- Flash button
- Mode dial
- Shutter button
- Battery door
- Tripod socket
- Dock connector door
- Lens cap strap post
Camera Specifications
| Kodak EasyShare DX4530 zoom digital camera | ||
| Camera screen | Transmissive reflective LCD with anti-glare coating; 1.8 in. (45.7 mm);color; 72,000 pixels Preview rate:20.4 fps | |
| Color | 24-bit, millions of colors | |
Communication with computer | USB | Via USB cable or camera dock |
| Dimensions | Width Depth Height | 4.3 in. (110.5 mm) 1.5 in. (39.0 mm) 2.6 in. (66.0 mm) |
Weight | 7.4 oz (210 g) with battery and card | |
| Exposure control | Multi-pattern TTL-AE withprogram modes (Standard, Sport, Night,Long Time Exposure, Exposure Compensation) | |
| File format | Still | JPEG/EXIF v2.2 Exit Print |
| Video | Quicktime movie |
| Flash | Modes | Auto, Fill, Red-eye, Off |
Range (at ISO 140) | Wide: 2.0 to 11.2 ft (0.6 to 3.4 m) Tele: 2.0 to 6.6 ft (0.6 to 2.0 m) | |
Charging Time | < 7 seconds with charged battery | |
| Kodak EasyShare DX4530zoomdigital camera | ||
| Focus Distance | Close-up | Wide angle: 2.8 to 28 in. (7 to 70 cm); Telephoto: 11 to 28 in. (28 to 70 cm) |
Standard | 2 ft (0.6 m) to infinity | |
Landscape | Fixed focus | |
| ISO | Automatic (130-200) | |
| Lens | Type | Optical quality glass, 6 groups/7 elements (2 aspherical lenses) |
Maximum Aperture | f/2.8 - f/4.8 | |
Focal Length | 38 - 114 mm | |
| Operating Temperature | 32 to 104° F (0 to 40° C) | |
| Picture storage | 32 MB internal; SD or MMC card | |
| Pixel resolution | ⭐⭐⭐ ⭐⭐⭐ ⭐⭐ ⭐ | Best: 2580 x 1932 (5.0 M) pixels Best (3:2): 2580 x 1720 (4.5M) pixels Better: 2032 x 1524 (3 M) pixels Good: 1288 x 966 (1.2 M) pixels |
| Power | Battery |
(2) AA Ni-MH rechargeable (optional) |
AC adapter | 3V DC (optional) | |
| Self Timer | 10 seconds | |
| Tripod socket | Yes | |
| Video resolution | 320 x 240 pixels, 15 fps | |
| Video Out | NTSC or PAL selectable | |
| Viewfinder | Real image optical | |
| Kodak EasyShare DX4530zoomdigital camera | |
| White balance | Automatic |
| Zoom (still capture) | 3X optical, 3.3X digital |
Original Factory Settings—Camera
Feature | Factory Setting |
Date/Time | 2003/1/1; 12:00 |
Date/Time Stamp | Off |
Exposure Compensation | 0.0 |
Flash | Auto, Sport, Night: Auto Landscape, Close-up, Video:Off |
Image Storage | Auto |
Liveview | Off |
Orientation Sensor | On |
Shutter Sounds | On |
Storage Location | Auto |
Print Quantity | 1 |
Picture Quality | Best |
Quickview | On |
Self Timer | Off |
Slide Show Interval | 5 seconds |
Video Out | NTSC |
Getting Started
Install Software First
Install the software from the Kodak EasyShare software CD before connecting the camera (or optional camera dock) to the computer. Failure to do so may cause the software to load incorrectly.
Need This User Guide in Larger Print?
- See www.kodak.com/go/dx4530support.
- Navigate to the Manuals section.
- Click View as PDF to open the User’s Guide.
- On a Windows OS-based computer or Mac OS 8.6 or 9.x:
From the File menu, select Print.
In the Print window, select Fit to Page.
On Mac OS X:
From the File menu, select Page Setup.
Change Scale to 200%. - Print as usual.
What Can I Do With My Camera?
 Capture Still Pictures
Use Auto mode to enjoy point-and-shoot operation. Use Sport, Night, Landscape, and Close-up modes to expand your capabilities. Capture Videos with Sound
Capture videos as QuickTime movies. Review
Display, protect, and delete pictures and videos; tag for albums.- Share
Share pictures (print, email, save as Favorites) and videos (email, save as Favorites).  Set-Up
Customize your camera functions.
What Can I Do With My Pictures and Videos?
Install the software from the Kodak EasyShare software CD, then:
- Transfer
Transfer pictures and videos to your computer. - Share
Print pictures, order prints online, email pictures and videos. - Print
Print pictures directly to your home printer or Kodak EasyShare printer dock 4000. Order prints online from Ofoto (www.ofoto.com). Or purchase an optional Kodak secure digital (SD) card or multimedia card (MMC) and:- Automatically print to any printer with an SD/MMC slot
- Make prints at an SD/MMC-capable Kodak picture maker kiosk www.kodak.com/go/picturemaker
- Take the card to your local photo retailer for professional printing
- Organize
Use Favorites to organize and retrieve pictures on a computer. - Edit
Add special effects to your pictures, make a custom slide show, fix red-eye, crop, rotate, and much more.
Package Contents
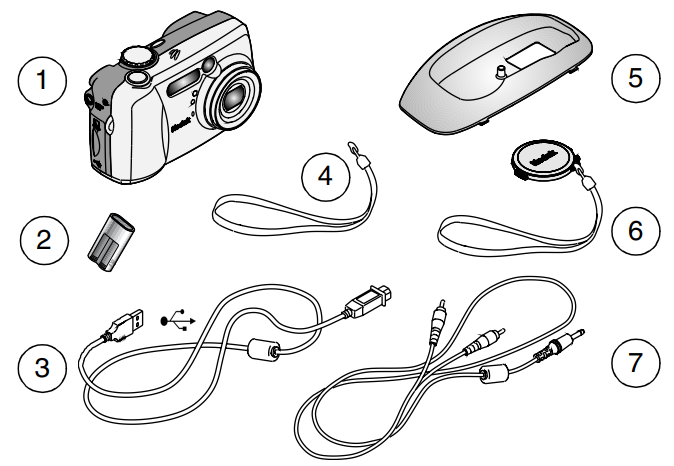
- Camera
- CRV3 or equivalent*
- USB cable 7 Audio/Video cable
- Wrist strap
- Custom camera dock insert (for EasyShare printer dock 4000 or EasyShare camera dock II)
- Lens cap with strap
Not shown: User’s Guide, Quick Start Guide, Kodak EasyShare software CD. (In some countries, the User’s Guide is provided on a CD only. Contents may change without notice.)
If your camera was packaged with a Kodak EasyShare camera dock II, a Kodak EasyShare Ni-MH rechargeable battery and AC power adapter are included.
Attaching the Wrist Strap
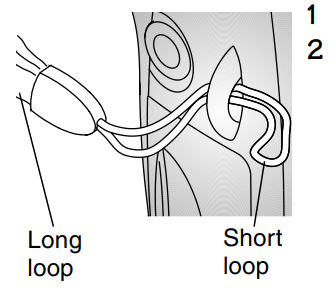
- Thread the wrist strap as shown.
- Thread the long loop through the short loop. Pull until secure.
Attaching the Lens Cap Strap
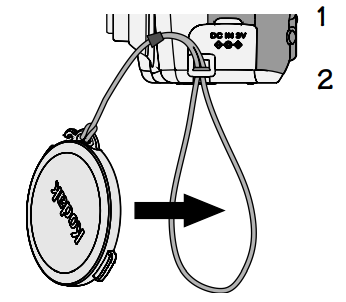
- Thread the lens cap string through the lens cap strap post.
- Thread the lens cap through the loop. Pull until secure.
Use the lens cap to protect the lens when camera is not in use.
Adding Optional Lenses
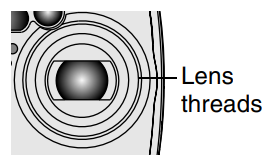
Lenses are available. Purchase accessories at a dealer of Kodak products. See https://www.kodak.com/go/dx4530accessories
Loading the Battery
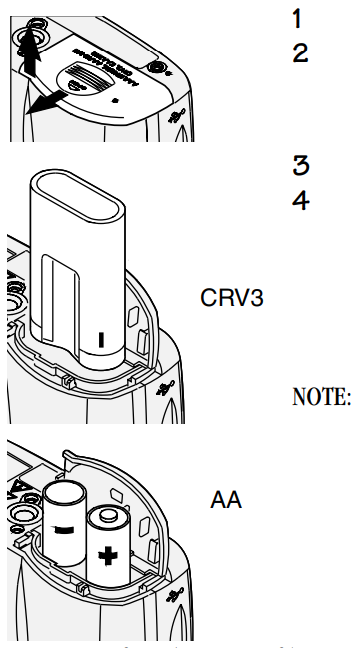
- Turn the Mode dial to Off.
- On the bottom of the camera, slide the battery door and lift to open.
- Insert the CRV3 battery as shown.
- Close the battery door.
Important Battery Information
The CRV3 battery is not rechargeable. For acceptable battery life, and to make sure your camera operates dependably, do not use alkaline batteries.
NOTE: If AA batteries were included with your camera, insert them as shown.
Mode Dial Settings
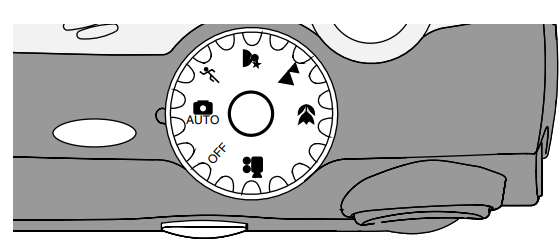
Icon | Mode | Purpose |
Off | Off | Turns off the camera. |
| Auto | For general picture-taking. Automatically sets exposureand focus. Flashfires if needed. | |
| Sport | For subjects thatare in motion. Shutterspeed is fast. Flash fires if needed. | |
| Night | For night scenes or low light conditions. Captures close and background subjects. Flash firesif needed. In dark scenes, the shutter speedis set between 1/30 and 1/2 second. Place camera on a flat, steadysurface or tripodto avoid camerashake. | |
| Landscape | For distant subjects. Flash does not fire unless you turn it on.* | |
| Close-up | For subjects 2.8 to 28 in. (7 to 70 cm) from the lens in wide angle,or 11 to 28 in.(28 to 70 cm) in telephoto. Flash does not fire. | |
| Video | Captures video with sound. Flash does not fire. |
Turning On the Camera
- Remove the lens cap.
If you do not remove the lens cap, it comes off automatically when you turn on the camera. Turn the Mode dial from Off to any other position.
The ready light blinks green while the camera performs a self-check.
When the ready light glows steady green, the camera is ready to take pictures (or videos, if the mode dial is set to ).
).
In Still and Video modes, a status area appears on the camera screen.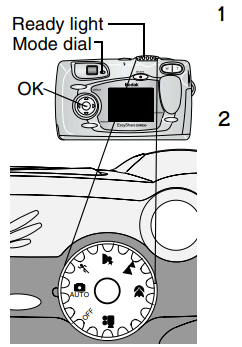
Changing the Display
To | Do This |
Turn Liveview on so thatthe camera screen can be usedas a viewfinder | Press the OK button. To turn it off, press the OK buttonagain. |
Change the Liveview setting so that it is on wheneverthe camera is on | See |
Turn the status area back on after it times out | Press ▼ |
Turn off the camera |
The camera completes operations thatare in process.
|
Setting the Date and Time
Setting the Date & Time, First Time
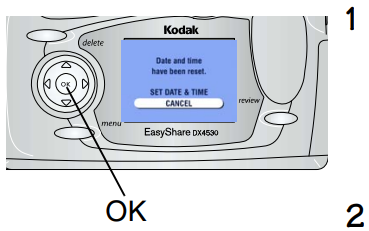
The Date and Time have been reset message appears the first time you turn on the camera or if the battery is removed for an extended time.
- SET DATE & TIME is highlighted. Press the OK button.
(Select Cancel to set the date and time at a later time.)
The Date & Time screen appears. Go to step 4 below, Setting the Date & Time, Anytime.
Setting the Date & Time, Anytime
- Turn on the camera. Press the Menu button.
- Press
 to highlight Setup, then press the OK button.
 - Press
 to highlight Date & Time, then press the OK button.
The date format is YYYY/MM/DD. The time is displayed in a 24-hour format. - Press to adjust the date and time. Press
 to advance to the next setting.
 - When finished, press the OK button.
Press
 the Menu button to exit the menu.
The setting remains until you change it.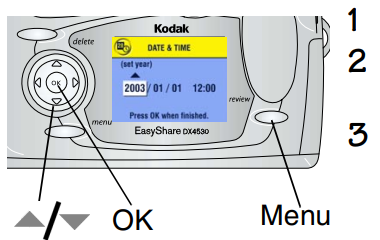
NOTE: Depending on your computer operating system, Kodak EasyShare software may allow your computer to automatically update the camera clock when you connect the camera. See the Kodak EasyShare software Help for details.
Checking Camera Status Icons
To check the current camera settings, turn the Mode dial from Off to any mode.

Status Icons (Top of Camera Screen)
Status icons depict enabled features and settings:
LT | ||||
Date stamp | Long time exposure | Exposure compensation | Self Timer | Flash mode |
 | 015 | 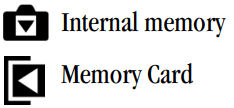 |
Quality | Pictures remaining | Current Storage location |
Screen Icons (Bottom of Camera Screen)
Screen icons depict the current mode or a battery concern:
Auto | Sport | Night | Landscape | Close-up | Review | Video |
Share | ||
Share | Low battery | Exhausted battery (blinking) |
Inserting an SD/MMC Card
Your camera has 32 MB of internal storage for pictures and videos. Optional SD/MMC cards provide removable, reusable storage.
CAUTION:
The card can only be inserted one way; forcing it may damage the camera or card.
Do not insert or remove a card when the green ready light is blinking; doing so may damage your pictures, card, or camera.
To insert an SD/MMC card:
- Turn off the camera.
- Open the card door.
- Orient the card as shown.
- Push the card into the slot to seat the connector.
- Close the door.
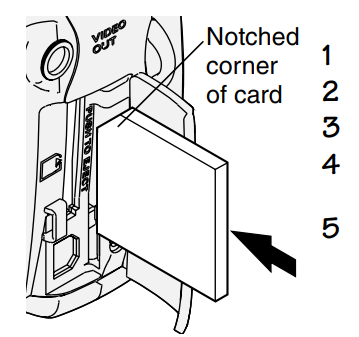
To remove the card, push it in, then release it. When the card is partially ejected, pull it out.
Choosing Internal Memory or SD/MMC Card
The camera offers two options for storing pictures and videos:
 Internal Memory —store pictures and videos in internal memory.
 SD/MMC Card —store as many pictures and videos as you like, depending on the size of the card. Purchase accessories at a dealer of Kodak products. See https://www.kodak.com/go/dx4530accessories
Managing Your Storage Location Setting
- Turn on the camera.
- Press the Menu button.
- Press to
 highlight Image Storage
 , then press the OK button.
 Press
 to highlight an option, then press the OK button:
Auto (default)—the camera uses the card if one is in the camera. If not, the camera uses internal memory.
Internal Memory—the camera always uses internal memory, even if a card is installed.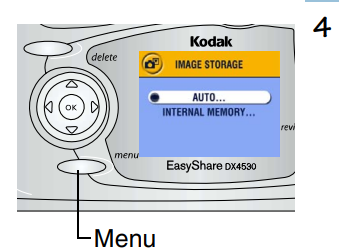
- Highlight Continue, then press the OK button again.
The setting remains until you change it and applies to all camera functions. - Press the Menu button to exit the menu.
Checking Your Storage Setting
In Still and Video modes, the storage location icon that appears in the status area indicates the camera’s storage location.
To check the location, either:
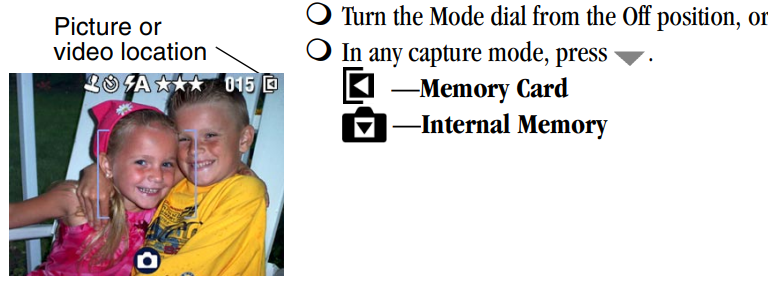
Checking a Picture or Video’s Location
In Review mode, the storage location icon that appears with a picture indicates the location of the picture or video and the camera setting.

Important Battery Information
Choose the replacement battery that fits your needs—and get the best performance.
Kodak Battery Replacement Types/Battery Life
Your camera can use the following types of batteries. Actual battery life may vary based on usage.
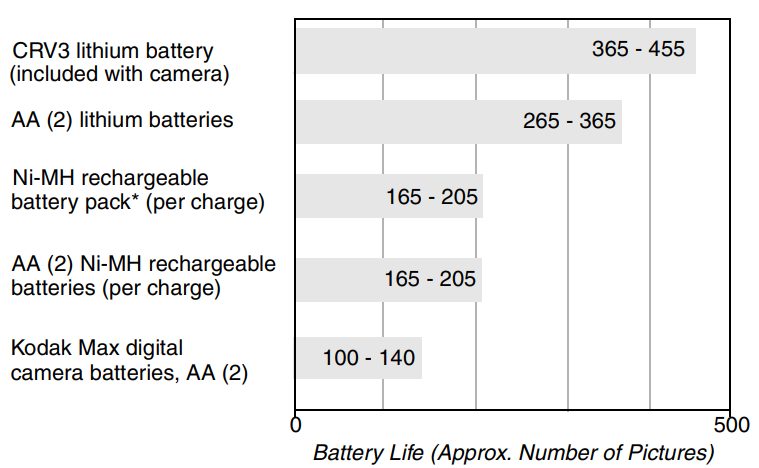
Included with the Kodak EasyShare camera dock II and printer dock 4000
We do not recommend or support alkaline batteries. For acceptable battery life, and to make sure your camera operates dependably, use the replacement batteries listed above.
Extending Battery Life
Limit the following activities that quickly deplete battery power:
- Reviewing your pictures on the camera screen (see page 37)
- Using Liveview (see page 20)
- Using Quickview (see page 21 and page 34).
- Excessive use of the flash
- Purchase an optional Kodak 3-volt AC adapter to power your camera (see page 95).
- Purchase an optional Kodak EasyShare camera dock II (see page 61). The camera dock II powers your camera, transfers pictures, and is a battery charger for its included Kodak EasyShare Ni-MH rechargeable battery pack.
- Purchase an optional Kodak EasyShare printer dock 4000 (see page 61). The printer dock 4000 powers your camera, makes 4 x 6 prints with or without a computer, transfers pictures, and is also a battery charger for its included Kodak EasyShare Ni-MH rechargeable battery pack.
- Dirt on the battery contacts can affect battery life. Wipe the contacts with a clean, dry cloth before loading batteries in the camera.
- Battery performance is reduced at temperatures below 41° F (5° C). Carry spare batteries when using your camera in cold weather, and keep them warm. Do not discard cold batteries that do not work; when they return to room temperature, they may be usable.
Battery Safety and Handling
- Do not allow batteries to touch metal objects, including coins. Otherwise, a battery may short circuit, discharge energy, become hot, or leak.
- For rechargeable battery disposal information, see the Rechargeable Battery Recycling Corporation Web site at www.rbrc.com.
Installing the Software
NOTE: This product was designed and manufactured to existing industry standards as of this product's release date. Future hardware and operating systems may or may not support this Kodak product. If you experience compatibility issues between this product and future hardware products or operating systems, contact your hardware or operating system manufacturer or retailer.
Windows System Requirements
- Personal computer running Windows 98, 98SE, ME, 2000, or XP OS
- 233 MHz processor or greater (300 MHz recommended for Windows 2000 and XP)
- 64 MB of available RAM (128 MB recommended)
- 100 MB of available hard disk space
- CD-ROM drive
- Built-in USB port
- Color monitor with a minimum resolution of 800 x 600 pixels; High Color (16-bit) or True Color (24-bit) recommended
- Internet access for online printing and emailing
Mac OS X System Requirements
- Macintosh computer with a G3 or G4 processor
- Mac OS 10.1.2, minimum
- 128 MB of available RAM
- 200 MB of available hard disk space
- CD-ROM drive
- Built-in USB port
- Color monitor with a minimum resolution of 800 x 600 pixels; thousands or millions of colors recommended
- Internet access for online printing and emailing
Mac OS 8.6 and 9.x System Requirements
- PowerPC-based Macintosh computer
- Mac OS 8.6/9.x
- 64 MB of available RAM
- 200 MB of available hard disk space
- CD-ROM drive
- Built-in USB port
- Color monitor with a minimum resolution of 800 x 600 pixels; thousands or millions of colors recommended
- Internet access for online printing and emailing
NOTE: Mac OS 8.6 and 9.x do not support the Share button functions. Mac OS
Install the Software
For information on the software applications included on the Kodak EasyShare software CD, click the Help button in the Kodak EasyShare software.
NOTE: If you computer is running Windows 2000, Windows XP Pro, or Mac OS X operating system, you need administrator privileges to install software. See your computer user’s guide.
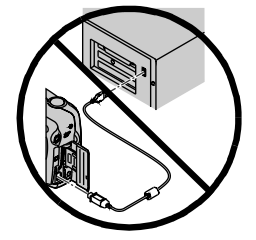
CAUTION
Install Kodak EasyShare software BEFORE connecting the camera or optional camera dock to the computer. Failure to do so may cause the software to load incorrectly.
- Before you begin, close all software applications that are open on your computer (including anti-virus software).
- Place the Kodak EasyShare software CD into the CD-ROM drive.
- Load the software:
- Windows OS-based computer—if the install window does not appear, choose Run from the Start menu and type d:\setup.exe where d is the drive letter that contains the CD.
- Mac OS 8.6 or 9.x—on the install window, click Continue.
Mac OS X—double-click the CD icon on the desktop, then click the Install icon.
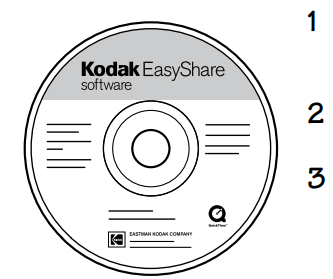
- Follow the on-screen instructions to install the software.
- Windows OS-based computers—select Complete to automatically install the most commonly used applications. Select Custom to choose the applications you wish to install.
- Mac OS 8.6 or 9.x—select Easy to automatically install the most commonly used applications.
- Mac OS X—follow the on-screen instructions.
NOTE: When prompted, take a few minutes to electronically register your camera and software. This lets you receive information regarding software updates and registers some of the products included with the camera. You must be connected to your Internet service provider to register electronically.
To register later, see www.kodak.com/go/register.
- If prompted, restart the computer. If you turned off anti-virus software, turn it back on. See the anti-virus software manual for details.
Setup Guide
To set up your Kodak EasyShare Zoom Digital Camera DX4530, follow these steps:
- Insert 2 AA batteries into the battery compartment.
- Insert an SD or MMC card into the card slot if you want additional storage.
- Turn on the camera using the power button.
- Set the date and time using the menu options.
- Adjust any other settings as desired (e.g., ISO, white balance).
- Connect the camera to your computer via USB to install the EasyShare software.
Connecting to the Computer
CAUTION
Install Kodak EasyShare software before connecting the camera or optional dock to the computer. Failure to do so may cause the software to load incorrectly.
Connecting to the Computer
You can transfer pictures and videos from the camera to the computer using either the provided USB cable or the optional Kodak EasyShare camera dock or camera dock II. See page 61 for connecting with a camera dock.
Transferring Pictures With the USB Cable
- Turn off the camera.
- Plug the labeled
 end of the USB cable into the labeled USB port on your computer.
 - Plug the other end of the USB cable into the labeled USB port on the camera.
An optional 3-volt AC adapter is available to save battery power (see page 95). Turn on the camera.
Kodak EasyShare software prompts you through the transfer process.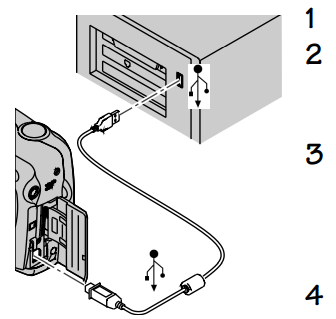
NOTE: You can also use a Kodak multi-card reader or Kodak SD multimedia card reader-writer to transfer your pictures. Purchase accessories at a dealer of Kodak products. See www.kodak.com/go/dx4530accessories.
Printing Pictures From Your Computer
For details on printing pictures from your computer, click the Help button in the Kodak EasyShare software.
Printing From an Optional SD/MMC Card
- Automatically print tagged pictures when you insert your card into a printer with an SD/MMC slot. See your printer User’s Guide for details.
- Make prints at an SD/MMC-capable Kodak picture maker. (We suggest contacting a location prior to visiting.)
- Take the card to your local photo retailer for professional printing.
Ordering Prints Online
Kodak EasyShare print service (provided by Ofoto www.ofoto.com) is just one of the many great online print services offered in the Kodak EasyShare software. You can easily:
- Upload your pictures.
- Edit, enhance, and add borders.
- Store pictures, and share them with family and friends.
- Order high-quality prints, photo greeting cards, frames, and albums—and have them delivered to your door.
Troubleshooting
When you have questions about your camera or camera dock II, start here. Additional technical information is available in the ReadMe file located on the Kodak EasyShare software CD. For updates to Troubleshooting information, see www.kodak.com/go/dx4530support.
Camera Problems
| Problem | Cause | Solution |
| Camera does not turn on. | Battery is not properly installed. | Remove and reinstall the batteries |
| Battery is not charged. | Replace or recharge the batteries | |
Lens cap is on, preventing lens from extending. | Remove the lens cap. | |
| Pictures remaining numberdoes not decrease after taking a picture. | The picture doesnot take up enough space to decrease the number. | The camera is operating normally. Continue taking pictures. |
Rechargeable Ni-MH battery pack has a short life. | There is dirt on the battery contacts. | Wipe the battery contacts with a clean,dry cloth before loading batteries in the camera. |
| The battery needsto be conditioned. |
EasyShare camera dock— When the charge light turns green, remove the camera from the dock. After a minimum of 5 minutes, placethe camera back on the dock. EasyShare cameradock II— When all 3 lights turngreen, remove the camera from the dock. Aftera minimum of 5 minutes, place the camera back on the dock
| |
Camera does not turn off; lens does not retract. | Alkaline batteries were installed in the camera. | Do not use alkaline batteries. Turn the Mode dial off, remove the alkaline batteries, and replace with an approved battery type . If the Mode dial is not off when you replace the batteries, the camera may not turn backon. In thatcase, turn the Modedial off, thenback on. |
| Shutter button does not work. | Camera is not turned on. | Turn on the camera |
The camera is processing a picture; the ready light (near the viewfinder) is blinking. | Wait until the light stops blinking before attempting to take another picture. | |
| The card or internal memory is full. | Transfer pictures to your computer deletepictures from the camera, switch storage locations , or insert a cardwith available memory
| |
| Stored pictures are damaged. | The card was removedwhen the ready light was blinking. | Make surethe ready lightis not blinking before removing the card. |
Part of the picture is missing. | Something was blocking thelens when the picture was taken. | Keep hands, fingers, or other objects away from the lens when taking pictures. |
Your eye or the picture was not centered correctly in the viewfinder or camera screen. | Leave space around subject when centering picture in viewfinder or camera screen. |
| In Review mode, you do not see a picture (or the expected picture) on the camera screen. | The camera may not be accessing the correct storage location. | Check the picture storage location setting |
| In Review mode, pictures are displayed as black screens. | Lens cap is on, preventing lens from extending. | Remove the lens cap. |
Picture orientation is not accurate. | The camera sensed that it was rotatedor tilted while the picture was taken. | Set the Orientation Sensor Turn off the Orientation Sensor when yoursubject is above or below you (suchas in thesky or on the floor). |
Camera freezes up when a card is inserted or removed. | Camera detects an error whenthe card was inserted or removed. | Turn the Modedial off, then back on. Make sure the camera is turned off before inserting or removing a card. |
| Picture is too dark. | Flash is not on or did not function. | Turn on the flash |
The subjectis too far away for the flash to have an effect. | Move so there is no more than 11.2 ft (3.4m) between the camera and the subject; 6.6 ft (2.0 m) in Telephoto. | |
| The subject is in frontof a bright light(backlit). | Use Fill flash or change your position so the lightis not behind the subject. | |
| Lighting condition is too dark. | Increase Exposure Compensation () or Long TimeExposure. | |
| Picture is too light. | The flash is not needed. | Change to Auto flash |
The subject wastoo close whenthe flash was used. | Move so thereis at least2.0 ft (0.6 m) between the cameraand the subject. | |
| The light sensor is covered. | Hold the cameraso your handsor other objects do not cover the light sensor. | |
| Lighting condition is too bright. | Decrease exposure compensation |
| Picture is not clear. | The lens is dirty. | Clean the lens |
| Subject too close when taking picture. | Move so thereis at least2.0 ft (0.6 m) between the cameraand the subject, or at least 2.8 in. (7.0 cm) in Close-up mode. | |
Subject or the camera moved while the picture was taken. | Hold the camera steadywhile taking the picture. | |
| The subject is too far away for the flash to be effective. | Move so there is no more than 11.2 ft (3.4m) between the camera and the subject; 6.6 ft (2.0 m) in Telephoto. | |
| Slide show does not run on external video device. | Video Out settingis incorrect. | Adjust the cameraVideo Out setting (NTSC or PAL, |
External device is set incorrectly. | Refer to the external device’s user’s guide. |
Camera/Computer Communications
Problem | Cause | Solution |
The computer cannot communicate with the camera. | Camera power is off. | Turn on the camera |
| Battery is not charged. | Replace or recharge the batteries | |
| Some Advanced Power Management utilities on laptops can turn off ports to save battery life. | See the PowerManagement section of your laptop user’s guide to disable this feature. | |
| USB cable is notsecurely connected. | Connect cable to camera and computer port | |
| Software is not installed. | Installthe software | |
| The Battery Monitoror similar software runs constantly. | Close that software before starting the Kodak EasyShare software. | |
Cannot transfer pictures to computer. The Add New Hardware Wizard cannot locate drivers. | Software is not installed on computer. | Disconnect USB cable(if using camera dock,disconnect cable and removecamera from dock). Install Kodak EasyShare software |
SD/MMC Cards and Internal Memory
Problem | Cause | Solution |
The camera does not recognize your SD/MMC card. | Card may not be SD/MMCcertified. | Purchase a certified SD/MMC card |
Card may be corrupt. | Reformat the card Caution: Formatting erases all pictures and videos, including protected files. | |
No card is inserted in camera or cardis not fully inserted. | Inserta card intothe card slot, then push to seat the connector | |
Camera freezes up when a card is inserted or removed. | Camera detects an error whenthe card was inserted or removed. | Turn the Mode dial off,then back on. Make sure the camera is off when inserting or removing a card. |
Memory card full. | Storage is full. | Transfer pictures and videosto the computer, then delete themfrom the camera. |
The maximum number of files or folders is reached (or other directory concern). | Transfer pictures and videos to the computer, thenformat the card or internal memory Caution: Formatting a card erases all pictures and videos, including protected files. (Formatting internal memory also erases email addresses. To restore addresses, see KodakEasyShare softwareHelp.) |
Camera Screen Messages
| Message | Cause | Solution |
| No imagesto display | There are no pictures in the current storage location. | Change yourpicture storage location setting. |
| Memory card requires formatting | Card is corrupted or formatted for another digital camera. | Insert a new card or format the card |
| Memory card cannot be read(Please format card or insert another card) | ||
| Internal memory requires formatting | Camera internal memory is corrupted. | Format the internal memory |
| Internal memory cannot be read (Please format internal memory) | ||
| No memory card(Files not copied) | No card in the camera. Your pictureswere not copied. | Insert a card. |
Not enough spaceto copyfiles (Files not copied) | There is not enough space in the location you are copying to (internal memoryor the card). | Delete pictures fromthe location you are copying to or insert a new card. |
Read only card,change to internal memoryto capture | Card in thecamera is write-protected. | To take a picture, inserta new card or change storage location to internal memory |
| Card is protected (Reset switch on card) | Switch on SD card is in write-protect position. | Reset the switch as shown on camera screen. |
Card is locked(Insert a new card) | Card is write-protected. | To take a picture, inserta new card or change storage location to internal memory |
| Card is unusable (Insert a new card) | Card is slow, corrupted, or unreadable. | Insert a newcard |
| Recording stopped. Record in internal memory (Card speed is slow) | Card cannot be used in the camera. | Change storage location to internal memor |
Memory card is full (Cannot save Share tagging) | There is no space remaining. | Insert a new card transfer pictures), or delete pictures |
| Internal memory is full (Cannot saveShare tagging) | Insert a card transfer pictures or delete pictures | |
| Date/Time entry screen appears automatically | This is the first timeyou turnedon the camera; or the batteries have been removed for an extended periodof time; or the batteries are exhausted. | Reset the clock |
| Unrecognized File Format | Camera cannot read the picture format. | Transfer the unreadable pictureto the computer or delete the picture |
| High camera temperature. (Camera will be turned off.) | The internal temperature of the camera is toohigh for the camera to operate. The viewfinder light glows red and the camera turns off in five seconds. | Leave the cameraoff for several minutes, then turn it back on. If the message reappears, repeat the sequence above until the message does not appear. |
| Memory Card is full | Thereis no morespace on the card in the camera. | Delete pictures fromthe card insert a new card, or change storage location to internal memory |
| Internal Memory is full | There is no morespace in the camera’s internal memory. | Delete pictures fromthe internalmemory or change storage location to Auto andinsert card |
No Address Bookin Camera | Address book has not been copied from thecomputer to the camera. | Create and copy address book from the computer. See Kodak EasyShare software Help. |
| Other error code | An error is detected. | Turn the Mode dial off, then backon. If the error appears again, call for service. |
Camera Ready Light Status
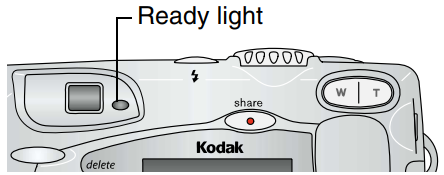
| Problem | Cause | Solution |
| Ready light doesnot turn on and the camera does not work. | Camera is not turned on. | Turn on the camera. |
Batteries are exhausted. | Replace or recharge the batteries. | |
| Mode dialwas on when batteries were reloaded. | Turn Mode dialoff, then back on. | |
| Ready light glows steady green. | Camerais on; ready to takea picture or video. | The camera is operating normally. |
| Ready light blinks red. | Batteries are lowor exhausted. | Replace or recharge the batteries. |
Card is too slow for Video mode. | Change your storage location to internal memory , or use a different card. |
| Ready light glows steady red. | Camera’s internal memory or cardis full. | Transfer pictures to your computer delete pictures from the camera, switch storage locations , or insert a cardwith available memory |
| Camera processing memory is full. | Wait. Resume picture taking when the light turns green. | |
Your card is read-only. | Change your storage location to internal memory or use a different card. | |
| Ready light blinks green. | Camera is starting up or picture is being saved. | Camera is operating normally. |
| Ready light blinks yellow. | Flash is not charged. | Wait. Resume picture taking when the lightstops blinking and turns green. |
Auto exposure or auto focus are not locked. | Release the Shutter button and recompose thepicture. |
Camera Dock II
Camera Dock II Problems
Problem | Cause | Solution |
Pictures are not transferred to the computer | AC adapter or USB cable is not securely connected. | Check the connections |
| Software is not installed. | Install the software | |
Computer needs to be restarted. | Restart the computer and try again. | |
| Camera was removed fromthe camera dock during picture transfer. | Replacethe camera on the camera dock and press the Connect button. | |
Connect button was notpressed. | Press the Connect button. |
Camera Dock II Light Status

| Camera Dock Power/Transfer Light | ||
| Light Status | Cause | Comment |
Light glows steady green | Camera is properly seated in the camera dock. | The camera andcamera dock are operating normally. |
| Light blinks green | Pictures and videos are being transferred to the computer. | |
| Light is off | Camera is notproperly seated in camera dock. | Remove the camera and re-seat it |
| Camera Dock Charging Lights | ||
| Light Status | Cause | Comment |
No lights | Charging has not started. | The camera is not seated in the camera dock Camera is turnedon. Turn offto begin charging. Rechargeable battery is not installed in camera. |
One green light | Battery is low. | The camerais charging. |
Two green lights | Battery is partially charged. | |
| Camera Dock Charging Lights | ||
| Light Status | Cause | Comment |
Three green lights | Battery is fully charged. | Charging resumes when necessary. |
Camera Dock Error Light | ||
Light Status | Cause | Comment |
One blinking red light | Battery is installed incorrectly. | Reinstall the battery |
The battery or connector pins are damaged. | Check for damage. | |
The camera and battery have been exposed to very highor low temperatures. | Slowly return the camera and battery to room temperature. | |
Kodak EasyShare Zoom Digital Camera DX4530 Pros & Cons
Pros:
- Ease of use with intuitive interface
- Good image quality for its time
- Versatile shooting modes
- Convenient EasyShare system for photo transfer and sharin
- Affordable price point at launch
Cons:
- Limited megapixel count compared to modern standards
- No image stabilization
- Battery life could be better
- No RAW image capture capability
- Slightly bulky design
Customer Reviews
Customer reviews for the Kodak EasyShare Zoom Digital Camera DX4530 were generally positive, with many users praising its ease of use and good image quality. Some common complaints included limited battery life and the lack of advanced features compared to more expensive models.
Faqs
What is the resolution of the Kodak?
How do I transfer photos from the Kodak DX4530 to my computer?
What type of memory cards does the DX4530 support?
Can I use rechargeable batteries with the Zoom Digital Camera?
What are some common shooting modes available on the Kodak EasyShare?
How do I set the date and time on my Kodak EasyShare Zoom Digital Camera DX4530?
Is there a built-in flash on the Zoom Digital Camera?
Can I use this camera for low-light photography?
Is the Kodak EasyShare Zoom Digital Camera DX4530 compatible with Mac computers?
Leave a Comment


_kodak_easyshare_zoom_digital_camera_dx4530.png)