How to Connect: Kodak Zoom Digital Camera DC280 User Guide
Content
Introduction
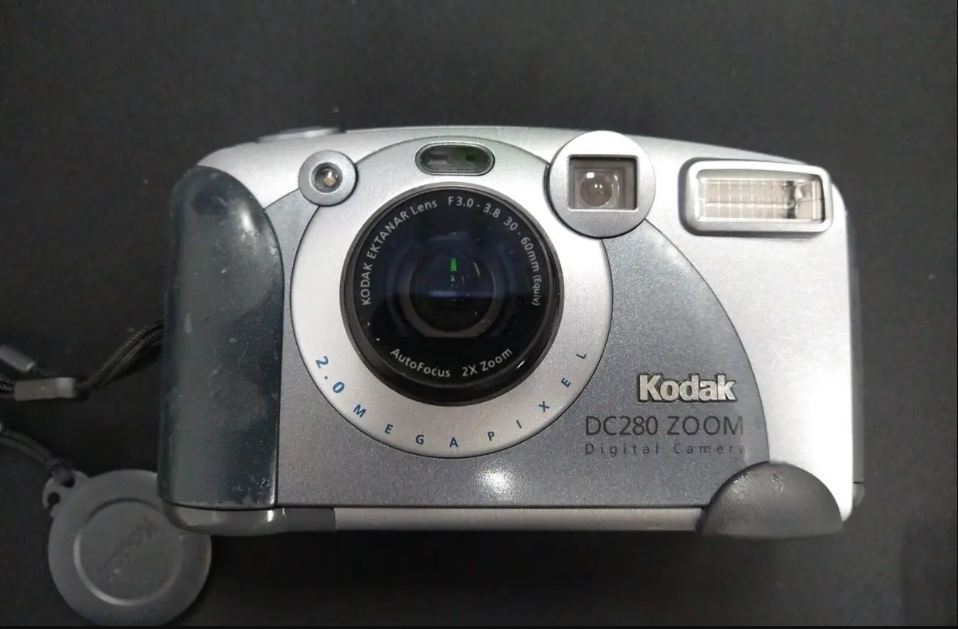
With its 2.0-megapixel CCD sensor, the DC280 produces crisp, detailed images that are appropriate for both regular use and exceptional events. Its 3x optical zoom lens makes it simple to take pictures of far-off subjects without sacrificing clarity. The camera supports both JPEG and TIFF picture formats for versatile photo management, and it has a 2-inch LCD screen for simple framing and shot evaluation. For photographers searching for a dependable and simple digital camera, the Kodak DC280 is a great option because of its built-in flash, several shooting modes, and small size.
DC280 Camera Specifications
- Pixel Resolution
- CCD 1901 x 1212 = 2.3 millions of pixels (total number of pixels)
- High 1760 x 1168=2,055,680
- Standard 896 x 592=530,432
- Color
- 24-bit, millions of colors
- Picture File Format
- Exif version 2.1 (JPEG base)
- Picture Storage
- External memory only: ATA compatible CompactFlash card
- Viewfinder
- Real image
- ASA/ISO Sensitivity
- 70
- Flash Range
- Wide 1.6 ft to 9.8 ft (0.5 to 3.0 m)
- TelePhoto 1.6 ft to 7.9 ft (0.5 to 2.4 m)
- Lens Type
- Optical quality glass
- Maximum Aperture
- Wide: F/3
- TelePhoto: F/3.8
- Zoom
- 6X: 2X Optical zoom, 3X Digital zoom
- Focal Length
- 30 to 60 mm (equivalent to 35mm camera)
- 6.5 to 13 mm (actual)
- Focus Distance
- Wide/TelePhoto: 1.6 ft (0.5 m) to infinity
- Close-Up: 0.82 ft (0.25 m) to 1.6 ft (0.5 m)
- Power
- Batteries AA size 1.5-volt alkaline, or AA size 1.2-volt Ni-MH rechargeable
- DC Input Kodak-specified AC adapter
- Tripod Socket
- .25 in. (.006 m) threaded
- Video Out
- NTSC or PAL
- Dimensions
- Width 5.2 in. (133 mm)
- Length 2.0 in. (52 mm)
- Height 3.0 in. (76 mm)
- Weight
- 12.1 oz. (342 g) without batteries
- Operating Temperature
- 32 to 104° F (0 to 40° C)
Getting Started
Congratulations on your purchase of the new 1.3 megapixel KODAK DC240 Zoom Digital Camera (DC240) or 2.0 megapixel KODAK DC280 Zoom Digital Camera (DC280)—the cameras that take pictures digitally, without the use of film. With your new camera, picture taking and print making have never been easier or faster. The possibilities are endless. Here are just a few examples of what you can do with your camera:
- Take digital pictures in unbelievable detail, color, and sharpness.
- Transfer your pictures to a computer for instant editing, enhancement, and placement into your document.
- E-mail your pictures in minutes to friends, family, and business associates anywhere in the world.
- Print high-quality pictures at home using KODAK Inkjet Photo Paper, or take your KODAK Picture Card to a KODAK Picture Maker System and create photo-quality enlargements with a touch of a button.
- Display your pictures to a large audience on a television or video monitor.
- Customize your pictures with a company logo or graphic using the KODAK DC240/DC280 Border Transfer Application.
Preparing to Take Pictures
Before you start taking pictures with your camera, you first need to install the batteries or connect a Kodak-specified AC adapter for power, and insert a KODAK Picture Card (camera memory card) into the camera.
Loading Batteries
Your camera uses four AA batteries to power the camera. For your convenience, two sets of batteries are included with your camera: four alkaline batteries, and four Ni-MH rechargeable batteries with battery charger. The alkaline batteries are provided so you can start using your camera immediately. The rechargeable batteries need to be charged first, before using them in the camera. Although both types of batteries work in your camera, do not mix different types of batteries in the camera at the same time. For information on guidelines for battery usage.

- Place your thumb on the battery door.
- Slide the battery door away from the camera.
- Insert the batteries as indicated on the battery cover, then close the battery door.
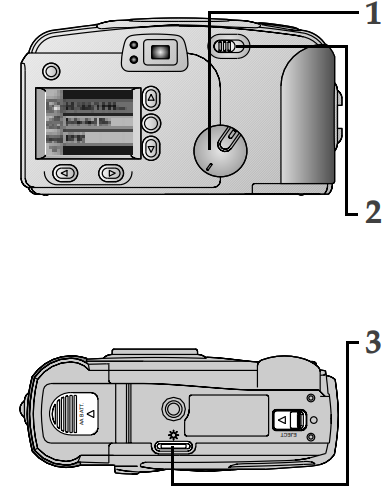
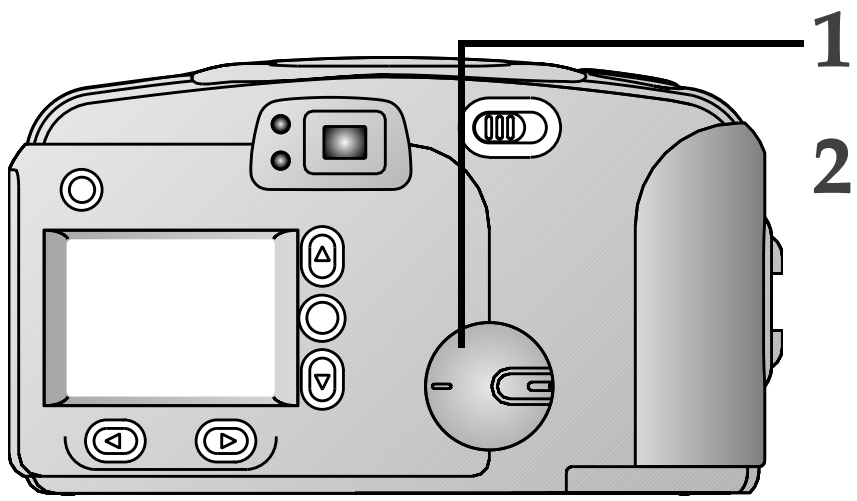
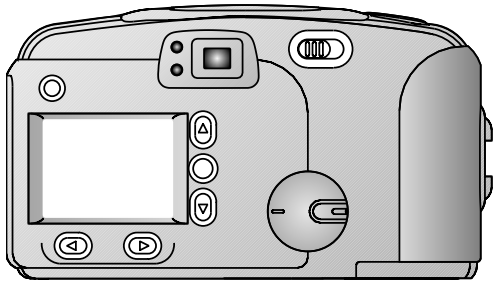
Turning the Camera On and Off
You turn the camera on and off using the POWER switch, located on the back of the camera.
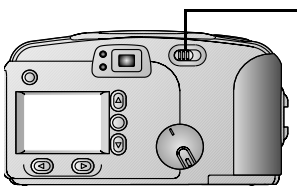
- To turn on the camera, slide the POWER switch to the right. The Status Display on top of the camera turns on.
- To turn off the camera, slide the POWER switch again to the right. The camera turns off when it is finished processing, deleting, or transferring the picture just taken.
Checking Batteries
So you are never caught with dead batteries, your camera indicates the power level of the batteries, in the form of a battery status symbol, which appears in the Status Display when you turn on the camera. For information on guidelines for battery usage.
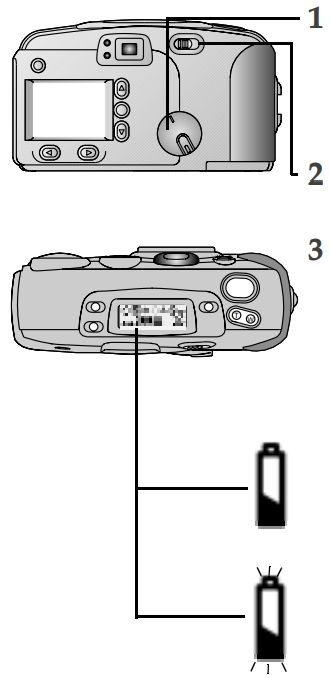
- Set the Mode dial to Capture, Review, or Camera Settings. The battery status symbol is not visible if you set the camera to Connect.
- Slide the POWER switch to the right to turn on the camera.
- Check the battery status symbol that appears in the Status Display.
- Full (No Icon)—indicates that batteries are charged and ready to use.
- Low—indicates batteries are not fully charged and will soon need to be replaced or recharged.
- Exhausted (blinking)—indicates batteries are too weak to power the camera and need to be replaced.
Using the Battery Charger
To ensure that you have a constant supply of freshly charged batteries, a battery charger and four AA Ni-MH rechargeable batteries are provided with some DC240/DC280 cameras. These batteries need to be charged before using and take up to eight hours to fully charge. So you are always prepared to take pictures, keep one set of rechargeable batteries in the camera, and an extra set charged, ready for use. You can purchase additional KODAK Ni-MH Rechargeable Batteries as an accessory. For details about available accessories, ask your dealer of Kodak products, or visit our Website at http://www.kodak.com/go/accessories.
- Verify that you are loading Ni-MH or Ni-Cd rechargeable batteries. If they are any other type, do not load them into the charger. This charger is for charging Ni-MH or Ni-Cd batteries only, with a maximum of 4 cells, and a maximum charge of 1450mAH. Do not charge non-rechargeable batteries.
Align the positive and negative ends of the batteries with the positive and negative contact points in the charger.
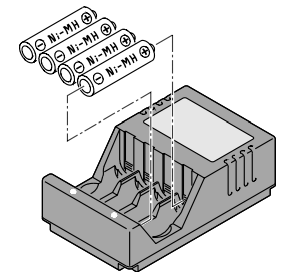
- Insert the batteries into the charger until the batteries snap in place.
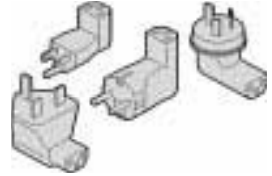
- Plug the charger into a power outlet. Depending on where you live, some battery chargers are supplied with power plugs that are not attached to the charger. If you have that type of charger, use the plug that matches your power outlet.
- Verify that the charge indicator lights on the charger turn on. If the lights do not turn on, verify that the batteries are inserted correctly. Batteries are fully charged when the charge indicator lights on the charger turn off, or after 8 hours of charging.
Unplug the charger and remove the batteries when charging is complete.
Using an AC Adapter
If you are taking pictures indoors or when the camera is connected to a computer, you may want to use a Kodak-specified AC adapter to help conserve battery power. It is important to use only a Kodak-specified AC adapter with your DC240/DC280 camera. If you do not have a Kodak-specified AC adapter, you can purchase one as an accessory. For details about available accessories, ask your dealer of Kodak products, or visit our Website at http://www.kodak.com/go/accessories.
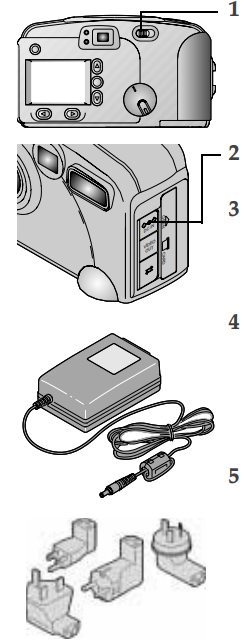
- Slide the POWER switch to the right to turn off the camera.
- Open the AC adapter port door on the side of the camera.
- Plug the appropriate end of the AC adapter into the port on the camera.
- Plug the AC adapter into the power outlet. Depending on where you live, some AC adapters are supplied with power plugs that are not attached. If you have that type of adapter, use the type of plug that matches your power outlet.
- Slide the POWER switch to the right to turn on the camera. The camera is now powered by the AC adapter.
Inserting a Camera Memory Card
Your camera comes with a KODAK Picture Card (camera memory card), that is used to store pictures you take with the camera. The camera memory card, also referred to as a CompactFlash card, is removable and reusable for easy storage and transfer of your pictures. Before you can take pictures, you need to insert a camera memory card into the camera. You can purchase additional KODAK Picture Cards as an accessory. For details about available accessories, ask your dealer of Kodak products, or visit our Website at http://www.kodak.com/go/accessories.
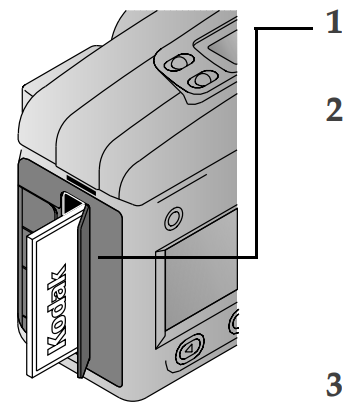
- Open the camera memory card door on the camera.
- Hold the camera memory card so the connection end is pointed at the camera, and the card label with the MB size is facing toward the back of the camera. The camera memory card can only be inserted one way into the camera. Forcing the card may damage your camera.
- Push the camera memory card all of the way into the card slot and close the door.
Removing a Camera Memory Card
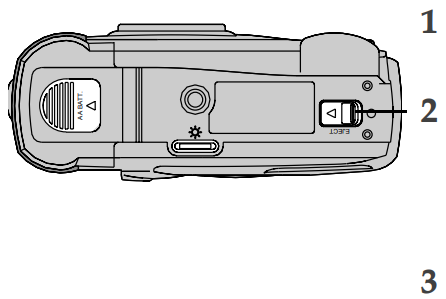
- Open the camera memory card door on the camera.
- Slide the EJECT button in the direction of the arrow. The camera memory card partially slides out of the slot.
- Remove the camera memory card from the slot and close the door.
WARNING: Do not insert or eject a camera memory card when the camera memory card light, located above the card door, is blinking. This may damage your pictures or camera. Use only certified camera memory cards that carry the CompactFlash logo.
Setting the Clock on Your Camera
Your camera has a built-in clock that maintains the date and time in a 24-hour format. The camera clock needs to be set if you plan to use the Date Stamp feature, which imprints the date on your picture.
- Set the Mode dial to Camera Setup.
Slide the POWER switch to the right to turn on the camera. The main Camera Setup screen appears.
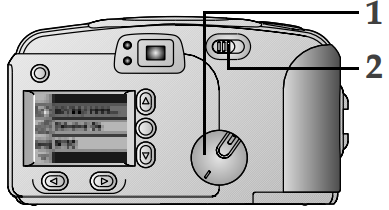
- Press a
 button until the icon
  is highlighted.
 - Press the DO-IT button. The Date/Time screen appears.
- Press a
 buttons to adjust the date and time fields.
 Press the DO-IT button. The camera accepts the setting and returns to the main Camera Setup screen. If you remove the batteries from the camera for an extended period of time, or the batteries become exhausted, you may need to reset the clock.
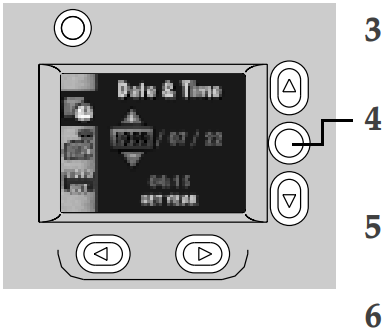
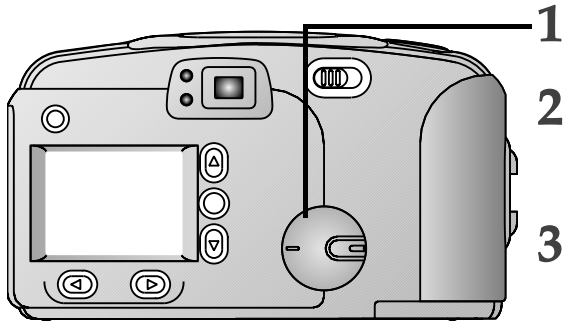
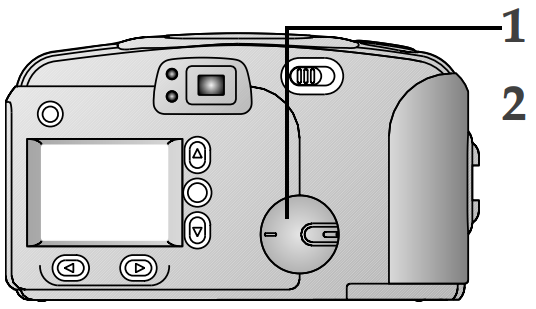
Adjusting the LCD Brightness
You can adjust the brightness of the color LCD to suit your particular needs.
- Set the Mode dial to Camera Setup. You can set the Mode dial to any setting you want as long as there is an image in the LCD screen to adjust the brightness level.
- Slide the POWER switch to the right to turn on the camera. The main Camera Setup screen appears.
- Use the dial on the bottom of the camera to adjust the brightness of the LCD screen to the brightness level you want.
Installing Your Software
The KODAK DC240/DC280 Installer Software (Installer) included with your camera contains software for Windows-based personal computers and Macintosh computers. These applications provide a variety of features that let you access and use the pictures stored on the camera memory card. Detailed information on using the software can be found in the online help supplied with each software application.
Windows-Based System Requirements
- Windows 95, Windows 98, or Windows NT 4.0 operating system.
- Personal computer with Pentium 90-MHz microprocessor (minimum) with CD-ROM drive.
- Color display monitor with a minimum resolution of 640 x 480 (1024 x 768 preferred) and thousands of colors recommended.
- 16 MB or more of available RAM.
- 70 MB of hard disk space available.
- Available serial port, USB port (Windows 98 only), or CF card reader.
Macintosh System Requirements
- PowerPC-based Macintosh computer, with CD-ROM drive.
- Operating system 7.6.1 or later for serial connection. Operating system 8.5.1 or later for USB connection.
- Color display monitor with a minimum resolution of 640 x 480 (1024 x 768 preferred) and 8-bit color (16-bit or 24-bit recommended).
- 16 MB or more of available RAM.
- 70 MB of hard disk space available.
- Available serial port, USB port, or CF card reader.
Kodak Software for Windows-Based Computers
There are four Kodak software applications supplied with the camera for use on a Windows-based computer. They are:
- KODAK DC240/DC280 Camera Mounter Software (Mounter)
provides an easy way to view pictures from the camera memory card and copy them to your computer. - KODAK DC240/DC280 Digital Access Software (TWAIN Acquire)
provides a quick way to view and copy pictures from the camera memory card to a TWAIN-compliant host software program, such as ADOBE Photoshop or ADOBE PhotoDeluxe. - KODAK DC240/DC280 Camera Controls Software (Camera Controls)
lets you change camera, capture, and communications settings from the computer. - KODAK DC240/DC280 Border Transfer Application (Border)
lets you convert existing BMP files into the border file format (BDR) and copy the borders to the camera memory card and to the hard disk.
Software Overview
A brief overview of the software is listed below. Detailed information on the software is available in the online help for each application.
| Feature | Mounter | TWAIN Acquire | Camera Controls | Border |
|---|---|---|---|---|
| View thumbnail images | ✔ | ✔ | ||
| Transfer pictures | ✔ | ✔ | ||
| Display picture information | ✔ | ✔ | ||
| Open pictures on hard drive | ✔ | |||
| Access Camera Controls | ✔ | ✔ | ✔ | |
| Take a picture | ✔ | |||
| Delete pictures | ✔ | ✔ | ||
| Format camera memory card | ✔ | ✔ | ||
| Add borders to camera memory card | ✔ | |||
| Copy borders to hard disk | ✔ |
Kodak Software for Macintosh Computers
There are three Kodak software applications supplied with the camera for use on a Macintosh computer. They are:
- KODAK DC240/DC280 Picture Transfer Application (Picture Transfer)
provides an easy way to view pictures from the camera memory card and copy them to your computer. - KODAK DC240/DC280 Digital Access Software (Plug-In Acquire)
provides a quick way to view and copy pictures from the camera memory card to any application that supports the ADOBE Photoshop plug-in module, such as ADOBE Photoshop or ADOBE PhotoDeluxe. - KODAK DC240/DC280 Border Transfer Application (Border)
lets you convert existing BMP and PICT files into the border file format (BDR) and copy the borders to the camera memory card and to the hard disk.
Software Overview
A brief overview of the software is listed below. Detailed information on the software is available in the online help for each application.
| Feature | Picture Transfer | Plug-In Acquire | Border |
|---|---|---|---|
| View thumbnail images | ✔ | ✔ | |
| Transfer pictures | ✔ | ✔ | |
| Display picture information | ✔ | ✔ | |
| Change camera settings | ✔ | ||
| Take a picture | ✔ | ||
| Change camera Capture settings | ✔ | ||
| Delete pictures | ✔ | ✔ | |
| Add borders to camera memory card | ✔ | ||
| Copy borders to hard disk | ✔ |
Installing the Software
While the Installer is automatically loading your software, take a few minutes to fill out and send in the camera product registration card. This allows you to receive information regarding software updates and registers some of the products included with the camera.
- Close all other software programs before starting the Installer.
- Place the Installer CD into the CD-ROM drive.
- Load the software.
- On a Windows-based computer—if Auto Play is enabled, the first install window automatically appears. If the first install window does not automatically appear, choose Run from the Start menu. In the Run dialog box, type the drive letter that contains the CD and type \setup.exe. For example: d:\setup.exe
- On a Macintosh computer—double-click the Installer icon.
- Follow the on-screen instructions to install the software.
- If prompted, restart the computer when the software installation is complete.
Detailed information on all the Kodak software is included in the online help for each application.
Description
Carrying the Kodak Zoom Digital Camera DC280 is effortless due to its small size and low weight. The LCD screen of the camera is big enough to view your images comfortably, and it features a sleek and fashionable appearance. You can go up close to your subject with the camera's 3x optical zoom lens, and you can zoom in even more with the 4x digital zoom. The camera's included flash is ideal for shooting in dimly lit areas, and sharing your images with friends and family is a breeze thanks to the EasyShare program.
Connecting Your Camera
In order for you to transfer pictures taken with your camera, you first need to connect the camera to your computer. The camera can communicate with your computer using:
- RS-232 serial cable connection for Windows-based computers.
- Serial cable or adapter plug for Macintosh computers.
- Universal Serial Bus (USB) cable connection for both Windows 98-based personal computers and Macintosh computers.
- Card reader. If you do not have a card reader, you can purchase one as an accessory. For details about available accessories, ask a dealer of Kodak products, or visit our Website at http://www.kodak.com/go/accessories.
Once the camera is connected to a computer and any required software is installed, you are ready to transfer pictures from the camera to your computer. Refer to the online help for information on each software application supplied with the camera.
Using a Serial Cable Connection
The most common means of connecting the camera to your computer is by serial cable connection. When connecting the camera, it is a good idea to use a Kodak-specified AC adapter (see page 5).
Connecting to a Windows-Based Computer
An RS-232 serial cable is provided so you can connect your camera to a Windows-based computer.
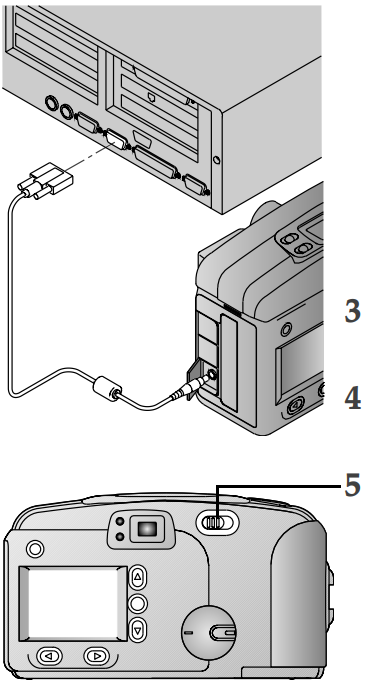
- Set the Mode dial to Connect.
Plug the appropriate end of the serial cable into an available 9-pin serial port on the computer. Serial ports are usually labeled COM1 and COM2, or A and B. If your computer has a 25-pin port, you need to use a 9-pin adapter (available at your local computer store) and attach it to the port before attaching the serial cable to the computer. If the ports are not labeled, see your computer User’s Guide for a diagram that illustrates all of the external ports.
- Open the serial/USB port door on the side of the camera.
- Plug the other end of the serial cable into the camera serial port.
Slide the POWER switch to the right to turn on the camera. If you get a message on your computer stating that you are not connected, refer to the Serial.PDF document installed with the software, or the online help for troubleshooting information.
Connecting to a Macintosh Computer
Either a serial cable for a Macintosh computer or adapter plug for use with the RS-232 serial cable is provided so you can connect your camera through a serial port on a Macintosh computer.
- Set the Mode dial to Connect.
- Connect the serial port adapter plug into the 9-pin end of the serial cable.
Plug the adapter end of the serial cable into an available serial port on the back of the computer. If your camera came with a serial cable for a Macintosh computer instead of the serial adapter plug, connect the end of the serial cable labeled MAC into the available serial port on the back of the computer. Serial ports on Macintosh computers are usually referred to as modem or printer ports. If the ports are not labeled, see your computer User’s Guide for a diagram that illustrates all of the external ports.
- Open the serial/USB port door on the side of the camera.
Plug the other end of the serial cable into the camera serial port.
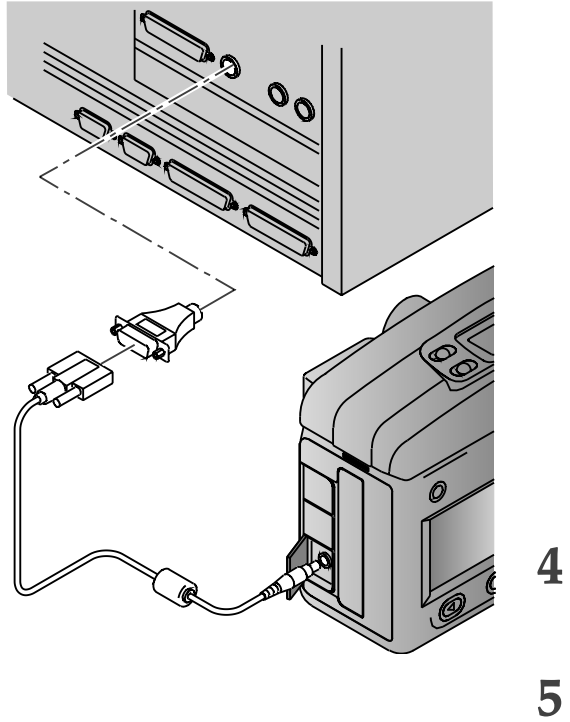
Slide the POWER switch to the right to turn on the camera. If you get a message on your computer stating that you are not connected, refer to the Connect.PDF document installed with the software, or the online help for troubleshooting information.

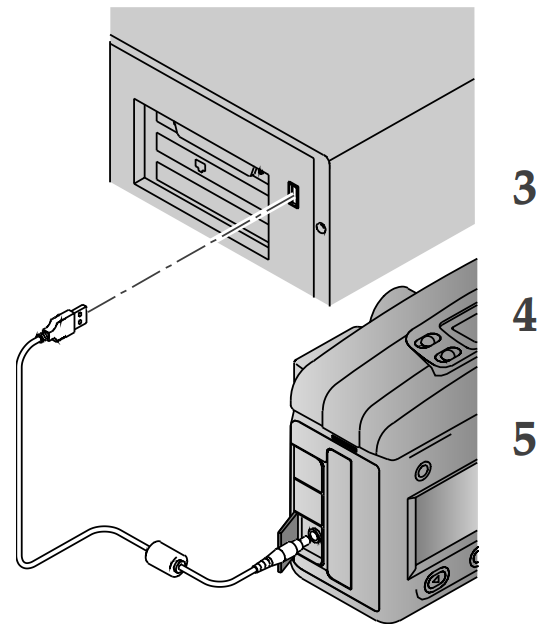
Using a USB Cable Connection
If you have a personal computer and are running Windows 98, or a Macintosh computer, you may be able to connect the camera using a Universal Serial Bus connection. The USB interface provides an easy and faster alternative to serial cable connection. However, since USB connections are relatively new, Kodak only recommends and supports using the camera with the systems listed above. When connecting the camera, it is a good idea to use a Kodak-specified AC adapter.
- Set the Mode dial to Connect.
Plug the appropriate end of USB cable into the port on the computer with the USB symbol. If the port is not labeled, see your computer User’s Guide for a diagram that illustrates all of the external ports.
- Open the serial/USB port door on the side of the camera.
- Plug the other end of the USB cable into the camera serial/USB port.
Slide the POWER switch to the right to turn on the camera. If you get a message on your computer stating that you are not connected, refer to the USB.PDF document installed with the software, or the online help for troubleshooting information.
Starting the Kodak Software for Windows-Based Computers
With the camera connected to your computer, you are now ready to open and use the software that you installed in Chapter 6. For detailed information on using the software, refer to the online help for each application.
Opening Mounter Software
- Double-click on the My Computer icon. The My Computer window appears.
- Double-click on the Camera icon. The Camera Memory Card window appears listing individual files.
Opening Digital Access Software (TWAIN Acquire)
- Open a TWAIN-compliant application, such as ADOBE Photoshop or ADOBE PhotoDeluxe.
- Choose File –> TWAIN Source.
- Select KODAK DC240/DC280 Zoom Acquire.
- Choose File –> TWAIN Acquire. The main Digital Access window appears.
Opening Camera Controls Software
Double-click on the Camera Control icon on the desktop to open the main Camera Controls window.
Opening Border Transfer Software
From the Windows Task bar click on Start –> Programs –> DC240/DC280 –> Border Transfer Application. The main Border Transfer window appears.
Starting the Kodak Software for Macintosh Computers
With the camera connected to your computer, you are now ready to open and use the software that you installed in Chapter 6. For detailed information on using the software, refer to the online help for each application.
Opening Picture Transfer Application
- In the KODAK DC240/DC280 Folder, double-click on the Picture Transfer Application folder. The Picture Transfer icon appears.
- Double-click on the Picture Transfer icon. The main Picture Transfer window appears.
Opening Digital Access Software (Plug-In Acquire)
- Open a Plug-In-compliant application, such as ADOBE Photoshop or ADOBE PhotoDeluxe.
- Choose File –> Acquire –> KODAK DC240/DC280 Acquire. The main Digital Access window appears.
Opening Border Transfer Software
- In the DC240/DC280 Folder, double-click on the Border Transfer Application folder.
- Double-click on the Border Transfer icon. The main Border Transfer window appears.
Navigating to Your Pictures
Pictures are stored on the camera memory card according to a standard agreed upon by many camera manufacturers. This standard allows you to use the camera memory card in different cameras.
Each Kodak application supplied on the Installer CD guides you to your pictures on the camera memory card; however, if you use a card reader to retrieve your pictures or you cannot locate your pictures using the software provided, the following description of the camera file structure may be helpful.
- Root level folder is named \DCIM. Each time you turn on the camera or insert a camera memory card, any empty folders within the \DCIM folder are removed.
- Typically, all pictures taken with the camera are stored in the \DCIM\100DC240 folder for the DC240 camera or \DCIM\100DC280 folder for the DC280 folder.
- Pictures are numbered in the order in which they are taken. The first picture is named DCP_0001.JPG, which is stored in the \DCIM\100DC240 folder for the DC240 or \DCIM\100DC280 folder for the DC280.
- When you transfer pictures to the computer, or delete pictures from the camera memory card, the camera uses consecutive numbers for subsequent pictures. For example, if the last picture taken was DCP_0007.JPG, the next picture is DCP_0008.JPG.
- When you insert the camera memory card into another DC240/DC280 camera, the next picture is derived by incrementing either the highest existing picture number, or the highest picture number previously taken by that camera.
- Once you take picture DCP_9999.JPG in the \DCIM\100DC240 folder or \DCIM\100DC280 folder, subsequent pictures will appear in a new folder (\DCIM\101DC240 or \DCIM\101DC280) on the camera memory card, beginning with picture DCP_0001.JPG.
- If you use the camera memory card in a camera other than the DC240/DC280 camera, and that camera manufacturer adheres to this file structure standard, the \DCIM folder will contain a folder named by that camera. Any pictures taken with that camera are stored in the folder using the naming conventions established by the manufacturer. For more information, refer to the documentation that accompanied that camera.
Setup Guide
To set up the Kodak Zoom Digital Camera DC280, follow these steps:
- Put the memory card and batteries into the camera.
- Slide the power switch to the "on" position to turn on the camera.
- To view the camera's settings, use the "menu" button.
- To choose the settings you wish to utilize, use the arrow keys to scroll through the menu selections.
- To save your settings, click the "OK" button.
Tips
There may be times when questions arise from using your camera. This chapter can point you in the right direction for finding the answers quickly, so you can continue using your camera.
Connecting with Your Camera
If you are getting messages on your computer that state you are not connected, refer to the PDF documents installed with the software, or the online help for troubleshooting information. If you are connecting to a:
- Windows-based Serial connection—refer to Serial.PDF
- Windows-based USB connection—refer to USB.PDF
- Macintosh computer—refer to Connect.PDF
Communicating with the Computer
If the camera cannot communicate with your computer you may need to adjust the port and/or speed settings. If you are using a Windows-based computer, the port and speed setting can be adjusted using the KODAK DC240/DC280 Camera Controls Software, or the KODAK DC240/DC280 Digital Access Software (TWAIN Acquire). If you are using a Macintosh computer, the port and speed settings can be adjusted using the KODAK DC240/DC280 Digital Access Software (Plug-In Acquire), or the KODAK DC240/DC280 Picture Transfer Application. Information on using these applications can be found in the online help for each software application.
Adjusting Your Monitor for Better Viewing
Your monitor display settings may need to be adjusted to view pictures from the camera. Refer to your computer’s User’s Guide for information on how to adjust your monitor’s display settings.
Getting Better Results from Your Printer
You may notice that the colors on your computer screen do not always match those in your documents or prints. This is because monitors and printers use different color systems.
You may be able to achieve more predictable results in your printed documents by:
- Improving the quality of your paper. Copier paper may not offer the same results as coated paper or paper made especially for inkjet printers.
- Adjusting your printer software settings.
- Using fresh ink cartridges. Do not use ink cartridges beyond their life expectancy.
Remember these few tips when it comes time to print your document:
- Color printing takes more time. More complex pictures increase the printing and drying time.
- Color printing is more memory intensive than black and white. If your computer gives you an insufficient memory message, you may need to close some applications, change some settings, or add additional memory.
- Color prints may not photocopy as clearly as black and white. If you plan to photocopy documents, you should consider printing the document in grayscale. This setting is usually changed from the Print dialog box.
- Resizing the picture to a smaller size or printing the picture on glossy paper may increase the quality of the print.
To improve the quality of your prints, you may want to print your pictures on KODAK Inkjet Snapshot Paper (Snapshot Paper). Snapshot Paper is made to work with most inkjet printers to give you clearer, crisper, and more detailed images on your prints.
General Maintenance and Safety
- To keep from damaging your camera, avoid exposing it to moisture and extreme temperatures.
- Clean the outside of the camera by wiping with a clean, dry cloth. Never use harsh or abrasive cleaners or organic solvents on the camera or any of its parts.
- Do not allow any chemicals, such as suntan lotion to come into contact with the painted surface of the camera.
- Never disassemble or touch the inside of the camera. This could result in electrical shock.
- If you notice smoke or a strange smell coming from the camera, immediately turn off the camera, wait a few minutes until the camera cools, and then remove the batteries.
- Clean the lens and back LCD screen:
- Do not use cleaning solutions unless they are designed specifically for camera lenses. Do not wipe the camera lens or LCD screen with chemically treated eyeglass lens tissue as it may scratch the lens.
- Blow gently on the lens or LCD screen to remove dust and dirt.
- Moisten the lens or LCD screen by breathing lightly on it.
- Wipe the lens or LCD screen gently with a soft, lint-free cloth or an untreated lens-cleaning tissue.
Service agreements are available in some countries. Please contact a dealer of Kodak products for more information.
Using Your Batteries
- Kodak recommends KODAK Photolife AA Alkaline Batteries, or KODAK Photolife AA Ni-MH Rechargeable Batteries for use in the camera.
- Remove the batteries when the camera is stored for extended periods of time.
- Always follow your battery manufacturer’s directions fully. Do not attempt to disassemble, short circuit, or subject the battery to high temperature or fire.
- Your camera has been designed to operate correctly using a variety of AA-size batteries currently available. These include 1.5-volt alkaline and rechargeable 1.2-volt Nickel Metal Hydride (Ni-MH).
- Replace all batteries of a set at the same time. New batteries should not be mixed with used ones. Do not mix rechargeable and nonrechargeable batteries. Do not mix alkaline or Ni-MH types of batteries. Do not mix different grades or brands of batteries. Failure to observe this precaution may result in some batteries in a set being driven beyond their normal exhaust point and increase their possibility of leakage.
- NOT ALL BATTERIES ARE CREATED EQUAL! Battery life depends significantly on age, usage conditions, type, brand, and camera. Digital camera requirements are very demanding on batteries. Not all batteries perform well under these challenging conditions. In Kodak lab tests, Ni-MH rechargeable batteries delivered outstanding results in a variety of conditions. Ni-MH batteries are designed for high-demand devices, such as digital cameras, and do not exhibit the “memory” effects seen with other rechargeable technologies.
- If you elect to use alkaline batteries in your camera, you will obtain better performance from “photo-flash grade” alkaline batteries, such as KODAK PHOTOLIFE alkaline batteries. These types of batteries last more than twice as long in digital cameras as ordinary alkaline batteries. Alkaline batteries are not rechargeable, do not attempt to recharge them in the battery charger.
- When using your camera on battery power, we recommend you limit continuous LCD Preview or Review to less than 10-minutes per session. If you are using the camera for longer periods, it is recommended that you do so with the camera powered by the AC adapter.
When disposing of batteries, follow the manufacturer’s instructions and any local and national regulations. Kodak suggests customers take advantage of any community battery recycling programs that may exist in your area. Contact your local waste remover or recycler for details.
Caution Hot Surface
- When removing batteries, allow to cool before touching, since the batteries may be hot.
Battery Charger Tips:
- For charging Ni-Cd or Ni-MH batteries only, with a maximum of 4 cells, and a maximum charge of 1450mAH.
- Do not charge nonrechargeable batteries.
Troubleshooting
If you are experiencing difficulties with your camera, check the following table for possible solutions.
Additional technical information is available in the ReadMe file located in the KODAK DC240/DC280 folder.
| Problem | Cause | Solution |
|---|---|---|
| The image on your monitor is jagged or inappropriately colored. | Monitor is not set correctly. | Adjust your monitor display settings. Refer to your computer’s User’s Guide for details. |
| The camera does not recognize your camera memory card. | The camera memory card may not be CompactFlash certified. | Purchase a certified CompactFlash camera memory card. See page 6. |
| The camera memory card may be corrupt or formatted for use in other digital cameras. | Reformat the camera memory card. See page 48. | |
| Camera memory card is not inserted in camera. | Insert a camera memory card. See page 6. | |
| Computer cannot communicate with the camera. | Camera power is off. | Turn on the camera. See page 2. |
| The Mode dial is not set to Connect. | Set the Mode dial to Connect. | |
| Some Advanced Power Management utilities on laptops can turn off ports to save battery life. | See the Power Management section of your laptop User’s Guide to disable this feature. | |
| Conflict with another serial device, such as a modem or PDA | Refer to the serial communication or corresponding section of your computer modem, PDA, and/or operating system User’s Guide. | |
| Camera is not connected to serial or USB cable, or cable is not connected to the computer serial or USB port. | Connect serial or USB cable to camera and computer port. Refer to the online help, or see Chapter 7, “Connecting Your Camera” on page 61. | |
| Port settings in software may be set to the incorrect COM port. | Change the COM port settings to Auto-Search or to a specific COM port. See the online help. | |
| Ready light does not turn on and the camera does not work. | Batteries are low or dead. | Batteries need to be replaced (see page 2), or recharged (see page 4). |
| Camera is not turned on. | Turn on the camera. See page 2. | |
| Red ready light comes on and camera does not take a picture. | Batteries are low. | Batteries need to be replaced (see page 2), or recharged (see page 4). |
| Camera memory card is full. | Transfer pictures to your computer, delete pictures on the card (see page 39), or insert a card with available memory (see page 6). | |
| Red ready light is blinking. | Flash is not charged. | Wait for the flash to charge. |
| Green ready light is blinking and camera takes a picture. | Auto Focus is not locked. | Release the SHUTTER button and recompose your picture. See page 11. |
| Green ready light is blinking and camera does not take a picture. | Picture is being processed and saved to camera memory card. | Wait for the picture to complete processing. |
| SHUTTER button does not work. | Camera is not turned on. | Turn on the camera. See page 2. |
| Mode dial is not set to Capture. | Set the Mode dial to Capture. | |
| Ready light is blinking. Camera is processing picture. | Wait until Ready light stops blinking before attempting to take another picture. | |
| The Status Display reads Full. The camera memory card is full. | Transfer pictures to your computer, delete pictures on the card (see page 39), or insert a card with available memory (see page 6). | |
| Camera does not turn on. | Batteries are not properly installed. | Remove and reinstall the batteries. See page 2. |
| Batteries are low or dead. | Batteries need to be replaced (see page 2), or recharged (see page 4). | |
| Part of the picture is missing. | Something was blocking the lens when the picture was taken. | Keep hands, fingers, or other objects away from the lens when taking pictures. |
| Your eye or the picture was not centered correctly in the viewfinder. | Leave space around subject when centering picture in viewfinder. | |
| Camera Close-Up is activated without using Preview. | Activate Preview when using the Close-Up feature. See page 17. | |
| Picture is too dark. | Flash is not on or did not function. | Turn on the flash. See page 15. Check the flash default setting. See page 51. |
| The subject is too far away for the flash to have an effect. | Move so there is no more than 13 ft (4.0 m) between the camera and the subject. | |
| The subject is in front of a bright light. | Change your position so the light is not behind the subject. | |
| The Exposure Compensation is set incorrectly. | Increase the Exposure Compensation. See page 22. Check the Exposure Compensation default setting. See page 53. | |
| The camera Metering setting is set to the Center-Weighted. | Change the Metering setting to Multi-Pattern. See page 28. | |
| Picture is too light. | The flash is not needed. | Change to Auto flash. See page 15. Check the flash default setting. See page 51. |
| The subject is too close when the flash was used. | Move so there is at least 1.6 ft (0.5 m) between the camera and the subject. | |
| The light sensor is covered. | Hold the camera so your hands or other objects do not cover the light sensor. | |
| The Exposure Compensation is set incorrectly. | Decrease the Exposure Compensation. See page 22. Check the Exposure Compensation default setting. See page 53. | |
| Stored pictures are damaged. | The camera memory card was removed when the Ready light was blinking. | Make sure the Ready light is not blinking before removing the card. |
| Picture is black and white, sepia toned, or has too much contrast. | The Effects setting is set incorrectly. | Change the Effects setting to No Effects. See page 24. Check the Effects default setting. See page 54. |
| Pictures remaining number does not decrease after taking a picture. | The image Resolution and Quality settings do not take up sufficient space to decrease the picture remaining number. | The camera is operating normally. Continue taking pictures. |
| Picture is not clear. | The lens is dirty. | Clean the lens. See page 90. |
| Subject too close when taking picture. | Stand at least .82 ft (.25m) in wide angle, 1.6 ft (.5m) in telephoto. | |
| Subject or the camera moved while the picture was taken. | Hold camera steady until the picture is taken. | |
| The subject is too far away for the flash to be effective. | Move so the subject is less than 13 ft (4.0 m) away. | |
| The Sharpness setting may be set incorrectly. | Change the Sharpness setting to Standard. See page 30. | |
| Picture is tinted green, blue, or red-orange. | The White Balance setting is set incorrectly. | Change the White Balance setting to Auto. See page 27. Check the White Balance default setting. See page 52. |
| LCD Messages | ||
| Memory Card is Full. | Memory card is full and cannot hold additional pictures. | Transfer pictures to your computer, delete pictures on the card (see page 39), or insert a card with available memory (see page 6). |
| No Memory Card Available. | There is no memory card inserted in the camera. | Insert a memory card into the camera. See page 6. |
| Memory Card is Corrupted/Unreadable. | Memory card is corrupted. | Insert a new (see page 6) or reformat the memory card (see page 48). |
| Camera needs service. | The camera is malfunctioning. | Have the camera serviced. |
Pros & Cons
Pros
- Small and light in weight
- 4x digital zoom and 3x optical zoom lens
- Big LCD display
- Simple to employ
- Reasonable cost
Cons
- low resolution in contrast to cameras of today
- Not connected to Bluetooth or Wi-Fi
- Restricted memory size
- Absence of manual controls
Customer Reviews
The Kodak Zoom Digital Camera DC280 has received positive reviews from users for its user-friendly features and small size. Nonetheless, the camera's low resolution and small memory capacity have drawn criticism from some. Reviews of the camera have generally been favorable due to its dependability and price.
Most Common Complaints
Its low resolution and small memory capacity are the most frequently voiced concerns regarding the Kodak Zoom Digital Camera DC280. Additionally, a few users have complained about problems with the LCD screen and battery life of the camera.
Faqs
Which kind of memory card is compatible with the Kodak?
What is the process for moving pictures from the Kodak DC280 to my PC?
What is the Kodak battery life?
How do I adjust the Kodak Zoom Digital Camera DC280 image resolution?
What are the Kodak Zoom Digital Camera primary features?
Does the Kodak Zoom Camera come with an integrated flash?
How can I clean my Kodak DC280 lens?
Can I use the Kodak Zoom Digital Camera DC280 with any current operating system?
How can I adjust the Kodak date and time?
Which add-ons come with the Kodak?
Leave a Comment