Makita Brushcutter Attachment EM403MP Manual | Assembling & Operations
Content
Introduction
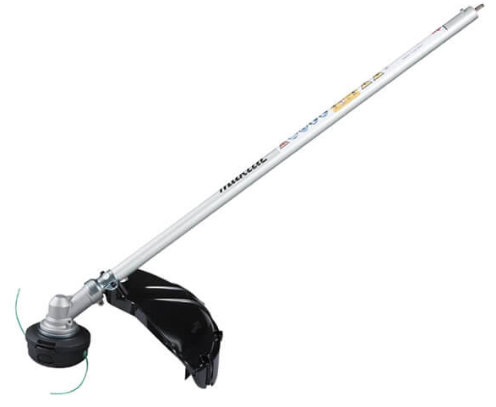
The Makita Brushcutter Attachment EM403MP is a versatile and powerful tool that is designed to make landscaping and gardening tasks easier and more efficient. This attachment is compatible with select Makita brushcutters, providing users with the ability to convert their brushcutter into a powerful edger or trimmer. The EM403MP attachment features a 9-inch diameter cutting swath, a bump-feed line advance system, and an adjustable handle for comfortable use. The estimated price of the Makita Brushcutter Attachment EM403MP is around $150 to $200, and it was launched in the market in 2021.
SPECIFICATIONS
Model: | EM403MP | EM404MP | EM405MP | EM406MP | |
Dimensions: length x width x height (without cutting tool) | 876 mm x 392 mm x 225 mm (34-1/2″ x 15-1/2″x 8-7/8″) | 876 mm x 187 mm x 232 mm (34-1/2″ x 7-3/8″x 9-1/8″) | |||
Net weight | 1.5 kg (3.3 lbs) | 1.3 kg (2.8 lbs) | |||
Cutting diameter | Metal blade | 230 mm (9″) | - | ||
Nylon cutting head | 420 mm (16.5″) | ||||
Gear ratio | 14:19 | 13:21 | 14:19 | 13:21 | |
- Due to our continuing program of research and development, the specifications herein are subject to change without notice.
- Specifications may differ from country to country.
- Weight according to EPTA-Procedure 01/2014
Approved power unit
This attachment is approved to use only with the following power unit(s):
- EX2650LH Multi function power head
- DUX60 Cordless multi function power head
- XUX01 Cordless multi function power head
WARNING: Never use the attachment with non-approved power unit. Non-approved combination may cause serious injury.
PARTS DESCRIPTION
EM403MP, EM404MP
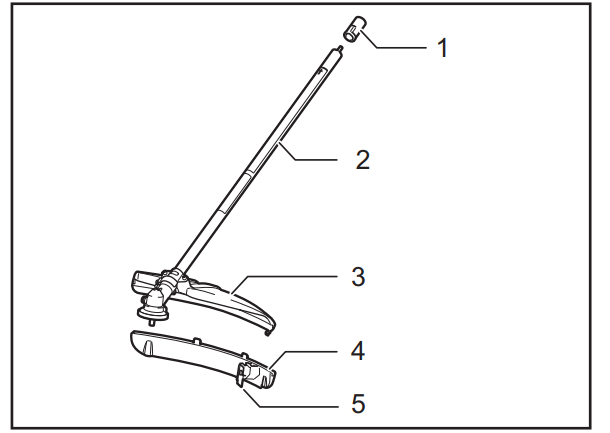
- Cap
- Pipe
- Protector (universal type)
- Protector extension 5. Cutter
EM405MP, EM406MP
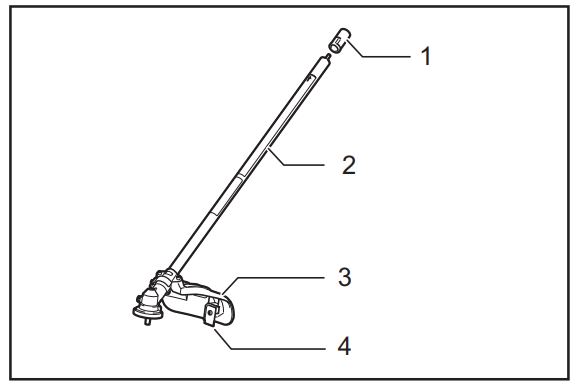
- Cap
- Pipe
- Protector (narrow type)
- Cutter
ASSEMBLY
WARNING
- Before assembling or adjusting the equipment, switch off the motor and remove the spark plug cap or battery cartridge. Otherwise the cutting tool or other parts may move and result in serious injury.
- Before handling cutting blade, wear protective gloves. During the assembly or adjustment, your fingers may contact with the cutting blade and it may cause serious injury.
- When assembling or adjust-ing the equipment, always put it down. Assembling or adjusting the equipment in an upright position may result in serious injury.
- Follow the warnings and precautions in the chapter “SAFETY WARNINGS” and the instruction manual of the power unit.
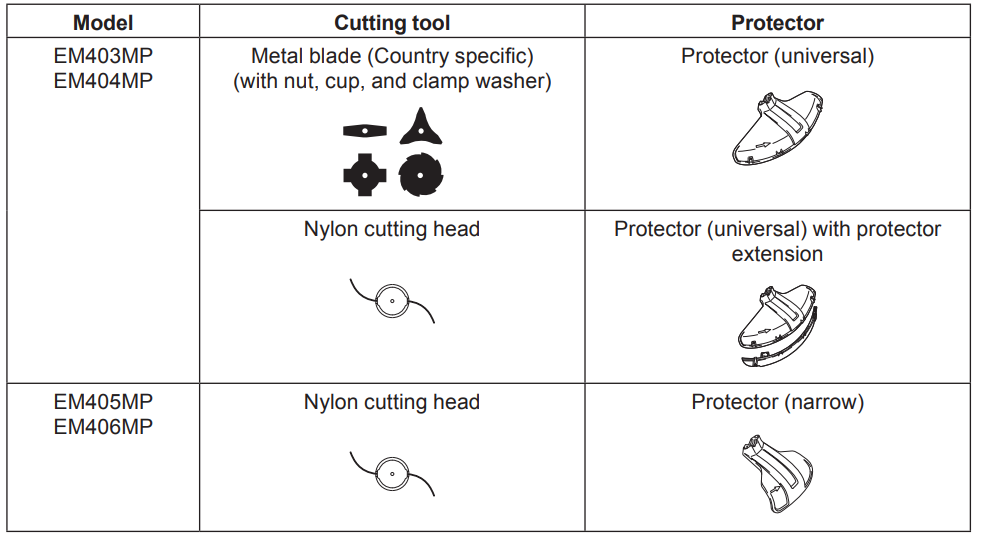
Correct combination of the cutting tool and the protector
CAUTION: Always use the correct combination of cutting tool and protector. The wrong protector may not protect you from flying debris and stones. It can also affect the balance of the tool and result in serious personal injury.
Installing the protector (cutting tool guard)
WARNING
- Do not use a cutting tool without an appropriate protector at any time.
- Always use the cutting tool with the correct combination of the protector. Otherwise contact with a cutting tool may cause serious injury.
NOTICE: Periodically tighten the bolts on the protector. Tighten the right and left bolts evenly so that the gap between the clamp and the protector is constant.
Fix the protector to the clamp with bolts.
Protector (universal type)
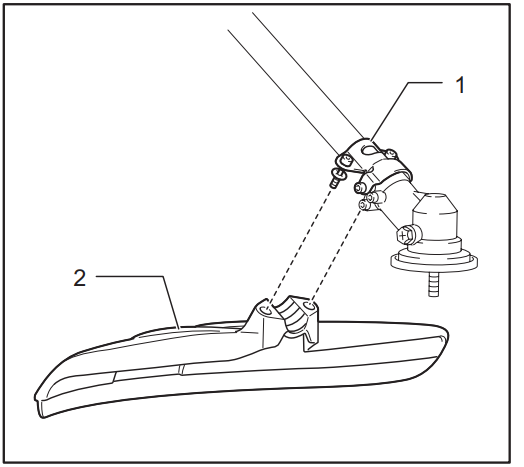
- Clamp
- Protector
Protector (narrow type)
.png)
- Clamp
- Protector
- Cutter
CAUTION: Be careful not to injure yourself with the cutter mounted on the protector.
NOTE: The cutter on the protector keeps the nylon cord best length for cutting.
For EM403MP and EM404MP
To install the protector extension, insert the protector extension to the protector and then snap the clips on. Make sure that the tabs on the protector extension fit into the slots on the protector.
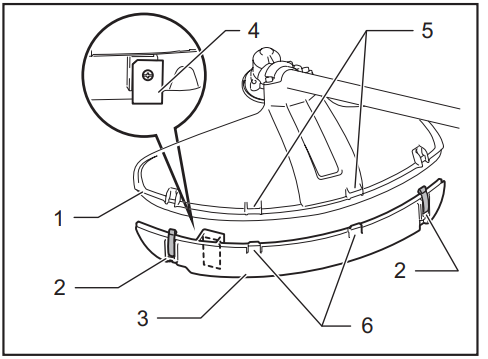
- Protector (universal type)
- Clip
- Protector extension
- Cutter (inside)
- Slot
- Tab
To remove the protector extension from the protector, unclasp the clips and pull the protector extension out.
CAUTION
- Make sure to push in the protector extension until it is fully inserted. Otherwise the protector extension may fall and result in personal injury.
- Be careful not to injure your-self with the cutter mounted on the protector extension.
Installing the cutting tool
CAUTION
- Be sure to use genuine MAKITA cutting tools.
- Make sure to remove the hex wrench after installation.
- When installing the cutting tool, turn the tool upside down for ease of the procedure.
Installing the metal blade
For EM403MP and EM404MP
CAUTION
- When handling the metal blade, always wear gloves and put the blade cover on the blade.
- The outside diameter of the metal blade must be 230 mm (9″). Never use any blades larger than 230 mm (9″) in out-side diameter.
- The metal blade must be well polished, free of cracks or breakage. If the metal blade hits against a stone during operation, stop the motor and check the blade immediately.
- Polish or replace the metal blade every three hours of operation.
- Always use the supplied wrench(es) to remove or to install the blade.
Applicable blade
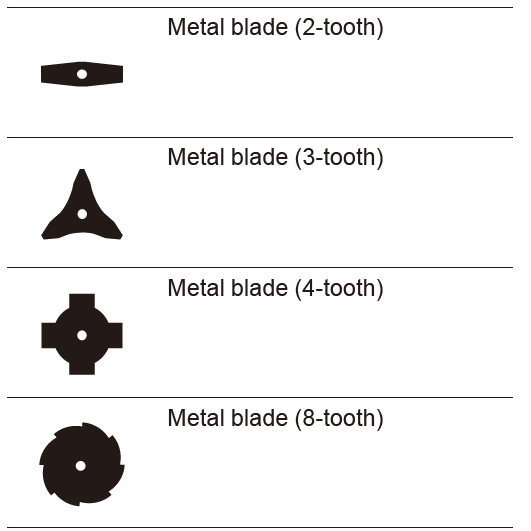
- Insert the receive washer into the shaft.
- Insert the hex wrench through the hole in the gear case to lock the shaft. Rotate the shaft until the hex wrench is fully inserted.
- Mount the metal blade onto the receive washer.
- Install the clamp washer and cup, and then tighten the nut securely. Tightening torque: 16 - 23 N•m
- Remove the hex wrench.
OPERATION
WARNING
- Follow the warnings and precautions in the chapter “SAFETY WARNINGS” and the instruction manual of the power unit.
- If the cutting tool moves at idle, adjust the idle speed of the engine down. Otherwise you cannot stop the cutting tool by throttle off and it may cause serious injury.
Adjusting the hanger position and shoulder harness
WARNING: Do not use the tool if you cannot adjust the hanger position and shoulder harness length within the range as illustrated. Using the tool with improper weight balance may bring the cutting tool upward and result in personal injury.
When replacing an accessory with another, the weight balance of the equipment may change. In such case, adjust the hanger position and shoul-der harness length as follows.
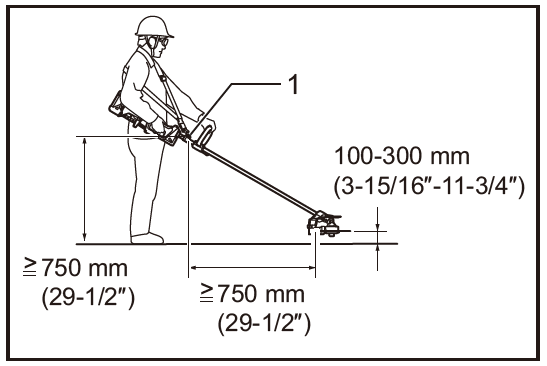
- Hanger
To change the hanger position, loosen the fixing screw on the hanger and then move the hanger (A). Adjust the hanger position and shoulder harness length so that:
- the hanger positions 750 mm (29-1/2″) or higher from the ground,
- the cutting tool positions 100 mm (3-15/16″) to 300 mm (11-3/4″) high from the ground and,
- the unguarded part of cutting tool is horizon-tally 750 mm (29-1/2″) or further away from the hanger.
After adjusting the hanger position, tighten the screw with a wrench or screwdriver (depending on the power unit) securely.
Using a nylon cutting head
During operation, use the tip of the nylon cutting cord for cut. As the nylon cutting cord is worn and shortened with the cutting operation, the operator needs to feed it manually. To feed the nylon cutting cord, tap the nylon cutting head on the ground while it rotates around 6,000/min.
NOTE: If the nylon cutting cord does not feed out, rewind it. Refer to the chapter “MAINTENANCE.”
MAINTENANCE
WARNING
- Before inspecting or maintaining the equipment, switch of the motor and remove the spark plug cap or battery cartridge. Otherwise the cutting tool or other parts may move and result in serious injury.
- When inspecting or maintaining the equipment, always put it down. Assembling or adjusting the equipment in an upright position may result in serious injury.
- Follow the warnings and precautions in the chapter “SAFETY WARNINGS” and the instruction manual of the power unit.
- Never use gasoline, benzine, thinner, alcohol or the like. Discoloration, deformation or cracks may result.
Interval of inspection and maintenance
Operating hour | Before Operation | Daily (10h) | 30h | |
Whole unit | Visually inspect for damaged parts |
√ | - | - |
All fixing screws and nuts | Tighten |
√ | - | - |
Gear case | Supply grease | - | - |
√ |
Drive axle | Supply grease | - | - |
√ |
Cutter blade | Visually inspect for damage |
√ |
√ | - |
Power unit | Refer to the instruction manual of the power unit | |||
Pros & Cons
Pros
- Versatile and can be used as an edger or trimmer
- Powerful 9-inch diameter cutting swath
- Bump-feed line advance system for easy line replacement
- Adjustable handle for comfortable use
- Compatible with select Makita brush-cutters
Cons
- May be expensive for some users
- Compatible only with select Makita brush-cutters
- Some users may find it heavy to use for extended periods
- May require frequent line replacement
TROUBLESHOOTING
Before asking for repairs, conduct your own inspection first. If you find a problem that is not explained in the manual, do not attempt to dismantle the machine. Instead, ask Makita Authorized Service Centers, always using Makita replacement parts for repairs.
State of abnormality | Probable cause (malfunction) | Remedy |
Motor does not start. | - | Refer to theinstruction manual of the power unit. |
Motor stops soon. | - | Refer to theinstruction manual of the power unit. |
Motor speed does not increase. | - | Refer to theinstruction manual of the power unit. |
Cutting tool doesnot rotate. | Loose attachment of the cut- ting tool | Tighten securely. |
| Cutting toolcaught a twig. | Remove foreign matter | |
| Abnormal drive system | Contact an authorized service center for repairs. | |
Main unit vibrates abnor- mally.
immediately. | Broken, bent or worn cutting tool | Replace the cutting tool. |
| Loose attachment of the cut- ting tool | Tighten securely. | |
| One end of nylon cutting cord has beenbroken and the nyloncutting head got unbalanced. | Feed the nylon cuttingcord with tap- ping the nylon cutting head on the ground. | |
| Irregular attachment of cut- ting tool | Attach properly. | |
| Abnormal drive system | Contact an authorized service center for repairs. | |
Cutter blade does notstop immediately.
immediately. | The powerunit does notwork properly. | Refer to theinstruction manual of the power unit. |
The nyloncutting cord does not feed. | The cordis used up or tan- gled in the spool. | Rewind the cord. |
The nyloncutting cord is not cut off at the correct length. | The cord cutter on the protec- tor is damaged or missing. | Contact an authorized service center for repairs. |
| The cord extends pastthe protector. | Rewind the cord. |
Customer Reviews
Customers who have used the Makita Brushcutter Attachment EM403MP have given it positive reviews, praising its versatility and power. Many users have said that the attachment has made their landscaping and gardening tasks easier and more efficient. However, some users have complained about the attachment's weight and have said that it may require frequent line replacement. Overall, the Makita Brushcutter Attachment EM403MP has received positive feedback from customers, with an average rating of 4.5 out of 5 stars.
Faqs
What is the Makita Brushcutter Attachment EM403MP used for?
What is the price of the Makita Brushcutter Attachment EM403MP?
Is the Makita Brushcutter Attachment EM403MP compatible with all Makita brushcutters?
What is the cutting swath of the Makita Brushcutter Attachment EM403MP?
Does the Makita Brushcutter Attachment EM403MP have an adjustable handle?
How do you replace the line on the Makita Brushcutter Attachment EM403MP?
How much does the Makita Brushcutter Attachment EM403MP weigh?
What is the warranty period for the Makita Brushcutter Attachment EM403MP?
Can the line on the Makita Brushcutter Attachment EM403MP be replaced with a heavier gauge line?
Is the Makita Brushcutter Attachment EM403MP easy to use?
Leave a Comment
