
How to Use: Razor Mighty Max Battery Dune Buggy 25143511 User Guide
Content
Razor Mighty Max Battery Dune Buggy 25143511
Introduction
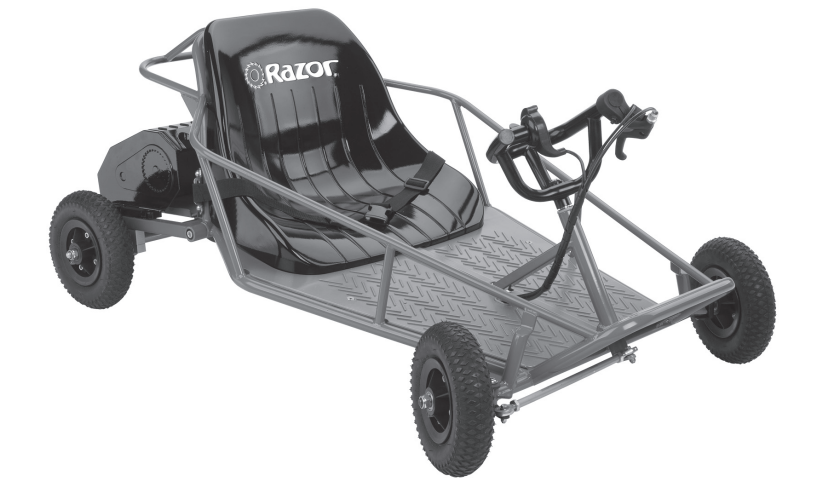
The Razor Mighty Max Battery Dune Buggy 25143511 is an exciting and durable electric vehicle designed for young adventurers. This dune buggy is part of Razor's lineup of high-quality, battery-powered toys that combine fun and safety. The Mighty Max is suitable for children aged 3 and above, making it an excellent choice for kids who are just starting to explore the world of powered vehicles.
With its sturdy construction and robust design, the Razor Mighty Max can handle various terrain types, including grass, dirt, and smooth surfaces. The vehicle is powered by a rechargeable 6V battery, providing a runtime of up to 40 minutes on a single charge. The estimated price for this model is around $150, making it an affordable option for parents looking to introduce their children to motorized fun.
The Razor Mighty Max was launched as part of Razor's ongoing commitment to innovation and safety in children's toys. With its easy-to-use controls and parental features such as a safety flag and adjustable speed settings, this dune buggy is perfect for backyard adventures or trips to the park.
Safety Reminders
- Loose Parts: Check and secure all fasteners before every ride. There should not be any unusual rattles or sounds from loose parts or broken components. If you are not sure, ask an experienced mechanic to check.
- Brake: Check the brake for proper function. When you squeeze the lever, the brake should provide positive braking action. When you apply the brake with the speed control on, the brake cut-off switch will stop the motor.
- Frame, Fork and Steering Wheel: Check for cracks or broken connections. Although broken frames are rare, it is possible for an aggressive driver to bash into a curb or wall and wreck and bend or break a frame. Get in the habit of inspecting yours regularly.
- Tire Inflation: Periodically inspect the tires for excess wear, and regularly check the tire pressure and re-inflate as necessary. If you get a flat tire, the inner tube can be patched or a new tube can be purchased from Razor or an authorized repair center.
- Safety Gear: Always wear proper protective equipment such as an approved safety helmet. Elbow pads and kneepads are recommended. Always wear shoes (lace-up shoes with rubber soles), never drive barefooted or in sandals, and keep shoelaces tied and out of the way of the wheels, motor and drive system.
Before You Begin
Required Tools
Some tools may be supplied; however, we recommend the use of mechanic’s grade tools. Use the supplied tools only as a last resort.
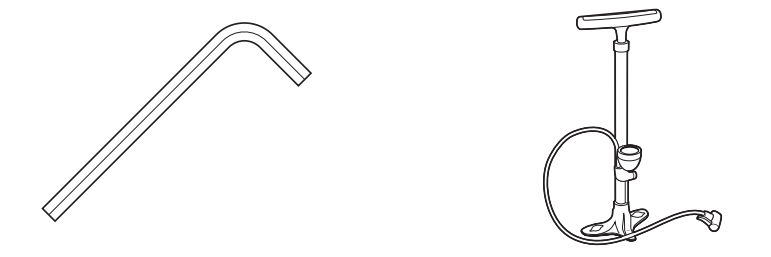
- 2.5mm hexagonal wrench (included)
- Bicycle-style tire pump for Schrader valve tires, with pressure gauge (NOT included)
WARNING: DO NOT USE NON-RAZOR PARTS WITH YOUR RAZOR DUNE BUGGY.
The Dune Buggy has been built to certain Razor design specifications. The original equipment supplied at the time of sale was selected on the basis of its compatibility with the frame, fork and all other parts. Certain aftermarket components may not be compatible.
Detailed Specifications
- Age Range: 3 and above
- Weight Capacity: 65 lbs (29.5 kg)
- Power Source: Rechargeable 6V battery
- Runtime: Up to 40 minutes per charge
- Top Speed: Approximately 2 mph (3.2 km/h)
- Dimensions: 33.5 x 19.5 x 20.5 inches (85 x 49.5 x 52 cm)
- Weight: 26 lbs (11.8 kg)
- Additional Features: Safety flag, adjustable speed settings, parent-controlled throttle
Product Parts
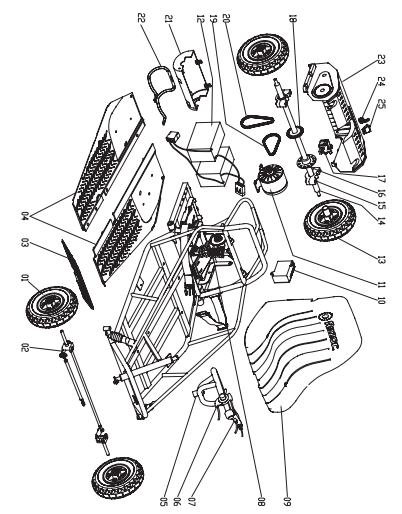
- Front wheel
- Steering assembly
- Footrest
- Platform (left / right)
- Steering wheel
- Thumb tab throttle
- Brake lever with cable
- Shock absorber
- Seat
- Control module
- Motor (24V/ 250W)
- Battery (2-12V/7Ah) with 30 amp fuse
- Rear wheel
- Rear axle
- Upper/ Lower clamp (rear axle)
- Disc brake
- Brake caliper
- Rear axle sprocket
- Chain (Motor)
- Chain (rear axle)
- Lower battery cover
- Bottom battery cover bracket
- Upper battery cover
- Charger port with wires
- On/ Off switch
Assembly And Setup
Charging the Battery
Your Dune Buggy may not have a fully charged battery; therefore you must charge the battery prior to use.
- Initial charge time: 18 hours
- Recharge time: up to 12 hours
- Fully charge once a month when not in use
- Run time: up to 40 minutes
- Average battery life: 250 charge/discharge cycles
- Do not store below 32 degrees - this can damage the battery.
- Plug the charger into the port on the Dune Buggy. Make sure the power switch is in the “off” position.
- Plug the charger plug into wall outlet.
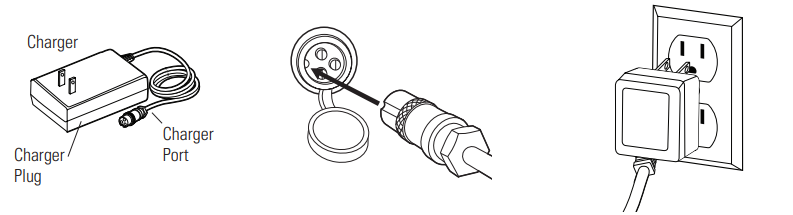
Note: If the charger gets warm during regular use, this is a normal response and is no cause for concern. If your charger does not get warm during use, it does not mean that it is not work properly.
WARNING: The lap belt arrangement supplied with the Dune Buggy is for “play” use only. It is not an ASTM-approved safety belt system and is not intended to function as an approved lap/shoulder/seat restraining device.
Setup Guide
To operate the Razor Mighty Max Battery Dune Buggy, follow these steps:
- Assemble the vehicle according to the instructions provided in the user manual. This includes attaching the wheels, steering wheel, and safety flag.
- Charge the 6V battery for at least 8 hours before first use.
- Adjust the speed settings as desired using the parent-controlled throttle.
- Ensure the child is wearing appropriate safety gear such as a helmet before allowing them to drive.
- Turn on the vehicle and let your child enjoy their ride.
Repair And Maintenance
Turn power switch off before conducting any maintenance procedures.
Replacing the Fuse
- Make sure the power switch is turned off.
- Open fuse box located on the battery.
Remove fuse and replace with a new one of equal amperage. Note: Amperage is located on top of fuse. Fuse must be replaced with one of equal amperage.
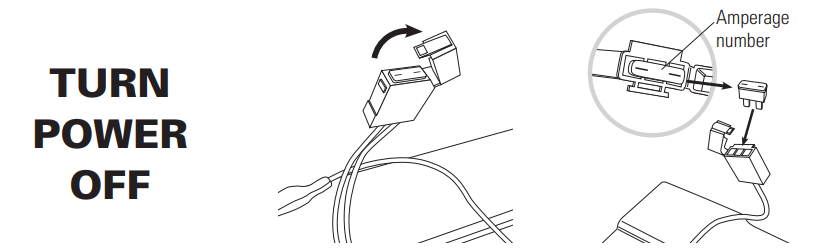
Close the fuse box.
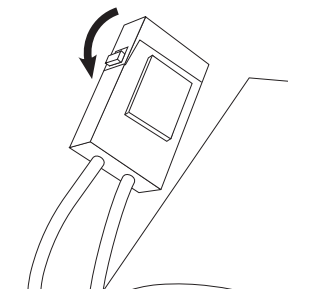
WARNING: To prevent shock make sure power is in the “off” position and charger is not plugged into unit while conducting any maintenance procedures.
Inflating the Tires
Tires are inflated when shipped, but they invariably lose some pressure between the point of manufacturing and purchase.
Using a bicycle style tire pump equipped for a Schrader-type valve, inflate the tires to the PSI indicated on the sidewall of the tires.
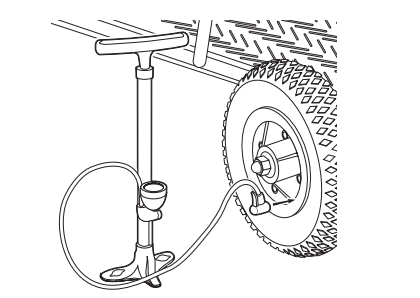
Note: The pressurized air supplies found at stations are designed to inflate high-volume automobile tires. If you decide to use such an air supply to inflate your Dune Buggy tires, first make sure the pressure gauge is working, then use very short bursts to inflate to the correct PSI. If you inadvertently over-inflate the tire, release the excess pressure immediately.
- Battery Care and Disposal
- Do not store the battery in temperatures above 75° or below -10° F.
- Disposal: Your Razor product uses sealed lead-acid batteries which must be recycled or disposed of in an environmentally safe manner. Do not dispose of a lead-acid battery in a fire. The battery may explode or leak. Do not dispose of a lead-acid battery in your regular household trash. The incineration, land filling or mixing of sealed lead-acid batteries with household trash is prohibited by law in most areas. Return exhausted batteries to a federal or state approved lead-acid battery recycler or a local seller of automotive batteries. If you live in Florida or Minnesota, it is prohibited by law to throw away lead-acid batteries in the municipal waste stream.
- Warning: If a battery leak develops, avoid contact with the leaking acid and place the damaged battery in a plastic bag. Refer to the disposal instructions at left. If acid comes into contact with skin or eyes, flush with cool water for at least 15 minutes and contact a physician.
- Charger
The transformer/charger supplied with the Dune Buggy should be regularly examined for damage to the cord, plug, enclosure and other parts, and, in the event of such damage, the bike must not be charged until it has been repaired or replaced. Use ONLY with the recommended charger. - Replacement Parts
The most frequently requested replacement parts (wheels, tires, tubes, batteries and chargers) are available for purchase at some Razor retail partners. For the complete selection of replacement parts visit www.razor.com/shop.
Warranty
Razor Limited Warranty
The manufacturer warranties this product to be free of manufacturing defects for a period of 90 days from date of purchase. This Limited Warranty does not cover normal wear and tear, tires, tubes or cables, or any damage, failure or loss caused by improper assembly, maintenance, or storage or use of the Razor Dune Buggy.
This Limited Warranty will be void if the product is ever
- used in a manner other than for recreation;
- modified in any way;
- rented.
The manufacturer is not liable for incidental or consequential loss or damage due directly or indirectly to the use of this product. Razor does not offer an extended warranty. If you have purchased an extended warranty, it must be honored by the store at which it was purchased.
Troubleshooting
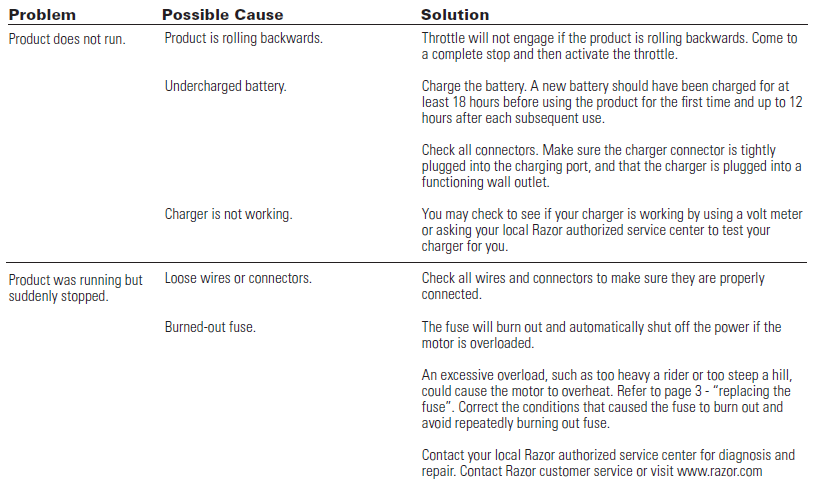
If you encounter any issues with your Razor Mighty Max Battery Dune Buggy, here are some common problems and solutions:
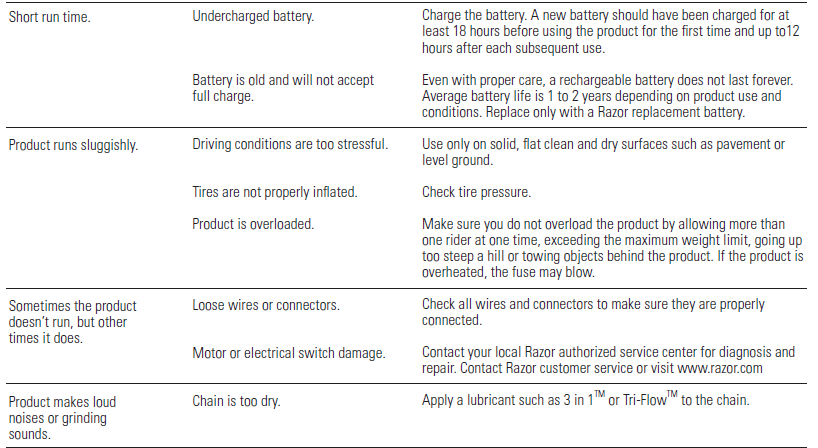
Pros & Cons
Pros:
- Durable construction suitable for various terrains.
- Parent-controlled throttle for adjustable speed settings.
- Included safety flag enhances visibility.
- Rechargeable battery with up to 40 minutes runtime.
- Affordable price point compared to other similar products.
Cons:
- Limited top speed may not be as exciting for older children.
- Assembly required which can be time-consuming.
- Weight capacity is relatively low compared to some other models.
Customer Reviews
Customers have generally praised the Razor Mighty Max Battery Dune Buggy for its durability and ease of use. Many parents appreciate the safety features and adjustable speed settings that provide peace of mind while their children play. Some common complaints include the limited top speed and the need for assembly, but overall, it is considered a great value for its price.
Faqs
What is the recommended age range for the Razor Mighty Max Battery Dune Buggy?
How long does it take to fully charge the battery?
What is the weight capacity of the Razor Mighty Max?
Can I adjust the speed of the Razor Mighty Max?
Is assembly required for this product?
How long does a single charge last?
Is safety gear included or recommended?
Can I use this dune buggy on different terrains?
What if my child exceeds the weight limit?
How do I troubleshoot if my dune buggy does not start?
Tags
More razor manuals
- How to Use: Razor Power Core E-90 Electric Hub Motor Scooter User Manual
- How to Assemble: Razor Smart Electric Scooter C35 User Manual
- How to Use: Razor EcoSmart Metro HD SUP Scooter User Guide
- Razor Dirt Rocket Bike MX500 Instruction Guide | Charging
- Razor DXT Electric Drift Trike User Guide | Assembly Instructions
- Razor RipRider 360 Caster Trike User Guide | Assemble
Leave a Comment