How to Assemble: Razor Smart Electric Scooter C35 User Manual
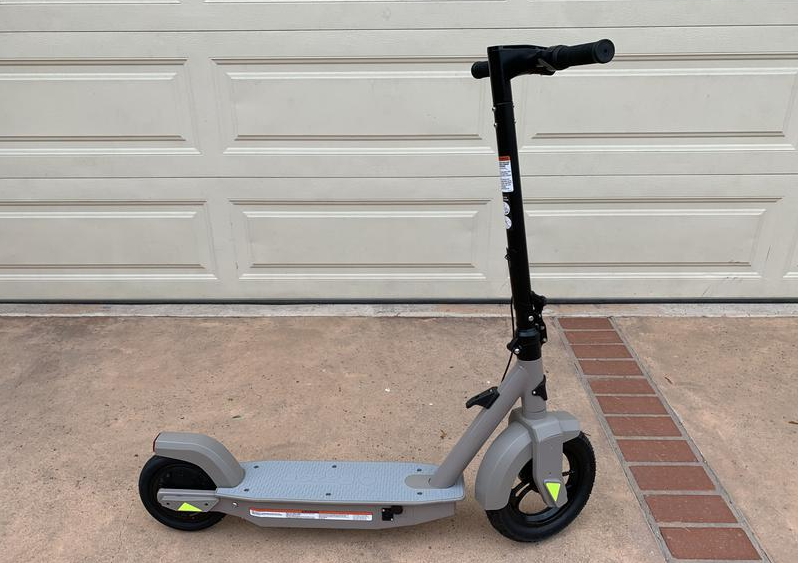
Content
Introduction
The Razor C35 Smart Electric Scooter is designed for a smooth and efficient ride, featuring a powerful 350-watt motor that allows for speeds of up to 18 mph. With a 37V lithium-ion battery, it offers a range of up to 18 miles on a single charge, making it perfect for commuting. The scooter's innovative design includes a 12.5-inch front tire and an 8.5-inch rear tire for enhanced stability. Priced at approximately $579.99, it combines performance with comfort for urban travel.
Specifications
- Motor: 350W high-torque motor
- Speed: Up to 18.6 mph (30 km/h)
- Range: Up to 10 miles (16 km) on a single charge
- Battery: 36V lithium-ion battery with 5.2Ah capacity
- Charging Time: Approximately 4 hours
- Weight Capacity: 220 lbs (100 kg)
- Weight: 28.2 lbs (12.8 kg)
- Brakes: Hand-operated front brake and rear fender brake
- Tires: 8.5-inch pneumatic tires
- Connectivity: Bluetooth app connectivity
BEFORE YOU BEGIN
Remove contents from box. Remove the separators that protect the components from damage during shipping. Inspect the contents of the box for scratches in the paint, dents that may have occurred during shipping. Because your scooter was partially assembled and packed at the factory, there should not be any problems, even if the box has a few scars or dents.
MAKE SURE POWER SWITCH IS TURNED “OFF” BEFORE CONDUCTING ANY ASSEMBLY OR MAINTENANCE PROCEDURES.
Estimated Assembly and Set-Up Time
Razor recommends assembly by an adult.
Allow up to 15 minutes for assembly, not including initial charge time. Allow up to 8 hours for charge.
WARNING:
DO NOT USE NON-RAZOR PARTS WITH YOUR RAZOR ELECTRIC SCOOTER. Razor scooters have been built to certain Razor design specifications. The original equipment supplied at the time of sale was selected on the basis of its compatibility with the frame and all other parts. Certain aftermarket components may not be compatible. Use of non-Razor parts will void the warranty.
Note: The electric scooter must be moving at least 3 mph (5 km/h) while applying the throttle to engage the motor.
Product ID Locations:
(See locations to the left)
- Side of Deck
- Charger
- UPC Side of Box (Not Shown)
Required Tools
4 mm Allen Wrench (Included)
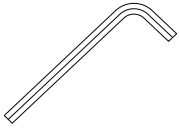
2.5 mm Allen Wrench (Included)

Box Contents
- C35
- Charger
- Owner’s Manual
- 4 mm Allen Wrench
- 2.5 mm Allen Wrench
Description
The Razor Smart Electric Scooter C35 boasts a sleek and sturdy design, with a durable aluminum frame that ensures longevity and stability. The scooter features an intuitive control panel with a digital display showing speed, battery level, and other vital metrics. The 8.5-inch pneumatic tires provide a smooth ride over various terrains, while the hand-operated front brake and rear fender brake offer safe and reliable stopping power.
The scooter also includes a foldable design for easy storage and transport, making it perfect for commuters who need to store it in small spaces or take it on public transportation. The LED light on the front adds visibility and safety during nighttime rides.
Assembly & Set-up of Razor C35 Smart Electric Scooter
Unfolding the Scooter for First Time Use
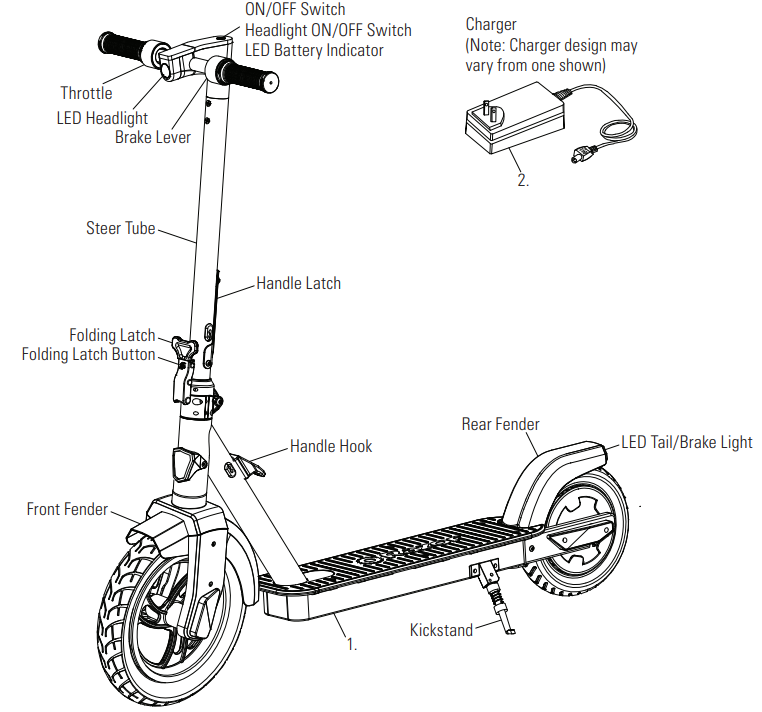
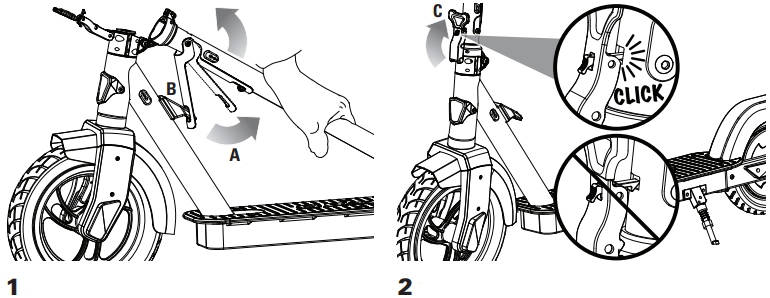
- To unfold scooter, disengage the Handle Latch (A) from the Handle Hook (B) and stow the Handle Latch against the Steer Tube.
With the Steer Tube upright, secure the Folding Latch (C) by pushing open Folding Latch up against the Steer Tube to lock in place. Once secured, pull out on the Folding Latch (C) to test that it’s engaged and locked.
WARNING: Keep fingers clear of the pivoting mechanism when folding or unfolding the scooter. Make sure others are standing clear.
Note: The Folding Latch will make a clicking sound when it is locked into the Steer Tube properly.
Attaching the Handlebars
Required Tool: 4 mm Allen wrench (included)
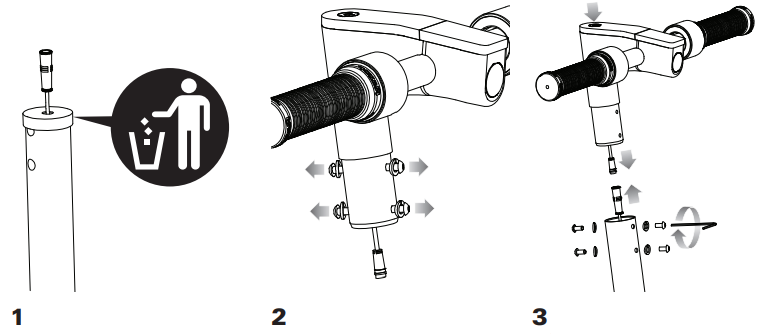
- Before inserting the handlebars onto the Steer Tube, pull the connector through and remove the rubber protector. Discard rubber protector.
- Using a 4 mm Allen wrench, remove the four (4) Allen screws and washers from the handlebar.
Plug in connector. Slide the stem onto the Steer Tube. Be careful not to pinch wire. Tighten the four (4) handlebar screws and washers securely with a 4 mm Allen wrench.
Inflating the Front Tire
The front tire is inflated when shipped, but it invariably may lose some pressure between the point of manufacturing and your purchase. Always inflate tire to the correct PSI before first time use.
- Lower air pressure can result in a shorter ride time.
- Periodically check front tire. Reinflate when needed.
Remove the valve cap and using a bicycle style tire pump equipped for a Schrader-type valve, inflate the front tire to the correct PSI indicated on the sidewall of the tire. Replace the valve cap.
WARNING: Do not use the electric scooter for the first time until you have inflated the front tire to the correct PSI. Failure to do so may damage your electric scooter and void your warranty.
WARNING: Do not overinflate, as this could damage the tire or wheel.
Note: The pressure air supplies found at gasoline stations are designed to inflate high-volume automobile tires. If you decide to use such an air supply to inflate your electric scooter tire, first make sure the pressure gauge is working, then use very short bursts to inflate to the correct PSI. If you inadvertently overinflate the tire, release the excess pressure immediately.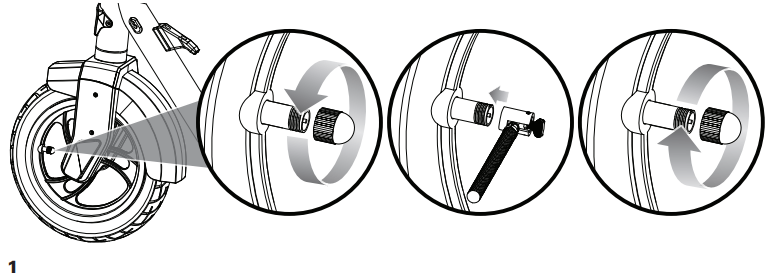
CHARGING THE BATTERY
Your C35 may not have a fully charged battery; therefore you must charge the battery prior to use. Be sure to charge the battery in a clean, dry location away from direct sunlight, flames or sparks.
- Initial charge time: 8 hours.
- Recharge time: up to 8 hours, even if the light turns green.
- Always charge the battery immediately after riding.
- Fully charge battery before storing for extended periods of time.
- Unplug charger from the wall outlet when not in use.
- Failure to recharge battery periodically may result in a battery that will not accept a charge.
- Make sure the power button is turned OFF when product is not in use. If the power button is left on for an extended period of time, the battery may reach a stage at which it will no longer hold a charge.
- Run time: Up to 60 minutes of continuous ride time. Run time may vary depending on riding conditions, rider weight, climate, and/or proper maintenance.
- Constant starting and stopping may shorten ride time.
- Battery life can vary depending on proper maintenance and usage of the product.
- Do not charge at or below 32°F (0°C).
Charger
(Note: Charger design may vary from one shown)
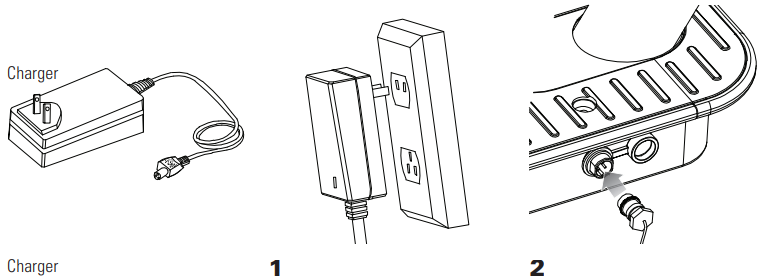
- Plug the charger plug into wall outlet. The light on the charger should be green.
Note: If green light (LED) does not turn on, try a different outlet. Note: Make sure power button is in the OFF position. Plug the charger into the charger port. The light on the charger should turn red during charging. The light will turn green again when charging is complete.
Model Voltage (Nominal) Vdc Capacity (Nominal) Ah Charge Temperature Range Operating Temperature Range C35 37 7.5 0° to 40°C
32° to 104°F
-20° to 40°C
-4° to 122°F
WARNING: Use ONLY with the recommended charger. Batteries are only to be charged under adult supervision. The charger is not a toy. Always disconnect the charger before wiping down and/or cleaning the C35 with a damp cloth.
The charger supplied with the C35 should be regularly examined for damage to the cord, plug, enclosure and other parts. In the event of such damage, the C35 must not be charged until it has been repaired or replaced. Chargers have built-in overcharge protection to prevent battery from being overcharged.
Note: If the charger gets warm during regular use, this is a normal response and is no cause for concern. If your charger does not get warm during use, it does not mean that it is not working properly.
- Wall outlet - Green (stand by)
- Wall outlet and unit - Red (charging)
- Wall outlet and unit - Green (charged)
Note: Continue charging unit even if light turns green prior to 8 hours.
WARNING: Battery charge can deplete over time. Periodically recharge battery when not in use.
PRE-RIDE CHECKLIST
- Lights
Check the head- and tail-lights for proper function. When you activate the lights (reference “How to Ride on page 7 of this manual), the headlight and taillight should illuminate. - Brakes
Check the brake and brake light for proper function. When you press the electronic brake (on handlebar) or step on the rear-fender brake, the brakes should provide positive braking action and tail/brake light should illuminate. When you apply the brakes with the throttle on/engaged, the brake cut-off switch should cut power to the motor. - Wheels
Periodically inspect the wheels for excessive wear. - Tire
Periodically inspect the front tire for excess wear and replace as needed. Regularly check the tire pressure and inflate as needed. - Frame, Fork and Handlebars
Check for cracks or broken connections. Although broken frames are rare, it is possible for an aggressive rider to run into a curb or object and wreck, bend or break a frame. Get in the habit of inspecting your scooter on a regular basis. - Hardware/Loose Parts
Before every ride, check all parts, such as nuts, bolts, fasteners, etc., to ensure they are secure and assembled correctly. There should not be any unusual rattles or sounds from loose parts or broken components. If the product is damaged, do not ride. Reference “Safety Warnings” on pages 1 and 2 of this manual. - Safety Gear
Always wear proper protective equipment, such as an approved safety helmet (with chin strap securely buckled), elbow pads, and kneepads. A helmet may be legally required by local law or regulation in your area. A long-sleeved shirt and long pants are recommended. Always wear shoes and keep shoelaces tied and out of the way of the wheels and drive system. NEVER RIDE BAREFOOT OR IN SANDALS. - Laws and Regulations
Always check and obey any local laws or regulations. - Insurance
Do not assume that your existing insurance policies necessarily provide coverage for electric product use. Check with your insurance company for information regarding insurance. - Storage
Prolonged exposure to UV rays, rain and the elements may damage the enclosure materials, store indoors when not in use.
USAGE
How to Ride
- Do not activate the thumb throttle unless you are on the C35 and in a safe, outdoor environment suitable for riding. Put kickstand up.
Press the power button (A) for two seconds, the LEDs on the battery display will light up. Press the power button (A) for two seconds again to turn the unit off.
Headlight and Taillight: To activate the headlight and taillight the product must be powered ON. Press the power button (A) once to activate the headlight and taillight. To deactivate the headlight and taillight, press the power button once again.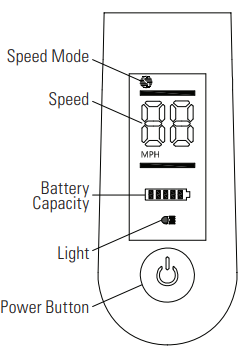
- Get on the scooter and place both hands on the handlebars. Kick to start (B), and then press down on the thumb throttle (C).

Note: Electric scooter mustbe moving at least 3 mph (5 km/h) while engaging throttle to engage motor.
How to Stop
For controlled stops, apply the brake by pressure on the rear-fender brake or electronic brake (on the handlebar).
Razor recommends that you practice applying the brake options at various speeds and in an open area free from obstructions before riding your scooter around others. When the brake is applied the tail/brake light will glow brighter. The brake light is always functional and independent of the other lights being activated.
- Option 1 - Press the electronic brake (on the handlebar), the power will cut off and then the product will slow to a stop.
Option 2 - Step on the rear-fender brake, the power will cut off, and then the product will slow to a stop.
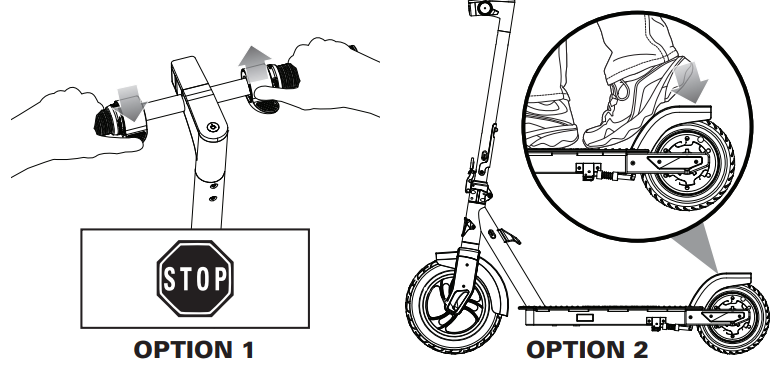
Note: The C35 electric scooter features Regenerative Braking. Regenerative braking is a means of recovering and converting kinetic energy into stored power. Using the scooter’s electric motor, energy that is usually lost during deceleration and braking is captured and converted back to stored power extending run time and range.
Regenerative braking only recovers a small amount of energy at a time but can be significant over the course of a full battery cycle. As always specifications and the amount of recovered regeneration varies with rider weight, terrain, and environmental conditions.
WARNING: The brakes are capable of skidding the rear tire and throwing an unsuspecting rider. Practice in an open area free from obstacles until you are familiar with the brake function. Avoid skidding to a stop as this can cause you to lose control and/or damage the rear tire.
Note: As an additional safety feature, the scooter is designed to cut power to the motor when the brakes are applied.
Note: The motor will re-engage, (without having to kick to start) if brakes are released and the throttle is applied before the scooter has slowed down to under 3 mph (5 km/h).
Note: Practice riding only in wide open areas clear from curbs, parking blocks, and other obstacles. Impacting the wheels against any hard surface can damage the wheels. Wheels are not covered under the limited warranty.
USAGE
Changing the Speed Mode
There are two modes for speed. The C35 is set on the Sport (18 mph (29 km/h)) speed setting at the factory. Press pthe ower button twice quickly to select the speed mode.
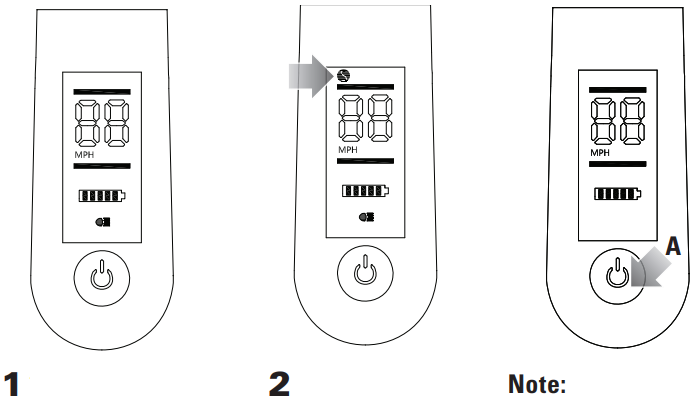
- The Normal mode max speed is up to 10 mph (16 km/h).
- The Sport mode max speed is up to 18 mph (29 km/h) as shown by an “S” at the top of the display.
Note: The C35 display default setting is in miles. If you would like to change the display setting to kilometers, press the power button (A) three times quickly to select the kilometers setting.
Using and Setting Cruise Control
The C35 electric scooter features Cruise Control. While activated, this feature will automatically keep your electric scooter running at a set speed. This allows you to ride without having to constantly press on the thumb throttle. Practice in an open area free from obstacles until you are familiar with the cruise control feature.
Note: The C35 is shipped with the cruise control feature deactivated from the factory. When turning the electric scooter power ON, the letters NC (No Cruise) will appear on the display showing that the cruise control feature is not enabled.
How to Enable Cruise Control Mode and Set the Speed
- The cruise control mode is controlled by the power button on the display (A).
- While stationary, to enable the cruise control mode, press the power button (A) quickly four (4) times. The electric scooter will then beep (sound) once and the display will show the letter C (Cruise) for a few seconds (B).
The electric scooter must be traveling at least 6 mph (9.7 km/h) to set cruise control speed. To set a constant speed, press the throttle (C) and ride your scooter until you reach your desired speed — then hold the throttle at that speed for eight (8) consecutive seconds.
The electric scooter will beep (sound) once and the cruise control icon (D) will appear on the display, indicating that the electric scooter is now set at the desired speed. Once set, you can take your thumb off the throttle and your electric scooter will maintain that set speed.
Pressing any control such as the throttle, e-brake or rear-fender brake will deactivate the speed setting and the cruise control icon (D) will disappear from the display. Your speed setting will not be saved and you will need repeat step 3 to reset to your desired speed.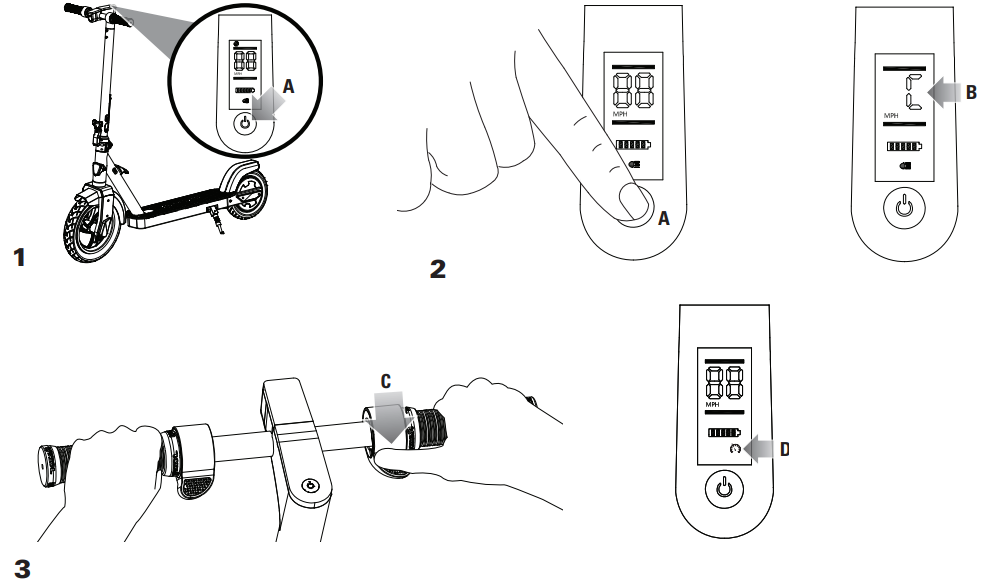
Note: Once the electric scooter is powered OFF, cruise control mode will be disabled. To use the cruise control feature, the cruise control mode must be enabled (following steps 1-3 above) each time you power ON your electric scooter.
How to Disable Cruise Control Mode

To manually disable the cruise control mode, press the power button (A) quickly four (4) times. The electric scooter will then beep (sound) once and the display will show the letters NC (No Cruise) for a few seconds (E).
Folding Scooter
- To fold scooter, press and hold down the Folding Latch Button (A) while pulling the Folding Latch (B) open.
To use the Steer Tube as a carrying handle, deploy the Handle Latch (C) and engage the Handle Hook (D) on the frame.
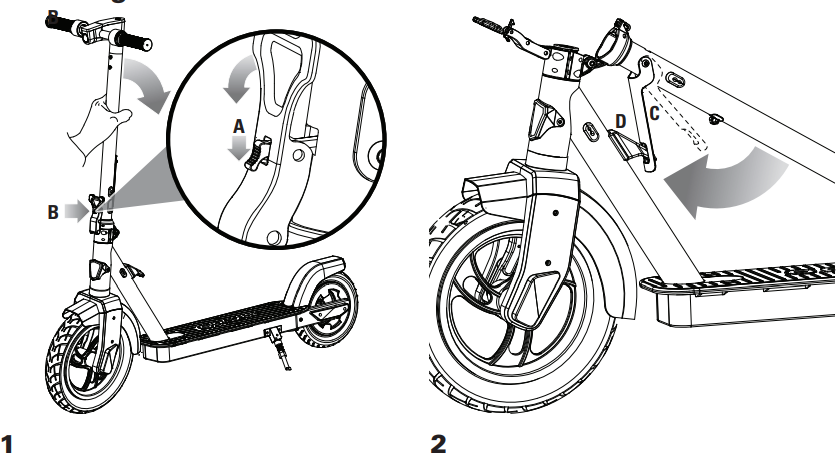
WARNING: Keep fingers clear of the pivoting mechanism when folding or unfolding the scooter. Make sure others are standing clear.
Setup Guide
To set up your Razor Smart Electric Scooter C35, follow these steps:
- Unpack the scooter and ensure all parts are included.
- Assemble the handlebars and secure them using the provided screws.
- Charge the battery for at least 4 hours before first use.
- Download the Razor app from your app store to pair your scooter via Bluetooth.
- Configure your settings within the app, such as speed limits and battery alerts.
REPAIR AND MAINTENANCE
Turn power switch “OFF” before beginning repair or maintenance:
- Read the instructions
- Remove charger plug
- Turn the power off
- Secure the product under repair
- Exercise caution around exposed parts
- Contact Razor customer service if unsure about any repair or maintenance
- Repair and maintenance should be performed by an adult only
Adjusting the Folding Mechanism
Required Tool: 2.5 mm Allen Wrench (included)
- Fold scooter according to folding scooter instructions on page 8. Using a 2.5 mm Allen wrench, loosen screw A. Using a 2.5 mm Allen wrench adjust screw B.
Tighten screw A and unfold to complete adjustment.
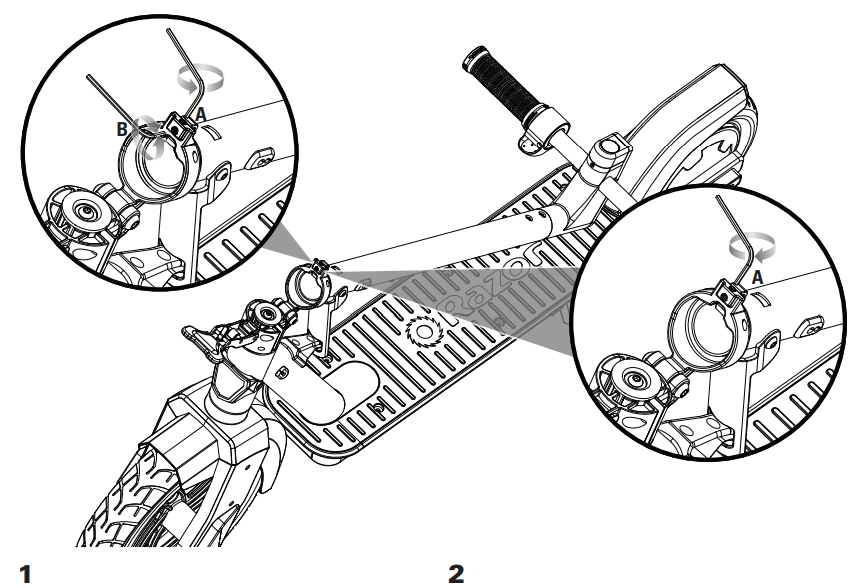
WARNING: Keep fingers clear of the pivoting mechanism when folding or unfolding the scooter. Make sure others are standing clear.
WARNING: Risk of fire - no user-serviceable parts.
Cleaning Your Scooter
- Wipe with a damp cloth to remove dirt and dust.
- Do not use industrial cleaners or solvents as they may damage the surfaces.
- Do not use alcohol, alcohol-based or ammonia-based cleaners as they may damage or dissolve the plastic components or soften the decals or decal adhesive.
Battery Care and Disposal
Do not store in freezing or below-freezing temperatures. To properly maintain your battery and ensure maximum battery life, carefully read the “Charging the Battery” section on page 5 of this owner’s manual.
CONTAINS LITHIUM-ION BATTERY PACK. BATTERIES MUST BE RECYCLED.
Disposal: Your electric scooter uses a lithium-ion battery pack which must be recycled or disposed of in an environmentally safe manner. Do not dispose of a battery pack in a fire. The battery pack may explode.
Do not dispose of a battery pack in your regular household trash. The incineration, land filling or mixing of batteries with household trash is prohibited by law in most areas. Return exhausted batteries to a federal or state approved lithium-ion battery recycler.
Charger
- The charger supplied with the electric scooter should be regularly examined for damage to the cord, plug, enclosure and other parts and in the event of such damage, the product must not be charged until it has been repaired or replaced.
- Use ONLY with the recommended charger.
- Not intended for use at elevations greater than 2000 m above sea level.
Wheels
Wheels and drive system are subject to normal wear and tear. It is the responsibility of the user to periodically inspect wheels for excess wear and replace hub motor components as required.
Razor Smart Electric Scooter C35 Troubleshooting
Product(s) should be turned OFF and fully charged prior to doing any Troubleshooting.
NOTE: All troubleshooting steps should be performed by an adult only.
Problem | Possible Cause | Solution |
Does not work out of the box | Unit must be traveling at least 3 mph (5 km/h) before motor will engage Undercharged battery | Kick to start to at least3 mph (5 km/h) whileengaging throttle to engage motor. Check lights on charger: Plugged into wall - Green Plugged into wall & unit - Red (charging) Plugged into wall & unit - Green(charging complete) No lights/Blinking lights - Replace charger |
No longer works | No lights on charger Undercharged battery
Battery will not hold a charge | Check power to wall outlet and/or try a different outlet. Check lights on charger: Plugged into wall - Green Plugged into wall & unit - Red (charging) Plugged into wall & unit - Green(charging complete) No lights/Blinking lights - Replace charger Replace battery. |
Short run time/runs slow | Rider’s weight Riding conditions
Battery not fully charged
Old/damaged battery | Do not exceed 220 lb. (100 kg) maximumweight limit. Use only on flat, dry surfaces. Avoid inclines and areas with heavy debris. Charge product - refer to page 5 for charging information. Replace battery. Charge battery at least once a month when not in use. |
Display Error | Problem | Possible Cause | Solution | Note |
E1 | Unit does not work | Bad connection between motor and controller. | Check connectors between the motor and controller. | The motor may be the issue but this is highly unlikely. |
E2 | Unit does not work | Throttle Failure. | Check connections between the throttle and controller. | If connections areOK then throttle needs to be replaced. |
E3 | Motor stops working suddenly, usually due to overload suchas climbing a slope. | Motor issue | Cycle the throttle or turn the unit OFF, then ON. | It may be necessary to wait for the motorto cool down. |
E4 | Unit doesn’t work, or motor vibrates and/or doesn’t turn properly. | Motor issue | Replace controller. |
|
E6 | Unit doesn’t work. | Controller issue | Check connections between the display and controller. | If connections are OK, the controller needs to be replaced. |
E7 | Unit doesn’t work. | Battery | Battery needs to be replaced. |
|
E8 | Unit doesn’t work, or motor doesn’t turn properly. | Motor issue | Replace motor. |
|
E9 | Unit doesn’t work. | Brake issue | Check connections between the brake and controller. | If connections are OK then brake lever needs to be replaced. |
WARRANTY
The manufacturer warranties this product to be free of manufacturing defects for a period of 90 days from date of purchase. This Limited Warranty does not cover normal wear and tear, tire, tube or cables, or any damage, failure or loss caused by improper assembly, maintenance, storage or use of the C35.
Pros & Cons
Pros
- Powerful 350W motor for efficient travel
- Advanced Bluetooth app connectivity for real-time metrics
- Foldable design for easy storage and transport
- Durable aluminum frame with pneumatic tires for a smooth ride
- Affordable price point compared to other high-end scooters
Cons
- Limited range of up to 10 miles on a single charge
- Heavier weight may make it less portable for some users
- No built-in suspension system which can affect ride comfort over rough terrain
- Somewhat longer charging time compared to other models
Customer Reviews
Customers have praised the Razor Smart Electric Scooter C35 for its robust build quality, ease of use, and impressive performance. Many have noted that the scooter's Bluetooth connectivity adds a modern touch to their riding experience. However, some users have mentioned that the range could be extended and that the scooter could be lighter for better portability.
Faqs
What is the maximum speed of the Razor Smart Electric Scooter?
How long does it take to fully charge the battery?
Is the scooter foldable?
What is the weight capacity of the scooter?
Does the scooter come with any safety features?
Can I use this scooter in rainy conditions?
How do I update the software on my Razor C35 Smart Electric Scooter?
What kind of maintenance does the scooter require?
Can children use this scooter?
Is there a warranty on this product?
Leave a Comment
