Razor RipRider 360 Caster Trike User Guide | Assemble

Content
Introduction of Razor RipRider 360 Caster Trike
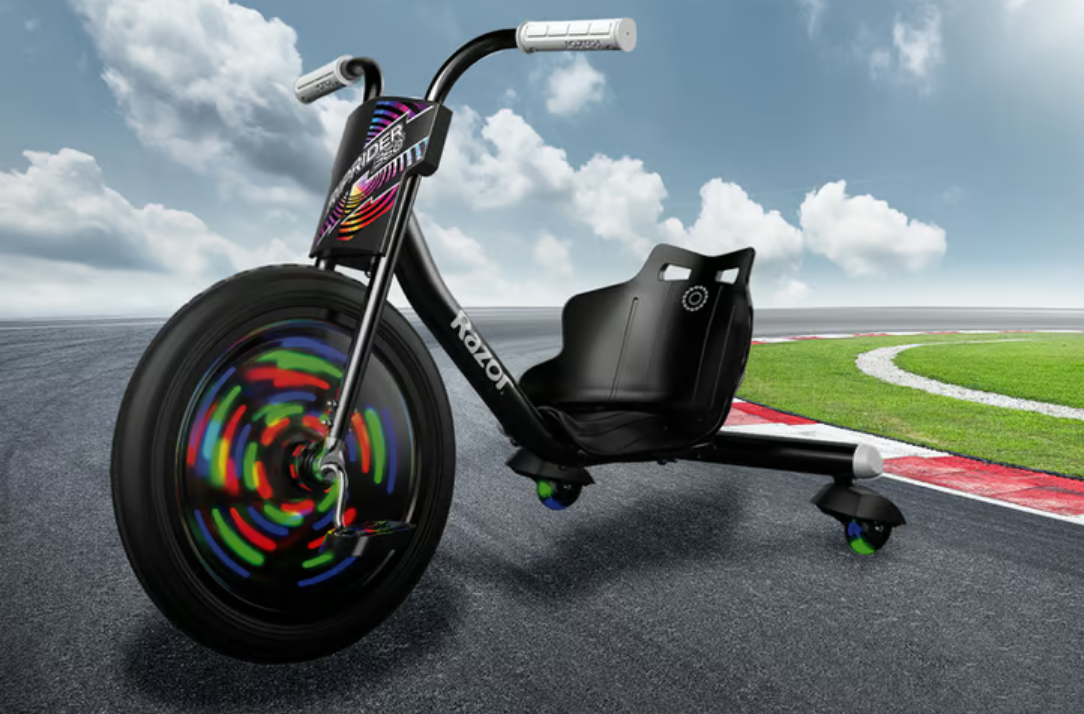
The Razor RipRider 360 Caster Trike is an exciting ride-on toy designed for kids and adults alike, offering a thrilling experience with its unique design. Featuring dual inclined caster wheels, it allows for effortless drifting and 360-degree spins, making it perfect for performing tricks and enjoying outdoor fun. The sturdy steel frame and MX-style handlebars ensure durability and comfort during rides. Priced at approximately $149, it provides an exhilarating way to enjoy active playtime.
BEFORE YOU BEGIN
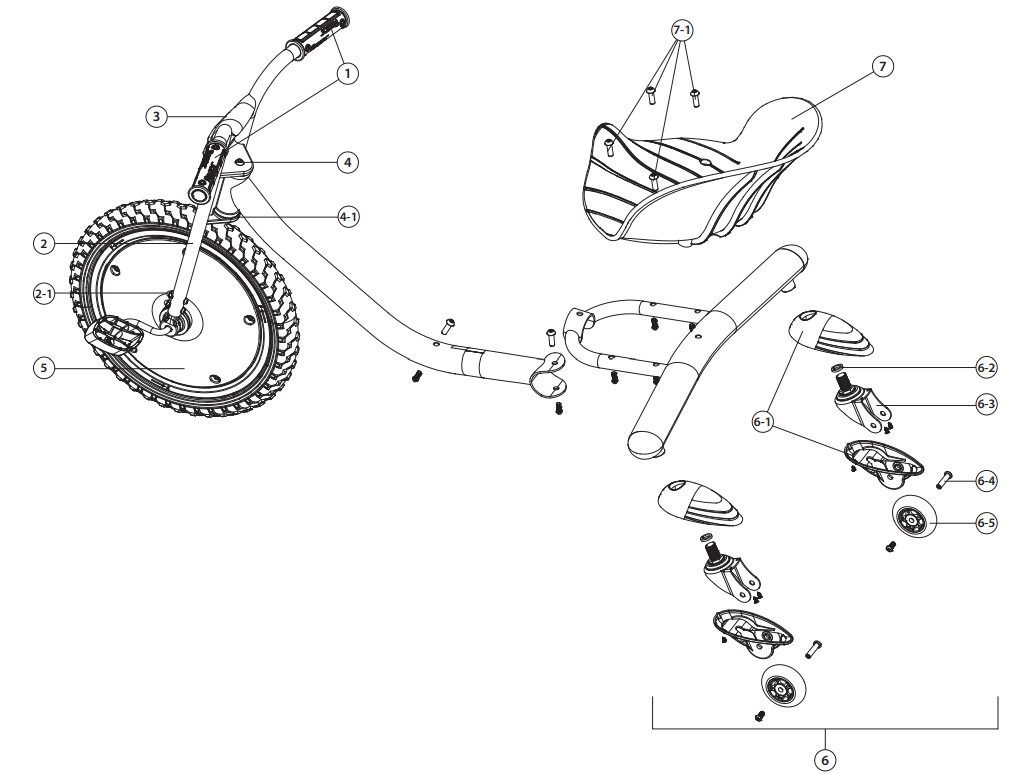
Remove contents from box and check parts against parts diagram found on page 6. Remove the separators that protect the components from damage during shipping. Inspect the contents of the box for scratches in the paint or dents that may have occurred during shipping. Because the RipRider 360˚ Caster Trike was partially assembled and packed at the factory there should not be any problems, even if the box has a few scars or dents.
Estimated Assembly and Set-Up Time
Allow up to 15–20 minutes for assembly.

WARNING: DO NOT USE NON-RAZOR PRODUCTS WITH YOUR RIPRIDER 360˚ CASTER TRIKE. The RipRider 360˚ Caster Trike has been built to certain Razor design specifications. The original equipment supplied at the time of sale was selected on the basis of its compatibility with the frame, fork and all other parts. Certain aftermarket products may not
be compatible and will void your warranty.
Product ID Locations: (See locations to the left)
- Frame (underneath unit)
- Box - side of UPC (not shown)
Razor RipRider 360 Caster Trike Required Tools

- Two (2) 5 mm Allen Wrenches (included)
- 10 mm/13 mm Wrench (included)
Plastic Bag Contents
- Tools
- Owner’s Manual
Specifications
The Razo Caster Trike boasts several key features that make it stand out:
- 360-Degree Spinning Wheels: The caster wheels allow for smooth, continuous spinning.
- Steel Frame: Durable steel frame ensures long-lasting performance.
- Adjustable Handlebars: Handlebars can be adjusted to fit different rider heights.
- PVC Wheels: High-quality PVC wheels provide smooth rolling and durability.
- Weight Capacity: Supports up to 160 pounds (72.5 kg).
Description
Caster Trike is engineered with safety and fun in mind. Its steel frame provides stability while the adjustable handlebars ensure a comfortable fit for riders of various heights. The PVC wheels are designed to withstand rough terrain and provide a smooth ride. The trike's design encourages active play, helping children develop their balance and coordination skills.
The RipRider's unique feature—the ability to spin 360 degrees—makes it a standout in the market. This feature not only adds an element of excitement but also helps in improving the rider's agility and reaction time.
ASSEMBLY AND SET-UP
Attaching the Frame
Required Tools: Two (2) 5 mm Allen Wrenches (included)

- Using two (2) 5 mm Allen wrenches, remove the coupling bolt on the end of the frame and the coupling bolt in the middle of the frame. Remove and discard the plastic insert.
Note: The coupling bolt in the middle of the frame is shorter. - Insert the rear frame into the frame assembly.
- Securely tighten the (longer) coupling bolt on the rear frame using two (2) 5 mm Allen wrenches.
- Securely tighten the (shorter) coupling bolt in the middle of the frame using two (2) 5 mm Allen wrenches.
Attaching the Front Fork
Required Tools: 13 mm Wrench and 5 mm Allen Wrench (included)

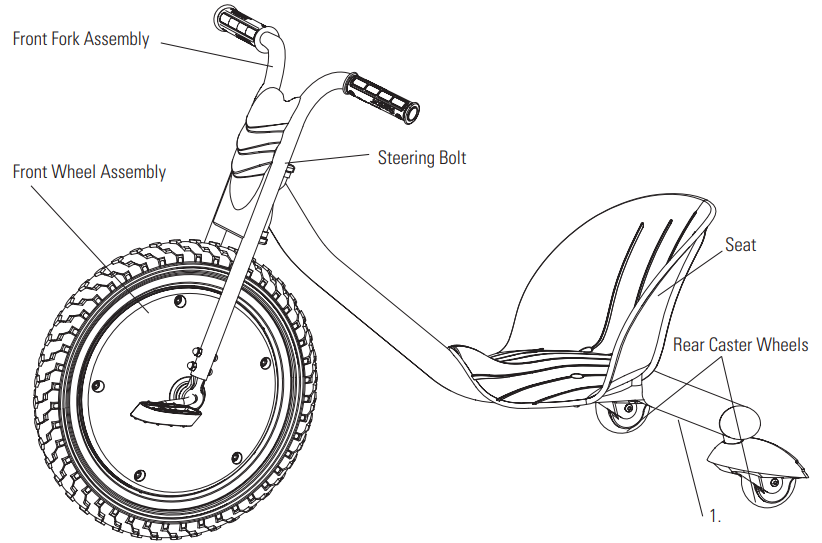
- Remove the steering bolt and locknut from the frame assembly with a 13 mm wrench and a 5 mm Allen wrench.
- Insert the front fork into the frame assembly.
- Be sure to properly align the slot on the headtube with the pin on the front fork as shown.
- Reinsert the steering bolt and secure with locknut using a 13 mm wrench and a 5 mm Allen wrench.
WARNING: Failing to properly tighten the steering bolt that attaches the front fork assembly to the frame assembly can cause you to lose control and fall.
Attaching the Front Wheel
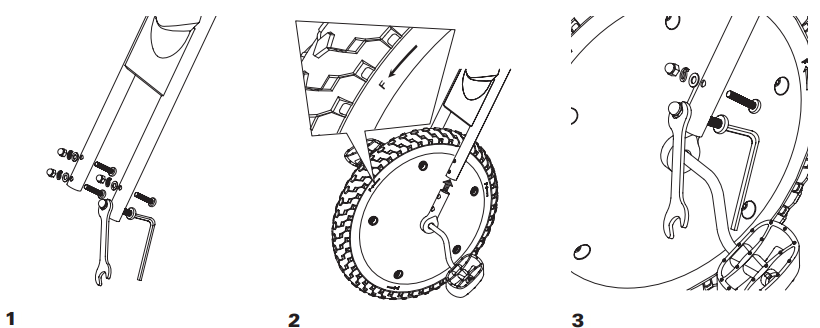
Required Tools: 5 mm Allen Wrench and 10 mm Wrench (included)

- Remove the four (4) coupling bolts from the front fork using a 5 mm Allen wrench and a 10 mm wrench.
- Insert the wheel assembly into the front fork and align holes. When installing the wheel, make sure the letter “F” and arrow (located on the side of the wheel) are facing the direction as shown above.
- Reinsert the coupling bolts through the front fork and tighten securely.
Attaching the Seat
Required Tools: Two (2) 5 mm Allen Wrenches (included)

- Using two (2) 5 mm Allen wrenches, remove the four (4) coupling bolts from the frame.
- Align the four (4) holes in seat with the four (4) holes in frame. Insert the coupling bolts through the top and bottom of the frame.
- Tighten the coupling bolts using two (2) 5 mm Allen wrenches.
PRE-RIDE CHECKLIST
Wheels
Periodically inspect the wheels for excess wear.
Frame, Fork and Handlebars
Check for cracks or broken connections. Although broken frames are rare, it is possible for an aggressive rider to run into a curb or object and wreck and bend or break the frame. Get in the habit of inspecting your scooter on a regular basis.
Hardware/Loose Parts
Check and secure all fasteners before every ride. Make sure the steering bolt and casters are tight. There should not be any unusual rattles or sounds from loose parts or broken components. If the unit is damaged, do not ride. Reference
“Safety Warnings” on page 1 of this manual.
Safety Gear
Always wear proper protective gear, such as an approved safety helmet. Elbow pads and kneepads are recommended. Always wear closed toe shoes (lace-up with rubber soles) and keep shoelaces tied and out of the way of the wheels. NEVER RIDE BAREFOOTED OR IN SANDALS.
Laws and Regulations
Always check and obey any local laws or regulations.
Be Careful!
This product is not for aggressive or trick riding. Avoid steep inclines and don’t ride too fast — you can lose control and fall. Skateboard parks are not designed for young riders. Never ride in traffic or on the street and watch your surroundings for pedestrians, bikers, boarders and skaters.
Maintain a hold on the handlebars at all times.
Setup Guide
The setup of the Razor RipRider 360 Caster Trike is straightforward and can be completed with minimal tools:
- Assemble the frame by attaching the handlebars and caster wheels according to the instructions provided.
- Adjust the handlebars to fit your child's height.
- Ensure all bolts and screws are tightened securely.
- Perform a quick safety check before letting your child ride.
Once assembled, the trike is ready for use. Always supervise children when they are riding the RipRider.
REPAIR AND MAINTENANCE
Cleaning
Wipe with a damp cloth to remove dirt and dust. Do not use industrial cleaners or solvents, as they may damage the surfaces. Do not use alcohol, alcohol-based or ammonia-based cleaners, as they may damage or dissolve the plastic components or soften the decals or decal adhesive.
Wheels and Bearings
Under normal circumstances and conditions, Razor wheels and wheel bearings are maintenance free. Nonetheless, it is the responsibility of the owner or guardian to periodically inspect the wheels for wear and tear, the axle for proper tightness, bearings for side-to-side play, and for loose parts. When a wheel develops play, this is an indication of excess wear and replacement is necessary. Replace immediately with only genuine Razor wheels. Worn wheels/bearings are considered normal wear-and-tear and are not covered by the Razor Warranty. Wheels other than genuine Razor wheels may not be compatible with your Razor product. The use of anything other than genuine Razor replacement parts may affect your safety and will void your warranty.
Replacement Parts
The most frequently requested replacement parts are available for purchase at some Razor retail partners. For the complete selection of replacement parts visit https://www.razor.com
RIPRIDER 360° CASTER TRIKE PARTS
Keep your RipRider 360˚ Caster Trike rolling for years with genuine Razor parts. Visit our website to purchase replacement parts. (Specifications subject to change without notice.)

- Handlebar Grip (x2)
- Front Fork
- Front Fork Coupling Bolts (x4)
- Front Cover
- Steering Bolt
- Lock Nut
- Front Wheel w/ Pedals and Cranks Complete
- Rear Wheel Complete (x2)
- Rear Wheel Cover (Upper/Lower)
- Spring Washer
- Caster
- Axle Bolts
- Wheel
- Seat
Seat Coupling Bolts (x4)
Troubleshooting
Common issues with the Razor RipRider 360 Caster Trike can often be resolved with simple troubleshooting steps:
- Wobbly Wheels: Check if all bolts are tightened properly. If the issue persists, consider replacing worn-out wheels.
- Difficult Turning: Ensure the caster wheels are clean and free from debris. Lubricate the wheels if necessary.
- Loose Handlebars: Tighten the screws holding the handlebars in place.
Always refer to the user manual for detailed instructions and safety precautions.
Razor RipRider 360 Caster Trike Pros & Cons
Pros
- Durable Construction: The steel frame and PVC wheels ensure longevity.
- Fun and Interactive: The 360-degree spinning feature adds an exciting element to playtime.
- Adjustable: Handlebars can be adjusted to fit different rider heights.
- Easy Assembly: Simple setup process with minimal tools required.
Cons
- Weight Limitation: Maximum weight capacity of 160 pounds may limit use for older or heavier children.
- Maintenance Required: Regular cleaning and lubrication of wheels are necessary for smooth operation.
- No Brakes: Riders must learn to control their speed without the aid of brakes.
Customer Reviews
Customer reviews highlight the Razor RipRider 360 Caster Trike as a fun and durable product that children love. Many parents appreciate its ability to encourage active play and improve balance skills. However, some users mention that assembly can be tricky for those who are not handy with tools, and occasional maintenance is necessary to keep the trike in good condition.
Common complaints
Include issues with wheel stability over time and the need for periodic tightening of bolts. Despite these minor drawbacks, the overall consensus is positive, with many recommending it as a great value for the price.
WARRANTY
The manufacturer warrants this product to be free of manufacturing defects for a period of 6 months from date of purchase. This Limited Warranty does not cover normal wear and tear, or any damage, failure or loss caused by improper assembly, maintenance, or storage.
Faqs
What is the recommended age range for the Razor?
How much does the Razor RipRider 360 Caster Trike weigh?
Can I use the Razor RipRider 360 Caster Trike on rough terrain?
How do I maintain the caster wheels of my RipRider?
Is assembly of the Razor RipRider difficult?
What is the maximum weight capacity of the Razor RipRider?
Can I adjust the handlebars on my RipRider?
Are there any safety precautions I should be aware of when using the Razor RipRider?
How do I fix wobbly wheels on my RipRider?
Leave a Comment
