Razor DXT Electric Drift Trike User Guide | Assembly Instructions
Content
Introducing the Razor DXT Electric Drift Trike
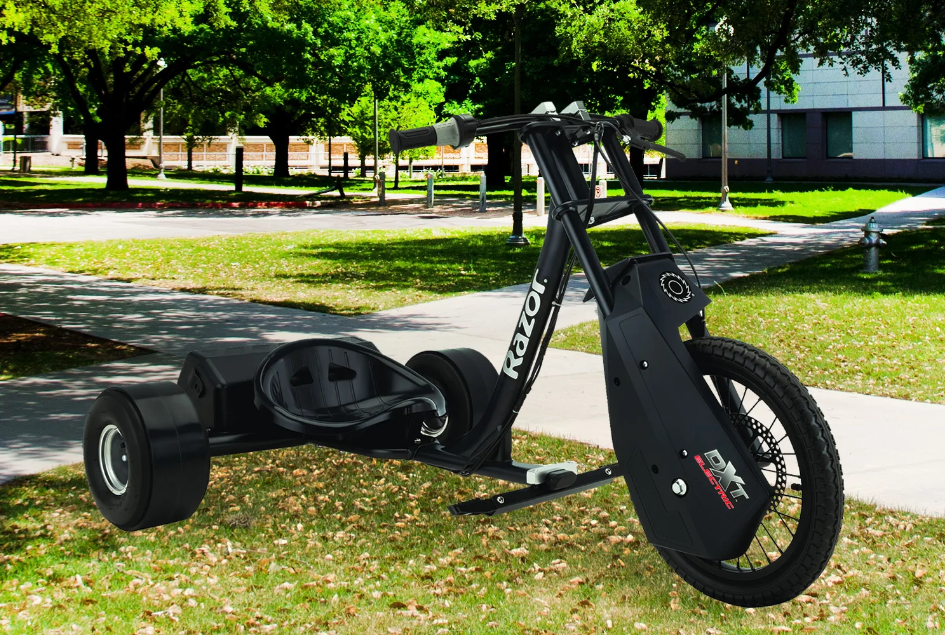
Razor is an exciting ride designed for thrill-seekers and drifting enthusiasts. Equipped with a powerful 500-watt high-torque motor, this trike can reach speeds of up to 15 mph, providing exhilarating performance. Its moto-style construction and 10-inch slick surface rear wheels ensure smooth drifting and sharp turns. With a run time of up to 60 minutes, it's perfect for extended outdoor fun. The DXT Electric Drift Trike is priced at approximately $719.99, making it a premium choice for adventurous riders.
Parts
Keep your product running for years with genuine Razor parts. Visit our website to purchase replacement parts.
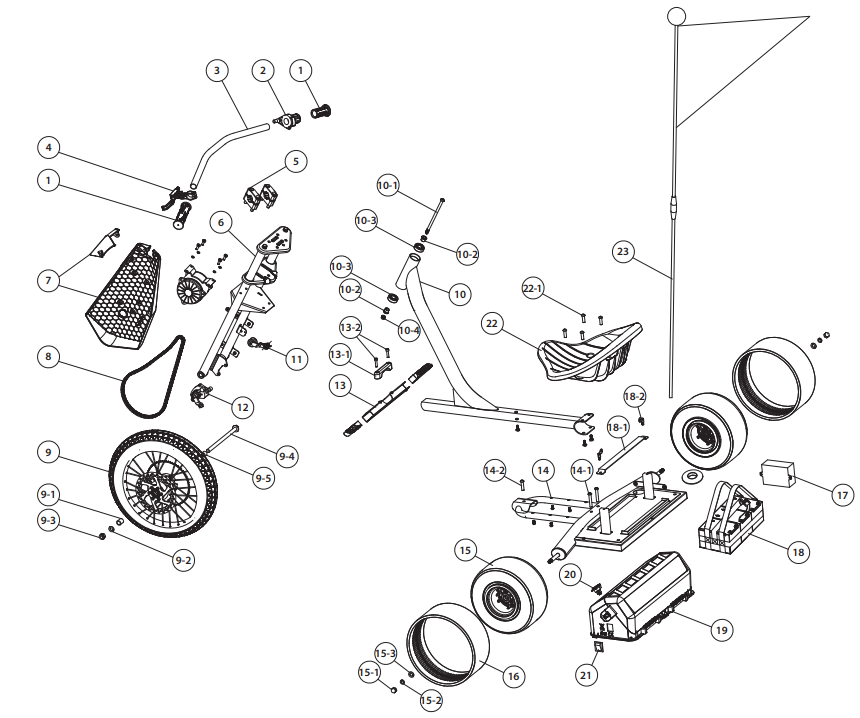
(Specifications subiect to change without notice.)
- Handlebar Grips (x2)
- Twist Grip Throttle
- Handlebars
- Brake Lever
- Handlebar Clamps (Upper/Lower)
- Front Fork
- Chain Guard (Right/Left)
- Chain
- Front Wheel
- 9-1. Large Spacer
- 9-2. Flat Washer
- 9-3. Locknut
- 9-4. Axle Bolt
- 9-5. Small spacer
- Down Tube
- 10-1. Steering bolt
- 10-2. Brushing (x2)
- 10-3. Bearing (x2)
- 10-4. Locknut
- Chain Tensioner
- Caliper Brake
- Footpegs
- 13-1. Footpeg clamp
- 13-3. Coupling bolts (x2)
- Rear Frame
- 14-1. Rear Frame Coupling Bolt (Long) (x2)
- 14-2. Rear Frame Coupling Bolt (Short) (x1)
- Rear Wheel (x2)
- 15-1. Locknut (x2)
- 15-2. Spring Washer (x2)
- 15-3. Flat Washer (x2)
- Sleeve (x2)
- Control Module
- Battery (3- 12v/12ah) with 30 amp fuse
18-1. Battery Bracket
18-2. Battery Bracket Bolt (x2) - Battery Cover
- Charge Port
- On/Off Switch
- Seat
- 22-1. Seat Coupling Bolt (x4)
- Flag
Specifications
- Motor: 250W High-Torque Electric Motor
- Battery: 24V Lead-Acid Battery with up to 2 hours of continuous use
- Speed: Up to 15 mph (24 km/h)
- Brakes: Hand-operated front brake and rear foot brake
- Frame: Durable Steel Frame with Aluminum Alloy Wheels
- Tires: 10" Pneumatic Tires with Drift-Ready Design
- Weight Capacity: 200 lbs (90 kg)
BEFORE YOU BEGIN
Remove contents from box and check parts against parts diagram found on page 15. Remove the separators that protect the components from damage during shipping. Inspect the contents of the box for scratches in the paint or dents that may have occurred during shipping. Because the DXT Electric Drift Trike was partially assembled and packed at the factory there should not be any problems, even if the box has a few scars or dents.
Estimated Assembly and Set-Up Time
- Allow up to 15–20 minutes for assembly. Two (2) person assembly recommended.
- Allow up to 12 hours for charge (see page 7 for charging information).
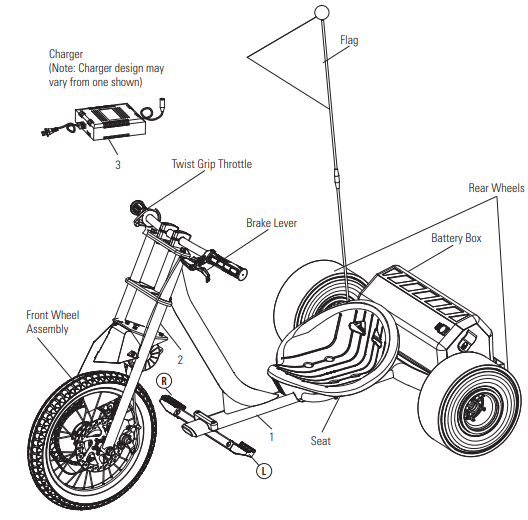
WARNING: DO NOT USE NON-RAZOR PRODUCTS WITH YOUR DXT ELECTRIC DRIFT TRIKE. The DXT Electric Drift Trike has been built to certain Razor design specifications. The original equipment supplied at the time of sale was selected on the basis of its compatibility with the frame, fork and all other parts. Certain aftermarket products may not be compatible and will void your warranty.
WARNING: The safety flag is intended to increase rider’s visibility to others. Do not bend excessively (flag can break if over-stressed) nor remove from seat when riding.
Product ID Locations
See locations to the left
- Frame (underneath unit)
- Front Fork
- Charger
- Box - Side of UPC (not shown)
Required Tools

- Two (2) 5 mm Allen Wrenches 6 mm Allen Wrench
- 13 mm Wrench
- Spoke Tensioner
Box Contents
- DXT Electric Drift Trike
- Flag
- Charger
- Tools
- Owner’s Manual
Description
Electric Drift Trike boasts a sleek and robust design, making it both stylish and functional. The trike features a low center of gravity, which enhances stability and makes it easier to maneuver. The drift-ready tires are designed for smooth drifting on various surfaces, providing an unparalleled riding experience. The adjustable handlebars and seat ensure that riders of different heights can comfortably operate the trike.
The electric motor provides a quiet and efficient ride, while the battery offers sufficient power for extended use without frequent recharging. The hand-operated front brake and rear foot brake offer reliable stopping power, ensuring safety during operation.
ASSEMBLY AND SET-UP
Assembling the Frame
Required Tools: Two (2) 5 mm Allen Wrenches
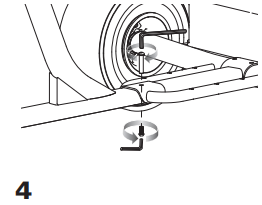
- Using two (2) 5 mm Allen wrenches, remove the three (3) coupling bolts from the downtube. Remove and discard the plastic insert.
- Connect the downtube to the rear frame and align the holes on the downtube with the holes on the rear frame.
Re-insert the two (2) longer coupling bolts (B) through downtube and rear frame and tighten securely in place.

Re-insert the one (1) shorter coupling bolt (A) through the center frame and downtube and tighten securely in place.
Attaching the Front Fork
Required Tools: 5 mm Allen Wrench and 13 mm Wrench
- Using a 5 mm Allen wrench and a 13 mm wrench, remove the steering bolt and locknut from the downtube.
Note: Place finger underneath the downtube to prevent the bottom bushing from falling out and getting lost. - Using a 13 mm wrench, loosen the two (2) bolts on the upper crown.
Re-insert the bottom bushing into the downtube then carefully slide the downtube between the upper and lower crowns.

WARNING: Failing to properly tighten the steering bolt that attaches the front fork assembly to the frame assembly can cause you to lose control and fall.
- Align the downtube with the hole in the upper and lower crown and re-insert the steering bolt. Se-curely tighten using a 5 mm Allen wrench and a 13 mm wrench.
- Re-tighten the two (2) 13 mm bolts on the upper crown.
Use zip tie to keep cable wires from rubbing against the front wheel when unit is in motion.

Attaching the Handlebars
Required Tool: 6 mm Allen Wrench
- Place handlebars between the upper and lower handlebar clamps.
Note: Make sure brake lever is on the left (from sitting position). Align the handlebars parallel to the front fork. Using a 6 mm Allen wrench, tighten all four (4) bolts securely to the upper crown.
Note: When properly tightened, the handlebars should not move forward or backward.
Attaching the Seat
Required Tools: Two (2) 5 mm Allen Wrenches
- Using two (2) 5 mm Allen wrenches, remove the four (4) coupling bolts from the frame.
Place the seat at desired position. Align the four (4) holes in the seat with the holes in the frame. Re-insert the coupling bolts and tighten bolts until seat is securely in place.

Attaching the Foot Pegs
Required Tool: 5 mm Wrench
- Using an 5 mm Allen wrench, loosen the two (2) coupling bolts on the foot pegs.
Slide the foot pegs onto the front of the downtube, as shown, and tighten bolts securely.

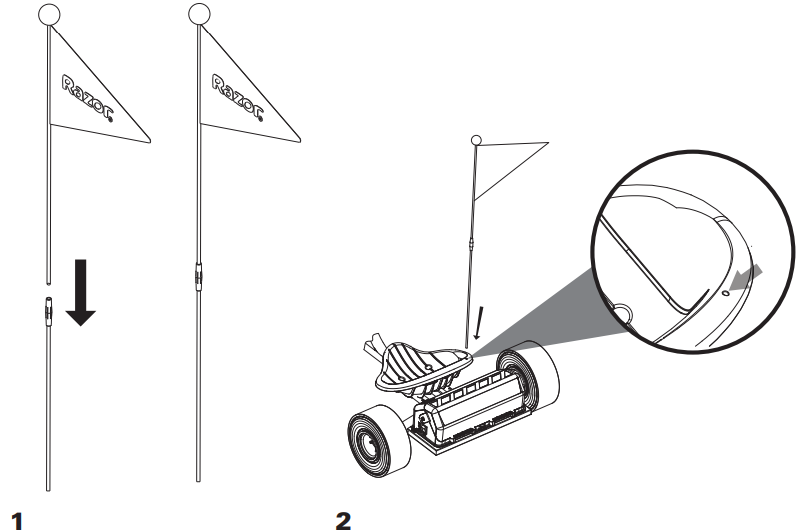
Attaching Flag
- Assemble flag as shown
Insert flag into fixed hole located on seat.
Inflating the Tires
The tires are inflated when shipped, but will invariably lose some pressure between the point of manufacturing and your purchase. Inflate the tires to the correct PSI before first time use.
Periodically check the tires. Reinflate when needed.
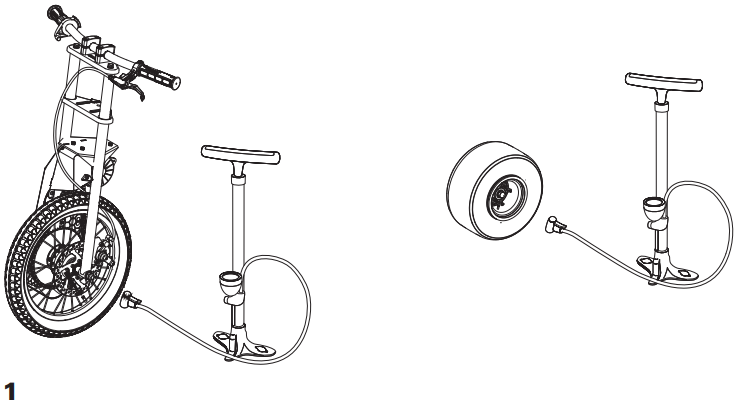
- Using a bicycle tire pump equipped for a Schrader valve, inflate the tires to the PSI indicated on the sidewall of the tire.
WARNING: Do not use the DXT Electric Drift Trike for the first time until you have inflated the tire to the correct PSI. Failure to do so may damage your DXT Electric Drift Trike and will void your warranty.
WARNING: Do not over inflate, as this could damage the tires or wheels.
Note: The pressurized air supplies found at gasoline stations are designed to inflate high-volume automobile tires. If you decide to use such an air supply to inflate your tire, first make sure the pressure gauge is working, then use very short bursts to inflate to the correct PSI. If you inadvertently over-inflate the tire, release the excess pressure immediately.
Checking Spoke Tension
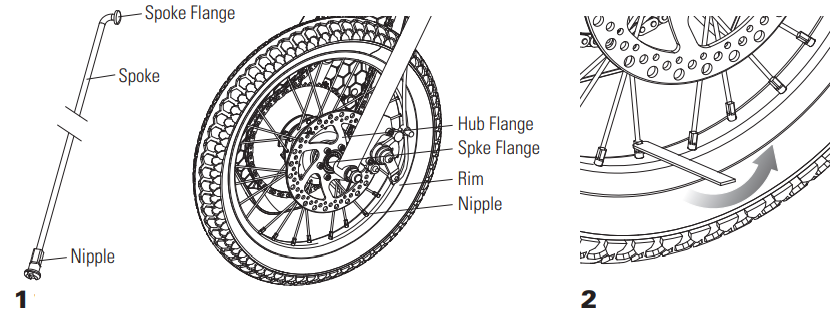
- Verify spoke tension by grasping and shaking each spoke. Spoke should not be loose from hub. Look for any play between spoke flanges where it mates with hub. Try to turn nipple using your fingers. You should not be able to spin any nipple by hand. If one or more spokes are loose, or if you can turn any nipple using your fingers, all spokes must be checked and need to be tightened with a spoke tightened.
- Start with spoke closest to tire valve and tighten each nipple. In sequence, exactly 1/4 to 1/2 turn. A single 1/4 to 1/2 turn may not be enough to bring the spokes into proper tension. Continue tightening all spokes in sequence, no more than 1/2 turn until all spokes are tight.
WARNING: Regularly check the spoke tension and retighten the spokes whenever loose. If you have any doubt, ask an experienced motorcycle or bicycle mechanic to inspect your spokes to determine if the spokes need tightening or adjusting.
Note: Tightening each nipple more than a 1/2 turn each can cause the wheel to become distorted and wobbly, thus permanently damaging the wheel.
Setup Guide
To assemble the Razor DXT Electric Drift Trike, follow these steps:
- Unbox and inspect all components for any damage.
- Attach the handlebars to the frame using the provided bolts and wrench.
- Install the seat and adjust it to your desired height.
- Connect the battery to the motor according to the instructions manual.
- Check all connections and ensure that everything is securely fastened before use.
Before operating, make sure to read through the user manual carefully and follow all safety guidelines.
CHARGING THE BATTERY
Your DXT Electric Drift Trike may not have a fully charged battery; therefore you must charge the battery prior to use.
- Initial charge time: 12 hours.
- Recharge time: up to 12 hours, even if the light turns green. Recommended maximum charging time is 24 hours.
- Always charge the battery immediately after riding.
- Fully charge battery before storing for extended periods of time.
- Unplug charger from the wall outlet when not in use.
- Failure to recharge battery periodically may result in a battery that will not accept a charge.
- Make sure the power switch is turned OFF when unit is not in use. If the power switch is left on for an extended period of time, the battery may reach a stage at which it will no longer hold a charge.
- To ensure long battery life, never store the product in freezing or below freezing temperatures! Freezing will permanently damage the battery.
- Run time: Up to 60 minutes of continuous ride time. Run time may vary depending on riding conditions, rider weight, climate, and/or proper maintenance.
- Constant stopping and starting may shorten ride time.
- Battery life can vary depending on proper maintenance and usage of the unit.
WARNING: Use ONLY with the recommended charger. Batteries are only to be charged under adult supervision. The charger is not a toy. Always disconnect the charger before wiping down and/or cleaning the DXT Electric Drift Trike with a damp cloth.
The charger supplied with the DXT Electric Drift Trike should be regularly examined for damage to the cord, plug, enclosure and other parts. In the event of such damage, the DXT Electric Drift Trike must not be charged until it has been repaired or replaced. Chargers have built-in overcharge protection to prevent battery from being overcharged.
Note: If the charger gets warm during regular use, this is a normal response and is no cause for concern. If your charger does not get warm during use, it does not mean that it is not working properly.
- Wall outlet - Green (stand by)
- Wall outlet and Unit - Red (Charging)
- Charging complete - Green (Charged)
Note: Continue charging unit even if light turns green prior to 12 hours.
WARNING: Failure to recharge the battery at least once a month may result in a battery that will no longer accept a charge.
Note: Make sure power is turned OFF when unit is not in use. If the power switch is left on for an extended period of time, the battery may reach a stage at which it will no longer hold a charge.
- Plug the charger plug into wall outlet. The light on the charger should be green.
Note: If green light (LED) does not turn on, try a different outlet. Plug the charger into the charger port on the product. Make sure the power switch is in the OFF position. The light on the charger should turn red during charging. The light will turn green again when charging is complete.

PRE-RIDE CHECKLIST
- Brake
Check the brake for proper function. When you squeeze the lever, the brake should provide positive braking action. - Tire/Wheels
Periodically inspect the tire/wheels for excess wear and replace as needed. Regularly check the tire pressure and inflate as needed. If you get a flat tire, the inner tube can be patched or a new tube can be purchased from Razor or an authorized repair center. - Frame, Fork and Handlebars
Check for cracks or broken connections. Although broken frames are rare, it is possible for an aggressive rider to run into a curb or object and wreck, bend or break the frame. Get in the habit of inspecting your product on a regular basis. - Hardware/Loose Parts
Check and secure all fasteners before every ride. There should not be any unusual rattles or sounds from loose parts or broken components. If the unit is damaged, do not ride. Reference “Safety Warnings” on page 1 of this manual. - Safety Gear
Always wear proper protective gear, such as an approved safety helmet. Elbow pads and kneepads are recommended. Always wear closed toe shoes (lace-up with rubber soles) and keep shoelaces tied and out of the way of the wheels. NEVER RIDE BAREFOOTED OR IN SANDALS. - Laws and Regulations
Always check and obey any local laws or regulations. - Insurance
Do not assume that your existing insurance policies necessarily provide coverage for product use. Check with your insurance company for information regarding insurance. - Be Careful!
Use extra caution on steep or long hills. Avoid excessive speeds. Never ride in traffic or on the street and watch your surroundings for pedestrians, bikers, boarders and skaters. Maintain a hold on the handlebars at all times.
Razor DXT Electric Drift Trike Usage
Riding the DXT Electric Drift Trike
- Place both hands on the handlebars and both feet on the foot pegs.
- Accelerate the DXT Electric Drift Trike to desired riding speed
- Coast when drifting
- Straighten front wheel before accelerating when a drift is completed
Stopping the DXT Electric Drift Trike
- To stop the unit, apply the brake lever until the unit comes to a complete stop.
Note: Keep both feet on the foot pegs when unit is in motion.
Troubleshooting
If you encounter any issues with your Razor DXT Electric Drift Trike, here are some common problems and solutions:
- Trike not turning on: Check if the battery is properly connected and charged. Ensure that all electrical connections are secure.
- Brakes not functioning: Inspect brake cables for any damage or misalignment. Adjust or replace them as necessary.
- Tires losing air quickly: Check for punctures or leaks in the tires. Make sure tire valves are tightly closed after inflation.
Always refer to the user manual for detailed troubleshooting guides and follow safety instructions to avoid any injuries or damage to the product.
REPAIR AND MAINTENANCE
Turn power switch “OFF” before beginning repair or maintenance:
- Read the instructions
- Remove charger plug
- Turn the power switch off
- Secure the unit under repair
- Exercise caution around exposed parts
- Contact Razor customer service if unsure about any repair or maintenance
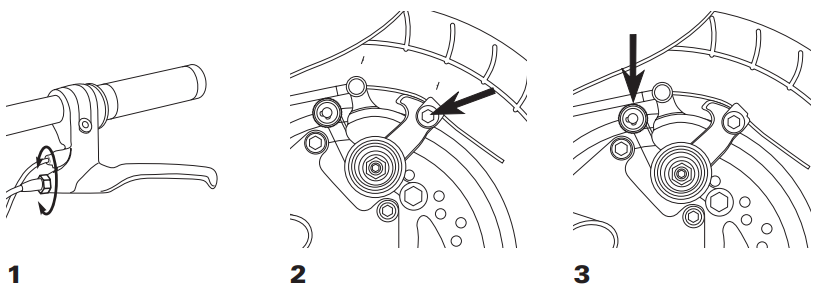
Adjusting the Brake
Tools Required: 5 mm Allen wrench
- To adjust brake cable play, thread the brake lever adjuster in or out 1/4 to 1/2 turn until the desired brake adjustment is attained. Most adjustments are complete at this step. If brake still needs further adjustment, proceed to step 2.
- If the brake has too much slack, loosen the rear anchor bolt with a 5 mm Allen wrench and pull the brake cable tighter. The distance between the end of the brake cable and the anchor bolt should be between 37 mm and 44 mm.
- If the brake disc is rubbing on the brake pads, use your fingers to twist the caliper adjuster in either direction until disc is centered between the brake pads.
WARNING: The brake is capable of causing the DXT Electric Dift Trike to skid the tire throwing an unsuspecting rider. Practice in an open area free from obstacles until you are familiar with the brake function. Avoid skidding to a stop as this can cause you to lose control or damage the rear tires.
Testing the Brake
To use the brake, squeeze the lever to increase the pressure on the brake. The brake lever is fitted with a cable adjuster to compensate for cable stretch and/or to fine-tune the lever movement to brake engagement. If brake is not engaging properly, follow instructions for adjusting the brake.
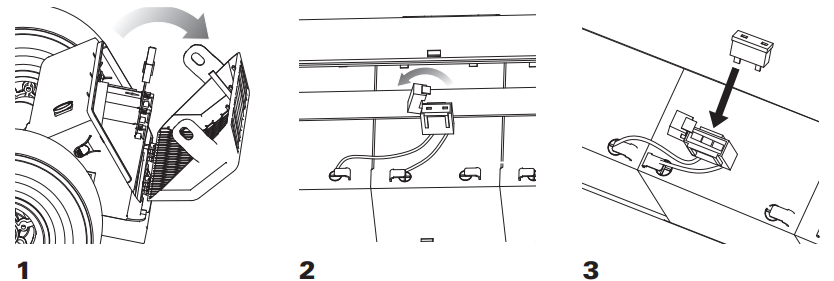
Replacing the Fuse
Turn power switch OFF.
- Open battery compartment located behind the seat.
- Locate fuse box on top of battery. Open the fuse cover to expose the fuse.
Remove damaged or burnt out fuse and replace with a new one of equal amperage. Close the fuse box.
Close battery compartment.
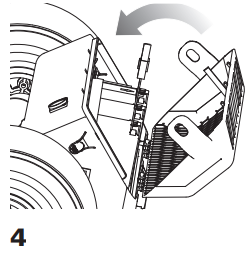
WARNING: To prevent shock, please follow the instructions accordingly and do not skip or combine any steps.
Rear Wheel Replacement
Required Tool: 16 mm Socket wrench
- Loosen the 16 mm locknut and remove rear wheel(s).
Install replacement wheel(s) and tighten securely in place. Note: the sequence of the hardware.
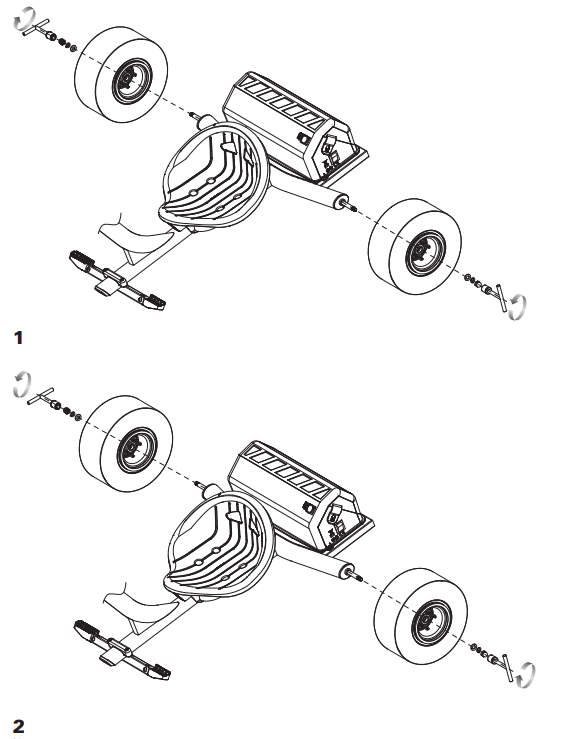
Rear Wheel Hardware Sequence
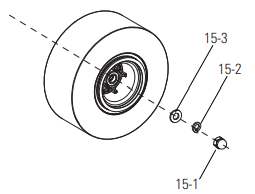
- 15-1. Locknut
- 15-2. Spring Washer
- 15-3. Flat Washer
Front Wheel and Chain Replacement
Required Tools: 15 mm Wrench, 19 mm Wrench, Phillips screwdriver
- Using a Phillips screwdriver, loosen the seven (7) screws on the chain guard.
Loosen the tension from the chain tensioner.
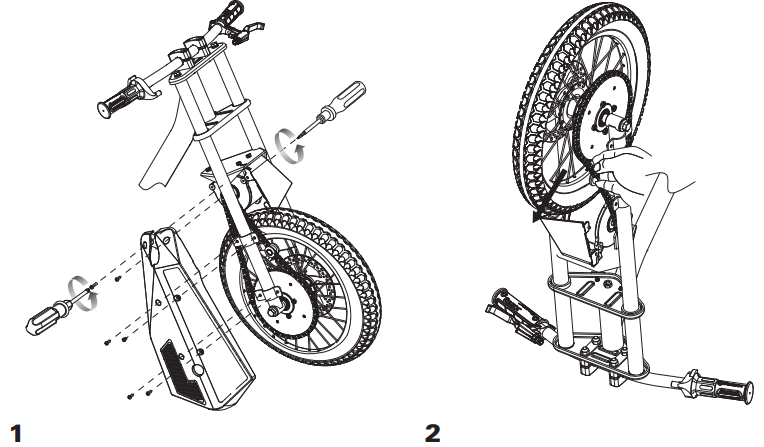
- Remove the chain from around the sprocket on the front wheel.
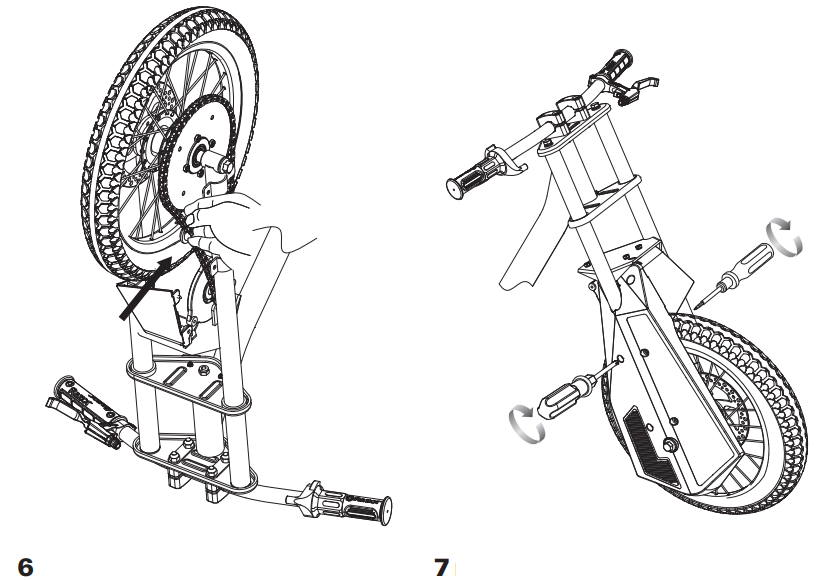
With a 15 mm and 19 mm open wrench remove the axle bolt. Remove front wheel.
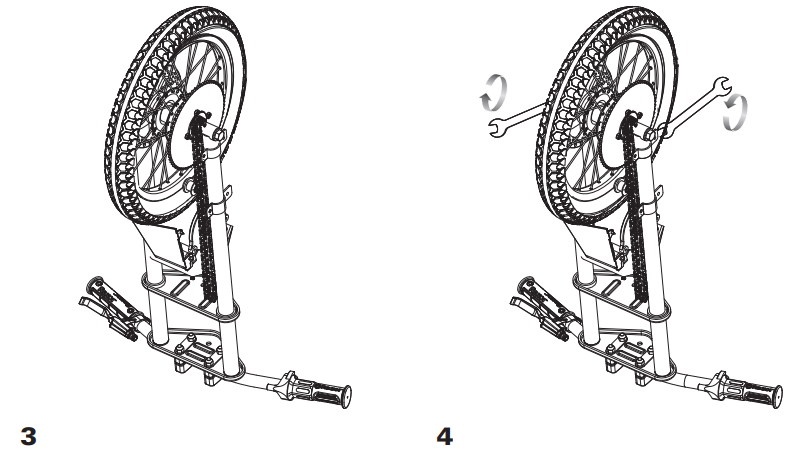
Required Tools: 5 mm Allen Wrench, 15 mm Wrench, 19 mm Wrench
- Front Wheel Hardware Sequence
9-3. 19 mm Lock Nut
9-2. Flat Washer - Fork
9-1. Large Spacer - Front Wheel
9-5. Small Spacer - Fork
9-4. 15 mm Axle Bolt
- Front Wheel Hardware Sequence
Re-install axle bolt and tighten front wheel securely to front fork.
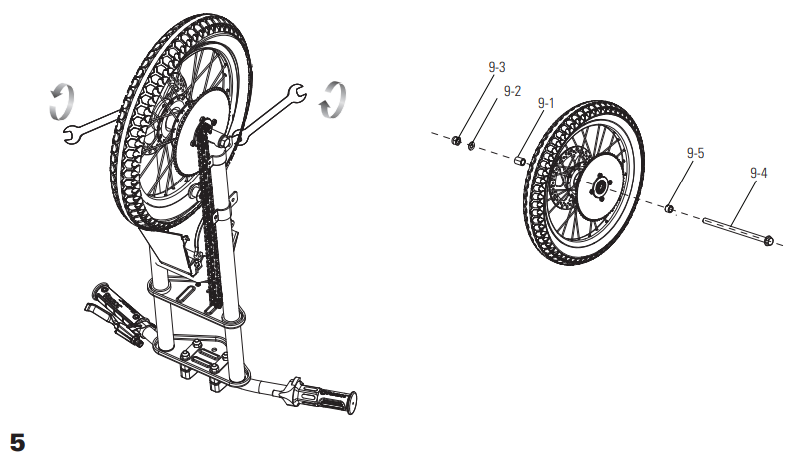
Re-attach chain around the front wheel and the motor sprocket.
Note: Make sure the chain tensioner is resting on the outer side of the chain.
DXT ELECTRIC TROUBLESHOOTING
Unit should be turned OFF and fully charged prior to doing any Troubleshooting
NOTE: All troubleshooting steps should be performed by an adult only
Problem | Possible Cause | Solution |
Electric motorbike does not run | Undercharged battery
Loose wires or connectors | Charge the battery. A new battery should have been charged for at least12 hours before usingthe electric motorbike for the firsttime and up to 12 hours aftereach subsequent use.
Check allconnectors. Make surethe charger connector is tightly plugged into the charging port,and that the charger is plugged intothe wall.
Make sure power flow to the wall outlet is on.
Check all wires and connectors to make sure they are tight.
The fuse will burnout and automatically shut off the power if the motoris overloaded. |
Electric motorbike was running but suddenly stopped | Burned-out fuse | An excessive overload, such as tooheavy a rideror too steepa hill, couldcause the motor to overheat. Replace the fusewith a new one of equal amperage. Correct the conditions thatcaused the fuseto burn outand avoid repeatedly burning out fuse (Refer to page 9 of this manual).
Contact your local Razor authorized service center for diagnosis and repair. |
Short run time(less than 15minutes per charge) | Motor or electrical switch damage
Undercharged battery
Tires are not properly inflated
Battery is oldand will notaccept full charge
Brakes are not adjusted properly | Charge the battery. A new battery should have been charged for at least12 hours before usingthe electric motorbike for the firsttime and up to 12 hours aftereach subsequent use.
Check all wires and connectors. Make sure the battery connector is tightly plugged into the charger connector, and thatthe charger is plugged intothe wall.
The tires are inflated when shipped butthey invariably willlose some pressure between the pointof manufacturing and your purchase. Refer to instructions on page 6 of this manual to properly inflate tires.
Even with propercare, a rechargeable battery does not last forever. Battery life can vary depending on propermaintenance and usageof unit. Replaceonly with a Razor replacement battery.
Refer to brake adjustment instructions on page 9 of this manual. |
Electric motorbike runs sluggishly | Riding conditions are too stressful Tires are not properly inflated
Electric motorbike is overloaded | Use only on solid, flat, clean and dry surfaces, such as pavement or level ground.
The tires are inflated when shipped, but they invariably will lose some pressure between the point of manufacturing and your purchase. Refer to instructions on page 6 of this manual to properly inflate tires.
Make sure youdo not overload the electric motorbike by allowing morethan one rider atone time, exceeding the maximum weight limit, going uptoo steep a hill or towing objects behind the product. |
Sometimes the product doesn’t run, but other times it does. | Loose wires or connectors
Motor or electrical switch damage | Check all wires around the motor and all connectors to make sure they are tight. Contact your local Razor authorized service center for diagnosis and repair. |
Electric motorbike does not stop when applying the brake | Brakes are not adjusted properly | Refer to instructions on page 9 of this manual to properly adjust brakes. |
Electric motorbike makes loud noises or grinding sounds | Chain is too dry. | Apply a lubricant such as 3 in 1™ or Tri-Flow™ to the chain. |
For moretroubleshooting tips, a list of available replacement parts or to locate an authorized Service Center in yourarea, visit our website at www.razor.com or call tollfree +1 866467 2967 tospeak to a live Customer Service Representative | ||
Razor DXT Electric Drift Trike Pros & Cons
Pros
- Powerful electric motor for smooth and efficient rides
- Durable steel frame and high-quality components
- Drift-ready tires for exciting drifting experiences
- Adjustable handlebars and seat for comfort
- Reliable braking system for safety
Cons
- Limited range due to battery life (up to 2 hours)
- Higher weight capacity may limit use for smaller riders
- Assembly required which can be time-consuming for some users
- Noisy operation when drifting at high speeds
Customer Reviews
Customers have praised the Razor DXT Electric Drift Trike for its performance, durability, and fun factor. Many reviewers have highlighted the ease of assembly and operation, as well as the thrill of drifting on various terrains. However, some users have noted that the battery life could be improved and that occasional maintenance is required to keep the trike in top condition.
Most Common Complaints
- Battery life could be longer.
- Assembly can be challenging for some users.
- Tires may need frequent inflation.
Warranty
Razor Limited Warranty
The manufacturer warranties this product to be free of manufacturing defects for a period of 90 days from date of purchase. This Limited Warranty does notcover normal wear and tear, tires, tubes or cables, or any damage, failure or loss caused by improper assembly, maintenance, storage or use. This Limited Warranty will be void if the product is ever:
- used in a manner other than for recreation or transportation;
- modified in any way;
- rented.
Faqs
What is the maximum speed of the Razor?
How long does it take to fully charge the battery?
What is the weight capacity of the Razor?
Can I use this trike on rough terrains?
Does it come with a warranty?
How do I maintain my Razor DXT Electric Drift Trike?
Can children use this trike?
Is it easy to assemble?
Can I upgrade or replace parts?
Is it safe to ride in wet conditions?
Leave a Comment
