Lifestance Wax Hair Removal Kit L2 User Manual
Content
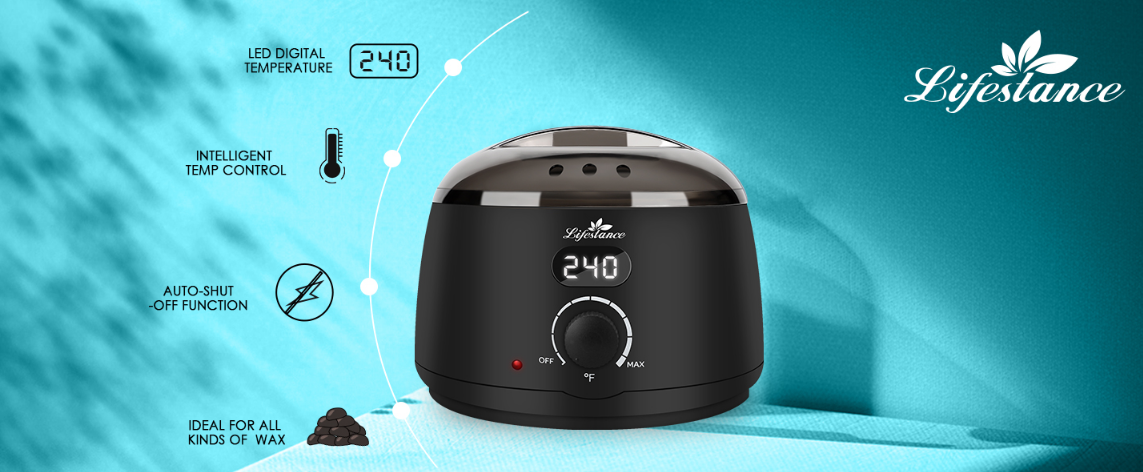
Introducing the Lifstance Wax Hair Removal Kit L2
You can have a salon-quality waxing experience without leaving your house with the Lifestance Wax Hair Removal Kit L2. This kit has everything you need for quick and easy hair removal, and its design is to give you smooth, hair-free skin. Everything you need for a thorough waxing session is included in the set, including high-quality wax beads, an easy-to-use wax warmer, and other accessories. With its long-lasting effects and salon-quality finish, the Lifestance Wax Hair Removal Kit L2 is ideal for all skin types and is great for eliminating hair from a variety of body locations, such as the bikini line, arms, and legs.
Overview
Technical Details
- Voltage: 110 - 240 V ~ (AC), 50 - 60 Hz
- Power consumption: 50 W
- Capacity: 500 ml
Detailed Description
Anyone seeking hair-free skin without the hassle or expense of professional waxing will find the Lifestance Wax Hair Removal Kit L2 to be an ideal solution. To make sure you have a safe and effective waxing experience, the kit is straightforward to use and comes with clear instructions. Because they are hypoallergenic and crafted from all-natural components, the hard wax beans are perfect for people whose skin is especially delicate. After getting waxed, your skin will feel silky and smooth thanks to the azulene oil that comes in the kit. It helps soothe and moisturizes the skin.
Quick-Start Guide
- READY
- Hair should be 1/4 inch long to wax effectively. Your skin should be clean and dry.
- SET
- Put wax into the wax warmer and allow the beads to melt until it's the consistency of honey.
- TEST
- Test a small amount of melted wax on the inside of your wrist to make sure that it's not too hot.
- APPLY
- Using the applicator, apply the wax in the direction of hair growth. Work in small manageable sections.
- COOL
- Wait for 30-45 seconds and allow the wax to harden. It's ready to remove as soon as it's no longer sticky to the touch.
- PULL
- Hold skin taut. Flick the edge of the wax up and pull quickly in the opposite direction of hair growth.
User Instructions
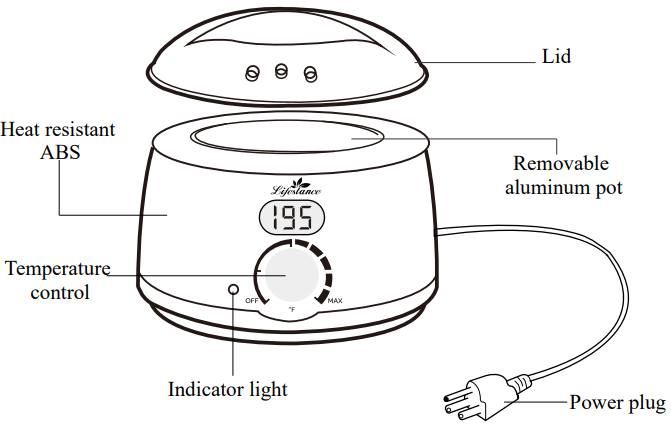
How to Use Lifestance Wax Warmer
- Fill the removable pot with 3.5-11 oz wax beads.
- Place the pot into the designated insert within the warmer.
- To melt wax quickly, place the lid on and turn the dial clockwise to max heat.
- After the wax is melted into a liquid consistency, adjust to your desired temperature. You'll see the indicator light turn from red to off when the desired temperature is reached.
The temperature will remain constant, meaning the warmer will automatically turn on to heat wax when it drops below the desired temperature.
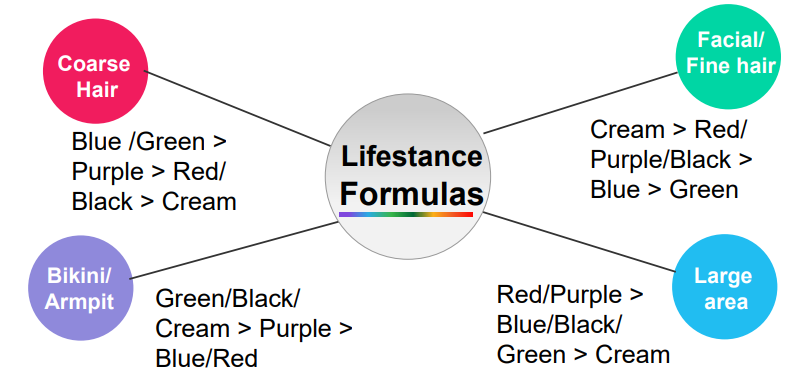
How to Use Lifestance Wax Beans
Application of hard wax depends on the area to be waxed and how coarse the hair is. Lifestance provides a wide variety of formulas targeting different body areas and types of hair. Different colors of hard wax are sequenced in order of effectiveness in terms of hair removal on the targeted area (e.g., Cream works best for facial/fine hair).
* Please note that the result will vary depending on your skin type, how you apply the wax, room temperature, etc.
- Allow the wax to melt completely. We recommend a temp between 150-180℉.
- The best indication that your wax is the right applicable temperature is when it resembles the consistency of thick honey.
- Always use with caution. It’s important to test a small amount of melted wax on the inside of your wrist before application.
- Make sure your skin is completely dry before waxing. Apply some baby powder to soak up any excess moisture if necessary.
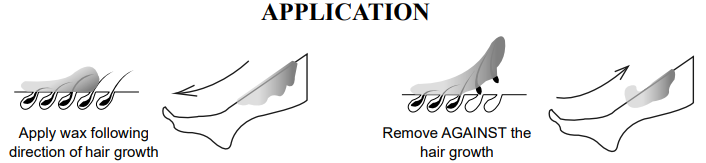
- Using the applicator, apply wax in the direction of hair growth. Use firm pressure to ensure each hair is shrink-wrapped with wax.
- Wait 30-45 seconds and allow the wax to harden.
- It's ready to be removed as soon as it's no longer sticky to the touch. Hold skin taut. Flick the edge of the wax up and pull quickly AGAINST the direction of hair growth.
- Repeat over different sections until the desired area is soft, silky, and hair-free.
Read All Instructions Before Using.
Easy Cleanup of Wax Pot
Note: You don’t need to clean the wax pot after each use! The leftover wax can be melted and reused for the next application. To clean your pot, please ensure that the appliance is unplugged but still warm. Use cotton muslin strips or paper towels to wipe clean. You can also use a wax warmer cleaning solution or a small amount of oil.
Pro Tips
To achieve more effective hair removal results, we strongly recommend:
- Apply wax in the direction of hair growth and remove in the opposite direction.
- Hydrate and exfoliate a day or two prior to waxing.
- On the day of waxing, avoid using any lotions or creams.
- When removing, pull the wax parallel and close to your waxed skin.
- Avoid undue sun exposure for 24-48 hours.
- Exfoliate after at least 24 hours to help prevent ingrown hairs.
- Get on a regular waxing schedule and avoid shaving in between waxing.
Application
Location
Eyebrows
- Brush, shape, and cut brows before waxing.
- Use the mini brow applicator and wax in small sections for precise results.
- Use Vaseline or coconut oil as a protective barrier over any brow hair you don't want the wax to stick to.
- Be cautious that wax doesn't drip into eyes.
Upper Lip, Chin & Cheeks
- Wax your upper lip in three sections: right, left, and center.
- Facial hair can grow in swirls, so stick with small sections.
Underarms/Legs
- Note the hair growth pattern before you begin. You may need to wax in several sections if your armpit hair grows in multiple directions.
- Applying against hair growth may be necessary to completely pick up all the hair.
Bikini & Brazilian
- Have a mirror on hand.
- Sit on the floor or on your bed with a towel under you, with the soles of your feet touching each other.
- Start waxing from the outside edges of the hairline, where your hair is thinnest and less sensitive.
- Take note of the way your hair grows. Work in small manageable sections.
- Hold your skin taut while removing wax, especially in sensitive areas prone to bruising.
Setup Guide
Your Lifestance Wax Hair Removal Kit L2 will be up and running in no time. All you have to do is plug in the wax warmer and give it a few minutes to heat up. Wash and exfoliate your skin to get it ready for waxing while it heats up. When the wax is hot enough, apply it to a tiny patch of skin to make sure it's not too hot. Then, work the wax in the direction of hair development and carefully remove it using the non-woven strips, being sure to work counterclockwise to the hair growth direction. Lastly, massage the skin with the azulene oil to make it feel softer and more supple.
Intended Use
This appliance has been designed exclusively for hair removal of legs, armpits, and the bikini zone on the human body. The warmer is suitable for use with all wax types (including canned wax). It is intended solely for use in private households. This product has been tested to comply with EMC Directive (2014/30/EU), LVD Directive (2014/35/EU), and FCC standards.
Note: During the first few minutes of initial use, you may notice a slight odor. This is normal and will quickly disappear.
Lifestance Warning
Please note that hair removal (of any kind!) can cause trauma to the skin, and normal skin reactions may occur such as redness, swelling, tenderness, etc.
- Before waxing, do a 24-hour patch test to see how your skin reacts.
- Beware of burns. Wax can reach high temperatures and cause burn injuries!
- Do not wax areas with redness, inflammation, swelling, open wounds, burns, eczema, or psoriasis.
- Consult your doctor before use if you are susceptible to allergic reactions or have any health concerns.
Important Safety Instructions
When using electrical appliances, especially when children are present, basic safety precautions should always be followed, including:
READ ALL INSTRUCTIONS BEFORE USING.
Danger: To reduce the risk of ELECTROCUTION:
- Always unplug this appliance immediately after using it.
- Connect this appliance to a properly grounded outlet only.
- Do not use while bathing or showering.
- Do not place or store the appliance where it may fall or be pulled into a tub or sink.
- Do not immerse the appliance in water or other liquids.
- NEVER reach in to get an appliance that has fallen into water. Make sure you don’t stand in water and unplug immediately with electrically insulated gloves.
Warning! Risk of Electrocution!
NEVER use this appliance near a bathtub, shower, or other vessels filled with water.
Caution – To reduce the risk of fire, burns, electric shock, or any other injury:
- This appliance can be used by children aged from 8 years and above and persons with reduced physical, sensory, or reasoning capabilities, or lack of experience and knowledge, provided that they are under supervision or have been instructed in the safe use of the appliance and understand the potential risks involved.
- Always test before use: apply hot wax on a small area of the skin for warmth and possible skin reactions.
- Use this appliance on a level, heat-resistant surface.
- Do not leave the appliance unattended while it is being operated or plugged in.
- Use this appliance only for its intended use. The use of attachments not recommended by the manufacturer may cause hazards.
- Do not allow children to play with the appliance.
- Close supervision is necessary when this appliance is used near children or invalids.
- Unplug from the outlet when not in use. Allow cooling before handling, cleaning, or storing the appliance.
- Never operate this appliance if it has a damaged cord or plug, if it is not working properly, if it has been dropped or damaged in any manner, or dropped into water.
- Keep the cord away from hot or heated surfaces. Do not wrap the cord around the appliance.
- Do not drape the cord over a counter or a tabletop in such a manner that it can be pulled on by a child or tripped over unintentionally.
- The use of an extension cord is not recommended.
Troubleshooting Q&A
Why didn't the wax remove all my hair?
- The hair was too short. The ideal length for wax to grip and remove hair from the root is 0.25 inch-0.75 inch (0.6 cm-2 cm).
- The wax was too cool. Heat the wax until it's the consistency of honey.
- Sometimes hair grows in multiple directions. Try a second application while applying the wax in an alternate direction.
- If hair remains after 2-3 passes, it's best to clean up with tweezers.
- Apply more pressure with the applicator. Firm pressure ensures each hair is shrink-wrapped with wax.
Why is wax residue left on my skin?
- The wax was applied too thin. Use a little more. Apply it about a nickel thick.
- The wax was applied unevenly. With practice, you will avoid this issue.
- Use the AFTER-Wax treatment oil to remove any residue.
How long should my hair growth be?
We advise waiting until your hair is at least ¼ inch in length (around the size of a grain of rice). If your hair is too short, there won’t be enough length for the wax to grip it, and your results won’t be successful.
Are there any concerns I should be aware of?
- Avoid applying wax to moles, warts, mucous tissue, sunburned, or irritated skin.
- Do not use wax if you’re taking Retin-A or Accutane.
- Do not wax after plastic surgery or a chemical peel until approved by a physician.
- Avoid sun and hot water for 8 hours after use.
Do I need cloth strips?
No cloth strips are needed with hard wax.
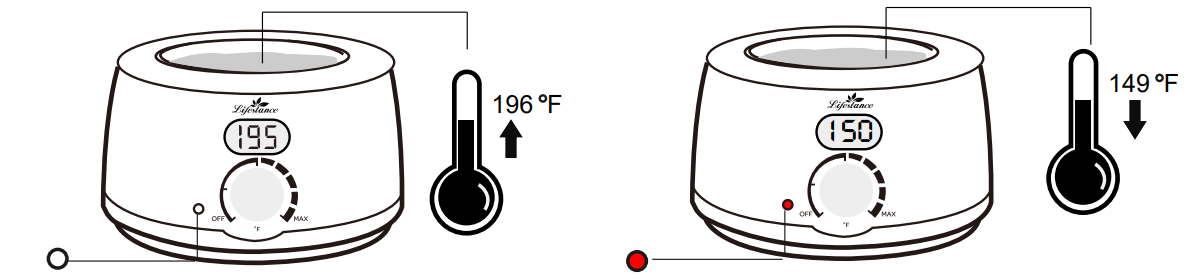
Is it normal if the wax warmer auto turns on and off?
Yes, this wax warmer has an AUTOMATIC POWER OFF FUNCTION. When the wax warmer reaches a high temperature, the indicator light will turn off automatically and turn on when the temperature is low.
1-Year Manufacturer Warranty
Your product will either be repaired or replaced by Lifestance® if any defect in material or workmanship occurs within ONE year from the date of purchase. The repair or replacement of a product does not signify the beginning of a new warranty period.
Please note this warranty does not apply if:
- The product has been damaged by accident, abuse, or mishandling.
- The product has been used in a way that does NOT follow the Lifestance Wax Warmer User Manual.
- Units subjected to unauthorized repair.
Manufacturer: ZHONGSHAN CITY PINK DIAMOND COSMETICS TECHNOLOGY CO., LTD. U.S. FDA Establishment ID: 1009665 Address: Building 11, No.11, Gangbao Road, Tongmao Industrial West Avenue, Dongsheng Town, Zhongshan City, Guangdong Province, P. R. China Email: [email protected]
Authorized Representative
Please note that the following address is not the service address.
Pros & Cons
- Pro: Salon-quality waxing at home
- Pro: Gentle on the skin
- Pro: Easy to use
- Con: Higher upfront cost compared to disposable waxing products
- Con: May require some practice to perfect the waxing technique
Customer Reviews
Customers rave about the Lifestance Wax Hair Removal Kit L2, praising its ease of use, gentleness on the skin, and salon-quality results. The most common complaint is that the kit can be difficult to clean, but many customers note that the high-quality results are worth the extra effort.
Faqs
What is the best temperature for the Lifestance Wax Hair Removal Kit L2?
How often should I wax?
Can I use the Lifestance Wax on my face?
Can I use the Lifestance Wax on my bikini area?
How do I clean the Hair Removal Kit L2?
Can I use the Lifestance Wax Hair on wet skin?
How long does the wax last?
Can I use the Lifestance Wax Hair Removal Kit L2 on facial hair?
Can I use the Lifestance Wax on my arms and legs?
Can I use the Hair Removal Kit L2 on my underarms?
Leave a Comment