Lockly First-Ever Doorbell Camera Smart PGD798MB Installation Guide
Content
Introduction
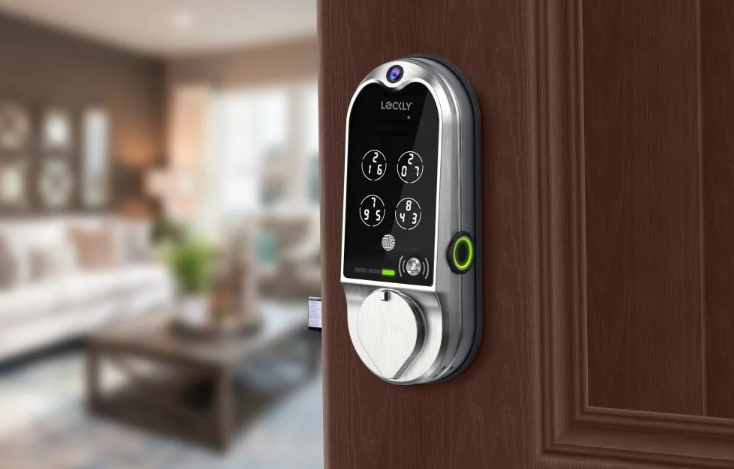
The unique Lockly First-Ever Doorbell Camera Smart PGD798MB combines doorbell and camera technology for home protection. This smart device's HD camera with night vision captures guests at any time. Users can remotely talk to guests on their smartphones with two-way audio. For real-time notifications and video playback, Lockly's secure app works perfectly with the PGD798MB. Lockly Doorbell Camera improves home security and convenience with its stylish appearance and powerful capabilities.
Detailed Specifications
- 1080p HD video
- Two-way audio
- Motion detection
- Night vision
- Weatherproof
- Wi-Fi and Bluetooth connectivity
- Smartphone app control
- Rechargeable battery
Parts List
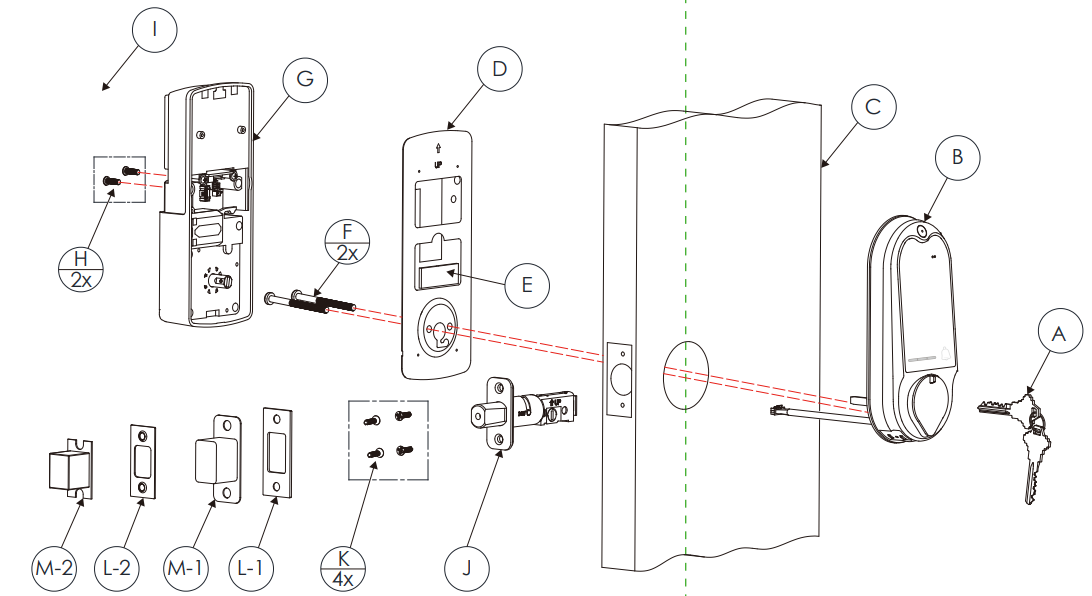
| Labeled As | Description | Count |
|---|---|---|
| A | Keys | 1 |
| B | Exterior Assembly | 1 |
| C | Exterior | 1 |
| D | Mounting Plate | 1 |
| E | Adhesive | 1 |
| F | UNF10-32*60mm Screw | 2 |
| G | Interior Assembly | 1 |
| H | PM4*12MM Screw | 2 |
| I | Battery Cover | 1 |
| J | Deadbolt | 1 |
| K | KA4*20MM Screw | 4 |
| L-1 | Strike Plate (Optional) | 1 |
| M-1 | Adhesive (Optional) | 1 |
| L-2 | Strike Plate (Optional) | 1 |
| M-2 | Strike Plate (Optional) | 1 |
Lockly Secure can be fitted for both right swing doors and left swing doors.
Description
The Lockly First-Ever Doorbell Camera Smart PGD798MB makes home security simple. You can see who is at your door with its 1080p HD video and talk to them from anywhere with its two-way audio. The motion detection feature alerts your smartphone, and the night vision lets you see who is at your door even in low light. Weatherproof, the Lockly First-Ever Doorbell Camera Smart PGD798MB can survive harsh weather. You can also use the Lockly app to operate the doorbell camera from your smartphone over Wi-Fi and Bluetooth.
PREPARE DOOR FOR INSTALLATION
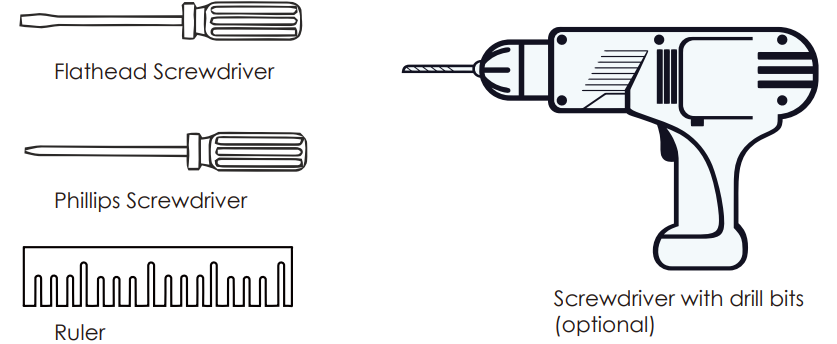
1.1: To complete installation, you would need the following:
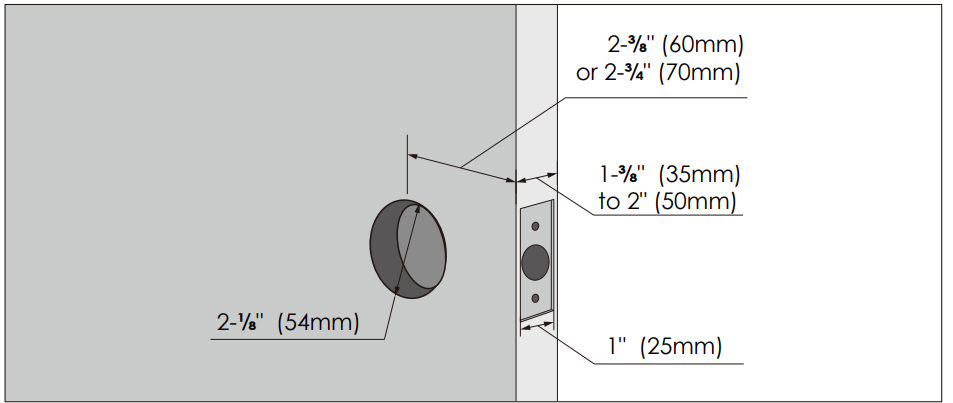
1.2: Prepare door and remove existing lock. If necessary, use provided Installation Template to prepare door.
ADJUST DEADBOLT AND INSTALL
2.1: Deadbolt slit hole must be aligned to the center of the door hole. If not adjust as shown below:
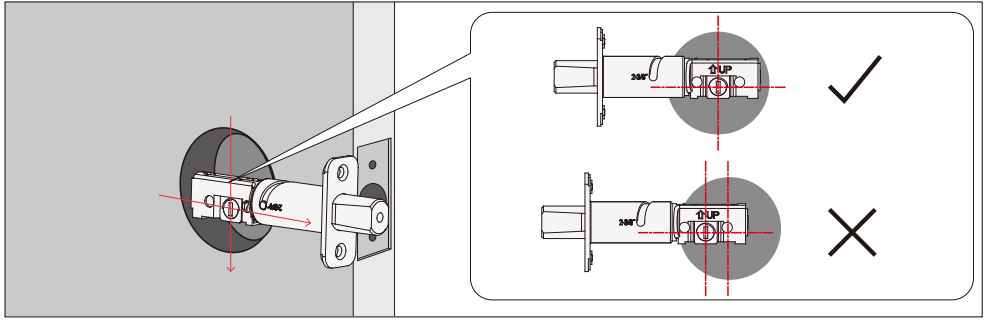
2.1.1: Wear gloves during adjustment to prevent pinching your hands.
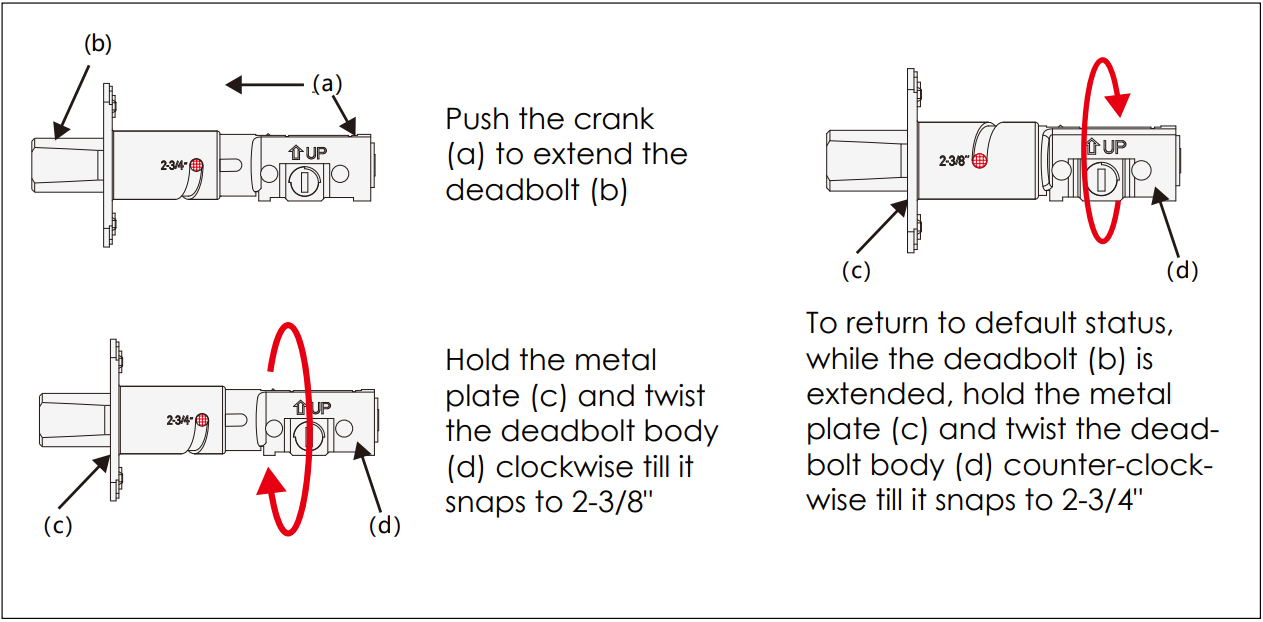
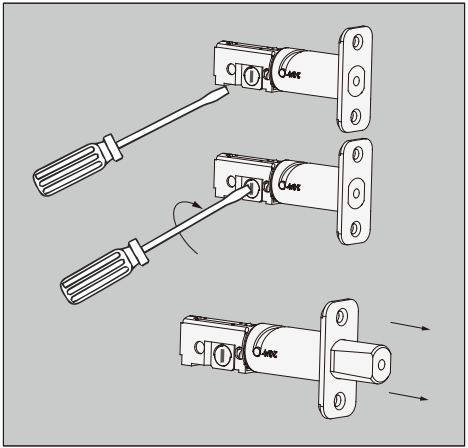
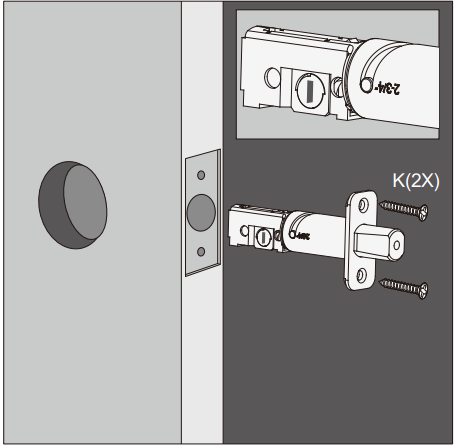
2.2: Extend the deadbolt by inserting a flat head screwdriver on the slit hole or by pushing the crank towards the metal face plate.
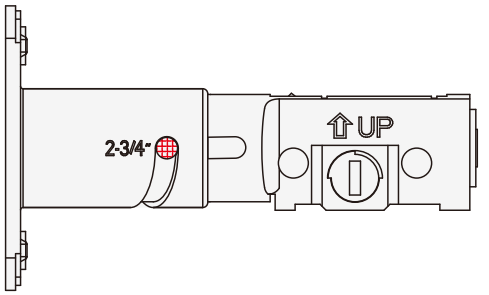
2.3: Insert the Deadbolt to the edge door hole, make sure that its right side up and the slit hole is in vertical position, then fasten with 2 screws (K).
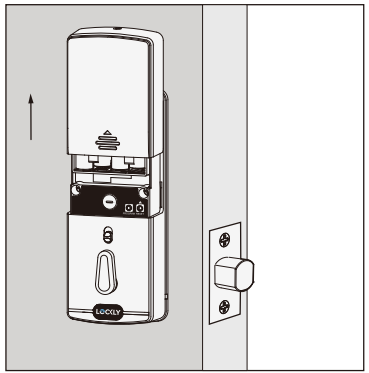
INSTALLING THE EXTERIOR ASSEMBLY
- 3.1: To secure Exterior Assembly of lock, peel the cover off the adhesive strips.
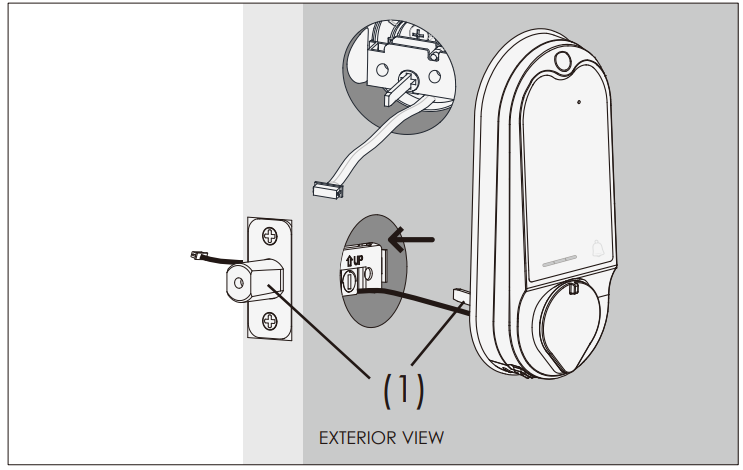
3.2: Before placing the exterior assembly on the door, make sure the torque blade is in vertical position and the deadbolt is extended.
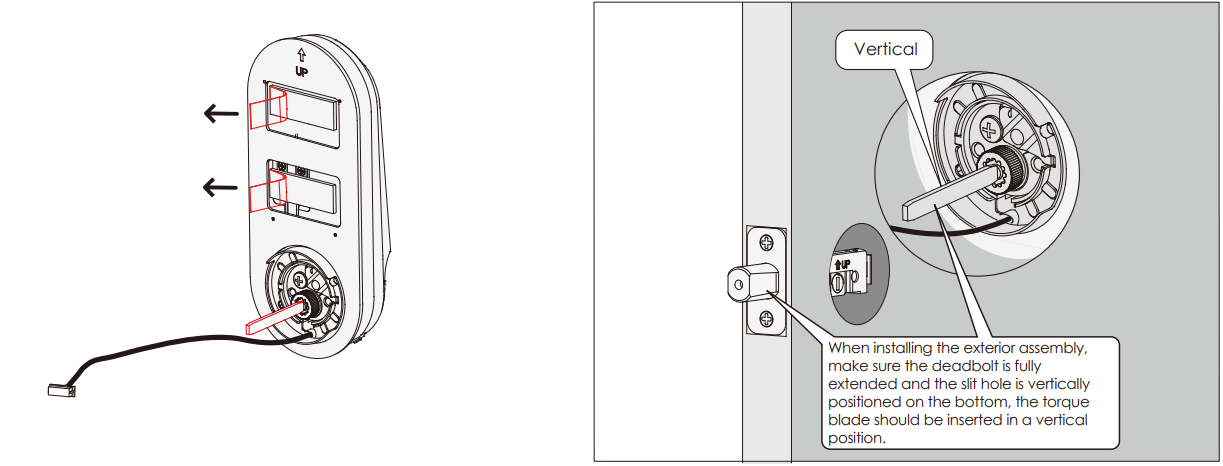
3.3: Place the exterior assembly on the door by inserting the torque blade on a vertical position to the deadbolt slit hole and guide the cable under the deadbolt. Secure and fasten with the adhesive strips.
INSTALLING THE INTERIOR ASSEMBLY
- 4.1: Peel off the cover off the adhesive strip on the mounting plate.
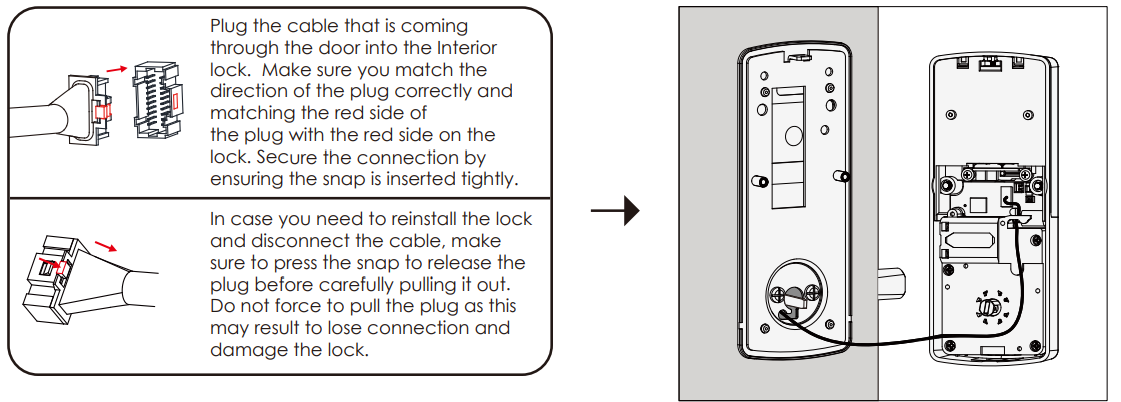
4.2: Place the mounting plate on the interior side of the door. Guide the cable to the opening ear on the side of the mounting plate and make sure the torque blade is at the center of the mounting plate.
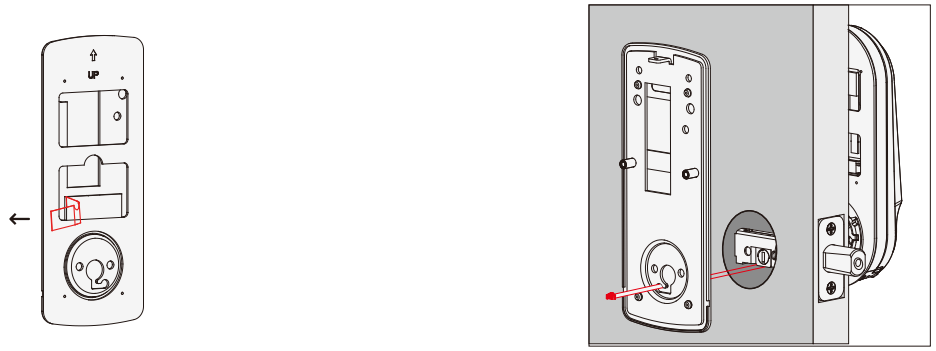
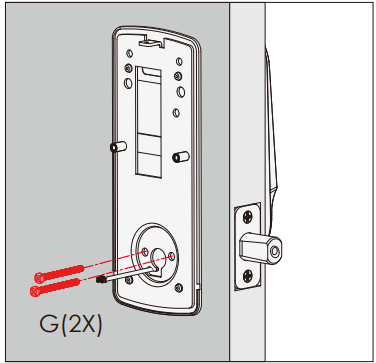
4.3: Without using any tools, insert 2 screws (G) on the side of the torque blade. By using hand carefully, turn the screws clockwise to catch the thread, then counter clockwise to make sure they are not cross threaded and turn smoothly. Make five turns before using a screwdriver to tighten the screws until the mounting plate is securely placed to the door.
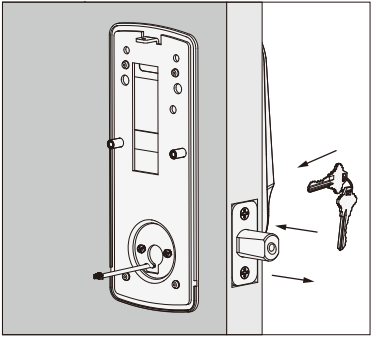
4.4: Before installing the interior assembly, use the physical key and try to unlock/lock to check if the deadbolt is moving and not stuck. Do not forget to take out the key before proceeding to next steps.
4.5:
- 4.6: Before placing the interior assembly to the mounting plate, ensure the thumb turn is vertical.
- 4.7: Place the interior assembly against the mounting plate and make sure the torque blade is inserted to the thumb turn shaft.
4.8: Secure the interior assembly with 2 screws (I).

INSTALLING BATTERIES
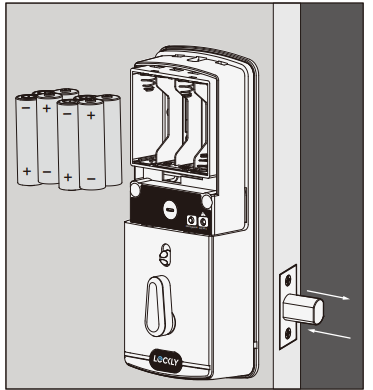
5.1: First install 3 of the 4 batteries. Before installing the last battery, press and hold the PROGRAM button while installing the last battery until you hear a beep from Lockly. Lockly will then perform a self-check and the keypad screen will start to initiate. This self-check will automatically determine and set your door lock to a left open or right open door.
- The self-check process is a very important step to ensure the installation is done properly. After the lock finishes the self-check, manually lock and unlock your door by using the thumb turn and the key to make sure the deadbolt moves smoothly. If you feel that there is tight tension while you are turning, it means that the lock may have not been installed straight. Go back to Step 2 and re-install the lock.
- To check if your lock was installed correctly, manually unlock your door by using the thumb turn, then brush your hand across the screen on the outside. Your lock should lock the deadbolt. If your lock automatically unlocks after it has been locked, it means that your lock was installed incorrectly - proceed to Step 2 to make sure your lock was installed with the deadbolt extended and the torque blade was inserted vertically while the deadbolt was extended.
5.2: After you check that the lock manually locks and unlocks and the deadbolt moves smoothly, install the battery cover with screw (H) and fasten.
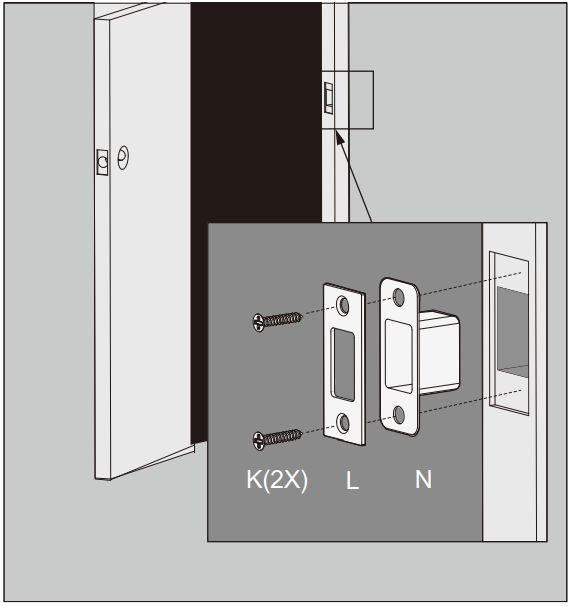
INSTALLING THE DOOR STRIKE
Install the door strike. Install the door strike to your door frame and proceed to the last step of installation of your new lock. You may use our supplied door strike or use your existing door strike as long as the deadbolt moves smoothly in and out of the door strike.
As there are many types of doors, you may need to make slight adjustments so the deadbolt moves smoothly. If anything is rubbing against the deadbolt when locking and unlocking, you may experience a warning sound (rapid beeping) indicating that the lock is experiencing misalignment or something is blocking the deadbolt.
Setup Guide
Lockly First-Ever Doorbell Camera Smart PGD798MB setup is simple. Charge the rechargeable battery and place it into the doorbell camera. Download and register the Lockly app on your smartphone. Connect the doorbell camera to Wi-Fi and Bluetooth via the app. Install the doorbell camera on your door using the provided hardware after connecting it. Finally, adjust doorbell camera settings like motion detection sensitivity and video recording using the app.
Troubleshooting
If you are having trouble with the Lockly First-Ever Doorbell Camera Smart PGD798MB, here are some common problems and solutions:
- Problem: The doorbell camera is not connecting to Wi-Fi.
Solution: Make sure your Wi-Fi network is working properly, and that you have entered the correct Wi-Fi password. If the problem persists, try resetting the doorbell camera and reconnecting it to your Wi-Fi network. - Problem: The doorbell camera is not charging.
Solution: Make sure the rechargeable battery is inserted correctly and that the charging cable is properly connected to the doorbell camera. If the problem persists, try using a different charging cable or outlet.
Pros & Cons
Pros
- 1080p HD video
- Two-way audio
- Motion detection
- Night vision
- Weatherproof
- Smartphone app control
Cons
- Expensive compared to other smart doorbell cameras
- Requires Wi-Fi connection for full functionality
Customer Reviews
Customers love the Lockly First-Ever Doorbell Camera Smart PGD798MB for its high-quality video and audio, as well as its easy setup and use. Some common complaints include the high price and the requirement for a Wi-Fi connection. Overall, the Lockly First-Ever Doorbell Camera Smart PGD798MB is a great choice for homeowners looking for a reliable and feature-packed smart doorbell camera.
Faqs
Is the doorbell Lockly First-Ever Doorbell Camera Smart PGD798MB waterproof?
What power source powers the Lockly First-Ever Doorbell Camera Smart PGD798MB?
Can my doorbell chime work with the Lockly First-Ever Doorbell Camera Smart PGD798MB?
Does the Lockly First-Ever Doorbell Camera Smart PGD798MB see at night?
How do I get doorbell camera notifications?
For the Lockly First-Ever Doorbell Camera Smart PGD798MB, what is the expected retail price?
Has the doorbell Doorbell Camera Smart PGD798MB a wide-angle lens?
Does the doorbell Doorbell Camera Smart PGD798MB support iOS and Android?
What happens when the electricity goes out?
Can I watch Doorbell Camera Smart PGD798MB footage live?
Leave a Comment