Lorex Advanced Motion Detection D841 Setup Guide | configuration
Content
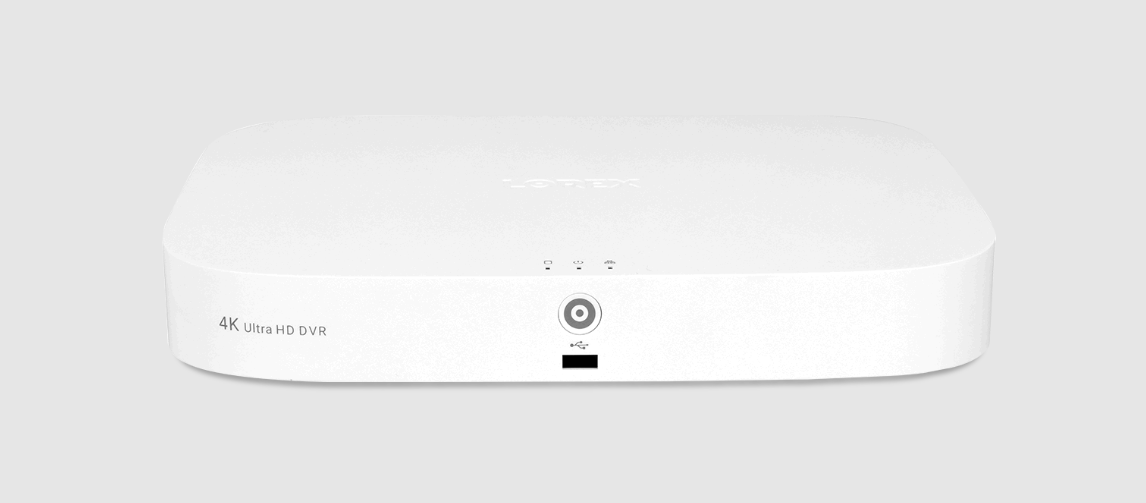
Introduction OF Lorex Advanced Motion Detection D841
The Lorex Advanced Motion Detection D841 is a state-of-the-art security camera designed to provide homeowners and businesses with advanced surveillance capabilities. This camera is equipped with advanced motion detection technology that can distinguish between people, animals, and vehicles, making it easier to monitor and protect your property. The estimated price of the Lorex Advanced Motion Detection D841 is around $200, and it was launched in the market in 2021.
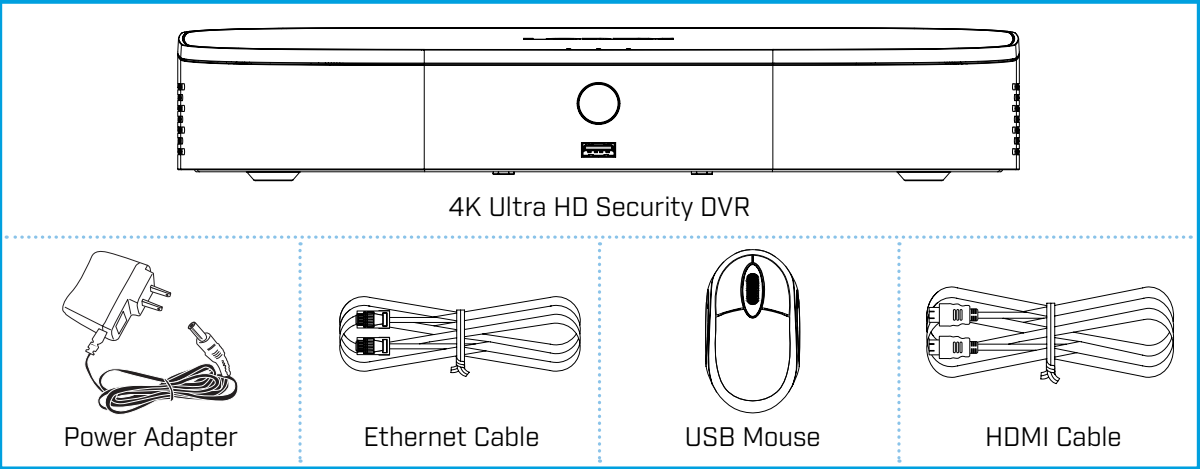
Package Contents
Lorex Detailed Specifications
The Lorex Advanced Motion Detection D841 features a 4K resolution camera with a 112-degree field of view. It has advanced color night vision technology, which provides clear and vivid images even in low light conditions. The camera also has a built-in microphone and speaker, allowing for two-way communication. The camera is also equipped with advanced analytics, such as line crossing, intrusion detection, and face detection. The camera is weather-resistant and can withstand extreme temperatures, making it suitable for both indoor and outdoor use.
Dimensions

Setting Up Your Recorder
See the steps below (expanded instructions to the right) to complete initial setup of the recorder:

Overview of extra ports
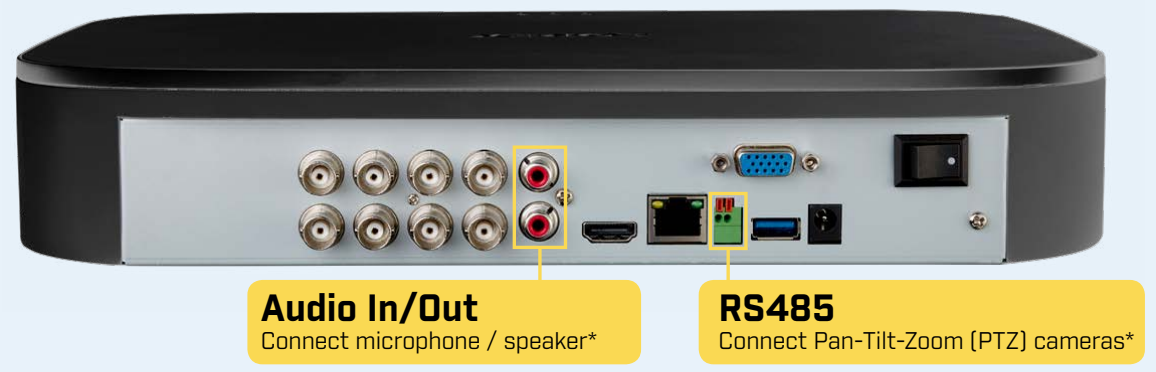
Back panels shown below are for illustration only. Your recorder’s back panel may appear different, with all the same ports in different locations.
Connect cameras
Test your cameras prior to selecting a permanent mounting location by temporarily connecting the cameras and cables to your DVR.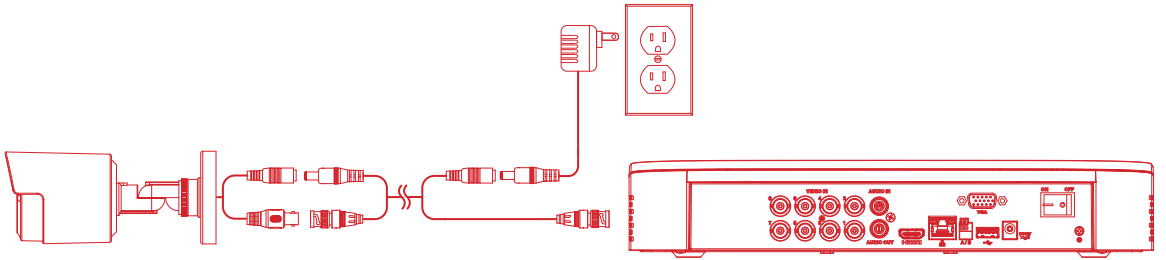
NOTES
The extension cable must be a single stretch of cable between the recorder and camera. You cannot connect multiple extension cables to each other.
This guide covers connecting cameras to your security recorder only. For full instructions on installing your cameras, please refer to your camera’s documentation at https://www.lorex.com/
Before selecting a permanent mounting location for your cameras, see Ensuring Accurate Person and Vehicle Detection below for important camera installation notes.Connect router
Connect the recorder to your router using the included Ethernet cable.
NOTE: To receive automatic firmware updates and enable remote viewing with mobile apps, a high speed Internet connection is required (minimum upload speed of 5Mbps required for 4K viewing; 3.5Mbps for lower resolutions). All other system features can be used without an Internet connection.Connect mouse
Connect the included mouse to a USB port on the recorder.
Connect monitor
Connect the recorder to a monitor using the included HDMI cable or a VGA cable (not included). The HDMI port supports up to 4K resolution, and VGA supports up to 1080p.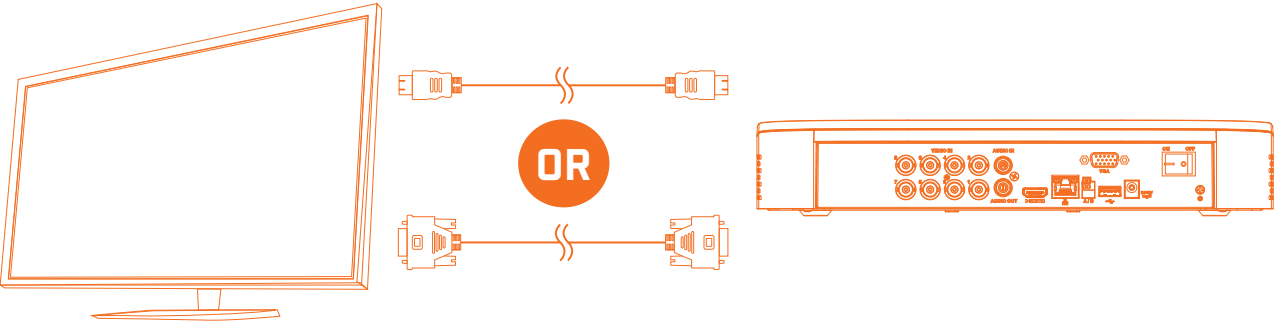
IMPORTANT: The system will automatically match the resolution of the connected monitor the first time you use the recorder. If you need to switch monitors, make sure you set the recorder to an output resolution supported by the new monitor before switching. See Changing the Recorder’s Output Resolution on the rear for details.
Connect power
Use the included power adapter to connect the recorder to a nearby outlet. Turn the recorder on using the power switch on the back panel.
Lorex Setup Wizard
When you first power up your recorder, the Lorex Setup Wizard will begin. The Wizard will help you configure core system settings.
You will also create a secure password. For future reference, it is recommended that you record your password here: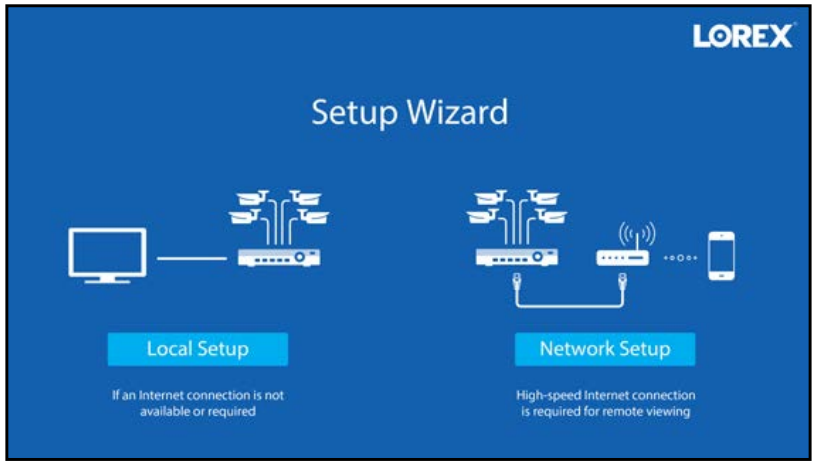
Record your password below and store in a secure place.
NOTE: In live view, hover the mouse cursor over the top of the screen to open the Navigation Bar. Move the mouse cursor away from the top of the screen to close the Navigation Bar.
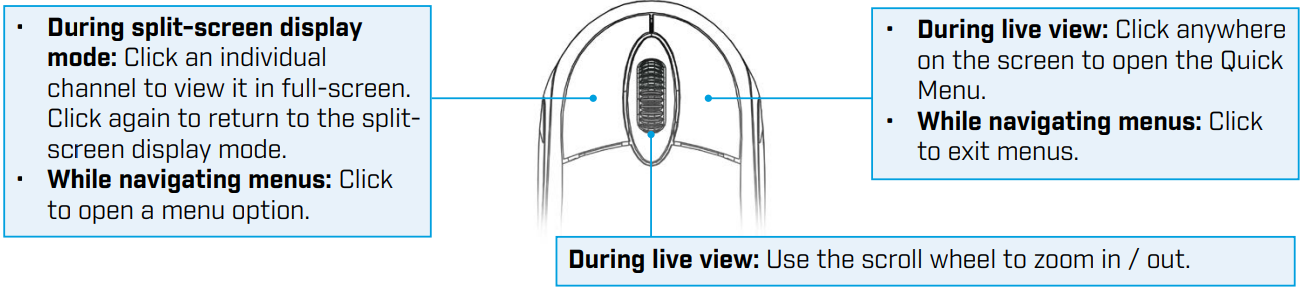
Using the Mouse
Quick Access to System Information
To quickly open a window that displays vital system information such as device ID, model number, firmware version, and IP address.
- Tap the button on the front panel of the recorder.
- Right-click to open the Quick Menu and click Info.
Using the Quick Menu
Right-click anywhere on the live viewing screen to open the Quick Menu.
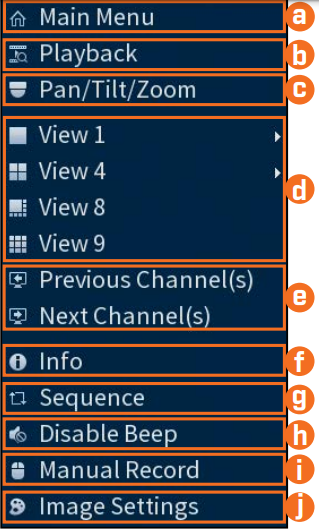
- a. Open Main Menu.
- b. Search and playback recordings.
- c. Control PTZ cameras (not included).
- d. Select camera / live display view.
- e. View previous / next channel(s).
- f. View system information
- g. Start/stop sequence mode.
- h. Temporarily disable all current audible warnings.
- i. Open manual recording controls.
- j. Adjust camera color and image settings.
Changing the Recorder’s Output Resolution
The system will automatically match the resolution of the connected monitor the first time you use the recorder.
IMPORTANT: If you need to switch the monitor, make sure you set the recorder to an output resolution supported by the new monitor before switching.
To change the recorder’s output resolution

- From live view, right-click and then click Main Menu. If prompted, log in using the system user name (default: admin) and your new, secure password.
- Click DISPLAY, then configure the following:
- Set Resolution to match the highest resolution supported by your monitor. For example, select 3840×2160 for 4K monitors, or 1920×1080 for 1080p.
- Click Apply. The recorder will restart before changes take effect.
Playback
Search through and play video recordings from the hard drive.
To search for and play recordings
- From live view, right-click and then click Playback. If prompted, log in using the system user name (default: admin) and your new, secure password.
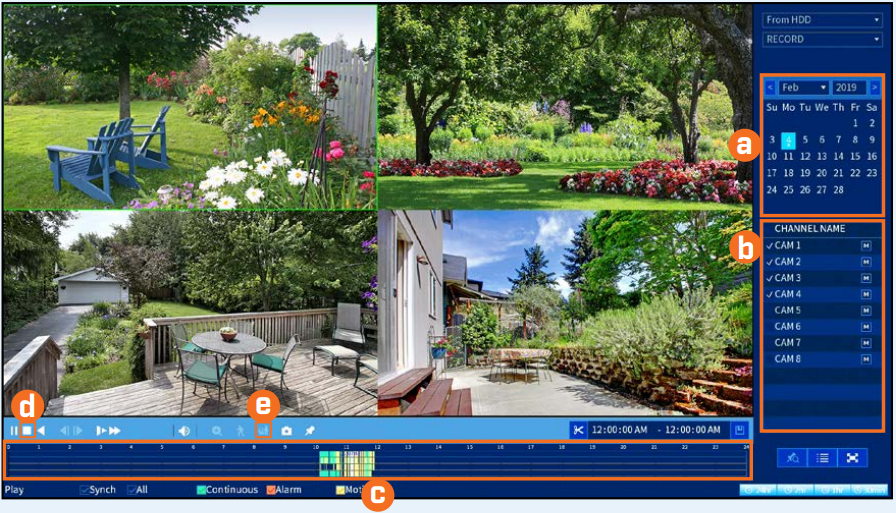
- Configure the following:
- Use the calendar on the right to select the date to playback.
- Check channels you want to play back. Click the icon beside each selected channel to select Mainstream (M) or Substream (S) video quality.
- Click inside the video bar to select the playback time. Playback starts immediately at the selected time.
To filter for person / vehicle recordings
You must enable Smart Motion Detection on any and all channels you would like to filter for person / vehicle detection. See the section Motion & Advanced Person/Vehicle Detection for details. - Click
 to stop current playback.
 - Hover over the icon. Check
 Person and Vehicle to filter available playback events. Wait a few seconds for the video bar to show detection events.
Backup
Back up recordings from the hard drive to a USB flash drive (not included).
To back up recordings

- Insert a formatted USB flash drive (not included) into a free USB port on the recorder.
- From live view, right-click and then click Main Menu. If prompted, log in using the system user name (default: admin) and your new, secure password.
- Click BACKUP.
- Configure the following:
- Select your USB drive and the folder for the backup.
- Select the channel(s) and recording types to search by.
- Select a start and end time.
- Choose a file format.
- Click Add to see recordings that match your search.
- Check boxes next to recordings you want to back up.
- Click Backup.
Motion & Advanced Person/Vehicle Detection
Set preferences for motion detection. This section includes setup of person/vehicle detection. By default, person/vehicle detection is enabled on channels 1-4.
To configure motion & advanced person/vehicle detection
- From live view, right-click and then click Main Menu. If prompted, log in using the system user name (default: admin) and your new, secure password.
- Click ALARM. Click MOTION on the far-left, then click the Motion Detect tab.
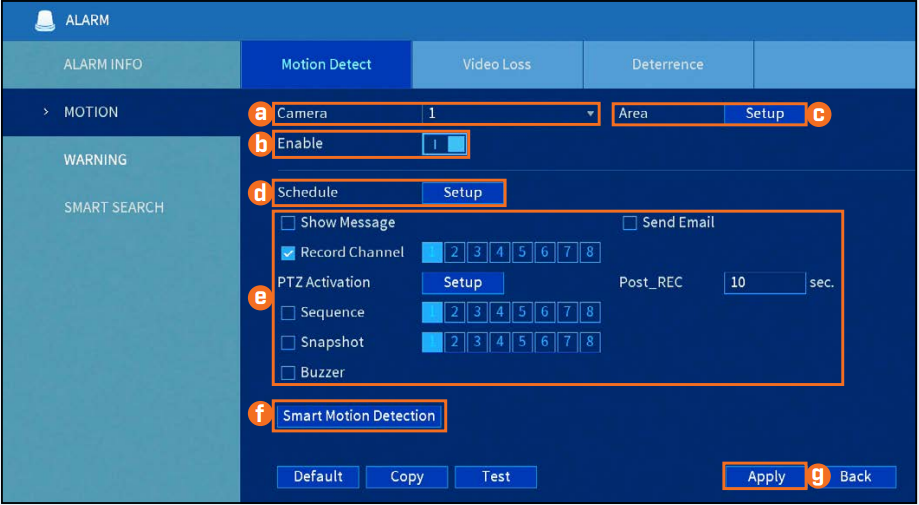
- Configure the following:
- Select the channel you would like to configure.
- Click Enable.
- Click Setup next to Area to set an active area for motion detection. See Figure 1 below for details.
- Click Setup next to Schedule to set the weekly schedule for motion detection. See Figure 2 below for details.
- Set preferences for how the system reacts to motion detection events.
- Click Smart Motion Detection to enable person / vehicle detection. See Figure 3 below for details.
- Click Apply to save changes.
Motion Detection Area
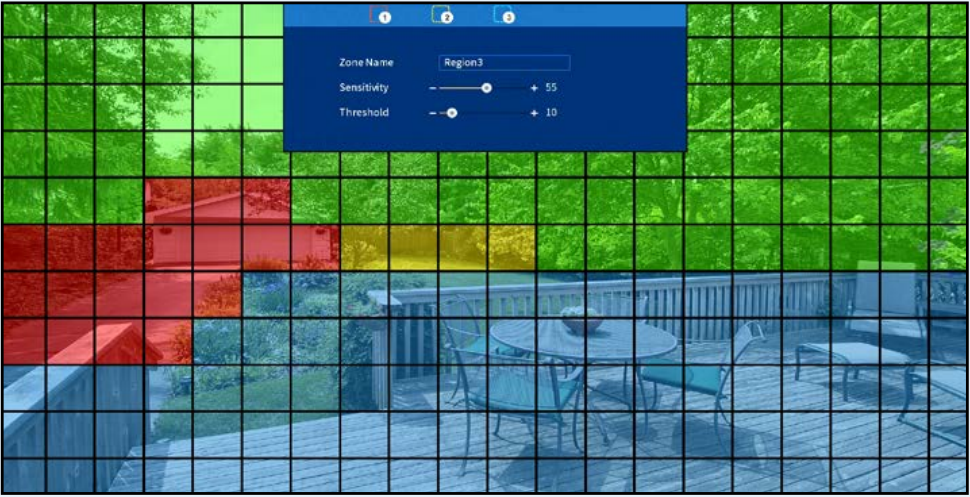
- The camera image appears with a red grid overlay. This means the entire image is enabled for motion detection.
- Click or click-and-drag to add / remove boxes from the active area. Cells that have been removed from the active area appear green.
- Hover near the top of the image to reveal zone selection. You can set up to 3 different zones with different sensitivity and threshold values.
- Right-click when finished.
Motion Schedule
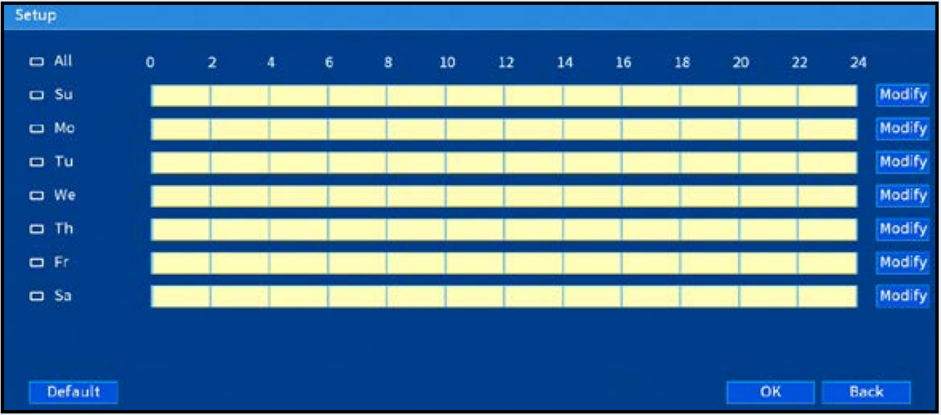
- The default schedule, shown in Figure 2, is active at all times.
- Click Modify to change the schedule for the corresponding day of the week.
- Click OK when finished.
Smart Motion Detection
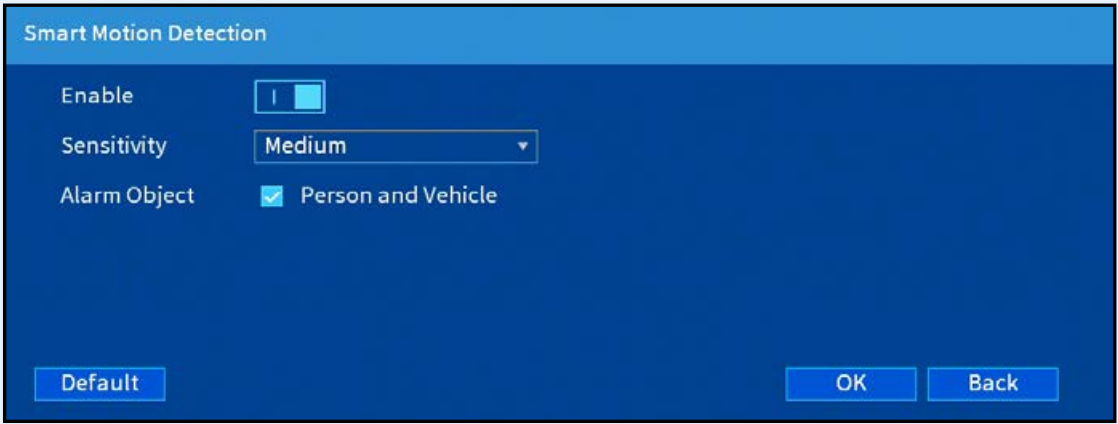
- Click Enable to allow detection of people and vehicles on the selected channel.
IMPORTANT: A maximum of 4 channels will support person/vehicle detection at once. By default, channels 1-4 have person/vehicle detection enabled. - Select a Sensitivity level (a high sensitivity value will detect smaller objects than a low value).
- Check Person and Vehicle.
- Click OK when finished.
Configuring Deterrence Settings
Set preferences for automatic warning light triggering on compatible Lorex deterrence cameras.
To configure deterrence settings

- In live view, right-click and click Main Menu. If prompted, log in using the system user name (default: admin) and your new, secure password.
- Click ALARM. Click MOTION on the far-left, then click the Deterrence tab.
- Configure the following:
- Select the channel of a connected deterrence camera.
- Check Enable.
- Click Setup next to Warning Light to configure preferences.
- Click Setup next to Area to set an active area for automatic deterrence. See Figure 4 below for details.
- Click Setup next to Schedule to set the weekly schedule for automatic deterrence. See Figure 5 below for details.
- Click Apply.
Deterrence Area of Lorex Advanced Motion Detection D841
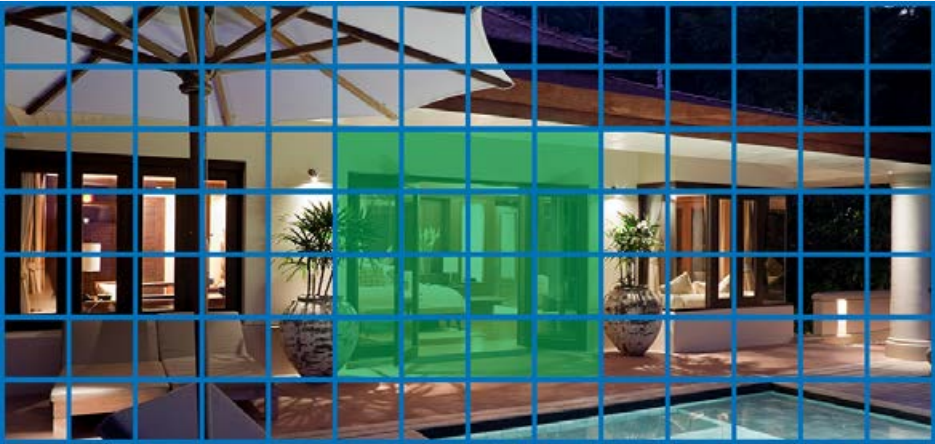
- The camera image appears with a grid overlay. The green area is the active area for deterrence.
- Click or click-and-drag to add / remove boxes from the active area.
- In Figure 4, only motion around the doorway will trigger warning light.
- Right-click when finished.
Deterrence Schedule

- The default schedule, shown in Figure 5, is active during the night, between 5pm and 7am.
- Click Modify to change the schedule for the corresponding day of the week.
- Click OK when finished.
Lorex Advanced Motion Detection D841 Description
The Lorex Advanced Motion Detection D841 is a high-end security camera that provides advanced surveillance capabilities. Its advanced motion detection technology can distinguish between people, animals, and vehicles, reducing the number of false alarms. The camera's 4K resolution and 112-degree field of view ensure that you get a clear and wide-angle view of your property. The camera's color night vision technology provides clear and vivid images even in low light conditions. The camera's built-in microphone and speaker allow for two-way communication, making it easier to communicate with family members, delivery personnel, or deter potential intruders.
Setup Guide
To set up the Lorex Advanced Motion Detection D841, follow these steps: 1. Download the Lorex Home app and create an account. 2. Connect the camera to a power source and wait for it to turn on. 3. Use the app to scan the QR code on the bottom of the camera. 4. Follow the prompts in the app to connect the camera to your Wi-Fi network. 5. Mount the camera in your desired location using the included mounting kit. 6. Adjust the camera's angle and field of view to your liking. 7. Test the camera's motion detection and two-way communication features.
Lorex Advanced Troubleshooting
If you encounter any issues with the Lorex Advanced Motion Detection D841, try the following troubleshooting steps: 1. Make sure the camera is connected to a power source and turned on. 2. Check that the camera is connected to your Wi-Fi network. 3. Ensure that the camera's lens is clean and free of obstructions. 4. Make sure the motion detection settings are correctly configured. 5. If the camera is still not working, try resetting it to its factory settings.
Pros & Cons
Pros
- Advanced motion detection technology
- 4K resolution camera with a wide field of view
- Color night vision technology
- Two-way communication features
- Weather-resistant and suitable for indoor and outdoor use
Cons
- Expensive compared to other security cameras
- Requires a Wi-Fi connection to use all features
Customer Reviews about Motion Detection D841
Customers have praised the Lorex Advanced Motion Detection D841 for its advanced motion detection technology and clear image quality. However, some customers have complained about the camera's high price point and the need for a Wi-Fi connection to use all features. Overall, customers have rated the camera highly for its surveillance capabilities and ease of use.
Faqs
How Can I Configure the Settings on My Lorex Advanced Motion Detection D841?
Can I Access Lorex Advanced Motion Detection D841 System Remotely?
How to Effectively Position Your Lorex Advanced Motion Detection D841 for Maximum Coverage?
What Steps Should I Follow for Updating My Lorex Advanced Motion Detection D841 Firmware?
How Do I Troubleshoot Connectivity Issues with My Lorex Advanced Motion Detection D841 System?
What Are the Best Practices for Securing the Recorded Data on My Lorex Advanced Motion Detection D841?
How Can I Optimize Night Vision on My Lorex Advanced Motion Detection D841?
How to Create Custom Surveillance Zones with Lorex Advanced Motion Detection D841?
Can I Integrate Smart Home Devices with My Lorex Advanced Motion Detection D841 System?
What is the price of the Lorex Advanced Motion Detection D841?
Leave a Comment