How to Assemble: Louisville Attic Ladder AA2210 Guide
Content
Introduction of Louisville Attic Ladder AA2210
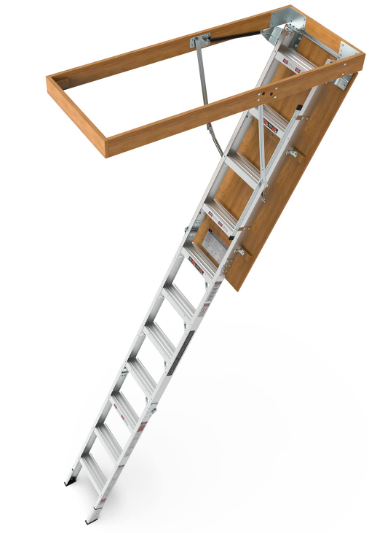
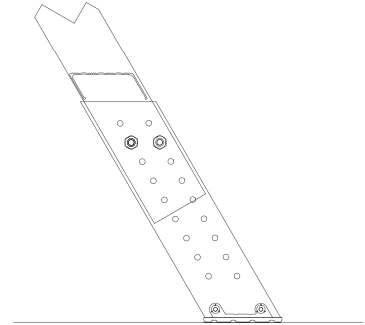
The Louisville Attic Ladder AA2210 is a popular choice for homeowners looking for a sturdy and reliable way to access their attic spaces. This ladder is made of high-quality materials and is designed to last for years of regular use. It has an estimated price range of $200 to $300 and was launched in 2020. The AA2210 model is suitable for ceiling heights between 7 feet and 10 feet and can support up to 250 pounds.
Included with your Folding Attic Ladder
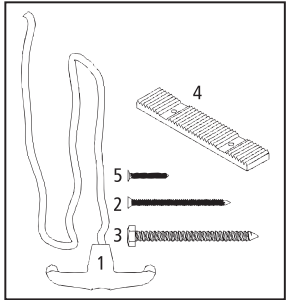
WOOD SERIES | ||
NO. | ITEM | QTY |
1 | Pull cord 36” | 1 |
2 | Deck screw2 1/2” | 8 |
3 | Lag screw3” | 10 |
4 | Plastic Shoe | 2 |
5 | Wood screw 1” | 4 |
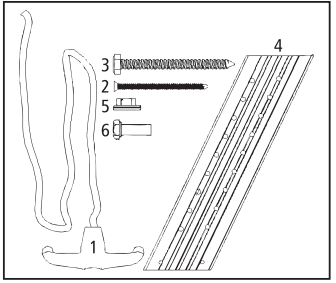
ALUMINUM SERIES | ||
NO. | ITEM | QTY |
1 | Pull cord 36” | 1 |
2 | Deck screw2 1/2” | 8 |
3 | Lag screw3” | 10 |
4 | Aluminum Feet (mounted on ladder) | 2 |
5 | 1/4” Nuts (mounted on ladder) | 4 |
6 | Bolts 1/4” x ¾” large (mounted on ladder) | 4 |
MATERIALS REQUIRED
- Stepladder
- Hammer
- Adjustable wrench
- Tape measure
- Hand saw
- Hack saw
- Drill
- Drill bit 1/8”,1/16”
- Phillips screw driver
- (2) Temporary boards 1” x 4” x 32”
- Shims
INSTALLATION INSTRUCTIONS FOR WOOD MODELS AND FOR ALUMINUM MODELS READ INSTRUCTIONS AND WARNINGS COMPLETELY BEFORE STARTING
IMPORTANT: Do not open folding attic ladder until instructed to in step number 3.
Louisville Attic Ladder AA2210 Detailed Specifications
The Louisville Attic Ladder AA2210 has several key features that make it a popular choice for homeowners. These include:
- 7-foot to 10-foot ceiling height range
- Maximum weight capacity of 250 pounds
- Aluminum construction for durability and lightweight use
- Insulated door to help maintain energy efficiency
- Spring-loaded design for easy opening and closing
- Non-marring feet to protect flooring
- Hardware for secure installation
- Handrail and prop pole for added safety
FOLDING ATTIC LADDER LOCATION
Allow ample room for the swing clearance and the landing space of the folding attic ladder when it is opened (see Figure 3 and table 1). Locate the folding attic ladder rough opening so that when you enter the storage area, you will have adequate head clearance.
You must have a rough opening of 22 1/2” x 54” or 25 1/2” x 54”. If not, proceed to the appendix for framing instructions.
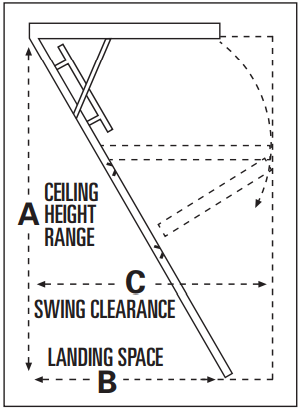
MODEL | ROUGH OPENING | CEILING HT. RANGE “A” | LANDING SPACE “B” | SWING CLEARANCE “C” |
AA2510 | 25 1/2” x 54” | 7’ 8” – 10’ 3” | 67” | 74” |
AA2210 | 22 1/2” x 54” | 7’ 8” – 10’ 3” | 67” | 74” |
WA2210 | 22 1/2” x 54” | 7’ 11” – 10’ 3” | 64 1/2” | 74” |
PRELIMINARY INSTALLATION INSTRUCTIONS
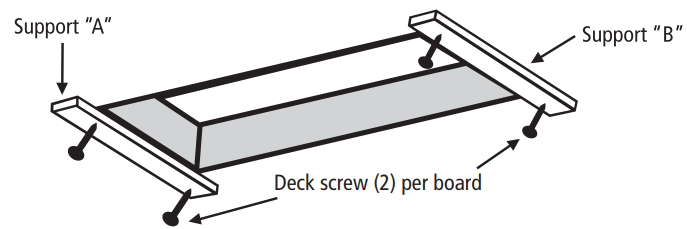
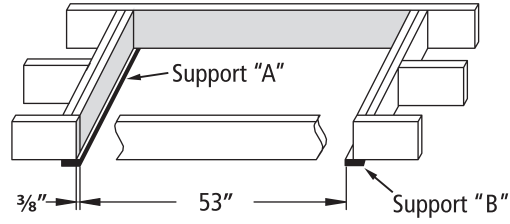
Attach temporary supports “A” and “B” with 2 ½” deck screws as shown in Figure 4. Support “A” should be located at the end where the door hinge of the ladder will go. The edge of support “A” should extend into the rough opening 3/8” as shown in Figure 5. Make sure both screws penetrate header above ceiling.
Measuring from the inside edge of support “A”, locate and secure the inside edge of support “B” 53” from inside edge of support “A” (Figure 5). Make sure both screws penetrate header above ceiling.
- Thread pull cord through pre–drilled hole in door and tie a knot in end of cord. Length can be adjusted after ladder is completely installed. Be sure the knot is large enough to not slip through the hole. For aluminum models, remove aluminum feet on bottom section. These will be reinstalled in Step 3.
- Position one person up in the attic, and position the other person in the room below. When using stepladder make sure ladder is fully open, all feet firmly supported and user’s weight and materials he is carrying does not exceed the load rating of the ladder.
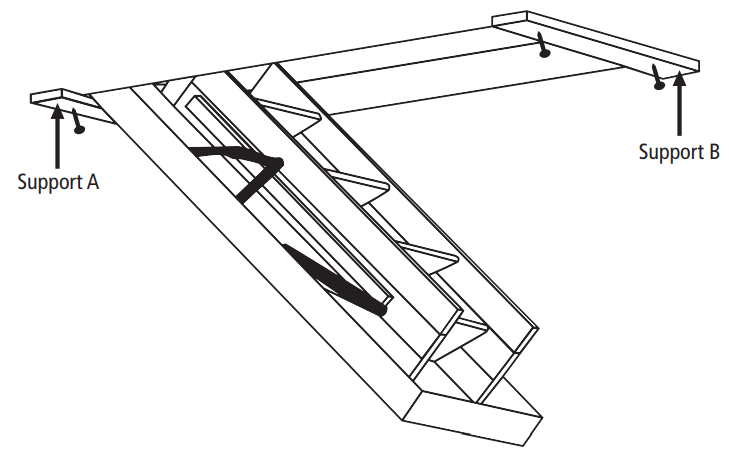
The person below will need to raise the attic ladder into the rough opening and with assistance from person above position securely on the temporary support boards (Figure 6).
Make sure frame on door hinge side of ladder is pushed up against header and is centered side to side in rough opening. Temporarily secure frame to header using two 2 ½” deck screws (Figure 7). Do not use pre–drilled holes for deck screws. Pre–drilled holes are used in Step 2.
CAUTION: This is only a temporary connection, NEVER climb on ladder in this condition.
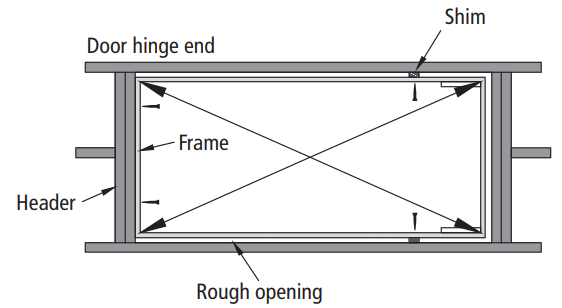
- Carefully open attic ladder door but do not unfold the climbing section until indicated in step 3. Center and square the opposite side of attic ladder frame in the rough opening using shims. Ensure ladder frame is square by measuring diagonals of the frame within 1/8” (Figure 7).
- Secure sides of ladder frame to ceiling joists with 2 1/2” deck screws at shim locations (Figure 7). Do not use pre–drilled holes for deck screws. Pre–drilled holes are used in Step 2.
PERMANENT INSTALLATION
The ladder comes with pre–drilled holes for permanent installation at locations shown in Figure 8 for wood models and Figure 9 for aluminum models. Shim, when necessary to fill space between ladder frame and rough opening, at pre–drilled locations. Using 1/8” drill bit, drill pilot holes through shim into ceiling joists and header.

- Install the ten 3” lag screws provided, at each location to permanently secure the ladder.
- WARNING: Never use deck or sheetrock screws in place of lag screws for permanent installation.
Remove temporary boards from ceiling installed in step 1.
ADJUST LADDER LENGTH
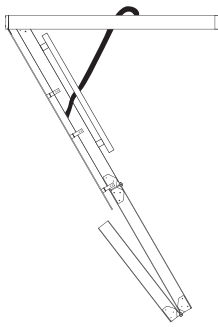
Remove plastic straps holding the sections together and carefully unfold ladder to the ground rotating bottom section behind middle section (Figure 10).
WOOD MODELS ONLY: (Aluminum models: skip to next section on page 8)
- Press down on top and middle sections of the ladder to ensure the power arms are fully extended before taking measurements for trimming your ladder.
With a straight edge, measure distances from middle section to floor, for both A & B lengths (Figure 11). Record the results in the space provide in table 2. Take measurements for both the left and right rails.
LEFT RAIL
RIGHT RAIL
A
B
A
B
Measurement to floor
Subtract for rubber shoe
(-1/4”)
(-1/4”)
(-1/4”)
(-1/4”)
Rail cut length
- Complete the table: Subtract 1/4” from each measurement and record in table 2 in row titled “Cut Length”
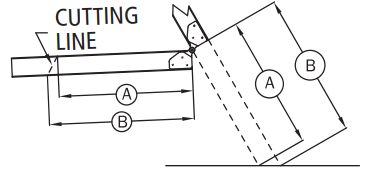
- Transfer these dimensions to the bottom section of the ladders right and left rails and draw a cutting line between the two points. Trim bottom section to length using wood saw.
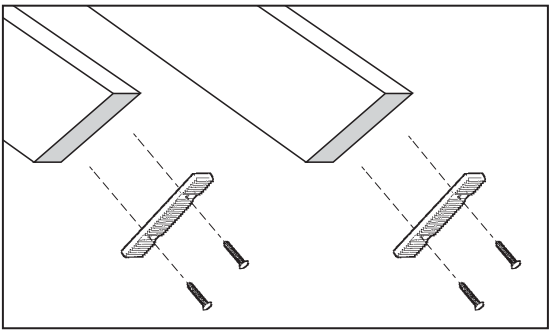
Install rubber tread to bottom ends of rail using 1” screws provided. Drill 1/16” pilot holes into wood prior to installing screws to prevent splitting of rail (Figure 12).
Proceed to “Check the length after making your cuts” on page 9.
ALUMINUM MODELS ONLY
- Using a tape measure double check the height of the ceiling.
Determine the location to cut the ladder and ladder feet for your ceiling height from table 3.
CEILING HEIGHT
RAIL CUT
FOOT CUT
7’ 8” – 7’ 9”*
Figure 13, step #3
E
7’ 10” – 7’ 11”
C
E
8’ – 8’ 2”
C
D
8’ 3” – 8’ 5”
C
no cut
8’ 6”
Figure 13, step #2
no cut
8’ 7” – 9’ 1”
B
no cut
9’ 2” – 9’ 4”
A
no cut
9’ 5” – 9’ 10”
Figure 13, step #1
no cut
9’ 11” – 10’ 3”
no cut
no cut
Cut the side rails and ladder feet (when required) at the appropriate line.
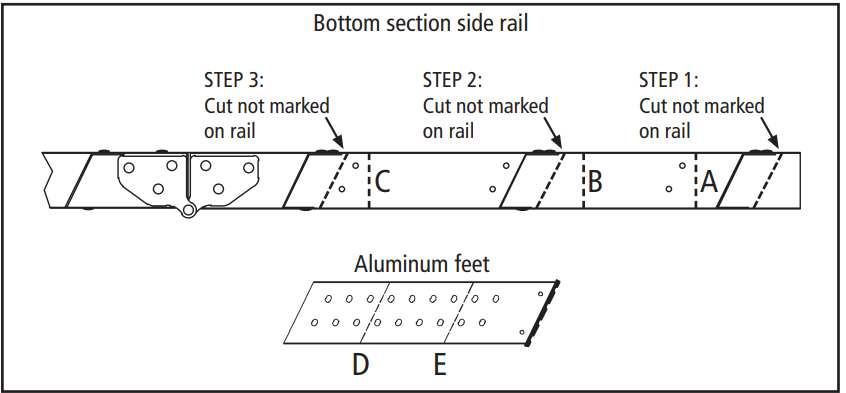
NOTE: The rail is not pre–marked for angle cuts required below a step (see Figure 13).
- Press down on the climbing section to ensure that the folding arms are fully extended.
Slide aluminum foot over ladder rail as shown in Figure 14. Position so the rubber foot is in contact with the floor. Align with closest set of predrilled holes in rail. Attach using (2) 1/4” bolts and serrated nuts per side (included).
Check the length after making your cuts
Again, be sure the attic ladder power arms are fully extended. Trimmed correctly, your attic ladder should look like Figure 16. Verify that there are no gaps in the section and both feet are flat on the floor.
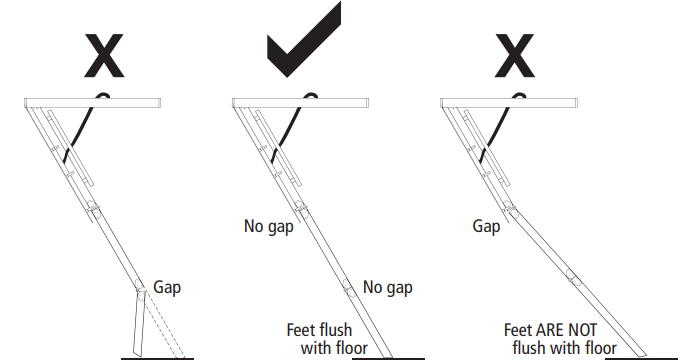
- If the attic ladder looks like Figure 17, then both of the legs are too long and need to be trimmed further.
- If the attic ladder looks like Figure 15, then both of the legs are too short, and the attic ladder is not safe to use. A new lower section would need to be purchased from the manufacturer.
- To install trim molding leave 3/8” clearance between your door panel at the hinged end and 1/8” on other 3 sides.
Appendix
Framing A Rough Opening Parallel To Ceiling Joist
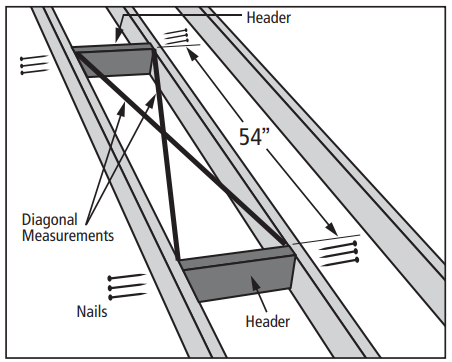
Make a rough opening to the size as required in table 1 ensuring that the dimensions of the diagonals of the frame are the same as illustrated in Figure 18.
MODEL | ROUGH OPENING | CEILING HT. RANGE “A” | LANDING SPACE “B” | SWING CLEARANCE “C” |
AA2510 | 25 1/2” x 54” | 7’ 8” – 10’ 3” | 67” | 74” |
AA2210 | 22 1/2” x 54” | 7’ 8” – 10’ 3” | 67” | 74” |
WA2210 | 22 1/2” x 54” | 7’ 11” – 10’ 3” | 64 1/2” | 74” |
- For Rough opening without joist removal (Figure 18)
- Locate headers in front and rear of the opening as shown in Figure 18.
- Check for squareness by making sure that diagonal measurements are within 1/8”.
Secure using (3) 16d nails into each end of the Header.
- Rough opening with joist removal (Figure 19)
- Install temporary support boards spanning both sides of joists to be removed.
Remove joist at length to allow for double headers to be installed on both ends of opening.
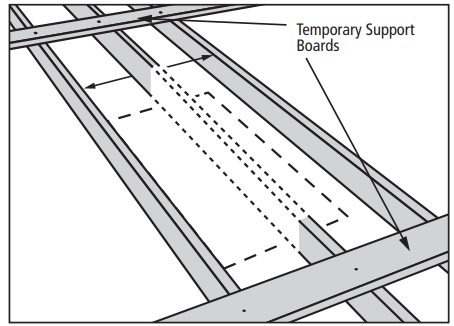
- Locate double headers at each end of opening and secure with (3) 16d nails into each end of the headers.
- Install stringer and check for squareness by making sure that diagonals are within 1/8”.
Secure using (3) 4” nails into each end of the stringer.

CAUTION: Consult an engineer or architectural approval for installations that require the removal of roof trusses or rough openings perpendicular to the ceiling joists.
Description
The Louisville Attic Ladder AA2210 is a high-quality ladder that is easy to install and use. It is made of durable aluminum and features a spring-loaded design that makes it easy to open and close. The ladder also has an insulated door to help maintain energy efficiency in your home. The AA2210 model is suitable for ceiling heights between 7 feet and 10 feet and can support up to 250 pounds. It also comes with a handrail and prop pole for added safety. The ladder is easy to install and comes with all the necessary hardware. The non-marring feet protect your flooring and the ladder is lightweight yet sturdy, making it a great choice for homeowners.
Louisville Attic Ladder AA2210 Setup Guide
To operate the Louisville Attic Ladder AA2210, follow these steps:
- Before installing the ladder, make sure the attic floor is level and clear of debris.
- Locate the ceiling joists and mark them for installation.
- Attach the ladder to the ceiling joists using the included hardware.
- Open the ladder and make sure it is securely attached to the ceiling joists.
- Test the ladder by climbing up and down, making sure it is stable and secure.
- Use the prop pole for added safety and stability when climbing up and down the ladder.
WARNING: Before you start installing your new Louisville Ceiling Mounted Folding Attic Ladder, you must read and understand the following:
- For residential use only. Not for use in a commercial or industrial setting.
- Installation requires two people.
- Do NOT remove plastic straps holding the ladder sections together until instructed.
- Check the ceiling height to make sure the ladder length is correct. If the ladder is too short, return it to the point of purchase for an exchange. Under no circumstance is any folding attic ladder to be used when the ceiling–to–floor measurement exceeds the maximum ceiling height as indicated for the Ceiling Mounted Folding Attic Ladder you are installing (See “Ceiling Height Range” column in table 1).
- This folding attic ladder is completely assembled and is ready for installation. Do not disassemble it to install.
- The springs / gas cylinders on this folding attic ladder are under pressure. Do not attempt to remove or replace before installation.
- Prior to installation, verify that all fasteners are properly tightened. Re–check these periodically after initial installation.
- Make sure there is no wiring or piping that the saw or drill can come in contact with during installation.
- Opening or standing on the folding attic ladder’s climbing sections prior to properly fastening to ceiling joists could cause serious bodily injury.
- Verify that the unit meets local building codes and that the intended area of installation is of sufficient strength to be used for a walking or working surface.
- If the home has roof trusses, do not cut the ceiling joists without consulting an engineer for approval.
- Before installation, read all the instruction labels on the folding attic ladder.
- Improper installation could result in serious bodily injury.
- Do not attempt to open the door prior to installation.
- Only use the lag screws provided for the permanent installation step.
- Follow the “Adjust The Ladder Height” instructions on Step 3 for proper trimming instructions.
- Annually lubricate (spray silicon recommended) pivot points of right and left folding arm mechanism (power arm assembly) to provide smooth, long–lasting operation.
Troubleshooting of Louisville Attic Ladder AA2210
If you encounter any issues with the Louisville Attic Ladder AA2210, try these troubleshooting tips:
- Make sure the ladder is securely attached to the ceiling joists.
- Check the ladder for any damage or wear and tear.
- Make sure the ladder is fully opened and closed before using it.
- Use the prop pole for added stability and safety.
- If the ladder is difficult to open or close, check for any obstructions and make sure the springs are not damaged.
Pros & Cons
Pros
Built to last, offering reliable stability.
Comes with clear instructions, making it user-friendly for DIY enthusiasts.
Designed for ease of use, ensuring the ladder extends and retracts smoothly.
Equipped with slip-resistant steps and adjustable feet to enhance safety.
Cons
Features an insulated door to help reduce energy costs.
Has a maximum load capacity, which may not be suitable for all users.
Requires specific dimensions in the ceiling, which might not fit all homes.
The ladder itself is heavy, which could complicate installation without help.
Faqs
What is the Louisville Attic Ladder AA2210's weight capacity?
What is the Louisville Attic Ladder AA2210's ceiling height range?
Is a railing included with the Louisville Attic Ladder AA2210?
Is installing the Louisville Attic Ladder AA2210 a simple task?
Is it possible to use the Louisville Attic Ladder AA2210 for commercial purposes?
What is the weight of the Louisville Attic Ladder AA2210?
Is it possible to paint the Louisville Attic Ladder AA2210?
What is the Louisville Attic Ladder AA2210 return policy?
Where can I purchase the AA2210 Louisville Attic Ladder?
What is the Louisville Attic Ladder AA2210's warranty?
Leave a Comment