Makita Cordless Angle Drill DA39lDW | Operating Instructions
Content
Introduction Of Makita Cordless Angle Drill DA39lDW
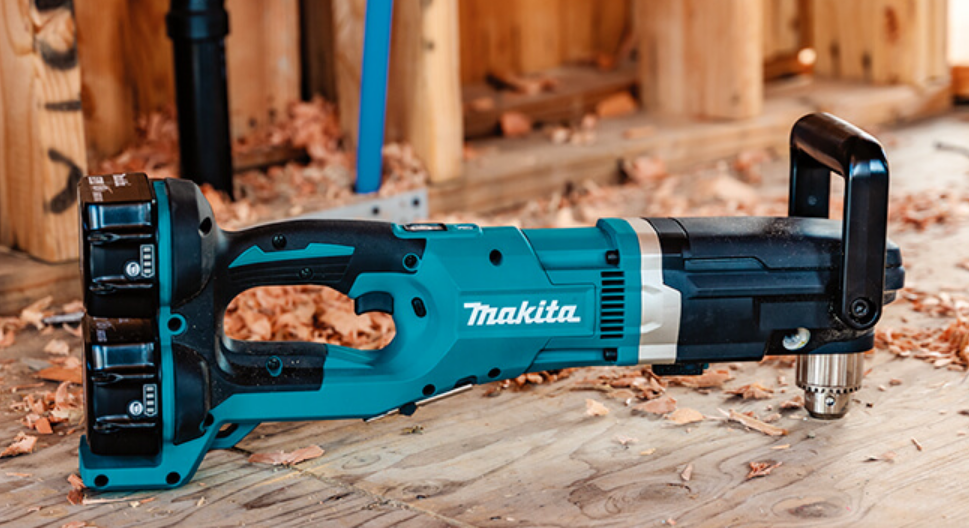
The Makita Cordless Angle Drill is a powerful and versatile tool that is perfect for a variety of drilling and driving applications. This cordless drill features a powerful motor that delivers 480 inch-pounds of max torque, allowing you to handle even the toughest drilling tasks with ease. The angle drill design also allows for greater access in tight spaces, making it an ideal choice for electrical, plumbing, and HVAC work. With a compact and lightweight design, the Cordless Angle Drill DA39lDW is comfortable to use and easy to maneuver, even in tight spaces. This tool is expected to be launched in the market with an estimated price range of $250 to $300.
Detailed Specifications
The Makita Cordless Angle Drill features a 4-pole motor that delivers 480 inch-pounds of max torque and 0-1,500 RPM. It has a 2-speed transmission that allows for precise drilling and driving control. The drill also features a 1/2-inch keyless chuck that accepts a variety of drill bits. The compact and lightweight design of the drill weighs only 3.8 lbs. with a battery, making it easy to handle and maneuver. The drill also features an LED light that illuminates the work area, making it easier to see in dark spaces. Additionally, the drill includes a belt clip for easy storage and transportation.
| Model DA391D |
|---|
| Capacities | No load speed (RPM) | Dimensions (L x W x H) | Net weight |
|---|---|---|---|
| Steel: 10 mm (3/8") | |||
| Wood: 12 mm (15/32") | 0 – 800 | 335 mm x 59 mm x 115 mm | 1.3 kg |
| Wood screw: 4.5 mm x 20 mm | (13-1/4” x 2-3/8” x 4-1/2”) | (2.9 lbs) | |
| (3/16” x 3/4") |
| Battery Cartridge 9000 | Model DC9700 Fast Charger |
|---|---|
| Voltage | Input |
| 9.6 V | A.C. only 50 Hz – 60 Hz |
Manufacturer reserves the right to change specifications without notice.
Note: Specifications may differ from country to country.
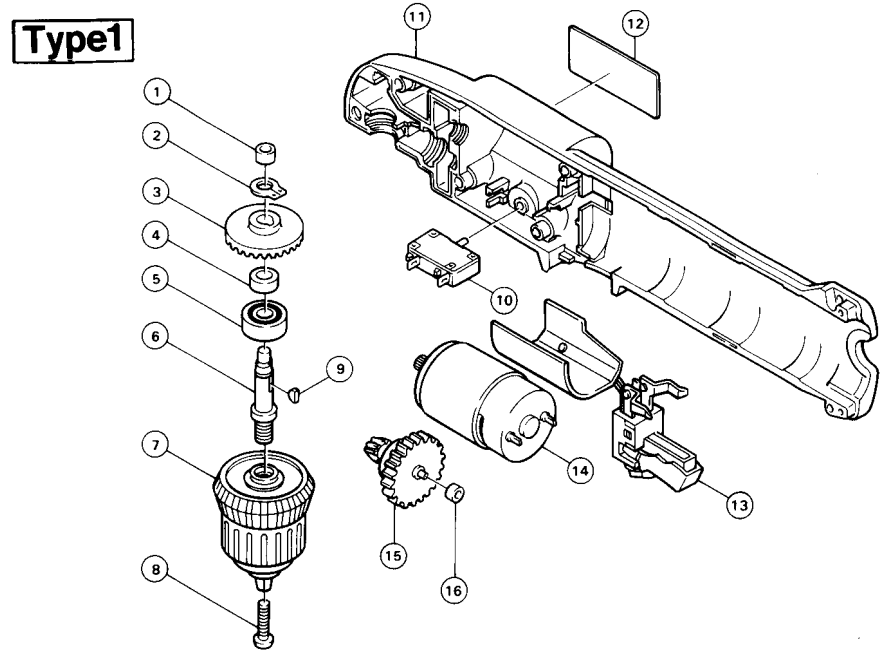
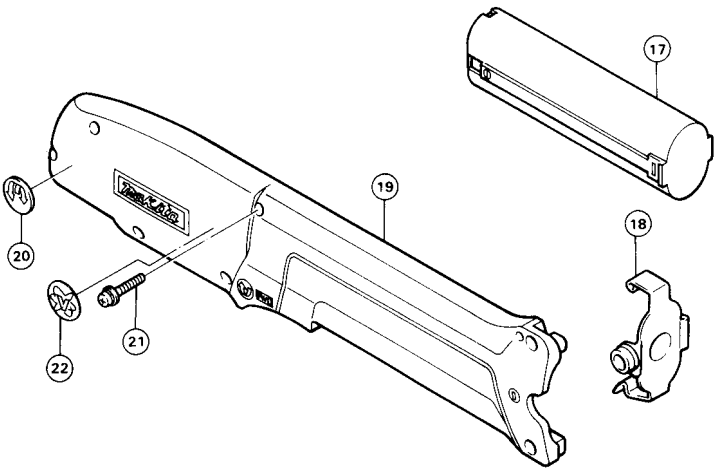
Features of DA39lDW
| ITEM NO. | NO. USED | DESCRIPTION | ITEM NO. | NO. USED | DESCRIPTION |
|---|---|---|---|---|---|
| 1 | 1 | Plane Bearing 5 | 12 | 1 | Name Plate |
| 2 | 1 | Retaining Ring S—8 | 13 | 1 | Switch |
| 3 | 1 | Spiral Bevel Gear 36 | 14 | 1 | DC Motor 9.6 V |
| 4 | 1 | Ring 8 | 15 | 1 | Gear |
| 5 | 1 | Ball Bearing 608LLB | 16 | 1 | Plane Bearing 4 |
| 6 | 1 | Spindle | 17 | 1 | Battery 9000 |
| 7 | 1 | Keyless Chuck | 18 | 1 | Set Plate |
| 8 | 1 | Pan Head Screw M5x22 | 19 | 1 | Housing Set (With item 11) |
| 9 | 1 | Woodruff Key 3 | 21 | 1 | Pan Head Screw M4x22 (With Washer) |
| 10 | 1 | Over Current Relay | 22 | 1 | Label |
| 11 | 1 | Housing Set (With item 19) |
Note: The switch and other part specifications may differ from country to country.
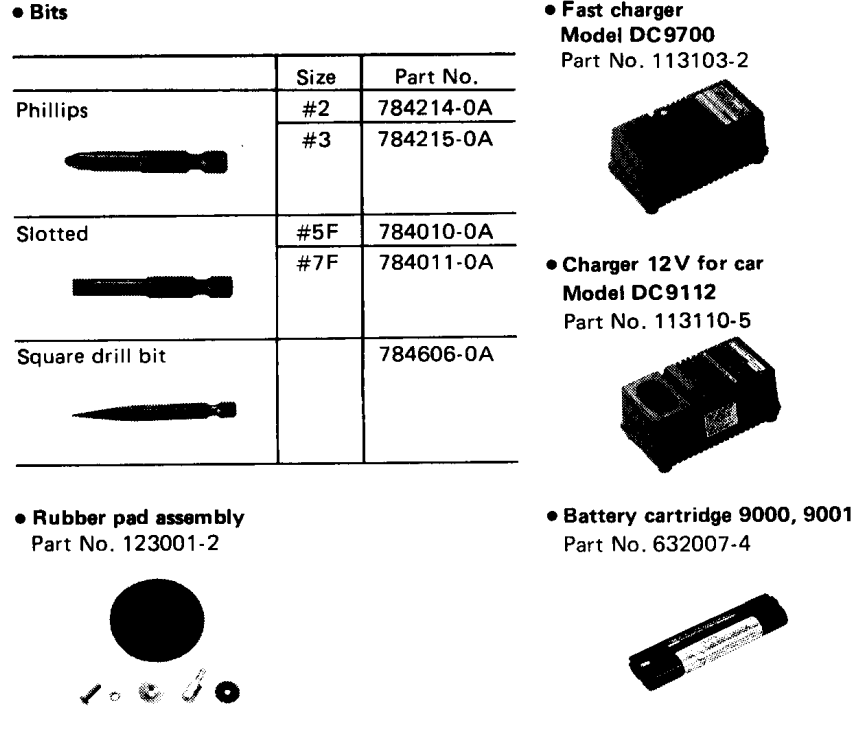
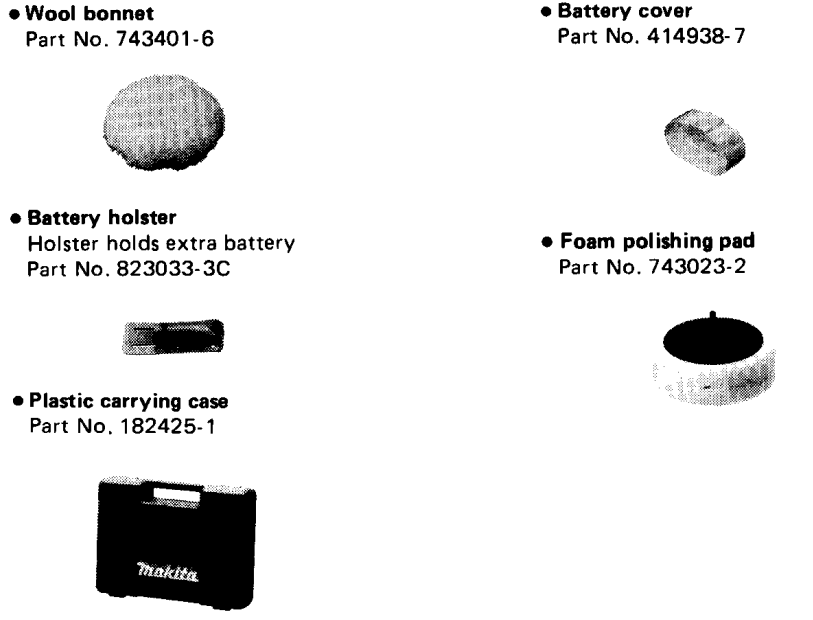
ACCESSORIES
CAUTION: These accessories or attachments are recommended for use with your Makita tool specified in this manual. The use of any other accessories or attachments might present a risk of injury to persons. The accessories or attachments should be used only in the proper and intended manner.
Setup of Cordless Angle Drill
To set up the Makita Cordless Angle Drill , first, insert the battery pack into the battery slot. Then, press the power button to turn on the drill. To adjust the drilling speed, use the 2-speed transmission switch located on the top of the drill. To change the drill bit, loosen the keyless chuck using the chuck key, insert the desired drill bit, and then tighten the chuck. Make sure the drill bit is securely tightened before drilling.
Description
The Makita Cordless Angle Drill DA39lDW is a versatile and powerful tool that is perfect for a variety of drilling and driving applications. The cordless design allows for greater mobility and access in tight spaces, making it an ideal choice for electrical, plumbing, and HVAC work. The drill's powerful motor and 2-speed transmission allow for precise drilling and driving control, while the keyless chuck accepts a variety of drill bits. The compact and lightweight design of the drill makes it comfortable to use and easy to maneuver, even in tight spaces. The LED light illuminates the work area, making it easier to see in dark spaces. The drill also includes a belt clip for easy storage and transportation.
Installing or removing the battery cartridge
Always switch off the tool before insertion or removal of the battery cartridge.
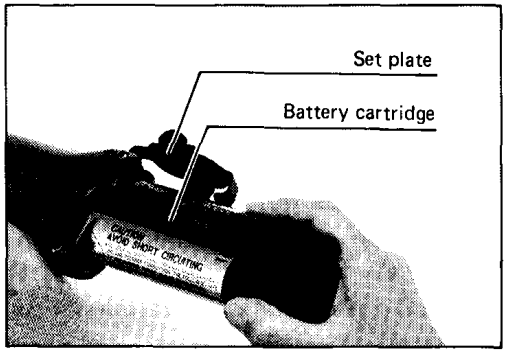
- To remove the battery cartridge, pull out the set plate on the tool and grasp both sides of the cartridge while withdrawing it from the barrel.
To insert the battery cartridge, align the tongue on the battery cartridge with the groove in the housing and slip it into place. Snap the set plate back into place. Be sure to close the set plate fully before using the tool.
- Do not use force when inserting the battery cartridge. If the cartridge does not slide in easily, it is not being inserted correctly.
Charging
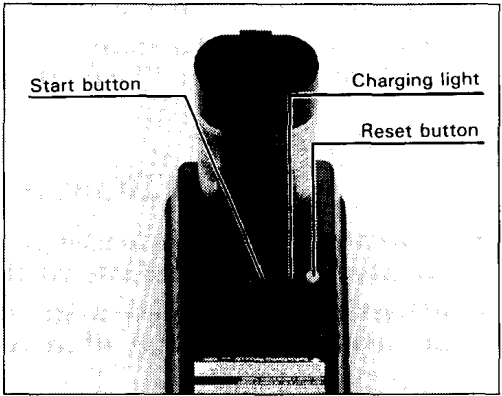
Plug the fast charger into your power source. Insert the battery cartridge so that the Charging light and the plus and minus terminals on the bat tery cartridge are on the same sides as their respective markings on the fast charger. Insert the cartridge fully into the port so that it rests on the charger port floor. Press the start button (red). The charging light will come on and charging will begin. If the charging light does not come on, press the reset button (yellow) first, then the start button (red). If the charging light goes out within 10 seconds even after pressing the reset button and start button a couple of times, the battery cartridge is dead. (CAUTION: Wait for more than 5 seconds after the charging light goes out to press the reset button again.) Replace it with a new one. When the charging light goes out after about one hour, you may remove the fully charged battery cartridge. After charging, unplug the charger from the power source.
CAUTION
- Your new battery cartridge is not charged. You will need to charge it before use.
- Do not keep the button pressed in with tape, etc. or the circuit will not function properly. Also, a malfunction of the charger may result possibly causing overheating, etc.
- If you try to charge a cartridge from a just-operated tool, sometimes the charging light will not come on. If this occurs, let the cartridge cool off for a while. Then re-insert it and try to charge it once more.
- When you charge a new battery cartridge or a battery cartridge that has not been used for a long period, it may not accept a full charge. This is a normal condition and does not indicate a problem. You can recharge the battery cartridge fully after discharging it almost completely a couple of times.
- If you wish to charge two battery cartridges, allow 15 minutes between chargings on the fast charger.
Installing or removing the driver bit or drill bit
CAUTION
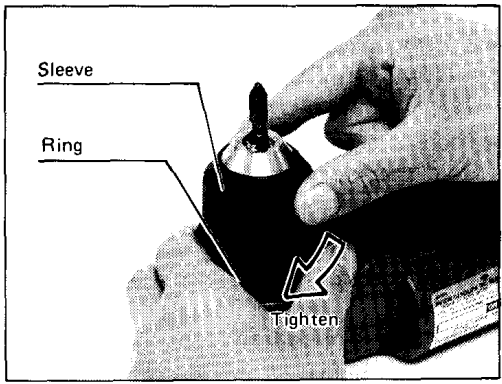
Always be sure that the tool is switched off and the battery cartridge is removed before installing or removing the bit. Hold the ring and turn the sleeve counterclockwise to open the chuck jaws. Place the bit in the chuck as far as it will go. Hold the ring firmly and turn the sleeve clockwise to tighten the chuck. To remove the bit, hold the ring and turn the sleeve counterclockwise.
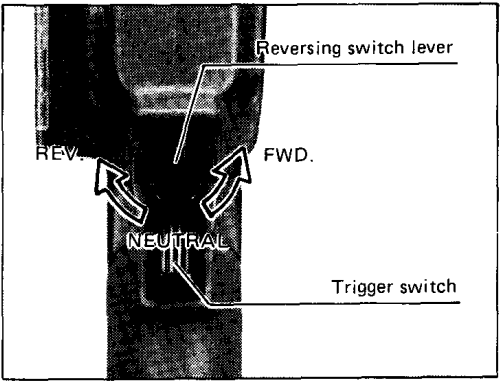
Switch action
Move the reversing switch lever to the "FWD" position for clockwise rotation or the "REV" position for counterclockwise. Tool speed is increased by increasing pressure on the trigger. To start the tool, simply pull the trigger. Release the trigger to stop. When the reversing switch lever is in the neutral position, the tool will not start even if you pull the trigger.
CAUTION
- Before inserting the battery cartridge into the tool, always check to see that the trigger switch actuates properly and returns to the "OFF" position when released.
- Always check the direction of rotation before drilling.
- Use the reversing switch lever only when the tool comes to a complete stop. Changing the direction of rotation before the tool stops may ruin the tool.
- When not operating the tool, keep the reversing switch lever in the neutral position.
Drilling operation
- Drilling in wood
When drilling in wood, best results are obrained with wood drills equipped with a guide screw. The guide screw makes drilling easier by pulling the bit into the workpiece. - Drilling in metal
To prevent the bit from slipping when starting a hole, make an indentation with a centerpunch and hammer at the point to be drilled. Place the point of the bit in the indentation and start drilling. Use a cutting lubricant when drilling metals. The exceptions are iron and brass which should be drilled dry.
CAUTION
- Pressing excessively on the tool will not speed up the drilling. In fact, this excessive pressure will only serve to damage the tip of your bit, decrease the tool performance and shorten the service life of the tool.
- There is a tremendous force exerted on the tool/bit at the time of hole breakthrough. Hold the tool firmly and exert care when the bit begins to breakthrough the workpiece.
- A stuck bit can be removed simply by setting the reversing switch to reverse rotation in order to back out. However, the tool may back out abruptly if you do not hold it firmly.
- Always secure small workpieces in a vise or similar hold-down device.
Screwdriving operation
Place the point of the driver bit in the screw head and apply pressure to the tool. Start the tool. Release the trigger just as the screw bottoms out. If the trigger is not released, the screw may strip out the hole or the screw and/or bit may be damaged.

NOTE
Make sure that the driver bit is inserted straight in the screw head, or the screw and/or bit may be damaged. When driving wood screws, predrill pilot holes to make driving easier and to prevent splitting of the workpiece. See the chart.
| Nominal diameter of wood screw (mm) | Recommended size of pilot hole (mm) |
|---|---|
| 3.1 (1/8") | 2.0 – 2.2 (5/64" – 3/32") |
| 3.5 (9/64") | 2.2 – 2.5 (3/32" – 3/32") |
| 3.8 (5/32") | 2.5 – 2.8 (3/32" – 7/64") |
| 4.5 (11/64") | 2.9 – 3.2 (7/64" – 1/8") |
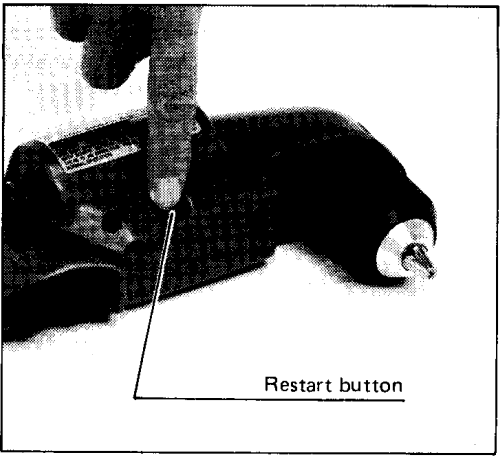
Overload protector
The overload protector automatically cuts out to break the circuit and the button pops out, whenever heavy work is prolonged. Wait 20-30 seconds before pressing the restart button to resume operation. Your finger should not be on the trigger when you press the restart button, however.
MAINTENANCE
CAUTION
- Always be sure that the tool is switched off and the battery cartridge is removed before attempting to perform inspection or maintenance.
- To maintain product SAFETY and RELIABILITY, repairs, maintenance or adjustments should be performed by Makita Authorized or Factory Service Centers, always using Makita replacement parts.
Troubleshooting
If the drill is not turning on, check to make sure the battery pack is properly inserted and charged. If the battery is charged and the drill still will not turn on, contact Makita customer service. If the drill is having trouble drilling or driving, make sure the drill bit is properly tightened and the chuck is in good working condition. If the problem persists, contact Makita customer service. Always use caution when operating the drill and follow all safety instructions provided by the manufacturer.
MAKITA ONE YEAR WARRANTY
Every Makita tool is thoroughly inspected and tested before leaving the factory. It is warranted to be free of defects from workmanship and materials for the period of ONE YEAR from the date of original purchase. Should any trouble develop during this one-year period, return the COMPLETE tool, freight prepaid, to one of Makita's Factory or Authorized Service Centers. If inspection shows the trouble is caused by defective workmanship or material, Makita will repair (or at our option, replace) without charge,
Pros & Cons of Cordless Angle Drill DA39lDW
Pros
- Powerful 4-pole motor delivers 480 inch-pounds of max torque
- The 2-speed transmission allows for precise drilling and driving control
- Keyless chuck accepts a variety of drill bits
- The compact and lightweight design is comfortable to use and easy to maneuver
- LED light illuminates the work area
Cons
- May be more expensive than some other cordless drills
- May not be as powerful as some corded drills
Customer Reviews of Makita Cordless Angle Drill DA39lDW
Customers have praised the Makita Cordless Angle Drill for its power, versatility, and compact design. Many customers have also noted that the drill is easy to use and maneuver, even in tight spaces. However, some customers have noted that the Makita Cordless Angle Drill DA39lDW may be more expensive than some other cordless drills on the market. Additionally, some customers have noted that the drill may not be as powerful as some corded drills.
Faqs
How should the Makita DA391DW battery be charged correctly before use?
Is it possible to drill into concrete and masonry with the Makita DA391DW?
If the charge on my Makita DA391DW is not holding, what should I do?
When is the Makita DA391DW battery fully charged, and how can I tell?
What is the Makita Cordless Angle Drill DA391DW's torque rating?
How can I register the warranty on my Makita DA391DW?
What safety measures are recommended for the Makita DA391DW?
Can drill bits used for regular drills be used with the Makita DA391DW?
How should I proceed if the Makita DA391DW begins to operate slowly or doesn't have power?
What does the Makita Cordless Angle Drill DA391DW warranty cover, and how long is it valid for?
Leave a Comment