Makita Cordless Blower & Vacuum XBU04 User Guide
Content
Introducing the Makita Cordless Blower & Vacuum XBU04
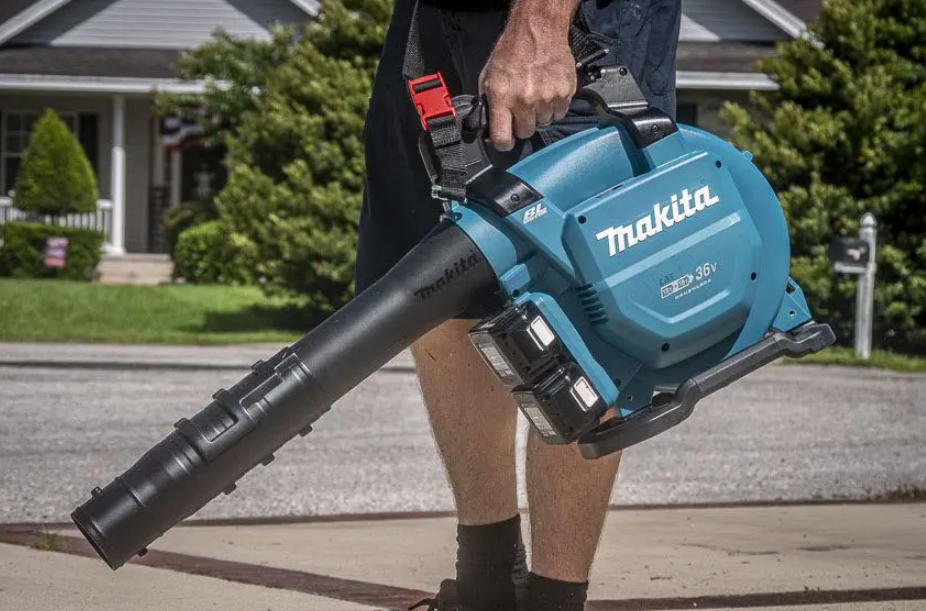
The Makita Cordless Blower & Vacuum XBU04 is a versatile 3-in-1 tool designed for efficient yard cleanup, functioning as a blower, vacuum, and mulcher. Powered by two 18V batteries, it features a brushless motor that delivers impressive performance with air speeds up to 120 MPH and airflow of 473 CFM. Its ergonomic design and telescoping nozzle enhance usability, making it suitable for various outdoor tasks. The XBU04 is priced at approximately $269, depending on the configuration.
Specifications
Model: | XBU04 | |
Capacities | Air volume | 0 - 13.4 m3/min (0 - 473 cu.ft./min) |
Air speed (average) | 0 - 54 m/s (0 - 120 MPH) | |
Air speed (max.) | 0 - 65 m/s (0 - 145 MPH) | |
Dimensions (L x W x H) *1 | 341 mm x 193 mm x 415 mm (13-3/8″ x 7-5/8″ x 16-3/8″) | |
Rated voltage | D.C. 36 V | |
Net weight | Blower *2 | 4.5 - 5.2 kg (9.9 - 11.5 lbs) |
Vacuum *3 | 6.0 - 6.6 kg (13.2 - 14.6 lbs) | |
- Without pipes, nozzles, dust bag, shoulder strap, and battery cartridges.
- With blower pipe, end nozzle and flat nozzle, and without suction pipe, suction nozzle, elbow pipe, dust bag and shoulder strap.
- With suction pipe, suction nozzle, elbow pipe, dust bag and shoulder strap, and without blower pipe, end nozzle and flat nozzle.
- Due to our continuing program of research and development, the specifications herein are subject to change without notice.
- Specifications may differ from country to country.
- The weight may differ depending on the attachment(s), including the battery cartridge. The lightest and heavi-est combination, according to EPTA-Procedure 01/2014, are shown in the table.
Applicable battery cartridge and charger
Battery cartridge | BL1815N / BL1820B / BL1830 /BL1830B / BL1840B / BL1850B / BL1860B |
Charger | DC18RC / DC18RD/ DC18RE / DC18SD / DC18SE / DC18SF / DC18SH |
- Some of the battery cartridges and chargers listed above may not be available depending on your region of residence.
WARNING: Only use the battery cartridges and chargers listed above. Use of any other battery cartridges and chargers may cause injury and/or fire.
Recommended battery adapter
Battery adapter | BAP182 / PDC01 |
- The battery adapter(s) listed above may not be available depending on your region of residence.
- Before using the battery adapter, read instruction and cautionary markings on the battery adapter.
Description
The Makita Cordless Blower & Vacuum XBU04 combines the efficiency of a blower with the practicality of a vacuum, making it ideal for various tasks around the house or job site. The tool features a variable speed control dial, allowing users to adjust power output according to their needs. Its lightweight design and ergonomic handle reduce user fatigue, enabling extended use without discomfort.
The blower mode is perfect for clearing leaves and debris from lawns, driveways, and walkways, while the vacuum mode is great for picking up dust, dirt, and small particles. The large capacity collection bag ensures less frequent emptying, enhancing overall productivity.
ASSEMBLY
CAUTION: Always be sure that the machine is switched off and the battery cartridge is removed before carrying out any work on the machine.
NOTICE: Before operating the machine, be sure to completely assemble the machine. Otherwise, the machine does not work.
Assembly for blowing
Installing or removing blower pipe and nozzle
Attach the blower pipe to the main unit.
Insert the blower pipe into the main unit with the bolt facing left as shown in the figure. Turn the blower pipe as shown in the figure so that the bolt is aligned with the hole on the main unit, and then tighten the bolt firmly using the hex wrench.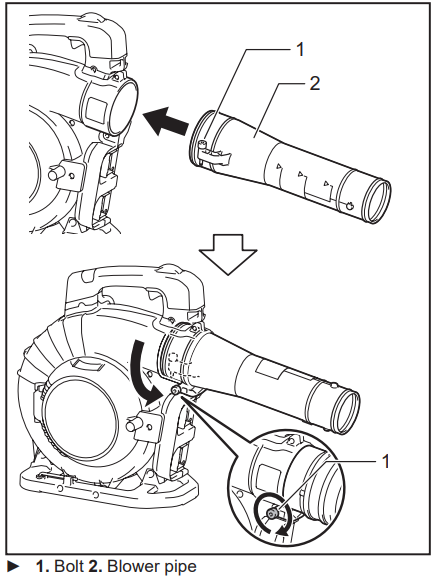
Align the protrusion on the blower pipe with the groove on the end nozzle, then attach the end nozzle to the blower pipe, and then turn the end nozzle to lock it into place.
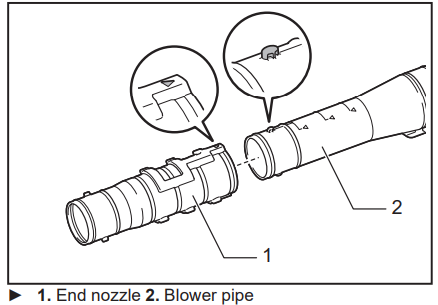
To remove the blower pipe and end nozzle, perform the installation procedure in reverse.
NOTE: The length of the nozzle can be changed by moving the nozzle as shown in the figure.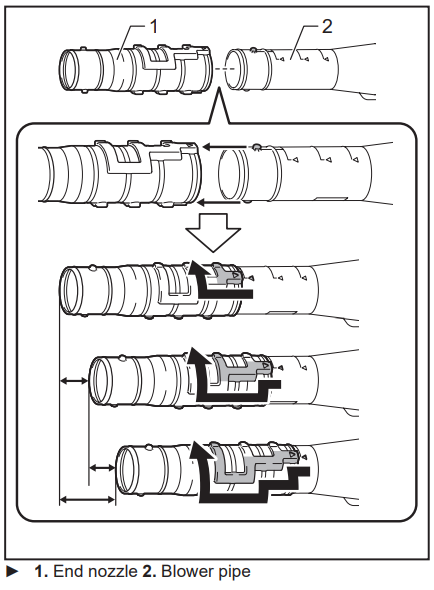
Installing or removing flat nozzle or extension nozzle
Optional accessory
Attach the flat nozzle or extension nozzle to the end nozzle, and then turn it to lock it into place.

You can also attach the flat nozzle or extension nozzle to the blower pipe.

To remove the flat nozzle or extension nozzle, perform the installation procedure in reverse.
Attaching shoulder strap
CAUTION: Be sure to attach the hooks of the shoulder strap to the machine securely. If the hooks are attached incompletely, they may come off and cause an injury.
CAUTION: Be sure to use the shoulder strap dedicated to this machine. Using another shoulder strap may cause an injury.
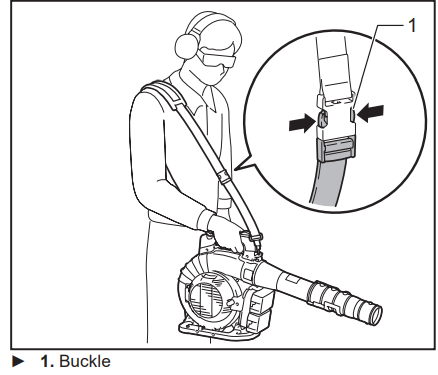
Attach the hooks of the shoulder strap to the machine as shown in the figure.

The shoulder strap features a means of quick release. Simply squeeze the sides of the buckle to release the machine from the shoulder strap.
Assembly for vacuuming
Installing or removing the suction pipe and nozzle
Optional accessory
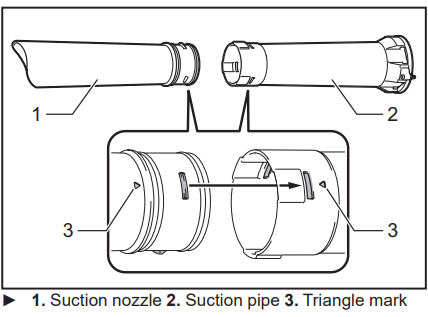
Align the triangle mark on the suction nozzle with that on the suction pipe, and then insert the suction nozzle into the suction pipe until the latch on the nozzle snaps into place.
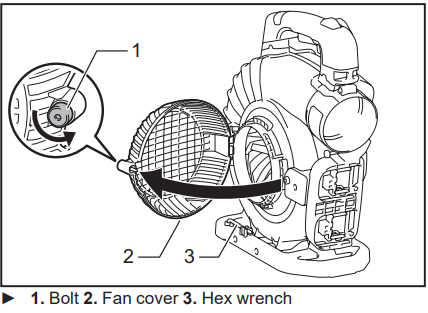
Loosen the bolt on the fan cover using the hex wrench, and open the fan cover.
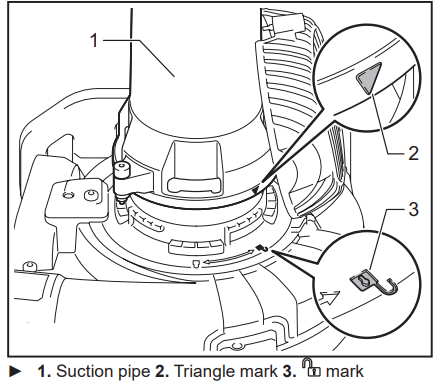
Align the triangle mark on the suction pipe with mark on the main unit, and then attach the suction pipe to the main unit.
Turn the suction pipe clockwise so that the bolt on the pipe is aligned with the hole on the main unit, and then fasten the bolt firmly using the hex wrench to secure the pipe to the main unit.
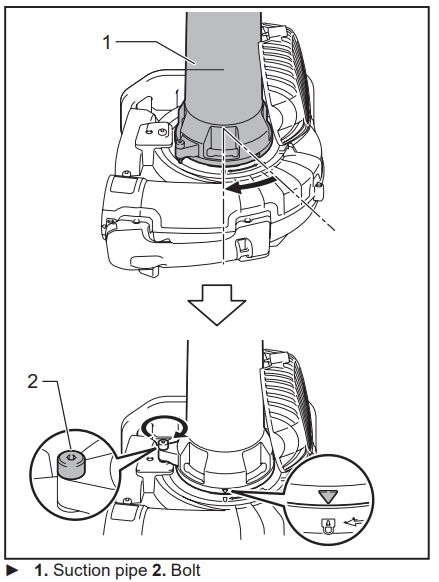
To remove the suction pipe and nozzle, perform the installation procedure in reverse.
Installing or removing elbow pipe and dust bag
Optional accessory
Insert the elbow pipe into the dust bag and tighten the belt to fix the elbow pipe as shown in the figure.
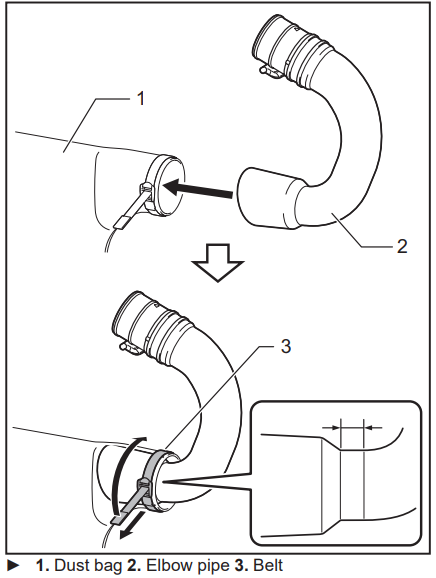
Attach the elbow pipe to the main unit.
Insert the elbow pipe into the main unit with the bolt facing left as shown in the figure. Turn the elbow pipe as shown in the figure so that the bolt is aligned with the hole on the main unit, and then tighten the bolt firmly using the hex wrench.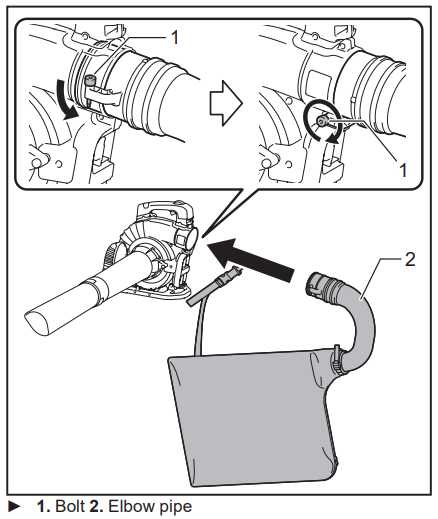
Attach the hook of the dust bag to the shoulder strap, and then attach the hooks of the shoulder strap to the main unit as shown in the figure.
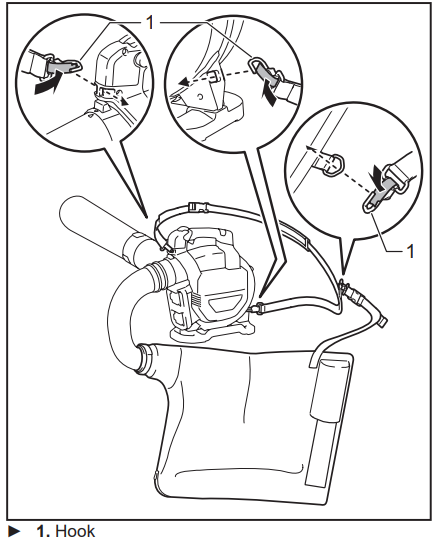
To remove the dust bag and elbow pipe, perform the installation procedure in reverse.
FUNCTIONAL DESCRIPTION
CAUTION: Always be sure that the machine is switched off and the battery cartridge is removed before adjusting or checking function on the machine.
Installing or removing battery cartridge
CAUTION: Always switch off the machine before installing or removing of the battery cartridge.
CAUTION: Hold the machine and the battery cartridge firmly when installing or removing bat-tery cartridge. Failure to hold the machine and the battery cartridge firmly may cause them to slip off your hands and result in damage to the machine and battery cartridge and a personal injury.
CAUTION: Always install the battery cartridge fully until the red indicator cannot be seen. If not, it may accidentally fall out of the machine, causing injury to you or someone around you.
CAUTION: Do not install the battery cartridge forcibly. If the cartridge does not slide in easily, it is not being inserted correctly.

- To remove the battery cartridge, slide it from the machine while sliding the button on the front of the cartridge.
- To install the battery cartridge, align the tongue on the battery car-tridge with the groove in the housing and slip it into place. Insert it all the way until it locks in place with a little click. If you can see the red indicator on the upper side of the button, it is not locked completely.
Indicating the remaining battery capacity
Only for battery cartridges with the indicator
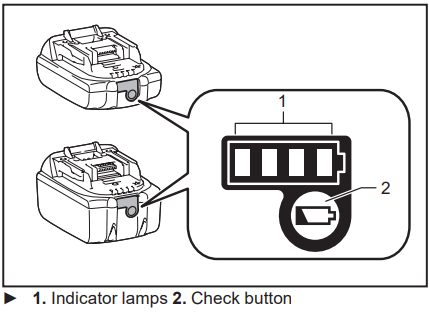
Press the check button on the battery cartridge to indicate the remain-ing battery capacity. The indicator lamps light up for a few seconds.

NOTE: Depending on the conditions of use and the ambient temperature, the indication may differ slightly from the actual capacity.
Machine/battery protection system
The machine is equipped with a machine/battery protec-tion system. This system automatically cuts off power to the motor to extend machine and battery life. The machine will automatically stop during operation if the machine or battery is placed under one of the following conditions:
Overload protection
When the machine or battery is operated in a manner that causes it to draw an abnormally high current, the machine automatically stops and the lamp for mode 1 blinks in green. In this situation, turn the machine off and stop the application that caused the machine to become overloaded. Then turn the machine on to restart.
Overheat protection
When the machine or battery is overheated, the machine stops automatically and the lamp for mode 1 lights up in red. In this case, let the machine and battery cool down before turning the machine on again.
Over-discharge protection
When the battery capacity is not enough, the machine stops automatically and the lamp for mode 1 blinks in red. In this case, remove the battery from the machine and charge the battery.
Main power switch
WARNING: Always turn off the main power switch when not in use.
To turn on the machine, press the main power switch. The lamps for mode 1 and mode 2 light up in green. To turn off, keep pressing the main power switch until the lamps for mode 1 and mode 2 go off.

You can use the machine in the vacuuming mode. In the vacuuming mode, the suction volume becomes smaller than in the normal mode.
When you turn on the machine, the machine starts up in the normal mode. To use the machine in the vacuuming mode, press the main power switch when the machine is turned on. The lamp for mode 2 goes off and only the lamp for mode 1 lights up in green. When you press the main power switch again, the machine returns to the normal mode, and the lamps for mode 1 and mode 2 light up in green.
NOTE: The lamp for mode 1 blinks in green if the machine is operated under unoperatable conditions. The lamp blinks in one of the following conditions.
- The switch trigger is pulled, when the bolt on the fan cover or suction pipe is not tightened firmly, or the bolt on the blower pipe or elbow pipe is not tightened firmly.
- The machine is turned on, when the control lever is not fully returned to the off position, or while you are pulling the switch trigger.
NOTE: This machine employs the auto power-off function. To avoid unintentional start up, the main power switch will automatically shut down when the switch trigger is not pulled for a certain period after the main power switch is turned on.
Switch action
WARNING: Before installing the battery cartridge into the machine, always check to see that the switch trigger actuates properly and returns to the "OFF" position when released.

To start the machine, simply pull the switch trigger. The speed is increased by increasing pressure on the switch trigger. Release the switch trigger to stop.
Cruise control function
The cruise control function allows the operator to maintain a constant speed without pulling the trigger. To increase the speed, turn the control lever forward. To decrease the speed, turn the control lever backward.

Hex wrench storage
When not in use, store the hex wrench as illustrated to keep it from being lost.
Accidental re-start preventive function
If you turn on the machine while pulling the switch trigger or while the control lever is not in the off position, the machine does not start. To start the machine, first release the switch trigger and return the control lever fully, and then turn on the machine.
Electronic function
The machine is equipped with an electronic function for easy operation.
- Constant speed control
The speed control function provides a constant rotation speed regardless of load conditions.
Makita Cordless Blower & Vacuum XBU04 OPERATION
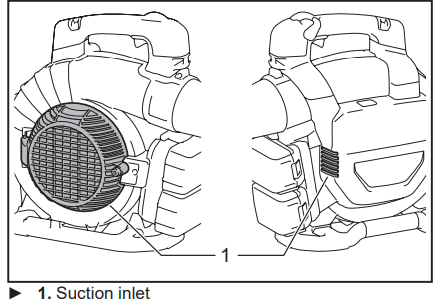
CAUTION: Do not place the machine on the ground while it is switched on. Sand or dust may enter from suction inlet and cause a malfunction or personal injury.
Blower operation
CAUTION: When performing the blower operation, be sure to remove the suction pipe, suction nozzle, elbow pipe and dust bag from the machine, and attach the blower pipe and nozzles to the machine.
Hold the machine firmly with a hand and perform the blowing operation by moving it around slowly. When blowing around building, big stone or vehicle, direct the nozzle away from them. When performing an operation in a corner, start from the corner and then move to wide area.

Vacuuming operation
CAUTION: When performing the vacuuming operation, be sure to remove the blower pipe and nozzles from the machine, and attach the suction pipe, suction nozzle, elbow pipe, dust bag, and shoulder strap to the machine.
CAUTION: Check the dust bag frequently for wear or deterioration.
CAUTION: Be sure to fasten the fastener of the dust bag before operating the machine.
CAUTION: Always switch off the machine before opening or fastening the fastener of the dust bag.
NOTICE: Do not allow wet materials, such as wet leaves, and foreign materials, such as large wood chips, metals, glass, pebbles, etc., to be sucked into the machine. Otherwise, a malfunction may occur.
NOTICE: Empty the dust bag before it becomes full. Otherwise, a malfunction may occur.
NOTICE: To prevent the suction of foreign mate rials, operating the machine in the vacuuming mode is recommended.
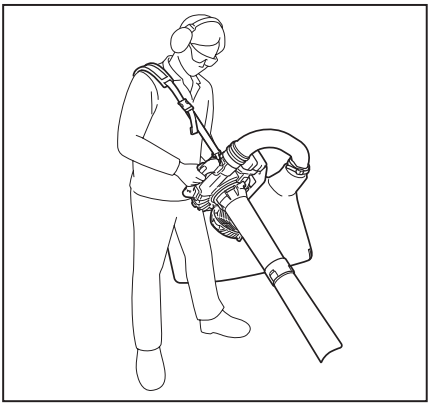
Put the shoulder strap and dust bag on the shoulder as shown in the figure. Adjust the length of the strap.
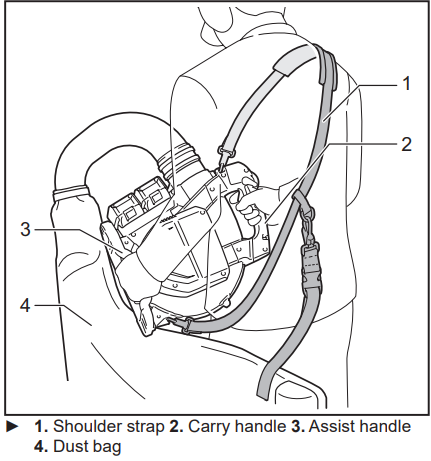
Hold the carry handle with your right hand and the assist handle with the other hand.
Setup Guide
To operate the Makita Cordless Blower & Vacuum XBU04, follow these steps:
- Insert the 18V LXT lithium-ion battery into the tool's battery slot.
- Attach the blower tube or vacuum nozzle depending on your intended use.
- For vacuum mode, secure the collection bag to the tool.
- Turn on the tool by pressing the trigger switch.
- Use the variable speed control dial to adjust power as needed.
MAINTENANCE
CAUTION: Always be sure that the machine is switched off and the battery cartridge is removed before attempting to perform inspection or maintenance.
To maintain product SAFETY and RELIABILITY, repairs, any other maintenance or adjustment should be performed by Makita Authorized or Factory Service Centers, always using Makita replacement parts.
Cleaning the machine
Clean the machine by wiping off dust with a dry cloth or one dipped in soapy water and wrung out.
NOTICE: Never use gasoline, benzine, thinner, alcohol or the like. Discoloration, deformation or cracks may result.
Remove dust or dirt from the suction inlets.
Makita Cordless Blower & Vacuum XBU04 Troubleshooting
Before asking for repairs, conduct your own inspection first. If you find a problem that is not explained in the man-ual, do not attempt to dismantle the machine. Instead, ask Makita Authorized Service Centers, always using Makita replacement parts for repairs.
State of abnormality | Probable cause (malfunction) | Remedy |
Motor does not run. | Battery cartridge is not installed. | Install the battery cartridge. |
| Battery problem (under voltage) | Recharge the battery. If recharging is not effective, replace battery. | |
For blower The blower pipe is not attached. The fan cover is not closed. | Attach the blower pipe, and then tighten the bolt. Close the fan cover, and then tighten the bolt. | |
For vacuum The elbow pipe or suction pipe is not attached. | Attach the elbow pipe or suction pipe, and then tighten the bolt. | |
| The drive system does not work correctly. | Ask your local authorized service center for repair. | |
Motor stops running after a little use. | Battery's charge level is low. | Recharge the battery. If recharging is not effective, replace battery. |
| Overheating. | Stop using the machine to allow it to cool down. | |
The machine does not reach the maximum speed. | Battery is installed improperly. | Install the battery cartridge as described in this manual. |
| Battery power is dropping. | Recharge the battery. If recharging is not effective, replace battery. | |
| The drive system does not work correctly. | Ask your local authorized service center for repair. | |
Abnormal vibration: stop the machine immediately! | The drive system does not work correctly. | Ask your local authorized service center for repair. |
Motor cannot stop: Remove the battery immediately! | Electric or electronic malfunction. | Remove the battery and ask your local authorized service center for repair. |
OPTIONAL ACCESSORIES
CAUTION: These accessories or attachments are recommended for use with your Makita prod-uct specified in this manual. The use of any other accessories or attachments might present a risk of injury to persons. Only use accessory or attachment for its stated purpose.
If you need any assistance for more details regard-ing these accessories, ask your local Makita Service Center.
- Vacuum kit
- Extension nozzle
- Flat nozzle
- Shoulder strap
- Makita genuine battery and charger
NOTE: Some items in the list may be included in the product package as standard accessories. They may differ from country to country.
MAKITA WARRANTY
Please refer to the annexed warranty sheet for the most current warranty terms applicable to this product. If an annexed warranty sheet is not available, refer to the warranty details https://www.makitatools.com set forth at the below website for your respective country.
Pros & Cons
Pros
- High Performance: Delivers strong air speed and volume.
- Convenience: Dual functionality saves space and reduces tool clutter.
- Long Battery Life: Up to 28 minutes of continuous operation on low speed.
- Ergonomic Design: Lightweight and comfortable to use.
- Compatibility: Works with Makita's 18V LXT lithium-ion batteries.
Cons
- Cost: May be more expensive than single-function tools.
- Noise Level: Can be loud during high-speed operation.
- Battery Drain: Heavy usage may reduce battery life faster than expected.
- Maintenance: Requires regular cleaning of filters and collection bags.
Customer Reviews
Customers generally praise the Makita Cordless Blower & Vacuum XBU04 for its versatility, powerful performance, and ergonomic design. Some users have noted that it can be noisy during high-speed operation and requires regular maintenance to keep it running efficiently.
A common complaint is the higher cost compared to single-function tools, but many agree that the dual functionality makes it a valuable addition to their tool collection.
Faqs
What is the maximum air speed of the Makita?
How long does the battery last on low speed?
Is the Makita Cordless compatible with all Makita batteries?
What is the weight of the tool with the battery?
Can I use this tool for heavy-duty tasks?
Why is my collection bag leaking?
Can I purchase additional accessories for this tool?
Is this tool suitable for indoor use?
What safety precautions should I take when using this tool?
Leave a Comment
