Makita Cordless Impact Driver DTD152 Instruction Guide | Specs & Features
Content
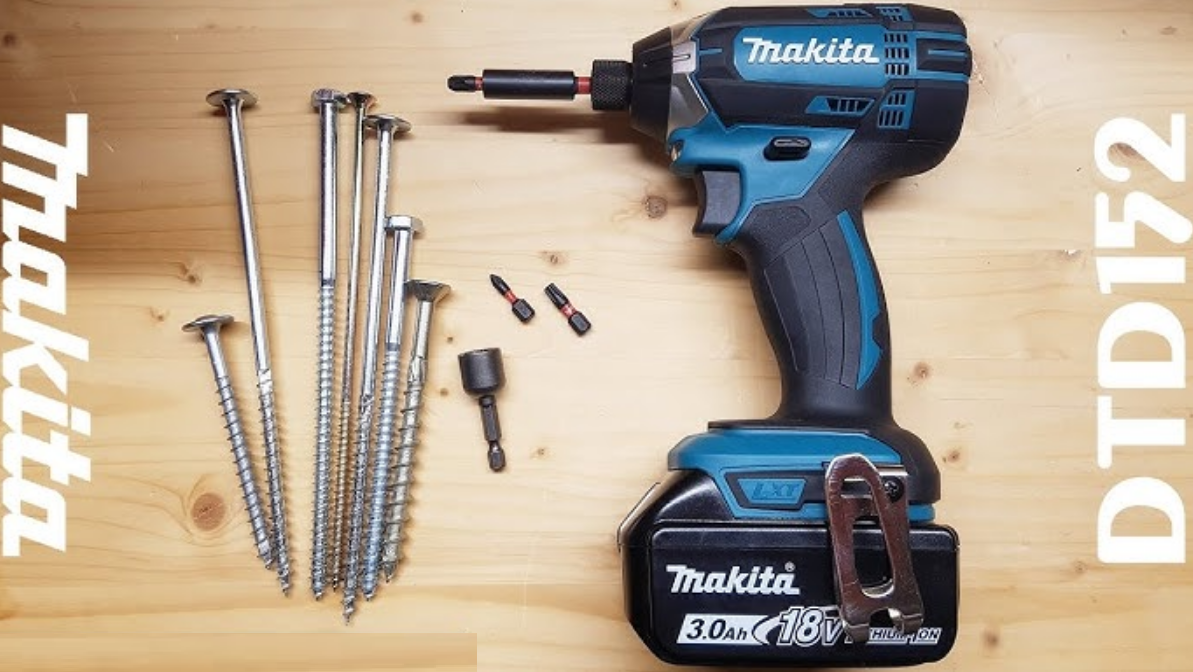
Introduction of Makita Cordless Impact Driver DTD152
The Makita Cordless Impact Driver is a powerful and versatile tool designed for a wide range of applications. This cordless impact driver offers a maximum torque of 1,600 in.lbs, making it an ideal choice for heavy-duty tasks. Its compact size and lightweight design ensure comfortable handling and easy maneuverability, even in tight spaces. The Makita Cordless Impact Driver is priced at around $199, and it was launched in September 2021.
Detailed Specifications
The Makita Cordless Impact Driver boasts the following key features
- Max torque of 1,600 in.lbs
- Compact size with a length of only 5-5/16"
- Lightweight design weighing only 2.8 lbs
- Built-in LED light for better visibility
- Variable speed trigger for precise control
- 4-pole motor for greater power and efficiency
- Electric brake for fast stop
- Battery capacity of 2.0Ah for longer run time
Model: | DTD152 | ||
Fastening capacities | Machine screw | 4 mm - 8 mm | |
Standard bolt | 5 mm - 16 mm | ||
High tensile bolt | 5 mm - 12 mm | ||
No load speed | 0 - 2,900 min-1 | ||
Impacts per minute | 0 - 3,500 min-1 | ||
Overall length | 137 mm | ||
Rated voltage | D.C. 18 V | ||
Battery cartridge | BL1815, BL1815N, BL1820, | BL1830, BL1830B, BL1840, | |
BL1820B | BL1840B, BL1850, BL1850B, | ||
BL1860B | |||
Net weight | 1.3 kg | 1.5 kg | |
Setup of Cordless Impact Driver
To operate the Makita Cordless Impact Driver , follow these steps
- Insert the battery pack into the tool's battery slot.
- Slide the chuck open and insert the fastener into the chuck.
- Slide the chuck closed to secure the fastener in place.
- Press the trigger to start the tool and adjust the speed as needed.
- Once the fastener is tightened, release the trigger and slide the chuck open to remove the fastener.
FUNCTIONAL DESCRIPTION
CAUTION: Always be sure that the tool is switched off and the battery cartridge is removed before adjusting or checking function on the tool.
Installing or removing battery cartridge
CAUTION: Always switch off the tool before installing or removing of the battery cartridge.
CAUTION: Hold the tool and the battery cartridge irmly when installing or removing battery cartridge. Failure to hold the tool and the battery cartridge irmly may cause them to slip off your hands and result in damage to the tool and battery cartridge and a personal injury.

- Red indicator
- Button
- Battery cartridge
To remove the battery cartridge, slide it from the tool while sliding the button on the front of the cartridge.
To install the battery cartridge, align the tongue on the battery cartridge with the groove in the housing and slip it into place. Insert it all the way until it locks in place with a little click. If you can see the red indicator on the upper side of the button, it is not locked completely.
CAUTION: Always install the battery cartridge fully until the red indicator cannot be seen. If not, it may accidentally fall out of the tool, causing injury to you or someone around you.
CAUTION: Do not install the battery cartridge forcibly. If the cartridge does not slide in easily, it is not being inserted correctly.
Battery protection system
Lithium-ion battery with star marking
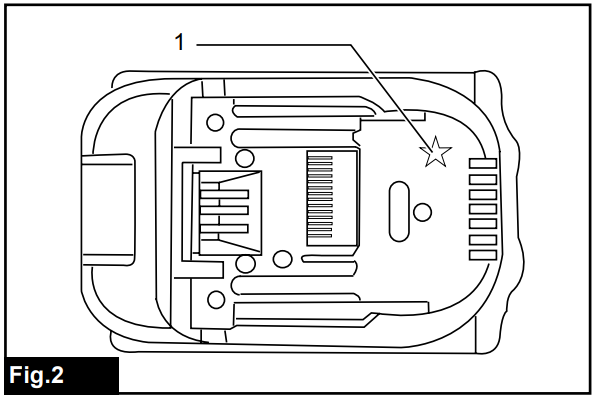
- Star marking
- Lithium-ion batteries with a star marking are equipped with a protection system. This system automatically cuts off power to the tool to extend battery life.
- The tool will automatically stop during operation if the tool and/or battery are placed under one of the following conditions:
- Overloaded
- The tool is operated in a manner that causes it to draw an abnormally high current.
- In this situation, turn the tool off and stop the application that caused the tool to become overloaded. Then turn the tool on to restart.
- If the tool does not start, the battery is overheated. In this situation, let the battery cool before turning the tool on again.
- Low battery voltage: The remaining battery capacity is too low and the tool will not operate. In this situation, remove and recharge the battery.
Indicating the remaining battery capacity
Only for battery cartridges with "B" at the end of the model number
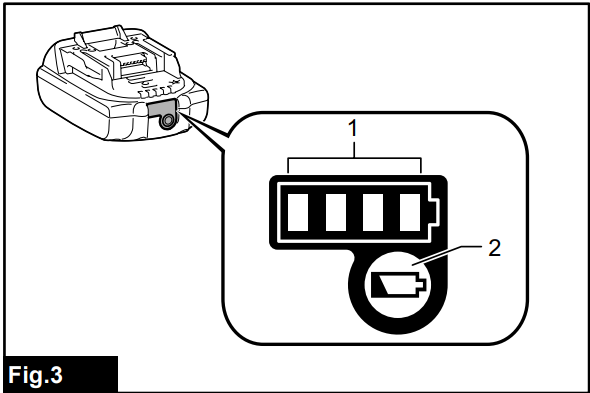
- Indicator lamps
- Check button
Press the check button on the battery cartridge to indi-cate the remaining battery capacity. The indicator lamps light up for few seconds.
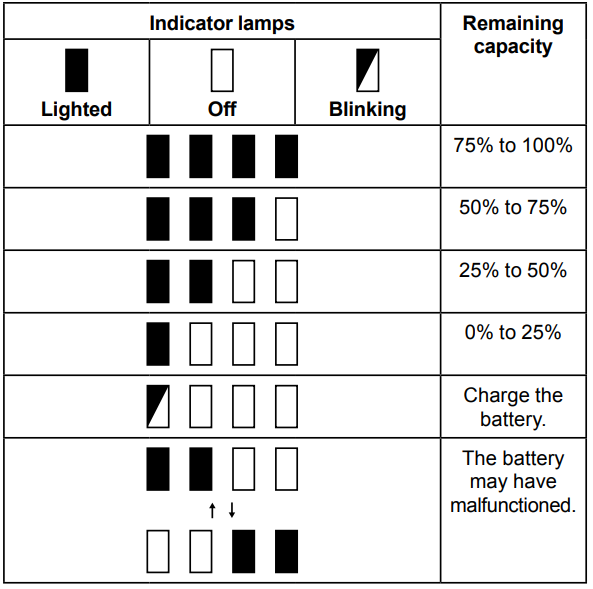
NOTE: Depending on the conditions of use and the ambient temperature, the indication may differ slightly from the actual capacity.
Switch action
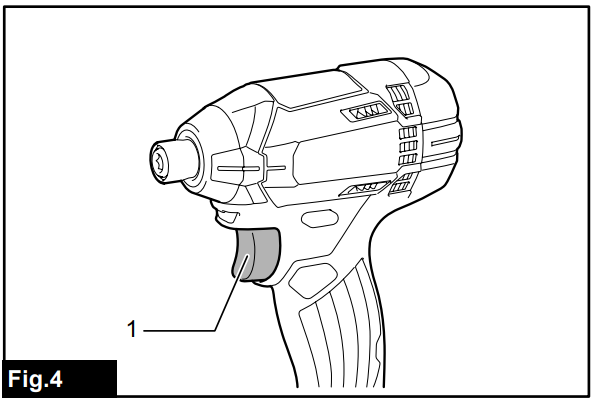
Switch trigger
CAUTION: Before installing the battery car-tridge into the tool, always check to see that the switch trigger actuates properly and returns to the "OFF" position when released.
To start the tool, simply pull the switch trigger. Tool speed is increased by increasing pressure on the switch trigger. Release the switch trigger to stop.
Lighting up the front lamp

CAUTION: Do not look in the light or see the source of light directly.
Pull the switch trigger to light up the lamp. The lamp keeps on lighting while the switch trigger is being pulled. The lamp goes out 10 -15 seconds after releasing the trigger.
NOTE: Use a dry cloth to wipe the dirt off the lens of the lamp. Be careful not to scratch the lens of lamp, or it may lower the illumination.
Reversing switch action
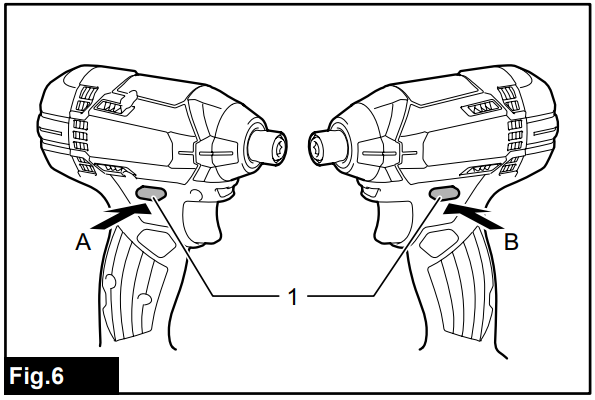
CAUTION
- Always check the direction of rotation before operation.
- Use the reversing switch only after the tool comes to a complete stop. Changing the direction of rotation before the tool stops may damage the tool.
- When not operating the tool, always set the reversing switch lever to the neutral position.
This tool has a reversing switch to change the direction of rotation. Depress the reversing switch lever from the A side for clockwise rotation or from the B side for counterclockwise rotation. When the reversing switch lever is in the neutral position, the switch trigger cannot be pulled.
ASSEMBLY
CAUTION: Always be sure that the tool is switched off and the battery cartridge is removed before carrying out any work on the tool.
Installing or removing driver bit/socket bit

Use only driver bit/socket bit that has inserting portion shown in the igure. Do not use any other driver bit/ socket bit.
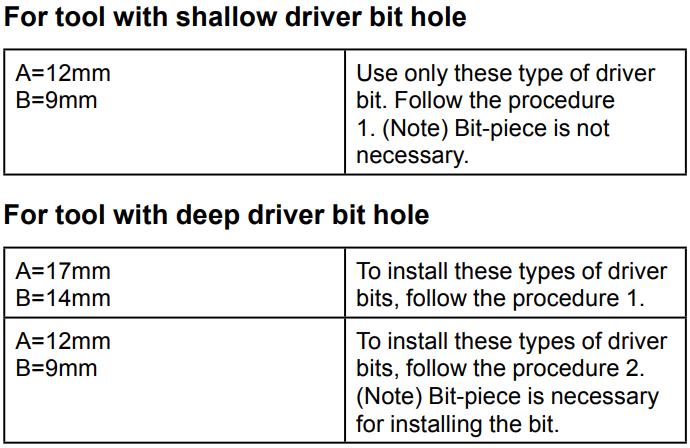
Procedure 1
For tool without one-touch type sleeve
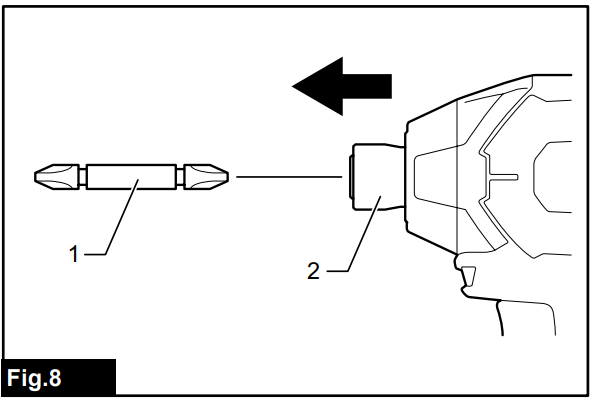
- Driver bit
- Sleeve
To install the driver bit, pull the sleeve in the direction of the arrow and insert the driver bit into the sleeve as far as it will go. Then release the sleeve to secure the driver bit. For tool with one-touch type sleeve To install the driver bit, insert the driver bit into the sleeve as far as it will go.
Procedure 2
In addition to Procedure 1, insert the bit-piece into the sleeve with its pointed end facing in.
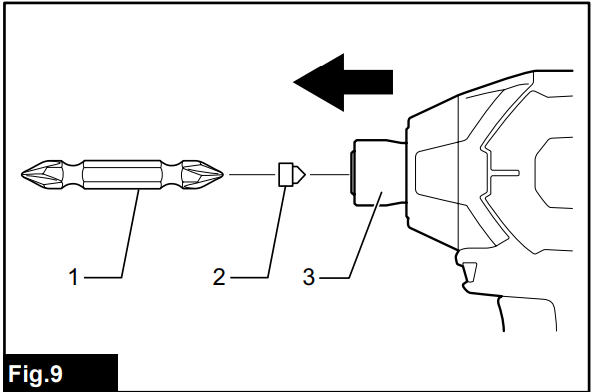
- Driver bit
- Bit-piece
- Sleeve
To remove the driver bit, pull the sleeve in the direction of the arrow and pull the driver bit out.
NOTE: If the driver bit is not inserted deep enough into the sleeve, the sleeve will not return to its original position and the driver bit will not be secured. In this case, try re-inserting the bit according to the instruc-tions above.
NOTE: When it is dificult to insert the driver bit, pull the sleeve and insert it into the sleeve as far as it will go.
NOTE: After inserting the driver bit, make sure that it is irmly secured. If it comes out, do not use it.
Installing hook
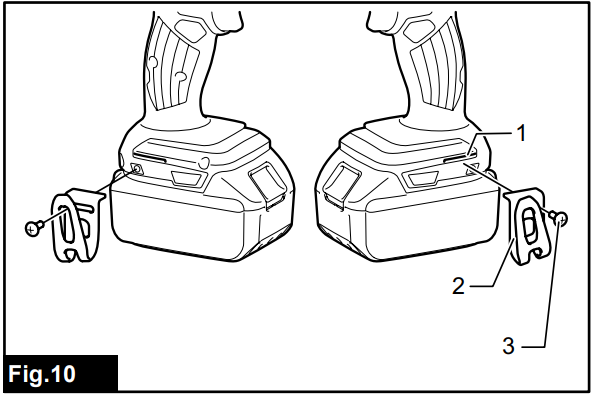
- Groove
- Hook
- Screw
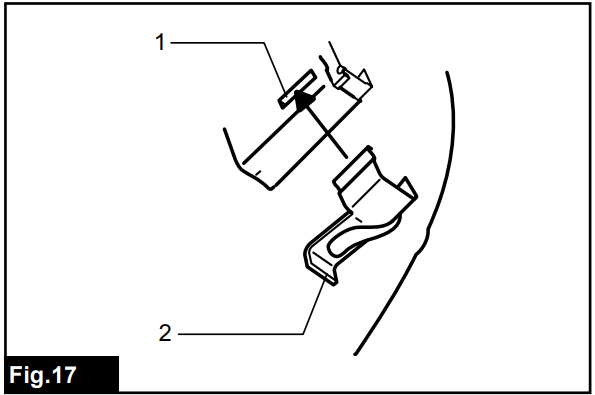
The hook is convenient for temporarily hanging the tool. This can be installed on either side of the tool. To install the hook, insert it into a groove in the tool housing on either side and then secure it with a screw. To remove, loosen the screw and then take it out.
OPERATION
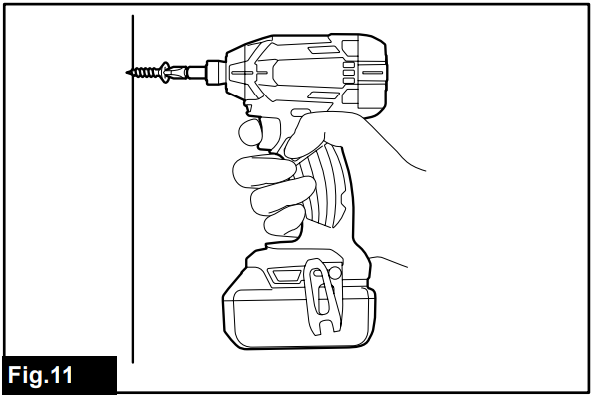
The proper fastening torque may differ depending upon the kind or size of the screw/bolt, the material of the workpiece to be fastened, etc. The relation between fastening torque and fastening time is shown in the igures.
Proper fastening torque for standard bolt

- Fastening time (second)
- Fastening torque
Proper fastening torque for high tensile bolt

- Fastening time (second)
- Fastening torque
Hold the tool irmly and place the point of the driver bit
in the screw head. Apply forward pressure to the tool to the extent that the bit will not slip off the screw and turn the tool on to start operation.
NOTICE
- If you use a spare battery to continue the operation, rest the tool at least 15 min.
- Use the proper bit for the head of the screw/bolt that you wish to use.
- When fastening M8 or smaller screw, carefully adjust pressure on the switch trigger so that the screw is not damaged.
- Hold the tool pointed straight at the screw.
- If the impact force is too strong or you tighten the screw for a time longer than shown in the figure , the screw or the point of the driver bit may be over-stressed, stripped, damaged, etc. Before starting your job, always perform a test operation to determine the proper fastening time for your screw.
The fastening torque is affected by a wide variety of factors including the following. After fastening, always check the torque with a torque wrench.
- When the battery cartridge is discharged almost completely, voltage will drop and the fastening torque will be reduced.
- Driver bit or socket bit
Failure to use the correct size driver bit or socket bit will cause a reduction in the fastening torque. - Bolt
- Even though the torque coefficient and the class of bolt are the same, the proper fastening torque will differ according to the diameter of bolt.
- Even though the diameters of bolts are the same, the proper fastening torque will differ according to the torque coefficient, the class of bolt and the bolt length.
- The manner of holding the tool or the material of driving position to be fastened will affect the torque.
- Operating the tool at low speed will cause a reduction in the fastening torque.
MAINTENANCE
CAUTION: Always be sure that the tool is switched off and the battery cartridge is removed before attempting to perform inspection or maintenance.
NOTICE: Never use gasoline, benzine, thinner, alcohol or the like. Discoloration, deformation or cracks may result.
Replacing carbon brushes
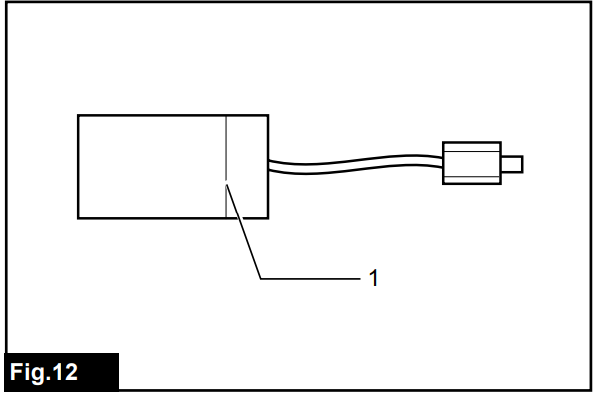
Limit mark
Check the carbon brushes regularly.
Replace them when they wear down to the limit mark. Keep the carbon brushes clean and free to slip in the holders. All carbon brushes should be replaced at the same time. Use only identical carbon brushes. Use a screwdriver to remove two screws then remove the rear cover.
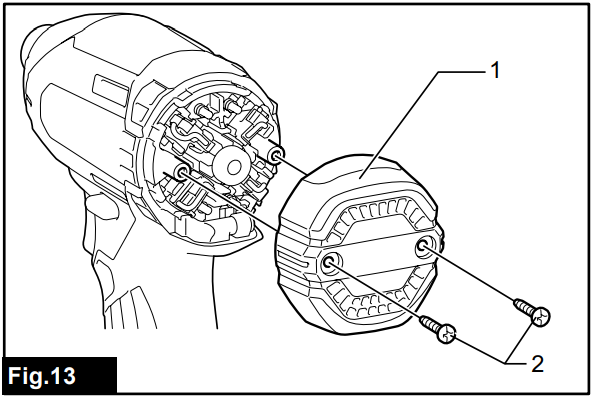
- Rear cover
- Screw
Raise the arm part of the spring and then place it in the recessed part of the housing with a slotted bit screwdriver of slender shaft or the like.
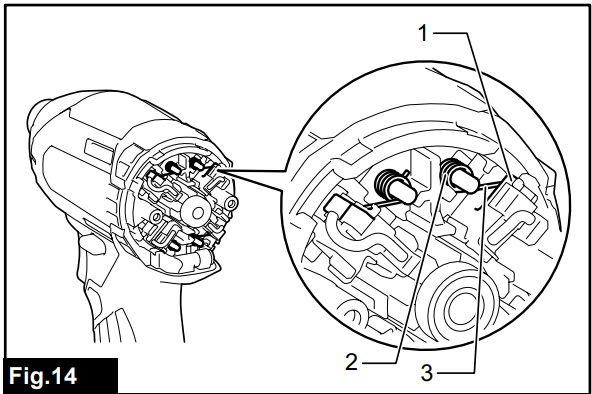
- Recessed part
- Spring
- Arm
Use pliers to remove the carbon brush caps of the carbon brushes. Take out the worn carbon brushes, insert the new ones and replace the carbon brush caps in reverse.
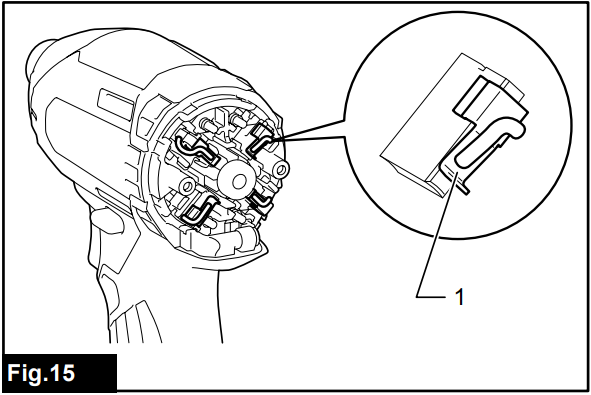
Carbon brush cap
Make sure to place the lead wire in opposite side of the arm.
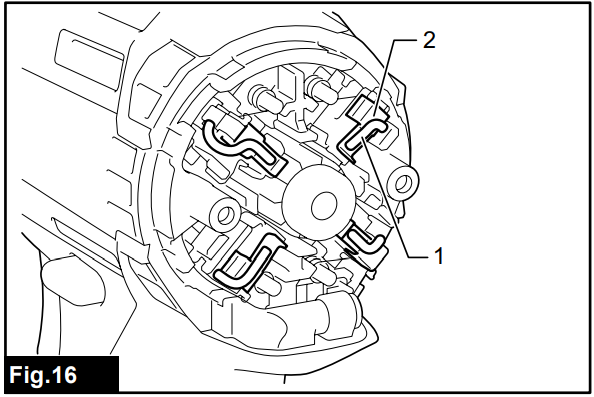
- Lead wire
- Carbon brush cap
Make sure that the carbon brush caps have it into the holes in brush holders securely.
- Hole
- Carbon brush cap
Reinstall the rear cover and tighten two screws securely.
Insert the battery cartridge into the tool and break in brushes by running tool with no load for about 1 minute.
Check the tool while running and electric brake operation when releasing the switch trigger. If electric brake is not working well, ask Makita Authorized or Factory Service Centers for repair.
To maintain product SAFETY and RELIABILITY, repairs, any other maintenance or adjustment should be performed by Makita Authorized or Factory Service Centers, always using Makita replacement parts.
Description of Cordless Impact Driver DTD152
The Cordless Impact Driver DTD152 is a high-performance tool that delivers fast and efficient fastening in a compact and lightweight package. Its 4-pole motor provides greater power and efficiency, while the variable speed trigger allows for precise control over the speed and torque. The built-in LED light ensures better visibility in dark workspaces, making it easier to complete tasks accurately. The Cordless Impact Driver DTD152 also features an electric brake that stops the tool quickly, reducing the risk of overtightening or damage to the fastener. Its compact size and lightweight design make it easy to handle and maneuver, even in tight spaces. The Makita Cordless Impact Driver is compatible with Makita's 18V LXT batteries, providing longer run time and faster charging times.
Troubleshooting
If you experience any issues with the Makita Cordless Impact Driver , try the following solutions:
- If the tool won't start, ensure that the battery is properly inserted and charged.
- If the tool is not delivering sufficient torque, check that the chuck is properly secured around the fastener.
- If the tool is overheating, allow it to cool down before continuing use.
- If the LED light is not functioning, replace the battery or check the tool's wiring.
Pros & Cons
Pros
- Powerful and efficient 4-pole motor
- Compact and lightweight design
- Built-in LED light and electric brake
- Longer run time and faster charging times with Makita's 18V LXT batteries
Cons
- Higher price point compared to other cordless impact drivers
- May be overkill for lighter-duty tasks
Customer Reviews of Makita Cordless Impact Driver
Customers have praised the Makita Cordless Impact Driver for its power, efficiency, and ease of use. Some have noted that it can be a bit heavy for prolonged use, but overall, they have been satisfied with its performance. However, some customers have reported issues with the battery life, noting that it can drain quickly during heavy use.
Faqs
Could you elaborate on the Makita DTD152 Impact Driver's compact design?
How Is the Makita DTD152 User Experience Improved by the Variable Speed Control Feature?
For what kinds of fastening tasks is the Makita Cordless Impact Driver DTD152 appropriate?
Is there an ergonomic design on the Makita DTD152 Cordless Impact Driver?
How Does the Makita DTD152 Quick-Shift Mode Affect Efficiency Improvement?
Which Safety Features Are Included in the Makita DTD152 Cordless Impact Driver?
How Robust Is the Makita Cordless Impact Driver DTD152's Construction?
Is it Possible to Use the Makita DTD152 Cordless Impact Driver for Automotive Repair Work?
How Is Visibility in Dark Workspaces Enhanced by the LED Light Feature?
What Kind of Warranty Does the Makita DTD152 Impact Driver Come With?
Leave a Comment
