Makita Cordless Lawn Mower XML05 Instruction Manual
Content
Introduction of Makita Cordless Lawn Mower XML05
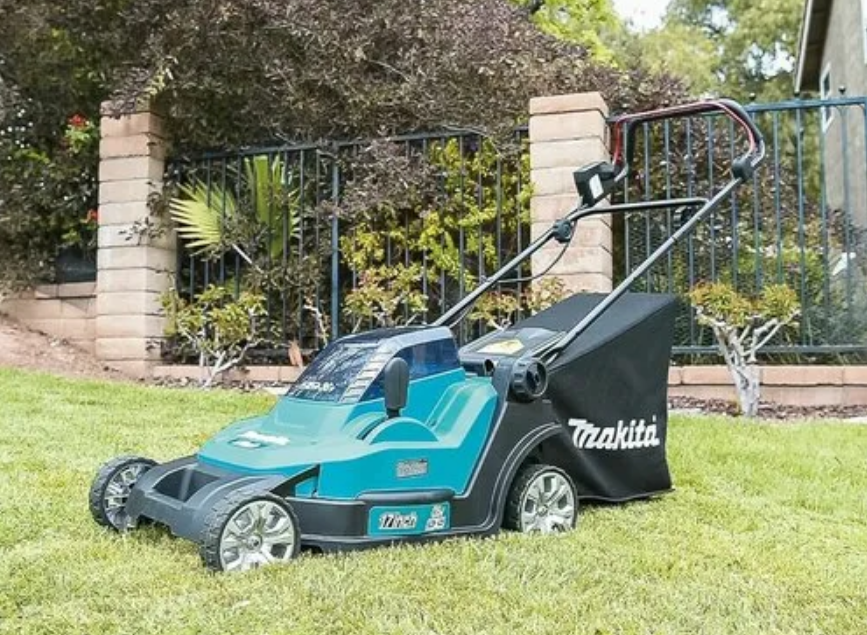
The Makita Cordless Lawn Mower XML05 is a compact and efficient solution for residential lawn care, designed to deliver powerful performance without the hassle of gas. Operating on two 18V LXT batteries, it features a 17-inch cutting width and a brushless motor that achieves up to 3,600 RPM for quick, clean cuts. Its lightweight design and ergonomic handle enhance maneuverability, making it ideal for detailed landscaping. The XML05 is priced at approximately $369.00 for the bare tool option.
SPECIFICATIONS
| Model: | XML05 | |
| Mowing width (blade diameter) | 430 mm (17") | |
| No load speed | 3,600 /min | |
| Part number of replacement mower blade | 191D43-8 | |
| Dimensions (L x W x H) | during operation | L: 1,435 mm to 1,490 mm (56-1/2" to 58-3/4") W: 460 mm (18-1/8") H: 1,005 mm to 1,045 mm (39-1/2" to 41-1/4") |
when stored (without grass basket) | 865 mm x 460 mm x 475 mm (34" x 18-1/8" x 18-3/4") | |
| Rated voltage | D.C. 36 V | |
| Net weight | 17.1 - 17.8 kg (37.7 - 39.2 lbs) | |
Applicable battery cartridge and charger
| Battery cartridge | BL1815N / BL1820B / BL1830 / BL1830B / BL1840B / BL1850B / BL1860B |
| Charger | DC18RC / DC18RD / DC18RE / DC18SD / DC18SE / DC18SF |
Description
The Makita Cordless Lawn Mower XML05 boasts a sleek and ergonomic design, making it easy to maneuver around tight spaces and larger areas alike. The brushless motor technology ensures long-lasting performance and minimal maintenance, while the 20" steel blade provides a clean cut every time. The mower also features adjustable cutting heights, allowing users to customize their cutting experience based on lawn conditions. With its large capacity cutting deck, this mower can handle thick grass with ease, making it an excellent choice for various lawn types.
The XML05 also comes with a convenient grass collection bag that can be easily detached and emptied, reducing the need for frequent clean-ups. Additionally, the mower's quiet operation at 60 dB(A) makes it suitable for early morning or evening use without disturbing neighbors.
ASSEMBLY
WARNING: Always be sure that the lock key and battery cartridge are removed before carrying out any work on the mower. Failure to remove the lock key and the battery cartridge may result in seri- ous personal injury from accidental start-up.
WARNING: Never start the mower unless it is completely assembled. Operation of the machine in a partially assembled state may result in serious personal injury from accidental start-up.
Installing the battery cover
WARNING: Do not insert the lock key and bat- tery cartridge before installing the battery cover. Failure to do so may cause a serious injury. Install the battery cover completely before the operation. The battery cover protects the mower and battery cartridge from mud, dirt, and water.
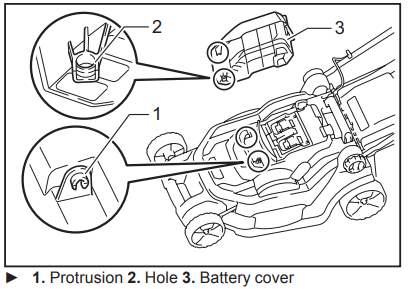
Place the battery cover with the protrusions on the mower aligned with the holes on the battery cover.
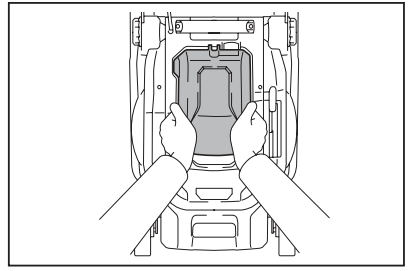
Place your hands in the middle of the battery cover and push it.
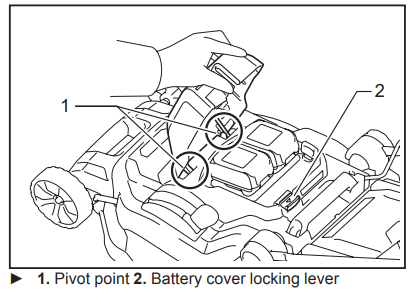
Before the first operation, check that the pivot point of the battery cover is attached properly. If the battery cover is installed correctly, it will not open until the battery cover locking lever is pulled.
Installing the handle
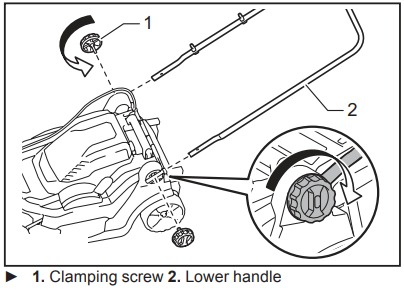
NOTICE: When installing handles, position the cords so that they are not caught by anything between the handles. If the cord is damaged, the mower switch may not work.
Slide both ends of lower handle into the grooves of the mower then fully tighten the clamping screws.
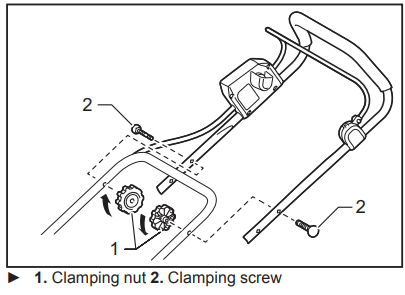
Align the screw holes of upper handle and lower handle. Secure them with the clamping screws and nuts.
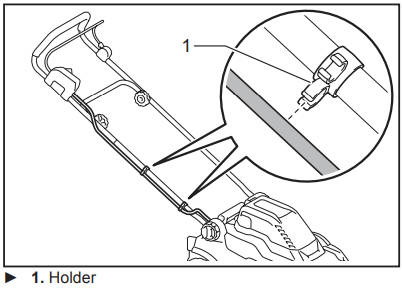
Attach the holders to the handle. Position the power supply cord as shown in the figure.
Removing the mulching plug
Optional accessory
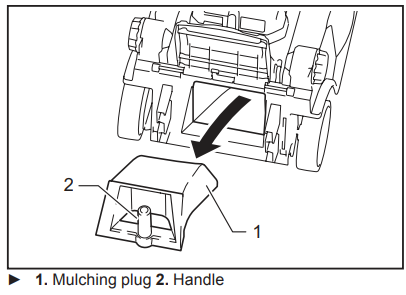
Open the rear cover.
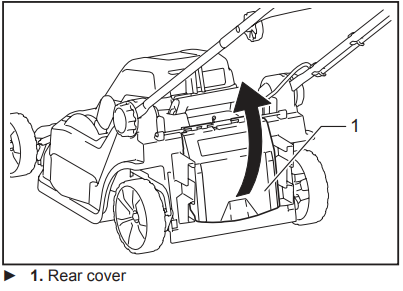
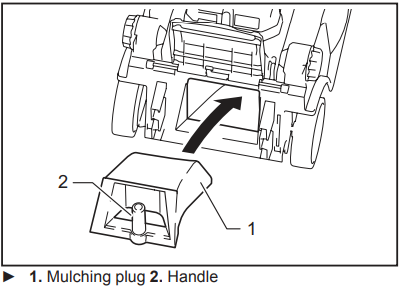
Hold the mulching plug by the handle, and then pull it out from the mower body as shown in the figure.
Installing the grass basket
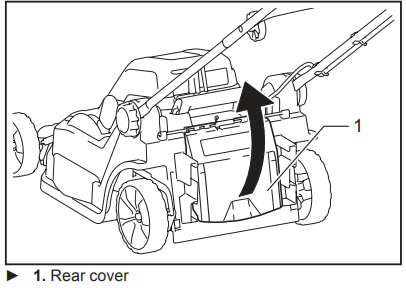
Onen the rear cover.
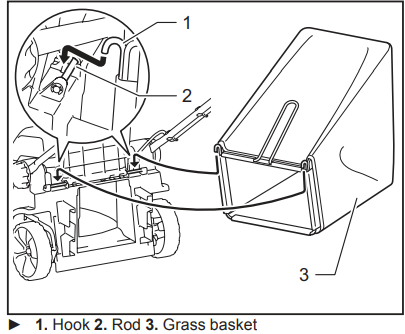
Hook the grass basket on the rod of the mower body as shown in the figure.
Attaching the mulching plug
Optional accessory
Open the rear cover, and then remove the grass basket.
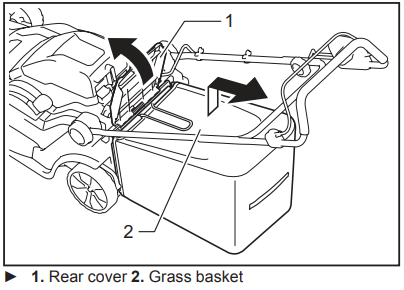
Hold the mulching plug by the handle, and then attach it to the mower body as shown in the figure.
FUNCTIONAL DESCRIPTION
Installing or removing battery cartridge
CAUTION: Always switch off the machine before installing or removing of the battery cartridge.
CAUTION: Make sure that you lock the battery cover before use. Otherwise, mud, dirt, or water may cause damage to the product or the battery cartridge.
CAUTION: Always install the battery cartridge fully until the red indicator cannot be seen. If not, it may accidentally fall out of the machine, causing injury to you or someone around you.
CAUTION: Do not install the battery cartridge forcibly. If the cartridge does not slide in easily, it is not being inserted correctly.
NOTE: The machine does not work with only one battery cartridge.
To install the battery cartridge;
Slide the battery cover locking lever and open the battery cover.
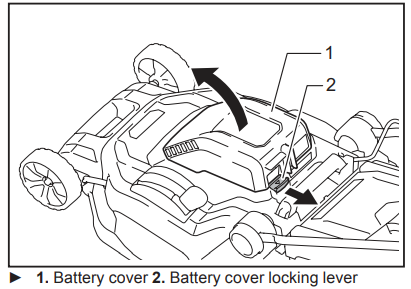
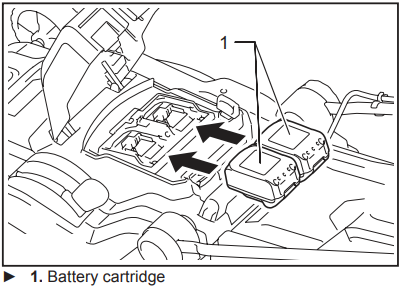
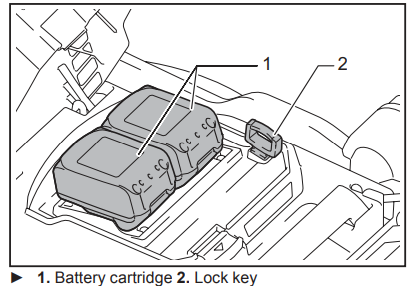
Align the tongue on the battery cartridge with the slot on the mower then slide the cartridge until it locks in place with a little click.
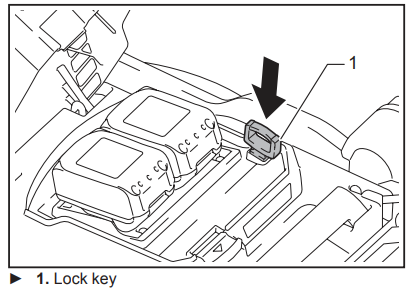
Insert the lock key in the place shown in the figure as far as it will go.
- Close the battery cover and push it until it is latched with the locking lever.
To remove the battery cartridge from the mower;
- Slide the battery cover locking lever and open the battery cover.
- Pull out the battery cartridge from the mower while sliding the button on the front of the cartridge.
- Pull out the lock key.
- Close the battery cover.
Machine/battery protection system
The machine is equipped with a machine/battery protection system. This system automatically cuts off power to the motor to extend tool and battery life. The machine will automatically stop during operation if the machine or battery is placed under one of the following conditions.
Overload protection
When the machine is operated in a manner that causes it to draw an abnormally high current, the machine automatically stops without any indication. In this situation, turn the machine off and stop the application that caused the machine to become overloaded. Then turn the machine on to restart.
Overheat protection
When the machine is overheated, the machine stops automatically. Let the machine cool down before turning the machine on again.
Overdischarge protection
When the battery capacity becomes low, the machine stops automatically. If the product does not operate even when the switches are operated, remove the bat- teries from the machine and charge the batteries.
Indicating the remaining battery capacity
Battery indicator
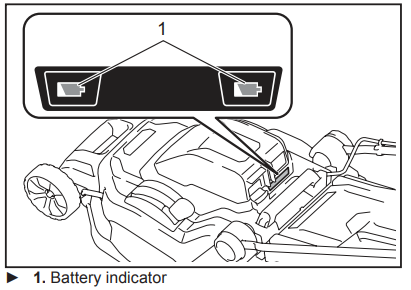
When the remaining battery capacity gets low, the battery indicator blinks on the applicable battery side. By further use, the machine stops and the battery indicator lights up about 10 seconds. In this situation, charge the battery cartridge.
Only for battery cartridges with the indicator

- Press the check button on the battery cartridge to indicate the remain- ina battery capacity. The indicator lamos liaht up for a few seconds.
NOTE: Depending on the conditions of use and the ambient temperature, the indication may differ slightly from the actual capacity.

Switch action
WARNING: Before installing the battery car- tridge, always check to see that the switch lever actuates properly and returns to the original position when released. Operating a machine with a switch that does not actuate properly can lead to loss of control and serious personal injury.
NOTE: The mower does not start without pressing the switch button even the switch lever is pulled.
NOTE: Mower may not start due to the overload when you try to mow long or dense grass at a time.
Increase the mowing height in this case. This mower is equipped with the interlock switch and han- dle switch. If you notice anything unusual with either of these switches, stop operation immediately and have them checked by your nearest Makita Authorized Service Center.
Install the battery cartridges. Insert the lock key into the interlock switch and then close the battery cover.
- Press the switch button and hold it.
Grab the upper handle and pull the switch lever.
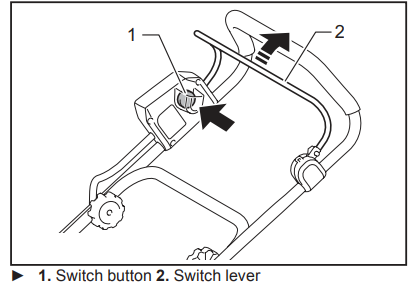
- Release the switch button as soon as the motor release the switch lever.
- Release the switch lever to stop the motor.
Adjusting the mowing height
WARNING: Never put your hand or leg under the mower body when adjusting the mowing height.
WARNING: Always make sure that the lever fits in the groove properly before operation. The mowing height can be adjusted in the range of between 20 mm (13/16") and 75 mm (2-15/16*).
- Remove the lock key.
Pull the mowing height adjusting lever to the
Outward of the mower body and sive leve our desired mowing height.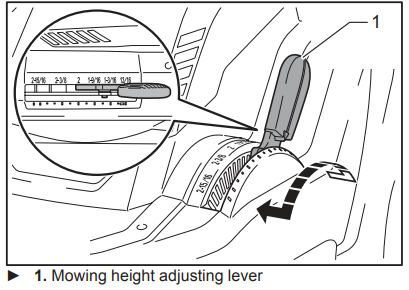
NOTE: The mowing height figures should be used just as a guideline. Depending on the conditions of the lawn or the ground, the actual lawn height may become slightly different from the set height.
NOTE: Try a test mowing of grass in a less conspicu- ous place to get your desired height.
Using mulching plug
Optional accessory
The mulching plug allows you to return the cut grass to the ground without gathering the cut grass in the grass basket. When you operate the machine with the mulch- ing plug, be sure to remove the grass basket.
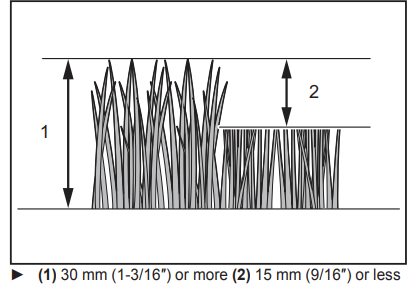
NOTICE: When using the machine with the mulching plug, make sure that the total length of grass is 30 mm (1-3/16") or more, or the cut length is 15 mm (9/16") or less.
Setup Guide
To operate the Makita Cordless Lawn Mower XML05,
- Start by ensuring the battery is fully charged.
- Next, attach the battery to the mower by aligning it with the battery slot and securing it in place.
- Adjust the handlebar to a comfortable height using the quick-release mechanism.
- Before each use, inspect the mower blade for any debris or damage; clean or replace as necessary.
For assembly, follow these steps:
- Attach the handlebar to the main body of the mower using the provided screws.
- Securely attach the grass collection bag to the rear of the mower.
- Check that all safety guards are in place.
- Plug in any additional accessories such as mulching kits if desired.
Pairing is not required as this is a standalone cordless mower; however, ensure all parts are securely attached before first use.
MAINTENANCE
WARNING: Always be sure that the lock key and battery cartridge are removed from the mower before storing or carrying the mower or attempting to perform inspection or maintenance.
WARNING: Always remove the lock key when the mower is not in use. Store the lock key in a safe place out of reach of children.
WARNING: Wear gloves when performing inspection or maintenance.
WARNING: Always wear the safety goggles or safety glasses with side shields when performing inspection or maintenance.
NOTICE: Never use gasoline, benzine, thinner, alcohol or the like. Discoloration, deformation or cracks may result. To maintain product SAFETY and RELIABILITY, repairs, any other maintenance or adjustment should be performed by Makita Authorized or Factory Service Centers, always using Makita replacement parts.
- Remove the lock key. Store it in a safe place out of the reach of children.
- Clean the mower using only a wet cloth. Do not spray or pour water on the mower when cleaning.
- Put the mower on its side and clean grass clip- pings accumulated on the underside of mower deck.
- Check all nuts, bolts, knobs, screws, fasteners etc. for tightness.
- Inspect moving parts for damage, breakage, and wear. Damaged or missing parts should be repaired or replaced
Storage
WARNING: When carrying or storing the mower, do not hold the folded handles but the front grip of the mower. Holding the folded handles may cause a serious injury or damage to the mower.
Before storing the mower, remove the battery cartridge from it. Store mower indoors in a cool, dry and locked place.Don't store the mower and charger in locations where the temperature may reach or exceed 40 °C (104 °F).

Loosen the clamping screws and expand the lower handle to both sides. Move down the handle forward. At this time, keep a firm grip on the lower handle so that the handle does not fall down to the far side from the mower body.
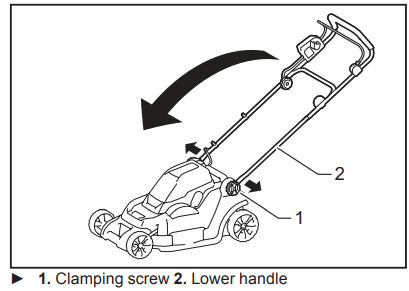
Loosen the clamping nuts and pivot the upper handle back while expanding the both sides.

Store the grass basket between the handle and the mower body.
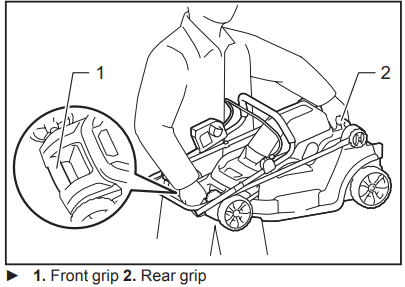
NOTE: When putting the mower in the upright posi- tion, do not hold the handle but use the front grip of the mower.
Removing or installing the mower blade
WARNING: Always remove the lock key and battery cartridge when removing or installing the blade. Failure to remove the lock key and battery cartridge may cause a serious injury.
WARNING: The blade coasts for a few sec- onds after releasing the switch. Do not start any operation until the blade comes to a complete stop.
WARNING: Always wear gloves when han- dling the blade.
Removing the mower blade
- Put the mower on its side so that the mowing height adjusting lever comes to the upper side.
- To lock the blade rotation, insert a screwdriver or a similar tool into a hole on the mower body.
Turn the bolt counterclockwise with the wrench.
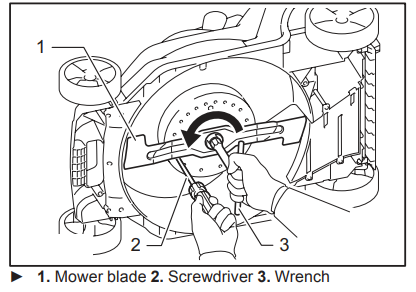
Remove the bolt, outer flange, mower blade, and inner flange in order.
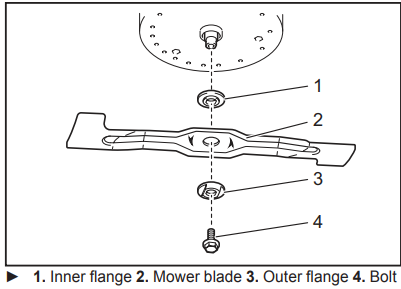
Installing the mower blade
To install the mower blade, take the removal procedure in reverse.
- WARNING: Install the mower blade carefully. It has a top/bottom facing. Place the blade so that the rotational direction arrow faces outward.
- WARNING: Tighten the bolt clockwise firmly to secure the blade.
- WARNING: Make sure that the mower blade and all the fixing parts are installed correctly and tightened securely.
- WARNING: When you replace the blades, always follow the instructions provided in this manual.
OPTIONAL ACCESSORIES
CAUTION: These accessories or attachments are recommended for use with your Makita tool specified in this manual. The use of any other accessories or attachments might present a risk of injury to persons. Only use accessory or attachment for its stated purpose.
If you need any assistance for more details regarding these accessories, ask your local Makita Service Center.
- Mower blade
- Mulching plug
- Makita genuine battery and charger
NOTE: Some items in the list may be included in the tool package as standard accessories. They may differ from country to country.
Troubleshooting
Before asking for repairs, conduct your own inspection first. If you find a problem that is not explained in the manual, do not attempt to dismantle the tool. Instead, ask Makita Authorized Service Centers, always using Makita replace- ment parts for repairs.
| State of abnormality | Probable cause (malfunction) | Remedy |
| Mower does not start. | Two battery cartridges are not installed. | Install the charged battery cartridges. |
| Battery problem (under voltage) | Recharge the battery cartridge. If recharging is not effective, replace battery cartridge. | |
| The lock key is not inserted. | Insert the lock key. | |
| Motor stops running after a little use. | Battery's charge level is low. | Recharge the battery cartridge. If recharging is not effective, replace battery cartridge. |
| Cutting height is too low. | Increase the cutting height. | |
| Motor does not reach maximum RPM. | Battery cartridge is installed improperly. | Install the battery cartridge as described in this manual. |
| Battery power is dropping. | Recharge the battery cartridge. If recharging is not effective, replace battery cartridge. | |
| The drive system does not workcorrectly. | Ask your local authorized service center for repair. | |
Mower blade does not rotate:
| Foreign object such as a branch is jammed near the blade. | Remove the foreign object. |
| The drive system does not work correctly. | Ask your local authorized service center for repair. | |
Abnormal vibration:
| Blade is imbalanced, excessively or unevenly worn. | Replace the blade. |
Pros & Cons
Pros
- Eco-Friendly: Zero emissions making it environmentally friendly.
- Convenient: Cordless design eliminates need for cords or gasoline.
- Durable: Brushless motor ensures long-lasting performance.
- Adjustable Cutting Height: Customizable cutting experience.
- Quiet Operation: Suitable for use at any time of day.
Cons
- Battery Life: Limited runtime may require multiple charges for larger lawns.
- Weight: May be heavy for some users when fully assembled.
- Costly Accessories: Additional parts like mulching kits can be expensive.
Customer Reviews
Customer reviews have been overwhelmingly positive, with many praising the ease of use and quiet operation of the Makita Cordless Lawn Mower XML05. Some common complaints include limited battery life on larger lawns and the weight of the mower when fully assembled. However, overall satisfaction remains high due to its reliable performance and eco-friendly design.
MAKITA WARRANTY
Please refer to the annexed warranty sheet for themost current warranty terms applicable to this product. If annexed warranty sheet is not available, refer to the warranty details set forth at below website for your respective country http://www.makitatools.com
Faqs
What is the estimated runtime of the Makita Cordless Lawn Mower XML05?
Is the Makita Cordless Lawn Mower XML05 suitable for large lawns?
How do I maintain the blade of my Makita Cordless Lawn Mower XML05?
Can I use my existing Makita 18V batteries with this mower?
What are some safety precautions I should take when using this mower?
How do I store my Makita Cordless Lawn Mower XML05 during off-season?
Can I purchase additional batteries for extended runtime?
How do I adjust the cutting height on my Makita Cordless Lawn Mower XML05?
Is there a mulching option available for this mower?
What warranty does Makita offer on this cordless lawn mower?
Leave a Comment
