Makita Cordless Lawn Mower XML09 Instruction Manual
Content
Introduction
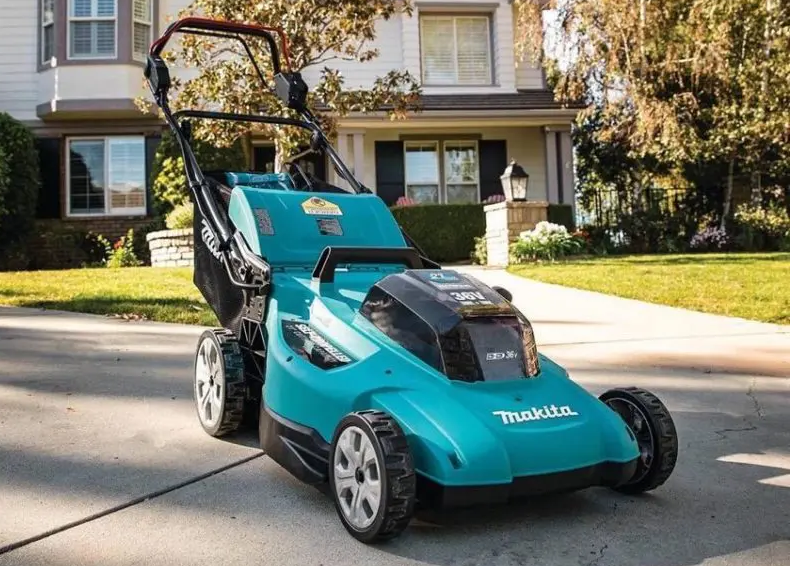
The Makita Cordless Lawn Mower XML09 is a powerful and eco-friendly solution for lawn care, featuring a 36V (18V X2) LXT brushless motor that delivers up to 2,800 RPM. This self-propelled mower is designed for efficiency, capable of cutting up to two-thirds of an acre in under an hour with minimal noise and emissions. The current cost for this model is approximately $799, making it a premium option for homeowners seeking advanced lawn maintenance technology.
Specifications
Model: | XML09 |
Mowing width (blade diameter) | 534 mm (21″) |
No load speed | 2,300 /min |
Maximum speed | 2,800 /min |
Part number of replacement mower blade | 191D52-7 |
Dimensions (L x W x H) | L: 1,655 mm to 1,740 mm (65″ to 68-1/2″) W: 590 mm (23-1/4″) H: 990 mm to 1,100 mm (39″ to 43-1/4″) |
Traveling speed | 2.5 - 5.0 km/h (1.6 - 3.1 mile/h) |
Rated voltage | D.C. 36 V |
Net weight | 43 - 47 kg (96 - 104 lbs) |
Protection degree | IPX4 |
- Due to our continuing program of research and development, the specifications herein are subject to change without notice.
- Specifications may differ from country to country.
- The weight may differ depending on the attachment(s), including the battery cartridge. The lightest and heavi-est combination, according to EPTA-Procedure 01/2014, are shown in the table.
Applicable battery cartridge and charger
Battery cartridge | BL1815N / BL1820B / BL1830 /BL1830B / BL1840B / BL1850B / BL1860B |
Charger | DC18RC / DC18RD / DC18RE / DC18SD / DC18SE / DC18SF / DC18SH |
- Some of the battery cartridges and chargers listed above may not be available depending on your region of residence.
WARNING: Only use the battery cartridges and chargers listed above. Use of any other battery cartridges and chargers may cause injury and/or fire.
Description
The Makita Cordless Lawn Mower XML09 combines power, efficiency, and convenience in a single package. Its BL motor provides consistent performance and long battery life, while the adjustable cutting height ensures a precise cut every time. The 17-inch steel cutting blade is durable and reliable, capable of handling thick grass without straining the motor.
The mower's compact and lightweight design makes it easy to handle for users of all ages and skill levels. Additionally, the low noise operation at 60 dB(A) allows for early morning or evening mowing without disturbing neighbors.
Makita Cordless Lawn Mower XML09 Assembly
WARNING: Always be sure that the lock key and battery cartridge are removed before carrying out any work on the mower. Failure to remove the lock key and the battery cartridge may result in seri-ous personal injury from accidental start-up.
WARNING: Never start the mower unless it is completely assembled. Operation of the machine in a partially assembled state may result in serious personal injury from accidental start-up.
Installing the handle
NOTICE: When installing handles, position the cords so that they are not caught by anything between the handles. If the cord is damaged, the mower switch may not work.
Align the holes in the lower handle with the holes in the mower body, and then tighten 4 bolts temporarily.
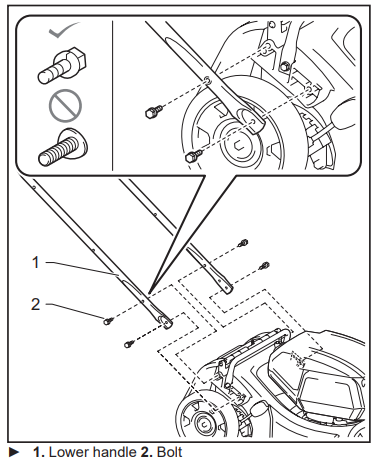
- Firmly tighten 4 bolts which were temporarily tightened in step 1 using box wrench 13.
Align the hole in the lower handle with the hole in the upper handle, then insert the bolt from inside, and then tighten the nut from outside with box wrench 13. Perform the same procedure on the other side.
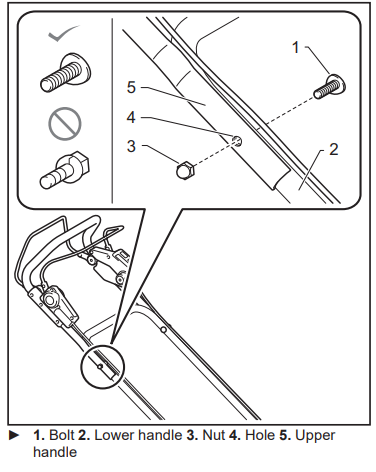
CAUTION: Hold the upper handle firmly so that it does not drop off your hand. Otherwise, the handle may fall and cause an injury.
Attach the holders to the handle.
Align the protrusions on the holder with the holes on the handle so that the protrusions fit in the holes. Position the cords as shown in the figure.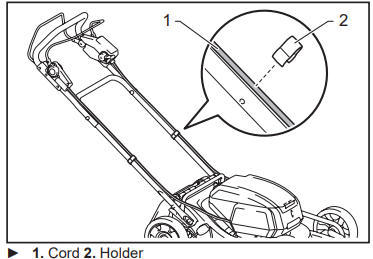
Removing the mulching plug
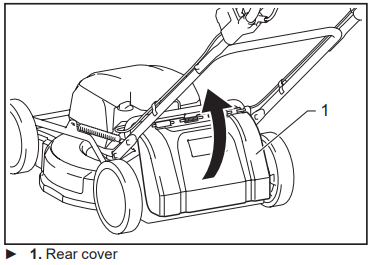
Open the rear cover.
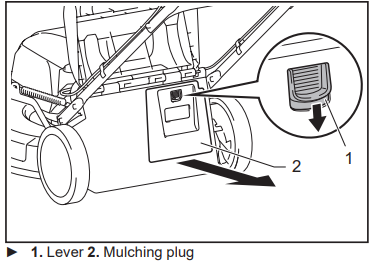
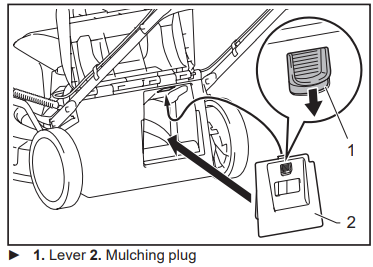
Remove the mulching plug while holding down the lever.
Installing or removing the grass basket
To install the grass basket, follow the steps below.
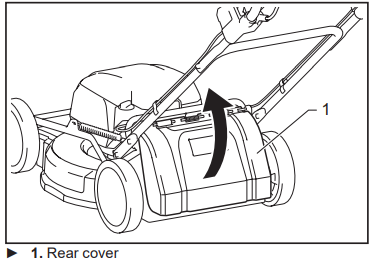
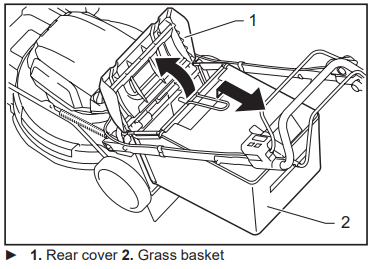
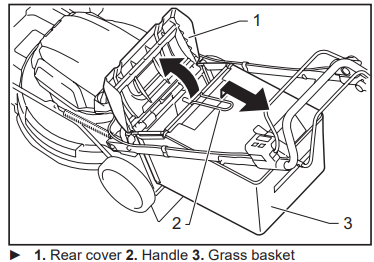
Open the rear cover.
Hold the handle of the grass basket, and then hook the grass basket on the rod of the mower body as shown in the figure.
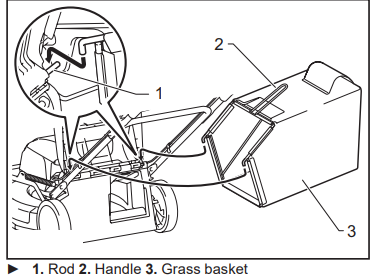
To remove the grass basket, open the rear cover, and then remove the grass basket by holding the handle.
Attaching the mulching plug
Open the rear cover, and then remove the grass basket.
Attach the mulching plug while holding down the lever, and then release the lever to lock the mulching plug.
FUNCTIONAL DESCRIPTION
Installing or removing battery cartridge
CAUTION: Always switch off the machine before installing or removing of the battery cartridge.
CAUTION: Hold the machine and the battery cartridge firmly when installing or removing bat-tery cartridge. Failure to hold the machine and the battery cartridge firmly may cause them to slip off your hands and result in damage to the machine and battery cartridge and a personal injury.
CAUTION: Make sure that you lock the battery cover before use. Otherwise, mud, dirt, or water may cause damage to the product or the battery cartridge.
CAUTION: Always install the battery cartridge fully until the red indicator cannot be seen. If not, it may accidentally fall out of the machine, causing injury to you or someone around you.
CAUTION: Do not install the battery cartridge forcibly. If the cartridge does not slide in easily, it is not being inserted correctly.
NOTE: The machine does not work with only one battery cartridge.
To install the battery cartridge;
Pull up the locking lever, and then open the battery cover.
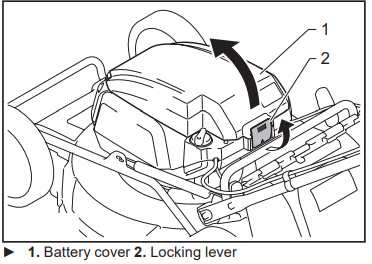
Align the tongue on the battery cartridge with the slot on the machine, and then slide the cartridge until it locks in place with a little click.
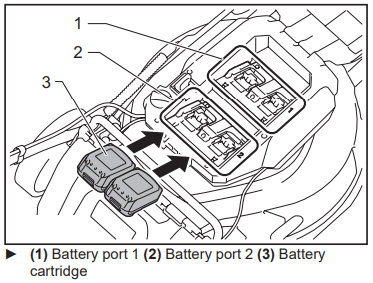
NOTE: Install at least 2 battery cartridges to battery port 1 or battery port 2.
Insert the lock key in the place shown in the figure as far as it will go.
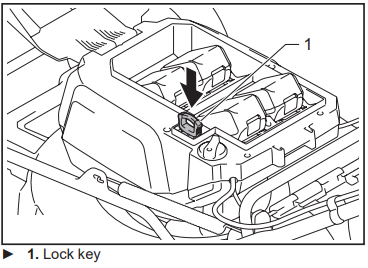
- Close the battery cover and push it until it is latched with the locking lever.
To remove the battery cartridge;
- Pull up the locking lever and open the battery cover.
- Pull out the battery cartridge from the machine while sliding the button on the front of the cartridge.
- Pull out the lock key.
- Close the battery cover.
Switching the battery cartridges
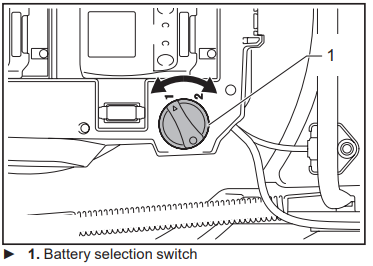
The machine uses 2 battery cartridges for operation at a time. Up to 4 battery cartridges can be installed to the machine. Before operating the machine, select the battery port 1 or battery port 2 by turning the battery selection switch.
NOTE: If only 2 battery cartridges are installed to the machine, be sure to select the battery port to which the battery cartridges are installed using the battery selection switch.
Machine/battery protection system
The machine is equipped with a machine/battery protection system. This system automatically cuts off power to the motor to extend machine and battery life. The machine will automatically stop during operation if the machine or battery is placed under one of the fol-lowing conditions:
Overload protection
When the battery is operated in a manner that causes it to draw an abnormally high current, the machine automatically stops and the main power lamp blinks in green. In this situation, turn the machine off and stop the application that caused the machine to become overloaded. Then turn the machine on to restart.
Overheat protection
When the machine or battery is overheated, the machine stops automatically and the main power lamp lights up in red. In this case, let the machine and battery cool before turning the machine on again.
Over-discharge protection
When the battery capacity is not enough, the machine stops automatically and the main power lamp blinks in red. In this case, remove the battery from the machine and charge the battery cartridges or change the battery cartridges to fully charged ones.
Indicating the remaining battery capacity
Only for battery cartridges with the indicator
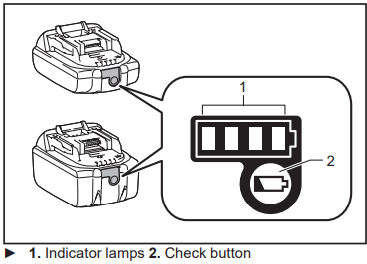
Press the check button on the battery cartridge to indi-cate the remaining battery capacity. The indicator lamps light up for a few seconds.
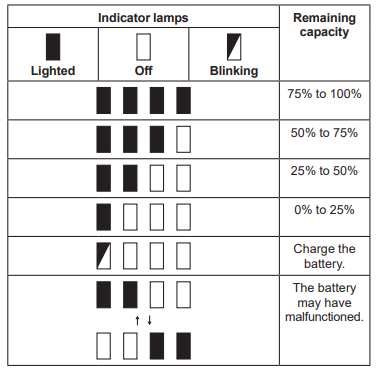
NOTE: Depending on the conditions of use and the ambient temperature, the indication may differ slightly from the actual capacity.
Control panel
The control panel has the main power switch, the mode switching button, and the indicator of remaining battery capacity.

Main power switch
WARNING: Always turn off the main power switch when not in use.
To turn on the machine, press the main power switch. The main power lamp lights up in green. To turn off the machine, press the main power switch again.
NOTE: If the main power lamp lights up in red or blinks in red or green, refer to the instructions for machine/battery protection system.
NOTE: This machine employs the auto power-off function. To avoid unintentional start up, the main power switch will automatically shut down when the switch lever and drive lever (if equipped) are not pulled for a certain period after the main power switch is turned on.
Mode switching button
You can switch the operating mode by pressing the mode switching button. When the machine is turned on, the machine starts up in the normal mode. When you press the mode switching button, the machine shifts to the noise reduction mode and the mode switching lamp lights up in green. In the noise reduction mode, you can decrease the noise at mowing. When you press the mode switching button again, the machine returns to the normal mode.
Indicating the remaining battery capacity
Press the check button to indicate the remaining battery capacities. The battery indicators correspond to each battery.
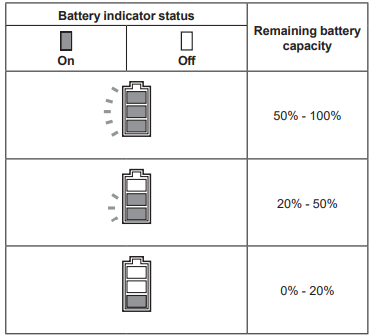
NOTE: The indicator lamps for remaining battery capacity is just for a reference. The actual battery capacity may differ depending on the usage conditions.
NOTE: Before you press the check button to indicate the remaining battery capacities, stop the machine.
Switch action
WARNING: Before installing the battery car-tridge, always check to see that the switch lever actuates properly and returns to the original posi-tion when released. Operating the machine with a switch that does not actuate properly can lead to loss of control and serious personal injury.
NOTE: The mower does not start without pressing the switch button even the switch lever is pulled.
NOTE: Mower may not start due to the overload when you try to mow long or dense grass at a time. Increase the mowing height in this case.
This mower is equipped with the lock key and handle switch. If you notice anything unusual with either of the lock key or switch, stop the operation immediately and have them checked by your nearest Makita Authorized Service Center.
- Install the battery cartridges. Insert the lock key, and then close the battery cover.
- Select the battery cartridges used for operation by turning the battery selection switch.
- Press the main power switch.
Pull the switch lever toward you while holding down the switch button. Release the switch button as soon as the motor starts running.
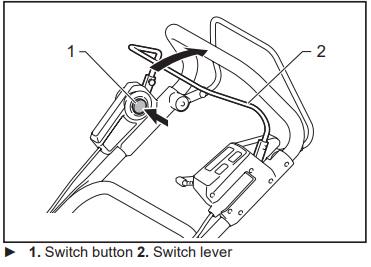
NOTE: If the lock key is not inserted, the power lamp blinks in green when you pull the switch lever.
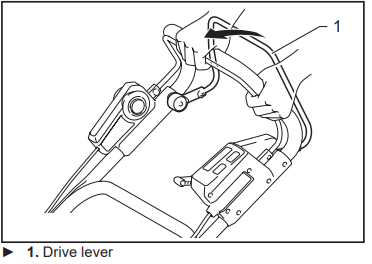
- While holding the switch lever, push the drive lever forward and hold it to drive the rear wheels.
NOTE: You can drive the rear wheels by pushing the drive lever forward and hold it without pulling the switch lever. Release the drive lever and the switch lever to stop the machine.
Adjusting the mowing height
WARNING: Never put your hand or leg under the mower body when adjusting the mowing height.
WARNING: Always make sure that the lever fits in the groove properly before operation.
The mowing height can be adjusted in the range of between 32 mm (1-1/4″) and 100 mm (3-15/16″).
Remove the lock key, and then pull the mowing height adjusting lever outward of the mower body and move it to your desired mowing height.
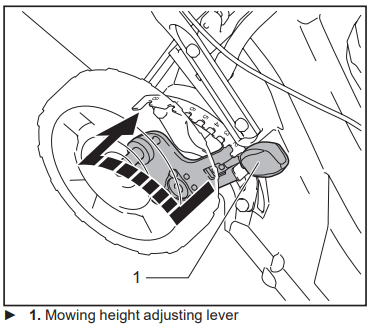
The table below shows the relationship between the number on the mower body and the approximate mow-ing height.
Number | Mowing height |
1 | 32 mm (1-1/4″) |
2 | 39 mm (1-9/16″) |
3 | 47 mm (1-7/8″) |
4 | 55 mm (2-3/16″) |
5 | 63 mm (2-1/2″) |
6 | 74 mm (2-15/16″) |
7 | 86 mm (3-3/8″) |
8 | 100 mm (3-15/16″) |
Hold the front grip or the lower handle with one hand, and then move the mowing height adjusting lever with the other hand.
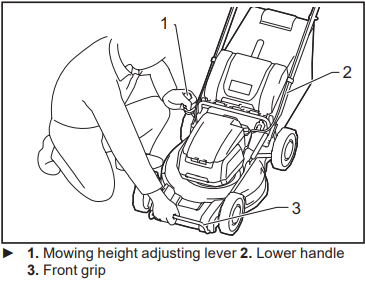
NOTE: The mowing height figures should be used just as a guideline. Depending on the conditions of the lawn or the ground, the actual lawn height may become slightly different from the set height.
NOTE: Try a test mowing of grass in a less conspicu-ous place to get your desired height.
Grass level indicator
Grass level indicator shows the volume of mowed grass. When the grass basket is not full, the indicator floats while the blades are running.
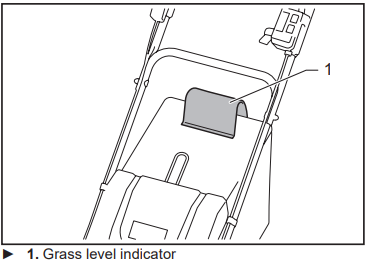
When the grass basket is almost full, the indicator does not float while the blades are running. In this case, stop the operation immediately and empty the basket.
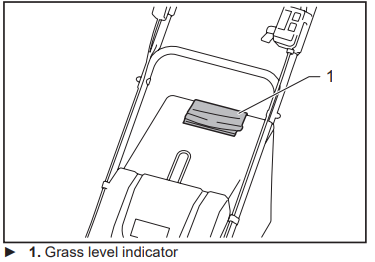
NOTE: This indicator is a rough guide. Depending on the conditions of inside of the basket, this indicator may not work properly.
Adjusting the handle height
CAUTION: Before removing the bolts, hold the upper handle firmly. Otherwise, the handle may fall and cause an injury.
The handle height can be adjusted in two levels.
Remove the upper bolts of the lower handle using box wrench 13, and then loosen the lower bolts.
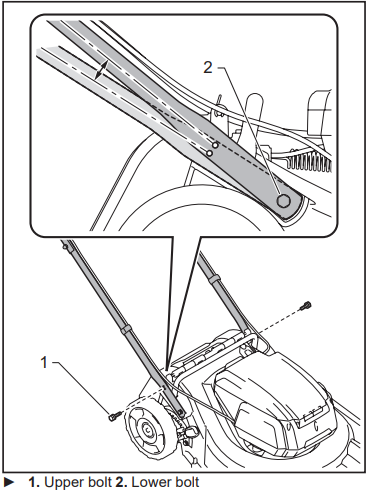
- Adjust the handle height, and then tighten the upper and lower bolts firmly.
Adjusting the traveling speed
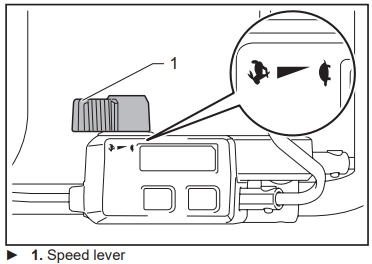
The traveling speed can be adjusted with the speed lever. To decrease the speed, pull the lever toward you, and to increase the speed, turn the lever forward.
Using mulching plug
The mulching plug allows you to return the cut grass to the ground without gathering the cut grass in the grass basket. When you operate the machine with the mulch-ing plug, be sure to remove the grass basket.
NOTICE: When using the machine with the mulching plug, make sure that the total length of grass after cutting is 30 mm (1-3/16″) or more, and the cut length is 15 mm (9/16″) or less.
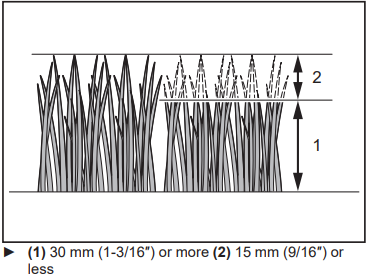
Using the rear discharge
Using the rear discharge allows you to discharge the cut grass to the ground from the rear side of the machine without gathering the cut grass in the grass basket. When you operate the machine using the rear dis-charge, be sure to remove the grass basket and mulch-ing plug, and close the rear cover.
Electronic function
The machine is equipped with the electronic functions for easy operation.
- Constant speed control of blade rotation
Electronic speed control for obtaining constant speed. Possible to get fine finish, because the rotating speed is kept constant even under load condition. - Soft start at driving
The soft-start function minimizes start-up shock, and makes the machine start smoothly. - Electric brake
This machine is equipped with an electric brake. If the machine consistently fails to quickly stop the mower blades after releasing the switch lever, have the machine serviced at Makita Authorized Service Center.
OPERATION
Mowing
WARNING: Before mowing, clear away sticks and stones from mowing area. Furthermore, clear away any weeds from mowing area in advance.
WARNING: Always wear the safety goggles or safety glasses with side shields when operating the mower.
CAUTION: If the cut grass or foreign object blocks up inside of the mower body, be sure to remove the lock key and battery cartridge and wear gloves before removing the grass or foreign object.
NOTICE: Use this machine for mowing lawn only. Do not mow weeds with this machine.

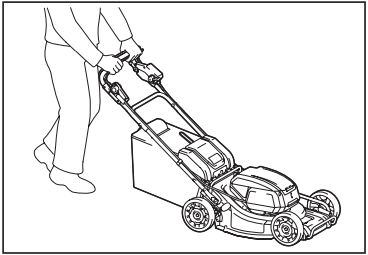
Firmly hold the handle with both hands when mowing. The mowing speed guideline is approximately 7 to 14 meters (23 - 46 ft.) per 10 seconds.
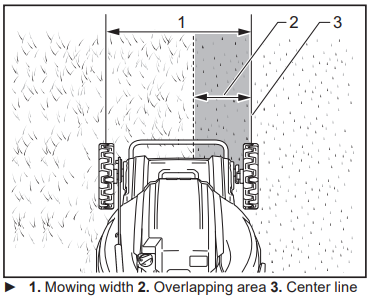
The center lines of the front wheels are guidelines to mowing width. Using the center lines as guidelines, mow in strips. Overlap by one half to one third the previ-ous strip to mow the lawn evenly.
Change the mowing direction each time to prevent the grass grain pattern from forming in just one direction.
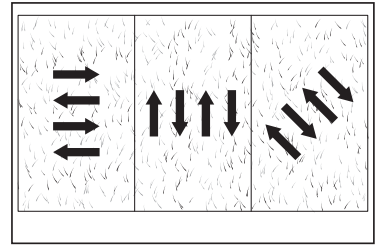
- Periodically check the grass basket for mowed grass. Empty the grass before it becomes full. Before every periodical check, be sure to stop the mower then remove the lock key and the battery cartridge.
NOTICE: Using the mower with the grass basket full prevents smooth blade rotation and places an extra load on the motor, which may cause breakdown.
Mowing a long-grass lawn
Do not try to cut long grass all at once. Instead, mow the lawn in steps. Leave a day or two between mowings until the lawn becomes evenly short.
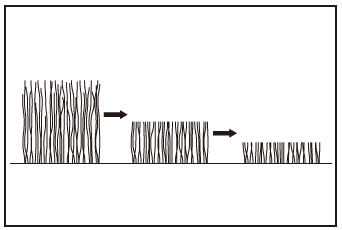
NOTE: Mowing long grass to a short length all at once may cause the grass to die. The cut grass may also block up inside of the mower body.
Emptying the grass basket
WARNING: To reduce a risk of accident, regu-larly check the grass basket for any damage or weak-ened strength. Replace the grass basket if necessary.
- Release the switch lever and drive lever.
- Remove the lock key.
- Open the rear cover and take out the grass basket by holding the handle.
- Empty the grass basket.
Maintenance
WARNING: Always be sure that the lock key and battery cartridge are removed from the mower before storing or carrying the mower or attempting to perform inspection or maintenance.
WARNING: Always remove the lock key when the mower is not in use. Store the lock key in a safe place out of reach of children.
WARNING: Wear gloves when performing inspection or maintenance.
WARNING: Always wear the safety goggles or safety glasses with side shields when performing inspection or maintenance.
NOTICE: Never use gasoline, benzine, thinner, alco-hol or the like. Discoloration, deformation or cracks may result.
To maintain product SAFETY and RELIABILITY, repairs, any other maintenance or adjustment should be performed by Makita Authorized or Factory Service Centers, always using Makita replacement parts.
- Remove the lock key and battery cartridges, and then close the battery cover.
- Put the mower on its side and clean grass clip- pings accumulated on the underside of mower deck.
- Pour water toward the bottom of the machine to which the blade is attached.
NOTICE: Do not wash the machine with high pressure water. - Check all nuts, bolts, knobs, screws, fasteners etc. for tightness.
- Inspect moving parts for damage, breakage, and wear. Damaged or missing parts should be repaired or replaced.
- Store the mower in a safe place out of the reach of children.
NOTICE: Do not pour water to the area shown in the figure. Pouring water to the motor unit may cause a malfunction of the machine.
Carrying the mower
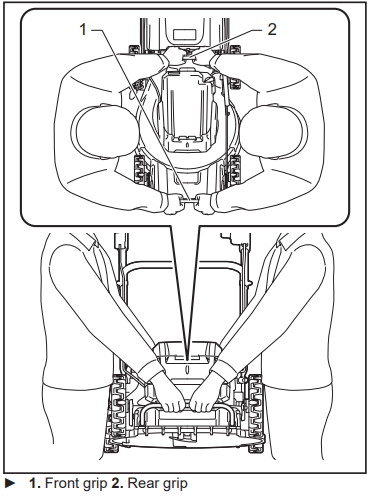
When carrying the mower, hold the front grip and rear grip with two people as shown in the figure.
Storing
Store mower indoors in a cool, dry and locked place. Don't store the mower and charger in locations where the temperature may reach or exceed 40 °C (104 °F).
Removing or installing the mower blade
WARNING: The blade coasts for a few seconds after releasing the switch. Do not start any opera-tion until the blade comes to a complete stop.
WARNING: Always remove the lock key and battery cartridge when removing or installing the blade. Failure to remove the lock key and battery cartridge may cause a serious injury.
WARNING: Always wear gloves when han-dling the blade.
Removing the mower blade
- Put the mower on its side so that the mowing height adjusting lever comes to the upper side.
- To lock the blade, insert the pin into a hole on the mower body.
Turn the bolt counterclockwise with box wrench 17.
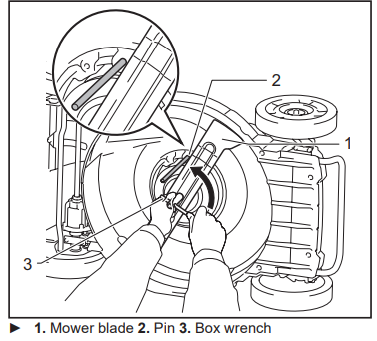
Remove the bolt, and then mower blade.
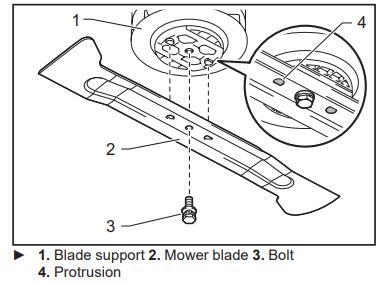
NOTICE: When installing the mower blade, make sure that the protrusions on the blade support fit in the holes in the mower blade.
Installing the mower blade
WARNING: Install the mower blade carefully. It has a top/bottom facing.
WARNING: Tighten the bolt clockwise firmly to secure the blade.
WARNING: Make sure that the mower blade and all the fixing parts are installed correctly and tightened securely.
WARNING: When you replace the blades, always follow the instructions provided in this manual.
NOTICE: After installing the mower blades, remove the pin from the mower body.
To install the mower blades, perform the removal proce-dure in reverse.
Setup Guide
To operate the Makita Cordless Lawn Mower XML09, follow these steps:
- Assemble the mower by attaching the handlebar and adjusting it to your preferred height.
- Insert the 18V LXT Lithium-Ion batteries into the battery slots on the mower.
- Adjust the cutting height using the lever located at the front of the mower.
- Pull the safety switch to engage the motor and begin mowing.
- For optimal performance, ensure the blades are clean and free of debris.
Troubleshooting
Before asking for repairs, conduct your own inspection first. If you find a problem that is not explained in the manual, do not attempt to disassemble the machine. Instead, ask Makita Authorized Service Centers, always using Makita replacement parts for repairs.
State of abnormality | Probable cause (malfunction) | Remedy |
Mower does not start. | Two battery cartridges are not installed. | Install two charged battery cartridges. |
Battery problem (under voltage) | Recharge the battery cartridge. If recharging is not effective, replace battery cartridge. | |
The lock key is not inserted. | Insert the lock key. | |
Battery selection switch is not in the correct position. | Select the battery port to which the battery car- tridges are installed using the battery selection switch. | |
Motor stops running after a little use. | Battery's charge level is low. | Recharge the battery cartridge. If recharging is not effective, replace battery cartridge. |
Cutting height is too low. | Increase the cutting height. | |
Cut grass is clogged in the mower. | Remove the clogged grass from the mower. | |
Motor does not reach maximum RPM. | Battery cartridge is installed improperly. | Install the battery cartridge as described in this manual. |
Battery power is dropping. | Recharge the battery cartridge. If recharging is not effective, replace battery cartridge. | |
The drive system does not work correctly. | Ask your local authorized service center for repair. | |
Mower blade does not rotate: stop the mower immediately! | Foreign object such as a branch is jammed near the blade. | Remove the foreign object. |
The drive system does not work correctly. | Ask your local authorized service center for repair. | |
Abnormal vibration: stop the mower immediately! | Blade is imbalanced, excessively or unevenly worn. | Replace the blade. |
OPTIONAL ACCESSORIES
CAUTION: These accessories or attachments are recommended for use with your Makita machine specified in this manual. The use of any other accessories or attachments might present a risk of injury to persons. Only use accessory or attach-ment for its stated purpose.
If you need any assistance for more details regard-ing these accessories, ask your local Makita Service Center.
- • Mower blade
- Makita genuine battery and charger
NOTE: Some items in the list may be included in the product package as standard accessories. They may differ from country to country.
MAKITA LIMITED WARRANTY
Please refer to the annexed warranty sheet for the most current warranty terms applicable to this product. If annexed warranty sheet is not available, refer to the warranty details set forth at below website for your respective country http://www.makita.ca
Makita Cordless Lawn Mower XML09 Pros & Cons
Pros
- Powerful Performance: High-torque BL motor ensures efficient cutting even through thick grass.
- Cordless Convenience: No more tangled cords or fuel spills; perfect for those seeking ease of use.
- Environmentally Friendly: Zero emissions make it an eco-friendly choice for lawn care.
- Low Maintenance: Easy to clean and maintain; no oil changes required.
Cons
- Battery Life Limitations: May require additional batteries for larger lawns or extended use.
- Higher Cost: More expensive than traditional gas-powered mowers in some regions.
- Charging Time: Batteries may take several hours to fully charge after heavy use.
Customer Reviews
Customers have generally praised the Makita Cordless Lawn Mower XML09 for its ease of use, powerful performance, and quiet operation. However, some users have noted that the battery life could be longer for larger lawns.
- "This mower has been a game-changer for my small yard It's so quiet and easy to maneuver." - John D.
- "I love how efficient it is, but I wish the batteries lasted longer on my bigger lawn." - Sarah K.
Faqs
How long does it take to charge the 18V LXT Lithium-Ion batteries?
What is the cutting capacity of the Makita Cordless Lawn Mower XML09?
Can I use other Makita 18V LXT batteries with this mower?
How do I adjust the cutting height on this mower?
Is this mower suitable for large lawns?
What safety precautions should I take when operating this mower?
How do I maintain this cordless lawn mower?
Can I use this mower in wet conditions?
What is included in the package when purchasing this mower?
Leave a Comment
