Makita Cordless Shear Wrench XTW01 Instruction Manual
Content
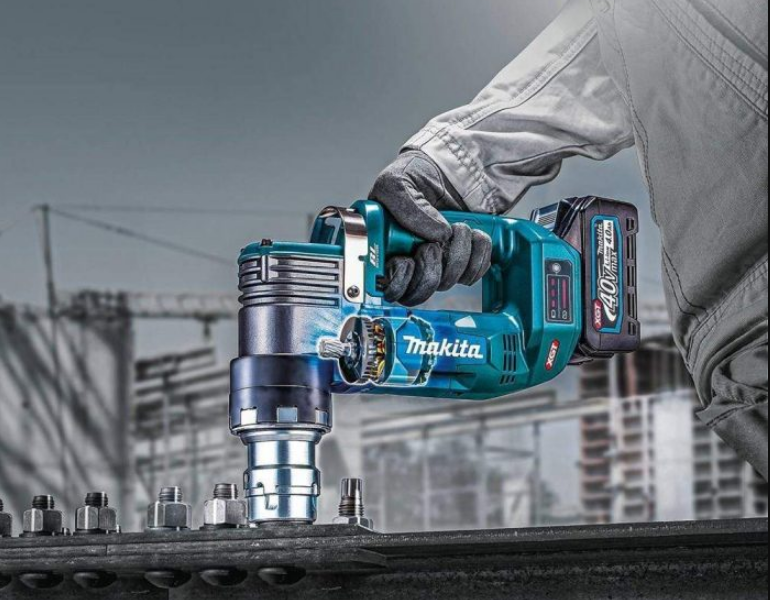
Shear Wrench XTW01 Introduction
The Makita Cordless is a versatile tool designed for efficient fastening and loosening of bolts, featuring a powerful brushless motor that delivers up to 2,200 RPM. Its compact design allows for ease of use in tight spaces, while the 3/8-inch square drive ensures compatibility with various sockets. With an ergonomic grip and lightweight construction, this shear wrench enhances user comfort during extended tasks. The current price for the XTW01 is approximately $289, reflecting its professional-grade performance.
Specifications
C | XTW01 | |
Bolt size | A325 | 5/8", 3/4", 7/8" |
A490 | 5/8", 3/4" | |
Maximum torque | 804 N•m (593 ft•lbs) | |
No load speed (RPM) | 14 /min | |
Overall length | 296 mm (11-5/8") | |
Rated voltage | D.C. 36 V | |
Standard battery cartridge | BL1815N / BL1820B / BL1830 / BL1830B / BL1840B / BL1850B / BL1860B | |
Charger | DC18RC / DC18RD / DC18SD / DC18SE / DC18SF | |
Net weight | 6.5 - 7.1 kg (14.3 - 15.7 lbs) | |
- Due to our continuing program of research and development, the specifications herein are subject to change without notice.
- Specifications and battery cartridge may differ from country to country.
- The weight may differ depending on the attachment(s), including the battery cartridge. The lightest and heavi-est combination, according to EPTA-Procedure 01/2014, are shown in the table.
FUNCTIONAL DESCRIPTION
CAUTION: Always be sure that the tool is switched off and the battery cartridge is removed before adjusting or checking function on the tool.
Installing or removing battery cartridge
CAUTION: Always switch off the tool before installing or removing of the battery cartridge.
CAUTION: Hold the tool and the battery car-tridge firmly when installing or removing battery cartridge. Failure to hold the tool and the battery cartridge firmly may cause them to slip off your hands and result in damage to the tool and battery cartridge and a personal injury.

To remove the battery cartridge, slide it from the tool while sliding the button on the front of the cartridge.
To install the battery cartridge, align the tongue on the battery cartridge with the groove in the housing and slip it into place. Insert it all the way until it locks in place with a little click. If you can see the red indicator on the upper side of the button, it is not locked completely.
CAUTION: Always install the battery cartridge fully until the red indicator cannot be seen. If not, it may accidentally fall out of the tool, causing injury to you or someone around you.
CAUTION: Do not install the battery cartridge forcibly. If the cartridge does not slide in easily, it is not being inserted correctly.
Indicating the remaining battery capacity
Only for battery cartridges with the indicator

Press the check button on the battery cartridge to indi-cate the remaining battery capacity. The indicator lamps light up for a few seconds.

NOTE: Depending on the conditions of use and the ambient temperature, the indication may differ slightly from the actual capacity.
Tool/battery protection system
The tool is equipped with a tool/battery protection sys-tem. This system automatically cuts off power to the motor to extend tool and battery life. The tool will auto-matically stop during operation if the tool or battery is placed under one of the following conditions:
Overload protection
When the tool or battery is operated in a manner that causes it to draw an abnormally high current, the tool automatically stops without any indication. In this sit-uation, turn the tool off and stop the application that caused the tool to become overloaded. Then turn the tool on to restart.
Overheat protection
When the tool or battery is overheated, the tool stops automatically. In this case, let the tool and battery cool before turning the tool on again.
Over-discharge protection
When the battery capacity is not enough, the tool stops automatically. In this case, remove the battery from the tool and charge the battery.
Switch action
WARNING: Before installing the battery car-tridge into the tool, always check to see that the switch trigger actuates properly and returns to the "OFF" position when released.
To prevent the switch trigger from accidentally pulled, the trigger-lock button is provided.
To start the tool, depress the trigger-lock button from A side and pull the switch trigger. Release the switch trigger to stop. After use, press in the trigger-lock button from B side.
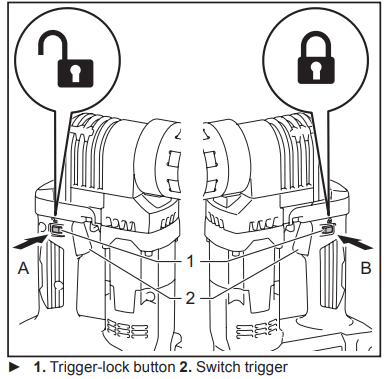
NOTE: The tool automatically stops if you keep pull-ing the switch trigger for about 6 minutes.
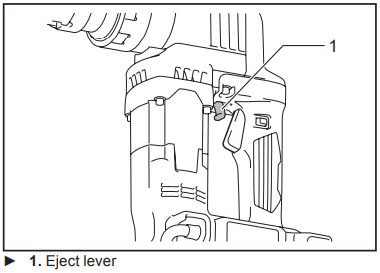
When you pull the eject lever, the bolt tip is ejected from the tool.
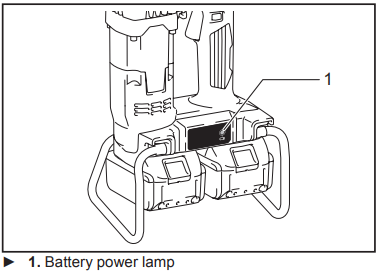
Battery power lamp
When the remaining battery capacity becomes low, the battery power lamp blinks. Charge the battery or replace the battery with fully charged one. When the remaining battery capacity becomes much lower, the tool stops and the battery power lamp lights up.
Hook
CAUTION: Be sure to attach the shoulder belt included in the tool as the standard accessory. Use the shoulder belt for carrying the tool, and never use the hook for other purposes such as the fall prevention at high location. If the hook is used for other purposes, excessive load may break them and cause serious injury to the operator and person around/underneath the operator.
CAUTION: When you attach the shoulder belt to the hook, be sure to attach it securely. If it is attached incompletely, the tool may come off and cause an injury.
CAUTION: When carrying the tool using the shoulder belt, be careful not to entangle the shoulder belt with your body or objects and not to hit objects with the tool. Failure to do so may cause an accident.
CAUTION: Remove the shoulder belt from the hook before operating the tool. Failure to do so may lose your balance at operation and cause an accident.

Attach the shoulder belt included in the tool as the standard accessory to the hook for carrying the tool. Remove the shoulder belt from the hook before operat-ing the tool.
Electric brake
This tool is equipped with an electric brake. If the tool consistently fails to quickly stop after the switch trigger is released, have the tool serviced at a Makita service center.
ASSEMBLY
CAUTION: Always be sure that the tool is switched off and the battery cartridge is removed before carrying out any work on the tool.
Removing the outer and inner sleeves
CAUTION: Be careful not to allow foreign mat-ter to enter the insides of the tool when removing or installing the outer and inner sleeves.
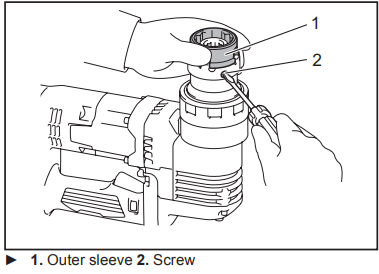
Loosen the two screws while holding the outer sleeve. The outer and inner sleeves will be pushed up by the springs built into the tool.
Press the pin down to remove the inner sleeve from the outer sleeve.
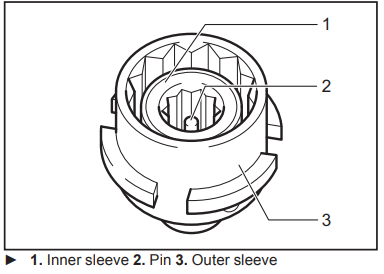
NOTICE: Be careful not to drop the inner sleeve when removing it.
NOTICE: Do not remove the tip rod, tip rod spring, and inner sleeve spring from the tool.

Installing the outer and inner sleeves
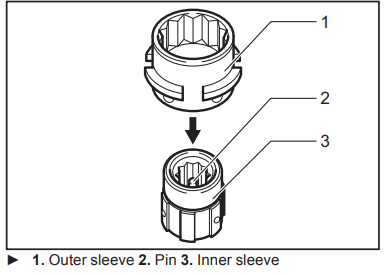
Place the inner sleeve with the pin facing upward. Attach the outer sleeve to the inner sleeve securely while pressing the pin of the inner sleeve.
Insert the outer and inner sleeves into the tool while rotating the inner sleeve clockwise and counterclock-wise until the outer sleeve touches the tool. Tighten the two screws firmly.
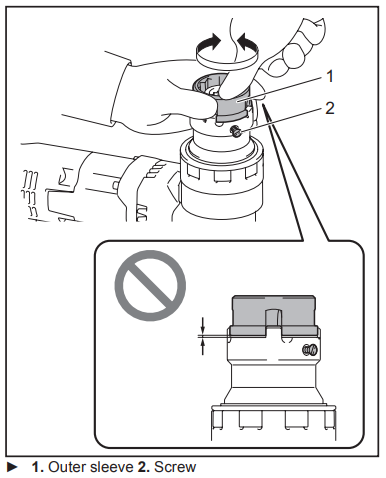
NOTICE: Make sure that there is no gap between the outer sleeve and the tool.
Makita Cordless Shear Wrench XTW01 OPERATION
CAUTION: Always insert the battery cartridge all the way until it locks in place. If you can see the red indicator on the upper side of the button, it is not locked completely. Insert it fully until the red indicator cannot be seen. If not, it may accidentally fall out of the tool, causing injury to you or someone around you.
CAUTION: Keep the bolt tips off of the ground, floor, walkways, etc. to prevent injury from tripping or falling.
- Tighten bolts preliminarily by using a hand wrench.
Hold the tool firmly and place the inner sleeve over the bolt so that the inner sleeve completely covers the bolt tip.
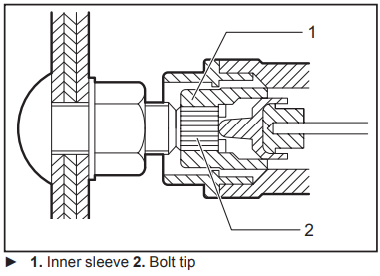
NOTICE: Be careful when fitting the sleeve onto the bolt tip. Striking the tip can damage it so that it will no longer fit inside the sleeve properly.
- Push the tool lightly until the outer sleeve com-pletely hold the nut. If the outer sleeve fails to hold the nut, rotate the tool clockwise or counterclockwise while pushing the tool lightly.
Press the trigger-lock button, and then pull the switch trigger. The outer sleeve rotates to tighten the nut.
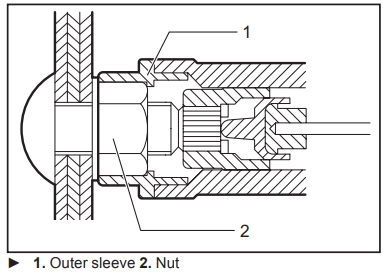
NOTICE: Do not force the tool down excessively. Apply the downward force to the degree needed to stabilize the tool.When the specified torque is attained, the bolt tip will be sheared at its notched portion. The bolt tip remains inside the inner sleeve.
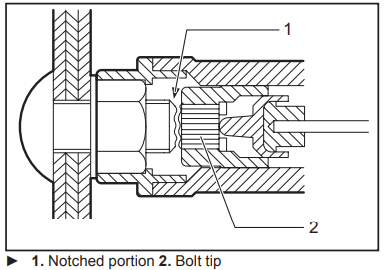
Release the switch trigger and withdraw the tool in a straight line.
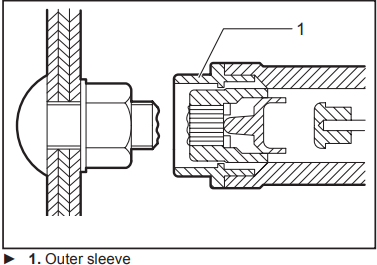
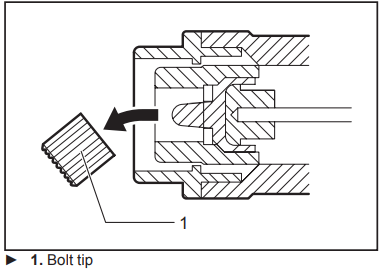
Pull the eject lever to eject the bolt tip from the tool. Catch the sheared bolt tips to prevent them from falling.
NOTICE: Washer and nut have head and tail. Head has identification mark for nut and chamfer for washer. When placing them, be careful not to place in reverse.
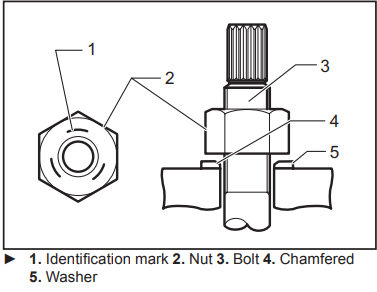
NOTICE: Replace nut, bolt and washer all together at one time when these rotate together, nut rotates excessively or a bolt protrude from nut surface too much or less.
NOTICE: Do not reuse used nut, bolt and washer.
Setup Guide
To operate the Makita Cordless Shear Wrench XTW01, follow these steps:
- Charge the 18V LXT lithium-ion battery according to the manufacturer's instructions.
- Attach the battery to the tool by aligning it with the battery slot and pressing it firmly into place.
- Install the desired blade by releasing the blade lock and sliding it into position. Secure it by re-engaging the blade lock.
- Adjust the speed setting based on your application needs using the speed selection switch.
- Hold the tool firmly with both hands, ensuring a secure grip on the ergonomic handle.
- Turn on the tool using the trigger switch and begin your cutting or shearing task.
MAINTENANCE
CAUTION: Always be sure that the tool is switched off and the battery cartridge is removed before attempting to perform inspection or maintenance.
NOTICE: Never use gasoline, benzine, thinner, alcohol or the like. Discoloration, deformation or cracks may result.
To maintain product SAFETY and RELIABILITY, repairs, any other maintenance or adjustment should be performed by Makita Authorized or Factory Service Centers, always using Makita replacement parts.
Battery guard
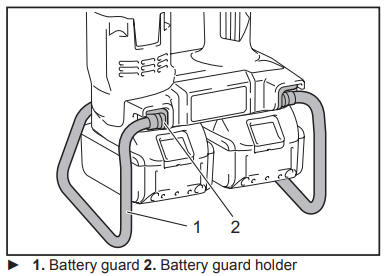
WARNING: Do not remove the battery guard. Do not use the tool with the battery guard removed or damaged. Direct impact to the battery cartridge may cause battery malfunction and result in injury and/or fire. If the battery guard is deformed or damaged, contact your authorized service center for repairs.
CAUTION: Do not attach a strap to the battery guard for hanging the tool.
CAUTION: Do not attach the shoulder belt to the battery guard.
OPTIONAL ACCESSORIES
CAUTION: These accessories or attachments are recommended for use with your Makita tool specified in this manual. The use of any other accessories or attachments might present a risk of injury to persons. Only use accessory or attachment for its stated purpose.
If you need any assistance for more details regard-ing these accessories, ask your local Makita Service Center.
Bolt size | Sleeve | Length |
M16 | Outer sleeve | 35 mm |
Inner sleeve | 36 mm | |
M20 | Outer sleeve | 37 mm |
Inner sleeve | 38 mm | |
M22 | Outer sleeve | 39 mm |
Inner sleeve | 39 mm | |
M22 | Outer sleeve | 85 mm |
Inner sleeve | 85 mm | |
5/8" | Outer sleeve | 35 mm |
Inner sleeve | 36 mm | |
3/4" | Outer sleeve | 37 mm |
Inner sleeve | 38 mm | |
3/4" | Outer sleeve | 83 mm |
Inner sleeve | 84 mm |
- Makita genuine battery and charger
NOTE: Some items in the list may be included in the tool package as standard accessories. They may differ from country to country.
Troubleshooting
If you encounter issues with your Makita Cordless Shear Wrench XTW01, here are some common problems and solutions:
- Tool Not Turning On: Check if the battery is properly seated and charged. Ensure that there are no obstructions in the trigger switch.
- Blade Not Cutting Efficiently: Inspect the blade for wear or damage. Replace it if necessary. Ensure that the blade is properly aligned and secured.
- Overheating: Allow the tool to cool down. Check for blockages or excessive load on the blades.
- Warning: Always wear protective gear including gloves, safety glasses, and ear protection when operating this tool.
WARRANTY
Please refer to the annexed warranty sheet for the most current warranty terms applicable to this product.If annexed warranty sheet is not available, refer to the warranty details set forth at below website for your respective country http://www.makitatools.com
Makita Cordless Shear Wrench XTW01 Pros & Cons
Pros
- Powerful Performance: Delivers high cutting efficiency across various materials.
- Convenience: Cordless operation provides greater mobility and ease of use.
- Adjustable Speed Settings: Allows for optimal performance based on material type.
- Ergonomic Design: Reduces user fatigue with comfortable grip and balanced weight distribution.
Cons
- High Initial Cost: The tool may be more expensive compared to other options on the market.
- Dependence on Battery Life: Requires frequent recharging for continuous use.
- Blade Replacement Costs: High-quality blades can be expensive to replace regularly.
Customer Reviews
Customers have praised the Makita Cordless Shear Wrench XTW01 for its robust performance and versatility. Many have noted its ease of use and the convenience of cordless operation. However, some users have reported that the initial cost is higher than expected and that frequent blade replacements can add up over time.
A common complaint is the need for better storage solutions for the tool and its accessories, as users find it inconvenient to keep everything organized.
Faqs
What is the cutting capacity of the Makita Cordless Shear Wrench?
How do I change the blade on the Shear Wrench?
What type of battery does the Makita use?
What safety features does the Cordless Shear Wrench XTW01 have?
How long does it take to charge the battery for the Makita Cordless Shear Wrench?
Is the Makita Cordless Shear suitable for heavy-duty use?
Can I use other blades with the Cordless Shear Wrench?
What is included in the package when purchasing the Cordless Shear Wrench?
Does the Makita Cordless Shear Wrench come with a warranty?
Leave a Comment
