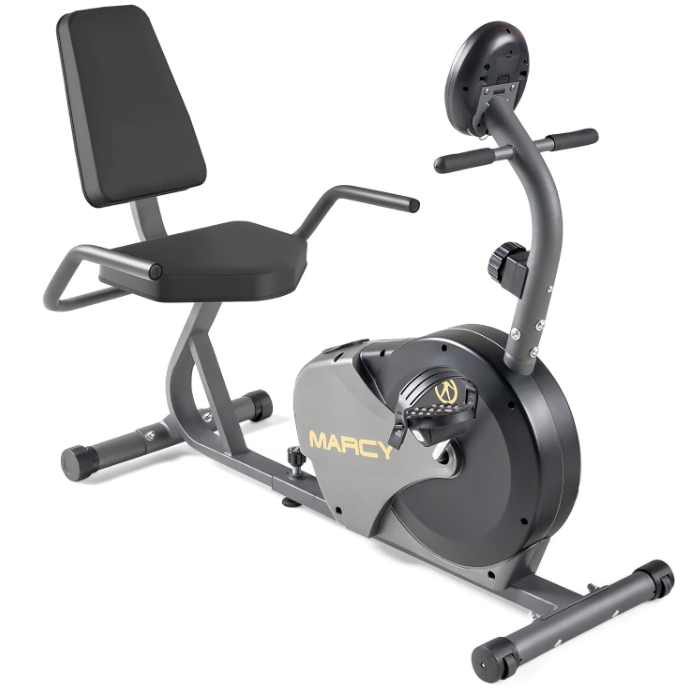
Marcy Magnetic Recumbent Bike ME-1019R Instruction Manual
Content
Marcy Magnetic Recumbent Bike ME-1019R Introduction
The Magnetic Recumbent Bike is designed for effective and comfortable home workouts. Launched in 2019, this bike features 8 levels of magnetic resistance, allowing users to customize their workout intensity. Priced at $199.99, it includes a user-friendly LCD computer display that tracks essential metrics such as time, speed, distance, and calories burned. Manufactured by Marcy, the ME-1019R is ideal for those seeking a low-impact exercise option that promotes cardiovascular fitness.
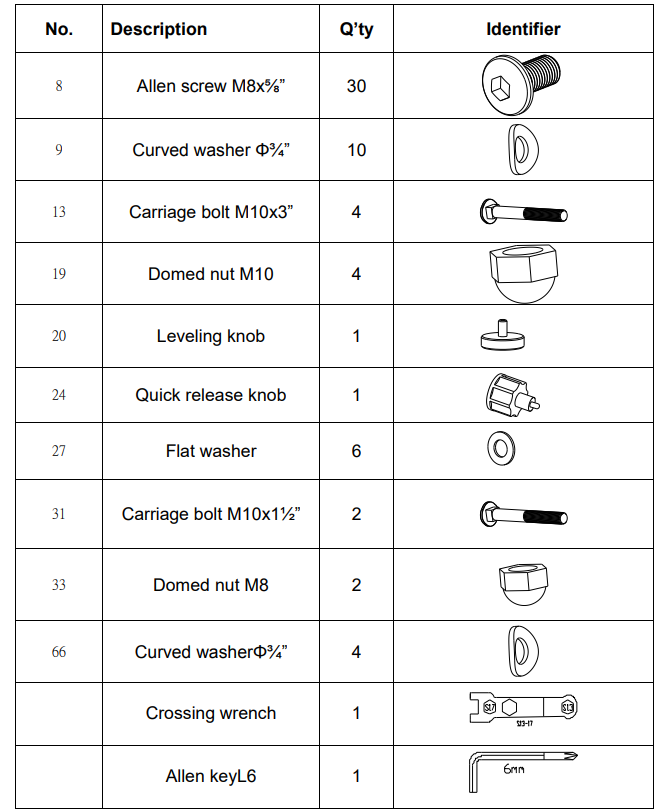
HARDWARE PACK
NOTE: The following parts are not drawn to scale. Please use your own ruler to measure the size.
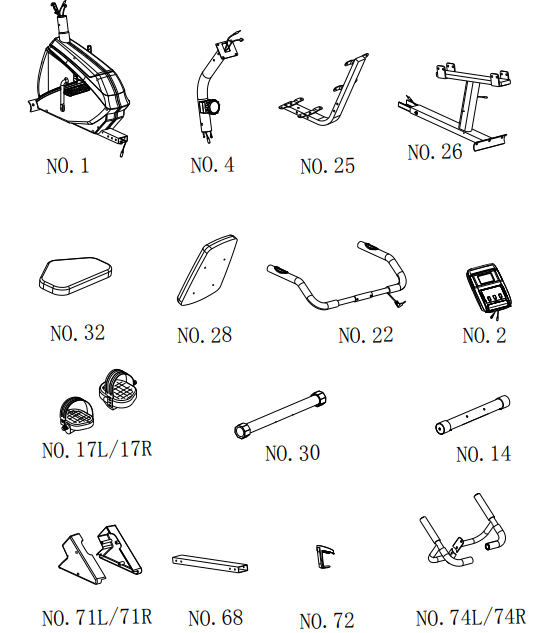
COMPONENTS FOR ASSEMBLY
| PART NO. | DESCRIPTION | Q’TY |
| 1 | Main frame | 1 |
| 2 | Computer | 1 |
| 25 | Seat support tube | 1 |
| 26 | Sliding frame | 1 |
| 14 | Front Stabilizer | 1 |
| 30 | Rear Stabilizer | 1 |
| 4 | Front post | 1 |
| 17 | Pedal L/R | 1/1 |
| 28 | Back Cushion | 1 |
| 32 | Seat Cushion | 1 |
| 22 | Handlebar | 1 |
| 71 | Decorative cover L/R | 1/1 |
| 68 | Sliding tube | 1 |
| 72 | Bottle holder | 1 |
| 74 | Stationary handlebar L/R | 1/1 |
Specifications
FUNCTION | AUTO SCAN | Every 6 seconds |
TIME | 00:00’~99:59’ | |
CURRENT SPEED | The maximum signal can be pickup is 99.9M/H | |
TRIP DISTANCE | 0.00~99.99M or 0.00~9999M | |
CALORIES | 0.1~999.9kCAL | |
ODO | 0.1~999.9M or 1 ~ 9999M | |
PULSE RATE | 40~240BPM | |
BATTERY TYPE | 2pcs of SIZE –AA or UM –3 | |
OPERATING TEMPERATURE | 0°C ~ +40°C | |
STORAGE TEMPERATURE | -10°C ~ +60°C | |
Description
The Marcy Magnetic Recumbent Bike ME-1019R boasts a sturdy steel frame that ensures stability and durability. The magnetic resistance system provides smooth and quiet operation, allowing you to work out without disturbing others. The ergonomic design includes a contoured seat and backrest, which are adjustable to accommodate different user heights and preferences. The bike also features pulse grip sensors for monitoring heart rate and a multi-functional LCD display that tracks various workout metrics.
The step-through design makes it easy to get on and off the bike, which is particularly beneficial for users with mobility issues. Additionally, the transportation wheels enable easy movement of the bike to different locations within your home or gym.
ASSEMBLY INSTRUCTION
STEP 1
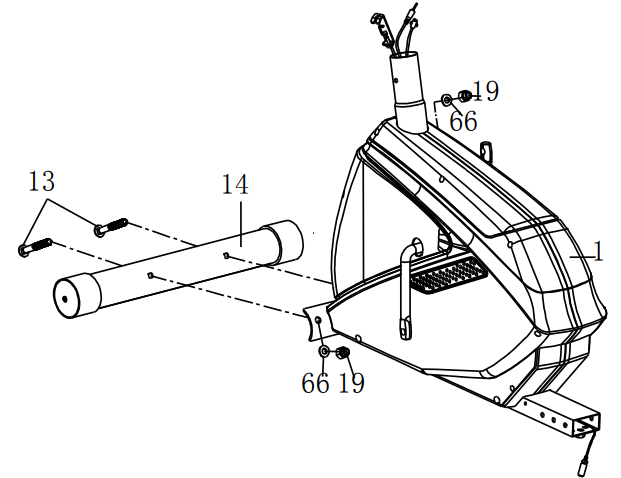
Attach the front stabilizer (#14) to the main frame (#1), securing with two carriage bolts (#13), two curved washers (#66) and two domed nuts (#19).
STEP 2
- Connect middle extension pulse wire (#63) to the rear extension pulse wire (#64). Attach sliding frame (#26) to main frame (#1), and tighten with six Allen bolts (#8) and flat washers (#27). Attach the leveling knob (#20) to the bottom of main frame (#1).
Attach the rear stabilizer (#30) to the sliding frame (#26) and tighten with two carriage bolts (#13), curved washers (#66) and domed nuts (#19).
Tip: Avoid pinching the Extension Wires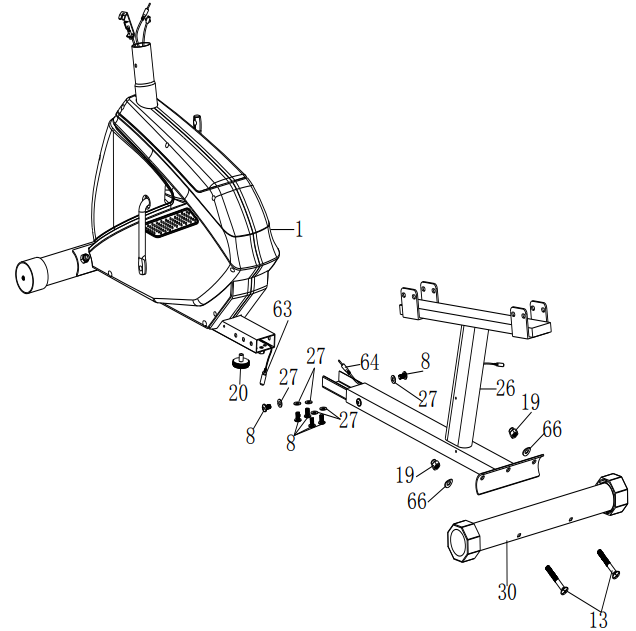
STEP 3
- Connect the upper extension sensor wire (#10) to the lower sensor wire (#12).
- Connect the front extension hand pulse wire (#60) to the middle extension hand pulse wire (#63).
- Connect the tension control cable (#7) to the extension tension cable (#11).
Attach front post (#4) to the main frame (#1). Secure using four curved washers (#9) and four Allen bolts # (8).
Tip: Avoid pinching the Extension Wires and hand pulse wires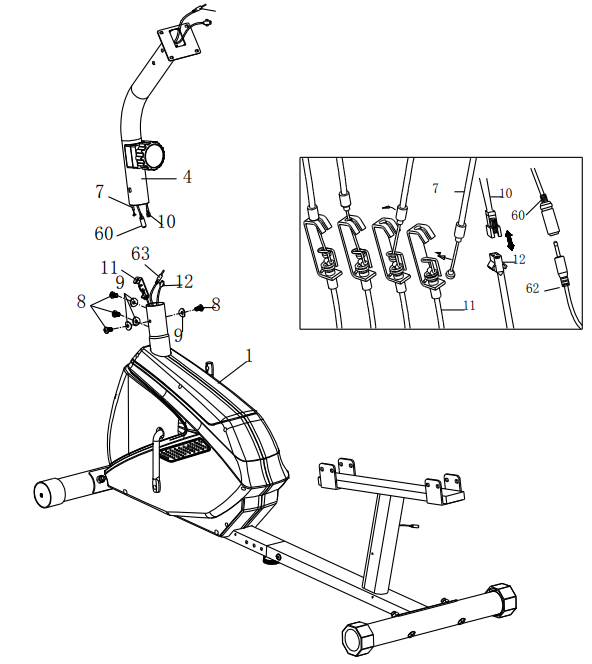
HOW TO CONNECT TENSION CONNECTOR
- Slide the Cable wire from the extension sensor wire Connector in between the opening on the wire holder on sensor wire Connector.
- Pull the extension sensor wire Connector backward and slide the wire through the slot on the bracket.
Drop down the Connector so the fitting sits firmly on top of the bracket.
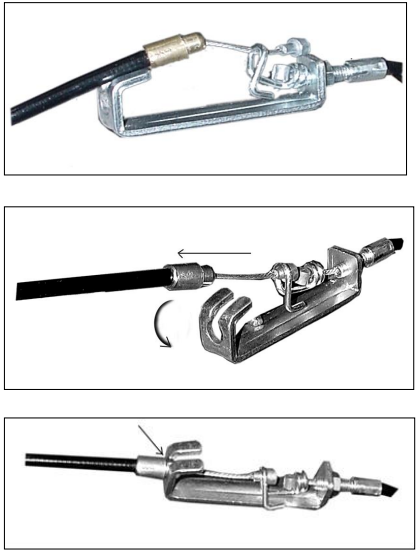
NOTE: In order to hold the Front Post while connecting the cables and wires, extra help may be needed
STEP 4
- Insert the sliding tube (#68) into seat support bracket (#25). Line up the holes and secure sliding tube (#68) with quick release knob (#24).
- Attach seat pad (#32) to the seat support bracket (#25). Secure using four Allen bolts (#8).
- Attach the sliding tube (#68) to the sliding frame (#26). Secure using eight Allen bolts (#8).
Attach backrest pad (#28) to the seat support bracket (#25). Secure using four Allen bolts (#8).

STEP 5
- Attach the rear handlebar (#22) to the seat support bracket (#25). Secure using two carriage bolts (31), two curved washers (#9) and two domed nuts (#33).
- Connect the rear extension hand pulse wire (#64) to the hand pulse wire (#65) on the rear handlebar. Tip: Avoid pinching the pulse Wires
- Attach the left stationary handlebar (#74L) to the front post (#4). Secure using two curved washers (#9) and two Allen bolts (#8). Repeat for the right stationary handlebar (#74R).
- Connect the front extension hand pulse wire (#60) to the pulse wire form the computer (#2)
- Connect the upper extension sensor wire (#10) to the wire from the computer (#2).
Tip: Avoid pinching the Extension Wires and pulse wires - Attach the computer (#2) to the top bracket of front post (#4). Secure using four screws (#3) which are pre-assembled on the back of computer.
- Thread the Left Pedal (#17L) counterclockwise into the Crank (#21).
Thread the Right Pedal (#17R) clockwise into the Crank (#21) on the other side.

STEP 6
- Attach bottle holder (#72) to the front post (#4). Secure using two self-tapping screws (#16).
Attach decorative cover L/R (#71L/R) to the sliding frame (#26). Secure using four self-tapping screws (#16) and one self-tapping screw (#61).
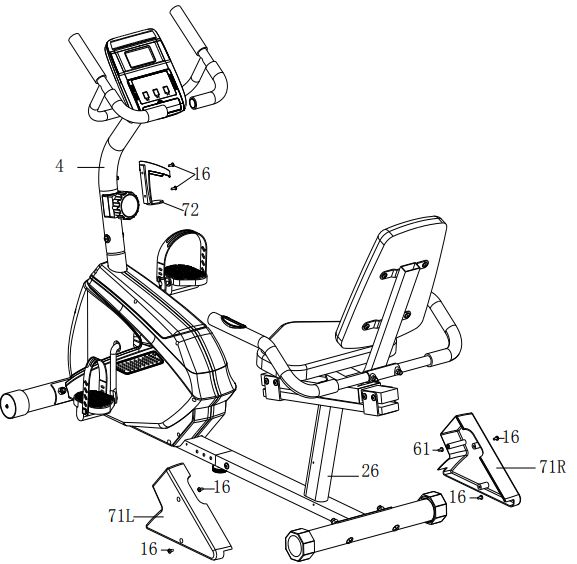
Setup Guide
To assemble the Marcy Magnetic Recumbent Bike ME-1019R, follow these steps:
- Unpack all components and ensure all parts are included.
- Assemble the frame by attaching the main frame parts together using the provided bolts and screws.
- Attach the seat and backrest to the frame, ensuring they are securely fastened.
- Install the handlebars and adjust them to your desired height.
- Connect the magnetic resistance system to the flywheel and ensure proper alignment.
- Plug in the bike and test all functions, including resistance levels and LCD display.
Once assembled, adjust the seat and handlebars to fit your body comfortably. Familiarize yourself with the control panel and start your workout by selecting your desired program or resistance level.
EXPLODED DIAGRAM
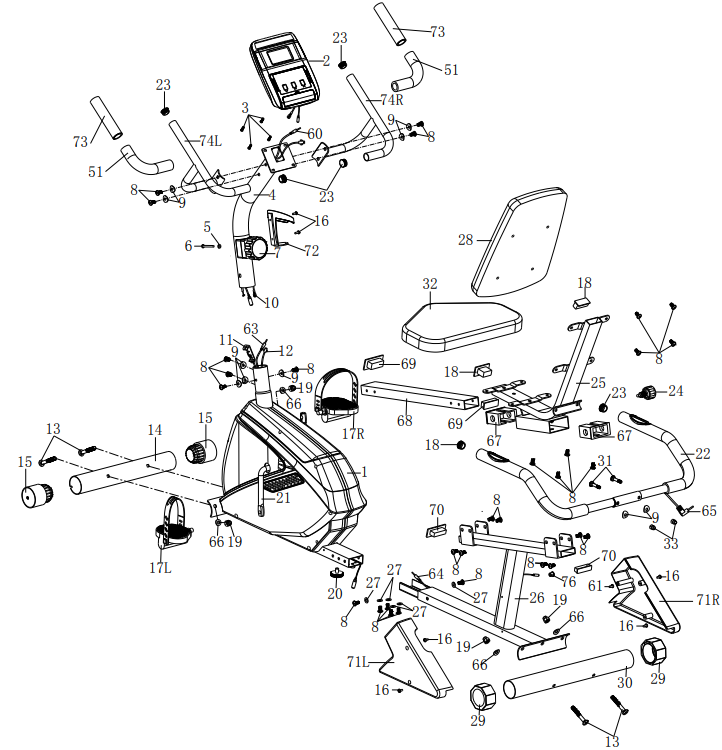
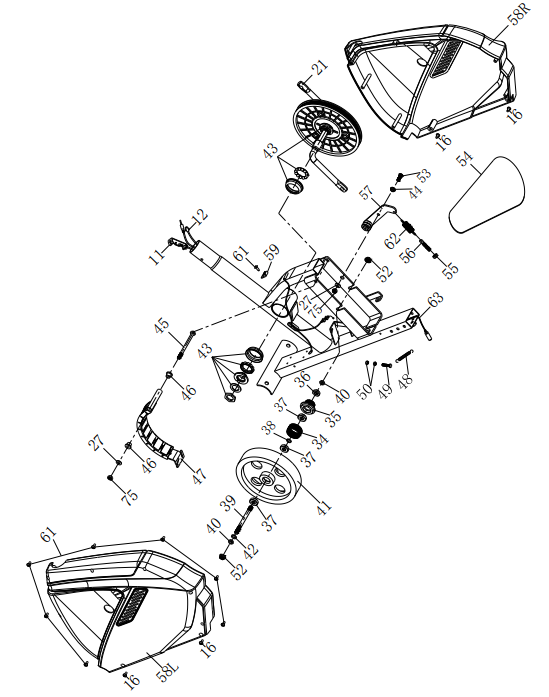
Part No. | Description | Qty | Part No. | Description | Qty | |
1 | Main frame | 1 | 39 | Axle for flywheel | 1 | |
2 | Computer | 1 | 40 | Nut M10 | 2 | |
3 | Philips Screw M5x⅜" | 4 | 41 | Flywheel | 1 | |
4 | Front Post | 1 | 42 | Bowl shaped spacer | 1 | |
5 | Flat washer Φ⅜" | 1 | 43 | BB parts | 1 | |
6 | Screw M5x1½" | 1 | 44 | Spacer | 1 | |
7 | Tension control knob w/cable | 1 | 45 | Allen bolt M8x4" | 1 | |
8 | Allen bolt M8x⅝” | 30 | 46 | Spacer for magnetic assembly | 2 | |
9 | Curved washer Φ¾” | 10 | 47 | Magnetic assembly | 1 | |
10 | Upper computer sensor wire | 1 | 48 | Spring for magnetic assembly | 1 | |
11 | Lower tension cable | 1 | 49 | Hex bolt M6x1" | 1 | |
12 | Lower computer sensor wire | 1 | 50 | Nut M6 | 2 | |
13 | Carriage bolt M10x3” | 4 | 51 | Lower foam grip for stationary handlebar | 2 | |
14 | Front stabilizer | 1 | 52 | Flange nut | 2 | |
15 | End cap for front stabilizer | 2 | 53 | Allen bolt M8x¾" | 1 | |
16 | Self-tapping screw ST5*16 | 10 | 54 | Belt | 1 | |
17 | Pedal L/R | 1/1 | 55 | Nut M8 | 1 | |
18 | Rear Handlebar End cap | 2 | 56 | Hex bolt M8x1¾" | 1 | |
19 | Domed nut M10 | 4 | 57 | Idler assembly | 1 | |
20 | Leveling knob | 1 | 58 | Chain cover L/r | 1/1 | |
21 | Crank | 1 | 59 | Sensor bracket | 1 | |
22 | Handlebar | 1 | 60 | Front extension pulse wire | 1 | |
23 | Handlebar end cap | 6 | 61 | Self-tapping screw ST5*15 | 9 | |
24 | Quick release knob | 1 | 62 | Spring for idler | 1 | |
25 | Seat support | 1 | 63 | Middle extension pulse wire | 1 | |
26 | Sliding frame | 1 | 64 | Rear extension pulse wire | 1 | |
27 | Washer Φ⅔" | 6 | 65 | Hand pulse wire | 1 | |
28 | Backrest pad | 1 | 66 | Curved washerΦ¾” | 4 | |
29 | End cap for rear stabilizer | 2 | 67 | Spacer | 2 | |
30 | Rear stabilizer | 1 | 68 | Sliding tube | 1 | |
31 | Carriage bolt M10x1½” | 2 | 69 | Sliding tube End cap | 2 | |
32 | Seat pad | 1 | 70 | Sliding frame End cap | 2 | |
33 | Domed nut M8 | 2 | 71 | Decorative cover L/R | 1/1 | |
34 | Spring cultch | 1 | 72 | Bottle holder | 1 | |
35 | Little belt pulley | 1 | 73 | Upper foam grip for stationary handlebar | 2 |
36 | Bearing | 1 | 74 | Stationary handlebar L/R | 1/1 | |
37 | Bearing | 3 | 75 | Aircraft nut M8 | 2 | |
38 | Copper washer | 1 | 76 | Grommet | 1 |
EXERCISE GUIDELINES
Using your MAGNETIC BIKE will provide you with several benefits, it will improve your physical fitness, tone muscle and in conjunction with calorie controlled diet help you lose weight.
The Warm Up Phase
This stage helps get the blood flowing around the body and the muscles working properly. It will also reduce the risk of cramp and muscle injury. It is advisable to do a few stretching exercises as shown below. Each stretch should be held for approximately 30 seconds, do not force or jerk your muscles into a stretch - if it hurts, STOP.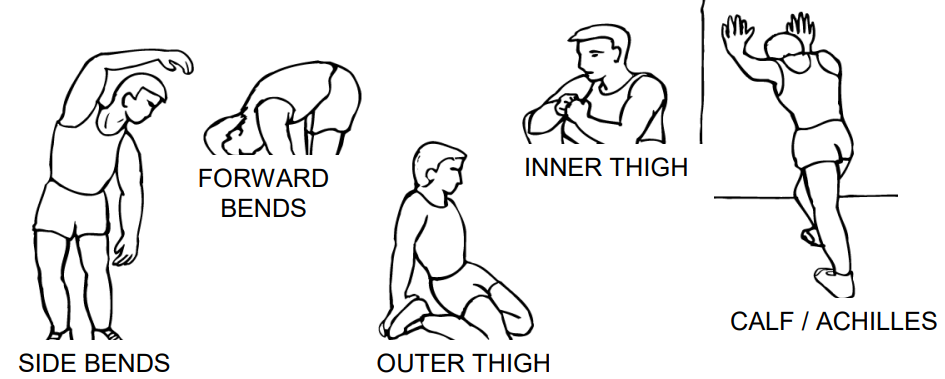
The Exercise Phase
This is the stage where you put the effort in. After regular use, the muscles in your legs will become more flexible. Work to your but it is very important to maintain a steady tempo throughout. The rate of work should be sufficient to raise your heartbeat into the target zone shown on the graph below.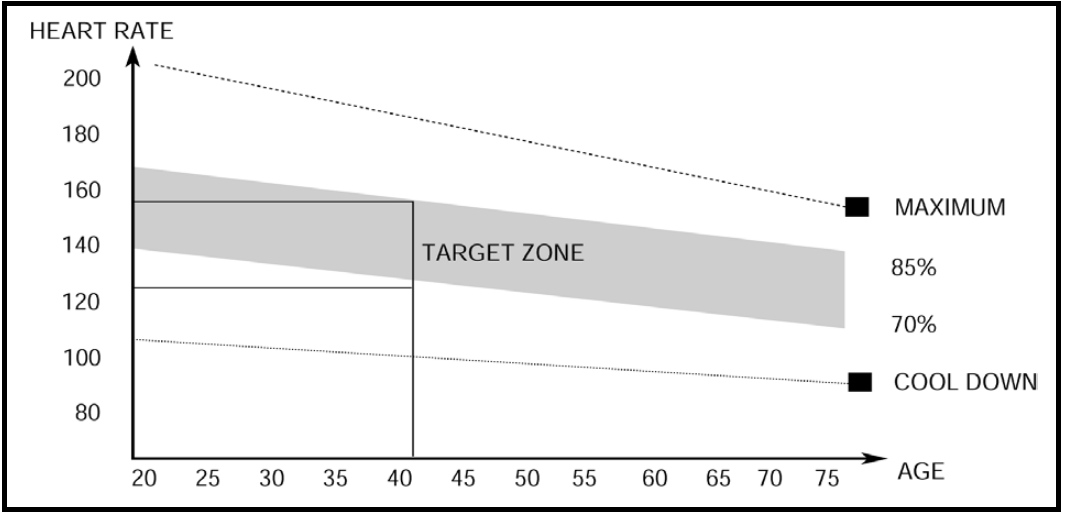
This stage should last for a minimum of 12 minutes though most people start at about 15-20 minutes
- The Cool Down Phase
This stage is to let your Cardio-vascular System and muscles wind down. This is a repeat of the warm up exercise e.g. reduce your tempo, continue for approximately 5 minutes. The stretching exercises should now be repeated, again remembering not to force or jerk your muscles into the stretch. As you get fitter you may need to train longer and harder. It is advisable to train at least three times a week, and if possible space your workouts evenly throughout the week.- MUSCLE TONING
To tone muscle while on your FAN BIKE you will need to have the resistance set quite high. This will put more strain on our leg muscles and may mean you cannot train for as long as you would like. If you are also trying to improve your fitness you need to alter your training program. You should train as normal during the warm up and cool down phases, but towards the end of the exercise phase you should increase resistance making your legs work harder. You will have to reduce your speed to keep your heart rate in the target zone. - WEIGHT LOSS
The important factor here is the amount of effort you put in. The harder and longer you work the more calories you will burn. Effectively this is the same as if you were training to improve your fitness, the difference is the goal.
- MUSCLE TONING
COMPUTER
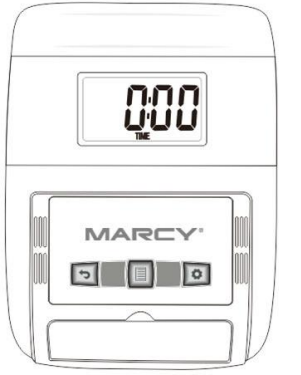
FUNCTIONAL BUTTONS:
- MODE - Push down for selecting functions.
- SET - To set the time, distance, calories and hand pulse.
- RESET - For resetting time, distance, calories and hand pulse.
FUNCTION AND OPERATIONS:
- SCAN: Press “MODE” button until “SCAN” appears, monitor will cycle through all the 6 functions: Time, speed, distance, calorie ODO and pulse. Each function will display for 6 seconds.
- TIME:
- Count the total time of exercise from start to end.
- Press “MODE” button until “TIME” appears, press “SET” button to set exercise time. When the “set” is zero, the computer will sound an alarm for 15 seconds.
- SPEED: Display current speed.
- DIST:
- Count the distance of exercise from start to end.
- Press “MODE” button until “DIST” appears. Press “SET” button to set exercise distance. When the “set” is zero, the computer will sound an alarm for 15 seconds.
- CALORIES:
- Count the total calories of exercise from start to end.
- Press “MODE” button unit “CAL” appears. Press “SET” button to set exercise calories. When the “set” is zero, the computer will sound an alarm for 15 seconds.
- ODO: Monitor will display the total accumulated distance.
- PULSE: Press MODE button until “PULSE” appears. Before measuring your pulse rate, please place the palms of your hands on both contact pads and the monitor will show your current heart beat rate in beats per minute(BPM) on the LCD after 6~7 seconds.
Note: During the pulse measurement, the measured value may be higher than the actual pulse rate during the first 2~3 seconds, then will return to normal level. The PULSE Function value cannot be regarded as the basis of medical treatment.
Press “MODE” button until “PULSE” appears. Press “SET” button to set exercise pulse. The setting values of 40-240 RPM , the computer will sound alarm when heart rate is below the SET value.
NOTE:
- If the display is faint or does not show any digits, please replace the batteries.
- The monitor will automatically shut off after 4 minutes of inactivity.
Troubleshooting
If you encounter any issues with your Marcy Magnetic Recumbent Bike ME-1019R, here are some common problems and solutions:
- Resistance not working: Check if the resistance cable is properly connected to the flywheel. Ensure that the magnetic resistance system is aligned correctly.
- LCD display not turning on: Verify that the bike is properly plugged in and that there are no loose connections.
- Noisy operation: Lubricate the moving parts as per the manufacturer's instructions. Ensure all bolts and screws are tightened securely.
- Heart rate monitor not working: Make sure your hands are in contact with the pulse grip sensors. Ensure the sensors are clean and free from moisture.
Always refer to the user manual for detailed troubleshooting instructions and safety precautions.
Recumbent Bike ME-1019R Pros & Cons
Pros
- Sturdy and durable construction
- Ergonomic design for comfort
- Smooth and quiet magnetic resistance system
- Adjustable seat and handlebars for customization
- Multifunctional LCD display with various metrics
- Heart rate monitoring through pulse grip sensors
- Affordable price point compared to similar models
Cons
- Assembly can be time-consuming and may require additional help
- Some users find the seat and backrest adjustments somewhat stiff
- Limited pre-set programs compared to higher-end models
- No Bluetooth connectivity or app integration
Customer Reviews
Customers have generally praised the Marcy Magnetic Recumbent Bike ME-1019R for its comfort, ease of use, and durability. Many users appreciate the adjustable features and the variety of resistance levels. However, some have noted that the assembly process can be challenging and that the bike lacks advanced features like Bluetooth connectivity.
Common complaints include issues with the heart rate monitor accuracy and some users finding the LCD display less intuitive than expected.
Warranty
IMPEX Inc. ("IMPEX") warrants this product to be free from defects in workmanship and material, under normal use and service conditions, for a period of two years on the Frame from the date of purchase. This warranty extends only to the original purchaser. IMPEX's obligation under this Warranty is limited to replacing or repairing, at IMPEX's option.
Faqs
What is the weight capacity of the Marcy Magnetic?
How many resistance levels does the Marcy have?
Does the Marcy ME-1019R come with pre-set workout programs?
How do I assemble the Recumbent Bike?
Can I adjust the seat and handlebars on the Magnetic Bike?
Does the Magnetic have heart rate monitoring?
Is the Marcy Magnetic quiet during operation?
Can I move the Bike ME-1019R easily?
Does the Marcy Magnetic have any warranty?
Leave a Comment
