Midea Portable Air Conditioner MAP10S1CWT User Manual | Installation
Content

Introduction
With the Midea Portable Air Conditioner MAP10S1CWT, you can effectively cool your personal area with its efficient cooling capabilities. This device offers a welcome break from the heat in any room thanks to its space-saving design and low movement requirements. It provides adaptability for comfort throughout the year by including functions such as dehumidification and fan modes.
Tools Needed
- Medium Phillips screwdriver
- Tape measure or ruler
- Knife or scissors
- Saw (optional, to shorten window adaptor for narrow windows).
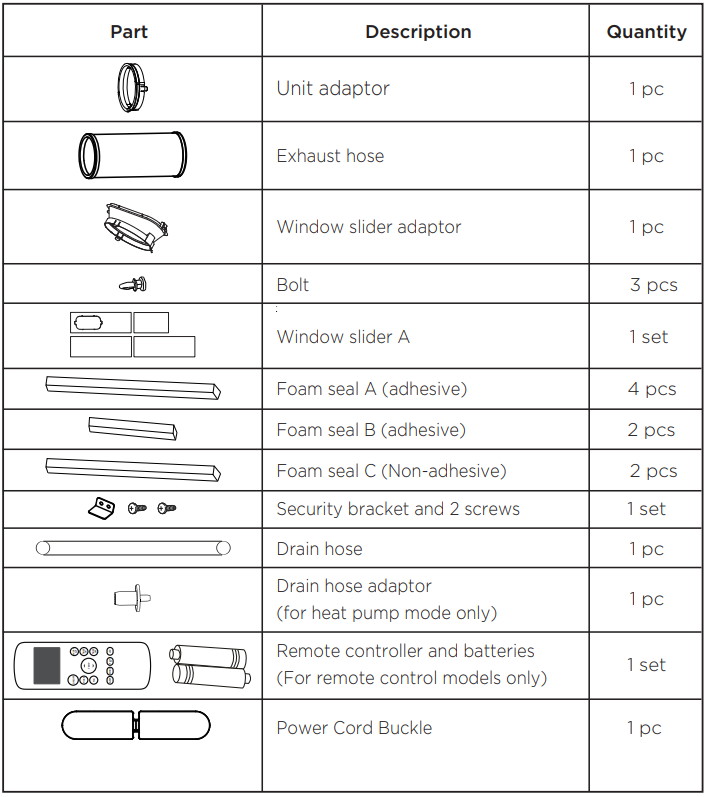
Accessories
Your Window Installation Kit fits windows 67.5-123 cm (26.5”-48”) and can be shortened for smaller windows.
Unit Specifications and Features
Preparation
Design and Compliance Notes
Design Notice:
In order to ensure the optimal performance of our products, the design specifications of the unit and remote control are subject to change without prior notice.
Energy Rating Information:
This product is tested in accordance with the DOE SACC capacity energy rating test.
Unit Temperature Range:
| Mode | Temperature Range |
|---|---|
| Cool | 62°F ~ 95°F (17°C ~ 35°C) |
| Dry | 55°F ~ 95°F (13°C ~ 35°C) |
| Heat (pump heat mode) | 41-86°F (5-30°C) |
The exhaust hose and adapter must be installed or removed according to the desired mode: The exhaust hose and adaptor must be installed or removed in accordance with the usage mode. For COOL or AUTO mode, exhaust hose must be installed. For FAN or DRY modes, exhaust hose must be removed.
Remote Control Instructions
Remote Control Specifications
| Model | RG57H4(B)/BGEFU1 |
|---|---|
| Rated voltage | 3.0V (Dry batteries R03/LR03x2) |
| Signal receiving range | 8 m (approx. 26 ft.) |
| Environment | 23°F ~ 140°F (-5°C ~ 60°C) |
Function Buttons
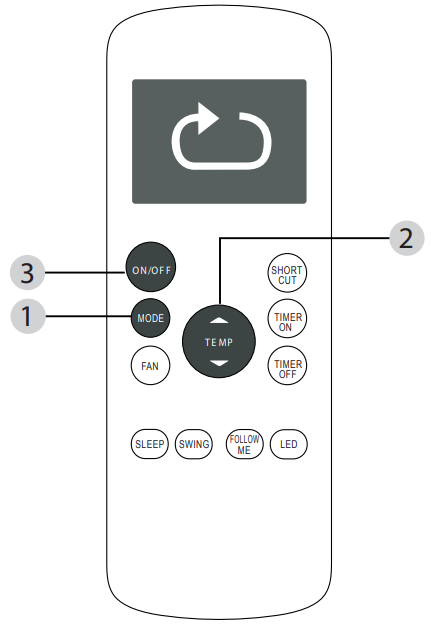
Before you begin using your new air conditioner, make sure to familiarize yourself with its remote control. The following is a brief introduction to the remote control itself. For instructions on how to operate your air conditioner, refer to the Operating Instructions section of this manual.
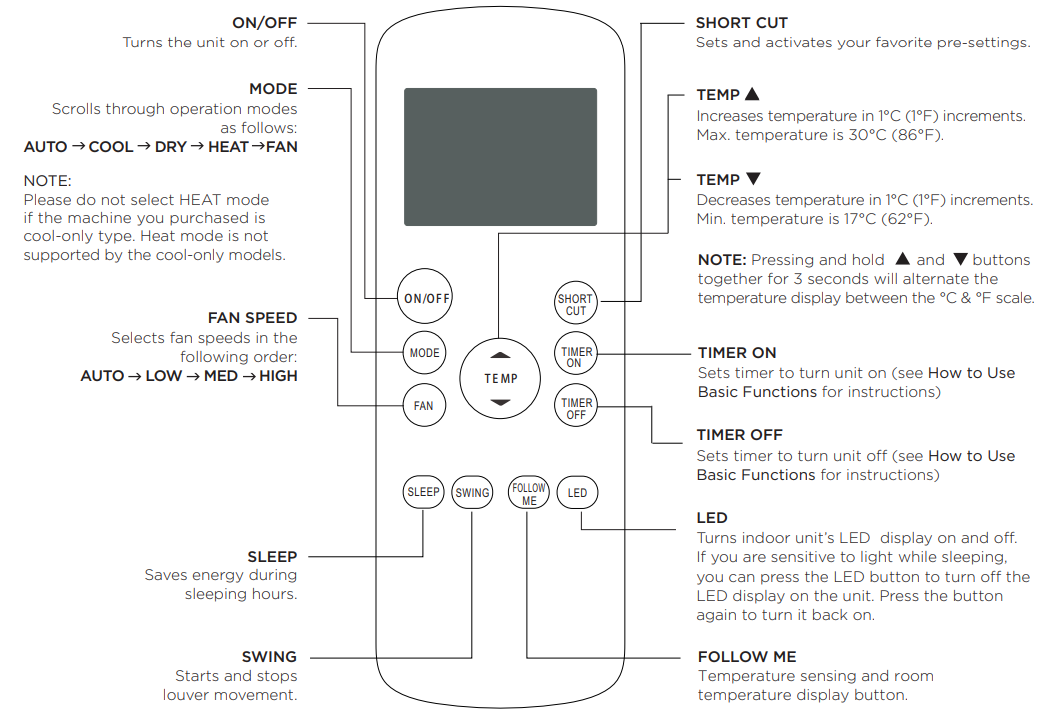
Handling the Remote Control
NOT SURE WHAT A FUNCTION DOES? Refer to the Operating Instructions section of this manual for a detailed description of how to use your air conditioner.
SPECIAL NOTE Button designs on your unit may differ slightly from the example shown. If the unit does not have a particular function, pressing that function’s button on the remote control will have no effect. When there are significant differences between features or operation implied by the remote control illustration and the actual functions described in the USER’S MANUAL, please refer to the descriptions in the USER’S MANUAL.
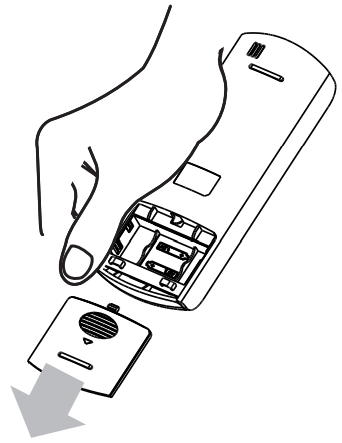
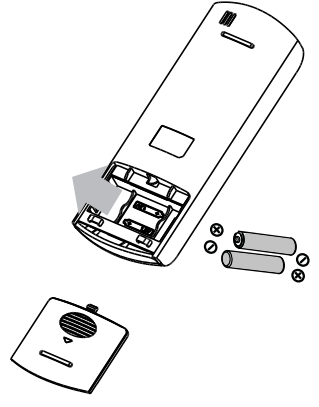
INSERTING AND REPLACING BATTERIES
Your air conditioning unit comes with two AAA batteries. Insert the batteries in the remote control before use.
- Slide the back cover of the remote control downward, exposing the battery compartment.
- Insert the batteries, paying attention to align the (+) and (-) ends of the batteries with the symbols inside the battery compartment.
- Slide the battery cover back into place.
BATTERY NOTES
For optimum product performance:
- Do not mix old and new batteries, or batteries of different types.
- Do not leave batteries in the remote control if you don’t plan on using the device for more than 2 months.
BATTERY DISPOSAL
Do not dispose of batteries as unsorted municipal waste. Refer to local laws for proper disposal of batteries.
TIPS FOR USING REMOTE CONTROL
- The remote control must be used within 8 meters / 26 feet of the unit.
- The unit will beep when the remote signal is received.
- Curtains, other materials, and direct sunlight can interfere with the infrared signal receiver.
- Remove batteries if the remote will not be used for more than 2 months.
Remote LED Screen Indicators
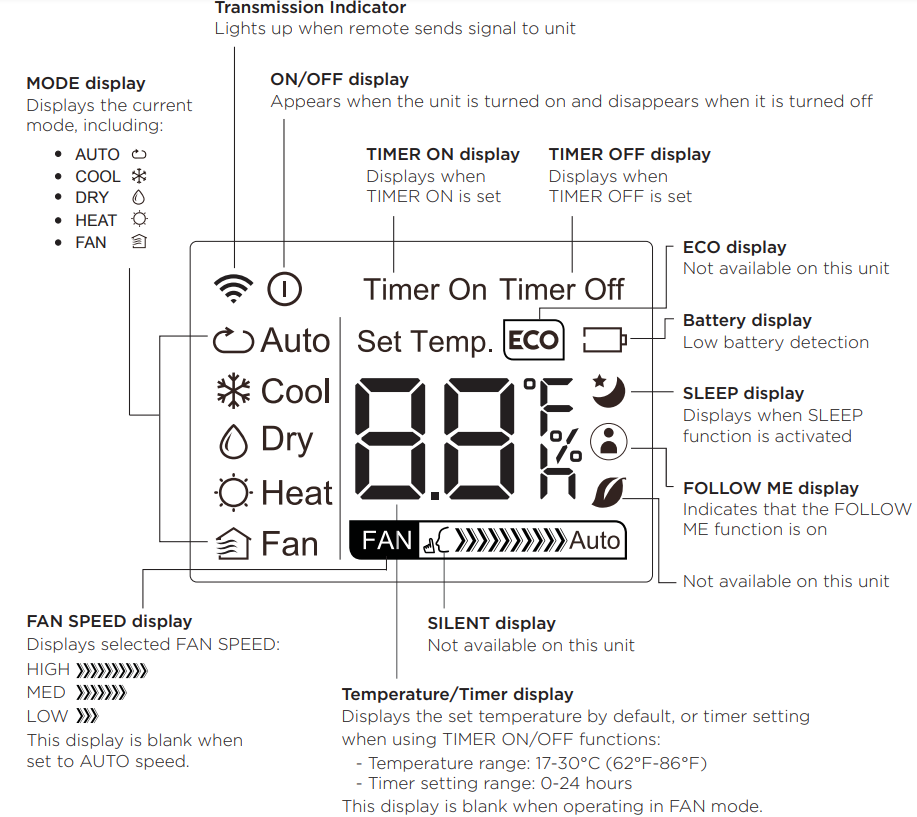
Basic Functions
SETTING THE DESIRED TEMPERATURE
The operating temperature range for this unit is 17-30°C (62°F-86°F). You can increase or decrease the set temperature in 1°C (1°F) increments.
AUTO Operation
In AUTO mode, the unit will automatically select the COOL, FAN, HEAT, or DRY mode based on the set temperature.
- Press the MODE button to select Auto mode.
- Set your desired temperature using the Temp
 or Temp
  button.
 - Press the ON/OFF button to start the unit.
NOTE: FAN SPEED cannot be set in AUTO mode.
COOL Operation
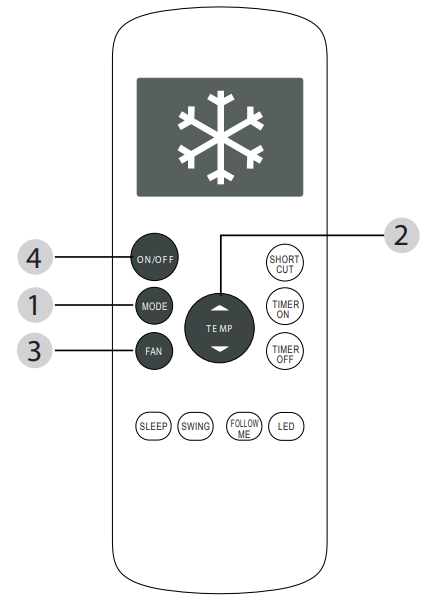
- Press the MODE button to select COOL mode.
- Set your desired temperature using the Temp or Temp button.
- Press the FAN button to select the fan speed: AUTO, LOW, MED, or HIGH.
- Press the ON/OFF button to start the unit.
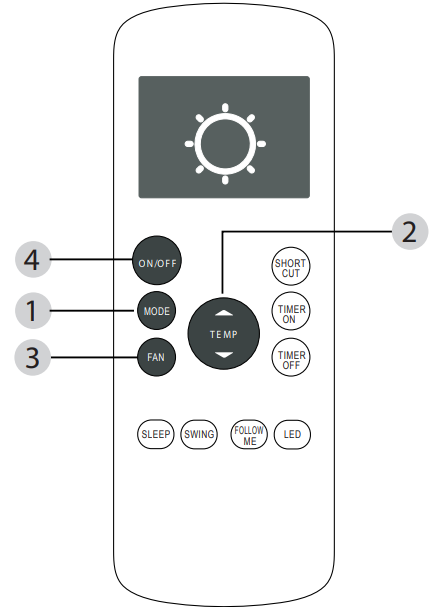
DRY Operation (Dehumidifying)
_midea_portable_air_conditioner_map10s1cwt.png)
- Press the MODE button to select DRY mode.
- Set your desired temperature using the Temp or Temp button.
- Press the ON/OFF button to start the unit.
NOTE: FAN SPEED cannot be set in DRY mode.
FAN Operation
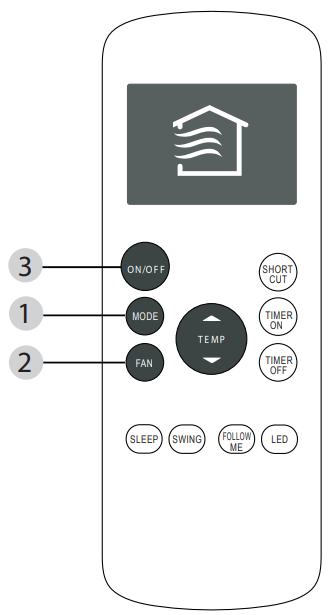
- Press the MODE button to select FAN mode.
- Press the FAN button to select the fan speed: AUTO, LOW, MED, or HIGH.
- Press the ON/OFF button to start the unit.
NOTE: You cannot set the temperature in FAN mode. As a result, your remote control’s LCD screen will not display temperature.
HEAT Operation
- Press the MODE button to select HEAT mode.
- Set your desired temperature using the Temp or Temp button.
- Press the FAN button to select the fan speed: AUTO, LOW, MED, or HIGH.
- Press the ON/OFF button to start the unit.
NOTE: As the outdoor temperature drops, the performance of your unit’s HEAT function may be affected. In such instances, we recommend using this air conditioner in conjunction with another heating appliance.
Timer Functions
Your air conditioning unit has two timer-related functions:
- TIMER ON - sets the amount of time after which the unit will automatically turn on.
- TIMER OFF - sets the amount of time after which the unit will automatically turn off.
TIMER ON Function
The TIMER ON function allows you to set a period of time after which the unit will automatically turn on, such as when you come home from work.
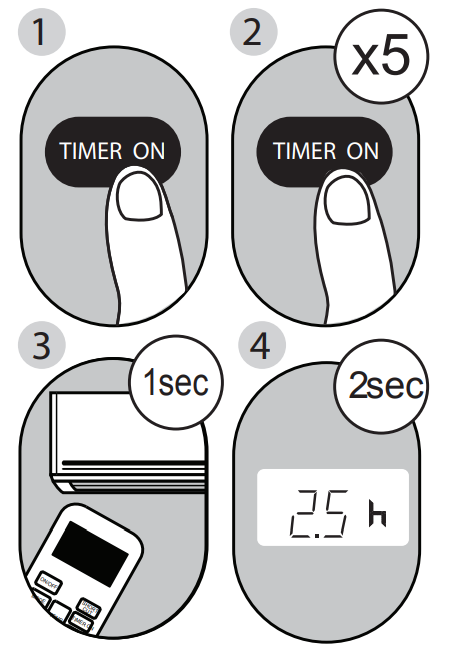
- Press the TIMER ON button. By default, the last time period that you set and an “h” (indicating hours) will appear on the display.
- NOTE: This number indicates the amount of time you want to elapse before the unit turns on. For example, if you set the TIMER ON for 2 hours, “2.0h” will appear on the screen, and the unit will turn on after 2 hours.
- Press the TIMER ON button repeatedly to set the time that you want the unit to turn on.
- Wait 2 seconds, then the TIMER ON function will be activated. The digital display on your remote control will then return to the temperature display.
TIMER OFF Function
The TIMER OFF function allows you to set a period of time after which the unit will automatically turn off, such as when you wake up.
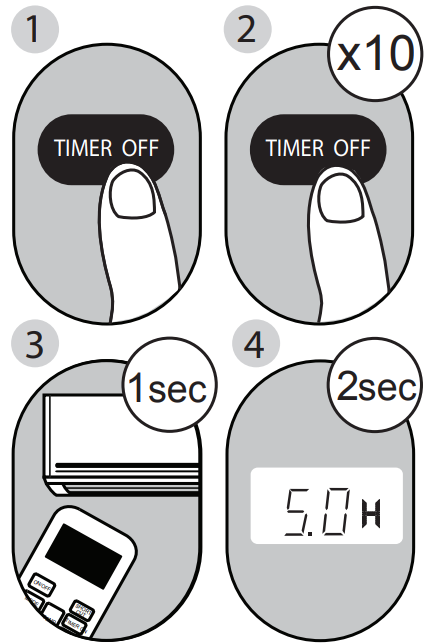
- Press the TIMER OFF button. By default, the last time period that you set and an “h” (indicating hours) will appear on the display.
- NOTE: This number indicates the amount of time you want to elapse before the unit turns off. For example, if you set the TIMER OFF for 2 hours, “2.0h” will appear on the screen, and the unit will turn off after 2 hours.
- Press the TIMER OFF button repeatedly to set the time that you want the unit to turn off.
- Wait 2 seconds, then the TIMER OFF function will be activated. The digital display on your remote control will then return to the temperature display.
NOTE: When setting the TIMER ON or TIMER OFF functions, up to 10 hours, the time will increase in 30-minute increments with each press. After 10 hours and up to 24, it will increase in 1-hour increments. The timer will revert to zero after 24 hours. You can turn off either function by setting the timer to “0.0h“.
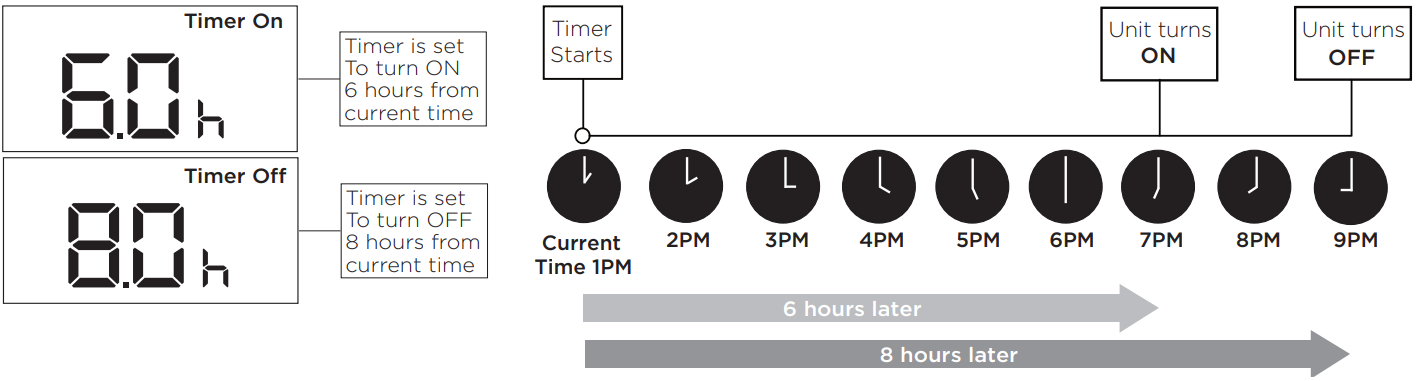
Setting both TIMER ON and TIMER OFF at the same time
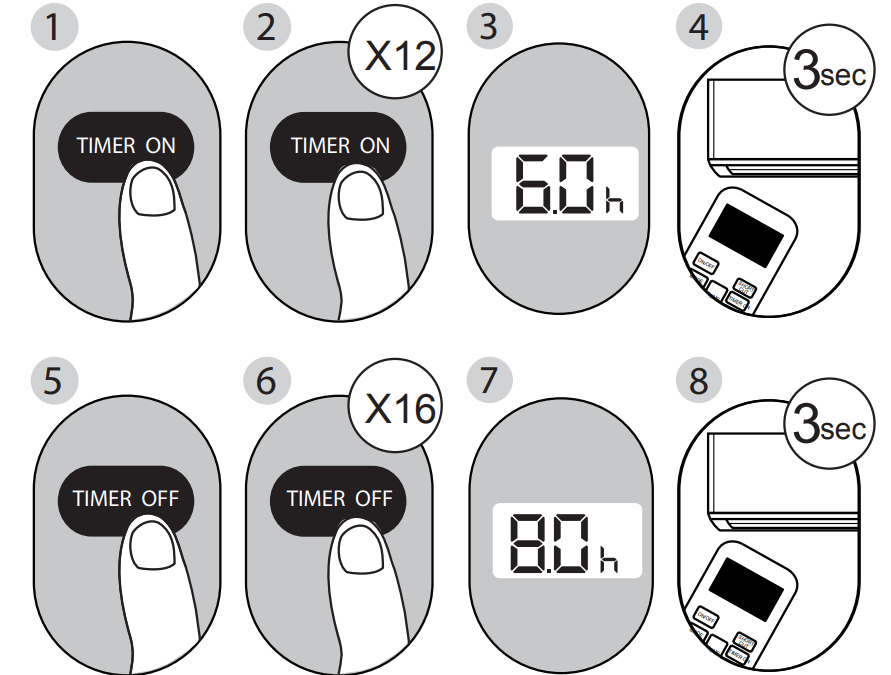
Keep in mind that the time periods you set for both functions refer to hours after the current time.
For example, say that the current time is 1:00 PM, and you want the unit to turn on automatically at 7:00 PM and want it to operate for 2 hours, then automatically turn off at 9:00 PM. Do the following (side figure):” – change to say “Follow the illustration to the left:
Example: Setting the unit to turn on after 6 hours, operate for 2 hours, then turn off (see the figure below)
Your remote display
Advanced Functions

NOTES
- Button configuration shown in illustrations is based on a typical model and may be slightly different from the actual one you purchased. In this case, please refer to your purchased remote control.
- All the functions described can also be accomplished by using the unit’s control panel. If the unit is without this feature, there will be no corresponding operation when pressing the relevant button on the remote control.
Description
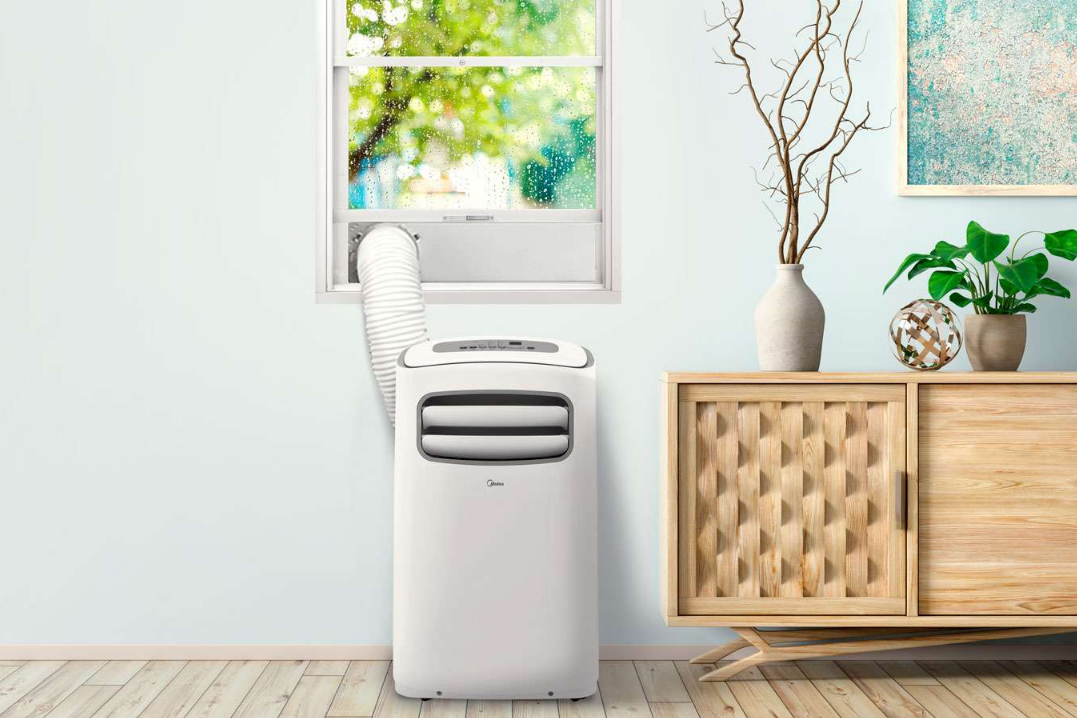
A cooling option that is both high-performing and efficient in terms of energy consumption, the Midea Portable Air Conditioner MAP10S1CWT is an excellent choice for your home or workplace. This portable air conditioning unit has a cooling capacity of 10,000 BTU, which allows it to effectively and swiftly cool off areas that are up to 350 square feet in size. It is easy to move from one room to another due to its portable and compact form, which makes it accessible. The digital display and remote control make it easy to use, and the 24-hour timer and sleep mode enable users to create their own preferred cooling patterns while simultaneously reducing their energy use. There are extra comfort options available, such as the fan mode and the dehumidifying function, in addition to the washable and reusable air filter that helps to maintain clean and fresh air. The use of the R410A refrigerant guarantees an operation that is kind to the environment. The Midea Portable Air Conditioner MAP10S1CWT comes with a 1.8 quart water tank, and an 8.05 feet hose and window installation kit included.
Operating Instructions
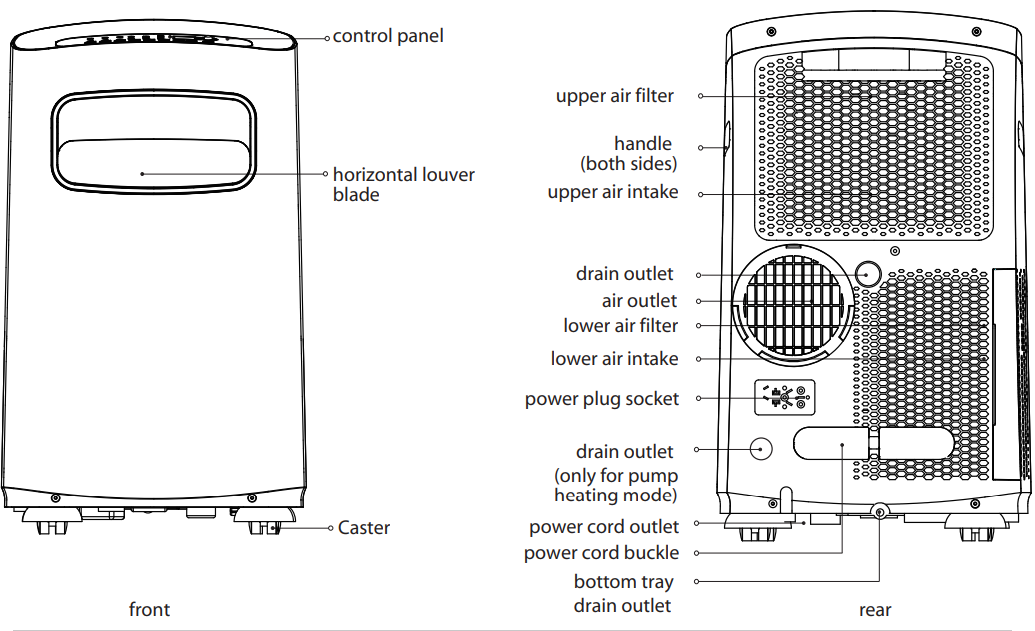
Control Panel Features
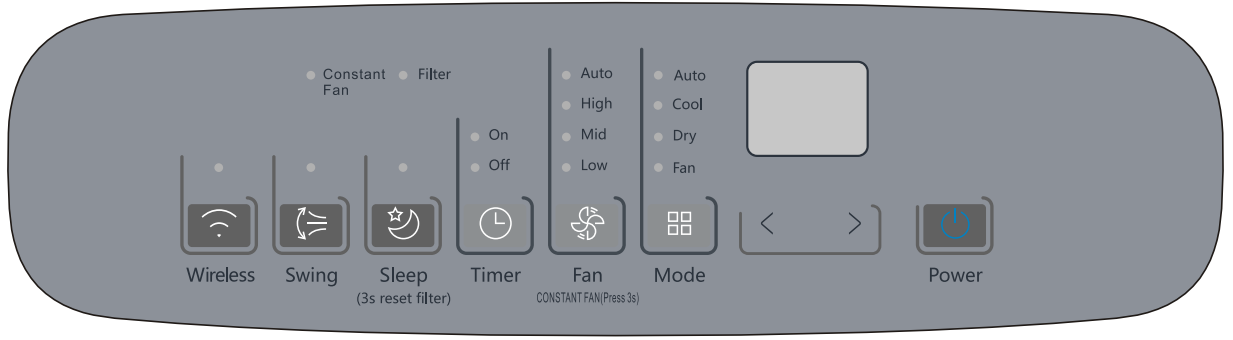
Wireless Button (On some models)
Used to initiate the wireless connection mode. For the first time to use the wireless function, press the wireless button for 3 seconds to initiate the wireless connection mode. The LED DISPLAY shows 'AP' to indicate you can set the wireless connection. If the connection (router) is successful within 8 minutes, the unit will exit wireless connection mode automatically and the wireless indicator illuminates. If the connection is a failure within 8 minutes, the unit exits wireless connection mode automatically. After Wireless connection is successful, for some models, you can press Wireless and DOWN (-) buttons at the same time for 0.5 seconds to turn off the Wireless function and the LED DISPLAY shows 'OF' for 3 seconds, press the Wireless button to turn on Wireless function and the LED DISPLAY shows 'ON' for 3 seconds.
NOTE: When you restart the wireless function, it may take a period of time to connect to the network automatically.
Swing Button (Applicable to the models with auto swing feature only)
Used to initiate the Auto Swing feature. When the operation is ON, pressing the SWING button can stop the louver at the desired angle.
Timer Button
Used to initiate the AUTO ON start time and AUTO OFF stop time program, in conjunction with the + & - buttons. The timer on or off light will illuminate depending on the selected setting.
Mode Button
Selects the desired operating mode. Each time you press the button, a mode is selected in a sequence that goes from AUTO, COOL, DRY, FAN, and HEAT. The mode light illuminates and indicates the selected mode. (cooling only models excluded)
Up (+) and Down (-) Buttons
Used to adjust (increasing/decreasing) temperature settings in 1°C/1°F increments in a range of 17°C/62°F to 30°C/86°F or the TIMER setting in a range of 0 ~ 24 hrs.
NOTE: The control is capable of displaying temperature in degrees Fahrenheit or degrees Celsius. To convert from one to the other, press and hold the Up and Down buttons at the same time for 3 seconds.
Fan/Constant Fan
Control the fan speed. Press to select the fan speed in four steps-LOW, MID(MED), HIGH, and AUTO. The fan speed indicator light illuminates under different fan settings.
NOTE: In cooling or Dry mode, press the button for 3 seconds to turn on or off the constant fan function. When the function is turned on, the constant fan light will illuminate, identifying the fan continuous run for cooling. When the function is turned off, the constant fan light will go out, identifying the fan cycle run with compressor stop.
Sleep/Filter Button
Used to initiate the SLEEP operation.
NOTE: After 250 hours of operation, the filter indicator light illuminates. This feature is a reminder to clean the air filter for more efficient operation. Press this button for 3 seconds to cancel the reminder.
Power Button
Power switch on/off
LED Display
Shows the set temperature in °C or °F and the Auto-timer settings. While on DRY and FAN modes, it shows the room temperature. Shows Error codes and protection code:
- E1 - Room temperature sensor error.
- E2 - Evaporator temperature sensor error.
- E3 - Condenser temperature sensor error (select models).
- E4 - Display panel communication error.
- P1 - Bottom tray is full -- Connect the drain hose and drain the collected water away. If the protection code repeats, call for service.
NOTE: When one of the above malfunctions occurs, turn off the unit and check for any obstructions. Restart the Unit. If the malfunction persists, turn off the unit and unplug the power cord. Contact the manufacturer, its service agents, or a similarly-qualified person for service.
HEAT Operation (Only for heat & cool models)
- Press the "MODE" button until the "HEAT" indicator light comes on.
- Press the ADJUST buttons "+" or " - " to select your desired room temperature. The temperature can be set within a range of 17°C
30°C/62°F86°F(or 88°F). - Press the "FAN SPEED" button to choose the fan speed. For some models, the fan speed cannot be adjusted under HEAT mode.
COOL Operation
- Press the “MODE” button until the “COOL” indicator light comes on.
- Press the ADJUST buttons “+” or “-” to select your desired room temperature. The temperature can be set within a range of 17°C
30°C/62°F86°F. - Press the “FAN SPEED” button to choose the fan speed.
DRY Operation
- Press the “MODE” button until the “DRY” indicator light comes on.
- While in this mode, you cannot select a fan speed or adjust the temperature. The fan motor operates at LOW speed.
- Keep windows and doors closed for the best dehumidifying effect.
- Do not connect the duct to a window.
AUTO Operation
- When you set the air conditioner to AUTO mode, it will automatically select cooling, heating (cooling only models excluded), or fan only operation depending on what temperature you have selected and the current room temperature.
- The air conditioner will control room temperature automatically according to the temperature point set by you.
- Under AUTO mode, you cannot select the fan speed.
FAN Operation
- Press the “MODE” button until the ”FAN“ indicator light comes on.
- Press the “FAN SPEED” button to choose the fan speed. The temperature cannot be adjusted.
- Do not connect the duct to a window.
TIMER Operation
- When the unit is on, pressing the Timer button will initiate the Auto-off stop program. The TIMER OFF indicator light illuminates. Press the Up or Down button to select the desired time. Press the TIMER button again within 5 seconds. The Auto-on start program is initiated and the TIMER ON indicator light illuminates. Press the up or down button to select the desired Auto-on start time.
- When the unit is off, press the Timer button to initiate the Auto-on start program. Pressing it again within five seconds will initiate the Auto-off stop program.
- Press or hold the Up or Down button to change the Auto time by 0.5-hour increments, up to 10 hours, then at 1-hour increments up to 24 hours. The control will count down the time remaining until the start.
- The system will automatically revert back to display the previous temperature setting if there is no operation within 5 seconds.
- Turning the unit ON or OFF at any time or adjusting the timer setting to 0.0 will cancel the Auto Start/Stop timer program.
- Should a malfunction occur, the Auto Start/Stop timed program will be cancelled.
SLEEP Operation
Pressing this button will increase (during cooling operation) or decrease (during heating operation, applicable models) 1°C/1°F after 30 minutes. The temperature will again increase (cooling) or decrease (heating) by another 1°C/1°F after an additional 30 minutes. This new temperature will be maintained for 7 hours before returning to the originally selected temperature. This ends the Sleep mode and the unit will continue to operate as originally programmed.
NOTE: This feature is unavailable in FAN or DRY mode.
Other Features
FOLLOW ME/TEMP SENSING Feature (optional)
NOTE: This feature can be activated from the remote control ONLY. The remote control serves as a remote thermostat allowing for precise temperature control at its location.
To activate the Follow Me/Temp Sensing feature, point the remote control towards the unit and press the Follow Me/Temp Sensing button. The remote display is the actual temperature at its location. The remote control will send this signal to the air conditioner every 3 minutes until the Follow Me/Temp Sensing button is pressed again. If the unit does not receive the Follow Me/Temp Sensing signal for 7 minutes, the unit will beep to indicate the Follow Me/Temp Sensing mode has ended.
AUTO-RESTART
If the unit shuts off unexpectedly due to a power outage, it will restart with the previously set function automatically when the power resumes.
WAIT 3 MINUTES BEFORE RESUMING OPERATION
After the unit has stopped, it cannot be restarted until 3 minutes have elapsed. This is to protect the unit. Operation will automatically resume after 3 minutes.
AIRFLOW DIRECTION ADJUSTMENT
The louver can be adjusted automatically, which also automatically adjusts the airflow direction.
NOTE: On some models, the louver can be adjusted manually only):
- When the Power is ON, the louver opens fully.
- Press the SWING button on the panel or remote control to initiate the Auto Swing feature. The louver will swing up and down automatically.
- If your unit has these features, please do not adjust the louver manually.
- If your unit does not have these features, the louvers may only be adjusted manually.
Water Drainage
- During dehumidifying modes, remove the upper drain plug from the back of the unit and install the drain connector (5/8” universal female mender) with a 3/4” hose (locally purchased). For models without drain connectors, just attach the drain hose to the hole. Place the open end of the hose directly over the drain area in your basement floor.
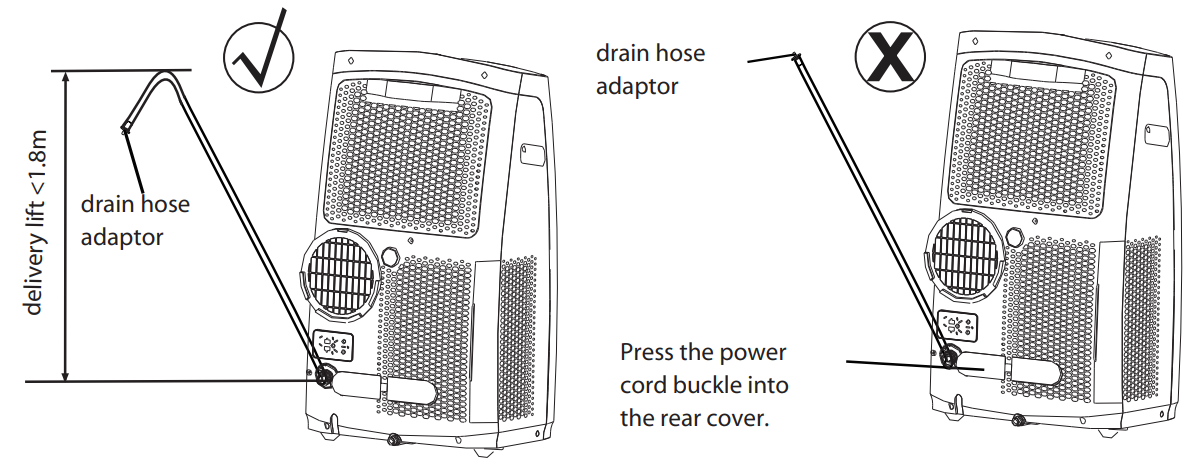
During heat pump mode, remove the lower drain plug from the back of the unit and install the drain connector (5/8” universal female mender) with a 3/4” hose (locally purchased). For models without drain connectors, just attach the drain hose to the hole. Place the open end of the hose adaptor directly over the drain area in your basement floor.
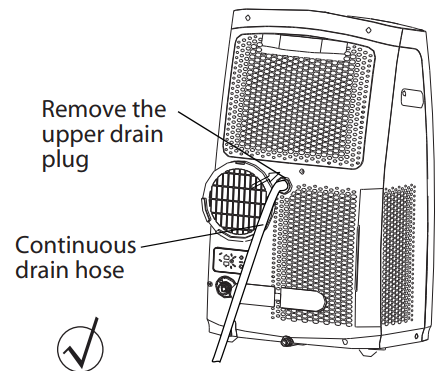
NOTE: Make sure the hose is secure so there are no leaks. Direct the hose toward the drain, making sure that there are no kinks that will impede water flow. Place the end of the hose into the drain and make sure the end of the hose is directed downward to let the water flow smoothly. (See Figs with). Installation not recommended. (See Figs with X). When the continuous drain hose is not used, ensure that the corresponding drain plug and knob are installed firmly to prevent leakage.
When the water level of the bottom tray reaches a predetermined level, the unit beeps 8 times. The digital display shows “P1.” At this time the air conditioning/dehumidification process will immediately stop. However, the fan motor will continue to operate (this is normal). Carefully move the unit to a drain location, remove the bottom drain plug and let the water drain away. Reinstall the bottom drain plug and restart the machine until the “P1” symbol disappears. If the error repeats, call for service.
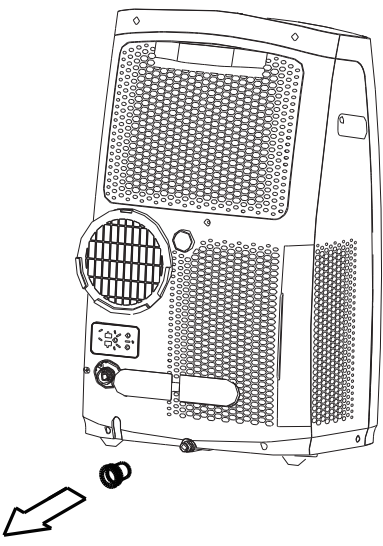
NOTE: Be sure to reinstall the bottom drain plug firmly to prevent leakage before using the unit.
Installation Instructions
Choosing the Right Location
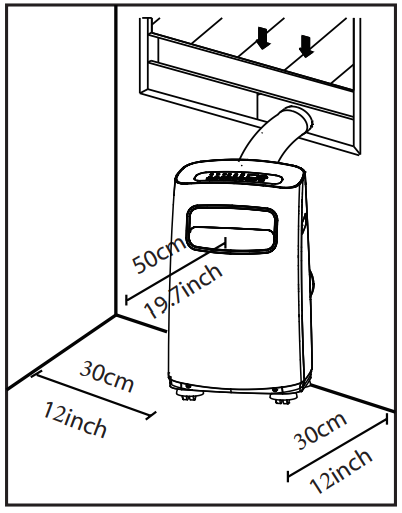
Your installation location should meet the following requirements:
- Make sure that you install your unit on an even surface to minimize noise and vibration.
- The unit must be installed near a grounded plug, and the Collection Tray Drain (found on the back of the unit) must be accessible.
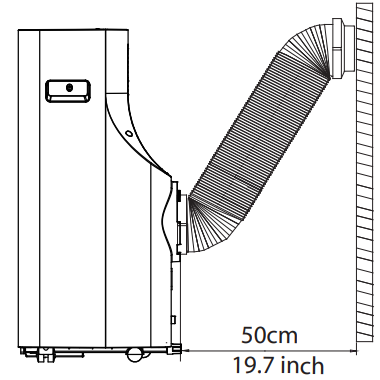
- The unit should be located at least 12" (30 cm) from the nearest wall to ensure proper air conditioning. The horizontal louver blade should be at least 19.7" (50 cm) away from obstacles.
- DO NOT cover the Intakes, Outlets, or Remote Signal Receptor of the unit, as this could cause damage to the unit.
Recommended Installation
NOTE: All the illustrations in the manual are for explanation purposes only. Your machine may be slightly different. The unit can be controlled by the unit control panel alone or with the remote control. See the remote control Instruction for details.
Note About Fluorinated Gasses
- This air-conditioning unit is a hermetically sealed unit that contains fluorinated gasses. For specific information on the type of gas and the amount, please refer to the relevant label on the unit itself.
- Service, maintenance, and repair of this unit must be performed by a certified technician.
- Product recycling must be done according to local regulations.
Window Installation Kit
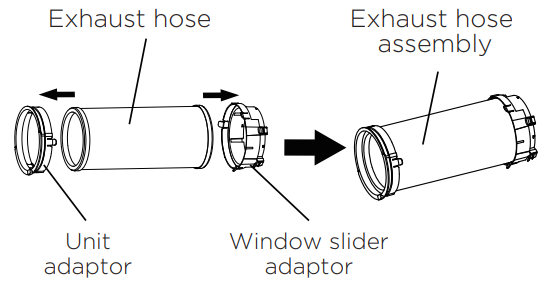
Step One: Preparing the Exhaust Hose Assembly
Press the exhaust hose into the window slider adaptor and unit adaptor, clamp automatically by elastic buckles of the adaptors.
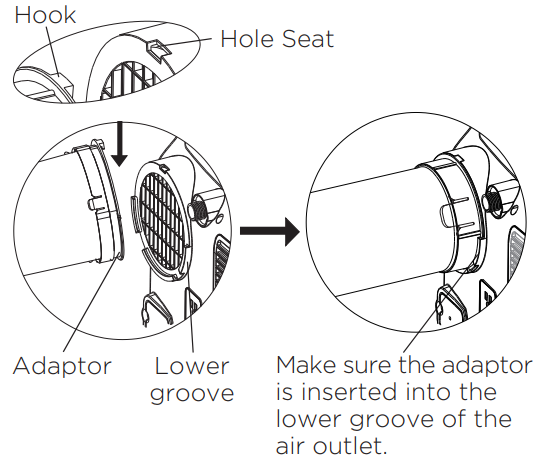
Step Two: Install the Exhaust Hose Assembly to the Unit
Insert unit adaptor of the exhaust hose assembly into the lower groove of the air outlet of the unit with the adaptor hook aligned with the hole seat of the air outlet and slide the exhaust hose assembly down along the direction indicated by the arrow.
Step Three: Preparing the Adjustable Window Slider
- Depending on the size of your window, you may need to adjust the size of the window slider.
- If the length of the window requires two or three window sliders, use the bolt(s) to fasten the window sliders once they are adjusted to the proper length.

NOTE: Once the Exhaust Hose assembly and Adjustable Window Slider are prepared, choose from one of the following two installation methods.
Type 1: Hung Window Installation
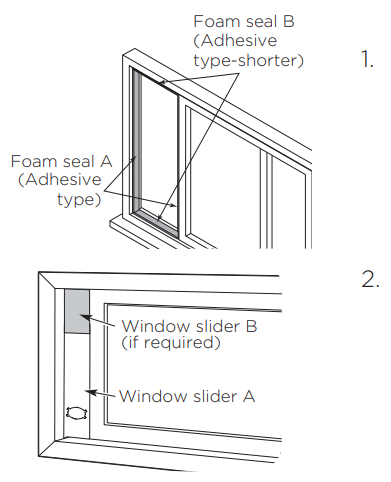
- Cut the adhesive foam seal A and B strips to the proper lengths, and attach them to the window sash and frame as shown.
Insert the window slider assembly into the window opening.
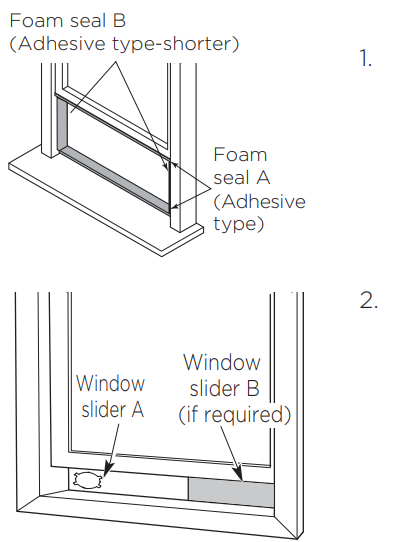
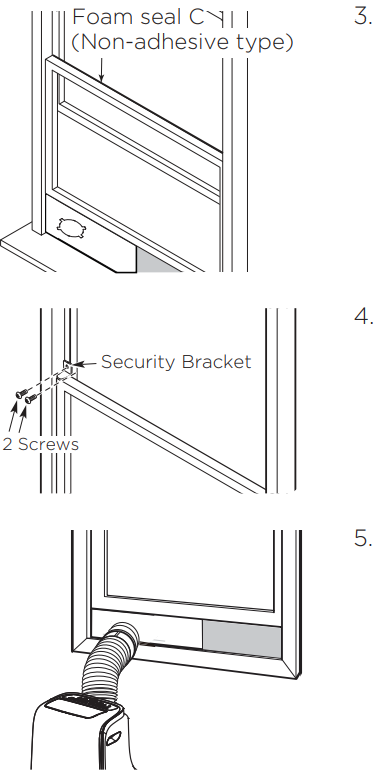
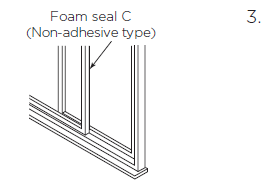
- Cut the non-adhesive foam seal C strip to match the width of the window. Insert the seal between the glass and the window frame to prevent air and insects from getting into the room.
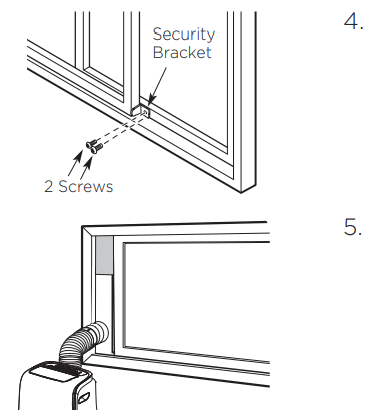
- If desired, install the security bracket with 2 screws as shown.
Insert the window slider adaptor into the hole of the window slider.
Type 2: Sliding Window Installation
- Cut the adhesive foam seal A and B strips to the proper lengths, and attach them to the window sash and frame as shown.
Insert the window slider assembly into the window opening.
Cut the non-adhesive foam seal C strip to match the window height. Insert the foam seal between the glass and the window frame to prevent air and insects from getting into the room.
- If desired, install the security bracket with 2 screws as shown.
Insert the window slider adaptor into the hole of the window slider.
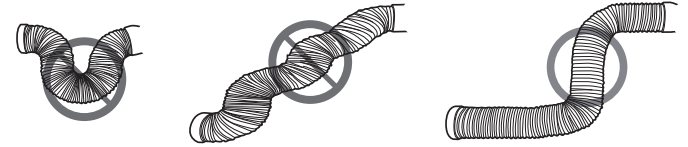
NOTE: To ensure proper functioning, DO NOT overextend or bend the hose. Make sure that there is no obstacle around the air outlet of the exhaust hose (in the range of approx. 20 inches) in order for the exhaust system to work properly. All illustrations in this manual are for explanation purposes only. Your air conditioner may be slightly different than the illustrations shown here.
Setup Guide
- Unpack the Midea Portable Air Conditioner MAP10S1CWT and remove all packaging materials.
- Place the unit on a flat, stable surface in the room you wish to cool.
- Install the window installation kit by following the instructions provided in the user manual.
- Connect the hose to the unit and the window installation kit.
- Plug the unit into a power outlet.
- Turn on the unit using the remote control or the digital display on the unit.
- Adjust the temperature, fan speed, and cooling mode to your desired settings.
Care and Cleaning
Safety Precautions
Always unplug the unit before cleaning or servicing.
- DO NOT use flammable liquids or chemicals to clean the unit.
- DO NOT wash the unit under running water. Doing so causes electrical danger.
- DO NOT operate the machine if the power supply was damaged during cleaning. A damaged power cord must be replaced with a new cord from the manufacturer.
Clean the Air Filter

Maintenance Tips
Be sure to clean the air filter every 2 weeks for optimal performance.
- The water collection tray should be drained immediately after the P1 error occurs, and before storage to prevent mold.
- In households with animals, you will have to periodically wipe down the grill to prevent blocked airflow due to animal hair.
Clean the Unit
Clean the unit using a damp, lint-free cloth and mild detergent. Dry the unit with a dry, lint-free cloth.
Store the Unit When Not in Use
Drain the unit’s water collection tray according to the instructions in the following section.
- Run the unit on FAN mode for 12 hours in a warm room to dry it and prevent mold.
- Turn off the unit and unplug it.
- Clean the air filter according to the instructions in the previous section. Reinstall the clean, dry filter before storing.
- Remove the batteries from the remote control
NOTE: Be sure to store the unit in a cool, dark place. Exposure to direct sunlight or extreme heat can shorten the lifespan of the unit.
Troubleshooting
Malfunction Diagnosis
Please check the following troubleshooting methods before calling for service:
| Problem | Possible Cause | Troubleshooting |
|---|---|---|
| Unit does not turn on when pressing ON/OFF button | P1 Error Code. The water collection tray is full. | Turn off the unit, drain the water from the water collection tray and restart the unit. |
| In COOL mode: room temperature is lower than the set temperature. | Reset the temperature. | |
| Unit does not cool well | The air filter is blocked with dust or animal hair. | Turn off the unit and clean the filter according to instructions. |
| Exhaust hose is not connected or is blocked. | Turn off the unit, disconnect the hose, check for blockage and reconnect the hose. | |
| The unit is low on refrigerant. | Call a service technician to inspect the unit and top off the refrigerant. | |
| Temperature setting is too high. | Decrease the set temperature. | |
| The windows and doors in the room are open. | Make sure all windows and doors are closed. | |
| The room area is too large. | Double-check the cooling area. | |
| There are heat sources inside the room. | Remove the heat sources if possible. | |
| The unit is noisy and vibrates too much | The floor is not level. | Place the unit on a flat, level surface. |
| The air filter is blocked with dust or animal hair. | Turn off the unit and clean the filter according to instructions. | |
| The unit makes a gurgling sound | This sound is caused by the flow of refrigerant inside the unit | This is normal. |
Warranty
One-year limited warranty from the original purchase date. Five-year compressor warranty from the original purchase date.
Midea Portable Air Conditioner MAP10S1CWT Pros & Cons
Pros
- High-performance and energy-efficient cooling
- Compact and portable design
- Remote control and digital display
- 24-hour timer and sleep mode
- Washable and reusable air filter
- Dehumidifying and fan mode
- R410A refrigerant
Cons
- The unit may be a bit loud when operating at high fan speeds
- The water tank may need to be emptied frequently in high-humidity conditions
Faqs
What is the Midea cooling capacity?
Is there a dehumidifier feature on the air conditioner?
What is the device's noise level?
What is the warranty on the Midea?
Is installing the air conditioner simple?
What kind of filter does the air conditioner make use of?
Is there a remote control for the air conditioner?
How can I remove the water from the operation of the dehumidifier?
Is there an auto-restart feature on the device?
Does the air conditioner have an energy-saving mode?
Leave a Comment