Noco Genius GB150 Jump Starter User Manual | How to Connect

Content
Introduction
The noco Genius GB150 Jump Starter is a versatile and powerful device designed to jump-start gasoline engines up to 6 liters and diesel engines up to 3 liters. With an estimated price of $129.95 and a launching date of January 2021, this jump starter is a reliable and safe solution for all your emergency starting needs. It is compact, lightweight, and easy to use, making it an ideal tool for both personal and professional use.
Technical Specifications
- Internal Battery: Lithium Ion
- Peak Current Rating: 3000A
- Operating Temperature: -20°C to +50°C
- Charging Temperature: 0ºC to +40ºC
- Storage Temperature: -20ºC to +50ºC (Avg Temp.)
- Micro USB (Input): 5V, 2.1A
- USB (Output): 5V, 2.1A
- 12V (Input): 12V, 5A
- 12V (Output): 12V, 15A
- Housing Protection: IP65 (w/Ports Closed)
- Cooling: Natural Convection
- Dimensions (L x W x H): 12.3 x 7 x 2.7 Inches
- Weight: 7.5 Pounds
How To Use
Charge the GB150.
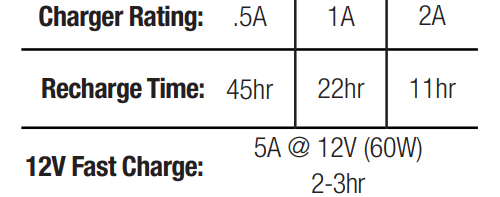
The GB150 comes partially charged out of the box and needs to be fully charged prior to use. Connect the GB150 using the included USB Charge Cable to the USB IN port and the USB car charger. It can also be recharged from any USB powered port, like an AC adapter, car charger, laptop and more. The USB IN port is rated at 2.1 Amps to ensure safe and efficient charging of the internal lithium battery. Due to FCC regulations, we recommend not to charge and discharge the unit at the same time. The time to recharge a GB150 will differ based on the discharge level and the power source used. Actual results may vary due to battery conditions.

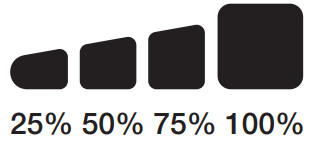
When recharging, the charge level of the internal battery is indicated by the Charge LEDs. The LEDs will slowly pulse 'On' and 'Off' and become solid until all four Charge LEDs are on. When the battery is fully charged, the Green 100% LED will be solid, and the 25%, 50% and 75% Charge LEDs will turn "Off". From time to time, the Green 100% LED will pulse indicating maintenance charging is occuring.

USB Charging (Up to 10W)
Connect the GB150 using the included USB Charge Cable to the USB IN port and a powered USB port, like an AC adapter, car charger, laptop and more. The USB IN port is rated at 2.1 Amps to ensure safe and efficient charging of the internal lithium battery.
12V Fast Charge (60W)
Connect the 12V Cable to the “12V IN” port on the GB150, and the other end to the Male 12 Plug. Plug into a powered 12V AUX Plug (Cigarette Lighter Port.)
Powering Your 12V Devices
Connect the 12V Cable to the “12V OUT” port on the GB150, and the other end to the Female 12V Plug (12V AUX/ Cigarette Lighter Port.) Plug-in any standard 12V device (Up to 15A) with a 12V plug and turn the GB150 “On” to start powering your device.
Connect to the Battery
Carefully read and understand the vehicle owner's manual on specific precautions and recommended methods for jump starting the vehicle. Make sure to determine the voltage and chemistry of the battery by referring to your battery owner's manual prior to using this product. The GB150 is for jump starting 12-volt lead-acid batteries only. Before connecting to the battery, verify that you have a 12-volt lead-acid battery. The GB150 is not suitable for any other type of battery. Identify the correct polarity of the battery terminals on the battery. The positive battery terminal is typically marked by these letters or symbol (POS,P,+). The negative battery terminal is typically marked by these letters or symbol (NEG,N,-). Do not make any connections to the carburetor, fuel lines, or thin, sheet metal parts. The below instructions are for a negative ground system (most common). If your vehicle is a positive ground system (very uncommon), follow the below instructions in reverse order.
- Connect the positive (red) HD battery clamp to the positive (POS,P,+) battery terminal.
- Connect the negative (black) HD battery clamp to the negative (NEG,N,-) battery terminal or vehicle chassis.
- When disconnecting, disconnect in the reverse sequence, removing the negative first (or positive first for positive ground systems).
Jump Starting
- Make sure all of the vehicle's power loads (headlights, radio, air conditioning, etc.) are turned off before attempting to jump start the vehicle.
- Press the Power Button to begin jump starting. All LEDs will flash, indicating that all LEDs are properly functioning. If you are properly connected to the battery, the White Boost LED will illuminate. If the battery clamps are connected in reverse, the Red Error LED will illuminate. Reverse the connections to clear this error and then the White Boost LED will illuminate. The White Boost LED is illuminated, when the GB150 is ready to jump start your vehicle.
- Try starting the vehicle. Most vehicles will immediately start. Some vehicles may require the GB150 to be connected for up to 30 seconds before starting. If the vehicle does not start right away, wait 20-30 seconds and try again. Do not attempt more than five (5) consecutive jump starts within a fifteen (15) minute period. Allow the GB150 to rest for fifteen (15) minutes before attempting to jump start the vehicle again.
- Once you have started your vehicle, disconnect the battery clamps, and remove the GB150.
Low Voltage Batteries & Manual Override
The GB150 is designed to jump start 12-volt lead-acid batteries down to 2-volts. If your battery is below 2-volts, the Boost LED will be "Off". This is an indication that the GB150 can not detect a battery. If you need to jump start a battery below 2-volts there is a Manual Override feature, which allows you to force "On" the jump start function.
CAUTION
USE THIS MODE WITH EXTREME CARE. THIS MODE IS FOR 12-VOLT LEAD-ACID BATTERIES ONLY. BOTH THE SPARK PROOF AND REVERSE POLARITY PROTECTION FEATURES ARE DISABLED. PAY VERY CLOSE ATTENTION TO THE POLARITY OF THE BATTERY BEFORE USING THIS MODE. DO NOT ALLOW THE POSITIVE AND NEGATIVE BATTERY CLAMPS TO TOUCH OR CONNECT TO EACH OTHER AS THE PRODUCT WILL GENERATE SPARKS. THIS MODE USES VERY HIGH CURRENT (UP TO 3000 AMPS) THAT CAN CAUSE SPARKS AND HIGH HEAT IF NOT USED PROPERLY. IF YOU ARE UNSURE ABOUT USING THIS MODE, DO NOT ATTEMPT AND SEEK PROFESSIONAL HELP.\
User Interface

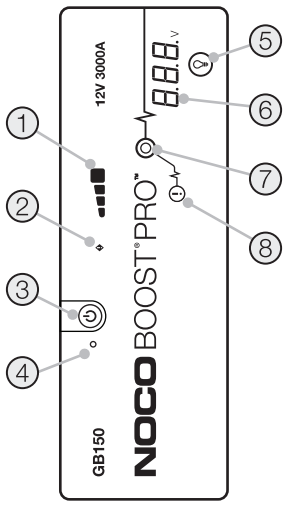
- Internal Battery Level: Indicates the charge level of the internal battery.
- Error LED: Illuminates Red if reverse polarity is detected, or blinks “On” and “Off” when the internal battery temperature is too high.
- Power Button: Push to turn unit "On" & "Off".
- Power LED: Illuminates White when unit is "On".
- Light Mode Button: Toggles the ultra-bright LED light through 7 light modes: 100% > 50% > 10% > SOS > Blink > Strobe > Off
- Voltmeter: The built-in voltmeter reads the voltage of the vehicle’s battery for enhanced diagnostics and troubleshooting. The voltmeter will automatically read the voltage of any battery (or battery system) when the battery clamps are connected, even if the unit is powered off. The voltmeter will read voltage between ~3V and ~20V. If the connected battery is below 3V, nothing will display. If the voltage is that low, there is likely a load(s) on the battery, such as headlights or and AC fan, that should be shut off before attempting to start the vehicle.
- Boost LED: Illuminates White when Boost is active. If the unit is connected properly to a battery, the GB150 will automatically detect a battery and go into Boost mode (LED flashes White when Manual Overide feature is active).
- Manual Override Button: To enable, push and hold for three (3) seconds.
WARNING: Disables safety protection and manually forces Boost "On". Only for use when a battery is too low to be detected.
Description
The noco Genius GB150 Jump Starter is a state-of-the-art device that combines safety, power, and portability in one sleek package. It is designed to provide a quick and easy solution for jump-starting your vehicle, with a built-in safety system that protects against reverse polarity, short circuits, over-current, and overcharging. The device is equipped with a high-output LED flashlight with multiple modes, including SOS and emergency strobe, making it an ideal tool for roadside emergencies. It also features a built-in LCD screen that displays the battery status and voltage, ensuring that you always know the state of charge and power level.
Setup Guide
To use the noco Genius GB150 Jump Starter, follow these simple steps:
- Connect the clamps to the jump starter, ensuring that the red clamp is connected to the positive terminal and the black clamp is connected to the negative terminal.
- Turn on the jump starter by pressing the power button.
- Start the engine by turning the key or pressing the start button.
- Disconnect the clamps from the vehicle once the engine starts.
- Recharge the jump starter after each use by plugging it into a wall outlet or a 12-volt DC outlet.
Troubleshooting
If the jump starter does not work, try these solutions:
- Check the battery level and ensure that it is fully charged.
- Check the clamp connections and ensure that they are securely attached to the vehicle's battery terminals.
- Check for any blown fuses or damaged components and replace them if necessary.
- Ensure that the jump starter is not exposed to extreme temperatures or moisture.
- Contact noco customer support for further assistance.
- Error LED: Solid Red
- Reverse polarity/Reverse the battery connections.
- Error LED: Blinking Red w/Cables Connected Properly
- The internal battery is too hot/ Allow the unit to cool. Bring the unit into cooler environment.
- Boost Light Does Not Come On w/Cables Connected Properly
- Connected battery is below 2-volts/ Remove all loads, and try again, or use Manual Override Mode.
Warranty
NOCO warrants that this product (the "Product") will be free from defects in material and workmanship for a period of one (1) year from the date of purchase (the "Warranty Period"). For defects reported during the Warranty Period, NOCO will, at its discretion, and subject to NOCO's technical support analysis, either repair or replace defective Products. Replacement parts and products will be new or serviceably used, comparable in function and performance to the original part and warranted for the remainder of the original Warranty Period.
Pros & Cons
Pros
- Compact and lightweight design
- Powerful and versatile
- Safe and easy to use
- Long-lasting battery
- Built-in LED flashlight and LCD screen
Cons
- May not work with larger engines
- May not hold a charge for extended periods
- May be more expensive than other jump starters
- May require frequent recharging
Customer Reviews
The noco Genius GB150 Jump Starter has received positive reviews from customers, with many praising its compact design, powerful performance, and ease of use. However, some customers have reported issues with the device's battery life and charging capabilities. Overall, the device has received high marks for its safety features, versatility, and reliability, making it a popular choice for those in need of a dependable jump starter.
Most Common Complaints
The most common complaints about the noco Genius GB150 Jump Starter include its short battery life, frequent recharging requirements, and higher price point compared to other jump starters. Some customers have also reported issues with the device's durability and longevity, with some units failing to hold a charge after only a few uses. However, these issues are relatively rare, and the majority of customers have reported positive experiences with the device.
Faqs
What is the price of the NOCO Genius GB150 Jump Starter?
Where can I buy the NOCO Genius GB150 Jump Starter?
What are the key features of the NOCO Genius GB150 Jump Starter?
How do I use the NOCO Genius GB150 to jump-start my vehicle?
Is there any maintenance required for the GB150?
How long does it take to fully charge the GB150?
Is customer support available if I have issues with my GB150?
Can the GB150 be used in extreme weather conditions?
Can the GB150 be used on motorcycles?
Does the GB150 have safety features to prevent incorrect use?
Leave a Comment
