Mingda 3d Scanner Printer D2 User Guide | Installation Instruction
Content
Introduction
Perfect for creators and engineers, the Mingda D2 3D Scanner Printer is a modern tool meant for both 3D scanning and 3D printing. While its 3D printing features let for high-quality, detailed prints, this flexible machine combines powerful scanning technologies to acquire exact 3D models. The D2 boasts easily navigable software, fast scanning and printing speeds, and material compatibility. Perfect for prototyping, education, and creative endeavors, its dual use simplifies the design to manufacturing process.
Detailed Specifications
The Mingda 3D Scanner Printer D2 boasts impressive specifications, including a print volume of 150 x 150 x 150 mm, a maximum scanning volume of 220 x 220 x 220 mm, and a laser engraving area of 125 x 125 mm. The device features a high-precision, direct-drive extruder with a 0.4mm nozzle diameter, and a print speed of up to 150 mm/s. The Mingda D2 also has a heated print bed that can reach temperatures up to 100°C, ensuring reliable adhesion and warp-free printing. The 3D scanner on the Mingda D2 has a resolution of up to 0.1 mm and can capture details with high accuracy.
Overview
The printing process of the MINGDA 3D printer involves using the slicing software CURA to convert the .stl document into a .gcode document. The 3D printer then reads the .gcode document and prints the filament into a 3D product. CURA runs on Windows XP, Vista, 7, 8, or 10.
- MODEL: D2
- PRINTING SIZE(mm): 230*230*260
- PRODUCT SIZE(mm): 460*330*528
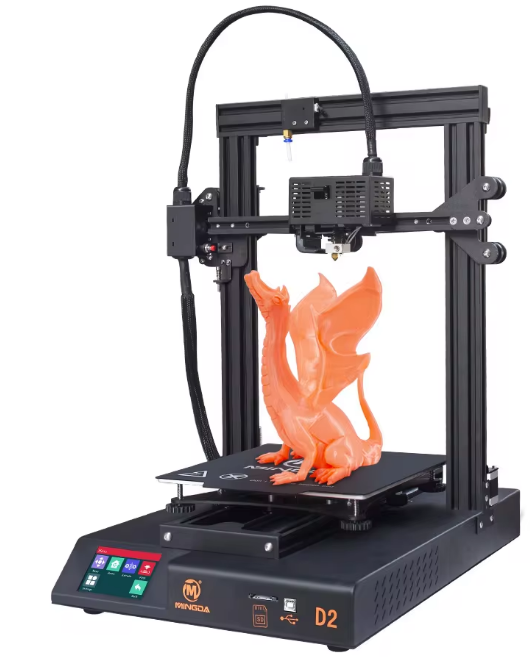
3D Printer Views

1 | Filament holder | 6 | Touching screen | 11 | Lead screw |
2 | Filament detector | 7 | SD cradslot | 12 | X axis motor |
3 | X Limit switch | 8 | USB port | 13 | Bed-leveling nut |
4 - | Printing head | 9 | Y Limitswitch | 14 | Z axis motor |
5 | Printing platform | 10 | Power Socket |
General List
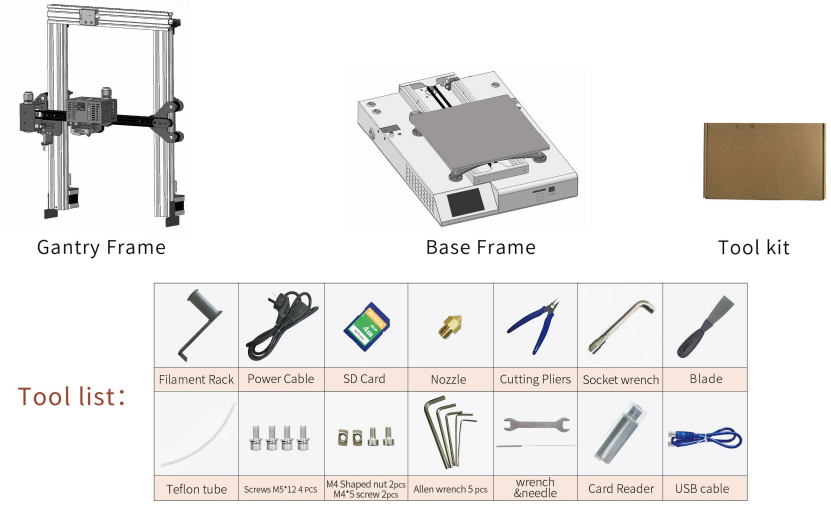
Device Installation
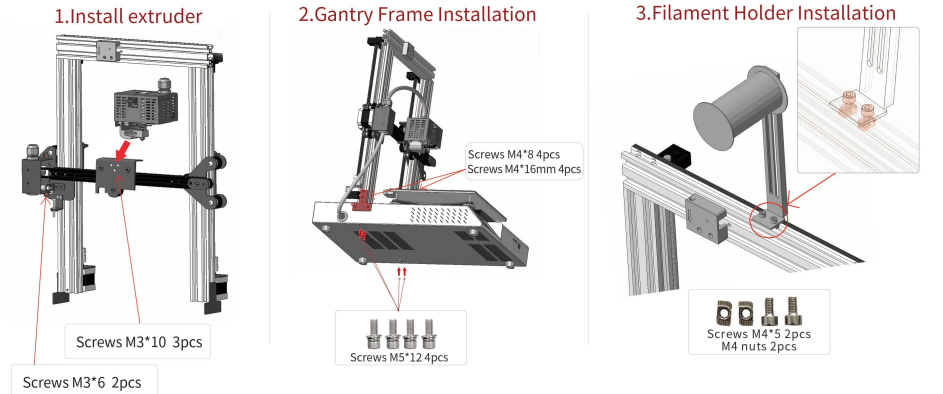
Cable Connection

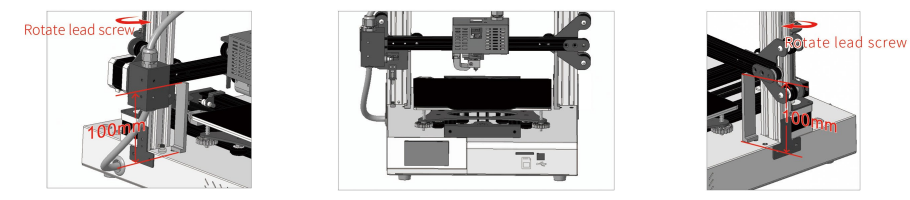
X-Axis Adjustment
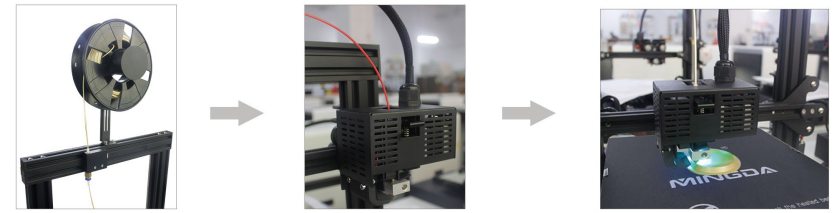
Filament Installation
Preheat the nozzle temperature to 200°C.

Hang the filament on the holder, pass it through the filament detector, press the extruder strip, and push the filament in until it flows out of the nozzle evenly.
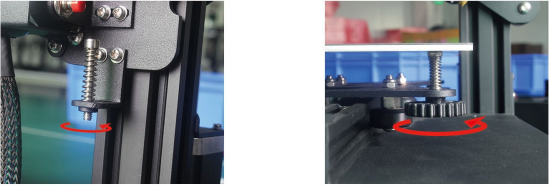
Bed Leveling
Choose Home
 , click
  to stop moving and prevent the nozzle from hitting the platform. Gently push the print head to the four corners and the middle of the platform, observing the gap between the nozzle and the hot bed.
Ensure the gap is about 0.1mm by inserting an A4 paper between the nozzle and the printing platform. Adjust the four fine-tuning nuts so the paper can move with resistance but not scratch.
If adding a glass or other material plate on the hot bed, adjust the limit block position and the platform level again.
Description
You can use the Mingda 3D Scanner Printer D2 for a lot of different things because it has everything you need for 3D printing. The Mingda D2 is a great choice whether you're a skilled designer, engineer, artist, or person who just wants to try 3D printing as a hobby. The Mingda D2 is simple to set up and use thanks to its friendly layout. The printer also has a built-in camera and Wi-Fi, so you can use your smartphone or computer to check on and control your prints from anywhere.
Machine Operation
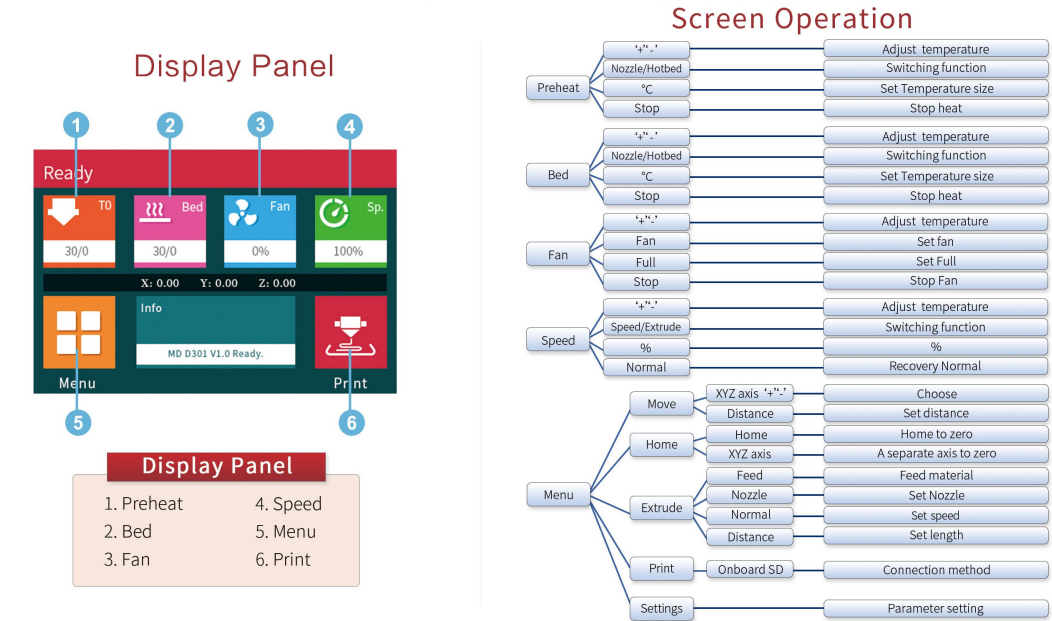
Display Panel Home Overview
Preheat Interface
Set the nozzle/bed temperature according to the filament type (e.g., ABS at 225°C, PLA at 185°C).
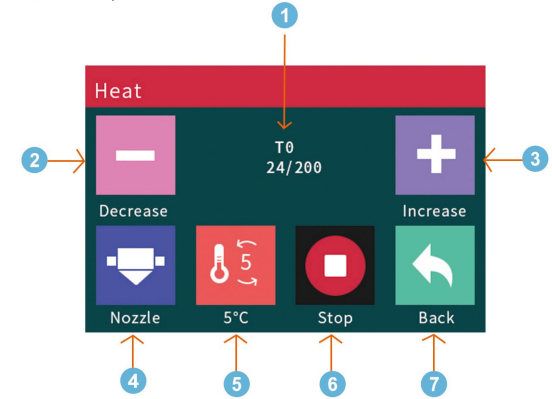
- Temperature display
- Reduce the temperature
- Increase the temperature
- Nozzle/bed
- 1/5/10
- Stop heating
- Return Back
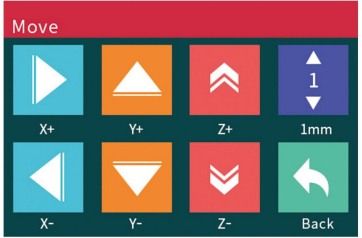
Interface Application
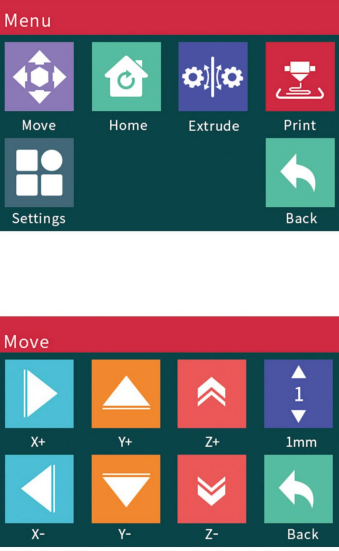
- Move: Click the button
 into "Manual" adjustment interface
 - Home: Position return to original position
- Extrude: Carry out material entry and exit
- Print: Click into the print interface to select the file for printing
- Settings: Each setting parameter of the system
- Back: Return to print interface
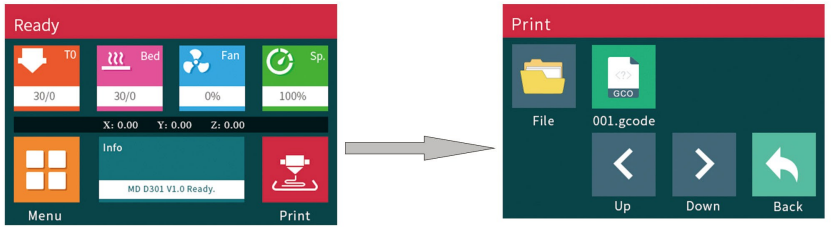
SD Card File List
Choose ![]() and enter the SD card file list to select the file to print.
and enter the SD card file list to select the file to print.
Printing Display
During printing, it shows printing position, Head/Bed temperature, File name, printing time and its printing bar. In addition, you can adjust the real temperature.
 Cancel printing and return X/Y axis to the original position.
 Pause printing; the printing head will move away.
 Continue printing after pausing.
 Adjust printing speed, temperature, and fan speed.
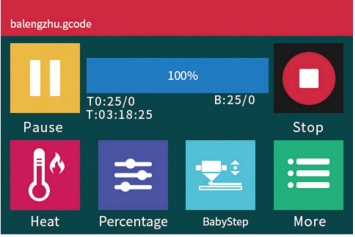
Settings
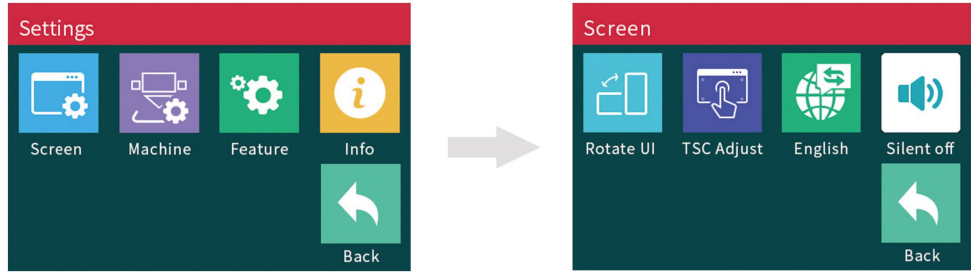
- Contains three function settings: Screen, Machine, Feature.
Screen: Change language and view firmware information.
Software Installation
MINGDA 3D printers can support Cura, RepetierHost, Simplify 3D and other slicing software for printing. You can get the latest installation software in two ways:
- Install from the inclu ded SD card
- Downloa d direc tly from MINGDA official website http://www.3dmingda.com/download/source_code.html
Software Installation (CURA)
- Double click Cura_XX.XX.exe to install
- Install the software as follows, all installed by default.
Add new machine
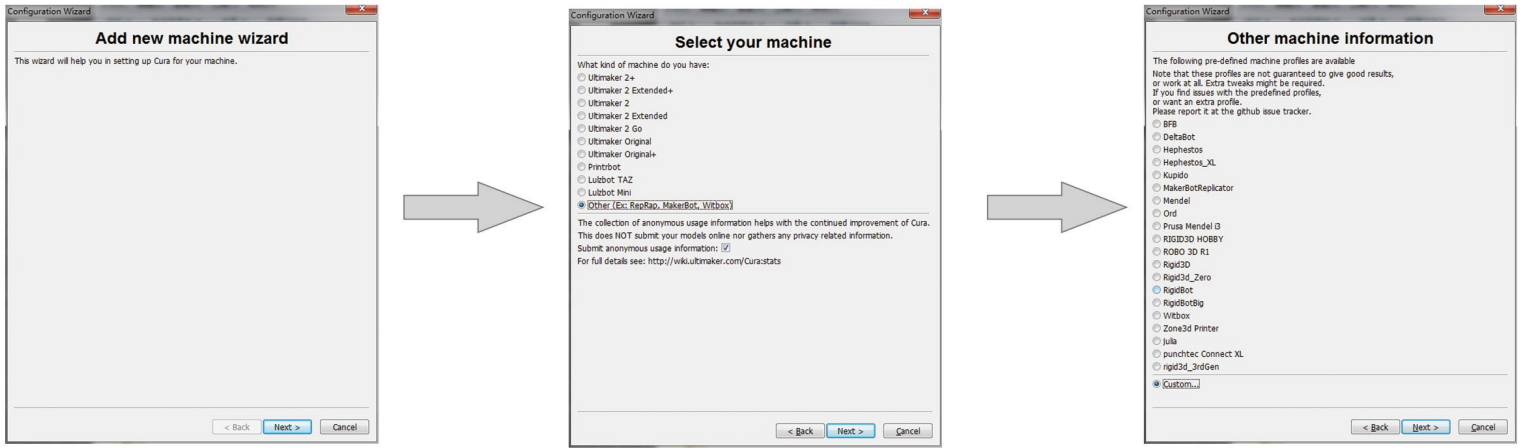
- Start Cura.
Click on "machine" - "add new machine", choose"others" -"Custom"
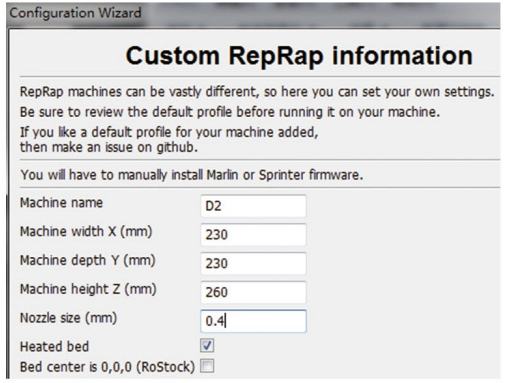
D2 machine settings are as follows.
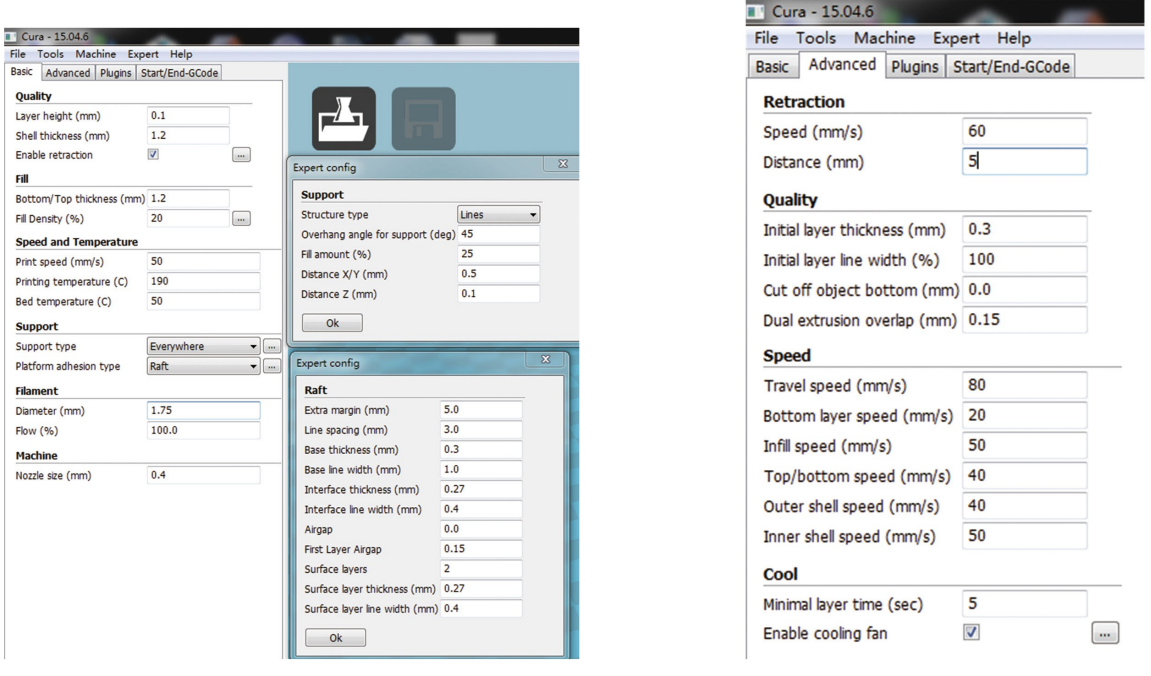
Settings, PLA recommended settings are as follows.
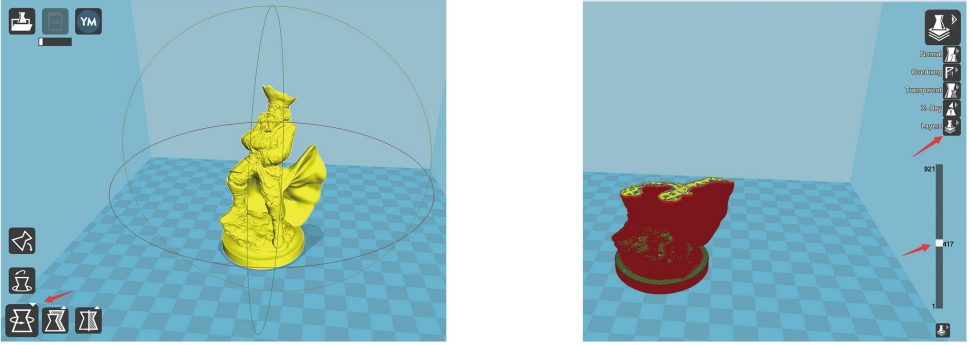
- Load the stl file, left click on the model, click on the bottom left rotation to rotate the model to the appropriate angle.
After the slice is complete, click on the view, select Layers, drag the slider preview, and check if there is a problem with the slice.
It will show the printing time and the weight. Click the SD card icon to save. Finally save the geode file in the GCODE folder in SD card.
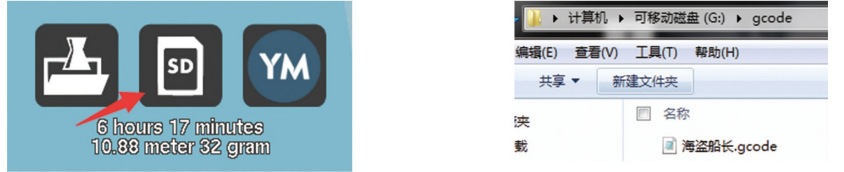
- Insert the SD card into the machine, select the file, start printing.
Setup Guide
Setting up the Mingda 3D Scanner Printer D2 is a straightforward process. Start by unpacking the device and leveling the print bed. Next, install the provided software on your computer and connect the Mingda D2 to your computer using the USB cable. Follow the on-screen instructions to calibrate the device and perform the initial setup. Once the setup is complete, you can start printing or scanning right away.
General Maintenance
Daily Preventive Maintenance
- Before printing, reset the Z-axis to check the distance between the nozzle and the platform to prevent the nozzle from scratching the platform.
- Before printing, check that the XV axis moves smoothly and check if the belt is worn or loose.
- Before printing, preheat the nozzle to check feeding. If it is not smooth, clean or replace the print nozzle assembly.
- After printing is completed, clean all the accumulated filaments and stains on the printing platform and lead screw.
- Filament that are not used for a long time should be sealed and stored. Excessive absorption of moisture from the air can make the filament brittle.
500 Hours Maintenance
About every 500 hours you should clean up the printer.
- Clean the body, absolute ethanol will be better to use.
- To clean the guide rails, f irst wipe the sides of the guide rails with anti-rust paint and re-add lubricant.
- Check the screws, check if the mounting screws such as the synchronous wheel, belts and motor are loose. If it is loose, it should be tightened in time.
1000 Hours Maintenance
After more than 1000 hours of running, the nozzle may become clogged or worn, which may have a negative impact on the surface smoothness and detail of the model. A new screw tube and print nozzle need to be replaced at this time. You can contact M INGDA for related videos.
- Cut off the printer power completely.
- Use sleeve to twist down the nozzle.
- Take out the new nozzle from kit and then install in original position.
- Use sleeve tights up the printing nozzle.
MINGDA 3D Printers adhere to the design concept of simplicity to the extreme. It can print products quickly and easily, even if you've never used a 3D printer before. The printer prints with PLA and ABS filaments, making the products strong and durable. You can perform drilling, tapping, grinding, and painting on the models. MINGDA 3D Printers combine proprietary hardware, software, and filament technologies creatively, leading you into a new world of 3D printing!
User-Guide Instructions
This User Guide is carefully organized into "Installation," "Operation," "Maintenance," and "Troubleshooting" sections for easy reading and understanding. Be sure to read the sections carefully to enjoy the optimum performance of the 3D printer.
Learn More Information
The SD card provides the electronic user guide, covering topics such as:
- Troubleshooting information
- Important safety statements and regulatory information
- Printing supplies related information
- Detailed instructions for use
For more information, visit the official websites:
Safety Precautions
These precautions ensure the correct use of the printer and protect it from damage. Always follow these precautions:
- Use the specified power supply voltage. Avoid connecting multiple devices to the printer's power outlet to prevent overload.
- Ensure the printer is properly grounded to avoid electric shock, fire, or electromagnetic interference.
- Contact after-sales or local service before disassembling or repairing the printer yourself. Check the "Support" section in the User Guide.
- Use the power cord that came with the printer. Do not damage, cut, or repair the power cord. Replace damaged power cords with quality-certified ones.
- Avoid allowing metal or liquid to enter the printer and contact internal parts to prevent fire, electric shock, or other serious accidents.
- Turn off the printer and unplug the power cord in the following conditions:
- The printer emits smoke or an abnormal smell.
- The printer emits abnormal noise not present during normal operation.
- Metal or liquid (not required for cleaning or routine maintenance) enters the printer.
- During thunderstorms.
- When the power is off.
This guide includes the following categories:
- Note: Potentially dangerous situations that may result in minor or moderate injury if not avoided.
- Warning: Potentially dangerous situations that may result in serious injury if not avoided.
- High temperature surface: Indicates the presence of high temperature equipment. Be cautious and wear safety gloves when working near hot parts.
- Gloves: Use gloves to avoid burns when performing maintenance procedures involving hot surfaces.
- Safety glasses: Wear safety glasses to avoid eye injury.
- Lifting hazard: Cooperate with two or more people when lifting to avoid serious injury.
- Recovery: Use the correct method for recovering filaments and packaging filaments.
- ESD: Use standard electrostatic discharge (ESD) precautions when working with or near electronic components.
Trouble Removal
| Problems | Suggestions |
|---|---|
| Without power | 1. socket has no power. 2. the power cord are the fuse are damaged. 3. Check if the power and main board lights are on. 4. Motherboard or screen failure. |
| No filament out | 1. the extruder motor is not rotating. 2. the extrusi on is not strong enough. 3. The noz zle is clogged, ple ase refer to "1000 Hours Maintenance". |
| Print misplacement | 1. t he movement is n o t p o w e r f u l. 2. t he mot or inte r f a ce and the sync hr on ous w heel ar e l o ose . 3. C he c k if t he pr in t s pe ed is se t t o o lar ge |
| SD card read abnormally | SD c ard poisoning; GCODE g arbled; SD c ard is damaged; c ard slo t is damaged |
| Can't show temperature or heat | Poor c on t a c t be t w e en te mper atu r e sensing line or he ating tube; damage t o temper a tu r e sensing line or he a ting tube; mot herb o ard f ailu r e . |
Customer Support
Please visit http://www.3dmingda.com/artic1e/news.html
Working Computer Specifications
- Operating system: Microsoft Windows XP, Vista, or 7.
- Processor: Minimum 2.4 GHz.
- RAM: Minimum 1GB (2GB recommended).
- Hardware installation: 90 MB.
- Monitor graphics resolution: Minimum 1024x768 (1280x1024 recommended).
- Video card: OpenGL accelerated graphics card (128 MB graphics card memory recommended).
MINGDA Limited Warranty
Besides limited warranty, within the maximum range allowed by law. MING DA or any authorized dealer have not made any other statements or implied guarantee, including marketability and special-purpose applicability of implied warranties. MING DA has not supplied, undertake or provide, authorized to assume responsibility for it or any other guarantee, including any authorized dealer or other express or implied warranties to the independent third party.
We provide a 12-month warranty on 3D printers (excluding the nozzle assembly) purchased on or after June 1, 2019 and a 3-month warranty on the nozzle assembly. The warranty period of each product starts from the date of production.
Pros & Cons
- Pros
- All-in-one 3D printing solution
- User-friendly interface
- High-precision 3D scanner
- Built-in camera and Wi-Fi connectivity
- Affordable price
- Cons
- Small print volume
- Limited material compatibility
- May require some assembly
Customer Reviews
Customers have praised the Mingda 3D Scanner Printer D2 for its high-quality prints, ease of use, and versatility. Many users have noted the excellent value for money, with the device offering a range of features at an affordable price. Some users have reported issues with connectivity and print quality, but these issues are relatively rare and can typically be resolved with some troubleshooting. Overall, the Mingda D2 is a highly recommended 3D printing solution for users of all skill levels.
Faqs
How do I know what kind of fiber the Mingda 3D Scanner Printer D2 can use?
Q: Does the Mingda D2 come put together already?
How much space does the Mingda D2 take up?
How do I make the Mingda D2 bed level?
Do you know if the Mingda D2 can print with flexible filaments?
In what size is the Mingda 3D Scanner Printer D2 nozzle?
How do I make the Mingda D2's software more up to date?
What is the warranty period for the Mingda 3D Scanner Printer D2?
Q: What kinds of things can the Mingda D2 scan?
Can I stop and start prints on the Mingda 3D Scanner Printer D2?
Leave a Comment