Razor RipStik Electric Skateboards Owner Manual
Content
Introduction
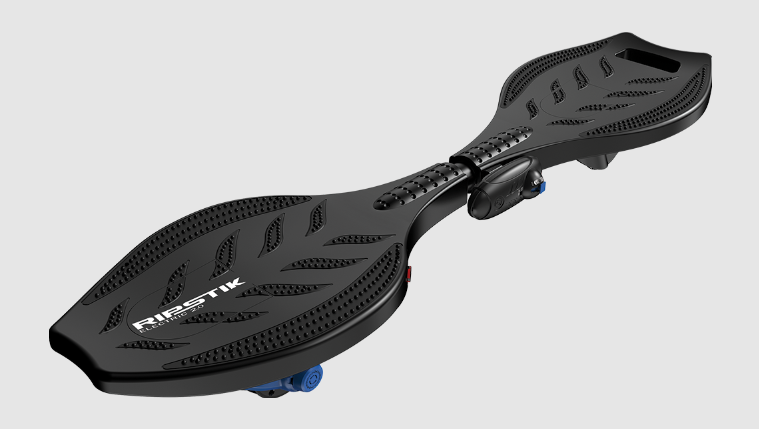
The Razor RipStik Electric Skateboard is the perfect combination of traditional skateboarding fun and the latest technology. This electric skateboard is designed for riders ages 9 and up, and can support a weight of up to 143 pounds. The RipStik has a top speed of 10 mph and a run time of up to 40 minutes of continuous use. The estimated price of the Razor RipStik Electric Skateboard is around $180. As of now, the product has been launched and is available for purchase online and in stores.
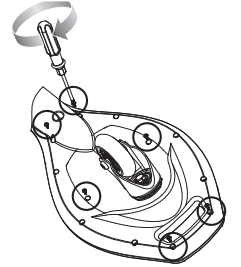
RIPSTIK ELECTRIC PARTS
Keep your RipStik Electric running for years with genuine Razor parts. Visit our website or e-mail us for more information on spare part availability. (Specifications subject to change without notice.)

- Traction Grips (Left/Right)
- Deck Plate (Front/Rear)
- Traction Plate
- Platform (Front/Rear)
- Front Wheel
- 5-1 Coupling Bolt
- Caster
- Torsion Bar
- 7-1 Torsion Bar Cover
- Charger Port
- On/Off Button
- Rear Wheel/Hub Motor Assembly
- Control Module
- Bottom Platform Cover
- 12-1 Bottom Rear Platform Cover
- Battery
- Battery Cover
- Remote
- Charger (Not Shown)
Detailed Specifications
The Razor RipStik Electric Skateboard features a high-performance, quiet 100-watt motor, and a lithium-ion battery that powers the board for up to 40 minutes of continuous use. The deck is made of 7-ply maple wood and is designed for maximum durability and flexibility. The board has a kicktail shape for easy maneuverability and control. The RipStik has a wireless, hand-held remote control that allows the rider to accelerate, brake, and monitor battery life. The board has a weight of 11 pounds and a size of 34" x 11" x 5".
Description
The Razor RipStik Electric Skateboard is the perfect way to get around. The board is easy to ride and control, with a wireless remote that makes it simple to accelerate, brake, and monitor battery life. The RipStik has a kicktail shape that allows for easy maneuverability and control, and the deck is made of 7-ply maple wood for maximum durability and flexibility. The board has a top speed of 10 mph and a run time of up to 40 minutes, making it perfect for short commutes or a fun ride around the neighborhood. With its high-performance motor and lithium-ion battery, the RipStik is a reliable and eco-friendly mode of transportation.
Product ID Locations
(See locations to the left)
- Underneath Product
- Charger
- UPC Side of Box (Not Shown)
Box Contents
- RipStik Electric
- Remote
- Two (2) AAA Batteries
- Charger
- Owner’s Manual
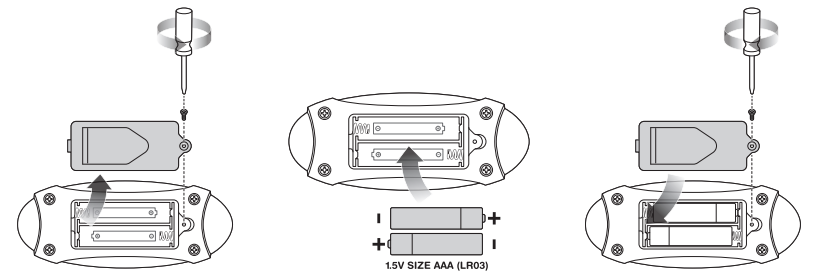
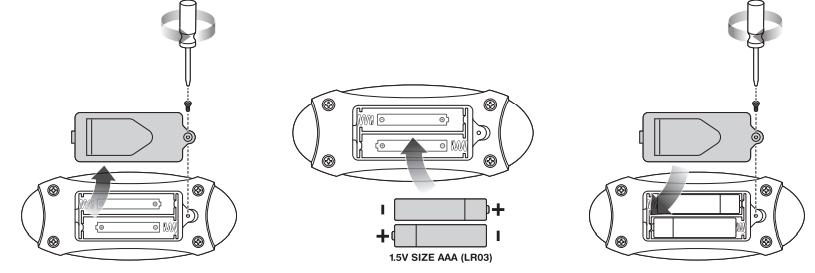
Installing Remote Batteries
Tool Required: Phillips screwdriver
- Loosen Phillips screw on battery cover and remove cover.
- Install two (2) AAA batteries.
Re-attach battery cover and securely tighten in place with screw.
Remote Pairing Confirmation
Note: Your remote should have been paired with your RipStik Electric at the factory
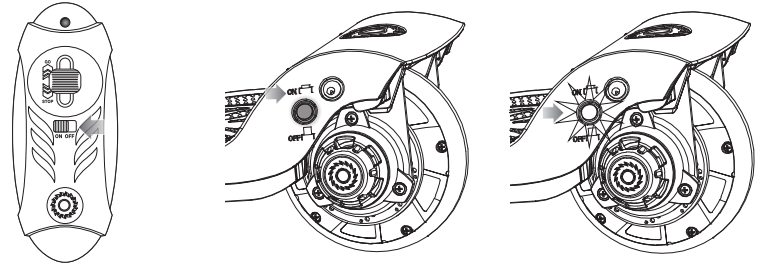
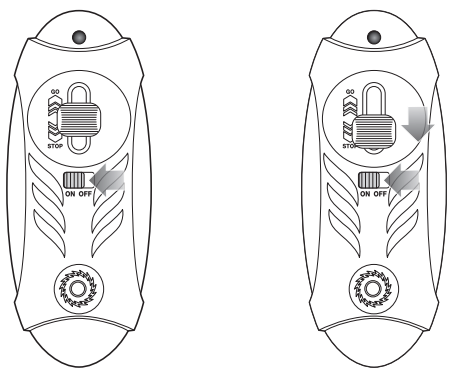
- Turn the power switch on the remote to the OFF position.
- Press power button on the product to the ON position.
- If the power button on the product is solid red, then the product has been successfully paired at the factory and no further steps are needed.
If power button on product is flashing, leave power button on the product in the ON position. See Pairing the Remote section below for pairing instructions.
Pairing the Remote
- Turn the power switch on the remote to the OFF position.
Turn product over. Open the pairing button cover located underneath the rear platform.
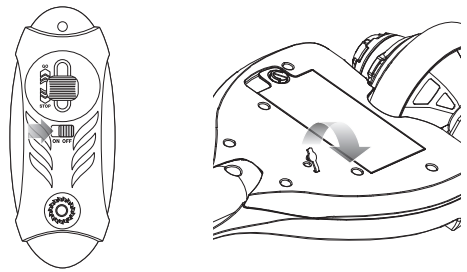
- Using a small object, gently tap the center of the pairing button. The light on the power button should now be flashing quickly.
- Move the lever on the remote to the “STOP” position and HOLD. Do not let go of the lever. Turn the power switch on the remote to the ON position.
If the light on the power button on the product is solid, your remote has been successfully paired.
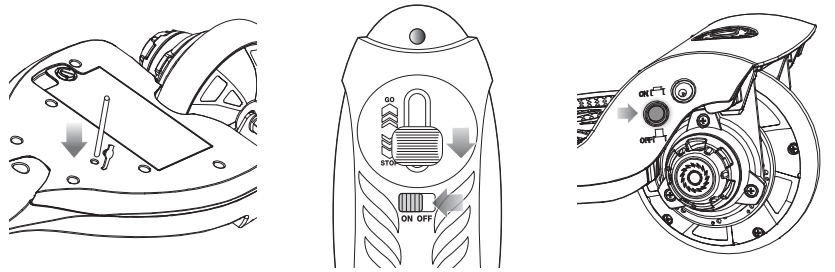
If the light on the product continues to flash quickly, turn power switch on the remote to the OFF position and repeat steps 3-4 until remote is paired.
Note: Contact Customer Service if you experience any issues with pairing the remote.
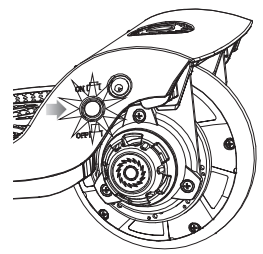
CHARGING THE BATTERY
Your RipStik Electric may not have a fully charged battery; therefore you must charge the battery prior to use. Be sure to charge the battery in a clean, dry location away from direct sunlight, flames or sparks.
- Initial charge time: 8 hours.
- Recharge time: up to 6 hours, even if the light turns green. Recommended maximum charging time is 24 hours.
- Always charge the battery immediately after riding.
- Fully charge battery before storing for extended periods of time.
- Unplug charger from the wall outlet when not in use.
- Failure to recharge battery periodically may result in a battery that will not accept a charge.
- Make sure the power button is turned OFF when product is not in use. If the power button is left on for an extended period of time, the battery may reach a stage at which it will no longer hold a charge.
- Run time: Up to 40 minutes of continuous ride time. Run time may vary depending on riding conditions, rider weight, climate, and/or proper maintenance.
- Constant starting and stopping may shorten ride time.
- Battery life can vary depending on proper maintenance and usage of the product.
- Do not charge at or below 32°F (0°C).
- Charger
(Note: Charger design may vary from one shown) - Plug the charger plug into wall outlet. The light on the charger should be green.
Note: If green light (LED) does not turn on, try a different outlet. Note: Make sure power button is in the OFF position. Plug the charger into the charger port. The light on the charger should turn red during charging. The light will turn green again when charging is complete.
WARNING: Use ONLY with the recommended charger. Batteries are only to be charged under adult supervision. The charger is not a toy. Always disconnect the charger before wiping down and/or cleaning the RipStik Electric with a damp cloth.
The charger supplied with the RipStik Electric should be regularly examined for damage to the cord, plug, enclosure and other parts. In the event of such damage, the RipStik Electric must not be charged until it has been repaired or replaced.
Chargers have built-in overcharge protection to prevent battery from being overcharged.
Wall outlet - Green (stand by) Wall outlet and product - Red (charging) Wall outlet and product - Green (charged) Note: Continue charging product even if light turns green prior to 6 hours.
WARNING: Battery charge can deplete over time. Periodically recharge battery when not in use.
PRE-RIDE CHECKLIST
Wheels
Periodically inspect the wheels for excessive wear.
Frame
Check for cracks or broken connections. Although broken frames are rare, it is possible for an aggressive rider to run into a curb or object and wreck, crack or break a frame. Get in the habit of inspecting your product on a regular basis.
Hardware/Loose Parts
Before every ride, check all parts, such as nuts, bolts, fasteners, etc., to ensure they are secure and assembled correctly. There should not be any unusual rattles or sounds from loose parts or broken components. If the product is damaged, do not ride. Reference “Safety Warnings” on pages 1 and 2 of this manual.
Safety Gear
Always wear proper protective gear, such as an approved safety helmet. Elbow pads, kneepads and wrist guards are recommended. Always wear athletic shoes (lace-up shoes with rubber soles) and keep shoelaces tied and out of the way of the wheels, motor and drive system. NEVER RIDE BAREFOOTED OR IN SANDALS.
Laws and Regulations
Always check and obey any local laws or regulations.
Insurance
Do not assume that your existing insurance policies necessarily provide coverage for product use. Check with your insurance company for information regarding insurance.
USAGE
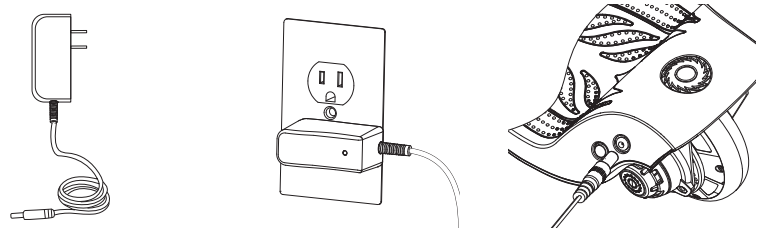
How to Ride
Do not activate the remote unless you are on the RipStik Electric and in a safe, outdoor environment suitable for riding. Turn power button to the “ON” position for both the RipStik Electric and the remote. Place one foot on the front deck plate and with the other foot, push (kick start) RipStik Electric while holding the lever on the remote in the “GO” position. Place other foot on rear deck plate once motor has engaged.
Note: RipStik Electric must be moving at least 3 mph (5 km/h), with lever on remote in GO position, for motor to engage.
How to Stop
The RipStik Electric, like regular RipStiks or skateboards does not have a conventional “brake”, however the RipStik Electric can coast to a stop or can use “dynamic motor braking” to slow more quickly.
- While riding, release the remote lever and it will return to the “NEUTRAL” position. The product will slow to a stop with motor resistance.
To slow more rapidly to a stop, move the remote lever down to the “STOP” position and hold. This will engage dynamic motor braking and the product will slow down more quickly.
Note: As an additional safety feature, the RipStik Electric is designed to cut power to the motor when the lever on the remote is in the “STOP” or neutral position.
Note: Motor will re-engage, (without having to kick start), if the remote is in the “GO” position before RipStik Electric has slowed down to under 3 mph (5 km/h).
Note: Practice riding only in wide open areas clear from curbs, parking blocks and other obstacles. Impacting the wheels against any hard surface can damage the wheels. Wheels are not covered under the limited warranty.
Setup Guide
Setting up the Razor RipStik Electric Skateboard is easy. First, make sure the board is fully charged. Next, unfold the board and turn it on using the switch on the bottom of the board. To pair the remote control with the board, press the "pairing" button on the remote and the "power" button on the board. Once the remote is paired, you're ready to ride. To ride the RipStik, simply stand on the board and use the remote to accelerate. To brake, use the remote to slow down. The LED lights on the remote will indicate the battery life and the board will beep when the battery is low.
REPAIR AND MAINTENANCE
Before beginning repair or maintenance:
- Read the instructions
- Disconnect charger
- Turn the power button OFF
- Exercise caution around exposed parts
- Contact Razor Customer Service if unsure about any repair or maintenance
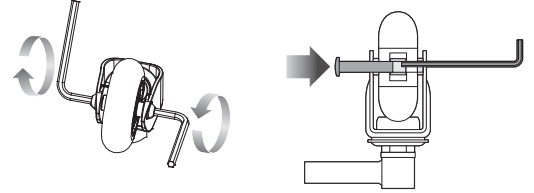
Caster Wheel Replacement
Tools Required: Two (2) 5 mm Allen Wrenches
- Turn product over. Using two (2) 5 mm Allen wrenches, loosen coupling bolt and remove wheel from caster.
Insert replacement wheel into caster. Note: Make sure all three (3) spacers are aligned with the holes in the bearings before inserting the coupling bolt. Secure tightly into place.
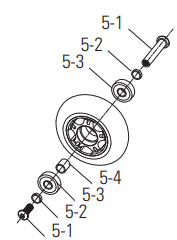
Wheel
- 5-1 Coupling Bolt
- 5-2 Spacer (x2)
- 5-3 Bearing (x2)
5-4 Spacer
Front Caster Replacement
Tools Required: Phillips Screwdriver and 24 mm Socket Wrench
- Remove wheel from caster (refer to step 1 above). Remove the six (6) Phillips screws attaching the deck plate to the platform.
- Turn product over. Using a 24 mm socket wrench, loosen the nut on the caster and remove caster.
- Insert replacement caster. Secure in place with nut removed in step 2.
Re-attach wheel to caster (refer to step 1 above).
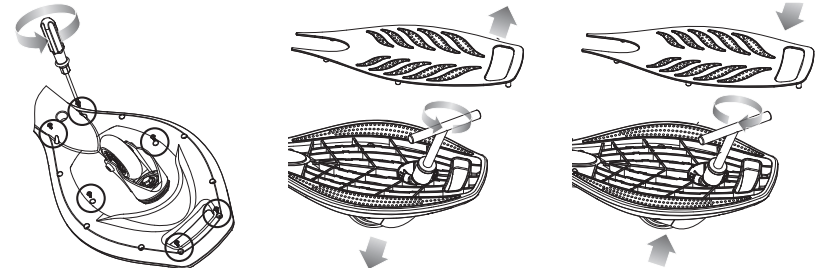
Re-attach the deck plate to the platform with the six (6) Phillips screws removed in step 1.
Caster
- 6-1 Locknut
- 6-2 Spring Washer
6-3 Flat Washer
Rear Wheel/Hub Motor Replacement
Tools Required: Phillips Screwdriver and Two (2) 13 mm Wrenches
Turn product over. Loosen the four (4) Phillips screws on the rear platform cover and remove cover.
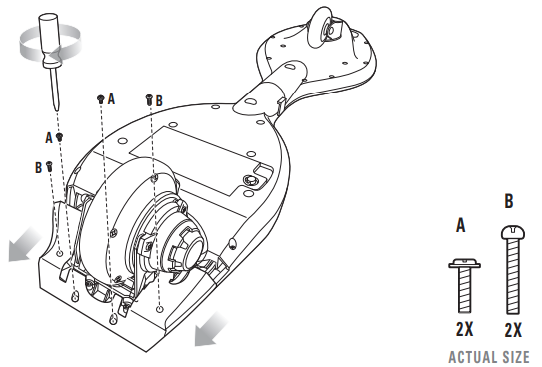
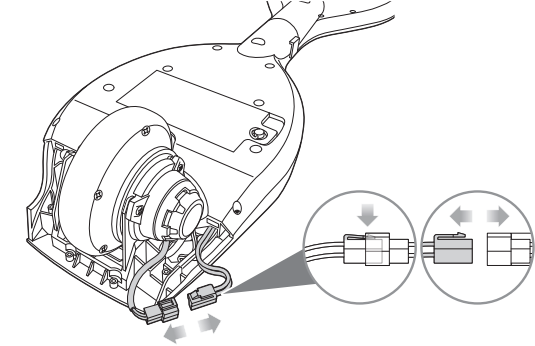
Disconnect the motor connector from the control module.
- Using a 13 mm wrench, loosen the outside locknut (11-6). Use a 13 mm wrench to prevent the inside nut (11-3) from turning.
Loosen the three (3) Phillips screws that attach the motor housing to the frame. Remove rear wheel.
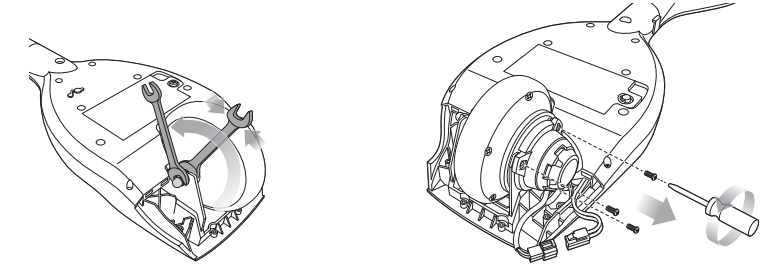
Install replacement wheel/hub motor by reversing steps 1-4.
Note: Rear wheel/hub motor hardware sequence: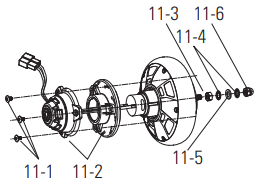
- Left Side: 11-1 Phillips Screws (x3), 11-2 Motor Housing
- Right Side: 11-3 Nut, 11-4 Spring Washer (x2), 11-5 Flat Washer,
- Frame: 11-6 Locknut
Remote Battery Replacement
Tool Required: Phillips Screwdriver
- Loosen Phillips screw on battery cover and remove cover.
- Remove old batteries and properly dispose.
- Install two (2) AAA replacement batteries.
Re-attach battery cover and securely tighten in place with screw.
Note: AAA batteries are not covered under the limited warranty.
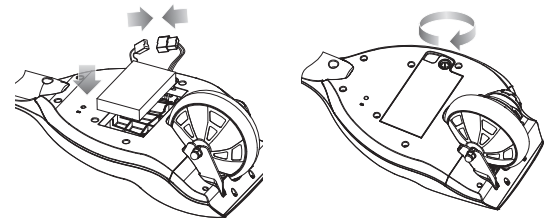
Product Battery Replacement
Tool Required: Phillips Screwdriver
- Turn product over. Loosen the Phillips screw on the battery cover and remove cover.
Disconnect the battery connector from the control module and carefully remove the battery from the product.
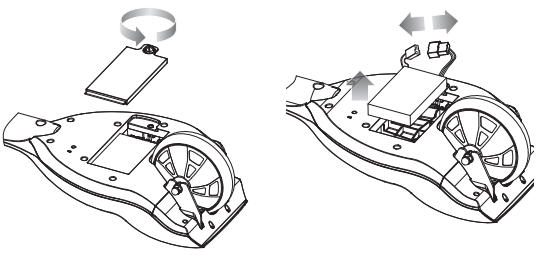
- Install replacement battery. Re-connect the battery connector to the control module.
Re-attach battery cover and securely tighten in place with screw.
WARNING
- Contains a lithium-ion battery pack - adult attention for changing and disposal.
- Battery should only be replaced by an adult.
- Dispose of batteries properly. See Page 11 – Battery Care and Disposal.
- Battery pack should not be disassembled, crushed, punctured, opened or otherwise mutilated.
Battery Care and Disposal
Do not store in freezing or below-freezing temperatures. To properly maintain your battery and ensure maximum battery life, carefully read the “Charging the Battery” section on page 6 of this owner’s manual.
Battery pack should not be disassembled, crushed, punctured, opened, or otherwise mutilated.
Disposal: Your Razor RipStik Electric uses a lithium-ion battery pack which must be recycled or disposed of in an environmentally safe manner. Do not dispose of a battery pack in a fire. The battery pack may explode or leak. Do not dispose of a battery pack in your regular household trash. The incineration, landfilling, or mixing of batteries with household trash is prohibited by law in most areas. Return exhausted batteries to a federal or state-approved lithium-ion battery recycler.
Charger
The charger supplied with the RipStik Electric should be regularly examined for damage to the cord, plug, enclosure, and other parts and in the event of such damage, the product must not be charged until it has been repaired or replaced. Use ONLY with the recommended charger.
Wheels
Wheels and the drive system are subject to normal wear and tear. It is the responsibility of the user to periodically inspect wheels for excess wear and replace the hub motor as required.
Replacement Parts
The most frequently requested replacement parts are available for purchase at some Razor retail partners. For the complete selection of replacement parts visit shop.razor.com.
Repair Centers
For a list of authorized Razor repair centers:
- Check online at https://razor.com/
- Additional Customer Service contact information is listed on the back of this manual.
WARNING: If a battery leak develops, avoid contact with the leaking solution and place the damaged battery in a plastic bag. Refer to the disposal instructions above. If the solution comes into contact with the skin, wash with soap and water immediately, neutralize with lemon juice, vinegar, or another mild acid, and contact a physician. If the solution comes in contact with eyes, flush immediately with water and contact a physician.
Recycling Lithium-Ion Batteries: Lithium-ion batteries are recyclable. You can help preserve our environment by returning your used rechargeable batteries to the collection and recycling location nearest you.
BEFORE YOU BEGIN
Remove contents from box. Remove the separators that protect the components from damage during shipping. Inspect the contents of the box for scratches, or dents that may have occurred during shipping. Because the RipStik Electric was 99% assembled and packed at the factory, there should not be any problems, even if the box has a few scars or dents. MAKE SURE POWER SWITCH IS TURNED “OFF” BEFORE CONDUCTING ANY ASSEMBLY OR MAINTENANCE PROCEDURES.
Estimated Assembly and Set-Up Time
Allow up to 5 minutes for assembly, not including initial charge time. Allow up to 8 hours for charge (see page 6 for charging information).

WARNING: DO NOT USE NON-RAZOR PRODUCTS WITH YOUR RAZOR RIPSTIK ELECTRIC. The RipStik Electric has been built to certain Razor design specifications. The original equipment supplied at the time of sale was selected on the basis of its compatibility with the frame and all other parts. Certain aftermarket products may not be compatible and will void the warranty.
Note: RipStik Electric must be moving at least 3 mph (5 km/h) while holding the lever on the remote in the “GO” position for motor to engage.
Razor RipStik Electric Skateboard Troubleshooting
| Problem | Possible Cause | Solution |
|---|---|---|
| Does not work out of the box | Product must be traveling at least 3 mph (5 km/h) before motor will engage | Kick start to at least 3 mph (5 km/h) while the lever on the remote is in the “GO” position to engage motor. Refer to page 4-5 for pairing information. |
| No longer works | No lights on charger<br>Undercharged battery<br>Battery will not hold a charge | Check power to wall outlet and/or try a different outlet. Check lights on charger:<br>- Plugged into wall - Green<br>- Plugged into wall & unit - Red (charging)<br>- Plugged into wall & unit - Green (charging complete)<br>- No lights/Blinking lights - Replace Charger<br>Turn product over. Turn the power switch on the remote and product to the ON position. Move the lever on the remote to the GO position and hold. Manually (use caution) spin the rear wheel forward. If the motor engages - replace the battery. |
| Short run time/runs slow | Rider's weight<br>Riding conditions<br>Battery not fully charged<br>Old/damaged battery | Do not exceed 143 lb (65 kg) maximum weight limit.<br>Use only on flat, dry surfaces. Avoid inclines and areas with heavy debris.<br>Charge product - refer to page 6 for charging information.<br>Replace battery.<br>Charge battery at least once a month when not in use. |
WARRANTY
The manufacturer warranties this product to be free of manufacturing defects for a period of 90 days from date of purchase. This Limited Warranty does not cover normal wear and tear, wheel, or any damage, failure or loss caused by improper assembly, maintenance, storage or use of the RipStik Electric.
This Limited Warranty will be void if the product is ever:
Pros & Cons
Pros
- Easy to ride and control
- Kicktail shape for easy maneuverability
- High-performance motor and lithium-ion battery
- Wireless remote control
- Eco-friendly mode of transportation
Cons
- Short run time of 40 minutes
- Not suitable for riders over 143 pounds
- Not suitable for rough terrain
- May take some time to get used to the remote control
Customer Reviews about Razor RipStik Electric Skateboard
Customers love the Razor RipStik Electric Skateboard for its easy ride and control, and the wireless remote control. The kicktail shape of the board makes it easy to maneuver, and the high-performance motor and lithium-ion battery provide a smooth and fast ride. The main complaints from customers are the short run time of 40 minutes
Faqs
Can I replace the battery on the Razor RipStik Electric Skateboard myself?
What should I do if the Razor RipStik Electric Skateboard has a short run time or runs slow?
How often should I charge the Razor RipStik Electric Skateboard if I’m not using it regularly?
What maintenance does the Razor RipStik Electric Skateboard require?
How do I clean the Razor RipStik Electric Skateboard?
How do I replace Razor RipStik Electric Skateboard remote batteries?
What should I do if Razor RipStik Electric Skateboard charger is not working?
Can I ride the Razor RipStik Electric Skateboard at night?
How do I know if Razor RipStik Electric Skateboard battery needs to be replaced?
What is the warranty period for the Razor RipStik Electric Skateboard?
Leave a Comment