Minn Kota Talon Tilt Bracket Johnson Outdoors User Manual
Content
Introduction
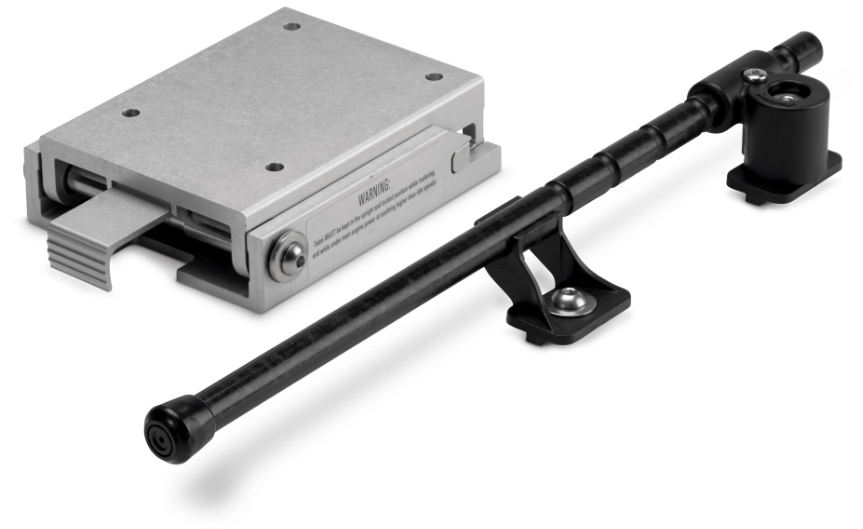
Your new Talon Tilt Bracket is designed to allow easy tilting when needed. These conditions include low hanging obstacles or backing in and out of low overhead clearances. The tilt feature may also be used to extend your Talon for easy cleaning purposes. Priced at approximately $100, it provides an effective solution for anglers seeking stability and convenience on the water.
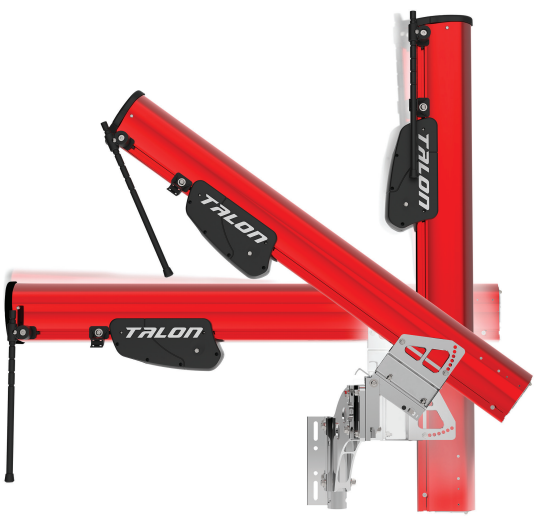
WARNING: TALON TILT BRACKET IS NOT DESIGNED TO BE USED IN THE TILTED (DOWN) POSITION WHILE TRAILERING, OR WHILE UNDER WAY ON THE WATER. ANY ATTEMPT TO USE THIS PRODUCT IN SUCH A FASHION COULD RESULT IN PROPERTY DAMAGE OR PERSONAL INJURY, AND WILL VOID THE WARRANTY. JOHNSON OUTDOORS WILL NOT BE HELD RESPONSIBLE FOR SUCH DAMAGE OR INJURY RESULTING FROM MISUSE OF THIS PRODUCT.
NOTE: TALON TILT BRACKET CAN ONLY BE INSTALLED WITH THE USE OF A TALON ADAPTER BRACKET (JACK-PLATE, OR SANDWICH STYLE) TO INSURE PROPER CLEARANCES FROM THE TOP CAP OF THE BOAT. DIRECT TRANSOM MOUNT APPLICATIONS WILL NOT HAVE PROPER CLEARANCE.
Detailed Specifications
The Minn Kota Talon Tilt Bracket features several key specifications that make it an invaluable addition to your boating gear:
- Compatibility: Designed to work with various Minn Kota Talon models.
- Material: Constructed from durable, marine-grade materials.
- Ergonomic Design: Allows for easy tilt adjustments and stowing of the Talon anchor.
- Installation: Easy to install with provided hardware and instructions.
- Adjustability: Offers multiple tilt positions for optimal stowage and deployment.
PARTS DIAGRAM
TALON TILT BRACKET FOR 8’, 10’ AND 12’ TALON MODELS
This page provides Minn Kota WEEE compliance disassembly instructions. For more information about where you should dispose of your waste equipment for recycling and recovery and/or your European Union member state requirements, please contact your dealer or distributor from which your product was purchased.
Tools required, but not limited to: flat head screw driver, Phillips screw driver, socket set, pliers, wire cutters.
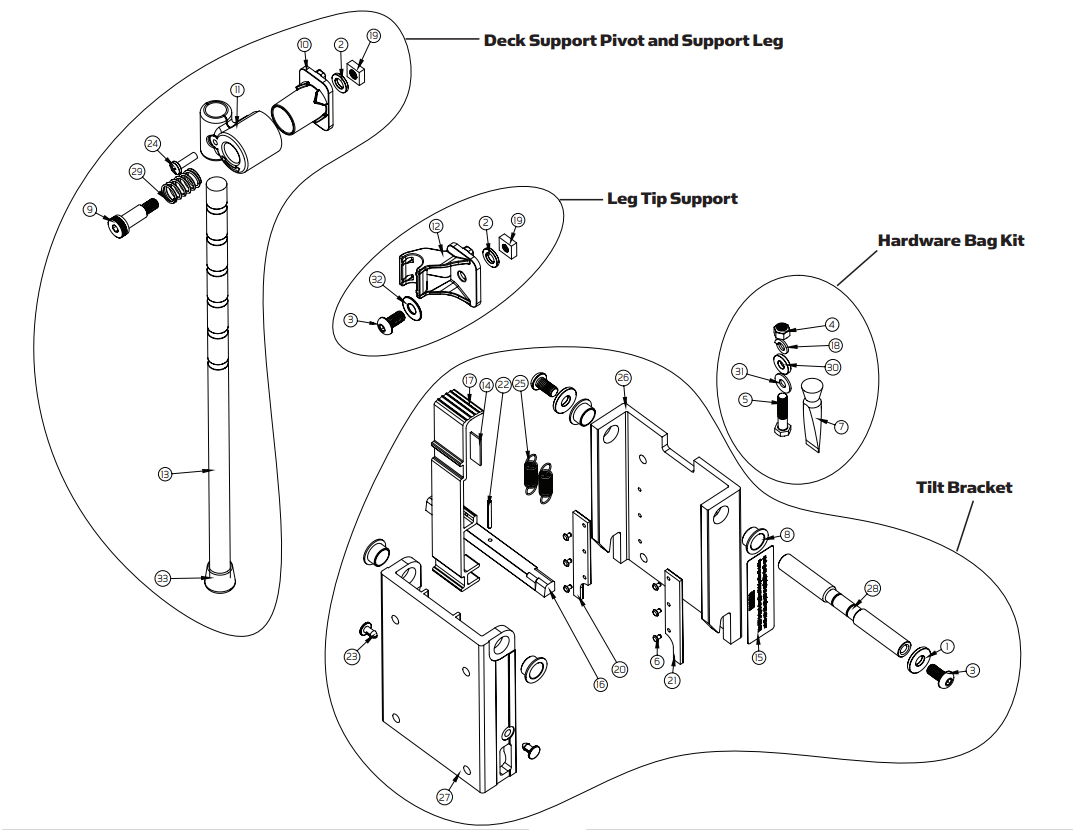
ITEM | QTY | PART NUMBER | DESCRIPTION |
1 | 2 | 2371759 | 3/8 HD FENDER WASHER, SS |
2 | 2 | 2371758 | 3/8 HD FLAT WASHER, SS |
3 | 3 | 2383443 | 3/8-16 X .75" BHCS, SS |
4 | 8 | 2223100 | NUT, 5/16-18 NYLOCK, SS |
5 | 8 | 2373521 | 5/16-18 X 1 1/2 HHCS |
6 | 6 | 2378601 | POP RIVET, 1/8", SS |
7 | 1 | 2378608 | ANTI SEIZE TUBE, 4CC |
8 | 4 | 2370007 | BEARING-SLEEVE,.625 X .375 |
9 | 1 | 2373531 | BOLT-SHOULDER, STABILIZER |
10 | 1 | 2372355 | CRUTCH, INNER PIVOT |
11 | 1 | 2372346 | CRUTCH, OUTER PIVOT MACHINED |
12 | 1 | 2372360 | CRUTCH, SUPPORT |
13 | 1 | 2992341 | CRUTCH, TILT BRACKET ASSEMBLY |
14 | 1 | 2375417 | INSULATOR, TILT BRACKET |
15 | 1 | 2375769 | LABEL, WARNING, TALON TILT BRACKET |
16 | 1 | 2372671 | LATCH PIN, WEDGED,TALON TILT BRACKET |
17 | 1 | 2377218 | LEVER, TILT MACHINED |
18 | 8 | 2371756 | LOCK WASHER, 5/16" - SS |
19 | 2 | 2373131 | NUT, SQUARE 3/8-16, SS |
20 | 1 | 2375119 | PAD-WEAR, TALON TILT BRKT LEFT |
21 | 1 | 2375114 | PAD-WEAR, TALON TILT BRKT RIGHT |
22 | 1 | 2372654 | PIN, SPRING - 1/8" X 1 1/4 SS |
23 | 2 | 2376730 | PLUG-SPACER,TALON TILT BRK |
24 | 1 | 2073408 | SCREW-1/4-20 X 7/8 PPH S/S |
25 | 2 | 2372744 | SPRING, LATCH, TILT BRACKET |
26 | 1 | 2371941 | TILT BASE, MACHINED |
27 | 1 | 2370237 | TILT COVER, MACHINED |
28 | 1 | 2372667 | TILT PIVOT PIN |
29 | 1 | 2372747 | SPRING, TALON STABILIZER |
30 | 8 | 2371746 | WASHER .75 X .3125, SS |
31 | 8 | 2261722 | WASHER-FLAT 5/16 S/S |
32 | 1 | 2091701 | WASHER, PROP |
33 | 1 | 2265100 | BUMPER |
n |
| 2770237 | TILT BRACKET ASSEMBLY W/ HARDWARE KIT |
n |
| 2994910 | HARDWARE KIT |
n |
| 2992345 | DECK SUPPORT PIVOT &LEG W/ LEG TIPSUPPORT |
Description
The Minn Kota Talon Tilt Bracket is engineered to provide a seamless and efficient way to manage your Talon shallow water anchor system. Its robust design ensures that it can withstand the rigors of frequent use and harsh outdoor conditions. The bracket's ergonomic construction allows users to easily adjust the tilt of their Talon anchor, facilitating quick stowage and deployment. This not only enhances convenience but also helps in maintaining the overall condition of your anchoring system.
With its compatibility across multiple Talon models, this bracket serves as a versatile accessory that can be integrated into various setups. Its marine-grade materials guarantee durability and resistance to corrosion, ensuring that the bracket remains functional over an extended period.
INSTALLATION
TOOLS REQUIRED FOR INSTALLATION
- 1 – ¼” Allen Wrench
- 1 – 7/32” Allen Wrench
- 1 – ½” Box End Wrench
- 1 – 9/16” Box End Wrench
- 1 – ½” Deep Well Socke
- 1 - #2 Phillips Screwdriver
MOUNTING THE TILT BRACKET
ATTENTION:
- BE SURE TO USE ANTI-SEIZE ON ALL HARDWARE DURING INSTALLATION
- DISCONNET POWER TO YOUR TALON PRIOR TO INSTALLATION
- If Talon is already mounted to your adapter bracket, you will need to disconnect power and remove the Talon with the quick release bracket from the adapter bracket before proceeding. DO NOT REUSE THE OLD HARDWARE.
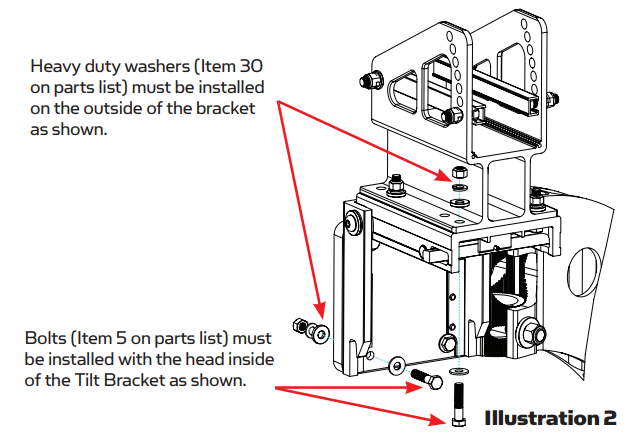
Tip: To remove Talon from the quick release bracket, loosen the 4 nylock nuts that hold the Talon in place, and slide the Talon up and out of the quick release bracket before unbolting the quick release bracket. Using the 5/16” hardware included, attach the Tilt Bracket with the latch lever facing inboard as shown in illustration 1 and 2.
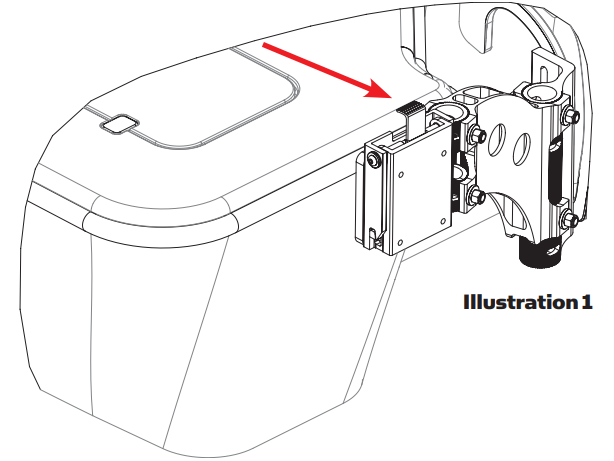
Using the new 5/16” hardware provided, reattach the Talon quick release bracket to the Tilt Bracket as shown. Verify that all mounting hardware is tightened and secure. Tip: Take note of the orientation of the mounting hardware. The heads of the bolts must be installed to the inside of the Tilt Bracket. The heavy-duty washers provided must be used on the outside of the tilt bracket as shown in Illustration 2.
- Reinstall Talon into the quick release bracket and tighten all hardware.

ADJUSTABLE DECK SUPPORT INSTALLATION
- Remove the top cover from the Talon using a #2 Phillips screw driver as seen in Illustration 3 above. There are a total of 4 screws holding the cover in place.
- Install the leg tip support on the port (left) side of the Talon by loosening the square nut until it is flush with the end of the screw. Slide the support into the channel making sure the washer is on the outside of Talon and the square nut is on the inside of the slot. Position the leg tip support against the top edge of the motor cover for now. The final position of this support will be determined later.
NOTE: The adjustable deck support can only be mounted on the port (left) side of Talon as in Illustration 4 above. - Install the deck support pivot by loosening the square nut until it is flush with the end of the shoulder bolt threads. Slide the support into the side channel of Talon making sure the washer is on the outside of Talon and the square nut is on the inside of the slot. The installed deck support pivot will already have the support leg installed and should look similar to Illustration 5 above when installed. Do not completely tighten any of the fasteners at this step.
- Now reinstall the Talon cover that was removed in step 1. Tighten all four screws securely.
Loosen the support leg locking screw until the support leg moves freely as shown in Illustration 6 below.

In the next few steps we will be adjusting the position and length of the support leg. In order to determine the best position for the support leg release the Talon Tilt Bracket by pressing on the release lever as pointed out in Illustration 7 to the right.

Pull out on the deck support pivot first and then rotate 90 degrees as seen in Illustration 8 to the right. The pivot will lock into its “in use” position.

- Pivot Talon down and:
- Position the support leg pivot along the length of Talon in the best location for your boat (see dimension “a” on illustration below). Tighten the support leg pivot into place using the ¼” Allen wrench.
Adjust the leg length to one of the machined slot locations that work best and retighten the locking screw that was loosened in step 5 (see dimension “b” on Illustration 9 below).
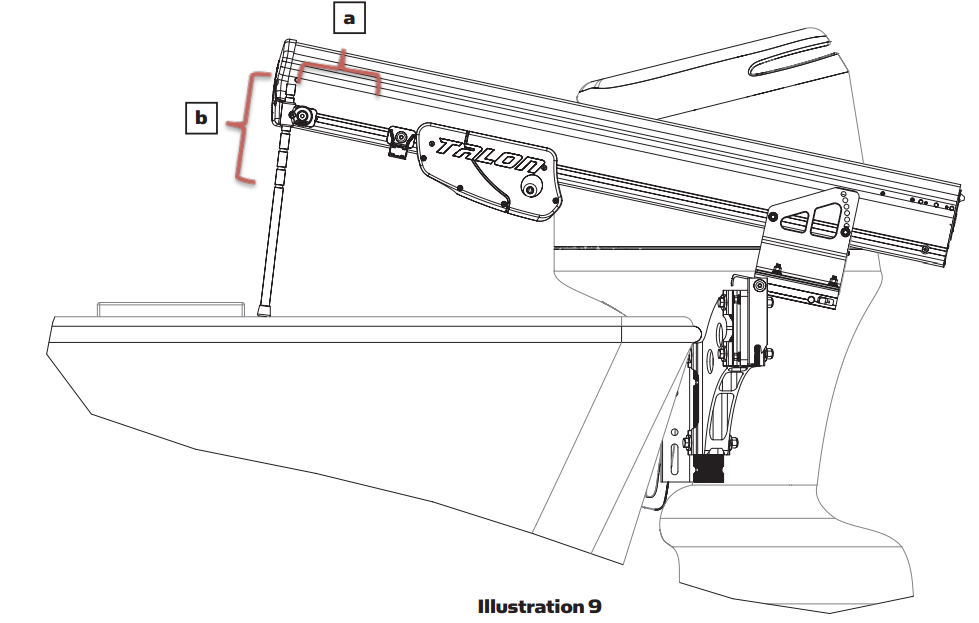
- Adjust the leg tip support position according to your adjusted leg support length, so that the end of the leg will rest in the cradle. Tighten the leg tip support using a 7/32” Allen wrench.
- Tilt the Talon up to normal operating position and verify that the tilt bracket locks.
- Next, pull out and pivot the deck support back to its stowed position into the leg tip support.
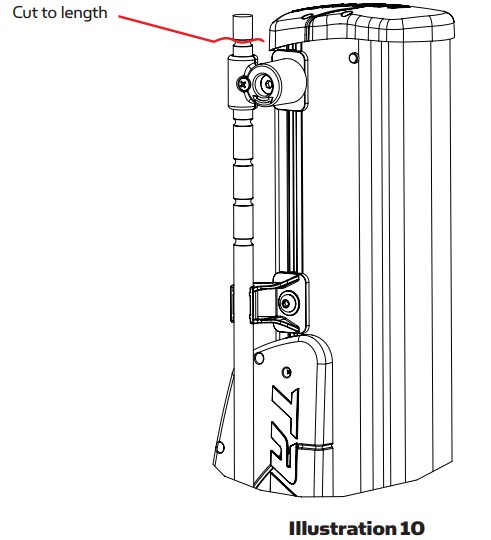
After final adjustments to the length of the support leg, any extra length can be cut off just above the deck support pivot (as seen in Illustration 10) using a standard hand saw.
Setup Guide
- To set up the Minn Kota Talon Tilt Bracket, follow these steps:
- Prepare the Installation Area: Ensure that the mounting area on your boat is clear and free from any obstructions.
- Align the Bracket: Position the bracket according to the provided instructions, ensuring proper alignment with your Talon anchor system.
- Secure the Bracket: Use the included hardware to securely fasten the bracket to your boat's mounting points.
- Adjust and Test: Adjust the tilt settings as needed and test the functionality of your Talon anchor system.
- Refer to the detailed instructions provided with the product for specific mounting requirements and any additional steps needed for your particular setup.
RECOMMENDED ACCESSORIES
TALON FOOTSWITCH
This simple wireless switch lets you easily raise and lower the spike. Control up to two Talons – independently or simultaneously – from the waterproof switch, which uses an LED display and features an easy-access battery compartment.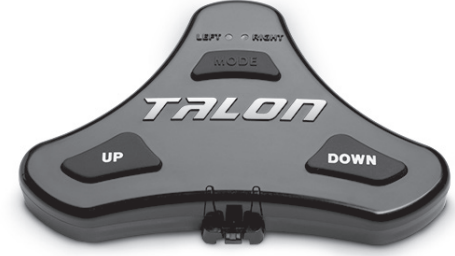
QUICK DISCONNECT PLUG (1810244)
The Talon Quick Disconnect Plug works well with the Quick Release Handles accessory for those who want to be able to easily remove and replace Talon for storage or security.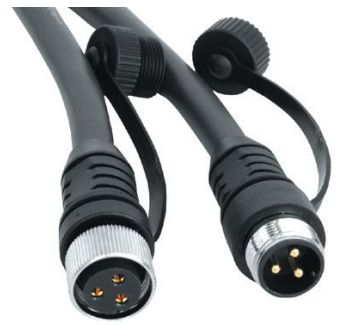
QUICK RELEASE HANDLE KIT
Easily remove Talon from your boat when not in use for safe storage with these stainless steel handles. It lets you vertically adjust or remove Talon without any tools.
TALON COVER
While trailering, protect your Talon with this durable, UV-resistant black vinyl cover. Features an all-weather, corrosion-resistant zipper and is designed for use with the Talon Tilt Bracket accessory.
SECURITY LOCK KIT/ADAPTER BRACKET LOCK
These custom stainless steel locks protect Talon from theft or tampering, and can only be opened with the included unique cut key. Adapter brackets mounted to the jack plate require the use of both sets of accessory locks.
Troubleshooting
Common issues and solutions for the Minn Kota Talon Tilt Bracket include:
- Loose Bracket: Check and tighten all mounting screws if the bracket feels unstable or loose.
- Difficult Tilting: Ensure that all moving parts are free from debris and apply a marine-grade lubricant if necessary.
- Corrosion: Regularly inspect for signs of corrosion and apply a protective coating to prevent further damage.
Always refer to the user manual for detailed troubleshooting instructions and follow safety guidelines to avoid any potential hazards.
For a complete listing of Talon accessories, visit https://www.minnkotamotors.com
FIVE YEAR WARRANTY
WARRANTY ON MINN KOTA TALON TILT BRACKET3
Johnson Outdoors Marine Electronics, Inc. warrants to the original purchaser that the purchaser’s entire Talon Tilt Bracket is free from defects in materials and workmanship appearing within five (5) years after the date of purchase. Johnson Outdoors Marine Electronics, Inc. will (at its option) either repair or replace free of charge, any parts found to be defective during the term of this warranty
Pros & Cons
Pros
- Durable Construction: Built from high-quality, marine-grade materials.
- Ease of Use: Simple tilt adjustments make stowing and deploying the Talon anchor system effortless.
- Universal Compatibility: Works with multiple Minn Kota Talon models.
- Easy Installation: Comes with clear instructions and necessary hardware.
Cons
- Cost: May be considered expensive by some users, although it offers long-term benefits.
- Space Requirements: Requires specific mounting space on your boat which might be limited in some cases.
- Maintenance Needs: Periodic checks and maintenance are necessary to ensure optimal performance.
Customer Reviews
The Minn Kota Talon Tilt Bracket has received positive reviews from customers who appreciate its ease of use and durability. Many users have noted that it significantly enhances the functionality of their Talon anchor system, making it easier to stow and deploy. Some common complaints include the initial cost and the need for periodic maintenance to prevent corrosion.
Faqs
What is the primary function of the Minn Kota Talon Tilt?
Is the Minn Kota Bracket compatible with all Talon models?
How do I install the Minn Kota Talon Tilt Bracket?
What materials are used in constructing the Tilt Bracket?
Why does my Minn Kota feel loose after installation?
How often should I maintain my Minn Kota Talon?
Is the Minn Kota Talon Tilt expensive?
Can I use the Minn Kota Bracket in saltwater environments?
What are some common issues with the Minn Kota Talon Tilt Bracket?
Where can I purchase the Minn Kota?
Leave a Comment
