How to Assemble: Mopio Hannah Shoe Cabinet MM9904 User Guide
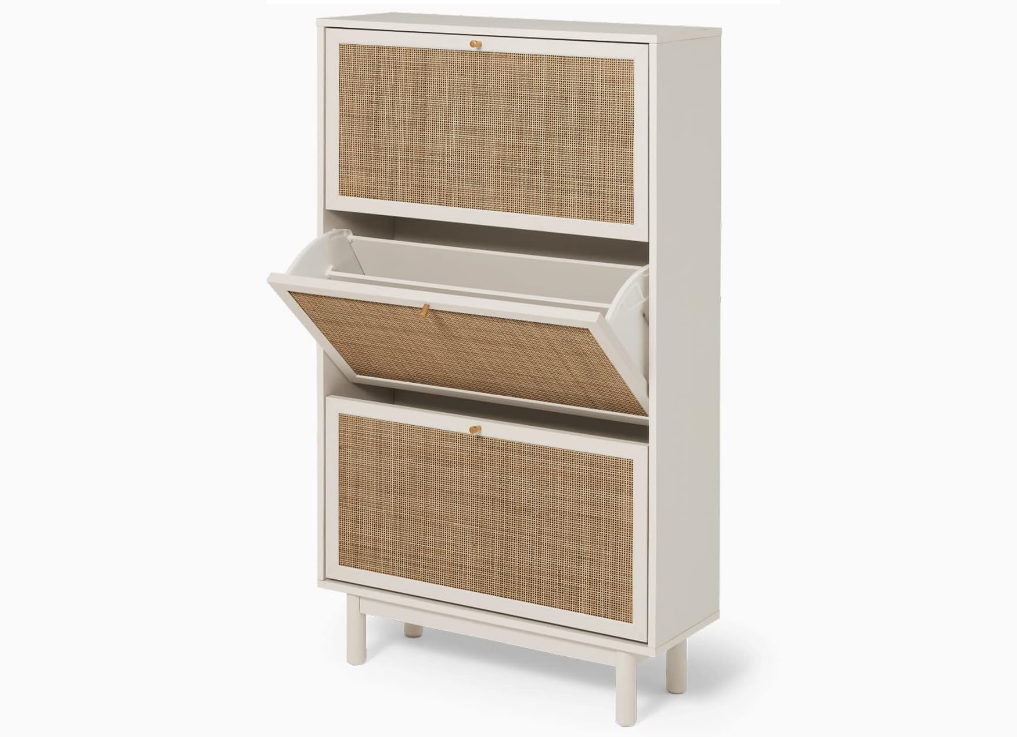
Content
Introduction of Mopio Hannah Shoe Cabinet MM9904
The Mopio Hannah Shoe Cabinet MM9904 is an elegant and functional storage solution designed to keep your footwear organized and easily accessible. With a sleek, modern design, it features multiple shelves that can accommodate various shoe sizes, making it perfect for any entryway or closet. The cabinet is constructed from durable materials, ensuring longevity while maintaining a stylish appearance. Priced at approximately $149.99, it combines practicality with aesthetic appeal for shoe lovers.
Specifications
- Dimensions: 30 inches wide x 12 inches deep x 60 inches tall
- Material: High-quality engineered wood and metal frame
- Number of Tiers: 5 adjustable shelves
- Door Type: Smooth sliding doors with soft-close mechanism
- Capacity: Can store up to 20 pairs of shoes depending on size
- Color: Available in White, Black, and Walnut finishes
- Assembly Required: Yes, comes with comprehensive assembly instructions
Before you start
Ensure you have received all cartons and familiarize yourself with the workload. Make sure there are enough helping hands to assist you, and that you have allocated the time required to assemble your new product.

Make sure you have cleared enough space in your home for the assembly. We recommend protecting your floor with a mat or cardboard to avoid scratches during the assembly process.

- Read instructions carefully and check no parts are missing.
Lay out all hardware on a soft surface so you can easily identify them.

Carefully identify all components in order to differentiate which pieces are left and right.

Install your new product carefully following the instructions. Don’t skip ahead!

DO NOT over-tighten screws or use a drill. It will damage the product.
If you need further assistance with assembling your Mopio product, please chat with us at www.mopio.com#chat.

Parts
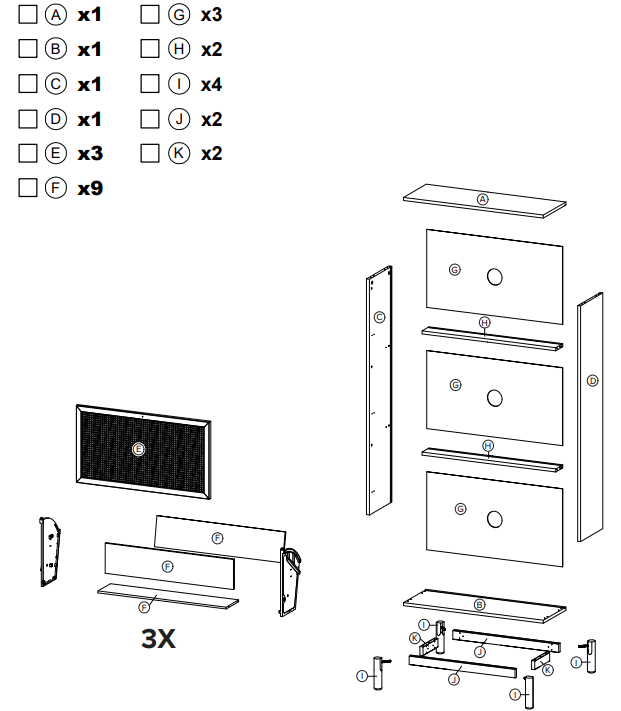
Hardware
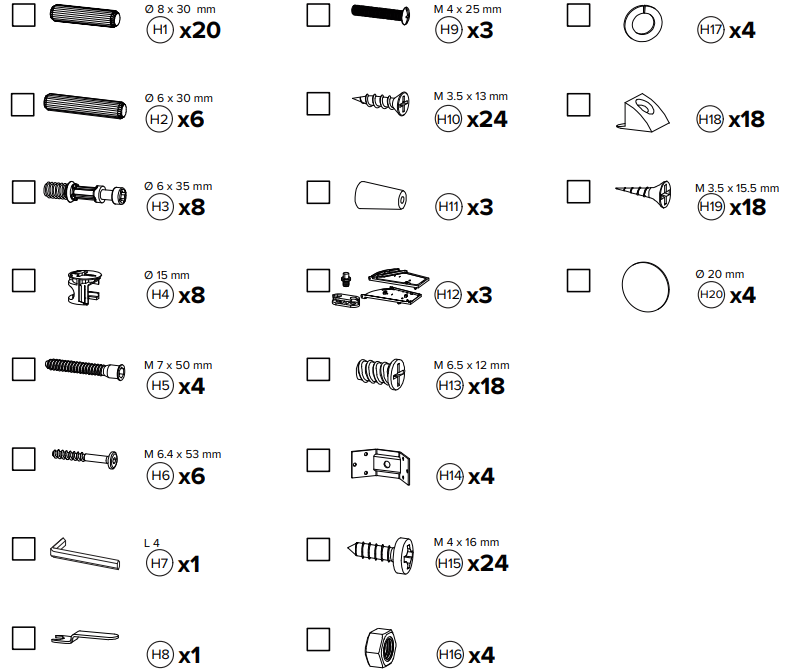
There are inner box(es) that include components required to complete this assembly.
Please do not completely tighten all the hardware, until each assembly step is complete.
Before discarding the packaging, please use the checklist to ensure that you have all the parts required to assemble your product. Please kindly note you will need the original package if you want to return the product later.
If parts are missing or damaged, we will gladly ship your replacement parts free of charge.

Assembly Instructions
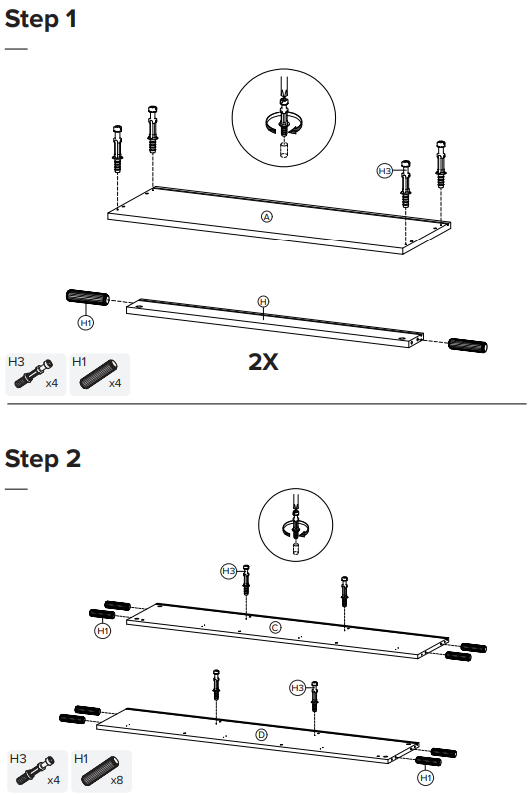
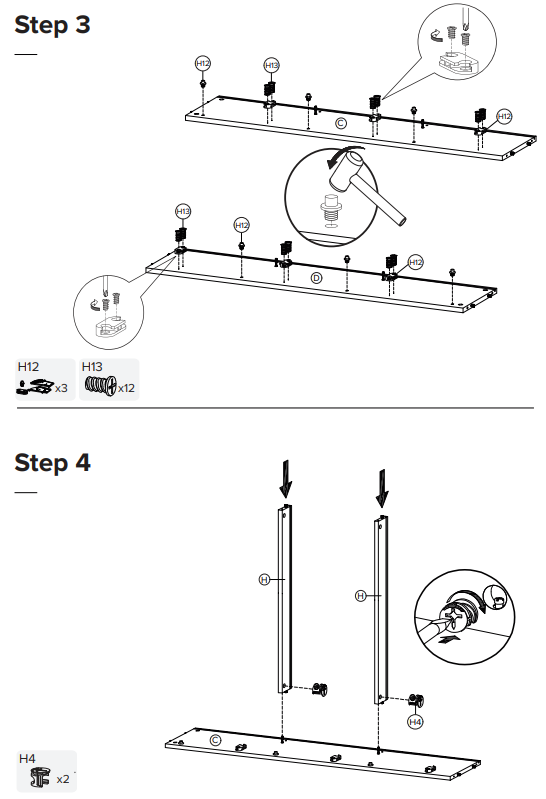
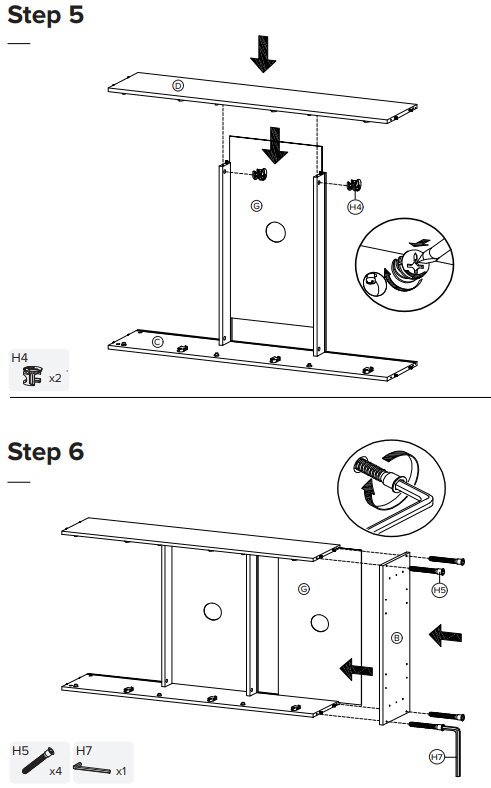
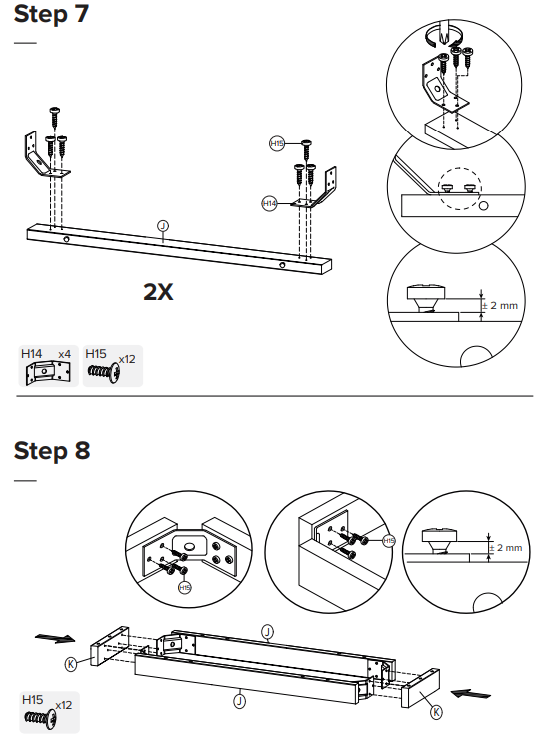
Step 7: Do not fully tighten the screw (leave about 2mm), you will tighten it on Step 11. Please refer to the illustration carefully for the bracket placement orientation.
Step 8: Do not fully tighten the screw (leave about 2mm), you will tighten it on Step 11. Please refer to the illustration carefully for the bracket placement orientation.
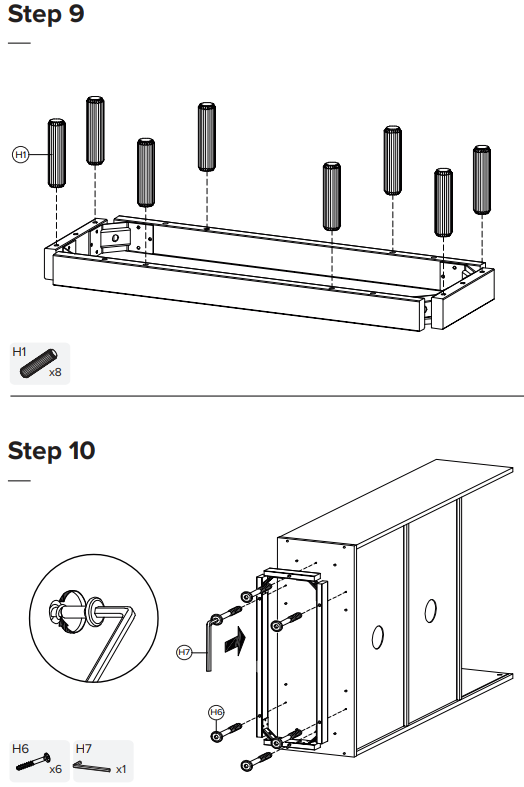
Step 11: Tighten all the screws on the leg frame as indicated in Illustration 1 and Illustration 2.
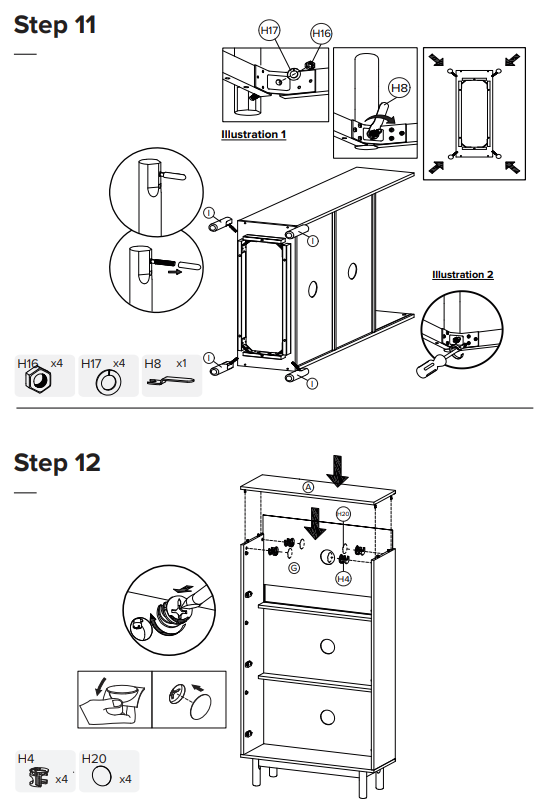
Step 13: Ensure to allocate the screw position correctly according to the illustration.
Step 14: Ensure to allocate the screw position correctly according to the illustration.
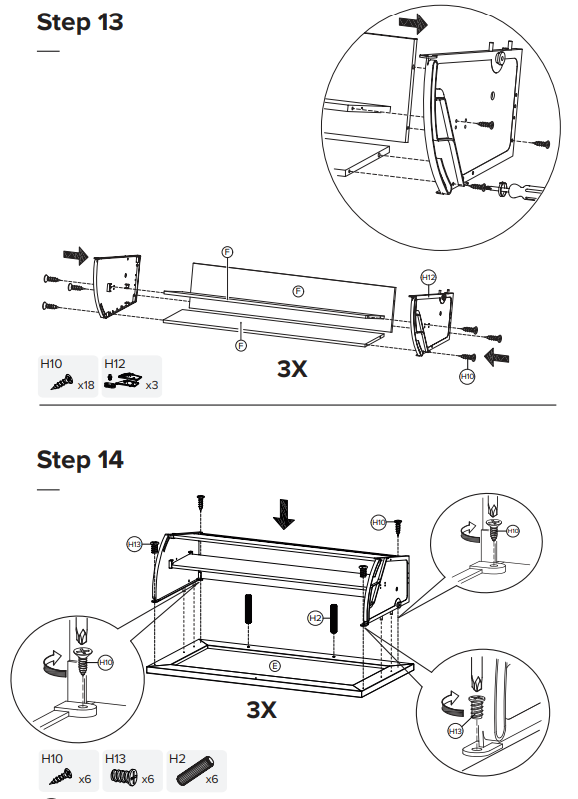
Step 16
Illustration 1:
Slot in the bottom pin as indicated.
Illustration 2:
Slide in the pin until it goes inside the rail.
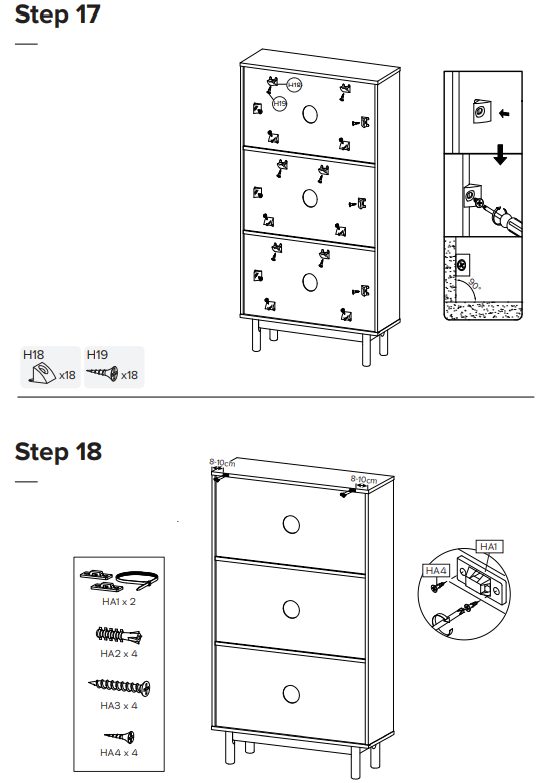
Step 17
Step 18
For safety reasons:
This product only can be used when an anti-tipping kit on this step is installed. Please do not skip steps 18 and 19.
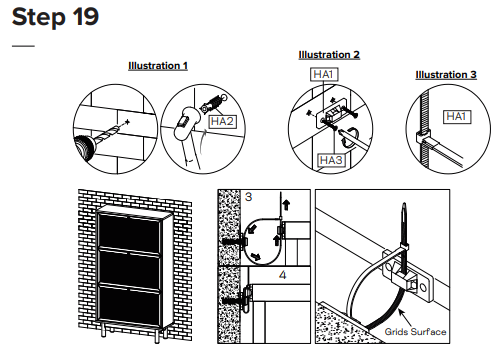
Step 19
Illustration 1:
Mark the position of the anti-tipping kit on the wall, drill and insert the wall anchor.
Illustration 2:
Screw the anti-tipping kit on the wall.
Illustration 3:
Strap together installed anti-tipping (HA1) on the wall and on the product Ensure that it is tight enough to prevent tipping.
Anti-tip Kit
- To prevent injury or property damage from the unexpected tipping of furniture, we highly recommend installing the anti-tip kit.
- Periodically check the screws. In case of loosening, change the screw position.
- With extra help, move the product into position. Please do not drag the product across your floor.
- Reposition the product and fix using the hardware recommended.
Please seek professional advice if unsure of wall constructions.
- Properly affixing furniture to your wall will depend on the wall material: concrete, drywall, masonry, or wood will require the appropriate hardware.
The wall anchor and wall screw provided are suitable for concrete walls only.
please source the right wall anchor and wall screw according to the wall type. Please consult with your local hardware store to ensure you are using the correct hardware for your wall type.
- This anti-tip kit is not a substitute for proper adult supervision.
- This anti-tip kit may provide protection against tipping furniture.
Tips:
- Teach and do not allow children to climb on furniture or drawers.
- Always keep the heavy load at the bottom of the drawer.
- Do not put toys or objects on the top that can attract children to climb.
- By installing an anti-tip kit, you acknowledge that you are fully aware of the safety requirement and agree to adhere to it. Illustrations in this guide are for reference only and may be slightly different from the actual object.
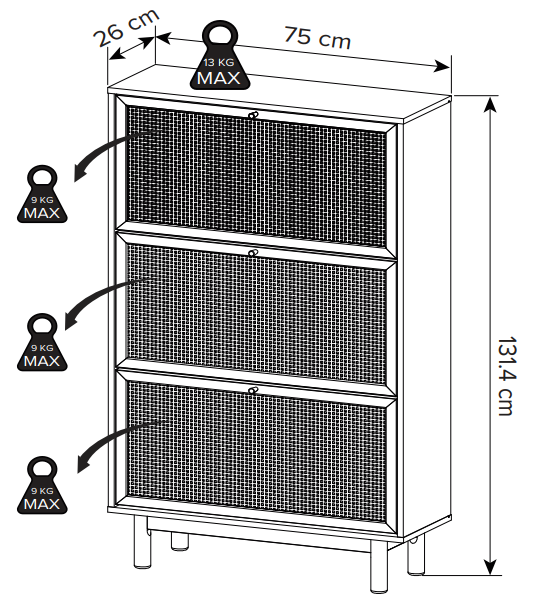
Hannah Shoe Cabinet MM9904 Weight Limit
Periodically check the screws. In case of loosening, change the screw position.

Do not overload or place heavy loads.

6Months
- A safety strap/bracket is included with this item. Please ensure the strap/bracket is attached to the product and the wall to ensure it remains stable at all times during use.
- The unit must only be used on a level floor.
Finished!
We’re almost there! Please perform the following checks to ensure assembly is properly done.
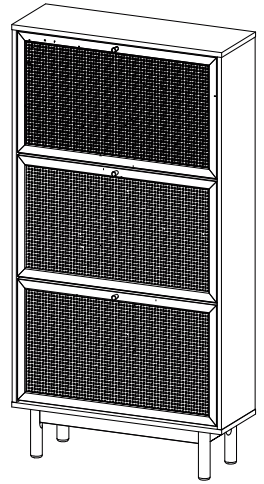
Ensure all legs frames are fully tightened, please refer to Step 11.
Move your Mopio product carefully, with 2 people lifting it to the preferred location. Clean the product with a dry cloth. You are all set!
Enjoy your fresh and updated living space thanks to the addition of your new Mopio product!
Care Instructions
Your furniture, if treated with respect and love, will last you a long time. Each piece requires light maintenance to maximize its longevity.
Few quick tips before using this product:
- For the recommended weight limit.
- Avoid uneven weight distribution for long time as it may cause damage to the product shape.
- Check and tighten the camlock and screw periodically as it may lose over time.
How to take care of it?
- Avoid direct sunlight or use curtains or blinds to limit sun exposure to the product.
- Clean the product regularly with a dry, soft cloth.
- Avoid using an abrasive or liquid cleanser.
- We recommend always attaching the provided floor protector to the leg ends to protect your floor
- Avoid placing hot objects on the tabletop surface.
- Spillage may damage the surface. Clean immediately with a dry cloth.
- We recommend using placemats or coasters underneath glasses, cups, bowls, or plates to prevent scratches to the table surface.
Follow the care instructions and look after your furniture, in return, your furniture will look after you.
We hope to see you soon!
Setup Guide
To assemble the mopio Hannah Shoe Cabinet MM9904, follow these steps:
- Unpack all the components and hardware carefully.
- Follow the instructions provided to assemble the frame and attach the shelves.
- Install the sliding doors and ensure they are aligned properly.
- Adjust the shelves according to your needs.
- Place the cabinet in your desired location and load it with your shoes.
The assembly process is relatively straightforward and can be completed within a few hours with basic tools.
Troubleshooting
If you encounter any issues during assembly or use, here are some common problems and solutions:
- Doors not sliding smoothly: Check if the doors are properly aligned and if there is any obstruction. Ensure all screws and bolts are tightened securely.
- Shelves not adjusting: Make sure the shelf pins are inserted correctly into the pre-drilled holes. If still problematic, refer to the user manual for detailed instructions.
- Cabinet unstable: Ensure all legs are on a level surface and adjust them if necessary. Check that all parts are securely assembled.
Always refer to the user manual for detailed troubleshooting guides and safety instructions.
Pros & Cons
Pros
- High-Quality Construction: Made from durable engineered wood and metal frame.
- Adjustable Shelves: Customizable to fit various shoe sizes.
- Sleek Design: Modern and elegant, fits well with any home decor.
- Smooth Sliding Doors: Equipped with soft-close mechanism for quiet operation.
- Affordable Price: Priced competitively compared to similar products on the market.
Cons
- Assembly Required: Requires time and effort to assemble.
- Space Limitation: May not fit in very narrow hallways or entryways due to its width.
- Weight Capacity: While sturdy, it has a limited weight capacity per shelf.
Customer Reviews
Customers have generally praised the mopio Hannah Shoe Cabinet MM9904 for its stylish design and robust construction. Many have appreciated the adjustable shelves and smooth sliding doors. However, some users have noted that assembly can be time-consuming and requires patience.
A common complaint is that the instructions could be clearer, but overall, the product has received positive feedback for its functionality and aesthetic appeal.
Warranty & Return
1-YEAR-LIMITED WARRANTY STATEMENT FOR MANUFACTURING DEFECTS
Your new product comes with a 1-year warranty against manufacturing defects, upon activation. The warranty starts on the date of receipt. No warranty will be honored without proof of purchase. The warranty and financial responsibility of the manufacturer only applies to the products itself.
MOPIO’S 30-DAY RETURN POLICY
We believe you will be thrilled with your purchase from Mopio. That’s because we go out of our way to ensure that products are designed and built to be just what you need. We understand, however, that sometimes a product may not be what you expected it to be. In that event, we invite you to review the following terms related to returning a product.
The Return
Returns are to be made within 30 days of the date you received the product. To initiate a return request, please message us or contact our customer service team at https://www.mopio.com#chat with your reason for returning so we can facilitate the request and issue return authorization to you. Please note the policy is subject to the conditions below:
We will not be able to offer a standard return policy after the 30-day timeframe has passed. However, our customer service team is always an email away if you require further assistance with your Mopio products.
Join Mopio Club and enjoy your 1-Year Warranty We’ve got more for you.
- Privileged Customer Care
- 10% Off Your Next Purchase (no min spend)
- 1-Year Free Warranty
- Early Access To Upcoming Launches
Faqs
What are the dimensions of the mopio Hannah Shoe Cabinet MM9904?
How many pairs of shoes can it store?
What should I do if my product received is incomplete?
What should I do if my shipment is damaged or products received are defective?
Does it come in different colors?
How do I adjust the shelves?
Why are my sliding doors not closing smoothly?
Can I use this cabinet for other storage purposes besides shoes?
Is the cabinet stable and durable?
What is the estimated price of this shoe cabinet?
Leave a Comment
