Features: Nautilus Elliptical Trainer Machine E616 User Guide
Content
Introduction
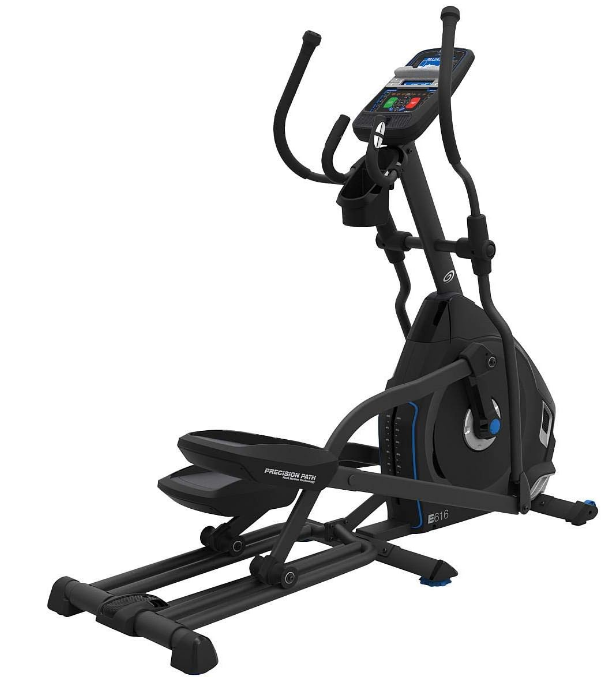
The Nautilus Elliptical Trainer Machine E616 is a high-quality fitness equipment designed to provide an effective cardiovascular workout in the comfort of your home. With a robust 14,000 BTU capacity and a sleek design, it features 29 workout programs and 25 resistance levels, catering to users of all fitness levels. The motorized incline allows for varied workouts, enhancing calorie burn and muscle engagement. This versatile machine is priced at approximately $799, making it an excellent value for fitness enthusiasts.
Specifications
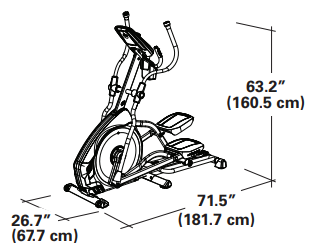
- Maximum User Weight: 300 lbs. (136 kg)
- Maximum Pedal Height - with full incline: 24” ( 61 cm)
- Machine Weight: 173.3 lbs. (78.6 kg)
- Power Requirements:
- Operational Voltage: 120V AC
- Operating Current: 2 A
This product, its packaging, and components contain chemicals known to the State of California to cause cancer, birth defects, or reproductive harm. This Notice is provided in accordance with California’s Proposi-tion 65. If you would like additional information, please refer to our website at www.nautilus.com/prop65.
Before Assembly
Select the area where you are going to set up and operate your machine. For safe operation, the location must be on a hard, level surface. Allow a workout area of a minimum 76” x 120” (193 cm x 305 cm). Be sure that the workout space you are utilizing has adequate height clearance, taking into consideration the height of the user and the maximum incline of the elliptical machine.
Basic Assembly Tips
Follow these basic points when you assemble your machine:
- Read and understand the “Important Safety Instructions” before assembly.
- Collect all the pieces necessary for each assembly step.
- Using the recommended wrenches, turn the bolts and nuts to the right (clockwise) to tighten, and the left (counterclock-wise) to loosen, unless instructed otherwise.
- When attaching 2 pieces, lightly lift and look through the bolt holes to help insert the bolt through the holes.
- The assembly can require 2 people.
Nautilus Elliptical Trainer Machine E616 PARTS
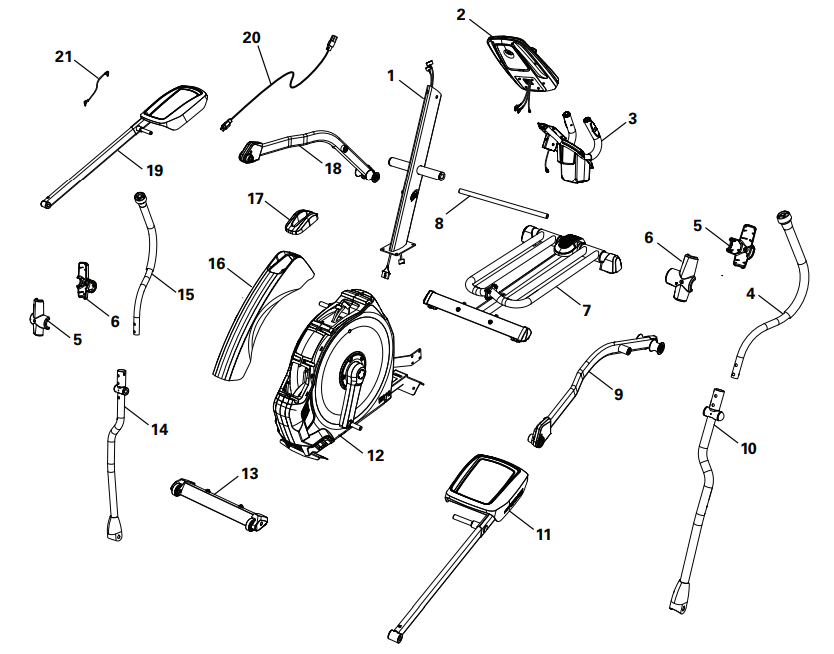
A decal has been applied to all right (“ R ”) and left (“ L ”) parts to assist with assembly.

HARDWARE
Note: Select pieces of Hardware have been provided as spares on the Hardware Card. Be aware that there may be remaining Hardware after the proper assembly of your machine.
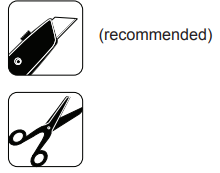
Tools
Included
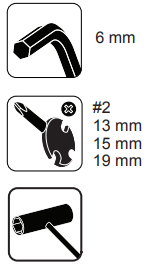
Not Included
ASSEMBLY
Attach Front Stabilizer to Frame
Note: Hardware (*) is pre-installed and not on the Hardware Card.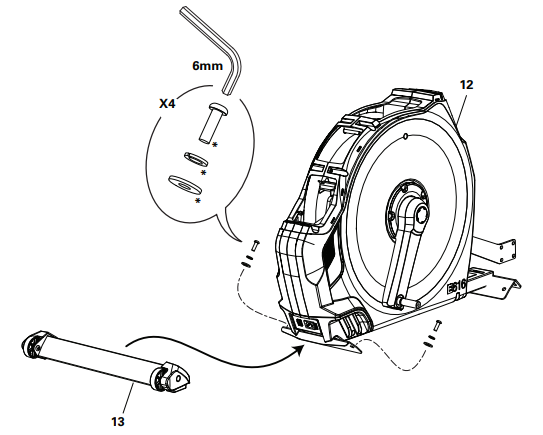
Attach Rail Assembly to Frame Assembly
Note: Hardware (*) is pre-installed and not on the Hardware Card.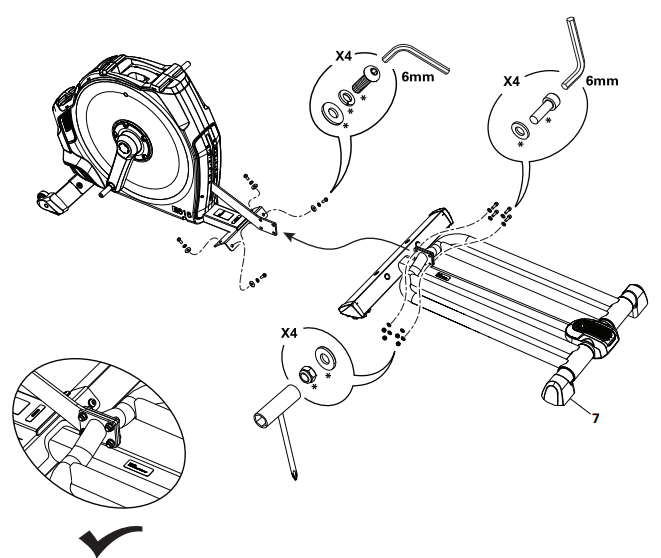
Connect the Cables and Attach the Console Mast to Frame Assembly
NOTICE: Do not crimp cables.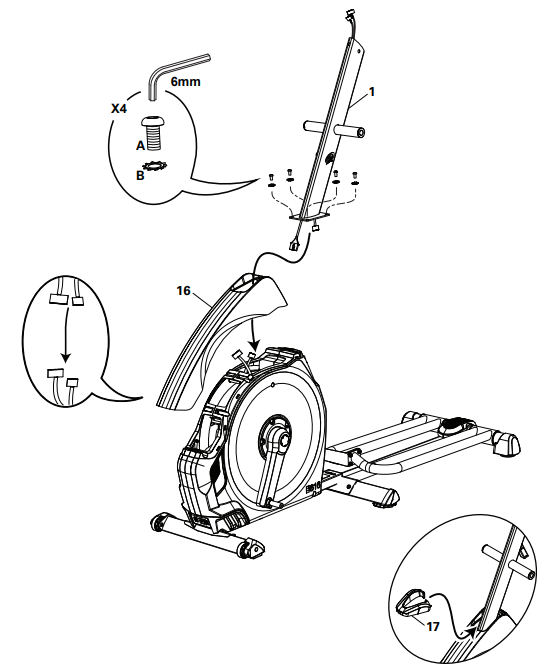
Attach Legs to Frame Assembly
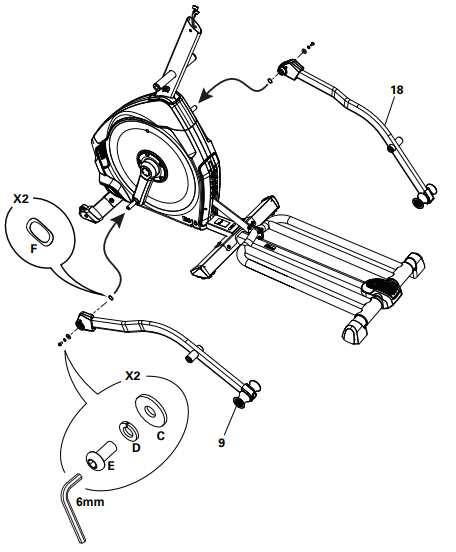
Attach Arm Pivot Rod and Lower Handlebar Arms to Frame Assembly
Note: Be sure to put Wave Washers (F) on Arm Pivot Rod before attaching the Lower Handlebar Arms.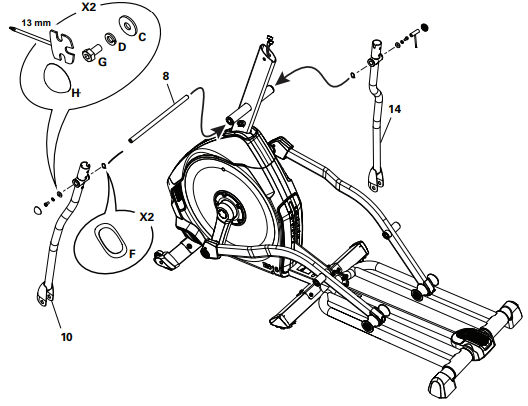
Attach Left Pedal to Frame Assembly
NOTICE: Attach the Pedal to the Leg first. Make sure the Pivot Sleeve (I) engages the Handlebar knuckle cover. Repeat step on opposite side with the Right Pedal (Item 19).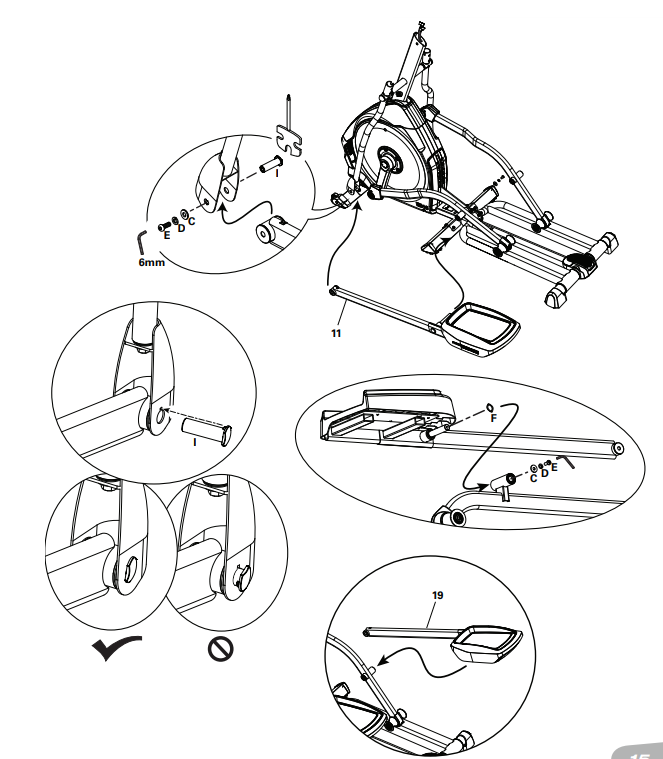
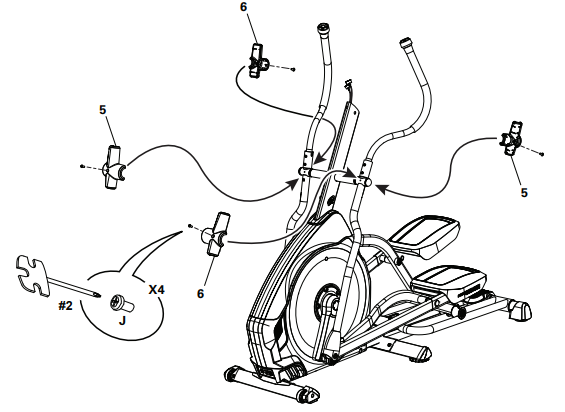
Attach and Adjust the Upper Handlebar Arms to Frame Assembly
Note: Hardware (*) is pre-installed and not on the Hardware Card.
WARNING: Make sure the Upper Handlebar Arms are secure before you exercise.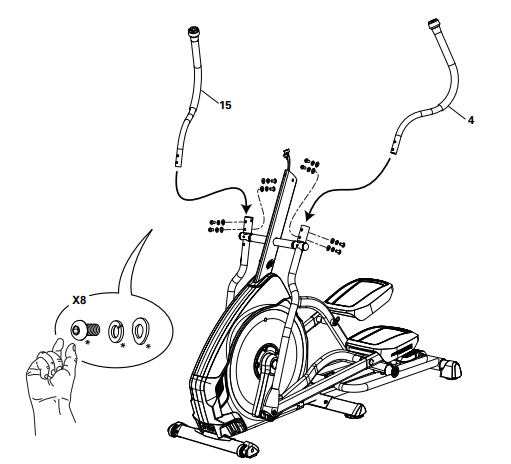
Attach Handlebar Shrouds to Frame Assembly
Remove Hardware from Console
Note: Hardware (*) is pre-installed and not on the Hardware Card. If desired, apply the French Cana-dian overlay to the Console face.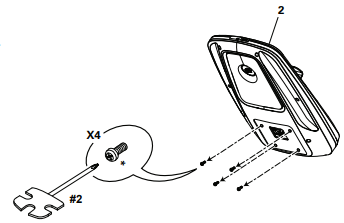
Route Cables through the Static Handlebar Assembly and Attach to Console
Note: Do not crimp the Cables. Connect the Heart Rate Cables from the Console and the Static Handlebar.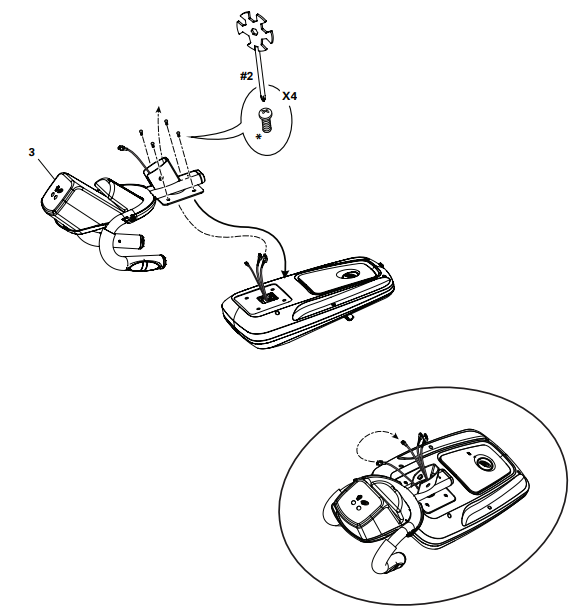
Connect the Cables and Attach the Console / Static Handlebar Assembly
Note: Do not crimp the Cables. Hardware (*) is pre-installed and not on the Hardware Card.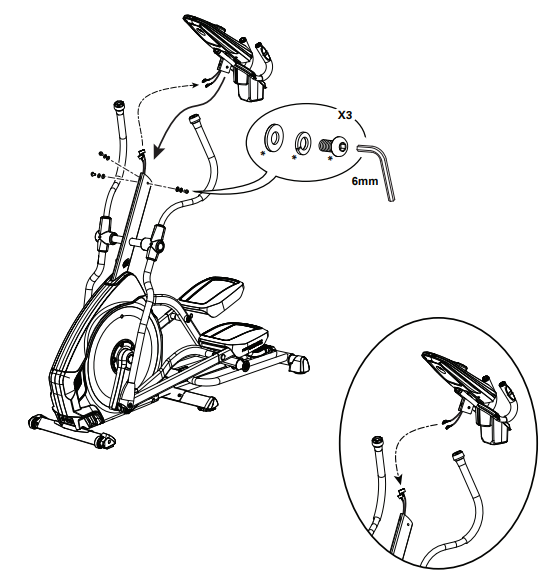
Connect the Power Cord to Frame Assembly
WARNING: Connect this machine to a properly grounded outlet only (see Grounding Instructions).
Note: When ready to operate the machine, be sure to turn on the power with the Power Switch.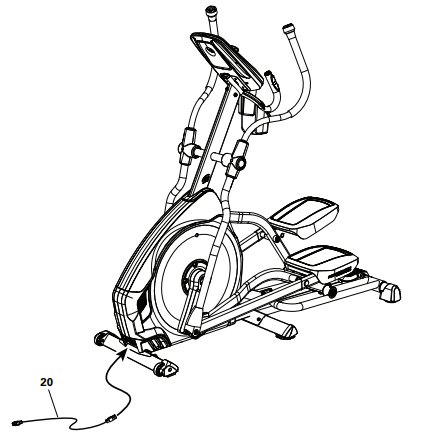
Final Inspection
Inspect your machine to ensure that all fasteners are tight and components are properly assembled.
Note: Remove any protective covers from the face of the Console. Remove the plastic scratch guard strips from Rails. Apply silicone lubricant to a cloth and wipe the Rails to eliminate roller noise.
WARNING: Silicone lubricant is not intended for human consumption. Keep out of reach of children. Store in a safe place.
Be sure to record the serial number in the fi eld provided at the front of this manual.
WARNING: Do not use until the machine has been fully assembled and inspected for correct performance in accordance with the Owner’s Manual.
BEFORE YOU START
Moving the Machine
The machine may be moved by one or more persons depending on their physical abilities and capacities. Make sure that you and others are all physically fit and able to move the machine safely.
- Remove the power cord.
- Use the Transport Handle to carefully lift the machine onto the transport rollers.
- Push the machine into position.
Carefully lower the machine into position.
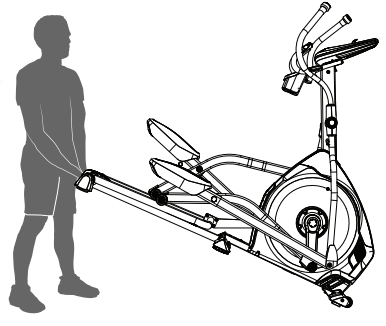
NOTICE: Be careful when you move the elliptical. Abrupt motions can affect the computer operation.
Leveling the Machine
The machine needs to be leveled if your workout area is uneven or if the Rail Assembly is slightly off the floor. To adjust:
- Place the machine in your workout area.
- Safely stand on the back of the Rail Assembly for approximately 20 seconds.
- Step off the machine.
- Loosen the locking nuts and adjust the levelers until they all contact the floor.
Do not adjust the levelers to such a height that they detach or unscrew from the machine. Injury to you or damage to the machine can occur. Adjust until the machine is level. Tighten the locking nuts.
Make sure the machine is level and stable before you exercise.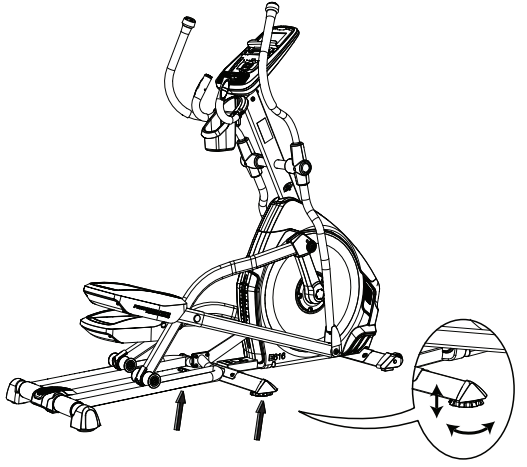
FEATURES

WARNING: Use the values calculated or measured by the machine’s computer for reference purposes only. The heart rate displayed is an approximation and should be used for reference only. Over exercising may result in serious injury or death. If you feel faint stop exercising immediately.
Console Features
The Console provides important information about your workout and lets you control the resistance levels while you exercise. The Console features the Nautilus Dual Track™ display with touch control buttons to navigate you through the exercise programs.
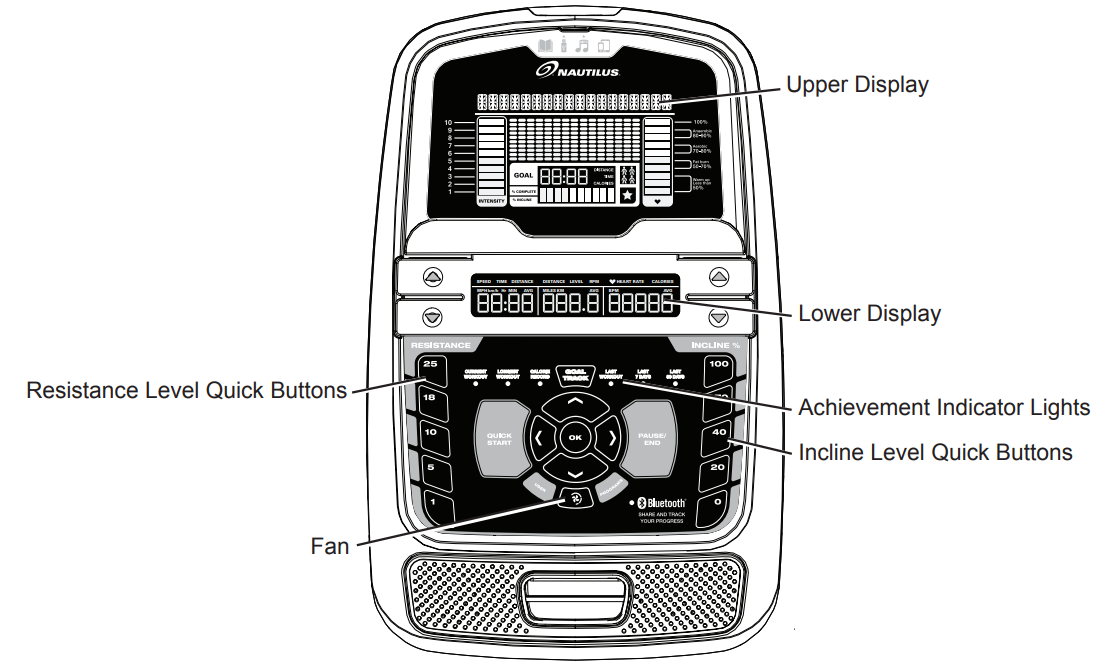
Keypad Functions
- Resistance Increase (▲) button- Increases the workout resistance level
- Resistance Decrease (▼) button- Decreases the workout resistance level
- Incline Increase (▲) button- Increases the Incline angle of the Rail Assembly
- Incline Decrease (▼) button- Decreases the Incline angle of the Rail Assembly
- QUICK START button- Begins a Quick Start workout
- USER button- Selects a User profile
- PROGRAMS button- Selects a category and workout program
- PAUSE / END button- Pauses an active workout, ends a paused workout, or goes back to the previous screen GOAL TRACK button- Displays the Workout Totals and Achievements for the selected User Profile
- Increase (▲) button- Increases a value (age, time, distance, or calories) or moves through options
- Left (◀ ) button- Displays different workout values during a workout, and moves through options
- OK button- Starts a Program workout, confirms information, or resumes a paused workout
- Right (▶ ) button- Displays different workout values during a workout, and moves through options
- Decrease (▼) button- Decreases a value (age, time, distance, or calories) or moves through options
FAN button- Controls 3-speed fan
- Resistance Level Quick Buttons- Shifts the resistance levels to the setting quickly during a workout
- Incline Level Quick Buttons- Shifts the incline level to the setting quickly during a workout
- Achievement Indicator Lights- when an achievement level is reached or a result is reviewed, the achievement indicator light will activate
Description
The Nautilus E616 elliptical trainer is engineered with durability and comfort in mind. Its sturdy frame and robust construction ensure long-lasting performance, while the ergonomic design provides a comfortable workout experience. The large backlit LCD display makes it easy to monitor workout metrics, and the Bluetooth connectivity allows users to track their progress through popular fitness apps.
The machine also comes with a set of oversized, cushioned footplates and multi-grip handlebars, ensuring stability and comfort during intense workouts. The 22-inch stride length accommodates users of various heights, making it an excellent choice for home gyms where multiple users may be using the machine.
Nautilus Dual Track Display
Upper Display Data
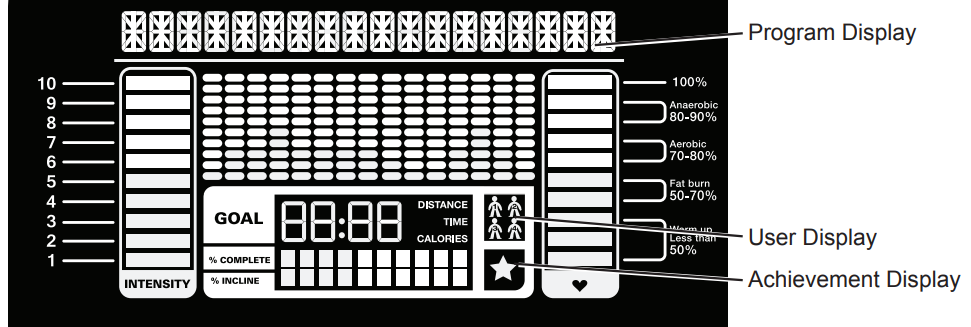
Program Display
The Program Display shows information to the User and the grid display area shows the course profile for the program. Each column in the profile shows one interval (workout segment). The higher the column, the higher the resistance level. The flashing column shows your current interval.
Intensity Display
The Intensity Display shows the level of work at that moment based on the current resistance level.
Heart Rate Zone Display
- The Heart Rate Zone shows which zone the current heart rate value falls into for the current User. These Heart Rate
- Zones can be used as a workout guide for a certain target zone (anaerobic, aerobic, or fat burn).
- Consult a physician before you start an exercise program. Stop exercising if you feel pain or tightness in your chest, become short of breath, or feel faint. Contact your doctor before you use the machine again.
- The heart rate displayed is an approximation and should be used for reference only.
Note: If no heart rate is detected, the display will be blank.
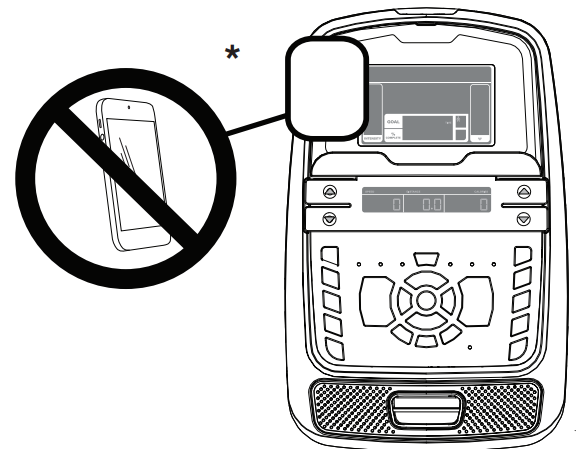
NOTICE: To prevent interference with the telemetry HR receiver, do not place any personal electronic devices in the left side of the media tray.
Goal Display
The Goal Display shows the currently selected type of goal (Distance, Time or Calories), the current value to achieve the goal, and the percent completed toward the goal.
User Display
The User Display shows which User Profile is currently selected.
Achievement Display
The Achievement Display activates when a workout goal is reached or a workout milestone is surpassed from past workouts. The Console display will congratulate and inform the User of their achievement, along with a celebratory sound.
Lower Display Data

The Lower Display shows the Workout Values and can be customized for each User (Consult the “Edit User Profile” section of this manual).
Speed
The Speed display field shows the machine speed in miles per hour (mph) or kilometers per hour (km/h).
Time
The TIME display field shows the total time count of the workout, the average Time for the User Profile, or the total operational time of the machine.
Note: If a Quick Start workout is performed for more than 99 minutes and 59 seconds (99:59), the units for Time will shift to hours and minutes ( 1 hour, 40 minutes ).
Distance
The Distance display shows the distance count (miles or km) in the workout.
Note: To change the measurement units to English Imperial or metric, refer to the “Console Setup Mode” section in this manual.
Level
The LEVEL display shows the current resistance level in the workout.
RPM
The RPM display field shows the pedal revolutions per minute (RPM).
Heart Rate (Pulse)
The Heart Rate display shows the beats per minute (BPM) from the heart rate monitor. When a heart rate signal is received by the Console, the icon will flash.
Consult a physician before you start an exercise program. Stop exercising if you feel pain or tightness in your chest, become short of breath, or feel faint. Contact your doctor before you use the machine again. The heart rate displayed is an approximation and should be used for reference only.
Calories
The Calories display field shows the estimated calories that you have burned during the exercise.
Bluetooth Connectivity with the “Nautilus Trainer™” Fitness App
This fitness machine is equipped with Bluetooth connectivity and can wirelessly sync with the “Nautilus Trainer” Fitness App on supported devices. The Software App syncs with your fitness machine to track total calories burned, time, distance, and more. It records and stores every workout for quick reference. Plus, it automatically syncs your workout data with MyFitnessPal, and Under Armour Connected Fitness to make hitting your daily calorie goal easier than ever! Track your results and share with friends and family.
- Download the free Software App, named Nautilus Trainer™. The software app is available on iTunes® and Google Play™.
Note: For a complete list of supported devices, review the software app on iTunes® or Google Play™. - Follow the instructions on the Software App to sync your device to your exercise machine.
- To sync your workout data with MyFitnessPal® or Under Armour® Connected Fitness, click on the desired program and login with your information.
Note: The “Nautilus Trainer™” Fitness App will automatically sync your workouts after the initial syncing.
USB Charging
If a USB Device is attached to the USB Port, the Port will attempt to charge the Device. The power supplied from the USB Port may not be enough to operate the Device and charge it at the same time.
Remote Heart Rate Monitor
Monitoring your Heart Rate is one of the best procedures to control the intensity of your exercise.
Contact Heart Rate
(CHR) sensors are installed to send your heart rate signals to the Console. The Console can also read telemetry HR signals from a Heart Rate Chest Strap Transmitter that operates in the 4.5kHz - 5.5kHz range.
Note: The heart rate chest strap must be an uncoded heart rate strap from Polar Electro or an uncoded POLAR® compatible model. (Coded POLAR® heart rate straps such as POLAR® OwnCode® chest straps will not work with this equipment.)
WARNING: If you have a pacemaker or other implanted electronic device, consult your doctor before using a wireless chest strap or other telemetric heart rate monitor.
NOTICE: To prevent interference with the telemetry HR receiver, do not place any personal electronic devices in the left side of the media tray.*
Contact Heart Rate Sensors
Contact Heart Rate (CHR) sensors send your heart rate signals to the Console. The CHR sensors are the stainless steel parts of the Handlebars. To use, put your hands comfortably around the sensors. Be sure that your hands touch both the top and the bottom of the sensors. Hold firm, but not too tight or loose. Both hands must make contact with the sensors for the Console to detect a pulse. After the Console detects four stable pulse signals, your initial pulse rate will be shown.
Once the Console has your initial heart rate, do not move or shift your hands for 10 to 15 seconds. The Console will now validate the heart rate. Many factors influence the ability of the sensors to detect your heart rate signal:
- Movement of the upper body muscles (including arms) produces an electrical signal (muscle artifact) that can interfere with pulse detection. Slight hand movement while in contact with the sensors can also produce interference.
- Calluses and hand lotion may act as an insulating layer to reduce the signal strength.
- Some Electrocardiogram (EKG) signals generated by individuals are not strong enough to be detected by the sensors.
- The proximity of other electronic machines can generate interference.
If your heart rate signal ever seems erratic after validation, wipe off your hands and the sensors and try again.
Heart Rate Calculations
- Your maximum heart rate usually decreases from 220 Beats Per Minute (BPM) in childhood to approximately 160 BPM by age 60. This fall in heart rate is usually linear, decreasing by approximately one BPM for each year. There is no indication that training influences the decrease in maximum heart rate. Individuals of the same age could have different maximum heart rates. It is more accurate to find this value by completing a stress test than by using an age related formula.
- Your at-rest heart rate is influenced by endurance training. The typical adult has an at rest heart rate of approximately 72 BPM, whereas highly trained runners may have readings of 40 BPM or lower.
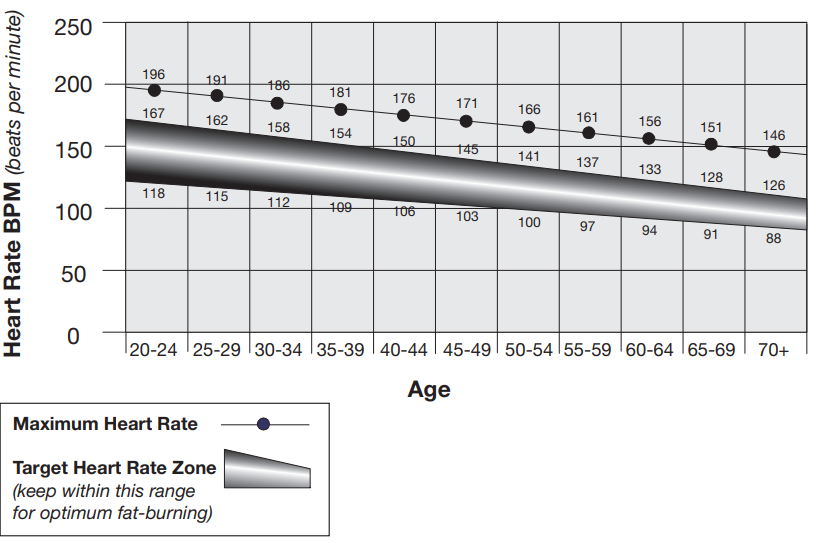
- The Heart Rate table is an estimate of what Heart Rate Zone (HRZ) is effective to burn fat and improve your cardiovas-cular system. Physical conditions vary, therefore your individual HRZ could be several beats higher or lower than what is shown.
- The most efficient procedure to burn fat during exercise is to start at a slow pace and gradually increase your intensity until your heart rate reaches between 60 – 85% of your maximum heart rate. Continue at that pace, keeping your heart rate in that target zone for over 20 minutes. The longer you maintain your target heart rate, the more fat your body will burn.
- The graph is a brief guideline, describing the generally suggested target heart rates based on age. As noted above, your optimal target rate may be higher or lower. Consult your physician for your individual target heart rate zone.
Note: As with all exercises and fitness regimens, always use your best judgment when you increase your exercise time or intensity.
FAT-BURNING TARGET HEART RATE
Setup Guide
To set up the Nautilus E616 elliptical trainer, follow these steps:
- Unbox and lay out all the components and tools provided.
- Assemble the frame and attach the footplates and handlebars according to the instructions manual.
- Connect the console to the main frame and ensure all cables are securely plugged in.
- Configure the machine by selecting your preferred language, unit of measurement, and other settings through the console.
- Pair your device with the machine via Bluetooth to sync your workout data with fitness apps.
MAINTENANCE
Read all maintenance instructions fully before you start any repair work. In some conditions, an assistant is required to do the necessary tasks.
WARNING
Equipment must be regularly examined for damage and repairs. The owner is responsible to make sure that regular maintenance is done. Worn or damaged components must be repaired or replaced immediately. Only manufacturer supplied components can be used to maintain and repair the equipment.
If at any time the Warning labels become loose, unreadable or dislodged, contact Nautilus® Customer Service for replacement labels.
DANGER
To reduce the risk of electrical shock or unsupervised usage of the equipment, always unplug the power cord from the wall outlet and the machine and wait 5 minutes before cleaning, maintaining or repairing the machine. Place the power cord in a secure location.
- Daily: Before each use, examine the exercise machine for loose, broken, damaged, or worn parts. Do not use if found in this condition. Repair or replace all parts at the first sign of wear or damage. After each workout, use a damp cloth to wipe your machine and Console free of moisture.
Note: Avoid excessive moisture on the Console. - Weekly: Check for smooth roller operation. Wipe the machine to remove dust, dirt, or grime. Clean the rails and surface of the rollers with a damp cloth. Apply silicone lubricant to a dry cloth and wipe the rails to eliminate roller noise. Silicone lubricant is not intended for human consumption. Keep out of reach of children. Store in a safe place.
Note: Do not use petroleum based products. - Monthly or after 20 hours: Make sure all bolts and screws are tight. Tighten as necessary.
NOTICE: Do not clean with a petroleum based solvent or an automotive cleaner. Be sure to keep the Console free of moisture.
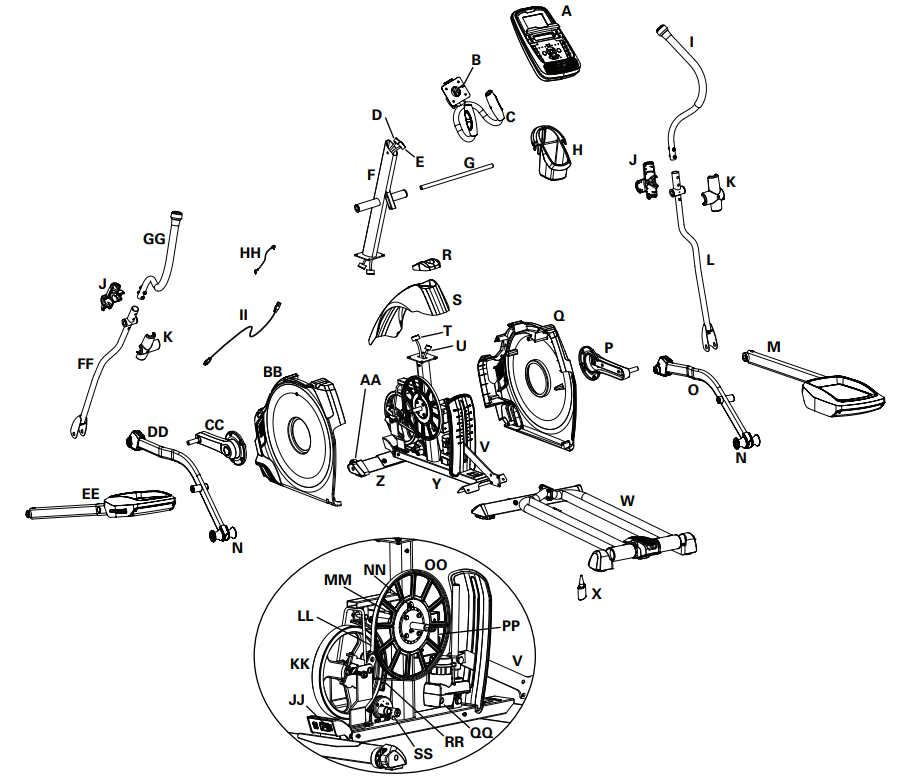
Maintenance Parts
TROUBLESHOOTING
Condition/Problem | Things to Check | Solution |
No display/partial display/ unit will not turn on | Check electrical (wall) outlet | Make sure unit is plugged intoa functioning wall outlet. |
Check connection at front of unit | Connection shouldbe secure and undamaged. Replace adapter or connection at unit if either are damaged. | |
Power Switch | Turn on the powerwith the Power Switch | |
Check data cable integrity | All wiresin cable shouldbe intact. If any arevisibly crimped or cut, replace cable. | |
Check data cable connections/orientation | Be sure cable is connected securely and oriented properly. Small latchon connector shouldline up and snap intoplace. | |
Check console display for damage | Check for visual signthat console display is cracked or other- wise damaged. Replace Console if damaged. | |
Console Display | If Console onlyhas partial display and all connections are fine, replace the Console. | |
If theabove steps do not resolvethe problem, contactCus- tomer Care for further assistance. | ||
Unit operates but Contact HR not displayed | HR cableconnection at Console | Be sure cable is connected securely to Console. |
HR cable box connection | Be surecables from handlebars and cable to Console are secure and undamaged. | |
Sensor grip | Be surehands are centered on HR sensors. Hands must be kept still with relatively equal pressure applied to each side. | |
Dry or calloused hands | Sensors may have difficulty with dried out or calloused hands. A conductive electrode cream (heart rate cream) can help make better conduct. These are available on the web or at medical or some larger fitness stores. | |
Static Handlebar | If testsreveal no otherissues, Static Handlebar should be replaced. | |
Unit operates but Telemetric HR not displayed | Chest Strap (optional) | Strap should be “POLAR®” compatible and uncoded. Make sure strap is directly against skin and contact area is wet. |
Check User Profile | Select theEdit User Profile option for theUser Profile. Go to the WIRELESS HR setting and make sure that the current value is set to ON. | |
Interference | Try movingunit away fromsources of interference (TV, Micro- wave, etc). | |
Replace ChestStrap | If interference is eliminated and HR does not function, replace strap. | |
Replace Console | If HR still doesnot function, replace Console. | |
Unit operates but Telemetric HR displayed incorrectly | Interference | Make surethat the HR receiver is not blockedby a personal electronic device in the left side of the media tray. |
No speed/RPM reading, Console displays “Please Stride” error code | Check data cable integrity | All wiresin cable shouldbe intact. If any arecut or crimped, replace cable. |
Check data cable connections/orientation | Be sure cable is connected securely and oriented properly. Small latchon connector shouldline up and snap intoplace. | |
Check magnet position (requires shroud removal) | Magnet should be in place on pulley. | |
Check Speed Sensor (requires shroud removal) | Speed sensor shouldbe aligned with magnet and connected to data cable. Realign sensorif necessary. Replace if there is any damage to the sensor or the connecting wire. |
Console shutsoff (enters sleep mode)while in use | Check electrical (wall) outlet | Make sure unit is plugged intoa functioning wall outlet. |
Check connection at front of unit | Connection shouldbe secure and undamaged. Replace adapter or connection at unit if either are damaged. | |
Check data cable integrity | All wiresin the cableshould be intact. If any arecut or crimped, replace cable. | |
Check data cable connections/orientation | Be sure cable is connected securely and oriented properly. Small latchon connector shouldline up and snap intoplace. | |
Reset machine | Unplug unit from electrical outlet for 3 minutes. Reconnect to outlet. | |
Check magnet position (requires shroud removal) | Magnet should be in place on pulley. | |
Check Speed Sensor (requires shroud removal) | Speed sensor shouldbe aligned with magnet and connected to data cable. Realign sensorif necessary. Replace if there is any damage to the sensor or the connecting wire. | |
Console continuously cyclesthrough program screens | Console is in demonstra- tion mode | Hold down the PAUSE/STOP buttonand Left buttontogether for 3 seconds. |
Fan willnot turn on or will not turn off | Check data cable integrity | All wiresin cable shouldbe intact. If any arecut or crimped, replace cable. |
Check data cable connections/orientation | Be sure cable is connected securely and oriented properly. Small latchon connector shouldline up and snap intoplace. | |
Reset machine | Unplug unit from electrical outlet for 3 minutes. Reconnect to outlet. | |
Fan willnot turn on, but Console operates | Check for blockage of fan | Unplug unit from electrical outlet for 5 minutes. Removemate- rial from fan. If necessary, detach the Console to help with removal. Replace the Console if unable to remove blockage. |
Unit rocks/does not sit level | Check leveler adjustment | Adjust levelers until machineis level. |
Check surface under unit | Adjustment maynot be ableto compensate forextremely un- even surfaces. Move machine to level area. | |
Foot pedals loose/unit difficult to operate | Hardware | Tightly secureall hardware on the PedalArms and Handlebar Arms. |
Drive train click/tick noise once perfull crank revolution | Check crank/pulley assembly | Disconnect left and right foot assemblies and rotate crank. If sound persists, replace crank/pulley assembly. If sound does not come from rotating crank, check footassemblies and up- per/lower handlebars. |
Check foot assemblies, leg assemblies, handlebar assemblies | Manually move foot, leg,and handlebar assemblies to isolate sound. Replace part making sound. | |
Check for loose hardware | Tightly secureall hardware on the Stabilizers and the baseof the Console Mast. | |
Knocking sound during machine operation | Check hardware at junction between Lower Handlebar Arm and Pedal | Make sure thatthe alignment tab on the Pivot Sleevegoes into the slot in the hole. Be sure the Pivot Sleeve extends through the opposite hole in the joint cover. |
Squeaking noise that appears a few minutes into a workout and normally will get progressively worse as the workout continues | Bolt that connects the swing arms to the axle running through the console mast | Loosen pivot rod bolt slightly until noise goes away. White lithium greasecan also be applied fora temporary fix.Contact Customer Care for assistance. |
Roller squeaking on rail | Apply silicone lubricant to a dry clothand wipe the rails to eliminate roller noise. | |
Workout results will not syncwith Bluetooth® en- abled device | Current consolemode | Machine must be in IdleMode to sync.Push the PAUSE/STOP button until the Power-Up Mode screen is displayed. |
Total time of workout | A workout must be longerthan 1 minuteto be savedand posted by the Console. | |
Fitness machine | Unplug unit from electrical outlet for 5 minutes. Reconnect to outlet. | |
Bluetooth® enabled device | Consult yourdevice to be sure thatthe Bluetooth® wireless feature has been enabled on it. | |
Fitness App | Review Specifications of Fitness App and confirm your device is compatible. | |
- | ||
Workout results not post- ing from Nautilus Train- er™ App to MyFitnessPal® account or UnderArmour® Connected Fitness | Sync accounts | From the Menu icon on the Nautilus Trainer™ App, selectthe Sync to MyFitnessPal® or Under Armour® Connected Fitness. |
Sync fails | Review account and password. | |
- |
WARRANTY
Nautilus, Inc. warrants that this product is free from defects in materials and workmanship, when used for the purpose intended, under normal conditions, and provided it receives proper care and maintenance as described in the Product’s Assembly and Owner’s manual. This warranty is good only for authentic, original, legitimate machines manufactured by
Nautilus, Inc. and sold through an authorized agent and used in the United States or Canada.
Terms
- Frame 10 years
- Mechanical parts 3 years
- Electronics 3 years
- Labor 1 year
(Labor support does not include the installation of replacement parts involved in the initial product assembly and preventative maintenance services.)
Nautilus Elliptical Trainer Machine E616 Pros & Cons
Pros
- Robust and durable construction.
- Versatile workout options with 29 pre-set programs.
- Advanced heart rate monitoring system.
- Large backlit LCD display for easy tracking of workout metrics.
- Bluetooth connectivity for seamless data transfer.
Cons
- Higher price point compared to some other elliptical trainers.
- Assembly can be time-consuming and requires some technical skill.
- Large footprint may not be ideal for smaller spaces.
Customer Reviews
Customers have generally praised the Nautilus E616 for its solid build quality, extensive workout options, and user-friendly interface. Many users appreciate the variety of pre-set programs and the accuracy of the heart rate monitoring system. However, some users have noted that assembly can be challenging and that the machine occupies a significant amount of space.
Faqs
What is the stride length of the Nautilus Elliptical Trainer Machine E616?
How many resistance levels does the Nautilusoffer?
Can I connect my fitness app to the Nautilus Elliptical?
Does the Nautilus come with heart rate monitoring?
How do I assemble the Machine elliptical trainer?
What if my display screen is not turning on?
Is the Machine suitable for small spaces?
How many pre-set programs does the Nautilus Elliptical Trainer Machine E616 offer?
Can I adjust the stride length on the Nautilus?
What kind of warranty does the Trainer Machine come with?
Leave a Comment
