Operations: Nautilus Recumbent Bike R616 User Manual
Content
Introduction
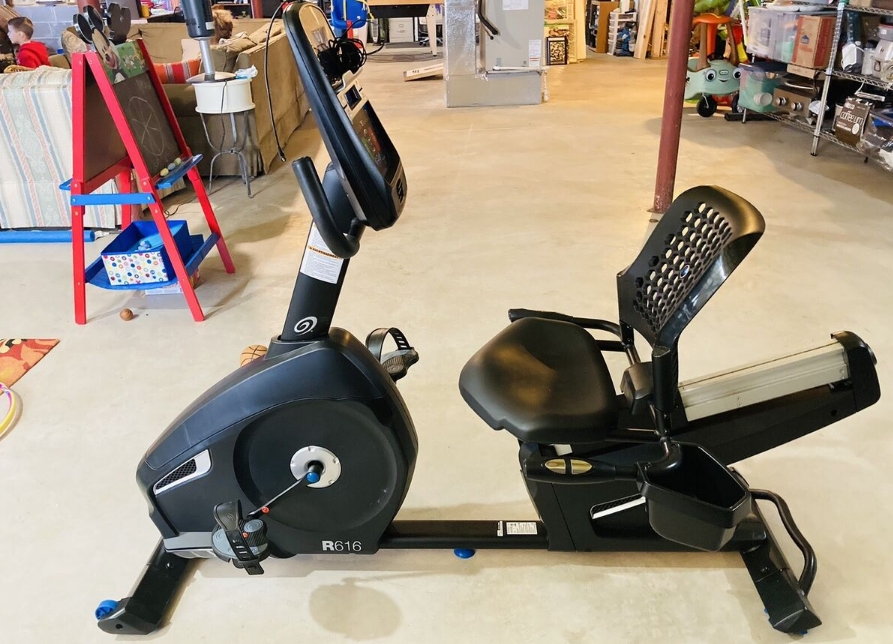
The Nautilus Recumbent Bike R616 is a high-performance exercise bike designed to provide a comfortable and effective workout experience. With 29 customizable workout programs and Bluetooth connectivity, users can track their progress through the Nautilus Trainer app or sync with other fitness apps. The bike features a dual-track LCD display, 25 resistance levels, and an adjustable seat for optimal comfort. Priced at approximately $599.00, it is an excellent choice for home fitness enthusiasts seeking versatility and performance.
Specifications
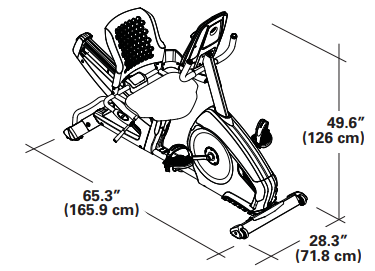
- Maximum User Weight: 300 lbs. (13V kg)
- Machine Weight: 91.9 lbs. (41.7 kg)
- Power Requirements:
- Operational Voltage: 9VDC
- Operating Current: 1.5A
- AC Power Adapter: UL listed, Rated 100V-240V 50/V0Hz Input, 9VDC, 1500mA Output. Class 2.
Before Assembly
Select the area where you are going to set up and operate your machine. For safe operation, the location must be on a
hard, level surface. Allow a workout area of a minimum of 77''; x 114'' (196 cm x 290 cm).
Basic Assembly Tips
Follow these basic points when you assemble your machine:
- Read and understand the “Important Safety Instructions” before assembly.
- Collect all the pieces necessary for each assembly step.
- Using the recommended wrenches, turn the bolts and nuts to the right (clockwise) to tighten, and the left (counterclockwise) to loosen, unless instructed otherwise.
- When attaching 2 pieces, lightly lift and look through the bolt holes to help insert the bolt through the holes.
- The assembly can require 2 people.
Nautilus Recumbent Bike R616 PARTS
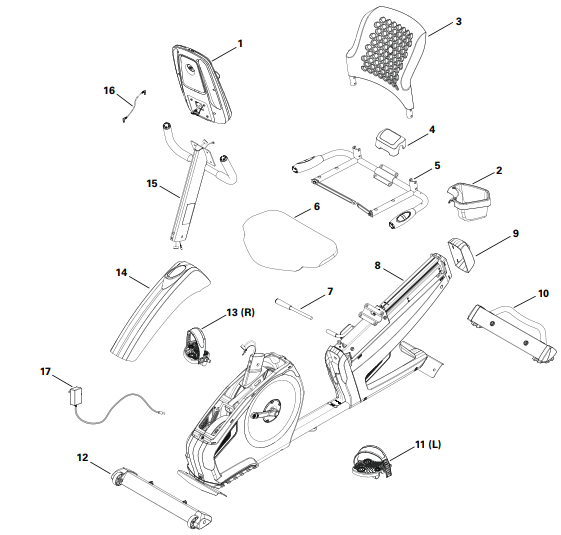
| Item | Qty | Description | Item | Qty | Description |
|---|---|---|---|---|---|
| 1 | 1 | Console | 10 | 1 | Rear Stabilizer |
| 2 | 1 | Water Bottle Holder | 11 | 1 | Left Pedal |
| 3 | 1 | Seat Back | 12 | 1 | Front Stabilizer |
| 4 | 1 | Seat Cover | 13 | 1 | Right Pedal |
| 5 | 1 | Seat Frame Assembly | 14 | 1 | Top Shroud |
| 6 | 1 | Seat Bottom | 15 | 1 | Console Mast |
| 7 | 1 | Seat Adjustment Handle | 16 | 1 | Media Cable |
| 8 | 1 | Frame | 17 | 1 | AC Adapter |
| 9 | 1 | Seat Rail End Cap |
HARDWARE

| Item | Qty | Description | Item | Qty | Description |
|---|---|---|---|---|---|
| A | 8 | Button Head Hex Screw, M8×1.25 | F | 2 | Phillips Head Screw, M5×12 |
| B | 10 | Button Head Hex Screw, M6×12 | G | 14 | Lock Washer, M6 |
| C | 8 | Flat Washer, M8 | H | 4 | Curved Washer, M6 |
| D | 8 | Lock Washer, M8 | I | 4 | Phillips Head Screw, M6×25 |
| E | 10 | Flat Washer, M6 |
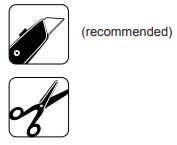
Tools
Included
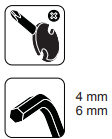
Not Included
ASSEMBLY
1a. Attach Stabilizers to Frame
Note: Hardware(*) is pre-installed on the stabilizers and not on the Hardware Card. Make sure transport wheels on the front stabilizer point forward.
1b. Attach the Seat Rail End Cap to the Frame Assembly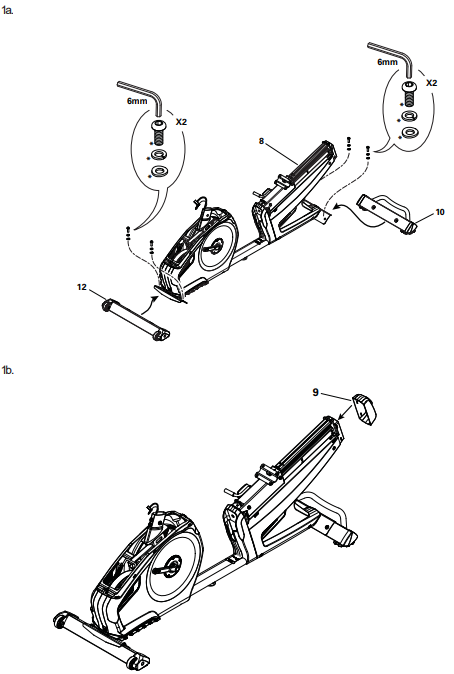
Attach the Seat Frame Assembly to the Seat Rail
NOTICE: Do not crimp the Heart Rate Cable. Once all hardware has been inserted, be sure to fully tighten it.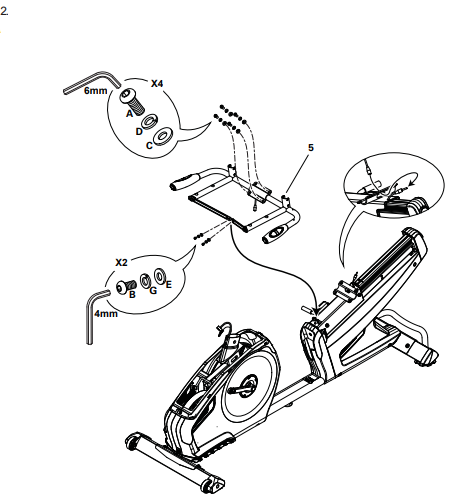
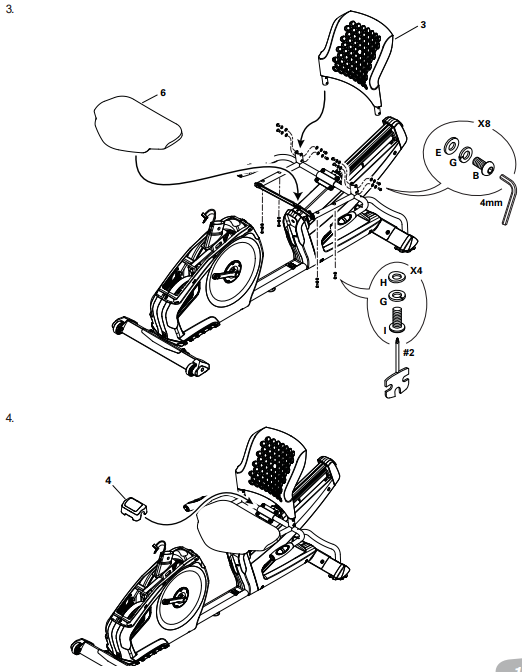
- Attach Seat Pads to Seat Frame Assembly
Attach Cover to Frame Assembly
- Attach Seat Adjustment Handle to Frame Assembly
Connect the Cables and Attach the Console Mast to Frame Assembly
NOTICE: Do not crimp the cables.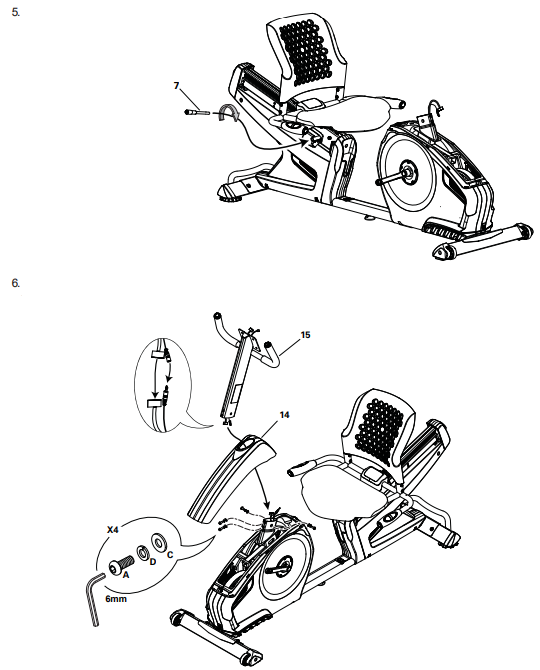
- Remove Hardware from Console
NOTICE: Do not crimp the cable.
Note: Hardware (*) is pre-installed and not on the Hardware Card. If desired, apply the French Canadian overlay to the Console face Connect Cables and Attach Console to Frame Assembly
NOTICE: Align the clips on the cable connectors and make sure the connectors lock. Do not crimp cables.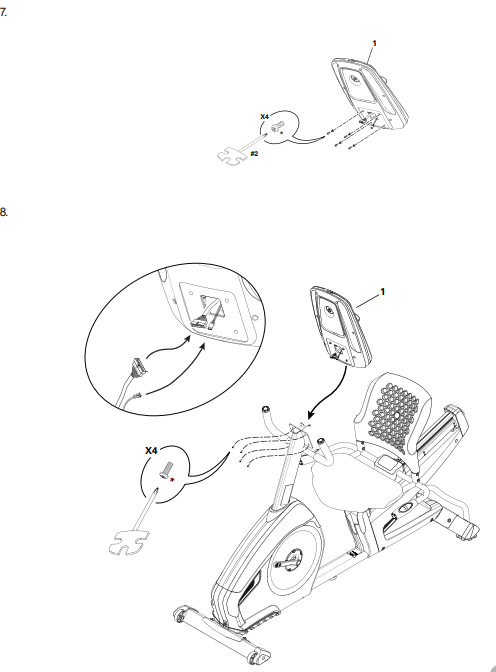
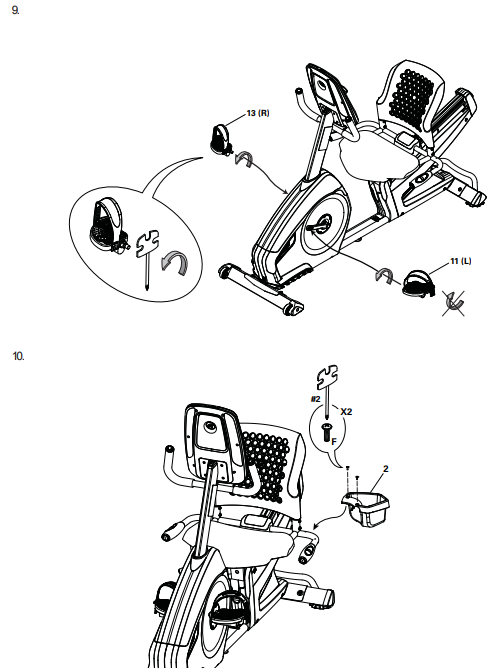
- Attach Pedals to Frame Assembly
NOTICE: The Left Pedal is reverse-threaded. Be sure to attach Pedals on the proper side of the Bike. Orientation is based from a seated position on the bike. The Left Pedal has an “L”, the Right Pedal an “R”. Attach Water Bottle Holder to Frame Assembly
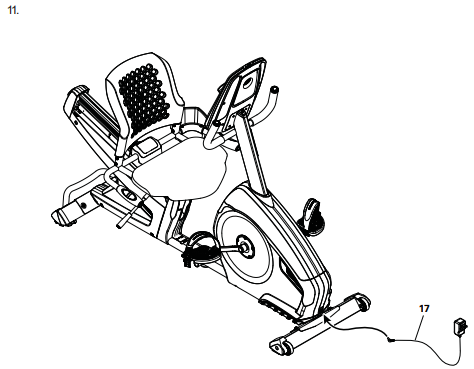
Connect AC Adapter to Frame Assembly
- Final Inspection
- Inspect your machine to ensure that all hardware is tight and components are properly assembled.
- Be sure to record the serial number in the held provided at the front of this manual.
- Do not use until the machine has been fully assembled and inspected for correct performance in accordance with the Owner’s Manual.
Description
The Nautilus Recumbent Bike R616 is built with durability and comfort in mind. The recumbent design allows for a more relaxed workout position, reducing strain on the back and joints. The bike features adjustable seating and handlebars, ensuring a customizable fit for users of various sizes. The high-resolution LCD display provides clear and detailed feedback on your workout progress, while the built-in heart rate monitoring system ensures you stay within your target zone. The bike also includes amenities like built-in speakers and a USB charging port, making your workout sessions more enjoyable and convenient.
Setup Guide
Setting up the Nautilus Recumbent Bike R616 is relatively straightforward.
- The package includes all necessary tools and a detailed instruction manual.
- Begin by assembling the base frame, followed by attaching the seat, handlebars, and pedals.
- Once assembled, plug in the bike and follow the on-screen instructions to configure your user profile and preferences.
- Pair your device via Bluetooth to sync your workouts with fitness apps.
- Ensure all parts are securely fastened and test the bike before your first use to ensure everything is functioning correctly.
MAINTENANCE
Read all maintenance instructions fully before you start any repair work. In some conditions, an assistant is necessary to do the necessary tasks.
Equipment must be regularly examined for damage and repairs. The owner is responsible to make sure that regular maintenance is done. Worn or damaged components must be repaired or replaced immediately. Only manufacturer supplied components can be used to maintain and repair the equipment.
If at any time the Warning labels become loose, unreadable or dislodged, contact Nautilus Customer Service for replacement labels. Disconnect all power to the machine before you service it.
Daily
Before each use, examine the exercise machine for loose, broken, damaged, or worn parts.
Do not use if found in this condition. Repair or replace all parts at the first sign of wear or damage.
After each workout, use a damp cloth to wipe your machine and Console free of moisture.
Note: Avoid excessive moisture on the Console.
NOTICE
- If necessary, only use a mild dish soap with a soft cloth to clean the Console.
- Do not clean with a petroleum based solvent, automotive cleaner, or any product that contains ammonia.
- Do not clean the Console in direct sunlight or at high temperatures. Be sure to keep the
- Console free of moisture.
Weekly
Clean the machine to remove any dust, dirt, or grime from the surfaces. Check for smooth seat slider operation. If needed, apply a very thin coating of silicone lube to ease operation.
WARNING: Silicone lubricant is not intended for human consumption. Keep out of reach of children. Store in a safe place.
Note: Do not use petroleum based products.
Monthly or after 20 hours: Check pedals and crank arms and tighten as necessary. Make sure all bolts and screws are tight. Tighten as necessary.
NOTICE: Do not clean with a petroleum based solvent or an automotive cleaner. Be sure to keep the Console free of moisture.
Maintenance Parts
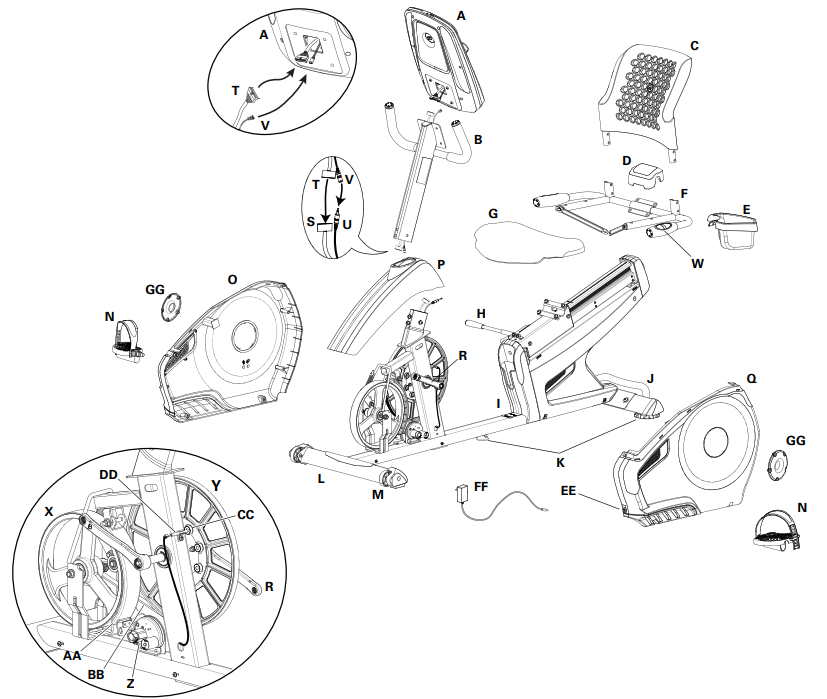
| Item | Description | Item | Description |
|---|---|---|---|
| A | Console | L | Stabilizer, Front |
| B | Console Mast | M | Transport Wheel |
| C | Seat Back | N | Pedals |
| D | Seat Cover | O | Shroud, Right |
| E | Water Bottle Holder | P | Shroud, Upper |
| F | Handlebar, Side | Q | Shroud, Left |
| G | Seat Bottom | R | Crank Arm |
| H | Seat Adjustment Handle | S | Console Cable, Lower |
| I | Frame Assembly | T | Console Cable, Upper |
| J | Rear Stabilizer | U | Heart Rate Cable, Lower |
| K | Leveler | V | Heart Rate Cable, Upper |
| L | Heart Rate Sensor (CHR) | W | Contact Heart Rate Sensor (CHR) |
| X | Flywheel | Y | Drive Pulley |
| Z | Servo Motor | AA | Brake Assembly |
| BB | Drive Belt | CC | Speed Sensor Magnet (8) |
| DD | Speed Sensor | EE | Power Inlet |
| FF | AC Adapter | GG | Cover, Crank Disc |
TROUBLESHOOTING
Condition/Problem | Things to Check | Solution |
| No display/partial display/ unit will not turn on | Check electrical (wall) outlet | Make sure unitis plugged intoa functioning walloutlet. |
Check connection at front of unit | Connection shouldbe secure andundamaged. Replace adapter or connection at unit if either are damaged. | |
| Check data cableintegrity | All wiresin cable shouldbe intact. If any arevisibly crimped or cut, replace cable. | |
| Check data cable connections/orientation | Be sure cable is connected securely and oriented properly. Small latchon connector shouldline up andsnap into place. | |
| Check consoledisplay for damage | Check forvisual sign thatconsole display is cracked or other- wise damaged. Replace Console if damaged. | |
| Console Display | If Console only has partial display and allconnections are fine, replace the Console. | |
| If theabove steps do not resolve the problem, contact Cus- tomer Care for further assistance. | |
| Unit operates but Contact HR not displayed | HR cableconnection at Console | Be sure cableis connected securely to Console. |
| HR cable box connection | Be sure cables from handlebars and cable to Console are secure and undamaged. | |
| Sensor grip | Be surehands are centered on HR sensors. Hands must be kept still with relatively equal pressure applied to each side. | |
| Dry or calloused hands | Sensors may havedifficulty with driedout or calloused hands. A conductive electrode cream (heart rate cream) can help make better conduct. These are available on the web or at medical or some larger fitness stores. | |
| Handlebar | If tests reveal no other issues,Handlebars should be replaced. | |
| Unit operates but TelemetricHR not displayed | Chest Strap (optional) | Strap should be “POLAR®” compatible and uncoded. Make sure strap is directly against skin and contact area is wet. |
| Chest Strap Batteries | If strap has replaceable batteries, install new batteries. | |
| Check User Profile | Select the EditUser Profile optionfor the UserProfile. Go to the WIRELESS HR setting and make sure that the current value is set to ON. | |
| Interference | Try movingunit away from sources of interference (TV, Micro- wave, etc). | |
| Replace Chest Strap | If interference is eliminated andHR does notfunction, replace strap. | |
| Replace Console | If HR still doesnot function, replace Console. | |
| Unit operates but TelemetricHR displayed incorrectly | Interference | Make surethat the HR receiver is not blocked by a personal electronic device in the left side of the media tray. |
| No speed/RPM reading, Console displays “Please Pedal” error code | Check data cableintegrity | All wires in cable shouldbe intact. If any arecut or crimped, replace cable. |
| Check data cable connections/orientation | Be sure cable is connected securely and oriented properly. Small latchon connector shouldline up andsnap into place. |
| Check magnet position (requires shroud removal) | Magnets should be in placeon pulley. |
| Check Speed Sensor (requires shroud removal) | Speed sensor shouldbe aligned withmagnets and connected to data cable. Realign sensor if necessary. Replace if there is any damage to the sensor or the connecting wire. | |
| Resistance does not change (machine turnson and operates) | Batteries (if equipped) | Replace batteries and check for proper operation. |
| Check Console | Check for visual signthat Console is damaged. Replace Con- sole if damaged. | |
| Check data cableintegrity | All wiresin cable shouldbe intact. If any arevisibly crimped or cut, replace cable. | |
| Check data cable connections/orientation | Be sure cable is connected securely and oriented properly. Reseat all connections. Smalllatch on connector should line up and snap into place. | |
| Check Servo Motor (requires shroud removal) | If magnets move, adjust untilthey are withinthe proper range. Replace Servo Motor if not functioning properly. | |
| If theabove steps do not resolve the problem, contact Cus- tomer Care for further assistance. | |
| Console shutsoff (enters sleep mode)while in use | Check electrical (wall) outlet | Make sure unitis plugged intoa functioning walloutlet. |
Check connection at front of unit | Connection shouldbe secure andundamaged. Replace adapter or connection at unit if either are damaged. | |
| Check data cableintegrity | All wiresin the cableshould be intact.If any are cut or crimped, replace cable. | |
| Check data cable connections/orientation | Be sure cable is connected securely and oriented properly. Small latchon connector shouldline up andsnap into place. | |
| Reset Machine | Unplug unit from electrical outlet for 3 minutes. Reconnect to outlet. | |
| Check magnet position (requires shroud removal) | Magnets should be in placeon pulley. | |
| Check Speed Sensor (requires shroud removal) | Speed sensor shouldbe aligned withmagnets and connected to data cable. Realign sensor if necessary. Replace if there is any damage to the sensor or the connecting wire. | |
| Fan willnot turn on or will not turn off | Check data cableintegrity | All wiresin cable shouldbe intact. If any arecut or crimped, replace cable. |
| Check data cable connections/orientation | Be sure cable is connected securely and oriented properly. Small latchon connector shouldline up andsnap into place. | |
| Reset machine | Unplug unit from electrical outlet for 3 minutes. Reconnect to outlet. | |
| Fan willnot turn on, but Console operates | Check for blockage of fan | Unplug unit from electrical outletfor 5 minutes. Remove mate- rial from fan. If necessary, detach the Console to help with removal. Replace the Console if unable to remove blockage. |
| Unit rocks/does not sit level | Check leveler adjustment | Adjust levelers until bikeis level. |
| Check surface under unit | Adjustment maynot be ableto compensate forextremely un- even surfaces. Move bike to level area. |
| Seat Assembly shifts / squeaks when in use | Hardware | Check hardware that attaches Seat assembly, and fully tighten hardware. |
| Pedals loose/unit difficult to pedal | Check pedalto crank arm connection | Pedal shouldbe tightened securely to crank. Insureconnection is not cross-threaded. |
| Check crankarm to axle connection | Crank shouldbe tightened securely to axle. Be sure cranksare connected at 180 degrees from each other. | |
| Clicking soundwhen pedaling | Check pedalto crank arm connection | Remove pedals.Make sure thereis no debris on threads, and reinstall the pedals. |
| Console continuously cycles through program screens | Console is in demonstra- tion mode | Hold down thePAUSE/END button andLeft button together for 3 seconds. |
| Workout results willnot sync with Bluetooth® enabled device | Current console mode | Machine must be in IdleMode to sync.Push the PAUSE/END button until the Power-Up Mode screen is displayed. |
| Total time of workout | A workoutmust be longerthan 1 minuteto be savedand posted by the Console. | |
| Fitness machine | Unplug unit from electrical outlet for 5 minutes. Reconnect to outlet. | |
| Bluetooth® enabled device | Consult yourdevice to be sure thatthe Bluetooth® wireless feature has been enabled on it. | |
| Fitness App | Review Specifications of Fitness App and confirmyour device is compatible. | |
| Contact [email protected] for further assistance. | |
Workout results not post- ing from Nautilus Train- er™ App to MyFitnessPal® account or Under Armour® Connected Fitness | Sync accounts | From the Menu icon on the Nautilus Trainer App, selectthe Sync to MyFitnessPal or Under Armour Connected Fitness. |
Nautilus Recumbent Bike R616 Pros & Cons
Pros
- Comfortable Design: The recumbent position reduces strain on the back and joints, making it ideal for users with mobility issues.
- Advanced Features: Includes 29 workout programs, Bluetooth connectivity, and a high-resolution LCD display.
- Durable Construction: Sturdy frame with a maximum user weight capacity of 300 lbs.
- Customizable Fit: Adjustable seating and handlebars ensure a comfortable fit for users of various sizes.
- Convenient Amenities: Built-in speakers and a USB charging port enhance the workout experience.
Cons
- Space Requirements: The bike is quite large and requires significant space in your home.
- Assembly Challenges: Some users may find the assembly process complex and time-consuming.
- Cost: Priced around $1,000, which may be out of budget for some potential buyers.
- Noisy Operation: Some users have reported that the bike can be noisy during operation.
Customer Reviews
Customers have generally praised the Nautilus Recumbent Bike R616 for its comfort, durability, and feature-rich design. Many have appreciated the variety of workout programs and the ease of use of the Bluetooth connectivity. However, some have noted that the assembly process can be challenging and that the bike is quite large, requiring significant space. Common complaints include the noise during operation and the higher price point compared to other models in the market.
WARRANTY
- Frame 10 years
- Mechanical parts 3 years
- Electronics 3 years
- Labor 1 year
(Labor support does not include the installation of replacement parts involved in the initial product assembly and preventative maintenance services.)
Faqs
What is the maximum user weight capacity of the Recumbent Bike ?
Does the Nautilus Bikecome with pre-set workout programs?
How do I assemble the Nautilus Recumbent Bike R616?
What type of display does the Nautilus have?
Are there any built-in amenities on the Nautilus Recumbent Bike R616?
Is the Nautilus Recumbent Bike R616 suitable for users with back or joint issues?
How do I configure my user profile on the R616?
Can I adjust the seating and handlebars on the Nautilus?
Leave a Comment
