Netgear AC1900 Smart WiFi Router R7000 | Installation & Settings
Content

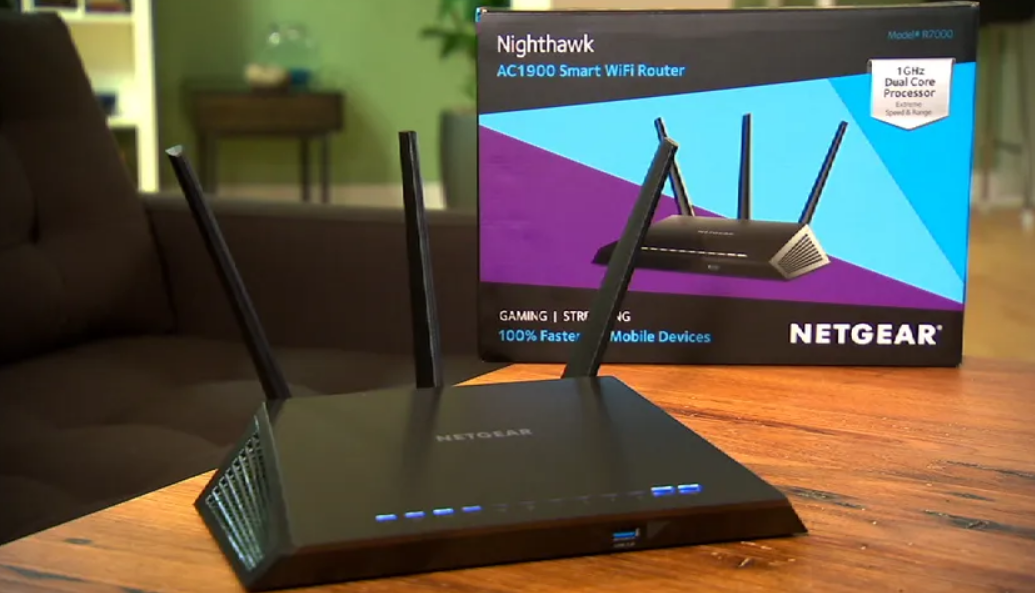
Introduction of Netgear AC1900 Smart WiFi Router R7000
The Netgear AC1900 Smart WiFi Router R7000 is a high-performance wireless router that provides fast and reliable internet connectivity for your home or office. With a top speed of 1900Mbps, this dual-band Gigabit router is perfect for heavy internet usage, including gaming, streaming, and video conferencing. The estimated price of the product is around $120 to $150, and it was launched in 2014.
Detailed Specifications
The Netgear AC1900 Smart WiFi Router R7000 comes with a powerful 1GHz dual-core processor, 128MB flash memory, and 256MB RAM. It has a total of five Gigabit Ethernet ports, including one WAN port and four LAN ports, providing fast and reliable wired connectivity. The router also supports dual-band wireless technology, with a maximum speed of 600Mbps on the 2.4GHz band and 1300Mbps on the 5GHz band.
The R7000 also features advanced wireless technologies, such as Beamforming+ and Smart Connect, which help to improve the range and reliability of the wireless connection. Additionally, the router has a USB 3.0 port and a USB 2.0 port, allowing you to share files, printers, and media across your network.
Description
The Netgear AC1900 Smart WiFi Router R7000 is a versatile and high-performance wireless router that is ideal for heavy internet usage. It has a sleek and stylish design, with a glossy black finish and adjustable antennas. The router is easy to set up and use, with a user-friendly interface that allows you to manage your network settings and monitor connected devices.
The R7000 supports the latest wireless technologies, including 802.11ac and dual-band, which help to provide fast and reliable internet connectivity. The router also features advanced security features, such as WPA/WPA2 encryption, guest network access, and parental controls, which help to keep your network and connected devices safe and secure.
Package Contents
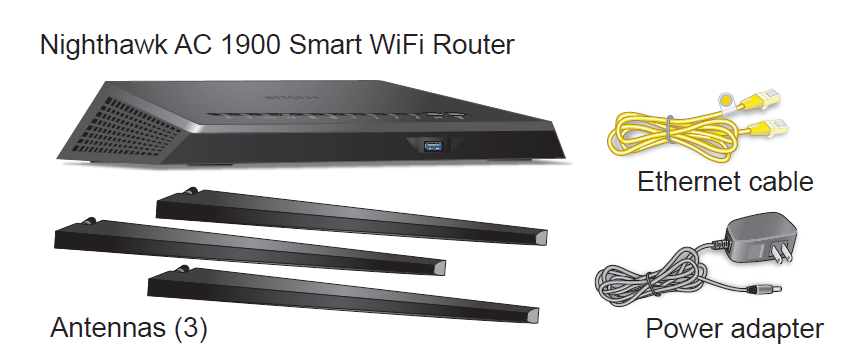
The box contains the following items.
Instructions
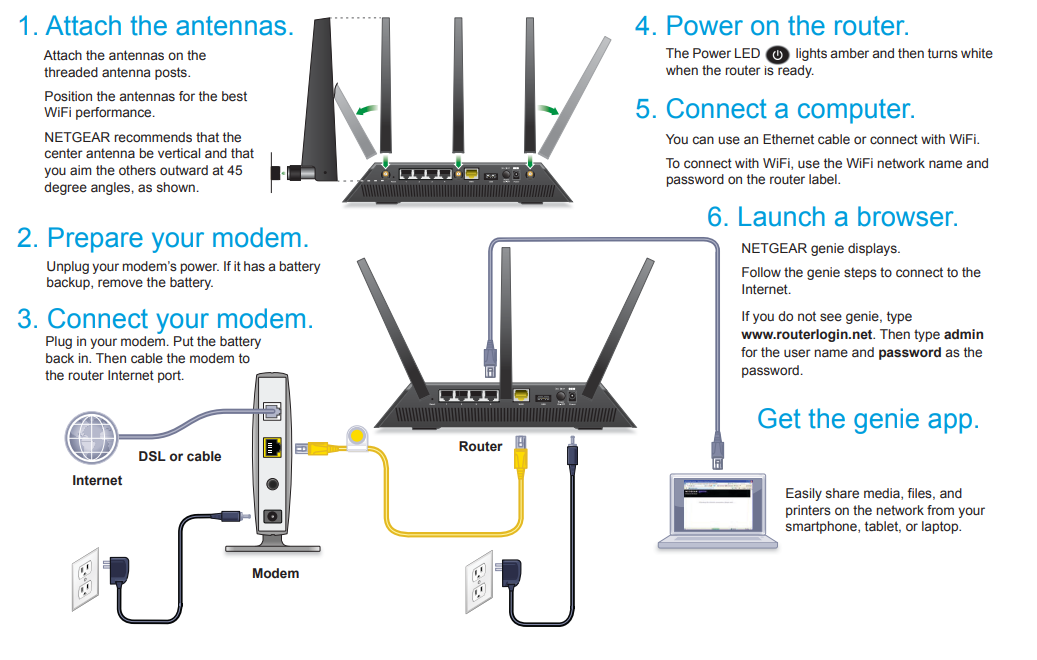
You can use this diagram to connect your router or follow the detailed instructions in this booklet.
Setup Guide
To set up the Netgear AC1900 Smart WiFi Router R7000, follow these steps:
- Connect the router to a power source and turn it on.
- Connect your computer or mobile device to one of the router's LAN ports using an Ethernet cable.
- Launch a web browser and enter http://www.routerlogin.net in the address bar.
- Enter the router's username and password (the default is "admin" for both).
- Follow the on-screen instructions to configure your network settings and connect to the internet.
Install Your Router
Make sure that your Internet service is active before you install your router.
To install your router
Attach the antennas.
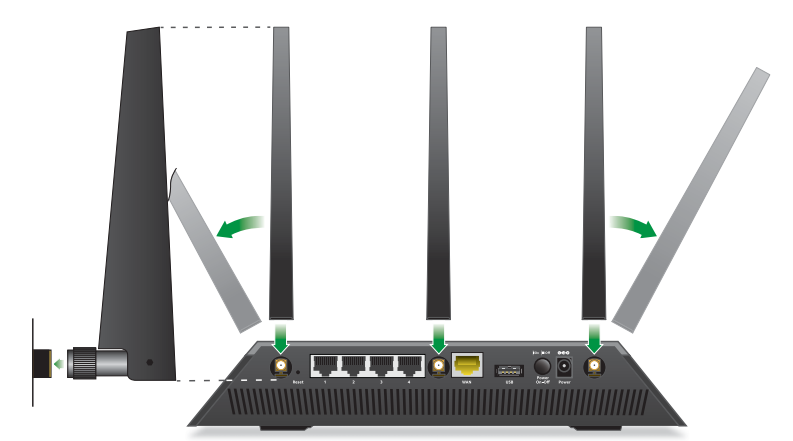
- Align the antennas with the antenna posts on the router.
- Attach the antennas on the threaded antenna posts.
- Position the antennas for the best WiFi performance. NETGEAR recommends that the center antenna be vertical and that you aim the others outward at 45 degree angles, as shown.
- Prepare your modem.
- Unplug your modem’s power.
- If the modem has a battery backup, remove its batteries.
If your modem was already connected to another router, disconnect the cable between your modem and that router.
Make sure that your modem is turned off and is cabled only to the wall jack for your Internet service.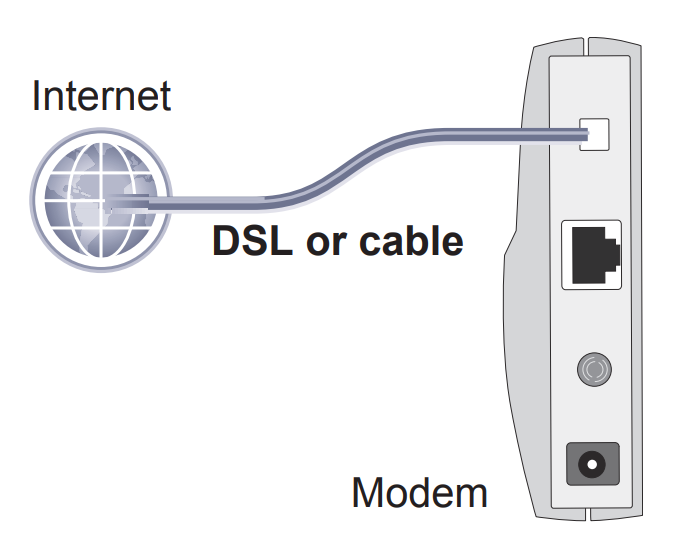
Connect your modem.
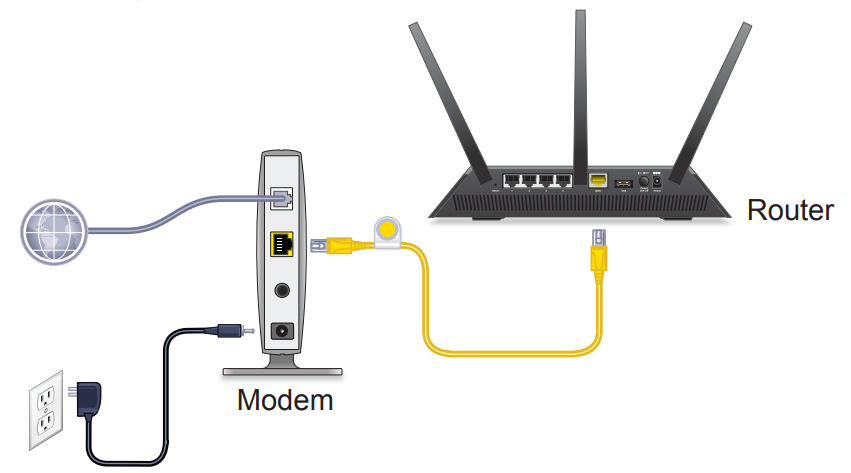
- Plug in, then turn on your modem. (Replace the batteries if you removed them previously.)
- With the yellow Ethernet cable that came with the router, connect your modem to the Internet port of your router.
Add power to the router.
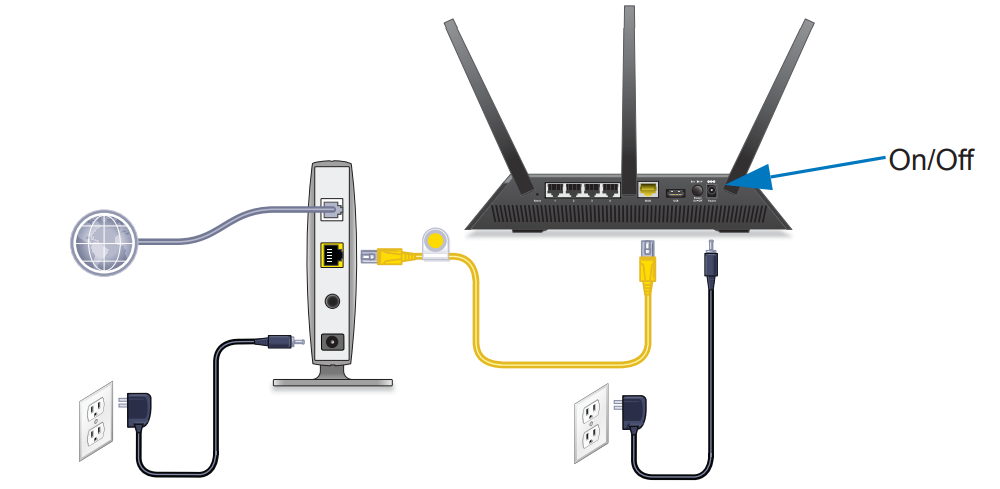
- Connect the power adapter to the router, and plug the power adapter into an outlet.
- Wait for the Power LED
 on the front panel to light amber and turn white. If no LEDs are lit, press the Power On/Off button on the rear panel of the router.
Connect a computer.
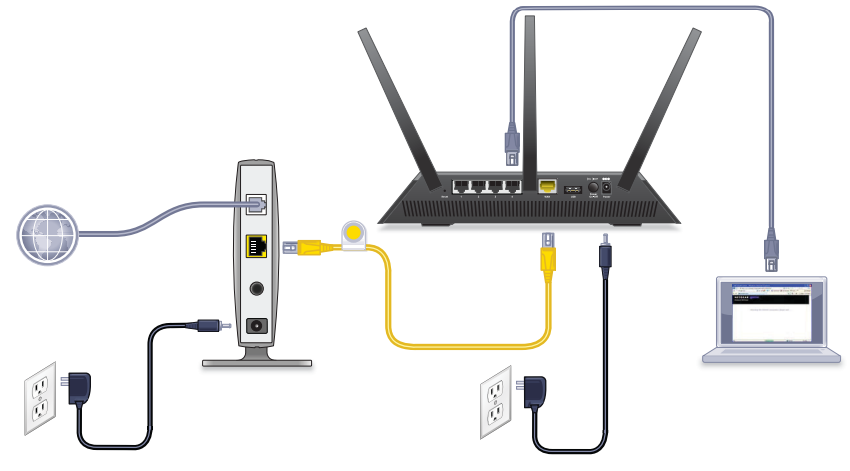
You can use an Ethernet cable or connect with WiFi:- For a wired connection, use an Ethernet cable (not included) to connect your computer to a black Ethernet LAN port on your router.
- To connect with WiFi, use the WiFi settings on the router label.
- Launch a web browser.
The first time that you connect to the router, the genie screen displays. Follow the genie steps to connect to the Internet.
If the genie screen does not display, try the following:- Close and reopen the browser.
- Make sure that your computer is connected to one of the four black LAN Ethernet ports on the router, or that you are connected to your WiFi network.
- Make sure that the router has full power, and that its Power LED
 is lit.
 - If your computer is set to a static or fixed IP address (this is uncommon), change it to obtain an IP address automatically from the router.
- If you still do not see the genie screen, log in to the router so that the genie can detect your Internet connection.
To log in to the router
- Enter admin for the user name and password for the password. The router BASIC Home screen displays. If your Internet connection is not set up yet, genie automatically detects your Internet connection.
LEDs
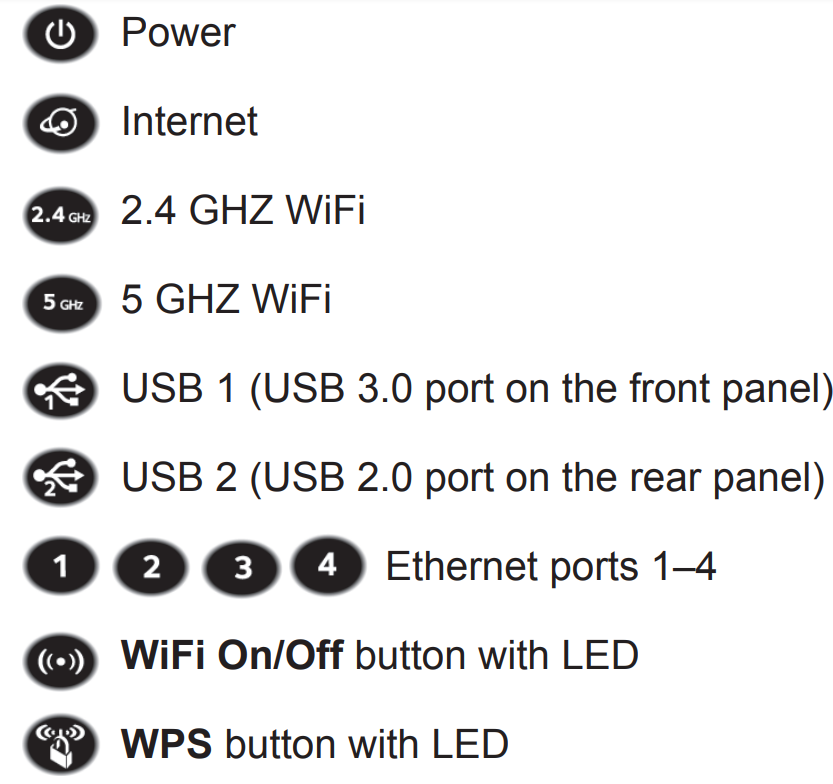
The LEDs on the top of the router light to indicate router activity
WiFi Network and Security
The preset WiFi network name (SSID) and network key (password) are unique to your router, like a serial number. Because the router automatically uses WiFi security, you don’t need to set it up. The WiFi settings are on the label.

NETGEAR recommends that you use the preset WiFi settings because you can check the router label if you forget them. NETGEAR genie lets you change these settings if you want. If you do so, write down the new WiFi settings and store them in a safe place.
You can write the WiFi settings from your router’s label in this space for easy reference.
- WiFi network name (SSID)
- Network key (password)
If you change the WiFi settings, write the new settings here for easy reference and store this booklet in a safe place.
- WiFi network name (SSID)
- Network key (password)
Join the WiFi Network
You can either use Wi-Fi Protected Setup (WPS) or select your WiFi network and type its password.
To join the network using WPS
- Press the WPS button on the router.
- Within two minutes, on your computer or wireless device, press its WPS button or click its onscreen WPS button.
For help with the WPS button on your computer or wireless device, check the instructions or online help that came with that computer or device. Some older equipment cannot use WPS.
To select your network and enter its password
- On your computer or wireless device, open the software that manages its WiFi connections. This software scans for WiFi networks in your area.
- Find and select your WiFi network. The WiFi network name and password are on the router’s label.
- Enter the WiFi password and click the Connect button.
View or Change the Router Settings
After you use genie to set up the router, you can log in to the router to view or change its settings.
Log In to the Router
To log in to the route
- Connect a computer or wireless device to the router.
You can use an Ethernet cable or connect with WiFi.- For a wired connection, use an Ethernet cable (not included) to connect your computer to a black Ethernet LAN port on your router.
- To connect with WiFi, select and join your WiFi network.
- Launch a web browser.
- Enter admin for the user name and password for the password. The router BASIC Home screen displays.
Change the Admin Password
To change the admin password
- Log in to the router.
- Click the ADVANCED tab.
- Select Administration > Set Password.
- Type your old password and type the new password twice.
- Select the Enable Password Recovery check box.
- Click the Apply button.
- When prompted, answer security questions. The answers are saved.
Recover a Forgotten Admin Password
The default password for the admin user name is password. If you changed the password and used the password recovery feature, you can retrieve this password.
To retrieve a forgotten admin password
- Launch a web browser.
- Click the Cancel button.
- When prompted, enter your saved answers and the serial number of your router.
The serial number is on the router label.
Find a Forgotten WiFi Security Password
The preset WiFi password is on the router label. If you changed your WiFi password and forgot what it is, log in to the router to view its current WiFi password.
To connect to the router and view its WiFi password
- Use an Ethernet cable to connect your computer to a black LAN port on the router.
- Launch a web browser. A login screen displays.
- Enter admin for the user name and password for the password. The router BASIC Home screen displays.
- Select Wireless Settings.
The Security Options section of the screen displays your WiFi password.
Prioritize with Quality of Service
You can use Quality of Service (QoS) to assign high priority to gaming and streaming video from the Internet.
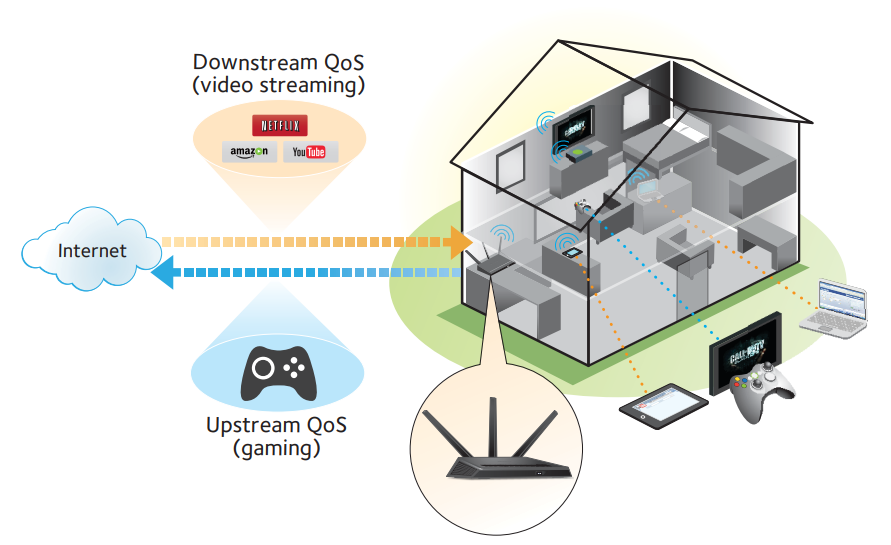
- To set up QoS, log in to the router and enable Downstream QoS and Upstream QoS.
- Downstream QoS prioritizes Internet traffic from the Internet to your network. This delivers better performance when you stream Internet video, such as when you watch YouTube videos.
- Upstream QoS prioritizes network traffic from local devices like your Xbox to the Internet. This provides for a lag-free online gaming experience.
Prioritize Internet Video Streaming
To set up QoS to assign a high priority to Internet video streaming, log in to the router and enable Downstream QoS.
To enable Downstream QoS
- Click the ADVANCED tab.
Select Setup > QoS Setup > Downstream QoS.

- Select the Enable Downstream QoS (Improved Video Streaming) check box.
- (Optional) Select the Streaming Database Auto Upgrade check box. The router automatically checks for updates for the streaming database, and downloads and installs them.
- Click the Apply button.
Prioritize Internet Gaming
To set up QoS to assign a high priority to Internet traffic from your gaming system, log in to the router and enable Upstream QoS.
To enable Upstream QoS
- Click the ADVANCED tab.
Select Setup > QoS Setup > Upstream QoS.
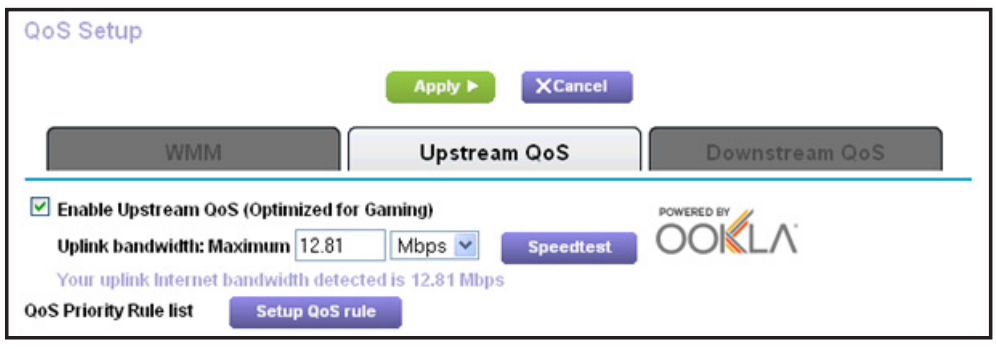
- Select the Enable Upstream QoS (Optimized for Gaming) check box.
- Specify the maximum uplink bandwidth for your Internet connection:
- If you know what your uplink bandwidth is, type it in the Uplink bandwidth Maximum field.
- If you are not sure, click the Speedtest button.
Speedtest verifies the upstream speed of your Internet connection. The Uplink bandwidth Maximum field displays the result of the test.
- Click the Apply button.
The router assigns a high priority to Internet traffic from your gaming devices to the Internet.
Share a USB Drive on the Network
ReadySHARE lets you access and share a USB drive connected to the router USB port. (If your USB drive has special drivers, it is not compatible.)

To connect a USB drive
- Insert your USB storage drive into the blue USB 3.0 port on the front of the router.
- If your USB drive has a power supply, you must use it when you connect the USB drive to the router.
When you connect the USB drive to the router USB port, it might take up to two minutes before it is ready for sharing. By default, the USB drive is available to all computers on your local area network (LAN).
To access the USB drive from a Mac
- Select Go > Connect to Server.
- Enter smb://readyshare as the server address.
- Click the Connect button.
To access the USB drive from a Windows computer
- Select Start > Run.
- Enter \\readyshare in the dialog box.
- Click the OK button.
NETGEAR genie App
The free NETGEAR genie app lets you easily monitor, connect, and control your home network from a Windows or Mac computer, tablet, or smartphone. You can share and stream music or videos, diagnose and repair network issues, set up parental controls, and more
- Access your router and change its settings or diagnose and repair network issues.
- Make a printer AirPrint compatible so that you can print from an iPad or iPhone.
- Use MyMedia to find and play media files in your network.
- Use Turbo Transfer to quickly send files from your computer or smartphone to another device on the network.
- Set up parental controls.
- Connect your smartphones and tablets to your home WiFi by scanning the WiFi QR code from genie.
ReadySHARE Vault Backup App
Your router comes with free backup software for all the Windows computers in your home. Connect a USB hard disk drive (HDD) to the USB port on your router for centralized, continuous, and automatic backup.
To back up your Windows computer
- Connect a USB HDD to a USB port on the router. For best performance, connect a USB 3.0 HDD to the blue USB 3.0 port on the front of the router.
- Install the Genie app on each Windows computer.
Launch ReadySHARE Vault.
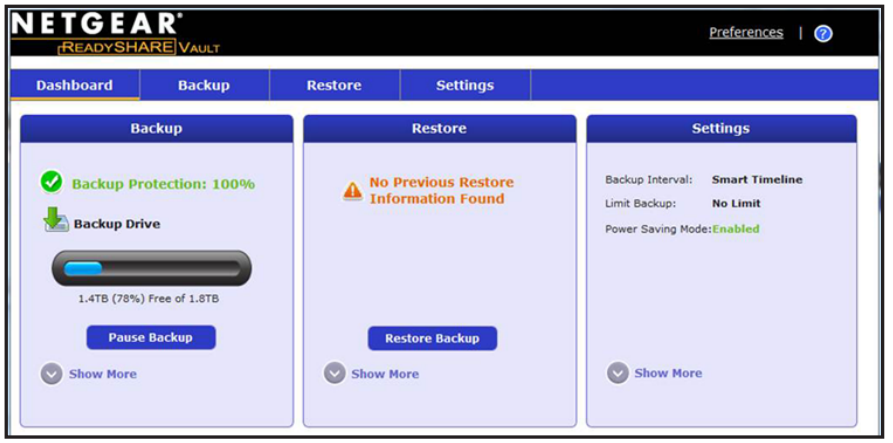
- Use the Dashboard or the Backup tab to set up and run your backup.
Share a USB Printer
You can connect a USB printer to the router’s USB port and print wirelessly.
To set up the ReadySHARE Printer
- Connect the USB printer to the router’s USB port with a USB printer cable.
- On each computer that will share the printer:
- Install the current USB printer driver software (available from the printer manufacturer).
- Select the language.
- If prompted, select the printer and click the Connect button for each computer.
When the first computer connects, the status changes to Manually connected by xxx. For each computer, when you complete Step 3, the printer status displays as Available.
More Premium Features
Your router lets you do the following and more
- Share media from DLNA and iTunes Server.
- Set up a secure VPN Service connection to your home network.
- Create a personal FTP server with a custom URL.
iTunes Server
iTunes Server lets you play music with your Windows or Mac iTunes app from a USB drive that is connected to the router USB port. You can also use the Apple Remote from iPhone and iPad to play music on any AirPlay devices, such as Apple TV or AirPlay-supported receivers.
To set up iTunes Server
From the ADVANCED tab, select Advanced > USB Storage > Media Server.
VPN Service
VPN Service allows you remote access to your home network with a secure connection.
To set up VPN Service
From the ADVANCED tab, select Advanced Setup > VPN Service to set up the VPN connection.
Personal FTP Server
With your customized free URL, you can easily access your own FTP server that is set up on your home network remotely.
To set up FTP and your free URL in the router
- From the ADVANCED tab, select USB Storage > Advanced Settings.
- Set up the FTP (via Internet) feature.
- From the ADVANCED tab, select Advanced Settings > Dynamic DNS and select NETGEAR as the service provider.
Troubleshooting
If you experience any issues with the Netgear AC1900 Smart WiFi Router R7000, try the following troubleshooting steps
- Check that the router is turned on and properly connected to a power source.
- Make sure that the router is connected to your modem using an Ethernet cable.
- Restart the router and modem by unplugging them from the power source, waiting for 30 seconds, and then plugging them back in.
- Check that the router's firmware is up to date.
- Make sure that the wireless network name (SSID) and password are correct.
Pros & Cons
Pros
- Fast and reliable internet connectivity
- Sleek and stylish design
- Advanced wireless technologies
- User-friendly interface
- Advanced security features
Cons
- May be overkill for light internet usage
- Price may be a bit high for some users
- Some users may find the interface a bit complicated to use
- Limited range compared to some other routers
Customer Reviews
Customers have praised the Netgear AC1900 Smart WiFi Router R7000 for its fast and reliable internet connectivity, advanced wireless technologies, and user-friendly interface. However, some users have complained about the router's limited range and high price.
Faqs
Can you tell me how far the Netgear R7000 Router can be used for WiFi?
Is it possible for the R7000 Router to handle many devices at the same time?
How compatible is the Netgear R7000 with the Amazon Alexa voice assistant?
What steps should I take if I experience a loss of internet connection with my Netgear R7000?
How can I return my Netgear R7000 to its original configuration?
How can I increase the Netgear R7000's WiFi speed?
With my Netgear R7000, how can I keep an eye on my internet traffic?
What protection features is the R7000 equipped with?
Is the R7000 Router compatible with a USB printer?
How long is the Netgear AC1900 Smart WiFi Router R7000 router's warranty?
Leave a Comment
