Newentor Weather Station EM3333 Instruction Guide
Content
Introduction
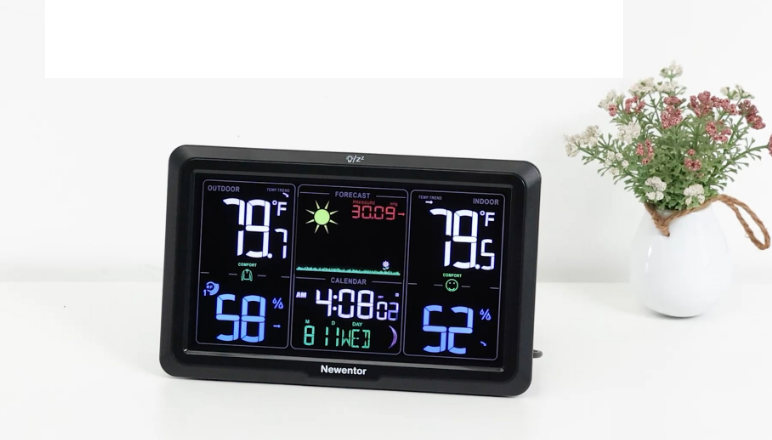
The Newentor Weather Station EM3333 is a high-accuracy weather monitoring system designed for both personal and professional use. This state-of-the-art device offers real-time weather data, including temperature, humidity, wind speed, wind direction, and rainfall. With an estimated price range of $200 to $300 and a tentative launching date set for late 2023, the EM3333 is poised to become a leading choice for weather enthusiasts and professionals alike.
Detailed Specifications
- Sensor types: Temperature, Humidity, Anemometer, Rain Gauge, and Barometer
- Communication protocol: Wireless (868 MHz or 915 MHz, depending on the region)
- Transmission range: Up to 300 meters (line of sight)
- Power source: Solar-powered sensors with backup batteries
- Display: Large, high-resolution LCD screen with backlight
- Data storage: Up to 3 months of historical data
- Waterproof rating: IP65 (protected against low-pressure water jets from any direction)
Weather Station Features
Main Station
- Weather Forecasting Function
- WWVB Radio Controlled Time Function (ON or OFF)
- Date and Weekday Display
- Time in Optional 12/24 Hour Format
- Daily Alarm Function
- Automatic Snooze Function
- Moon Phase Display
- USB Charger Output Socket
- 5 Levels Brightness Backlight with Power Adapter
- Comfort Display
- Trend Display of Temperature, Humidity, and Barometric Pressure
- Temperature:
- Temperature Alternatively in °C or °F
- Indoor Temperature Measurement Ranges: 15°F (-9.9°C) to 122°F (50°C)
- Outdoor Temperature Measurement Ranges: -4°F (-20°C) to 140°F (60°C)
- Outdoor Thermometer and Frost Alert
- Humidity
- Indoor & Outdoor Measurable Range: 20%RH ~ 95%RH
- Barometric Pressure
- Barometric Pressure Measurement Ranges: 17.72 in Hg (600 hPa/mb) to 32.50 in Hg (1100 hPa/mb)
- Pressure Alternatively in in Hg or mb/hPa
- Minimum/Maximum Display for Humidity and Temperature
- Remote Sensor
- 3 Remote Sensors Can Be Connected (Only 1 Included)
Remote Sensor
Wireless Outdoor Sensor
- Wall Mount or Table Stand
- 433.92MHz RF Transmitting Frequency
- 200 Feet Transmission Range in an Open Area
Power Supply
- Weather Station
Battery: 2 x AA (Not included) - Wireless Outdoor Sensor
Battery:2 x AA (Not included)
Weather Station Appearance
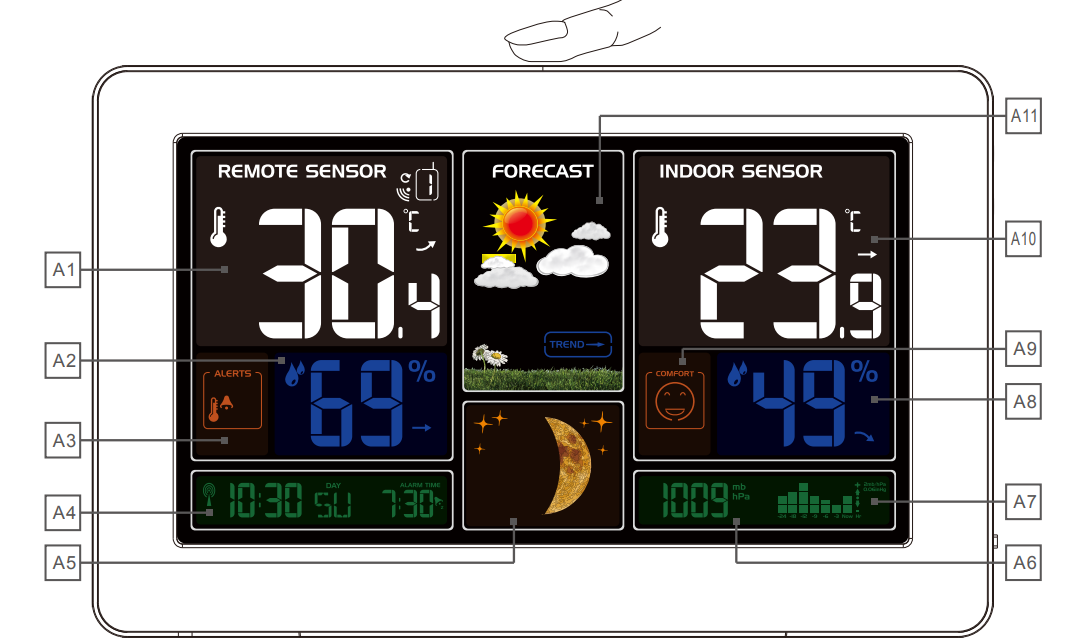
Part A – Weather Station Front
- A1: Remote Temperature
- A2: Remote Humidity
- A3: Remote Temperature Alert
- A4: Time/Calendar or Alarm Time
- A5: Moon Phase
- A6: Barometric Pressure
- A7: Histogram Shows the Atmospheric Pressure
- A8: Indoor Humidity
- A9: Indoor Comfort
- A10: Indoor Temperature
- A11: Weather Forecasting
Part B – Weather Station Back
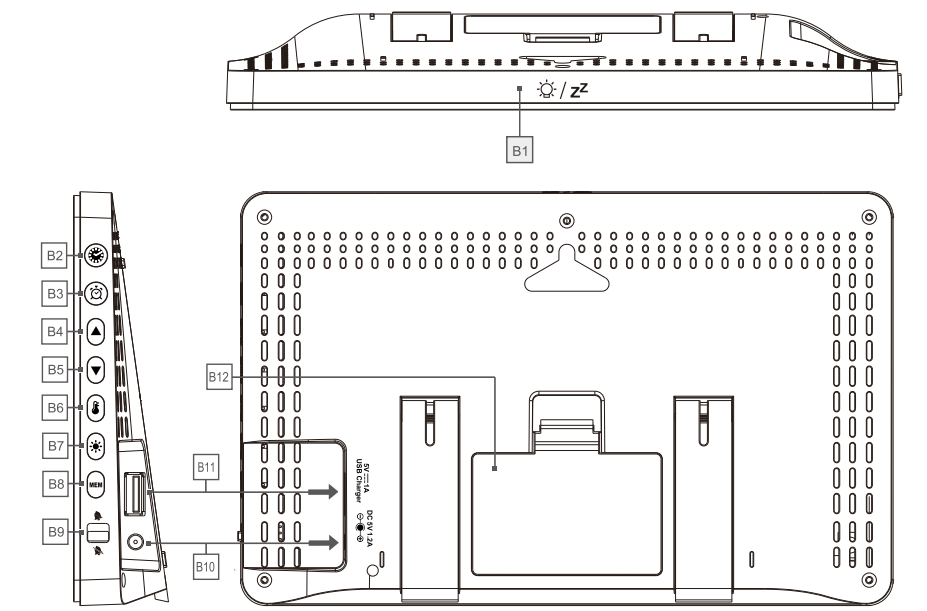
- B1:
 Touch Field
 - B2:
 Button
 - B3:
 Button
 - B4: “▲” Button
- B5: “▼” Button
- B6:
 Button
 - B7:
 Button
 - B8: “MEM” Button
- B9: Alarm On/Off Shift Switch
- B10: Power Supply Socket
- B11: USB Charger Output Socket
- B12: Battery Compartment
Part C – Wireless Outdoor Sensor
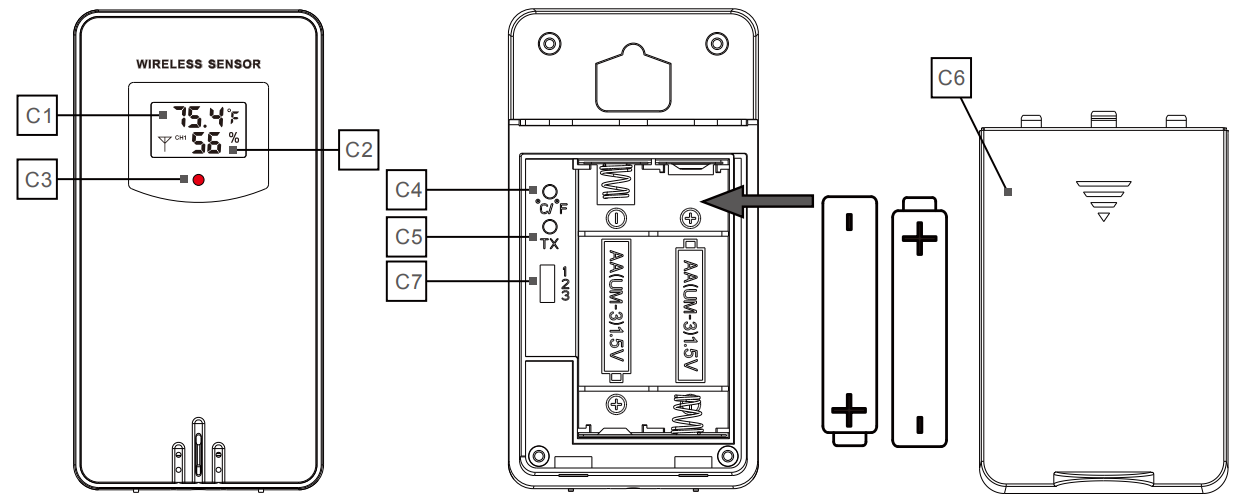
- C1: LCD Display – Temperature
- C2: LCD Display – Humidity
- C3: Transmit Signal LED
- C4: “°C/°F” Switch Button
- C5: “TX” Reset Button
- C6: Battery Compartment
- C7: 3 Channel Select
Button Function
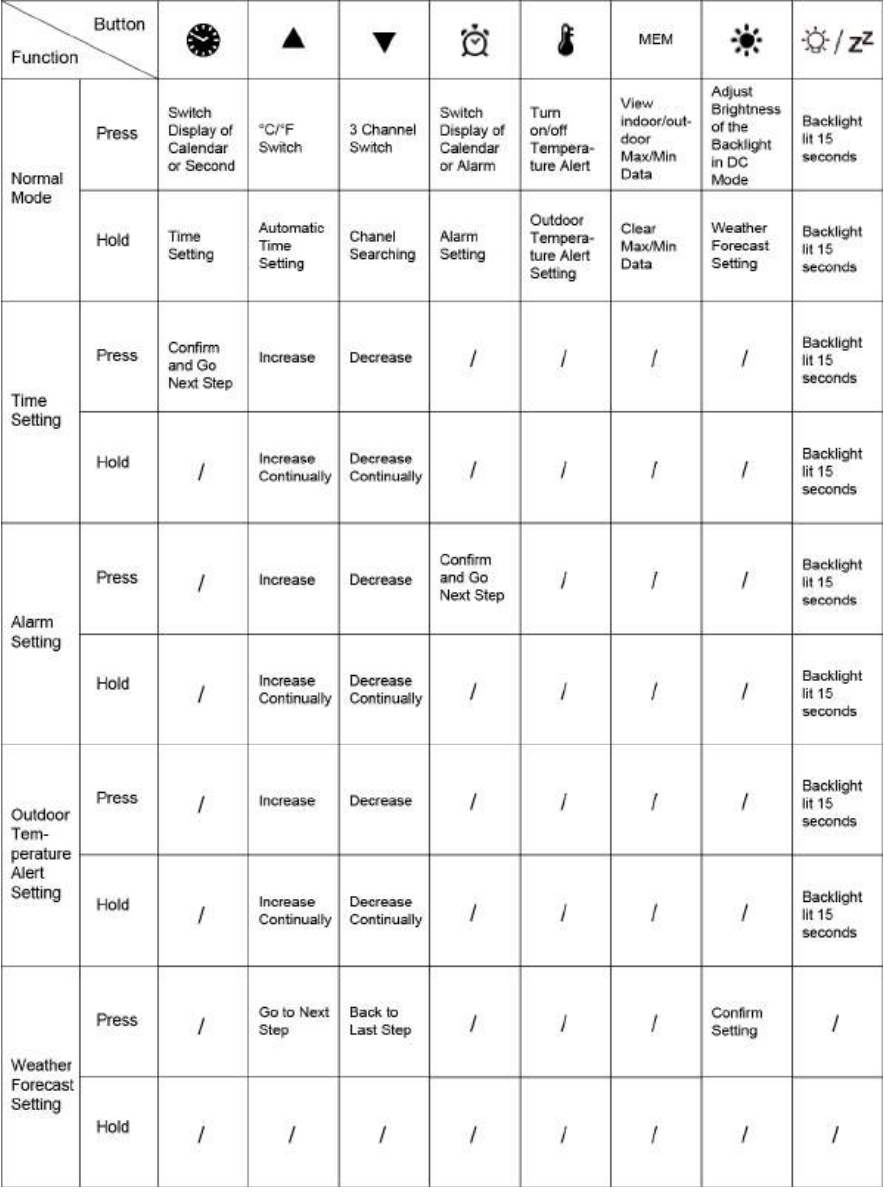
Description
The Newentor Weather Station EM3333 is a comprehensive weather monitoring solution that offers high accuracy and real-time data tracking. The system includes wireless sensors for temperature, humidity, wind speed and direction, and rainfall. The sensors are solar-powered, ensuring continuous operation even in low-light conditions, with backup batteries for added reliability. The large, high-resolution LCD display provides clear visibility of current weather conditions, as well as historical data and weather trends. The EM3333 is also waterproof, making it suitable for both indoor and outdoor use.
Initial Operation and Notes
Initial Operation
- Open the weather station battery compartment, insert 2 x AA batteries observing polarity [“+” and “–” marks].
- Remove the battery compartment on the Wireless Remote Sensor, insert 2 x AA batteries observing the correct polarity (+ and – marks), and close the battery compartment.
- When the power is connected, all the icons on the LCD display will light up for 3 seconds. You will hear a beep tone, and the weather station will start to detect the indoor temperature and humidity.
- The weather station will start to make a connection to the outdoor remote sensor. This operation takes about 3 minutes and is displayed by a flashing reception RF icon “
 ” in the “Remote Sensor” display area on the receiver.
 - Once the weather station has created a connection to the outdoor sensor, the clock will start automatically searching for the WWVB Signal to set the time and date. The radio mast icon “
 ” will flash showing it is searching for the signal, it may take up to 7 minutes to search.
Notes for Customer Before Use
- During the WWVB signal search mode, only the “
 ” and “▲” buttons will function. All other buttons have no function, and the backlight will not keep lighting during this moment even if the adapter is plugged in. Press the “▲” button to cancel the WWVB signal search, and all buttons and the backlight will function.
 - If the weather station fails to receive transmission from the outdoor sensor (“- -” display on the main station LCD), press and hold the “▼” button for 3 seconds to receive the transmission manually. The RF icon “
 ” flashes on the LCD, and the weather station will re-receive the data from the outdoor sensor. Or open the sensor battery compartment and press the TX button to connect the sensor and station again.
Time, Time Zone, and Calendar Setting
Manual Time Setting
- Press
 the button once to switch the display calendar or second.
 - Press and hold down the button for 3 seconds. The 12/24 hour mode display starts to flash. Use the “▲” and “▼” buttons to set the correct 12/24 hour mode.
- Press “” to confirm your setting. The Time Zones start to flash. Use the “▲” and “▼” buttons to set the correct time zone (-12 to +12).
- Press “” to confirm your setting. The Hour display starts to flash. Use the “▲” and “▼” buttons to set the correct hour.
- Press “” to confirm your setting. The Minute display starts to flash. Use the “▲” and “▼” buttons to set the correct minute.
- Press the “” button to confirm your setting. The Month and Date icon display starts to flash. Use the “▲” and “▼” buttons to set the date display on Month/Date or Date/Month.
- Press the “” button to confirm your setting. The Year display starts to flash. Now use the “▲” and “▼” buttons to set the correct year.
- Press the “” button to confirm your setting. The Month display starts to flash. Now use the “▲” and “▼” buttons to set the correct month.
- Press the “” button to confirm your setting. The Date display starts to flash. Now use the “▲” and “▼” buttons to set the correct date.
Press the “
” button to confirm your setting. The week display language starts to flash. Now use the “▲” and “▼” buttons to set the correct language.Language Sunday Monday Tuesday Wednesday Thursday Friday Saturday German, GE SO MO DI MI DO FR SA English, EN SU MO TU WE TH FR SA French, FR DI LU MA ME JE VE SA Italian, IT DO LU MA ME GI VE SA Spanish, SP DO LU MA MI JU VI SA Dutch, DU ZO MA DI WO DO VR ZA Danish, DA SO MA TI ON TO FR LO - Press the “” to confirm your setting and to end the setting procedures.
F.Y.I.
- After 20 seconds without pressing any button, the clock switches automatically from Set Mode to Normal Time Mode.
- The time zone must be set correctly according to the weather station area, or when the time signal is received, the time will be incorrect.
Automatic Time Setting
- The Weather Station automatically starts the WWVB Signal search up to 7 minutes after any restart or change of batteries. Press and hold down the “▲” button for 2 seconds to manually start the WWVB signal search.
- The radio mast icon “” will flash showing it is searching for the signal. Once the signal is found, the Time and Date will be automatically set. If no signal is found within 7 minutes, the radio mast icon will disappear, and it will automatically start searching again in 1 hour.
- At 1:00 / 2:00 / 3:00 am, the Weather Station automatically carries out a synchronization procedure with the WWVB signal to correct any deviations to the exact time. If this synchronization attempt is unsuccessful (The radio mast symbol disappears from the display), the system will automatically attempt another synchronization at the next full hour. This procedure is repeated automatically up to 5 times.
F.Y.I.
- A flashing radio mast icon indicates that the WWVB signal reception has started.
- A continuously displayed radio mast icon indicates that the WWVB signal was received successfully.
- We recommend a minimum distance of 8 feet to all sources of interference, such as televisions or computer monitors.
- Radio reception is weaker in rooms with concrete walls (e.g., in cellars) and in offices. In such extreme circumstances, place the system close to the window.
- During the RC receive mode, only the “ ” and “▲” button function. Other button operations have no function, and the backlight will not light up. If you want to carry out other functions of operation, please press the “▲” button to exit the RCC receiving mode.
Daily Alarm and Snooze Function Setting
Setting the Daily Alarm
- Press the
 button once to switch the display calendar or alarm.
 - Press and hold down the button for 2 seconds until the Alarm Time hour display starts to flash. Use the “▲” and “▼” buttons to set the required hour.
- Press the button to confirm your setting. The Minute display starts to flash. Use the “▲” and “▼” buttons to set the required minute.
- Press the button to confirm your setting and end the setting procedure.
F.Y.I.: After 20 seconds without pressing any button the clock switches automatically from setting mode to Normal clock mode.
Switching ON/OFF the Alarm Signal
- When the alarm shift switch is pushed in the
 position, the LCD displays the
 icon next to the date, indicating the alarm function is open.
 - When the back of the alarm shift switch is pushed in the
 position, the icon disappears, indicating the alarm function is closed.
 - When the alarm rings, press any button except the button to stop the alarm signal. It is not necessary to reactivate the alarm. It switches itself automatically to the alarm time which has already been set.
Snooze Function
- Touch the field or press the button when the alarm signal sounds to get to SNOOZE mode. The alarm signal sounds again after approx. 5 minutes.
Weather Forecast and Barometric
Weather Forecast
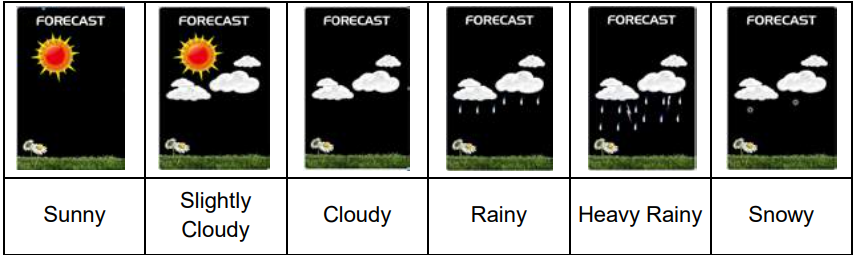
- The weather station calculates a weather forecast for about the next 8 hours based on the barometric pressure trend. This forecast provides an approximate indication of current developments. Please take the weather forecast from your local weather forecasting service into account as well as the forecast from your weather station. If there are discrepancies between the information from your device and the local weather forecasting service, take the advice of the latter as authoritative.
The weather station displays the following weather icon for the next 8 hours weather forecast, not current weather:
Barometric Pressure Display
- The current barometric pressure is automatically shown on the Weather Station once it starts receiving readings.
- Press and hold
 the button for 2 seconds to enter the air pressure unit and weather settings. The pressure units will flash. Use the “▲” and “▼” buttons to set the pressure unit to display in the “hPa/mb” or “in Hg”.
 - If the barometric pressure reading is below the minimum range, then LLLL will be displayed. If the barometric pressure reading is above the maximum range, then HHHH will be displayed.
Barometric Trend Display
The weather station can display the barometric pressure trend. You may see the following displays next to the weather forecast icon:
- The barometric pressure will rise.
- The barometric pressure will remain constant.
- The barometric pressure will fall.
Lunar Phases and Tide Indicator
The Moon icon and tide indicator of the Weather Station will also display 12 different Moon phases.

Temperature, Humidity, and Comfort Display
The temperature is displayed either in °C or °F. Briefly pressing the “▲” button allows you to switch between the individual modes.
Current Temperature and Temperature Trend Display
After you insert the batteries, the weather station measures the current temperature. The trend display shows a neutral temperature course. ![]() The further course of the trend display is determined as follows:
The further course of the trend display is determined as follows:
- If, after an hour, the temperature is more than 1°C higher than the value measured first, then a positive course is displayed
 .
. - If, after an hour, the temperature is more than 1°C lower than the value measured first, then a negative course is displayed
 .
.
Outdoor Temperature & Frost Alert Settings
- Press and hold down the
 button for 2 seconds until the icon for the Temperature Alert starts to flash.
 - The icon of the Upper limit of the Temperature alarm starts to flash. Use the “▲” and “▼” buttons to set the required maximum temperature. Press “” to confirm your setting.
- The icon of the Lower limit of the Temperature alarm starts to flash. Use the “▲” and “▼” buttons to set the required minimum temperature. Press the button to confirm your setting and end the setting procedure.
Activating and Deactivating Temperature & Frost Alert
- Press the “” button to activate or deactivate the remote temperature alert. When the remote temperature alarm is activated, the temperature alarm icon is displayed in the remote sensor bar.
- When the remote channel temperature value exceeds the set temperature range, the alarm will activate. The weather station will alarm continuously five times every minute. Simultaneously, the temperature alarm icon "
 " will flash. If the alarm activates due to temperature, the current channel's temperature value and either the upper limit icon "
 " or lower limit icon "
 " will also flash.
 - The frost alarm will be activated when the temperature of the REMOTE SENSOR is between +30°F to +37°F or -1°C to +3°C, symbol "
 " will flash.
F.Y.I.: When the temperature exceeds the upper limit of the alarm temperature setting, the upper limit alarm activates, and symbol "![]() " flashes. When the temperature falls below the lower limit of the alarm temperature setting, the lower limit alarm activates, and symbol "
" flashes. When the temperature falls below the lower limit of the alarm temperature setting, the lower limit alarm activates, and symbol "![]() " flashes.
" flashes.
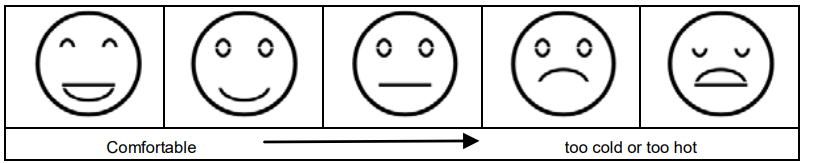
Comfort Display
Indoor comfort level is calculated based on indoor temperature and humidity, categorized into 5 levels.
Current Humidity and Humidity Trend Display
After inserting batteries, the weather station measures current relative humidity. The trend display initially shows a neutral relative humidity course. ![]() Further trends are displayed as follows:
Further trends are displayed as follows:
- If, after an hour, relative humidity increases by more than 5% from the initial measurement, a positive trend is displayed.
- If, after an hour, relative humidity decreases by more than 5% from the initial measurement, a negative trend is displayed.
- If relative humidity remains unchanged within an hour, the arrow changes to a horizontal arrow. The measured relative humidity is then considered neutral for further predictions.
Maximum/Minimum Temperature and Humidity
To view indoor/outdoor maximum and minimum temperature and humidity data, press the “MEM” button:
- Press once to display maximum temperature and humidity values.
- Press twice to display minimum temperature and humidity values.
- Press three times to return to current temperature and humidity levels.
To reset maximum and minimum temperature and humidity data, press and hold the “MEM” button for about 2 seconds. This resets all recorded minimum and maximum data to the currently displayed values.
F.Y.I.: If the temperature reading is below the range, "LL.L" will be displayed. If the temperature reading is above the range, "HH.H" will be displayed.
Remote Sensor Transmission
- The weather station automatically starts receiving transmission from the outdoor thermo sensor for outdoor temperature and humidity after batteries are inserted.
- The outdoor sensor will automatically transmit temperature and humidity signals to the Weather Station after batteries are inserted.
- The weather station can connect up to 3 channel wireless sensor registrations. When using multiple wireless sensors, ensure different channels are selected (channels 1, 2, 3).
- Press the “▼” key to switch the display between different channels of remote temperature and humidity. When displaying the symbol "
 ", channels will automatically switch every 5 seconds.
 - If the Weather Station fails to receive transmission from the outdoor sensor (displaying “--” on the LCD), press and hold the “▼” button for 3 seconds to manually receive transmission. The RF icon "" will flash on the LCD, indicating the Weather Station is receiving from the outdoor sensor.
F.Y.I.
- When setting up wireless sensors on different channels, ensure the weather station "REMOTE SENSOR" is set to the corresponding channel. If no signal is received from a channel, "--" will be displayed on the weather station's channel.
- Only one remote sensor is included. Ensure the weather station and remote sensor are set to the same channel.
Backlight
- If the product is powered by batteries, touch the “” field. The backlight will be lit for 15 seconds.
- When the power supply of the product is inserted into the power supply adapter, the battery will automatically disconnect the power supply, and the backlight will always be bright. Press the “” button to adjust the brightness of the backlight. You can adjust the 5 states: 4 different brightness backlight and close the backlight. Users can choose according to their personal preferences for different brightness backlight or turn off the backlight. Turn off the backlight when you can touch the “” field to light the backlight for 15 seconds.
USB Charger
- When you use the USB charger to charge the electronic device, please make sure the weather station is powered by the main adapter. DO NOT use batteries only.
Low Battery
- If the battery icon
 appears, the batteries in the outdoor sensor should be replaced as soon as possible.
Setup Guide
- Assemble the sensors and display unit according to the instructions provided in the user manual.
- Place the sensors in their desired locations, ensuring that they are level and unobstructed for accurate readings.
- Power on the sensors and display unit, allowing them to synchronize.
- Configure the display unit to your preferred settings, such as temperature units (Celsius or Fahrenheit) and data refresh rate.
- Pair the display unit with your smartphone or computer, if desired, for remote monitoring and data access.
SAFETY
- This item can be used by children 8 years of age and above, as well as by persons with reduced physical, sensory, or mental capacities or lacking experience and knowledge, if they are supervised or have been instructed in the safe use of the item and understand the dangers that may arise.
- Children must not play with the item.
- Cleaning and user maintenance must not be carried out by children, unless they are 8 years of age or older and are being supervised.
- Batteries, when swallowed, can be life-threatening. Therefore, keep the product and battery out of reach of small children. If a battery is swallowed, medical assistance must be sought immediately.
RISK OF BATTERY LEAKAGE
- In the event of a battery leak, immediately remove it from the device to prevent damage.
- Avoid contact with battery acid, thoroughly flush the affected area with plenty of clean water and seek immediate medical attention.
- Only use the same type of batteries, do not mix used and new batteries.
- Avoid extreme environmental conditions and temperatures as they may affect batteries e.g. above radiators.
- Remove the batteries from the device if they have not been used for a long period.
RISK OF EQUIPMENT DAMAGE
- Only use the specified battery type.
- When inserting the battery ensure the correct polarity. This is shown in the battery compartment.
- If necessary, clean the battery and device contacts before inserting the battery.
- Promptly remove drained batteries from the product.
- Do not make any modifications to the item. Only allow repairs to be carried out at a specialist workshop. Repairs carried out incorrectly can considerably endanger the user.
Troubleshooting
Common problems with the Newentor Weather Station EM3333 include sensor malfunctions, transmission issues, and display malfunctions. If you experience any of these issues, check the following:
- Ensure that the sensors are properly assembled and placed in unobstructed locations.
- Check the sensor batteries and ensure that they are properly installed and charged.
- Verify that the sensors and display unit are within transmission range and that there are no physical obstructions between them.
- If using remote monitoring, ensure that your smartphone or computer is connected to the internet and that the display unit is paired properly.
Newentor Weather Station EM3333 Guarantee
The device has been manufactured to strict quality guidelines and meticulously examined before delivery. The company Newentor guarantees the warranty for this device is 1 year from the purchase date.
Newentor Weather Station EM3333 Pros & Cons
Pros
- High accuracy and real-time data tracking
- Solar-powered sensors with backup batteries
- Waterproof design for indoor and outdoor use
- Large, high-resolution LCD display
- Remote monitoring capabilities
Cons
- Higher price point compared to some competing weather stations
- May require technical expertise for setup and configuration
- Limited transmission range may require additional sensors for larger properties
Customer Reviews
Customers have praised the Newentor Weather Station EM3333 for its high accuracy, reliable performance, and user-friendly interface. However, some have noted that the setup process can be complex, requiring technical expertise or additional assistance. The waterproof design and remote monitoring capabilities have also been well-received, with users appreciating the ability to monitor weather conditions from anywhere.
Common Complaints
The most common complaints regarding the Newentor Weather Station EM3333 include transmission issues, sensor malfunctions, and difficulties with the setup process. These issues are typically resolved through troubleshooting and user manual consultation, but some users may require additional assistance from customer support.
Faqs
What is the transmission range of the Newentor Weather Station EM3333?
Can the Newentor Weather Station EM3333 be used for both indoor and outdoor applications?
What is the power source for the sensors in the Newentor Weather Station EM3333?
How much historical data can the Newentor Weather Station EM3333 store?
What is the waterproof rating of the Newentor Weather Station EM3333?
Can the Newentor Weather Station EM3333 be used for remote monitoring?
What is the estimated price range of the Newentor Weather Station EM3333?
When is the tentative launching date for the Newentor Weather Station EM3333?
What are the sensor types included in the Newentor Weather Station EM3333?
What communication protocol does the Newentor Weather Station EM3333 use?
Leave a Comment