Nikon Coolplix Digital Camera P1000 Usage Guide
Content
Digital Camera Introduction
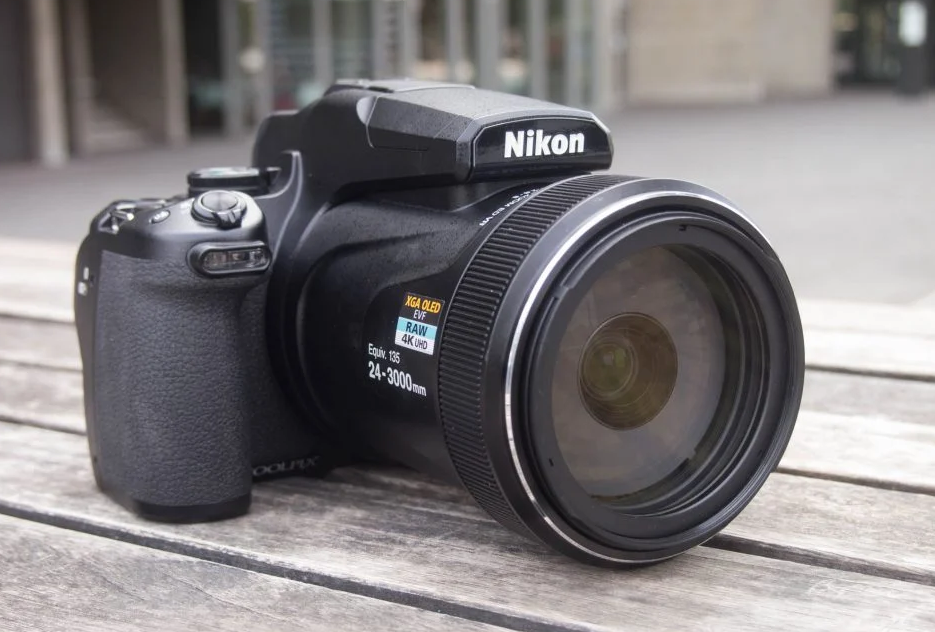
The Nikon Coolpix P1000 Digital Camera is a groundbreaking device that offers an impressive 3000mm super telephoto lens, making it one of the most powerful zoom cameras available. With a 16MP backside-illuminated CMOS sensor and advanced image stabilization, it captures stunning images even at extreme distances. The camera also supports 4K UHD video recording and features a vari-angle LCD for versatile shooting angles. Ideal for wildlife and sports photography, the P1000 is priced at approximately $996.95, reflecting its advanced capabilities and innovative technology.
Confirming the Package Contents
In the event that any items are missing, please contact the store where you purchased the camera.
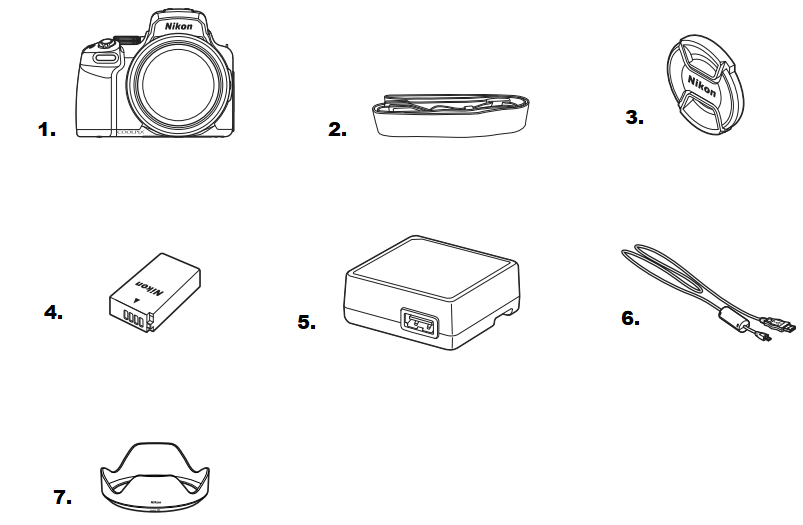
- COOLPIX P1000 Digital Camera
- Strap
- LC-77 Lens Cap
- EN-EL20a Rechargeable Li-ion Battery
- EH-73P Charging AC Adapter1, 2
- UC-E21 USB Cable
- HB-CP1 Bayonet Lens Hood
- Quick Start Guide (this manual)
- SnapBridge Connection Guide
- Warranty
Specifications
General Information
- Camera Type: Digital Compact Superzoom
- Model: Nikon Coolpix P1000
- Release Year: 2018
Image Sensor
- Sensor Type: CMOS
- Sensor Size: 1/2.3 inch
- Effective Pixels: 16 Megapixels
Parts of the Camera
The Camera Body
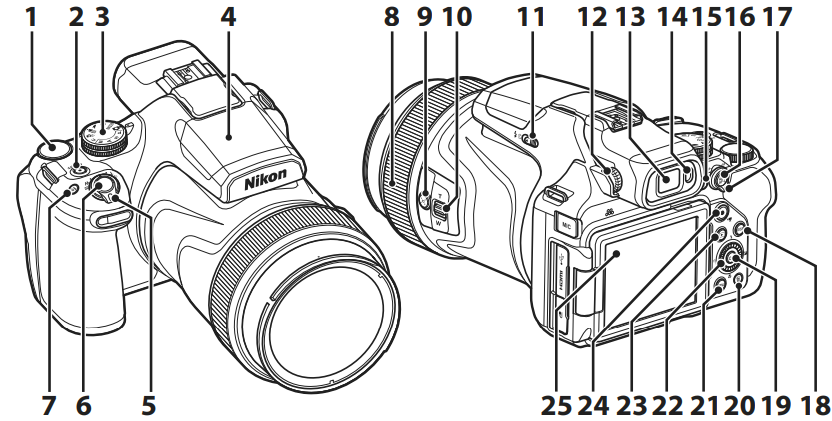
- Command dial
- Power switch/power-on lamp (charge lamp)
- Mode dial
- Built-in flash
- Zoom control
- Shutter-release button
- (function) button
- Control ring
 (snap-back zoom) button
- Side zoom control
 (flash pop-up) control
- Diopter adjustment control
- Electronic viewfinder
- Eye sensor
 (Monitor) button
 (AE-L/AF-L) button
- Focus-mode selector
 (display) button
 (apply selection) button
 (delete) button
 (menu) button
- Rotary multi selector (multi selector)*
 (playback) button
- (
 movie-record) button
 - Monitor
In this manual, the operation of pressing the upper, lower, left, or right part of the multi selector is indicated as![]() .
.
Getting Started
How to Attach the Camera Strap
Attach the strap to the left and right side of the camera.

How to Attach the Lens Cap and Lens Hood
- When you are not shooting images, attach the lens cap to protect the lens.
- The lens hood cuts out light which adversely affects the image, and it also helps to protect the camera. Do not use the lens hood when shooting with a flash or when the AF-assist illuminator is necessary for shooting.

Inserting the Battery and Memory Card

- With the battery’s positive and negative terminals oriented correctly, move the orange battery latch (3), and fully insert the battery (4).
- Slide the memory card in until it clicks into place (5).
- Be careful not to insert the battery or memory card upside-down or backward, as this could cause a malfunction.
- When the write-protect switch on the memory card is in the “lock” position, images cannot be captured or deleted, and the card cannot be formatted.
Formatting a Memory Card
The first time you insert a memory card that has been used in another device into this camera, make sure to format it with this camera.
- Note that formatting a memory card permanently deletes all images and other data on the memory card. Be sure to make copies of any images you wish to keep before formatting the memory card.
- Insert the memory card into the camera, press the d button, and select Format card in the setup menu (A17).
Removing the Battery or Memory Card
Turn the camera off and make sure that the power-on lamp and screen have turned off, and then open the battery-chamber/memory card slot cover.
- Move the battery latch to eject the battery.
- Gently push the memory card into the camera to partially eject the memory card.
- Be careful when handling the camera, battery, and memory card immediately after using the camera, as they may be hot.
Charging the Battery
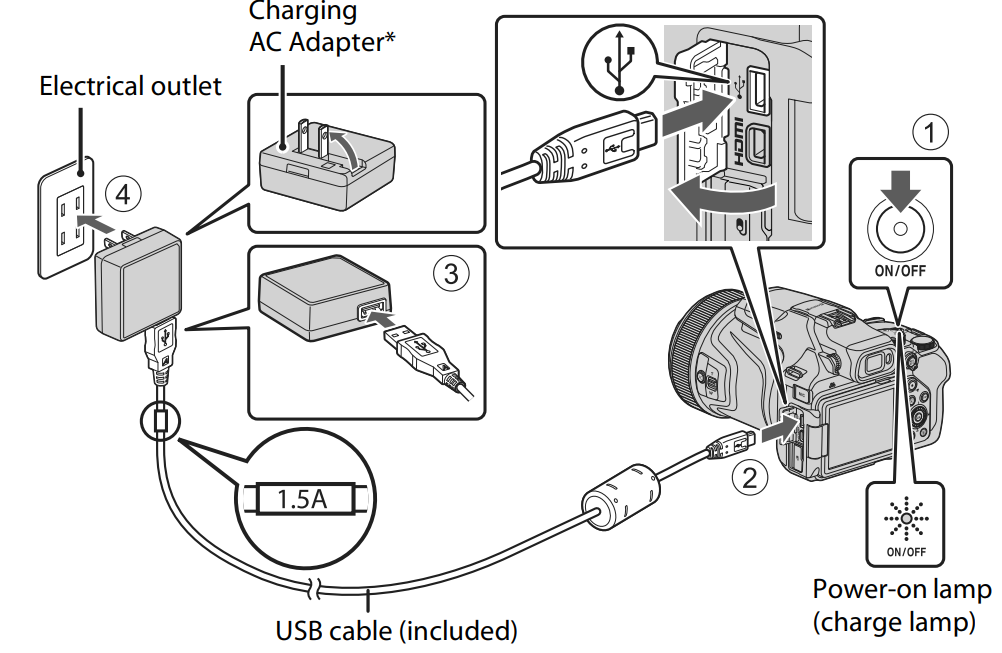
A plug adapter is attached depending on the country or region of purchase. The shape of the plug adapter varies with the country or region of purchase.
- Charging starts when the camera is connected to an electrical outlet while the battery is inserted, as shown in the illustration. The power-on lamp (charge lamp) slowly flashes while the battery is charging.
- When charging is complete, the power-on lamp turns off. Unplug the Charging AC Adapter from the electrical outlet, and disconnect the USB cable. Charging time is about 3 hours for a fully exhausted battery.
- The battery cannot be charged when the power-on lamp quickly flashes, possibly due to one of the reasons described below.
- The ambient temperature is not suited to charging.
- The USB cable or Charging AC Adapter is not properly connected.
- The battery is damaged.
Notes About the USB Cable
- Do not use a USB cable other than the UC-E21. Using a USB cable other than the UC-E21 could result in overheating, fire or electric shock.
- Check the shape and direction of the plugs and do not insert or remove the plugs at an angle.
Notes About Charging the Battery
- The camera can be operated while the battery is charging, but the charging time increases. The power-on lamp (charge lamp) turns off while the camera is being operated.
- Do not, under any circumstances, use another make or model of AC adapter other than the EH-73P/EH-73PCH Charging AC Adapter, and do not use a commercially available USB-AC adapter or a battery charger for a mobile phone. Failure to observe this precaution could result in overheating or in damage to the camera.
Opening the Monitor
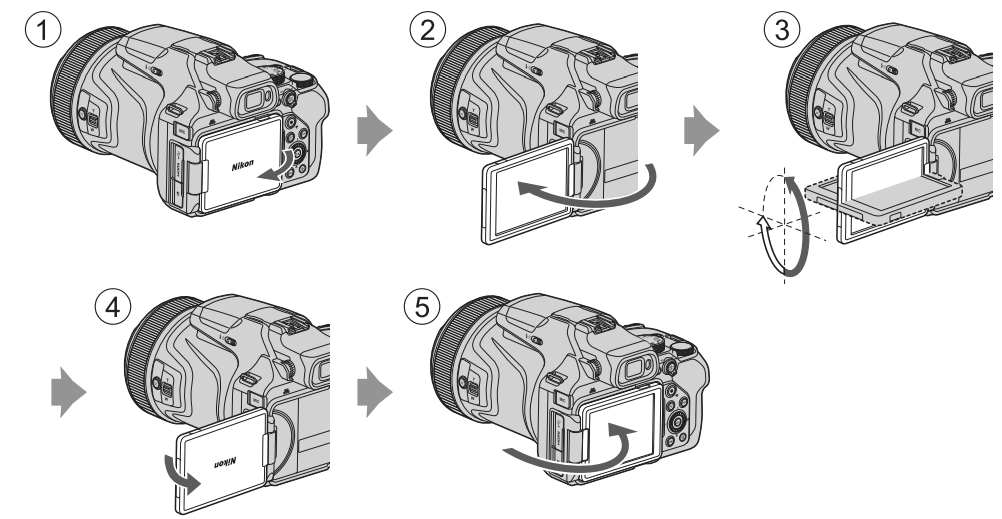
- You can adjust the direction and angle of the monitor. For normal shooting, fold the monitor against the back of the camera, facing out (5).
- When you are not using or carrying the camera, fold the monitor against the camera body with the screen facing in (1).
Notes About the Monitor
- The monitor’s adjustable range may be limited when a cable or accessories are attached to the camera.
- When moving the monitor, do not apply excessive force and move slowly within the monitor’s adjustable range so that the connection will not be damaged.
Description
The Nikon Coolpix P1000 is built with durability in mind, featuring a sturdy design that withstands various shooting conditions. The camera's ergonomic grip and intuitive controls make it easy to handle, even during extended shooting sessions. The vari-angle LCD monitor allows for flexible shooting angles, while the electronic viewfinder provides a clear and precise view of your subject. The camera's ability to capture high-quality images and videos at extreme distances makes it particularly appealing to those who need exceptional zoom capabilities.
Menu Operations about Nikon Coolpix Digital Camera P1000
You can set the menus listed below by pressing the d (menu) button.
 Shooting menu1, 2
 Movie manual mode menu3
 Movie menu1
 Playback menu4
 Network menu
 Setup menu
- Press the
 button when the shooting screen is displayed.
 - Menu icons and available setting options vary depending on the shooting mode.
- Rotate the mode dial to
 (Movie manual), and press the
  button when the shooting screen is displayed.
 - Press the
 button when the playback screen is displayed.
Instructions
Press the
 button.
The menu is displayed.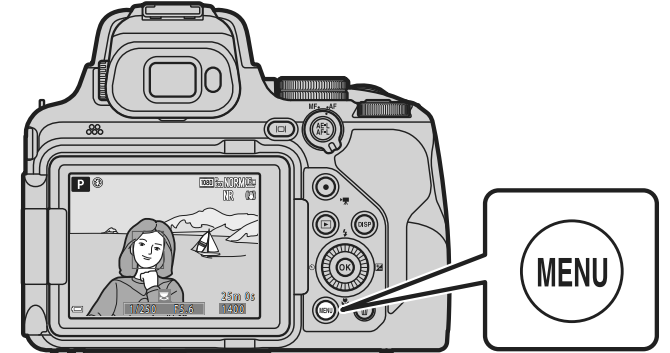
Press the multi selector
 .
.
The current menu icon is displayed in yellow.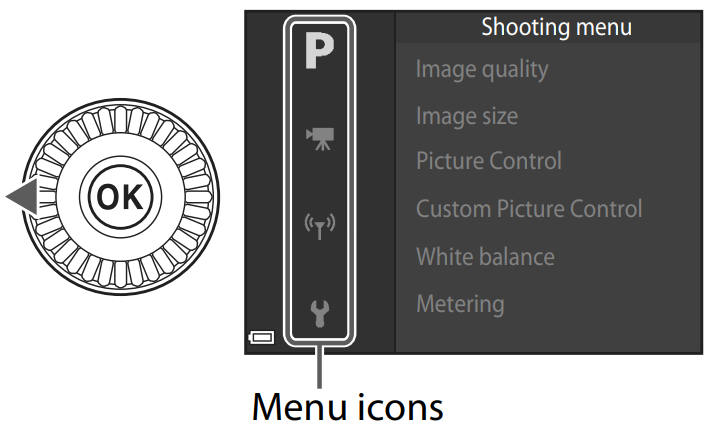
Select a menu icon and press the
 button.
The menu options become selectable.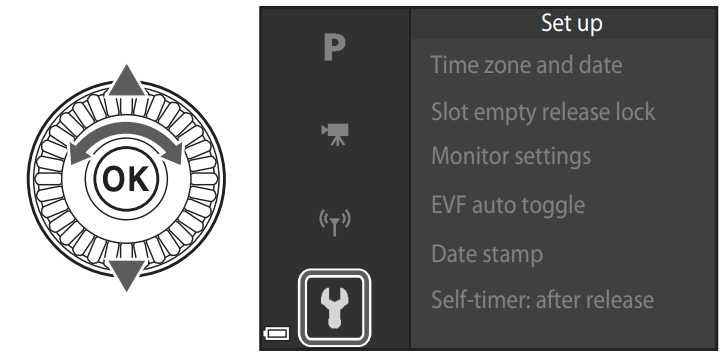
Select a menu option and press the
 button.
Certain menu options cannot be set depending on the current shooting mode or the state of the camera.
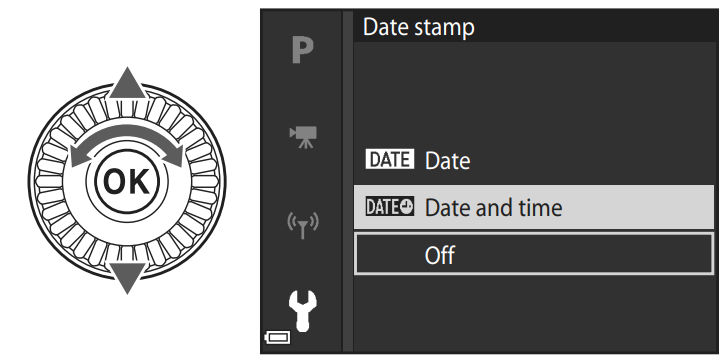
Items can also be selected by rotating the multi selector.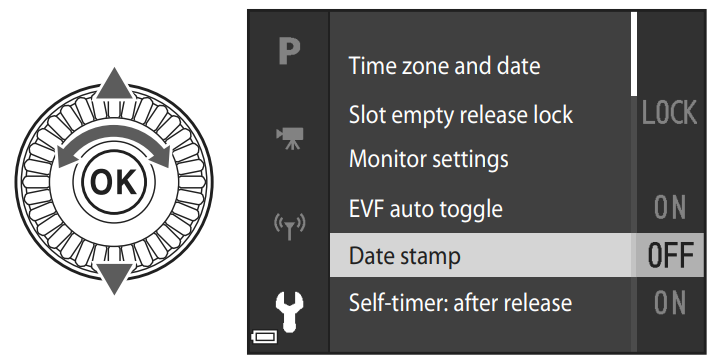
Select a setting and press the
 button.
The setting you selected is applied.
When you are finished using the menu, press the button.
When a menu is displayed, you can switch to shooting mode by pressing the shutter-release button or button.
Using the w (Function) Button
If you press the w button in j, k, l, m, or M mode, you can quickly configure the pre-saved menu options (default setting is Continuous). To set a different menu option, select U Fn button and select the desired menu option.
Camera Setup
Turn the camera on.
Use the multi selector to select and adjust settings.
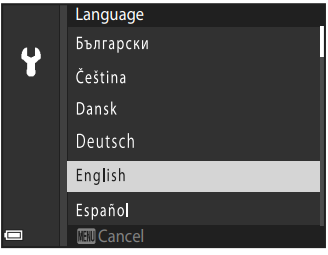
- A language selection dialog will be displayed. Press
 on the multi-selector to highlight a language and press
  to select.
 - The language can be changed at any time using the Language option in the setup menu (A17).
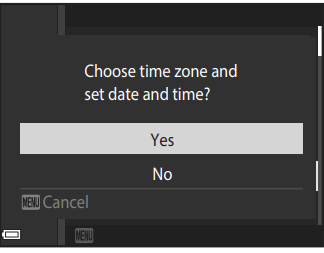
- A language selection dialog will be displayed. Press
Select Yes and press
 .
.
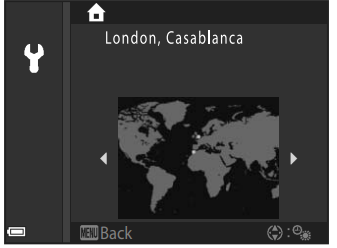
Highlight your home time zone and press
 .
.
To turn daylight saving time on press will be displayed at the top of the map. Press
  to turn daylight saving time off.
- Press
 to choose a date format and press
  .
. - Enter the current date and time and press
 .
.- Press
 to highlight items and press
 to change.
 Select the minute field and press
 to confirm the setting.
- Press
When prompted, press
 to highlight Yes and press
  .
.
The camera exits to the shooting display when setup is complete.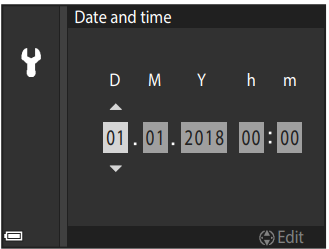
Resetting the Clock
The Time zone and date option in the setup menu can be used to choose the time zone and set the camera clock. Daylight saving time can be turned on or off in the Time zone menu.
Using the SnapBridge App
When you establish a wireless connection between the camera and a smart device using the SnapBridge app, you can upload images captured with the camera to the smart device or perform remote photography. See the included “SnapBridge Connection Guide” for the connection procedure.
Caring for the Product
The Camera
Do Not Apply Strong Impact to the Camera The product may malfunction if subjected to strong shock or vibration. In addition, do not touch or apply force to the lens.
Keep Dry
The device will be damaged if immersed in water or subjected to high humidity.
Avoid Sudden Changes in Temperature
Sudden changes in temperature, such as when entering or leaving a heated building on a cold day, can cause condensation to form inside the device. To prevent condensation, place the device in a carrying case or a plastic bag before exposing it to sudden changes in temperature.
Keep Away from Strong Magnetic Fields
Do not use or store this device in the vicinity of equipment that generates strong electromagnetic radiation or magnetic fields. Doing so could result in loss of data or camera malfunction.
Do Not Point the Lens at the Sun
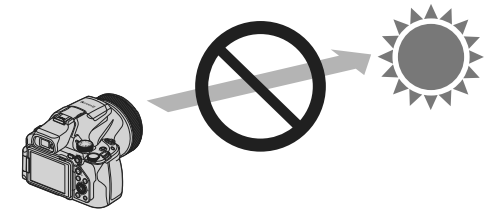
- Avoid pointing the lens at the sun or other strong light sources when shooting or when leaving the camera unattended without a lens cap.
- Strong light sources such as sunlight are concentrated through the lens, which may cause deformation of the internal parts of the lens or discoloration or burn-in on the image sensor. The camera may be damaged even when the lens is pointed toward the sun for a few seconds, particularly when the lens is in a telephoto position. The camera may not be able to perform exposure control when the internal parts of the lens are deformed.
- Unevenness may appear in images when discoloration or burn-in occurs on the image sensor. It is recommended that you attach the lens cap when you are not using the camera.
Turn the Product Off Before Removing or Disconnecting the Power Source or Memory Card
Do not remove the battery while the product is on, or while images are being saved or deleted. Forcibly cutting power in these circumstances could result in loss of data or in damage to the memory card or internal circuitry.
Notes About the Monitor
- Monitors (including electronic viewfinders) are constructed with extremely high precision; at least 99.99% of pixels are effective, with no more than 0.01% being missing or defective. Hence while these displays may contain pixels that are always lit (white, red, blue, or green) or always off (black), this is not a malfunction and has no effect on images recorded with the device.
- Images in the monitor may be difficult to see under bright lighting.
- Do not apply pressure to the monitor, as this could cause damage or malfunction. Should the monitor break, care should be taken to avoid injury caused by broken glass and to prevent the liquid crystal from the display touching the skin or entering the eyes or mouth.
The Battery
Precautions for Use
- Note that the battery may become hot after use.
- Do not use the battery at ambient temperatures below 0°C (32°F) or above 40°C (104°F) as this could cause damage or malfunction.
- If you notice any abnormalities such as excessive heat, smoke, or an unusual smell coming from the battery, immediately discontinue use and consult your retailer or Nikon-authorized service representative.
- After removing the battery from the camera or optional battery charger, put the battery in a plastic bag, etc. in order to insulate it.
Charging the Battery
Check the battery level before using the camera and replace or charge the battery if necessary.
- Charge the battery indoors with an ambient temperature of 5°C to 35°C (41°F to 95°F) before use.
- A high battery temperature may prevent the battery from charging properly or completely, and may reduce battery performance. Note that the battery may become hot after use; wait for the battery to cool before charging.
- When charging the battery inserted into this camera using the Charging AC Adapter or a computer, the battery is not charged at battery temperatures below 0°C (32°F) or above 50°C (122°F).
- Do not continue charging once the battery is fully charged as this will result in reduced battery performance.
- The battery temperature may increase during charging. However, this is not a malfunction.
Carrying Spare Batteries
Whenever possible, carry fully charged spare batteries when taking pictures on important occasions.
Using the Battery When Cold
On cold days, the capacity of batteries tends to decrease. If an exhausted battery is used at a low temperature, the camera may not turn on. Keep spare batteries in a warm place and exchange as necessary. Once warmed, a cold battery may recover some of its charge.
Battery Terminals
Dirt on the battery terminals may prevent the camera from functioning. Should the battery terminals become dirty, wipe them off with a clean, dry cloth before use.
Charging an Exhausted Battery
Turning the camera on or off while an exhausted battery is inserted in the camera may result in reduced battery life. Charge the exhausted battery before use.
Storing the Battery
- Always remove the battery from the camera or optional battery charger when it is not being used. Minute amounts of current are drawn from the battery while it is in the camera, even when not in use. This may result in excessive battery drain and complete loss of function.
- Recharge the battery at least once every six months and completely exhaust it before returning it to storage.
- Put the battery in a plastic bag, etc. in order to insulate it and store it in a cool place. The battery should be stored in a dry location with an ambient temperature of 15°C to 25°C (59°F to 77°F). Do not store the battery in hot or extremely cold locations.
Battery Life
A marked drop in the time a fully charged battery retains its charge, when used at room temperature, indicates that the battery needs to be replaced. Purchase a new battery.
Recycling Used Batteries
Recycle rechargeable batteries in accord with local regulations, being sure to first insulate the terminals with tape.
The Charging AC Adapter
- The EH-73P/EH-73PCH Charging AC Adapter is for use only with compatible devices. Do not use with another make or model of device.
- Do not use any USB cable other than the UC-E21. Using a USB cable other than the UC-E21 could result in overheating, fire or electric shock.
- Do not, under any circumstances, use another make or model of AC adapter other than the EH-73P/EH-73PCH Charging AC Adapter, and do not use a commercially available USB-AC adapter or a battery charger for a mobile phone. Failure to observe this precaution could result in overheating or in damage to the camera.
- The EH-73P/EH-73PCH is compatible with AC 100–240 V, 50/60 Hz electrical outlets. When using in other countries, use a plug adapter (commercially available) as necessary. For more information about plug adapters, consult your travel agency.
- The symbols on this product represent the following:
D AC, E DC, F Class II equipment (The construction of the product is double-insulated.)
Cleaning and Storage
Cleaning
Do not use alcohol, thinner, or other volatile chemicals.
Lens/ viewfinder | Avoid touching glass parts with your fingers. Remove dust or lint with a blower (typically a small device with a rubber bulb attached to one end that is pumped to produce a stream of air out the other end). To remove fingerprints or other stains that cannot be removed with a blower, wipe the lens with a soft cloth, using a spiral motion that starts at the center of the lens and working toward the edges. If this fails, clean the lens using a cloth lightly dampened with commercial lens cleaner. |
| Monitor | Remove dust or lint with a blower. To remove fingerprints and other stains, clean the monitor with a soft, dry cloth, being careful not to apply pressure. |
Body | Use a blower to remove dust, dirt, or sand, then wipe gently with a soft, dry cloth. After using the camera at the beach or other sandy or dusty environment, wipe off any sand, dust, or salt with a dry cloth lightly dampened with fresh water and dry thoroughly. Note that foreign matter inside the camera could cause damage not covered by the warranty. |
Storage
Remove the battery if the camera will not be used for an extended period. To prevent mold or mildew, take the camera out of storage at least once a month.
Turn the camera on and release the shutter a few times before putting the camera away again. Do not store the camera in any of the following locations:
- Places that are poorly ventilated or subject to humidity of over 60%
- Exposed to temperatures above 50°C (122°F) or below –10°C (14°F)
- Next to equipment that produces strong electromagnetic fields, such as televisions or radios
For Your Safety
To prevent damage to property or injury to yourself or to others, read “For Your Safety” in its entirety before using this product.
Keep these safety instructions where all those who use this product will read them.
DANGER
Failure to observe the precautions marked with this icon carries a high risk of death or severe injury.
WARNING
Failure to observe the precautions marked with this icon could result in death or severe injury.
CAUTION
Failure to observe the precautions marked with this icon could result in injury or property damage.
WARNING
- Do not use while walking or operating a vehicle. Failure to observe this precaution could result in accidents or other injury.
- Do not disassemble or modify this product. Do not touch internal parts that become exposed as the result of a fall or other accident. Failure to observe these precautions could result in electric shock or other injury.
- Should you notice any abnormalities such as the product producing smoke, heat, or unusual odors, immediately disconnect the battery or power source. Continued operation could result in fire, burns or other injury.
- Keep dry. Do not handle with wet hands. Do not handle the plug with wet hands. Failure to observe these precautions could result in fire or electric shock.
- Do not let your skin remain in prolonged contact with this product while it is on or plugged in. Failure to observe this precaution could result in lowtemperature burns.
- Do not use this product in the presence of flammable dust or gas such as propane, gasoline or aerosols. Failure to observe this precaution could result in explosion or fire.
- Do not aim the flash at the operator of a motor vehicle. Failure to observethis precaution could result in accidents.
- Keep this product out of reach of children. Failure to observe this precaution could result in injury or product malfunction. In addition, note that small parts constitute a choking hazard. Should a child swallow any part of this product, seek immediate medical attention.
- Do not entangle, wrap or twist the straps around your neck. Failure to observe this precaution could result in accidents.
- Do not use batteries, chargers, AC adapters, or USB cables not specifically designated for use with this product. When using batteries, chargers, AC adapters, and USB cables designated for use with this product, do not:
- Damage, modify, forcibly tug or bend the cords or cables, place them under heavy objects, or expose them to heat or flame.
- Use travel converters or adapters designed to convert from one voltage to another or with DC-to-AC inverters. Failure to observe these precautions could result in fire or electric shock.
- Do not handle the plug when charging the product or using the AC adapter during thunderstorms. Failure to observe this precaution could result in electric shock.
- Do not handle with bare hands in locations exposed to extremely high or low temperatures. Failure to observe this precaution could result in burns, or frostbite.
Troubleshooting
If the camera fails to function as expected, check the list of common problems below before consulting your retailer or Nikon-authorized service representative.
| Problem | Cause/Solution |
The camera is on but does not respond. | • Wait for recording to end. • If the problem persists, turn the camera off. If the camera does not turn off, remove and reinsert the battery or batteries or, if you are using an AC adapter, disconnect and reconnect the AC adapter. Note that although any data currently being recorded will be lost, data that have already been recorded will not be affected by removing or disconnecting the power source. |
| The camera cannot be turned on. |
The battery is exhausted. |
• The camera automatically turns off to save power (auto off function). • The camera and battery may not work properly at low temperatures. • The inside of the camera has become hot. Leave the camera off until the inside of the camera has cooled, and then try turning it on again. | |
| The camera turns off without warning. | |
• The camera is off. • The battery is exhausted. • The camera automatically turns off to save power (auto off function). • You cannot turn on both the monitor and viewfinder at the same time. It may take a while to switch between the monitor and viewfinder. • The camera is connected to a TV or computer. • Interval timer shooting, Multiple exp. Lighten scene mode (when Star trails is set) shooting, or time-lapse movie shooting is in progress, or the camera is capturing images with a long time-exposure using the Bulb setting or Time setting. | |
| The monitor or | |
| viewfinder is | |
| blank. | |
| The camera becomes hot. | The camera may become hot when used for an extended period of time such as to shoot movies, or when used in a hot environment; this is not a malfunction. |
Nikon Coolpix Camera P1000 Pros & Cons
Pros
- Exceptional 125x optical zoom capability.
- High-quality 4K UHD video recording.
- Durable and ergonomic design.
- Vari-angle LCD monitor and electronic viewfinder.
- Wireless connectivity via Wi-Fi and Bluetooth.
Cons
- Relatively high price point.
- Large size and weight due to extensive zoom range.
- Battery life could be better, especially with continuous use of zoom.
- No weather sealing or dust resistance.
Customer Reviews
Customers have praised the Nikon Coolpix P1000 for its unparalleled zoom capabilities, making it a favorite among wildlife photographers and bird enthusiasts. However, some users have noted that the camera's size and weight can be cumbersome, and battery life could be improved. Despite these minor drawbacks, the camera's overall performance and image quality have garnered positive reviews.
Faqs
What is the maximum optical zoom of the Nikon?
Does the Nikon Coolpix P1000 support 4K video recording?
How do I connect my Nikon to my smartphone?
What is the ISO range of the Nikon?
How long does the battery last on the Coolpix?
Can I update the firmware of my Coolpix?
What type of memory cards does the Nikon support?
Does the Nikon have a vari-angle LCD monitor?
Is there an electronic viewfinder on the Nikon Coolpix Camera P1000?
Leave a Comment
