How to Use: Noco Jump starter GBX75 12V Instruction Manual
Content
NOCO Jump starter Introduction
The noco Jump starter GBX75 12V is a powerful and compact device designed to jump-start your vehicle's dead battery quickly and safely. This jump starter is perfect for those who need a reliable solution for emergency situations. With an estimated price range of $100 to $150 and a launching date in mid-2023, this product is a must-have for every car owner.
Detailed Specifications
The noco Jump starter GBX75 12V features a high-output 12V battery with a capacity of 7,500mAh, providing up to 30 jump starts on a single charge. It also has a 5V/2.1A USB port for charging smartphones and other devices. The device is compact, lightweight, and comes with a durable carrying case. The GBX75 12V jump starter also has a built-in LED flashlight with SOS and strobe modes, making it a versatile tool for emergencies.
- Internal Battery: 74Wh Lithium
- Peak Current Rating: 2500A
- Operating Temperature: -20°C to +50°C
- Charging Temperature: 0ºC to +40ºC
- Storage Temperature: -20ºC to +50ºC (avg Temp.)
- USB-C (In): 5V 1.5A/9V 3A/12V 3A/15V 3A/20V 3A
- USB-C (Out): 5V 3A/9V 3A/12V 3A/15V 3A/20V 3A
- USB (Output): 5VDC 2.1A Max / 10W Max
- Housing Protection: IP65 (w/Ports Closed)
- Cooling: Natural Convection
- Dimensions (L x W x H): 8.4 x 5.4 x 2.5 Inches
- Weight: 3.77 Pounds
How To Use
Charge the GBX75
The GBX75 comes partially charged out of the box and needs to be fully charged prior to use. Connect the GBX75 using the included USB-C Charge Cable or 12V Car Charger to the USB-C IN/OUT port. It can be recharged from any powered USB port, like an AC adapter, car charger, laptop and more. The USB-C IN/OUT port utilizes Power Delivery 3.0 technology capable of receiving/delivering up to 60W. The time to recharge a GBX75 will differ based on the discharge level and the power source used. Actual results may vary due to battery conditions.
| Recharge Time | Charger Rating |
|---|---|
| 40h | 2.5W |
| 20h | 5W |
| 10h | 10W |
Internal Battery Level
When recharging, the charge level of the internal battery is indicated by the charge LEDs. The LEDs will slowly pulse ‘on’ and ‘off’ and become solid until all four charge LEDs are on. When the battery is fully charged, the green 100% LED will be solid, and the 25%, 50% and 75% charge LEDs will turn «off». From time to time, the green 100% LED will pulse indicating maintenance charging is occuring.

- Fast Charge : The GBX75 is equipped with fast charging technology that allows it to be recharged at a rate of up to 60W. A compatible charger, capable of 60W USB-C Power Delivery 3.0, is required to fully utilize this feature. The fast charge LED will illuminate when rate of charge exceeds 15W, indicating USB Power Delivery 3.0 is active.
- Recharge Time: 1.7h
- Charger Rating: 60W
- Auto Charger : The most effective way to charge GBX75 is by using The NOCO Auto Charger (not included).
NOTE: The vehicle must be On / Running for the Auto Charger to Fast Charge the unit.- Recharge Time: 1.7h
- Charger Rating: 60W
- Power Source : When charging USB devices, it is important to power on the GBX75 unit first and then plug in the USB device being charged.
NOTE: If the GBX75 unit is not powered on first, it will drain power from the USB device, if it is DRP compatible. To charge GBX75 with a DRP compatible device (e.g phone, laptop, power bank) ensure GBX75 is powered OFF before making a cable connection between GBX75 and the DRP device.
Connect to the Battery GBX75
- Carefully read and understand the vehicle owner’s manual on specific precautions and recommended methods for jump starting the vehicle.
- Make sure to determine the voltage and chemistry of the battery by referring to your battery owner’s manual prior to using this product. The GBX75 is for jump starting 12-volt lead-acid batteries only.
- Before connecting to the battery, verify that you have a 12-volt lead-acid battery. The GBX75 is not suitable for any other type of battery. Identify the correct polarity of the battery terminals on the battery.
- The positive battery terminal is typically marked by these letters or symbol (POS,P,+). The negative battery terminal is typically marked by these letters or symbol (NEG,N,-).
- Do not make any connections to the carburetor, fuel lines, or thin, sheet metal parts. The below instructions are for a negative ground system (most common).
- If your vehicle is a positive ground system (very uncommon), follow the below instructions in reverse order.
- Connect the positive (red) battery clamp to the positive (POS,P,+) battery terminal and the negative (black) battery clamp to the negative (NEG,N,-) battery terminal or vehicle chassis.
Jump Starting
- Make sure all of the vehicle’s power loads (headlights, radio, air conditioning, etc.) are turned off before attempting to jump start the vehicle.
- Press the power button to begin jump starting, and all LEDs will flash once. If you are properly connected to the battery, the white boost LED will illuminate and the battery charge LEDs will chase. A 60-second timeout countdown will begin as soon as a battery is detected.
- Try starting the vehicle. Most vehicles will immediately start. If the vehicle does not start right away, wait 20-30 seconds and try again. After the 60-second timeout is complete, the unit must be powered off, then back on, to initiate a new jump-start sequence. Do not attempt more than five (5) consecutive jump starts within a fifteen (15) minute period. Allow the GBX75 to rest for fifteen (15) minutes before attempting to jump start the vehicle again.
- Once you have started your vehicle, power off the unit, disconnect the battery clamps, and remove the GBX75.
60-Second Timeout
A 60-second countdown will be initiated as soon as a battery is detected. After 60 seconds has elapsed, the jump starting function will be disabled. The boost LED will turn off and the internal battery charge LEDs will indicate the current charge level of the unit. To reset the jump-starting function, press the power button to power off the unit. Press the power button again to power on the unit and restart the jump starting function.
CAUTION: 60-SECOND TIMEOUT IS DISABLED WHILE USING MANUAL OVERRIDE MODE. POWER WILL CONTINUE TO BE SUPPLIED WHILE MANUAL OVERRIDE IS ACTIVE. TO MAXIMIZE THE NUMBER OF JUMP-STARTS, IT IS RECOMMENDED TO TURN OFF THE BOOST-UNIT AS SOON AS THE VEHICLE HAS STARTED.
Low Voltage Batteries & Manual Override
The GBX75 is designed to jump start 12-volt lead-acid batteries down to 3-volts. If your battery is below 3-volts, the Boost LED will be «off». This is an indication that the GBX75 can not detect a battery. If you need to jump start a battery below 3-volts there is a manual override feature, which allows you to force «on» the jump start function.
CAUTION: USE THIS MODE WITH EXTREME CARE. THIS MODE IS FOR 12-VOLT LEAD-ACID BATTERIES ONLY. BOTH THE SPARK PROOF AND REVERSE POLARITY PROTECTION FEATURES ARE DISABLED. PAY VERY CLOSE ATTENTION TO THE POLARITY OF THE BATTERY BEFORE USING THIS MODE. DO NOT ALLOW THE POSITIVE AND NEGATIVE BATTERY CLAMPS TO TOUCH OR CONNECT TO EACH OTHER AS THE PRODUCT WILL GENERATE SPARKS. THIS MODE USES VERY HIGH CURRENT (UP TO 2500 AMPS) THAT CAN CAUSE SPARKS AND HIGH HEAT IF NOT USED PROPERLY. IF YOU ARE UNSURE ABOUT USING THIS MODE, DO NOT ATTEMPT AND SEEK PROFESSIONAL HELP.
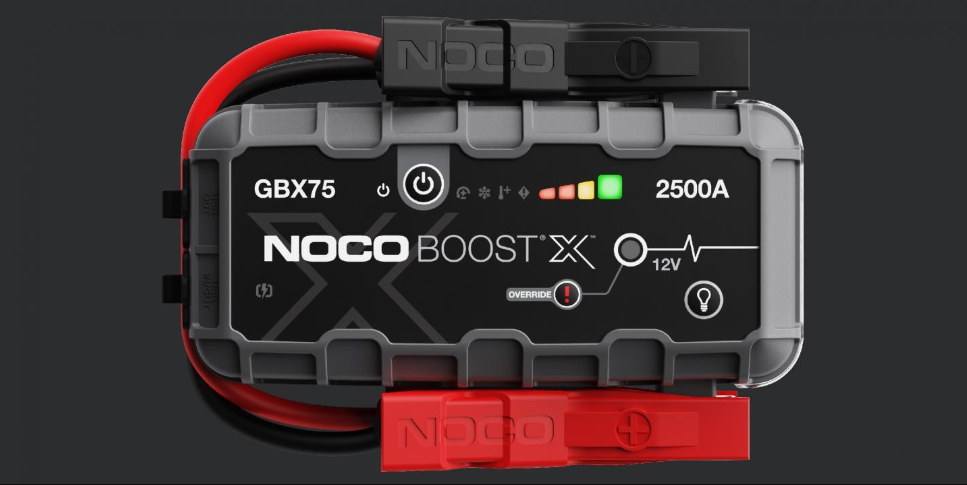
Description of GBX75 12V
The noco Jump starter is a portable and powerful device that provides a quick and easy solution for jump-starting your vehicle's dead battery. With its high-output 12V battery and compact design, this jump starter is a convenient and reliable tool for emergencies. The device also features a USB port for charging smartphones and other devices, making it an all-in-one solution for your emergency needs.
Jump starter Interface
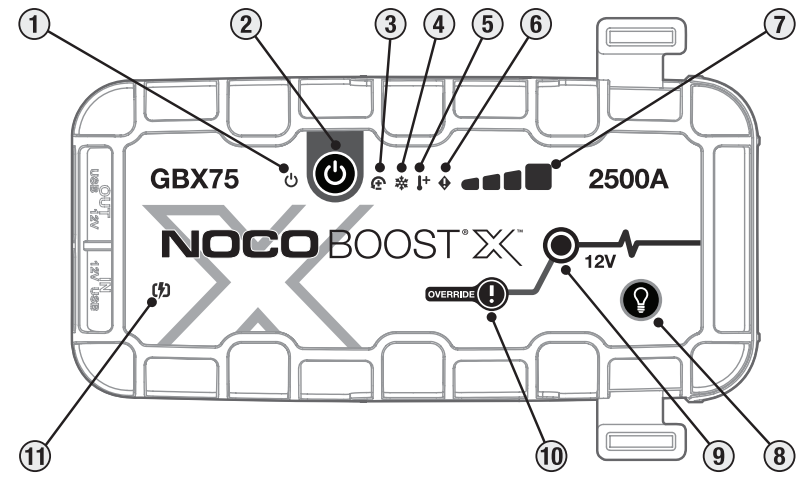
- Power LED Illuminates White when unit is «On». Will illuminate orange after the 60-second timeout countdown until the clamps are removed from the Car Battery or the GBX75 is power cycled ‘off’ and back ‘on’ again.
- Power Button Push to turn unit «on» & «off» or restart boost after 60-second timeout.
- Reverse Polarity Error LED Illuminates red if reverse polarity is detected.
- Cold LED Illuminates solid or flashes blue when internal temperature is too low.
- Hot LED Illuminates solid or flashes red when internal temperature is too high.
- Error LED Blinks “on” and “off” in various sequences (from 1 to 6 blinks) to convey error conditions.
- Internal Battery Level Indicates the charge level of the internal battery.
- Light Mode Button Toggles the ultra-bright LED light through 7 light modes: 100% > 50% > 10% > SOS > Blink > Strobe > Off
- Boost LED Illuminates white when boost is active. If the unit is connected properly to a battery, the GBX75 will automatically detect a battery and go into boost mode (LED flashes white when manual override feature is active).
- Manual Override Button To enable, push and hold for three (3) seconds. WARNING: Disables safety protection and manually forces Boost «On». Only for use when a battery voltage is too low to be detected.
- Fast Charge LED Illuminates white when fast charge is active. Fast charge LED turns red (solid/blinking) when there is an error.
Setup Guide of noco Jump starter GBX75 12V
To use the noco Jump starter GBX75 12V, follow these steps:
- Charge the device fully before using it for the first time.
- Connect the jumper cables to the jump starter and your vehicle's battery.
- Turn on the jump starter and then start your vehicle.
- Disconnect the jumper cables once your vehicle has started.
- Recharge the jump starter after each use to ensure it's ready for the next emergency.
Troubleshooting
If the jump starter GBX75 12V doesn't work, check the following:
- Make sure the device is fully charged.
- Check the connections to ensure they're secure.
- Make sure the jumper cables are connected to the correct terminals.
- Check the vehicle's battery to ensure it's not completely dead.
- If the device still doesn't work, contact noco's customer support for assistance.
| Error | Reason/Solution |
|---|---|
| Reverse polarity detected. / Reverse the battery connections. | |
| Single (1) Flash | Short circuit detected on battery clamps. / Remove all loads, reconnect clamps to battery. |
| Double (2) Flash | High voltage detected at clamps (the GBX75 is connected to a voltage system greater than 12V, such as 24V). |
_flash.png) Triple (3) Flash Triple (3) Flash | Bad battery cell detected. / When an internal battery cell has failed during charging. |
| Quadruple (4) Flash | Charge timeout error (i.e. the GBX75 has been in bulk charge for too long). |
| Sextuple (6) Flash | Back-Charge detected into the GBX75 through the clamps while in a Boost Mode (i.e. the GBX75 is in Manual Override and then connected to a system greater than 12V, such as 24V). |
| Unit is fully operational, but approaching upper temperature limit. / Allow the unit to cool. | |
| Hot LED: Flashing | Unit is too hot to jump start, only the flashlight is available in this state. / Allow the unit to cool. |
 Cold LED: Solid Cold LED: Solid | Unit is fully operational, but approaching lower temperature limit. / Allow the unit to warm up. |
| Cold LED: Flashing | Unit is too cold to jump start, only the flashlight is available in this state / Allow the unit to warm up. |
 Flashing Red Flashing Red | If charging the unit, check the cable or charger for damage / If charging a USB-C device, check cable or device for damage / If problem persists, contact NOCO support. |
| Solid Red | Connected Charger is Incompatible. / Unplug USB Cable, Turn Off/On the Unit, Use Different Charger. |
NOCO One Year Warranty
NOCO GBX75 12V warrants that this product (the “Product”) will be free from defects in material and workmanship for a period of One (1) Year from the date of purchase (the “Warranty Period”). For defects reported during the Warranty Period, NOCO will, at its discretion, and subject to NOCO’s technical support analysis, either repair or replace defective products. Replacement parts and products will be new or serviceably used, comparable in function and performance to the original part and warranted for the remainder of the original Warranty Period.
Pros & Cons
Pros
- Compact and lightweight design
- High-output 12V battery with a capacity of 7,500mAh
- USB port for charging smartphones and other devices
- Built-in LED flashlight with SOS and strobe modes
- Up to 30 jump starts on a single charge
Cons
- May not work with larger vehicles, such as trucks and SUVs
- The device is not waterproof
- The device can only provide a limited number of jump starts before needing to be recharged
Customer Reviews about GBX75
Customers love the noco Jump starter GBX75 12V for its compact design, easy-to-use interface, and reliable performance. Many have praised the device for helping them in emergency situations, with some noting that it jump-started their vehicles in just a few seconds. However, some customers have expressed concern about the device's limited compatibility with larger vehicles.
Faqs
How do I initiate a jump start with the noco Jump starter GBX75 12V?
How many times can the noco Jump starter noco Jump starter GBX75 12V be used before needing to be recharged?
Which safety measures are included in the Noco Jump starter GBX75 12V?
Which kinds of cars are compatible with the Noco Jump starter GBX75 12V?
How should my Noco Jump starter GBX75 12V be maintained?
How long does it take the Noco Jump starter GBX75 12V to charge completely?
What is the lifespan of the LED torch on the Noco Jump starter GBX75 12V?
How can I use my Noco Jump starter GBX75 12V to check the battery level?
Why do the various LED indicators on the Noco Jump starter GBX75 12V mean different things?
How long is the Noco Jump starter GBX75 12V warranty valid?
Leave a Comment