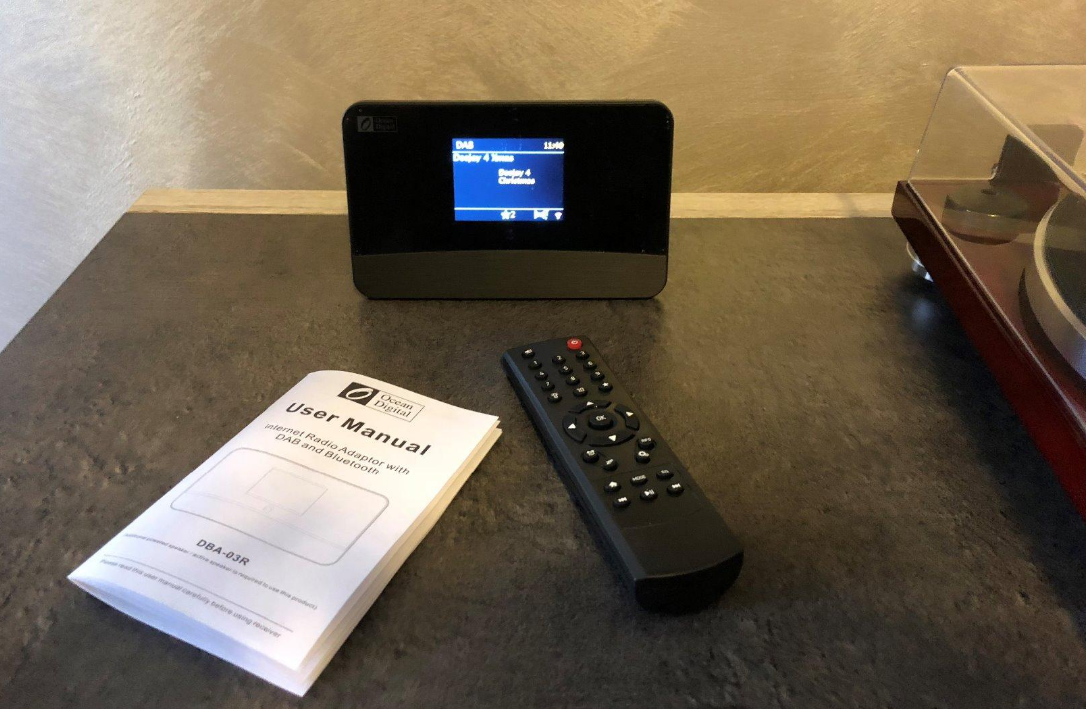
Ocean Digital Radio Adaptor DBA-03R User Manual
Content
Introduction of Ocean Digital Radio Adaptor DBA-03R
The Ocean Digital Radio Adaptor is a versatile and high-quality device that allows you to convert your traditional radio into a digital one. With its FM and DAB/DAB+ tuner, this adaptor provides access to a wide range of stations, both local and national. The estimated price of the Ocean Digital Radio Adaptor DBA-03R is around $80, and it's expected to be launched in the market in the second quarter of 2023.
Technical Specification
- Model: DBA-03R
- Power input: 5V 1A
- Power voltage: 100-240V~50/60Hz
- Wireless Network: IEEE802.11/b/g/n
- DAB/DAB+ range: 5A – 13F
- FM frequency: 87.5-108MHz
- Input/output jacks: 3.5mm Audio-out jack, 3.5mm Antenna jack, Optical out connection
- Unit Dimension: 170 x 95 x 45 mm (L x H x D)
- Remark: Specification may vary without notice
What’s included in the box
- Radio adaptor
- Power adaptor
- Remote control
- Wire antenna
- RCA cable
Location of Controls
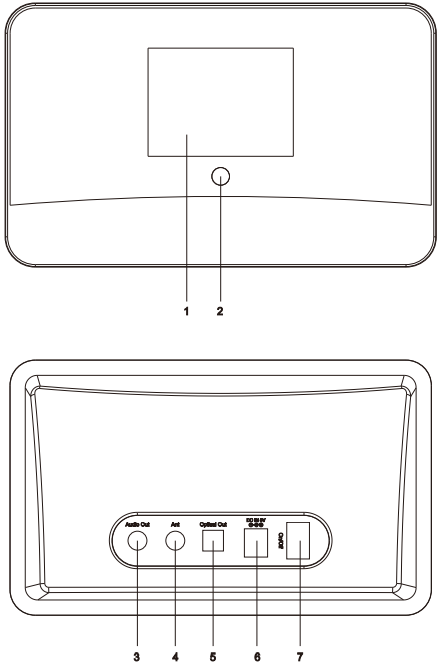
- TFT color display
- Infrared remote sensor
- 3.5 mm audio out socket –Connect external powered speakers with 3.5 mm plug or RCA adaptor with 3.5mm plug
- 3.5mm antenna input socket
- Optical Out- Digital optical output connection
- DC IN socket- Connect with the AC adaptor supplied in the package
- Power On/OFF switch
Remote control
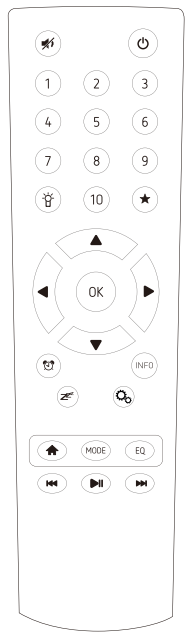
 Press to mute the sound.
 Power on/off standby.
- 1-10: Preset and recall the radio station by pressing a specific number. Press and hold the button to store the station. Press briefly to recall the station.
 Press to adjust the backlight, there are three levels available. Long pressing to save the playing station to a specific number at your choice. Press it briefly to recall the preset list.
- ▲ / ▼: Up/Down button, press to scroll up and down on the menu; During playback of the radio channel: Internet radio mode: back to the internet radio menu.
- DAB mode: press ▲ / ▼ return to the station list.
- FM mode: press ▲ / ▼ to fine tune the frequency.
 Press it to return to previous menu / left navigation.
 Right navigation / enter into sub menu.
- OK: Press to select/confirm an option;
- FM mode: press to auto scan the next available station.
 Press to set the Alarm on the radio
 Set the sleep timer of the radio, press the button repeatedly to select The timer period you desire.
- INFO: To view the detailed information of the current playing radio station or music stream from UPnP.
 To enter the setup wizard.
 Return to the main menu of the radio mode you are using or exit the operating menu to playing screen
- MODE: Press to enter the menu of the radio modes.
- EQ: Equalizer, press to enter EQ list and choose the preferred style.
 Previous song (for Bluetooth and UPnP).
 Play/pause (for Bluetooth and UPnP).
 Next song (for Bluetooth and UPnP).
Description
The Radio Adaptor DBA-03R features a compact and sleek design that fits perfectly in any room. It has a clear and easy-to-read LCD display, which shows the station name, frequency, and other relevant information. The adaptor also has a built-in battery that can last up to 12 hours, making it ideal for outdoor activities. Additionally, it supports multiple languages, including English, German, French, Italian, and Spanish.
Setup of Ocean Digital Radio Adaptor DBA-03R
Setting up the Ocean Digital Radio Adaptor DBA-03R is easy and straightforward. First, connect the adaptor to your radio's auxiliary input. Then, power on the adaptor and select the desired mode (FM or DAB/DAB+). Use the arrow buttons to scan for available stations, and once you find the station you want to listen to, press the play button. The adaptor also has a built-in antenna, which can be adjusted for optimal reception.
Before you start
Please ensure the following is ready
- You have a broadband internet connection.
- A wireless (Wi-Fi) broadband router is connected to the internet successfully. The radio supports Wireless B ,G and N connection (Wireless N router can also be used with the setting on B or G).
- You know the Wired Equivalent Privacy (WEP) or Wi-Fi Protected Access (WPA) data encryption code/password. You need to key in the correct code when the radio is connected to the wireless router for network connection. If you do not know the code/password, please contact the person /technician who set up the router/network for you.
- The radio can work via Wireless network connection (Wi-Fi connection)
Precautions
- The radio should not be used in a high temperature or high humidity environment over prolonged periods of time as this may damage the unit.
- Keep the radio away from liquids as it may get damaged. Please switch off the radio immediately if water or liquids is spilled into the radio. Consult with the shop you bought this radio for any question.
- Avoid using or storing the unit in dusty or sandy environment.
- Do not open and repair the radio by yourself.
- Use only the AC adaptor supplied with the radio. Connecting a power supply with a different rating will cause permanent damage to the radio and may be hazardous.
- Clean only with dry cloth
Getting started
- Connect the AC adaptor supplied in the package to the DC jack at the rear side of the radio.
- The radio is an adaptor and does not have internal speaker. Prepare a powered speaker which has the 3.5mm pin to plug in to the 3.5 mm line out jack on the radio.
- The radio supports also the optical connection. If you have a system comes with optical input, connect to the optical out on the radio to listen.
- Switch the radio on using the Power on/off switch. The radio will power up and the display on the front will light up and display as follow
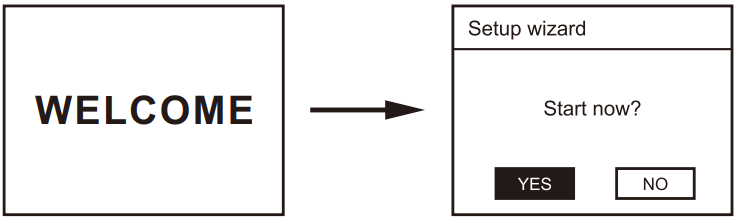
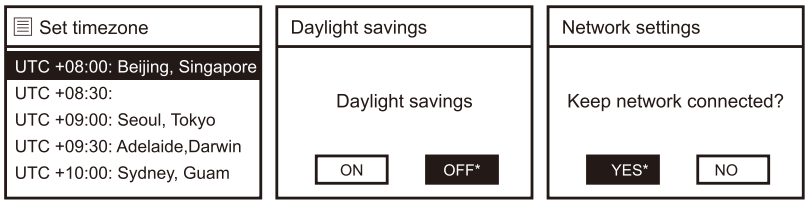
Select YES to start the wizard, select No to set up manually. If you select YES, it will start setting the date and time by choosing the 12 or 24 hour format, update the time from Network (this option is recommended) or you can set the time manually by selecting No Update.

It will then prompt you to set the time zone, select the time zone in your country, then select Daylight Saving is applicable and whether you want to keep network connected
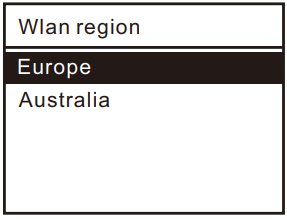
Then choose the WLAN Region
Connecting to the Wireless (Wi-Fi) Network
The radio will search the wireless networks which are available and display a list of the SSID (name of the wireless router). Select your SSID by using the <OK> button
_network.png)
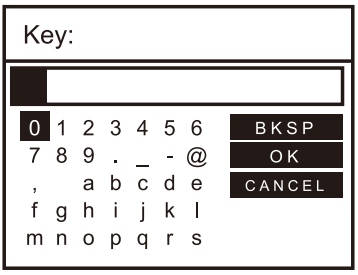
Then you need to enter the encryption password to access the wireless router.
To enter the code, press ◄►▲▼buttons to choose the characters, press <OK> button to confirm and skip to the next entry. If you want to make correction, scroll to the tab BKSP to erase the character that you just entered. After the input is completed, scroll to the tab OK then press
<OK> button on the remote control to save the key.
The radio will start connecting to the network. If the connection is successful, the following screen will appear.

If the connection is failed, the radio returns to the password entry screen.
System Settings
After the wireless network is connected successfully, press the <OK> button to exit the Setup wizard and it will enter the main menu automatically.
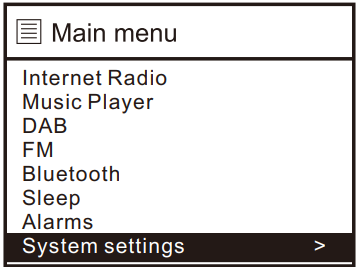
Go to System Setting to do other setting of your radio
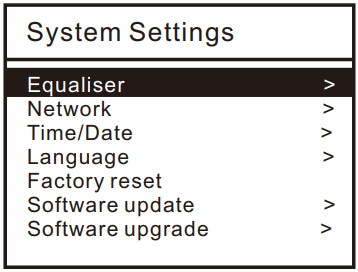
Equaliser
Adjust the sound of the music suits you best. There are presets of EQ and you can also tailor your prefer style using the "My EQ Profile Setup".
Network
- Network Wizard
To scan the wireless network available, you can select your wireless network to connect according to the steps described above. The radio is defaulted with [DHCP] for your network. If your network is not using DHCP configuration, please choose [Manual settings] and click [Wireless], and select [DHCP disable]. Then you can input the static IP information manually by entering your network IP address, Network Mask, Gateway address and DNS address. Note: If you are not sure if your network is using DHCP or not, please contact your ISP to verify. - PBC Wlan setup
If your wireless network router is using the WPS configuration, you can select this option to do the connection. - View setting
This is to view the current network setting of your radio, such as the MAC address, Wlan region, DHCP, SSID, IP address and Subnet mask. - Wlan region
Select the region where you are staying at. - Manual Settings
You can choose to set Static IP by disabling the DHCP. - Network Profile
The radio can save up to 4 wireless network settings. You can view the networks and delete unwanted networks. - Clear network settings
You can clear all the network settings under this option. - Keep the network connected
If it is chosen to keep the network connected, the wifi remains ON when the radio is switched to another mode of the radio.
Time/ Date
You can do the settings below
- Set Time/Date: This option is to set the Time and Date manually.
- Auto Update: You can choose to update the date and time by DAB, FM, update from network or No update.
Note that FM auto Time/Date update may not work in your area, so the DAB auto update option or update from Network are recommended. - Set format: This option will change the format of your clock to either 12 hour or 24 hour.
- Set time zone: Choose the time zone of the region where you are staying at.
- Daylight savings: If your country has daylight saving practice, choose ON in this option.
- Language
There are 13 languages available to display in the menu of your radio: English, Danish, Dutch, Finnish, French, German, Italian, Norwegian, Polish, Portuguese, Spanish, Swedish, and Turkish. - Factory reset
A factory reset will clear all user settings to default values, so time/date, network configuration and presets will be lost after the reset is confirmed. Note: After the reset is confirmed, it will stay on the screen "Proceed" for about 10 seconds before it reboots. - Software update
From time to time, we may make software upgrades available with bug fixes and/or additional features. You can either check manually, or set the radio to check periodically automatically. If it detects that newer software is available, it will ask if you want to go ahead with an update. If you agree, the new software is then downloaded and installed. After the software update, all user settings remain. Before starting a software update, ensure that the radio has a stable power connection. Do not interrupt the power during software update - Software upgrade
This is for service use only. - Setup Wizard
Choosing this option will guide you to run the network setup from the beginning. - Info
This is to show the software version and Radio ID for your radio This information is useful for you when you need to report any technical issues to the help centre, you will be asked for this information.
Backlight
Your radio has 3 backlight settings
- Timeout: This option is to set the period of time that you wish your display's backlight to remain lit after your last touch of any key of the remote control, when your radio is in both ON and STANDBY modes. The available options are: On/10 sec/20 sec/30 sec/45 sec/60 sec/90 sec/120 sec/180 sec.Selecting "On"will force your radio's backlight to remain on constantly. If you select a specific time option, e.g. 10 seconds, the display will dim down under the following two situations:
- When the radio is turned on, the display will dim down in 10 seconds after you use your device.
- When the radio turns off into standby, the backlight will dim down in 10 seconds if no buttons are touched.
- On level: This option will determine how bright the display's backlight is lit while the radio is on ON mode. There are 3 options for this setting: High, Medium& Low
- Dim level: There are 3 brightness levels of the Dimmed backlight available - low/medium/high.
Turning on/off the Radio
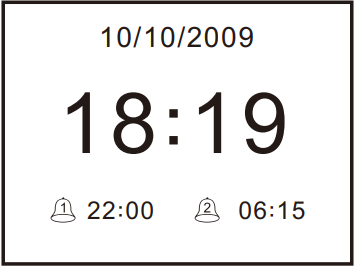
To power on/off the radio, press the Power on/off switch at the rear side of the unit. To turn it to Standby, press the Power button. It will switch to Standby. It will display the clock and alarm time if it is set.
To turn it ON again, do the same by pressing the Power button.
Alarms
It allows you to set and check the alarm time. Press ![]() button to set the alarm as the screen shows below, press ▲▼ to choose Alarm1 or Alarm2, then press OK to enter the alarm setting.
button to set the alarm as the screen shows below, press ▲▼ to choose Alarm1 or Alarm2, then press OK to enter the alarm setting.
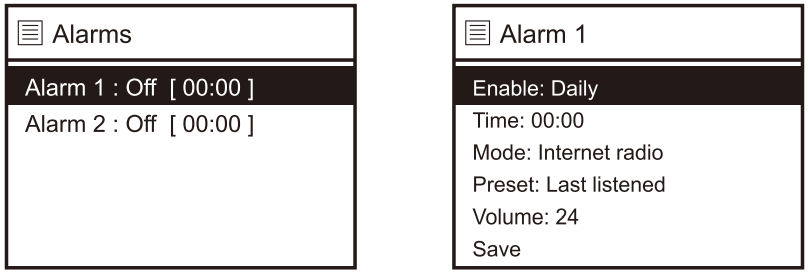
- Enable: Press OK to set the Alarm Off, Daily, Once, Weekends, or Weekdays.
- Time: Press ▲ or ▼ to set the hour and then press OK to go to set the minute.
- Mode: You can set the alarm sound source as Buzzer, DAB, FM or Internet Radio.
- Preset: If you choose the sound source as DAB, FM or Internet Radio, then there will be an extra menu “Preset” for you to choose the preset station or last listened station.
- Volume: You can set the alarm sound level as you want.
- Save: Press Save to confirm the alarm setting.
Sleep Timer
You can set the timer to put the radio in standby after certain time elapsed, from 15 minutes to 60 minutes with the step of every 15 minute. Press the button![]() on remote control to enter the setting, press the same button repeatedly to choose the timer option you prefer. The sleep timer icon will display on the bottom left corner and the time remaining before the radio goes into standby.
on remote control to enter the setting, press the same button repeatedly to choose the timer option you prefer. The sleep timer icon will display on the bottom left corner and the time remaining before the radio goes into standby.
Mode
The radio has five modes: Internet radio, Music Player, DAB radio, FM radio and Bluetooth
Press <Mode> button to enter the menu of modes, display as below
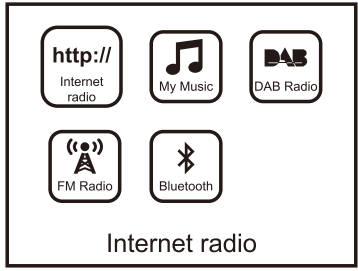
Press ◄► button to choose the mode you want to enjoy, and then press <OK> to confirm and enter the mode.
Internet radio
You can choose the Internet radio mode from the main menu, select Internet Radio and it will pop up the submenu as follow. If this is the first time you set up the radio, it will navigate to “Station List” for you to start
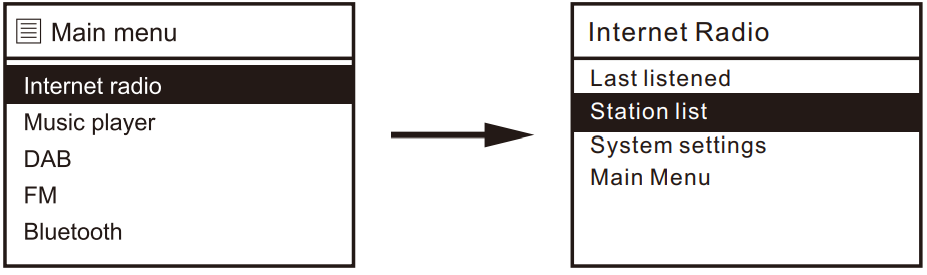
Station List
Select station list to access thousands of radio stations. Use ▲▼ button to choose the options and press OK.
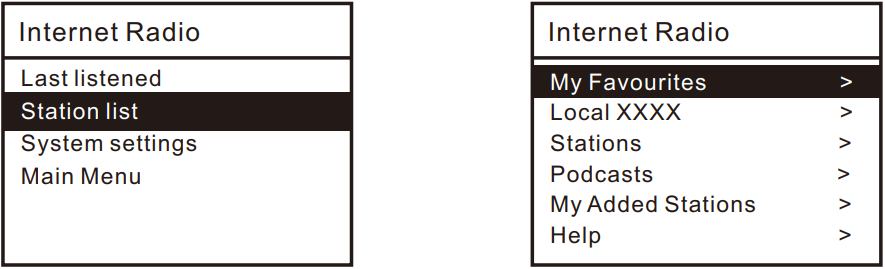
My Favorites
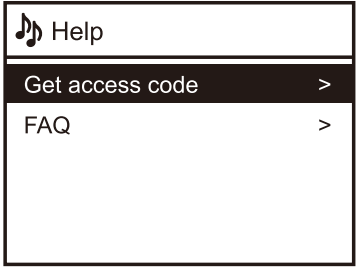
To register your internet radio with the Portal, please get the access code from the path below
On the Internet Radio Main menu > Station list > Help > Get access code
You need to become a member of the Radio Portal in order to do registration. Go to “Register here” at the left under Member Login section. Then you will be requested to key in the Access code and provide your email address to complete the registration.
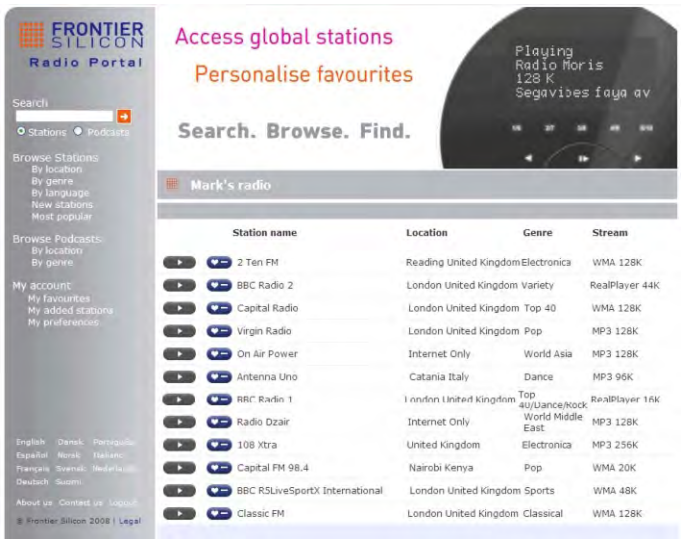
Once the registration is done, you are now ready to add your favorite station to your radio on the portal, to create your favorite list of stations. The favorite list will show on the radio, under My favorites on the menu
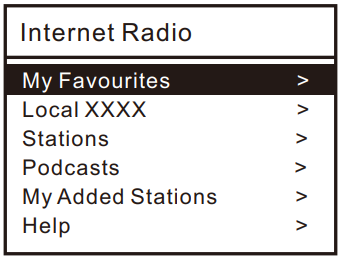
My Added Stations
If you have found a station that is not in our list, you can add it yourself on the Portal. Choose My Added Stations on the Portal, you will be requested to fill in the radio station name, URL..etc. in order to add the radio. You can always go back to the Radio Portal to update your favorite list and personalize your radio any time to make the most enjoyable list that suits you.
Note: Kindly note the added URL needs to be an audio streaming URL in order to play on this radio.
Local XXXX
The radio will detect the radio stations in your country if you have select the . You can enjoy listen to the radio stations in your country instantly by selecting this option.
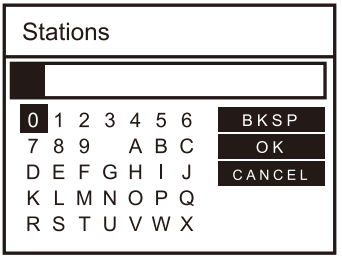
Stations
Choose this option to select radio stations in worldwide. It will be classified as Location, Genre, Search stations, etc

Search stations
You can also search through Internet broadcasts for stations or podcasts with particular keywords in their title. Select ‘Search Stations’, input the characters of the radio station.
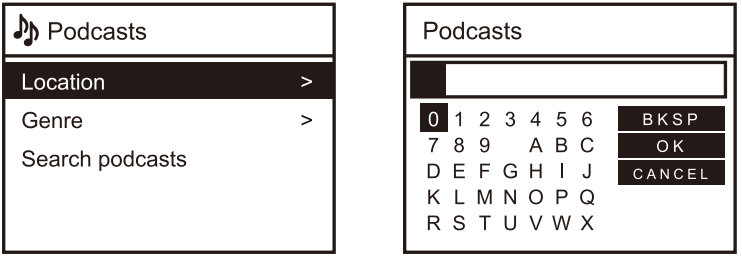
Podcasts
There are thousands of Podcasts available for you to choose from. Select this option to choose your favorite program to listen.
Help
To register on the Radio Portal, you will need an Access code. Get the code from this Help option. You can also get some FAQ from here.
Last listened stations
The radio stores your last listened radio stations, you can choose this option from the Internet Radio main menu to view the last listened station list. Simply press Home ![]() button to go back to the Internet Radio menu. Most recent stations appear at the top of the list. The next time you power on your radio, it will play the last listened stations.
button to go back to the Internet Radio menu. Most recent stations appear at the top of the list. The next time you power on your radio, it will play the last listened stations.
System settings
Refer to the <System settings> section.
Main Menu
Return to main menu by choosing this option. Whenever you want to return to the menu of Internet radio, press the Home < ![]() > button.
> button.
Listening to Internet Radio station
When it is playing a radio station and under the playing screen, press the <Info> button repeatedly and you will see more information about the radio station such as: Music title, description, genre, reliability, bit Rate/codec/sampling rate, playback buffer and today's date.

Note: The radio information is provided from the Internet radio broadcasters, so it is only accessible when there is such information transmitted by the radio broadcasters.
Preset and Recall of stations
The radio can store maximum 10 presets of stations. When listen to the radio station, press and hold the Preset button![]() to enter the preset menu, and then press the OK button to confirm. The “Save to Preset” message will appear, you can see the assigned preset number showing at the bottom center. You can also save the preset to a dedicated number by long-pressing the numeric key on the remote until it show “Preset Stored”
to enter the preset menu, and then press the OK button to confirm. The “Save to Preset” message will appear, you can see the assigned preset number showing at the bottom center. You can also save the preset to a dedicated number by long-pressing the numeric key on the remote until it show “Preset Stored”
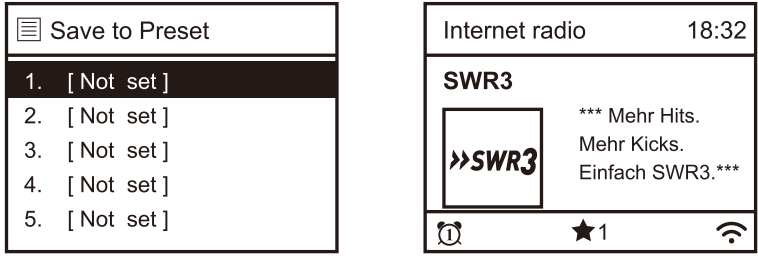
To recall the station, press the Preset button![]() briefly to enter the preset list, and then choose the station that you would like to listen, or press the specific numeric key to direct access. You can hold the numeric button to preset the stations also, and then recall the station by briefly press the numeric button.
briefly to enter the preset list, and then choose the station that you would like to listen, or press the specific numeric key to direct access. You can hold the numeric button to preset the stations also, and then recall the station by briefly press the numeric button.
Music Player
UPnP (Universal Plug and Play)
You can stream music from the Networked device which supports UPnP function to the radio to play For instance, most of the latest computer laptop supports UPP, and you can stream music from Windows Media Player application on thecomputer and listen on your radio.
Please make sure your computer laptop is on the same Wi-Fi network as the Radio before you start using this function
- If your PC is running Microsoft Windows XP, then you can use Windows
Media Player 11(WMP11) to act as your UPnP (Universal Plug and Play) media server. (For Windows 7 or above, please download the correspond version of Windows Media Player). The latest Windows Media Player may be downloaded from Microsoft's website and install by following the instructions detailed in its installation wizard. - Once installed, Windows Media Player will create a library from all the media files available to it on your PC.
- Windows XP / Windows Media 11
- To add new media files to the library, select File > Add to Library... > Advanced Options', Click 'Add' and choose the files you wish to add and click' OK
- Now you need to connect your Internet radio to Windows Media Player 11 and configure it to allow the radio to access your media library. In order to this, you will need to do the following:
- On the radio, go to the main menu and select <Music Player> <Shared Media>.
- It will scan for all available UPnP servers.
Note, this may take a few seconds for the radio to complete its scan and before the scan has completed, the radio will display '[Empty]'. The radio will continue to display '[Empty]' if no UPnP servers and found. - After a successful scan. Select your UPnP server, by rotating the dial if there is more than one UPnP server, and then press
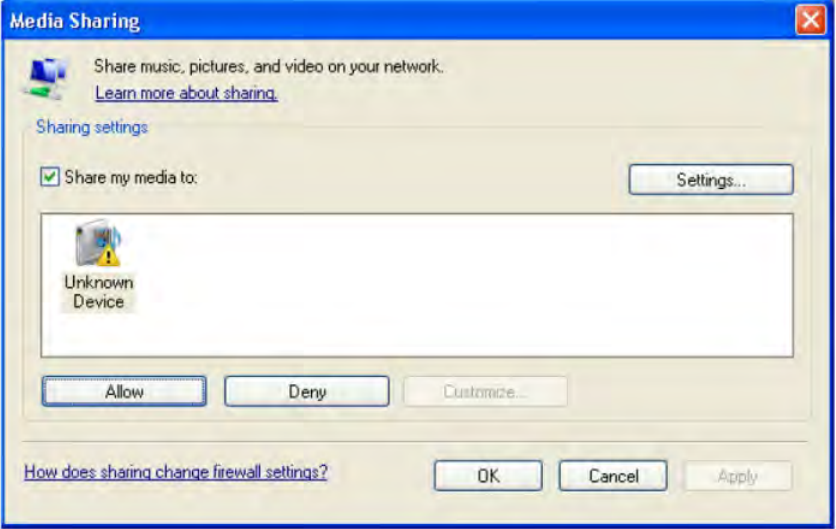
Your PC will now prompt you that a device has attempted to connect to your UPnP server. In order to allow the radio to have access to the media files, you will need to click the 'Library' tab from Windows Media Player 11 and select the <Media Sharing> item to open the 'Media Sharing' window. Selecting 'Media Sharing...' for Windows Media Player 11
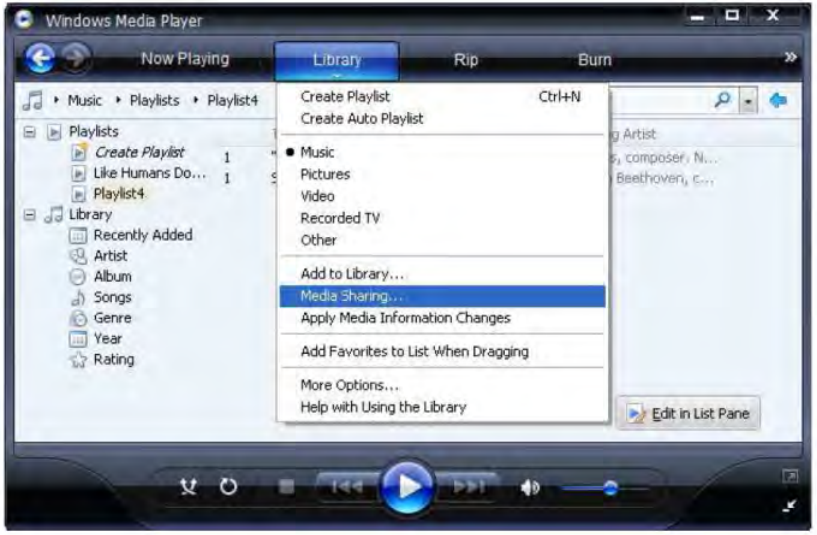
From the 'Media Sharing' windows, the radio will be listed as an unknown device. Click on the unknown device listed, then click the 'Allow' button and then click 'OK'. Allowing the Radio to Connect
- Windows 7 / Windows Media Player 12
- If you are using WMP 12, simply go to <File> and choose <Open> to retrieve the music files you would like to add to library.
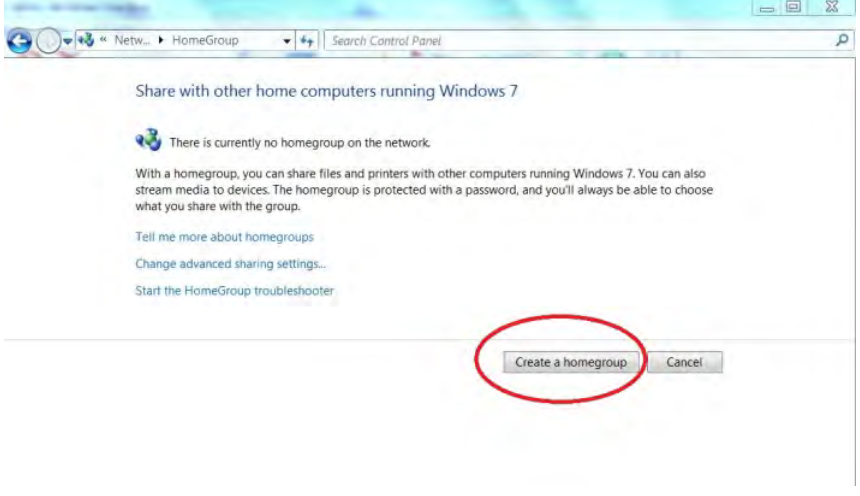
- Windows 7 or above requires the PC to be set as Home network and also with the Homegroup enabled to allow devices to access/ play the media files on your Windows Media Player. Please find the steps below
Go to <Control Panel>, select <Network and Internet>
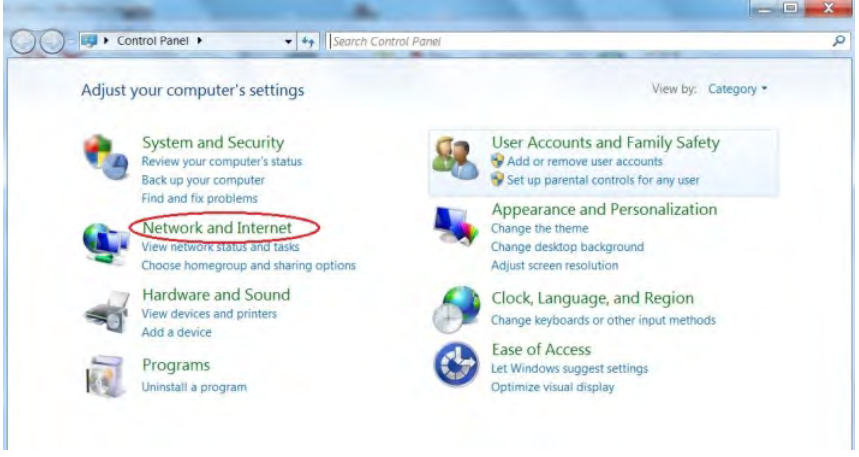
Choose < HomeGroup>

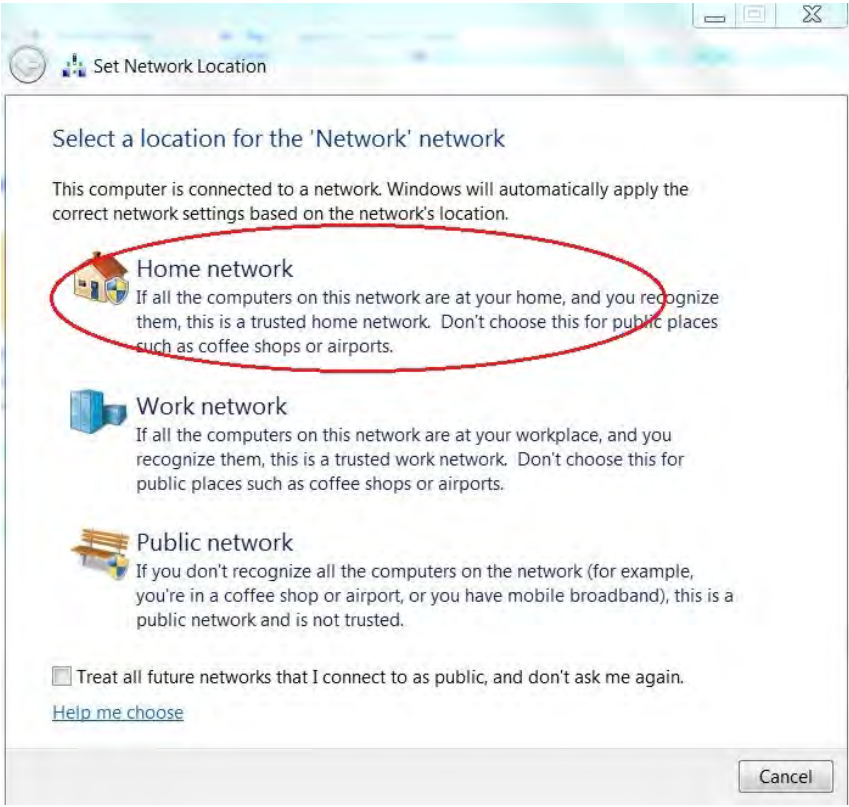
Set the network location
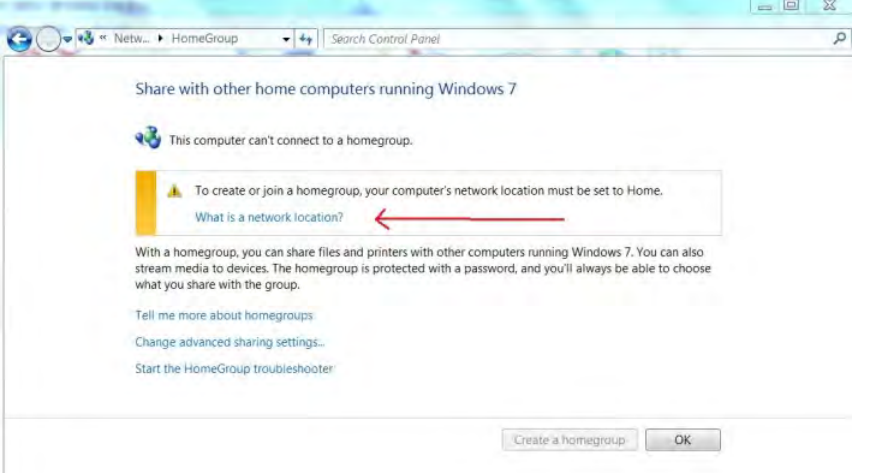
Choose Home network
Create a homegroup, then choose the kind of media file to be accessed, such as music..etc.
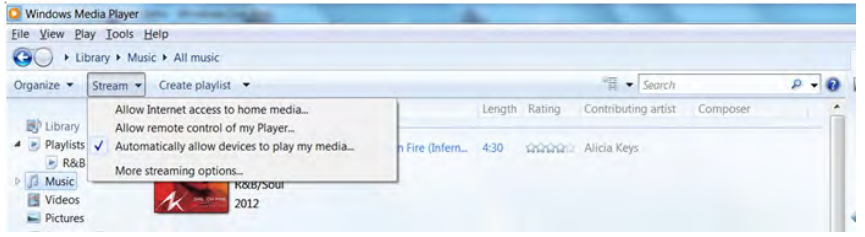
- Launch the Windows Media Player, select <Stream> and choose <Automatically allow devices to play my media> from the drop down list
You can now enjoy the music streaming from the Windows media player.
- Windows XP / Windows Media 11
Music streaming via UPnP
- Once the UnP server is configure to share media files with your radio, you can start music streaming.
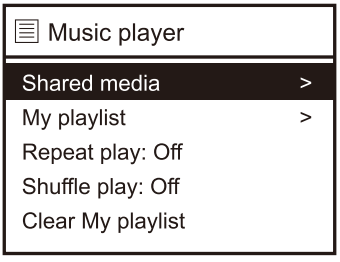
- On the main menu, select < Music Player> and choose <Shared media
- It may take a few seconds for the radio to complete the scan for available UPnP servers. If no UPnP servers are found, it will show <Empty List>.
- After a successful scan is done, select your UPnP server.
- The radio will show the media categories available from the UPP server, e.g. 'Music', 'Playlists' etc.
- Choose the media files that you wish to play
- Repeat play/Shuffle play
You can set the play mode as repeat or shuffle. - Playlists
Some media ripping applications allow 'Playlists' to be created. The Internet Radio is able to detect and stream these playlists, but they must be stored in the folder with the rest of the Media content and they must have the file extension.m3u. Windows Media player can create suitable playlist, just select 'create new playlist', drag and drop the tracks you want into the playlist, then use 'Save as' to ensure the file type is.mu. (Existing play lists can be opened and re-saved in this format) When the Internet Radio detects you have playlists, it will enable a new menu option allowing the playlist to be selected and added to the queue. If you re-connect to another PC of folder, which does not have any Playlists in the mu. format, the playlist option will not be presented in the menu - Clear My Playlist
You can delete the playlist in this option.
- Repeat play/Shuffle play
DAB radio
You can enjoy the DAB radio stations in your area (if it has DAB radio broadcasting).
Always ensure the wire antenna is fully extended to get the maximum signal strength. If the reception is not the best, try to move around the wire antenna. Place the radio close to the window as much as possible.
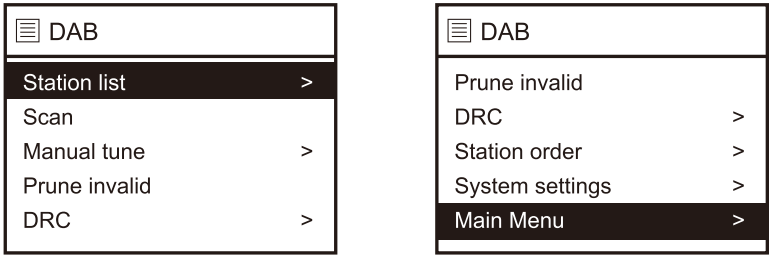
You can press ▲ or ▼ to select different menu, and you can press u key or OK button to enter the sub-menu for the one has “>” on right.
- Station List
You can press “” key to see the station list.
If you want to exit the station list, just press the <HOME> button. - Scan
To full scan the radio stations available in your region. - Manual tune
This function allows you to check whether a specific frequency can be received in your area and the corresponding signal strength. When this option is selected, it will show a list of DAB frequencies. Choose a frequency and it will display a bar of strength. If the selected frequency is available in your region, the signal bar will indicate with number of levels depends on the reception. - Prune Invalid
Some DAB services may stop broadcasting or you may not be able to receive a station. Prune stations will delete the DAB stations from your station list that can no longer be received. - DRC
Dynamic Range Control (also known as DRC) can make quieter sounds easier to hear when your radio is used in a noisy environment. This function is only available for the DAB.- DRC Off – No compression
- DRC High – Maximum compression
- DRC Low – Medium compression
Setting the compression to maximum will “boost” the quiet sounds, whilst keeping the loudest sounds at their original level.
- System settings
Refer to the <System Settings > section. - Station Order
You can choose different station order methods as Alphanumeric, Ensemble and Valid.
DAB Slideshow
Our radio supports DAB slideshow. If there are images transmitted by the broadcaster, you will see the image appeared on the playing screen.
To start the slideshow, press the <OK> button. The image will be enlarged to the full screen size. Whenever you want to resume to the playing screen, press the <OK> button again.
DAB Radio Information
When listening to a DAB radio station, you can view the information transmitted by the radio broadcaster if any. Cycling through the information available by pressing the <INFO> button repeatedly.
FM Radio
Switch the mode to FM.
- Quick scan
To quick scan the next station available, press <OK> button to start. It will stop when it finds a station. Whenever you want to stop the scan, press the <OK> again. - Manual tune
- Press ▼ to tune the frequency down by 0.05MHz
- Press▲ to tune the frequency up by 0.05MHz
Press the <Home > button, it will enter into the FM main menu.
- Scan Setting
You can choose whether to scan strong stations only or not when using the quick scan feature. - Audio Setting
When the FM reception is weak, you can choose to listen in Mono only.
FM Radio Information
When listening to a FM radio station, you can view the information transmitted by the radio broadcaster if any. Cycling through the information available by pressing the <INFO> button repeatedly.
Bluetooth
- Switch to Bluetooth mode.
- The radio adaptor is now discoverable by your Bluetooth device. Turn on the Bluetooth on your device and look up the device named “DBA-03R” from the list and select it. It will start pairing with the radio adaptor.
- If the connection is successful, it will show “Connected” on your Bluetooth device list.
- You can start playing the music from your Bluetooth device through the radio adaptor.
Warning
The normal function of the product may be disturbed by Strong Electro Magnetic Interference. If so, simply reset the product to resume normal operation by following the instruction manual. In case the function could not resume, please use the product in other location.
Troubleshooting
If you experience any issues with the Ocean Digital Radio Adaptor, here are some common problems and solutions to help you troubleshoot:
- No sound: Make sure the adaptor is properly connected to your radio and the volume is turned up.
- Poor reception: Adjust the built-in antenna or move the adaptor to a different location for better reception.
- Battery drains quickly: Make sure the adaptor is turned off when not in use, and avoid exposing it to extreme temperatures.
Pros & Cons of Ocean Digital Radio Adaptor
Pros
- Wide range of stations with FM and DAB/DAB+ tuner
- Compact and sleek design
- Long battery life
- Built-in antenna for optimal reception
- Supports multiple languages
Cons
- May not be compatible with all radio models
- No option to save favorite stations
- No remote control
Faqs
How can I link my Wi-Fi network to the Ocean Digital DBA-03R?
If my DBA-03R isn't turning on, what should I do?
There is an internet connection issue with the Ocean Digital Adaptor DBA-03R. How can I solve this problem?
What kind of stereo system can I use with the Ocean Digital DBA-03R?
Although my DBA-03R is linked to Wi-Fi, music is not being streamed. What might be the problem?
On the DBA-03R, how can I access and save my preferred radio stations?
What are the Ocean Digital DBA-03R's audio output options?
Can I upgrade the firmware on my Ocean Digital DBA-03R?
How can the factory settings of the DBA-03R be restored?
What guarantee is offered for the DBA-03R Ocean Digital Radio Adaptor?
Leave a Comment