Olide Automatic Swing Door Opener 120B Guide
Content
Introduction
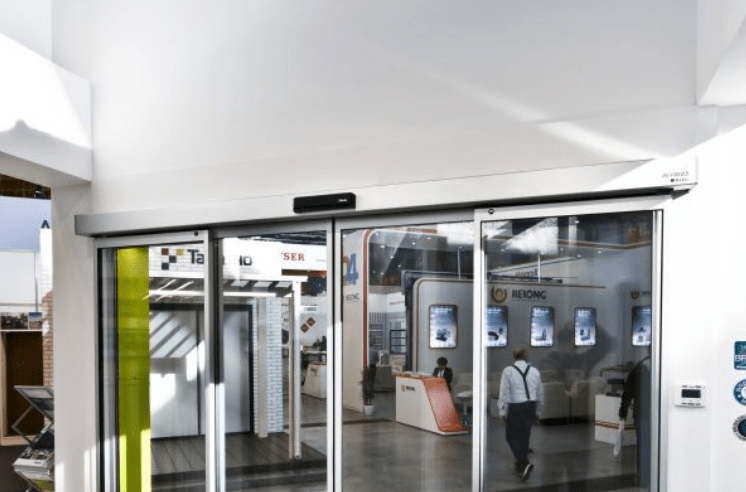
The Olide Automatic Swing Door Opener 120B is a versatile and reliable solution for automating swing doors in both residential and commercial settings. Designed to enhance accessibility and convenience, it features adjustable opening and closing speeds, multiple control options, and safety sensors to prevent accidents. Easy to install and compatible with various door types, the Olide 120B is ideal for improving entryway functionality.
Technical Parameters
- Voltage: 110-220 VAC +/-10%
- Power Consumption: 50W
- Opening Time: 3-7 sec. @ 90 degrees
- Hold Open Time: 1-30 sec. Adjustable
- Max. Door Frame Depth: 450mm / 17.7"
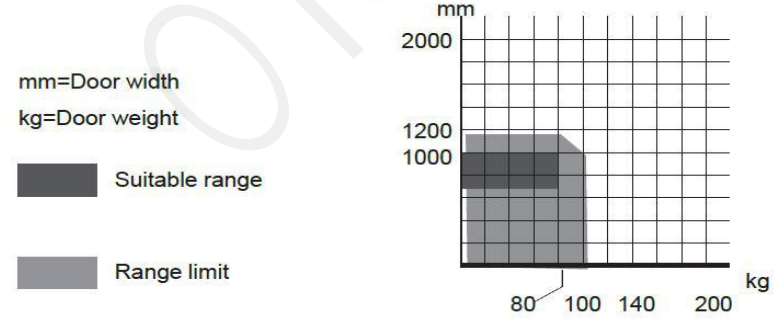
- Door Width: Max. 1200mm / 47.2"
- Max. Opening Angle: 120 degrees
- Environment Temperature: -20C to 50C / -4F to 122F
- Protection Class: IP12D
- Product Weight: 9Kg / 19.8lbs
Dimensions: L540 x H100 x W80mm / L21.2" x W3.9" x H3.14"
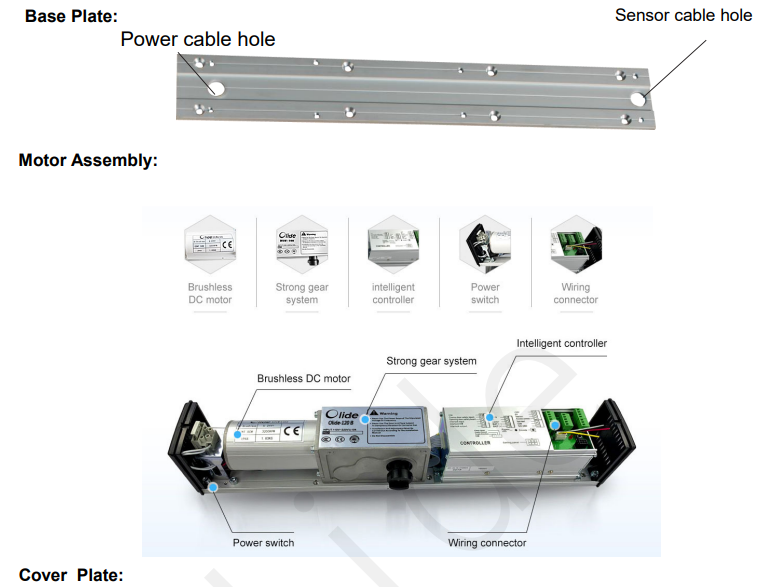
Olide Automatic Swing Door Opener 120B Components
Description
The Olide 120B is a top-notch, simply installed and operated automatic swing door opener. Its automated door reversing mechanism makes sure the door won't close on persons or objects, and its customizable opening and closing speeds make operating safe and smooth. More safety and security are offered by the opener's obstruction detecting sensors. The Olide 120B is an excellent option for both indoor and outdoor use since of its weather-resistant design, which guarantees it can last even the worst of weather conditions. Easy manual operation is also made possible in the case of a power loss or other emergency by the incorporated emergency manual override.
Installation
Installation example
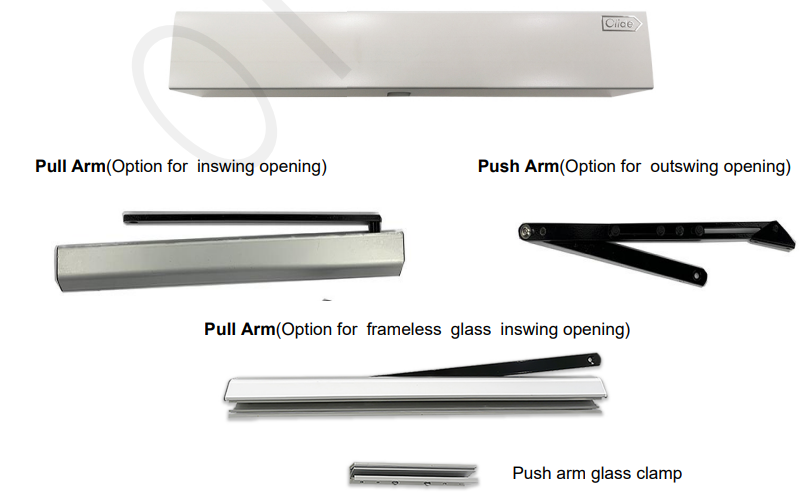
Pull Arm
The door opens to the inside toward the unit using the pull arm assembly.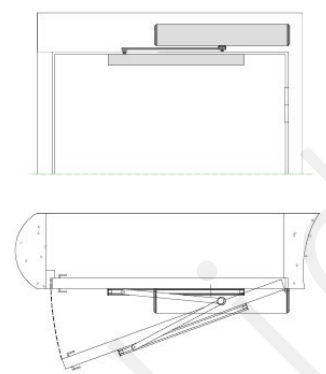
Push Arm
Door opens to the outside away from the unit using the push arm assembly.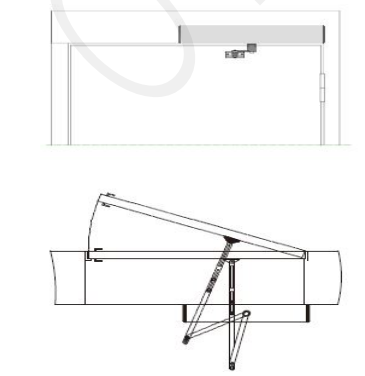
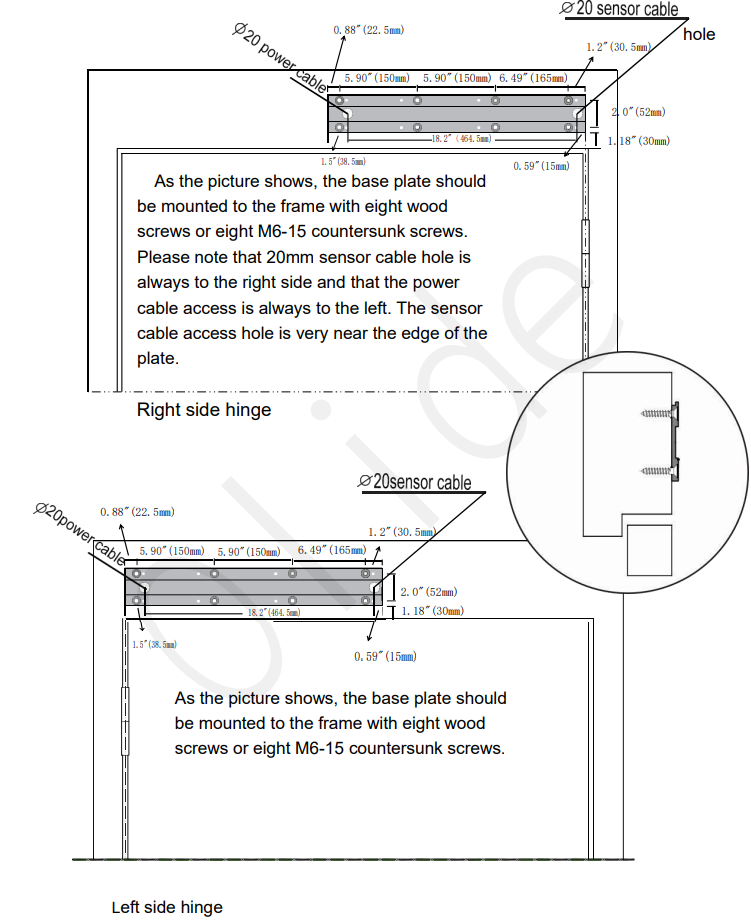
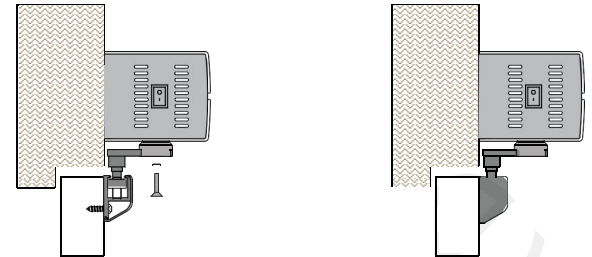
Installation of base plate
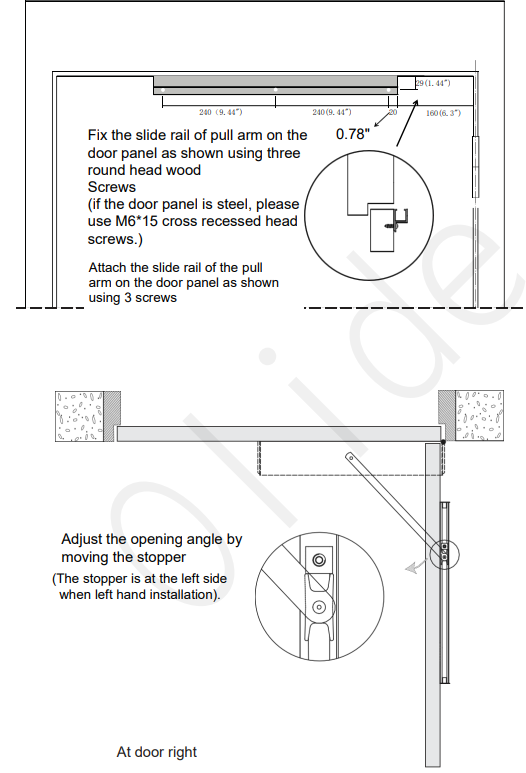
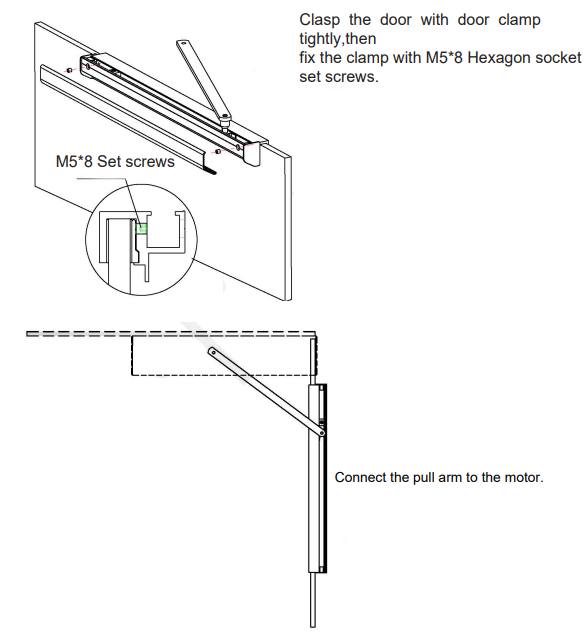
Installation of Pull arm
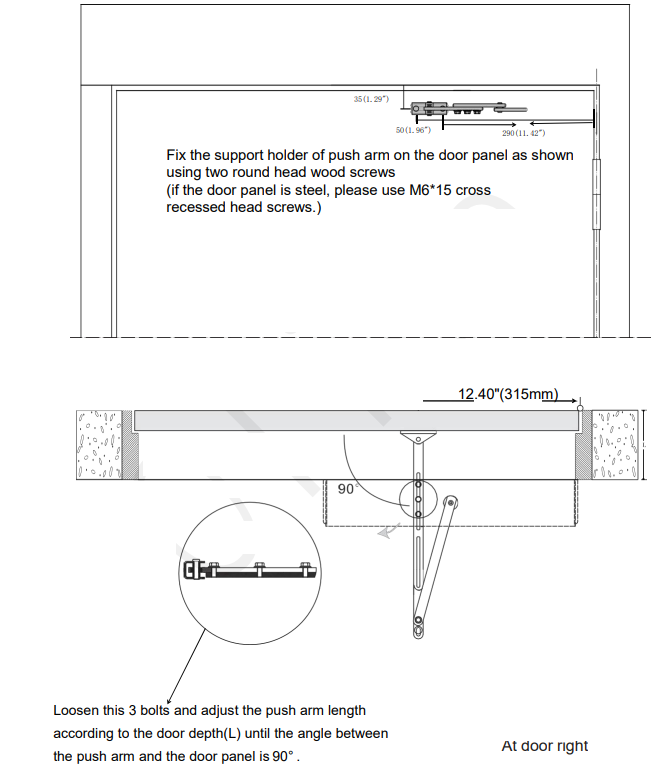
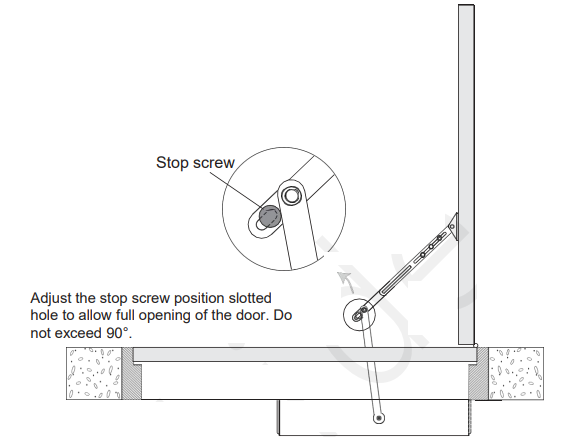
Installation of Push arm
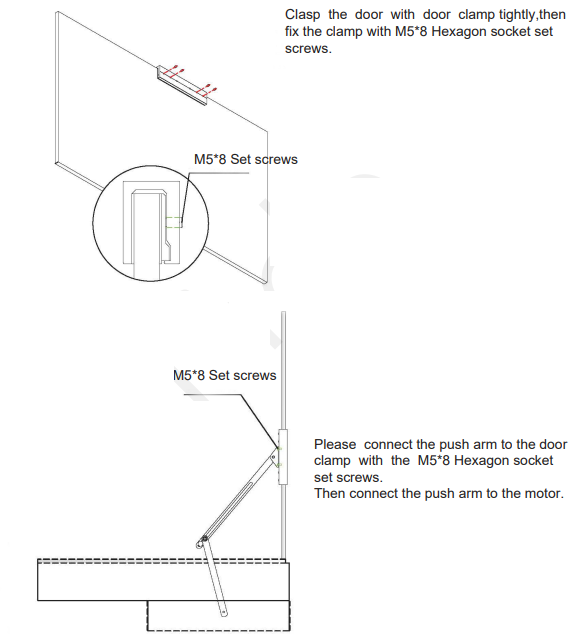
Installation of Push arm for frameless glass door
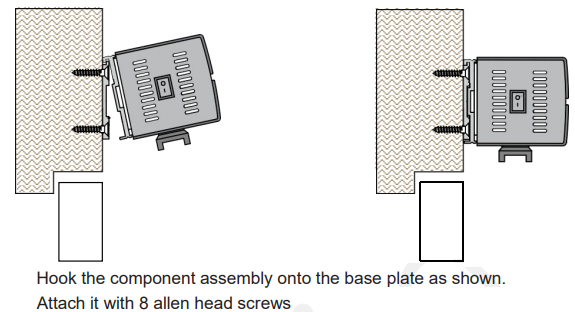
Installation of operation system
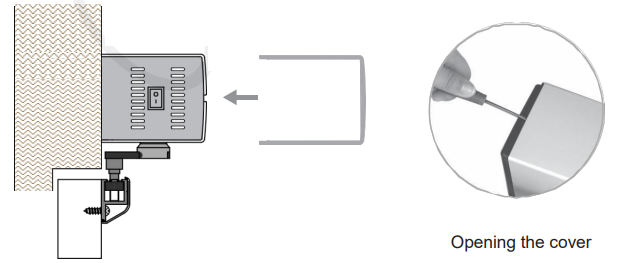
Installation of cover
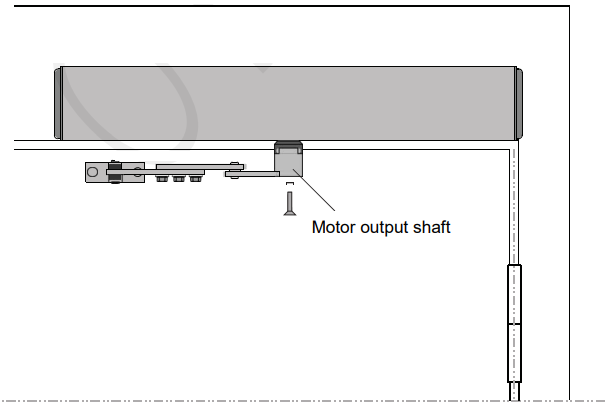
Connect pull arm to the operation system
Connect the push arm to the operation system
Setup Guide
Simply follow these instructions to use the Olide Automatic Swing Door Opener 120B:
- Install the opener as directed in the owner's handbook.
- Join the opener to an electrical supply.
- Utilising the keypad or remote control that is supplied, program the opener.
- To be sure the opener is operating properly, test it.
Olide Automatic Swing Door Opener 120B Electrical Connections
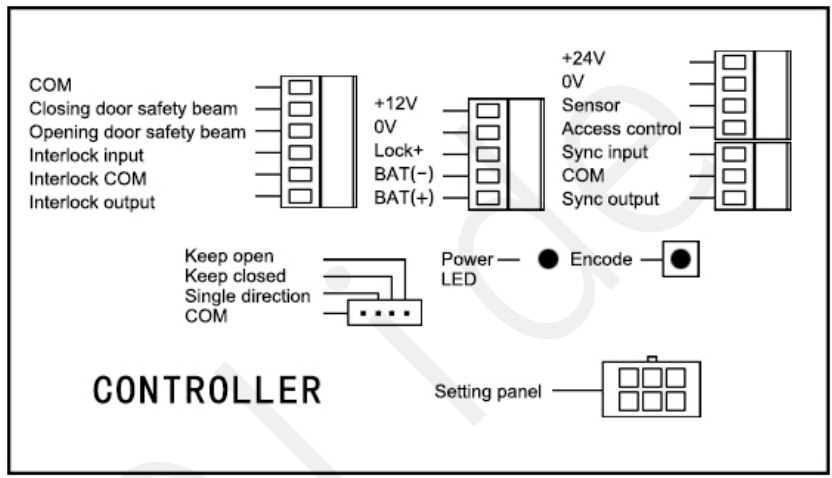
Control panel details
Power wiring: Please connect the 110V-240V AC power input according to the left picture.

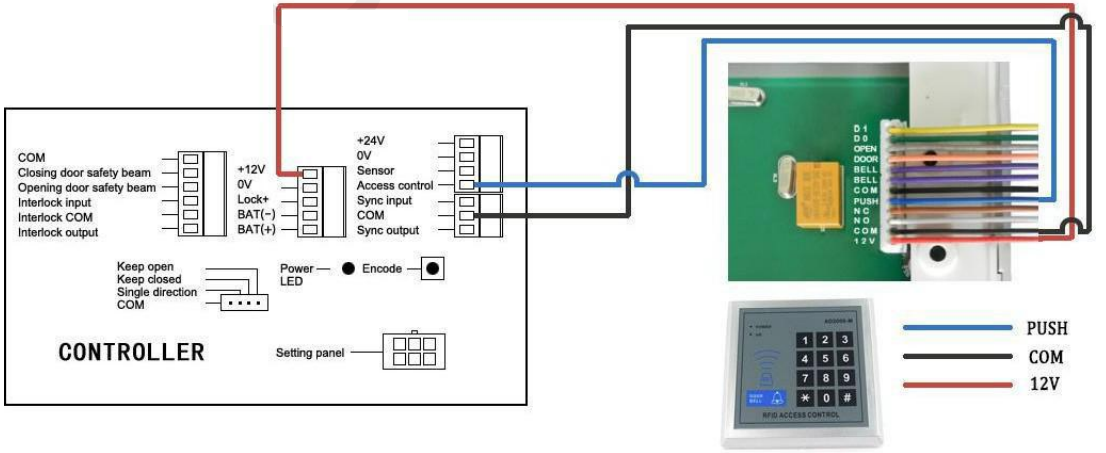
Connecting with keypads
Connecting to microwave sensors
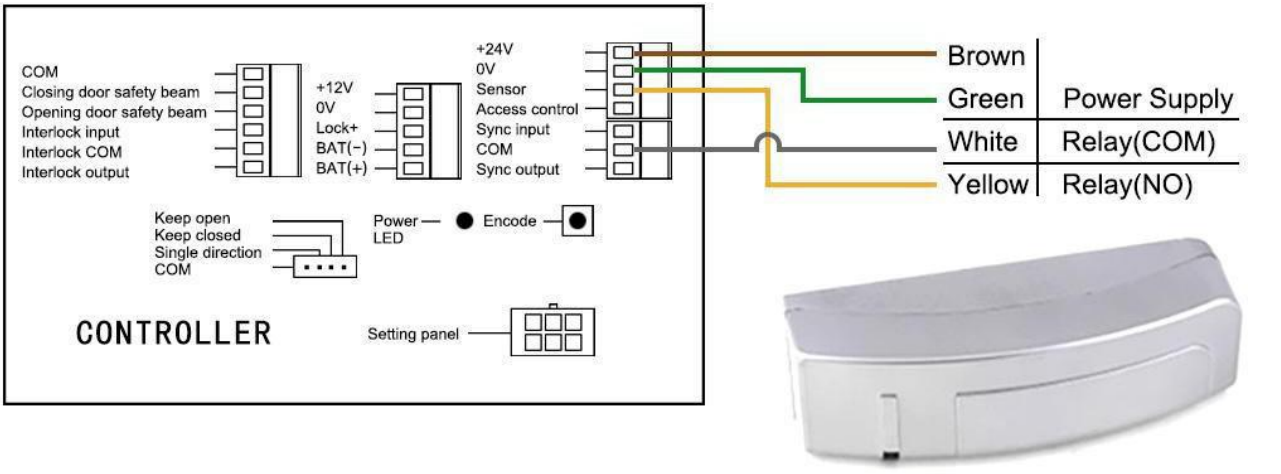
Connecting to PIR sensors
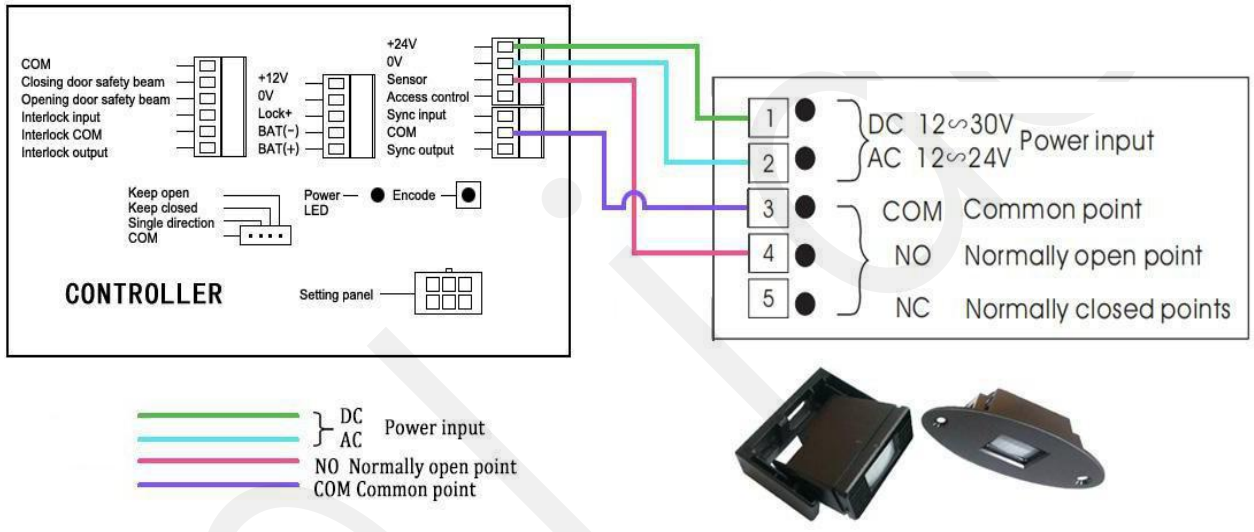
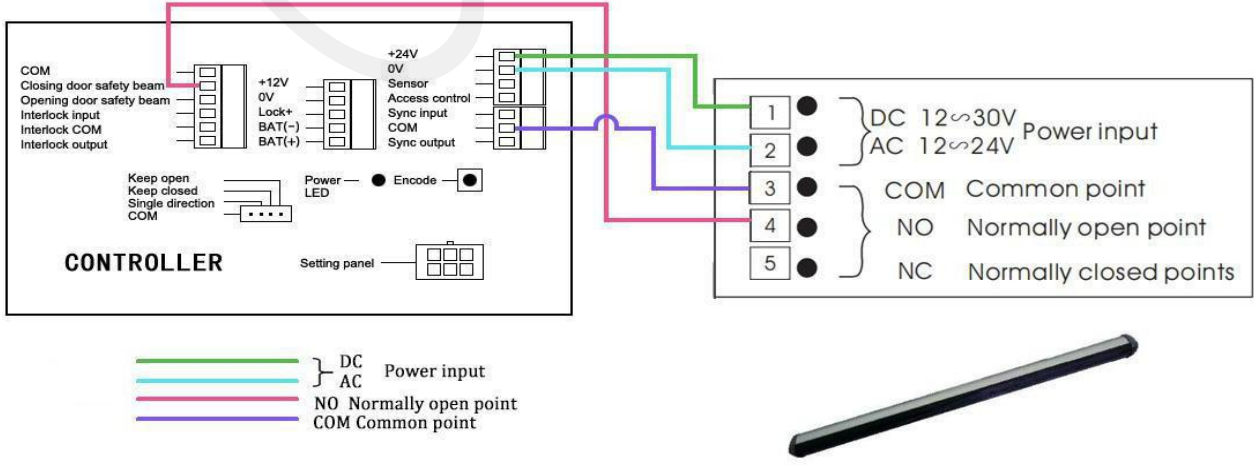
Connecting to safety motion top scans
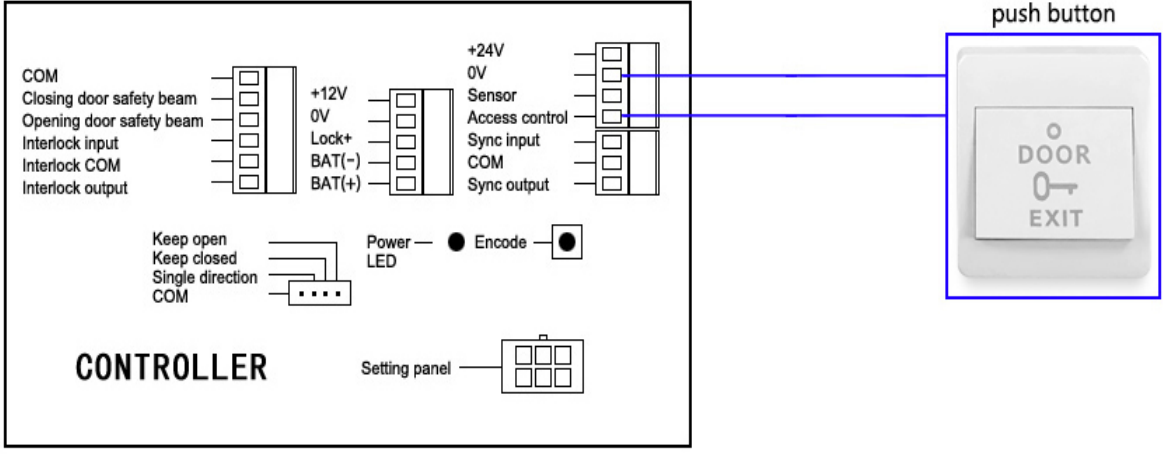
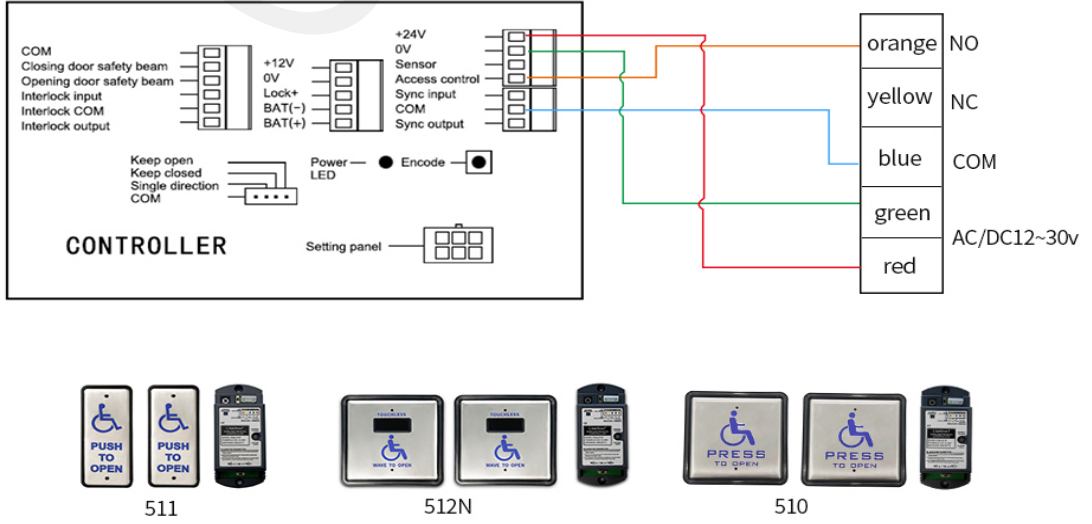
Connecting to plastic push buttons
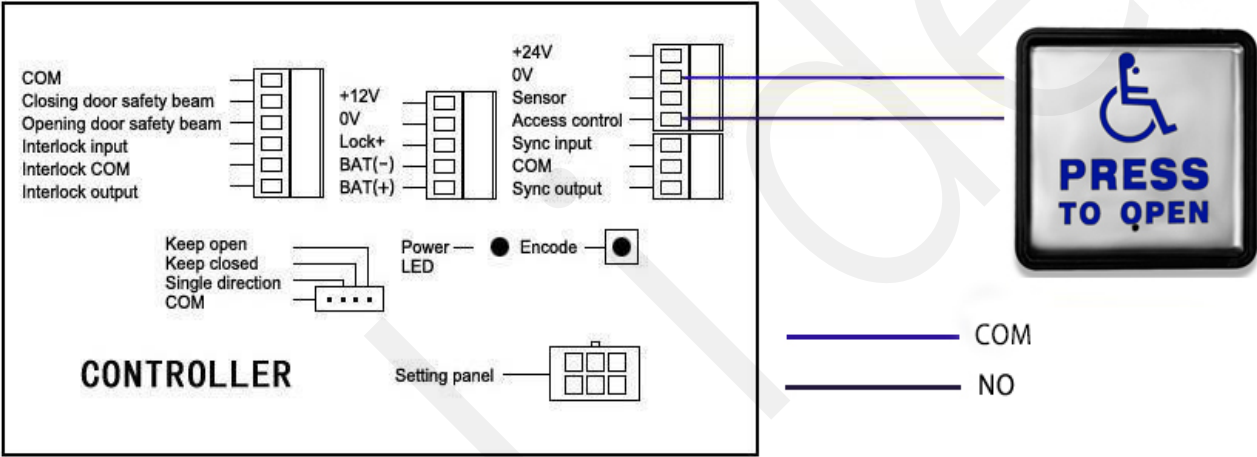
Connecting to wiring disabled push buttons
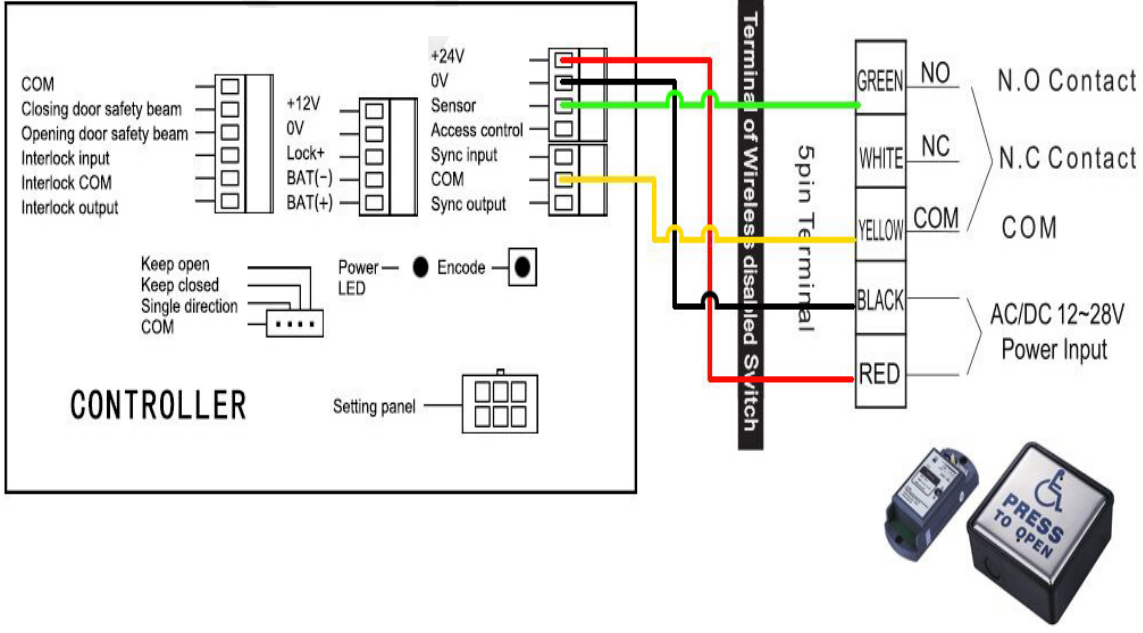
Connecting to wireless handicapped push buttons
Connecting to magnetic locks
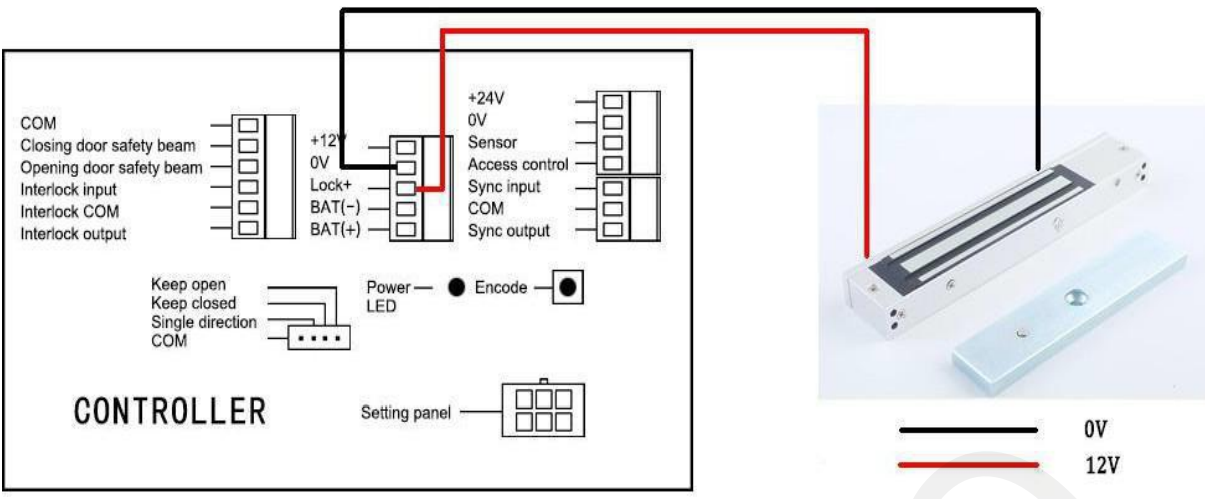
(Important Notes: As maglocks need constant power - You will need to press the LOCK button on the keychain remote control to initialize it. It will work normally afterward.)
Connecting to electrical locks
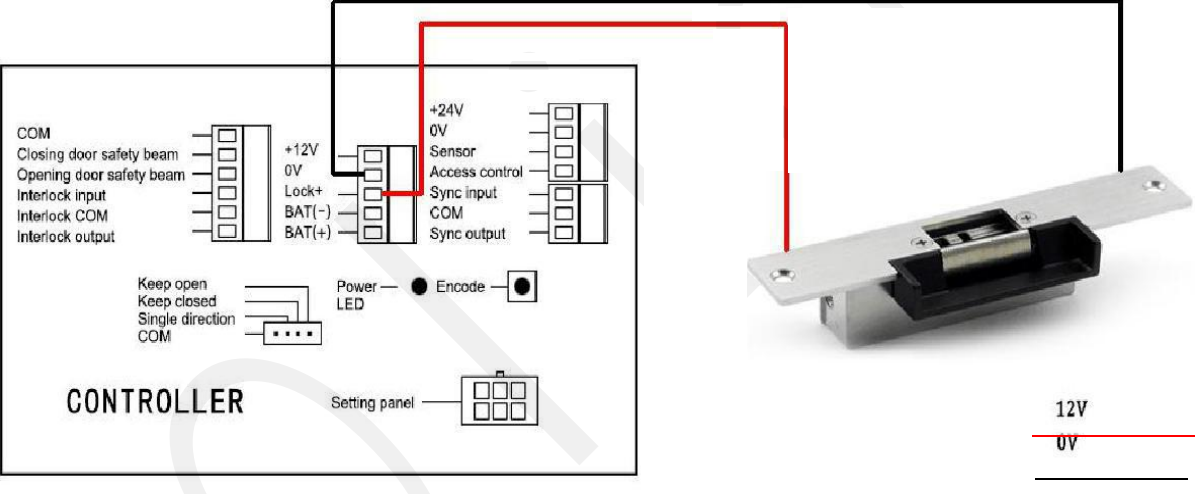
(Important Notes: As maglocks need constant power - You will need to press the LOCK button on the keychain remote control to initialize it. It will work normally afterward.)
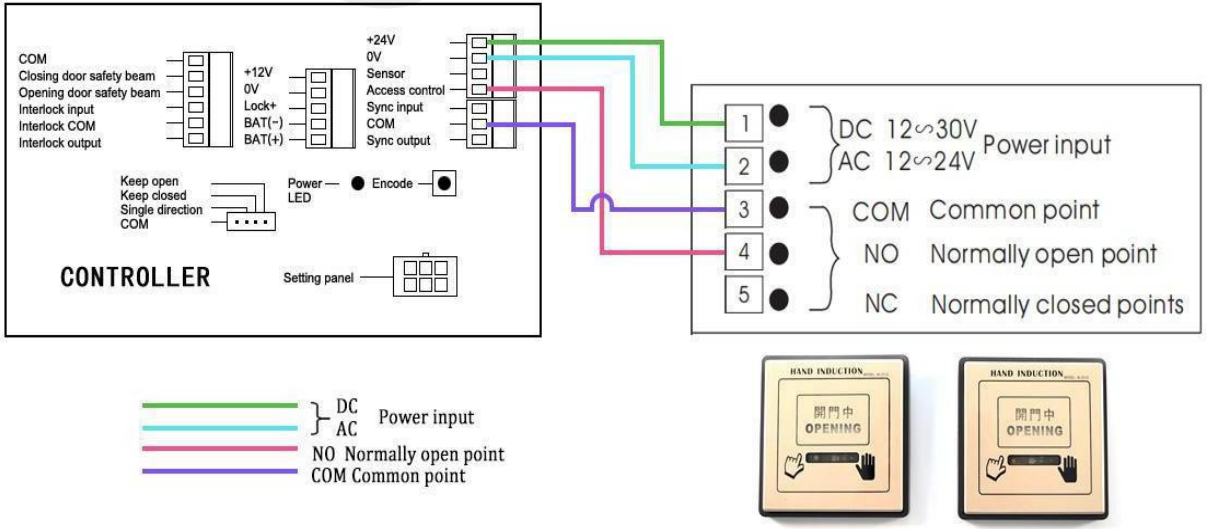
Connecting to hand sensor switches
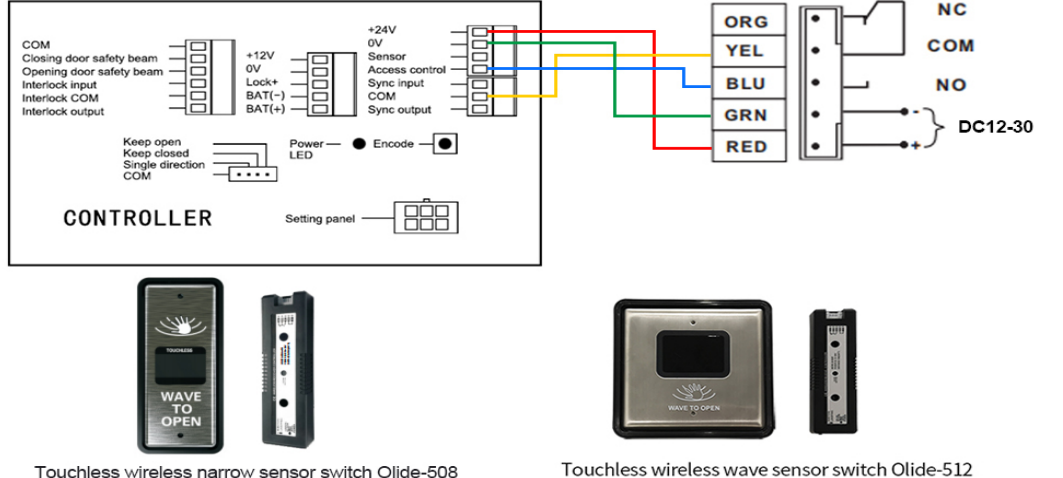
Connecting to wireless touchless sensor switch Olide-508, Olide-512
Connecting to wired touchless sensor switch Olide-514, Olide-513, and Olide-513N
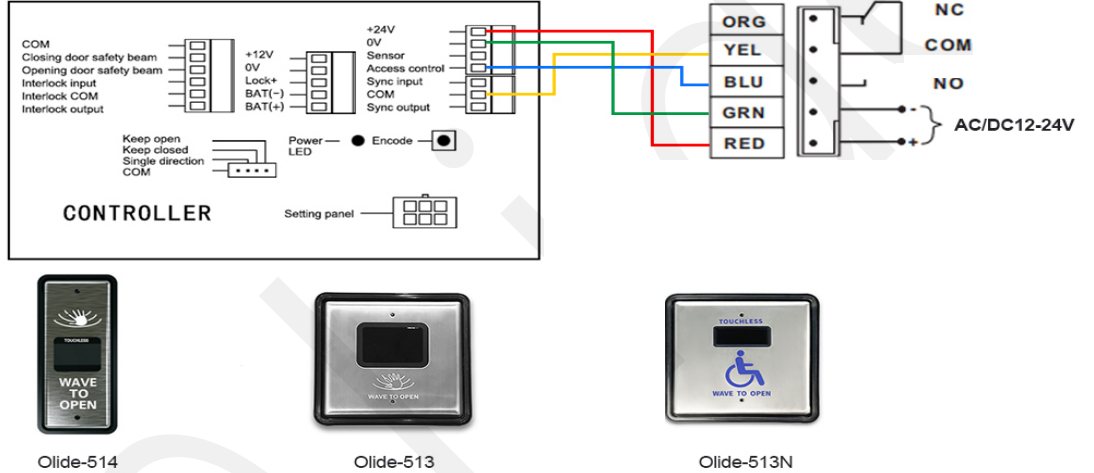
Connecting to wired touchless sensor switch Olide-514, Olide-513, and Olide-513N
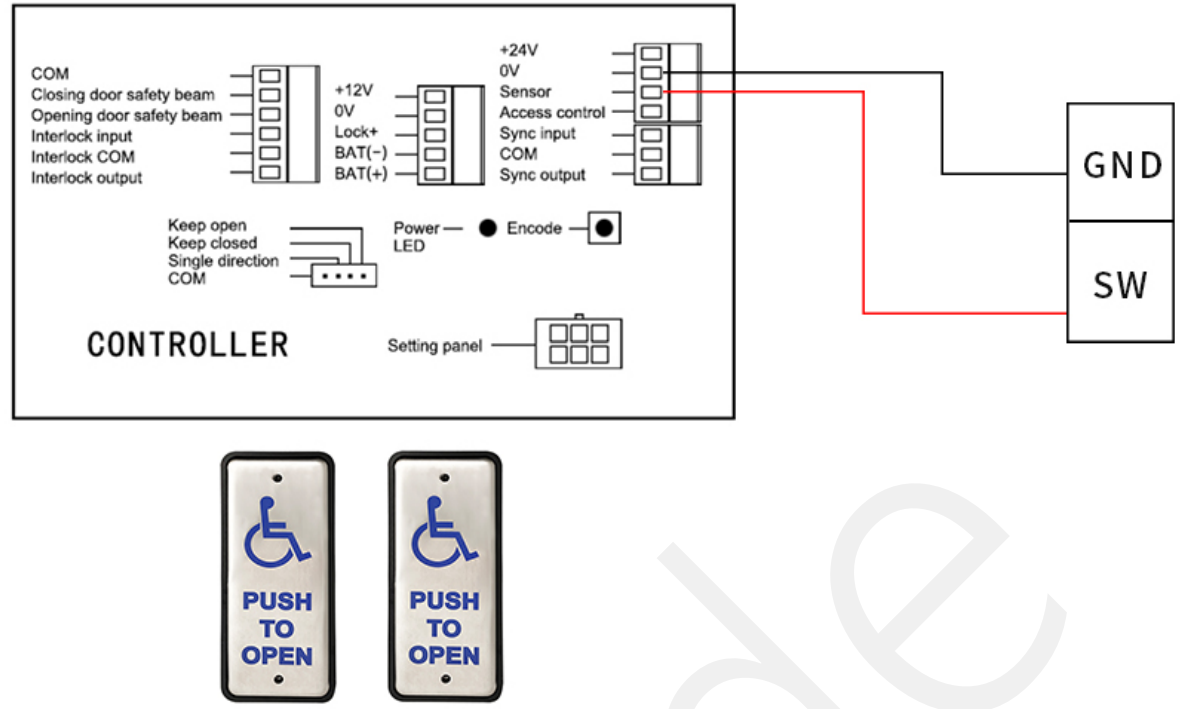
Connecting to wired narrow handicap push button 515
Double door synchronous connections
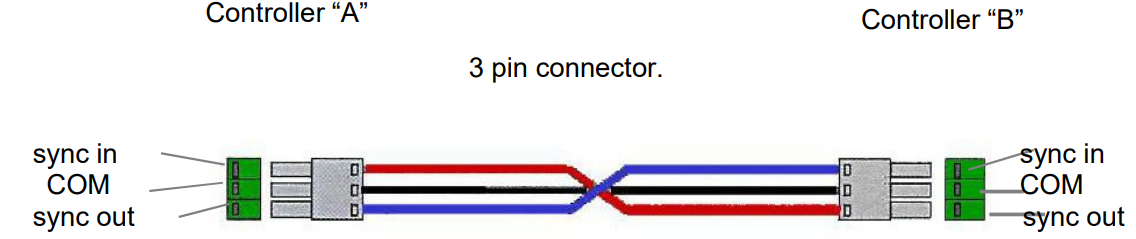
Interlock

Please use the hand programmer for setting the double door synchronous. The detailed steps are written on Page 21 and 22.
Wireless push buttons settings

The wireless push button needs to be encoded with the door opener.
Steps
- To delete: Press the "encode" button until the buzzer sound ceases, then release the "encode" button.
- To pair: Press the "encode" button once - the buzzer will sound. Now press the "PRESS" button, the buzzer sound will cease, indicating that the code has been successfully learned. When you use the remote control, the buzzer will sound for 2 seconds.
Note: If you press the "PRESS" button, and if the buzzer sounds twice - this indicates that the learning process has failed, please repeat step 2 again.
Remote control settings
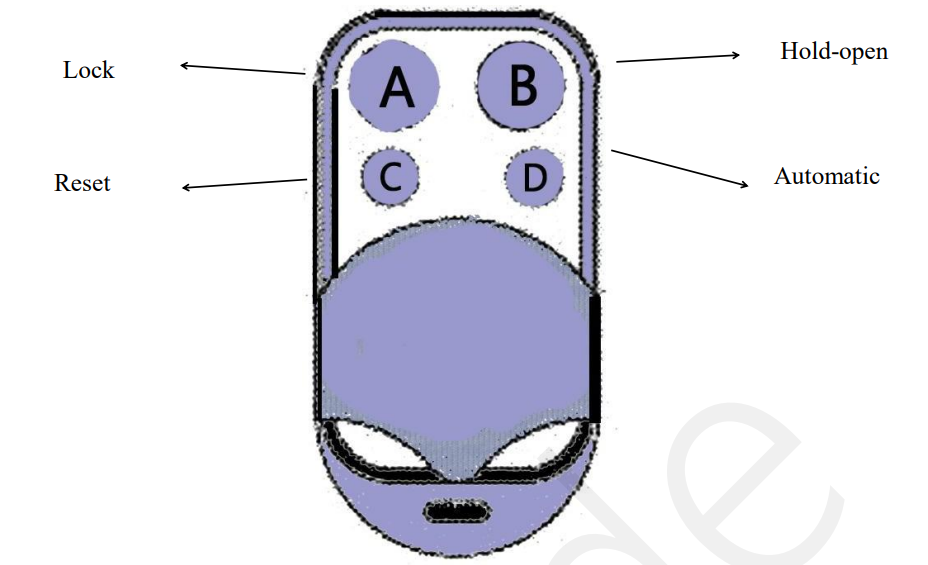
The remote control is pre-encoded to work with the door opener. Nevertheless, here is the process for encoding the remote with the opener.
- To delete all codes: Hold the “Encode” button on the component assembly until the buzzer is silent.
- To pair: Hold the “Encode” button until the buzzer sounds.
- Then press any button on the remote control.
- The buzzer should silence meaning that the encoding process is complete.
- If successful: When the remote control is used, the buzzer will sound once for 2 seconds. If the buzzer beeps twice, this means that the encoding has failed. Repeat step 2.
- To open the door momentarily: Press the "Automatic" button once.
Note: A maximum of 30 keychain remotes can be used on any one operator.
Hand programmer instruction
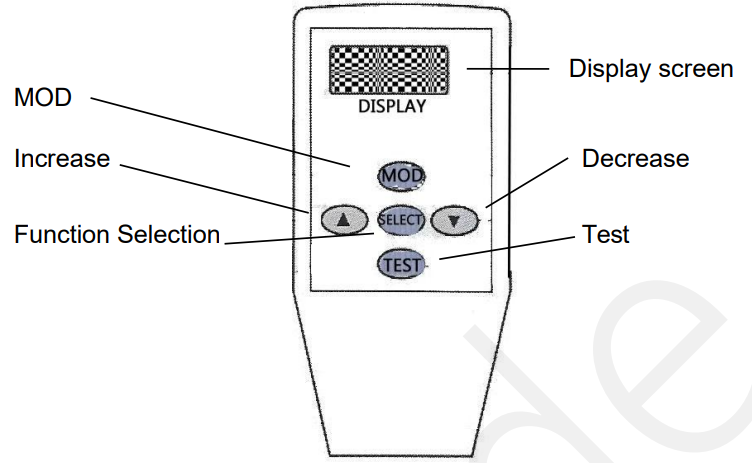
Display Screen guide and function display
F - 1 work parameters
- os = opening speed
- od = opening low speed angle
- cs = closing speed
- cd = closing low speed angle
- jb = closing force
- ok = opening hold time
- ERR3: Time out → Need to Replug
- ERR4: Date Error → Need to Repair
- increase operation = increase data
- decrease operation = decrease data
- function select / confirm parameter data
- → next parameter
- → parameters saved
- → parameters send
- TEST = check settings and test the door
F - 2 door parameters
- n1 single/double door
- n2 master/slave
- n3 synchronize settings
- o manual open door settings
- L lock mode selection
- F open direction settings
- P door closer settings
Parameters Adjustment
Adjustment steps

Troubleshooting
| Symptoms | Remedies |
|---|---|
| The door opens in the wrong direction. | Turn the power off, manually open the door halfway. Turn the power back on, check to see the door closes in the correct direction. If not, change the opening direction using the Handheld Programmer. |
| The door constantly rebounds when closing and repeatedly tries to open and close. | Check for obstacles in the path of travel of the door - clear objects as necessary. You can also try increasing the closing force using the Handheld Programmer. |
| The lock output doesn't work. | Ensure you have pressed the lock button on the remote (initial use only). |
Pros & Cons
Pros
- Adjustable opening and closing speeds
- Automatic door reversal system
- Obstacle detection sensors
- Weather-resistant construction
- Integrated emergency manual override
Cons
- May be more expensive than some other door opener options
- May require professional installation
Customer Reviews
"I recently installed the Olide 120B in my business and I am thrilled with the results. The opener is easy to use and provides a convenient hands-free entry for my customers. I highly recommend this product to anyone looking for a reliable and durable automatic door opener." - John Doe
"I have had the Olide 120B installed in my home for several months now and it has been a game changer. The opener is quiet, reliable, and easy to use. I am thrilled with my purchase and highly recommend this product to anyone looking for an automatic door opener." - Jane Smith
Faqs
What is the Olide Automatic Swing Door Opener 120B?
How do I install the Olide Automatic Swing Door Opener 120B?
What kinds of doors work with the Olide 120B?
Exists a manual operation mode for the Olide 120B?
How can I operate the Olide 120B door opener?
Can the speed at which the opening and closing occur be changed?
How can I program the Olide 120B remote control?
When does the Olide Automatic Swing Door Opener 120B door opener need maintenance?
Are there any other smart home systems that can be connected to the Olide 120B?
In the event that my Olide Automatic Swing Door Opener 120B door opener malfunctions, what am I to do?
Leave a Comment