Setup Codes: On-Q Home Systems Remote 1060 User Manual
Content
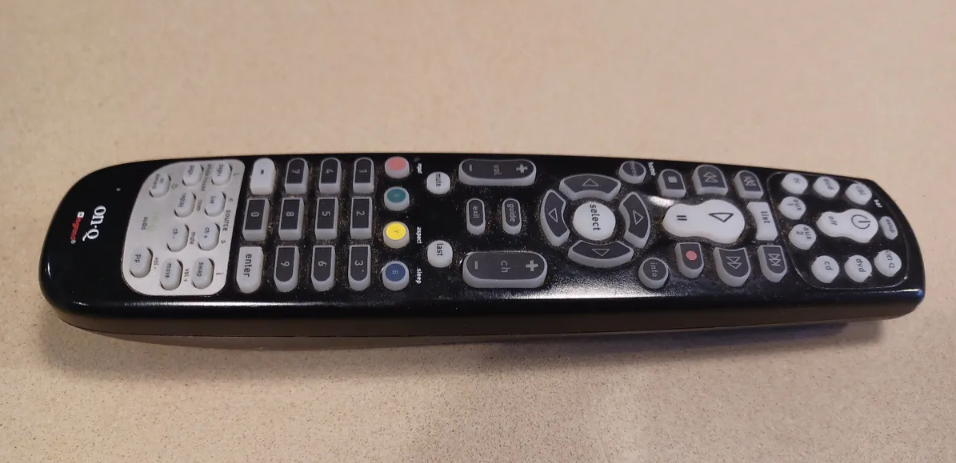
Introduction of On-Q Home Systems Remote 1060
Thank you for purchasing an On-Q universal remote control. Your remote lets you control up to 8 devices with one easy-to-use, compact unit.The On-Q Home Systems Remote is a powerful and versatile home automation remote that offers users a seamless and convenient way to control their home entertainment and automation systems. The estimated price of the remote is around $200, and it is now available for purchase. Out of the box, your remote is ready to control On-Q systems from any mode. After installing batteries, you can program the On-Q universal remote control to control your TV, VCR or DVD, Cable or Satellite Receivers, Amplifier or Tuner, and Auxiliary devices. To do so, follow the instructions in “Programming a Device”. For best results, please read and follow all the remaining instructions. Also, keep this guide for future reference.
Detailed Specifications of On-Q Home Systems Remote
The On-Q Home Systems Remote comes with a range of key features, including:
- 2.4" color LCD touchscreen display
- Integrated IR, RF, and Wi-Fi connectivity
- Compatibility with thousands of home automation devices
- Customizable buttons and macros
- Up to 6 months of battery life
- Programmable lighting and climate control
- Easy-to-use interface and setup
Description of Home Systems Remote 1060
The On-Q Home Systems Remote 1060 offers users a convenient and all-in-one solution for controlling their home automation and entertainment systems. With its 2.4" color LCD touchscreen display and integrated IR, RF, and Wi-Fi connectivity, the remote is able to control a wide range of devices, including TVs, stereos, thermostats, and lighting systems. The remote also features customizable buttons and macros, allowing users to create their own shortcuts and commands for even greater convenience. Additionally, the remote offers programmable lighting and climate control, allowing users to easily adjust the temperature and lighting in their home from the touch of a button.
INSTALLING BATTERIES
Your On-Q universal remote control requires 2 AA batteries.
Battery Use And Safety
- Use only fresh batteries of the required size and recommended type.
- Do not mix old and new batteries, different types of batteries (standard, alkaline, or rechargeable), or rechargeable batteries of different capacities.
- If you do not plan to use the remote for an extended period, remove the battery. It can leak chemicals that can destroy electronic parts.
WARNING
Dispose of old batteries promptly and properly. Do not burn or bury them.
To Install Batteries
- Open the battery compartment cover (located on the back of the remote).
- Place the AA batteries in the compartment and match the + and - polarity symbols inside.
- Replace the cover.
NOTE:
When the battery voltage is low, the feedback LED will blink 5 times after a key press.
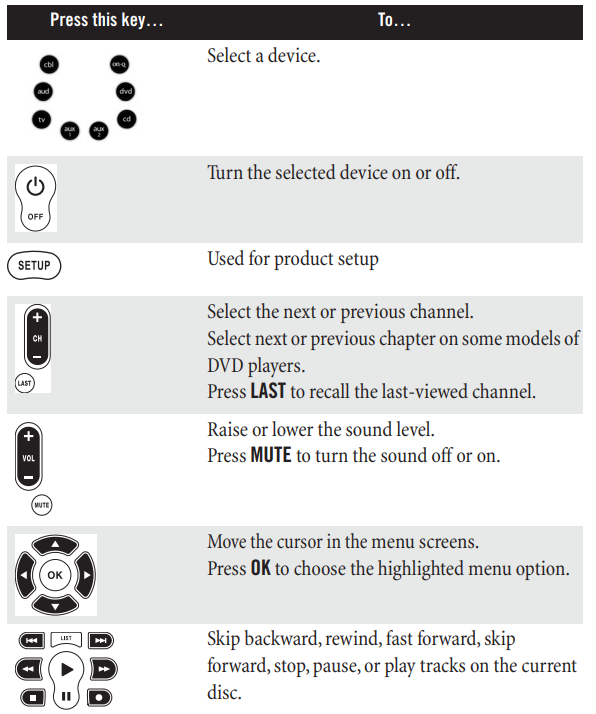
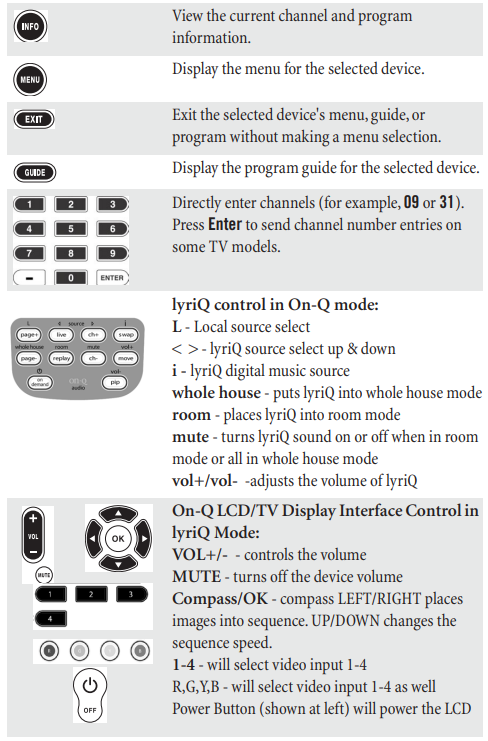
A QUICK LOOK AT THE ON-Q CONTROLS
PROGRAMMING A DEVICE
NOTE: Device button ONQ can NOT be programmed To program this remote to control home theater devices, follow the steps below.
Before proceeding, find the codes for the devices you want to program in “Manufacturer’s Codes” on the right side of this page and write them down or highlight them.
- Turn on the device (for example, a DVD player) and, if needed, load media (for example, a DVD).
- Press a device key on the remote that you wish to program ( TV. VCR/DVD, CBL/ SAT , etc.).
- Press and hold SETUP until the red LED blinks twice, then release.
- Enter the first five-digit code for the device and brand that you wish to program. The LED blinks once as each digit is entered. If the code is valid, the LED blinks twice.
NOTE: If the LED does not blink twice, repeat steps 2 to 4 and try entering the code again. - Aim the remote at the device and press Power Off. The device should turn off. If it does not, repeat steps 3–5, trying each code for your brand until you find one that works. If you cannot find a code that works, see “Searching for Your Code”.
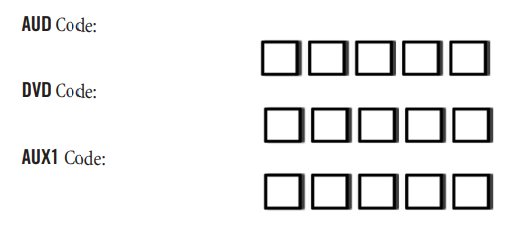
- Repeat steps 1 to 5 for the other devices you want to control. For future reference, write down each working device code in the following chart: CBL/SAT Code
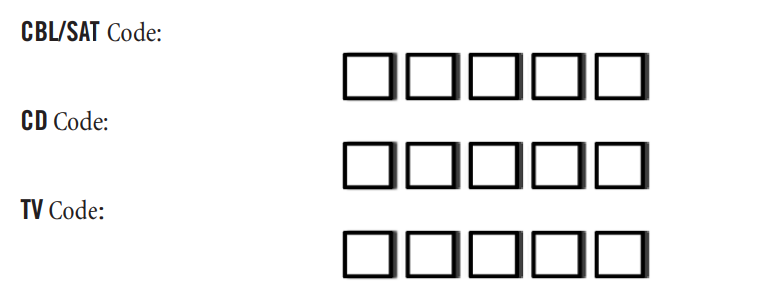
CHECKING THE CODES
If you have set up the remote using the procedure in “Searching for Your Code”, you may need to find out which five-digit code is operating your equipment. For example, to find out which code is assigned to your TV:
- Press TV once.
- Press and hold SETUP until the red LED blinks twice, then release.
- Enter 9 9 0 . The LED blinks twice.
- To view the code for the first digit, press 1 . Count the LED blinks (for example, three blinks = 3), and write down the number in the appropriate code listing at the top of this column.
NOTE: If a code digit is 0 , the LED does not blink. - Repeat step 4 for the four remaining digits, using 2 for the second digit, 3 for the third digit, 4 for the fourth digit, and 5 for the fifth digit.
- To check for other device codes, repeat steps 1—5, substituting the device key the desired mode you would like to check.
USING LEARNING
This universal remote control includes a Learning feature (some models may not include Learning) so you can add functions that are unique to your home entertainment devices (e.g.,VCR Tracking Up or Down). However, there are some considerations.
Learning Precautions
- Your original remote controls must be in working order for learning to work properly.
- Learned keys are mode-specific, so each one can store a unique function for each mode.
- Do not use the following keys for learning: Device Keys, SETUP, or Record (•).
- Learning capacity is approximately 42 to 75 keys, depending on the code being learned.
- Certain device functions are not learnable including multi-frequency types, some high frequency ones, and other unusual formats.
- For optimum learning, avoid high levels of ambient light such as natural sunlight or energy-efficient fluorescent lights.
NOTE: Please have your original remote controls handy before programming learning.
Programming a Learned Key
NOTE: If more than 10 seconds pass between key presses, the remote exits programming.
- Place the On-Q remote head-to-head (about 2" apart) from your original remote control. Also locate the key (on your original remote control) that you want the Potenza to learn. Press the mode key you wish to learn keys on.
- Press and hold SETUP until the LED blinks twice, then release.
- Enter 9 7 5 . The LED blinks twice.
NOTE: If the LED displays one long flash instead, either your batteries are low, or the On-Q remote has a memory fault. In either case, the remote cannot learn a new key. - Press the key on the remote you wish to learn onto. The feedback LED will blink rapidly for three seconds, suggesting the remote is ready to learn.
- On the original remote, press and hold the key to be learned. Continue holding the key on the original remote until the On-Q remote’s LED blinks twice.
NOTE: If the LED displays one long blink, a learning error has occurred. Try repeating this step again until a successful capture occurs. If the function is still not captured, press and hold SETUP to exit programming and review the “Learning Precautions” above. If needed, also see “Troubleshooting” below. After review, start programming again at step 1. - Repeat steps 4 through 5 for another key you would like to learn about. Once you have completed learning all keys, press and hold SETUP until the LED blinks twice to save all data learned.
Deleting a Single Learning Key
This process returns the key to its original programming for the mode you select. You can also delete learned programming by teaching a different function to the key (see “Programming a Learned Key”).
NOTE: If more than 10 seconds pass between key presses, the remote exits programming.
- Press the mode key that you wish to remove the learned key from.
- Press and hold SETUP until the LED blinks twice, then release.
- Enter 9 7 6 . The LED blinks twice.
- Press the key containing the learned function to be deleted twice. The LED blinks twice and exits from programming.
Deleting All Learned Keys in a Specific Mode
NOTE: If more than 10 seconds pass between key presses, the remote exits programming.
- Press and hold SETUP until the LED blinks twice, then release.
- Press 9 7 6 . The LED blinks twice.
- Press a mode key twice (i.e., TV. VCR/DVD, CBL/ SAT , etc.) to clear all the learned keys for that mode. The LED blinks twice and exits from the programming.
CHANGING VOLUME LOCK
The On-Q universal remote control comes preset to allow independent volume control of each selected device (Global Volume Unlock). However, you may change the Volume Lock setting to Global Volume Lock so that one device's volume will control volume in all other modes. After that, you can perform Individual Volume Unlock on a selected device to set its volume control for independent operation or Global Volume Unlock to remove all volume locking.
Locking Volume Control to One Mode (Global Volume Lock)
- Press and hold SETUP until the red LED blinks twice, then release.
- Enter 9 9 3 , the LED blinks twice.
- Press the mode key for the device you want to control (for example, TV).
- The LED blinks twice. Now when you press VOL+ , VOL- , or Mute , the selected device (for example, TV) controls the volume regardless of the current mode.
Unlocking All Volume Control (Restoring Global Unlock)
- Press and hold SETUP until the red LED blinks twice, then release.
- Enter 9 9 3 , the LED blinks twice.
- Press VOL+ . The LED blinks four times. Volume is independently controlled for all programmed devices.
Unlocking a Single Device’s Volume Control
- Press a device key ( TV. VCR/DVD, CBL/ SAT , etc.).
- Press and hold SETUP until the red LED blinks twice, then release.
- Enter 9 9 3 . The LED blinks twice.
- and then press VOL- . The LED blinks four times. Volume is independently controlled for the selected devices.
USING KEY MOVER
Your On-Q universal remote control includes a Keymover feature that allows you to map (or copy) keys from one mode (i.e., source mode) to another mode (i.e., destination mode) or to a different key in the same mode.
NOTE: Do not use any of the Device Keys, POWER, RECORD, or SETUP as a source or destination key .
Moving Keys in the Same Device Mode
- Press a device key ( TV. VCR/DVD, CBL/ SAT , etc.).
- Press and hold SETUP until the LED blinks twice, then release.
- Press 9 9 4 . The LED blinks twice.
- Press the key you want to move.
- Press the new key that should perform the function. The LED blinks twice.
- Repeat until you are finished moving keys.
Moving Keys to a Different Device Mode
This lets you, for example, control DVD functions while in TV mode. You would move the transport key functions ( Play , Stop , etc.) from DVD mode to TV mode, as follows:
- Press and hold SETUP until the LED blinks twice, then release.
- Press 9 9 4 . The LED blinks twice.
- Press the device key that contains the function you want to move (e.g., DVD ).
- Press the key you want to move (e.g., Play ).
- Press the device key that you want to move the function to. (e.g., TV ).
- Press the key in the new mode that should perform the function (e.g., Play ). The LED blinks twice.
- Repeat steps 1-6 to move additional keys.
Restoring All Keymoved Data in a Specific Mode
- Press and hold SETUP until the LED flashes twice, then release.
- Press 9 9 . The LED blinks twice.
- Press the device key you wish to remove all keymoved data from twice. The LED blinks twice.
- Repeat for each device you want to restore.
Restoring Original Key Function
- Press the device key for which you wish to remove the keymoved data from a specific key.
- Press and hold SETUP until the LED blinks twice, then release.
- Enter 9 9 4 . The LED blinks twice.
- Press the key you wish to remove the keymoved data from twice. The LED blinks twice.
- Repeat steps 1-4 for additional keys you wish to remove.
PROGRAMMING MACROS
Your On-Q universal remote control includes the ability to program any key (other than the SETUP key) with a Macro function. Each one can be set up to perform a pre-programmed set of sequential key presses with the press of one key. A macro can be used to control a home theater operation, to set a favorite channel, or for other multiple functions you would like to control with one key press. Moreover, each Macro Key can hold up to 15 key presses in total. You can program a macro that operates regardless of what mode you are in, or one that only operates when you are in a specific mode.
NOTE: Programming a new macro over an existing one erases the original macro.
Programming a Mode-Independent Macro
- Press and hold SETUP until the red LED blinks twice, then release.
- Press 9 9 5 . The LED blinks twice.
- Press the key you wish to assign a macro on.
- Enter the series of commands you want the macro to execute (up to 15 commands).
- Press and hold SETUP until the red LED blinks twice, then release.
Now, when you press the preset macro key , the remote sends the series of commands you have entered, regardless of what mode you are in. For example, you could program a macro key to turn on both your TV and cable box and select a particular channel. To clear the macro, repeated steps 1-5 above, but do not enter a series of commands at step 4.
Programming a Mode-Dependent Macro
- Press a device key ( TV. VCR/DVD, CBL/ SAT , etc.).
- Press and hold SETUP until the LED blinks twice, then release.
- Press 9 7 8 . The LED blinks twice.
- Press the key you wish to assign a macro on.
- Enter the series of commands you want the macro to execute (up to 15 commands).
- Press and hold SETUP until the red LED blinks twice, then release.
Now, when you press the macro key , the remote sends the series of commands you have entered, but only if you are in the mode you selected in step 1 . For example, you could program the macro key to turn on both your TV and cable box and select a particular channel, but only if you are in TV mode. If you ar in DVD mode, this key does not execute the macro you set up in TV mode. To clear the macro, repeat steps 1-6 above, but do not enter a series of commands at step 5.
MANUFACTURER’S CODES
Setup Codes for Home Systems
On-Q/Legrand 31804, 32312
Setup Codes for Audio Amplifiers
- Adcom 30577, 31100
- Bose 30674
- Carver 30892
- Curtis Mathes 30300
- Durabrand 31561
- Elan 30647
- GE 30078
- Harman/Kardon 30892
- JVC 30331
- Left Coast 30892
- Lenoxx 31561
- Marantz 30892
- McIntosh 30251
- Modulaire 30395
- NEC 30264
- Optimus 30395, 30013, 30300, 30823
- Parasound 30246
- Philips 30892
- Pioneer 30013, 30300, 30823
- Polk Audio 30892
- RadioShack 30395
- RCA 30013, 30300, 30823
- Realistic 30395, 30013
- Shure 30264
- Sony 30689, 30815
- Soundesign 30078
- Victor 30331
- Wards 30078, 30013
- Yamaha 30354, 30133
Setup Codes for Audio Accessories
- Accurian 31106
- Altec Lansing 31056, 31485
- Apple 31115, 31644
- Cambridge Soundworks 31530
- Creative 30872
- D-Link 31522
- Imerge 31491
- Integra 31789
- iPort 31917
- Marantz 31491
- Motorola 31464
- NaviPod 3164
- Netgear 31785
- Omnifi 31605
- Onkyo 31789
- Roku 31828
- Russound 32019
- Slim Devices 31844
- Sonance 31917
- SSI 31522
- Yamaha 31809, 31810
Setup Codes for Audio Receivers
- Adcom 30616
- Aiwa 31405, 30189, 30121, 31388, 31641
- Akai 30244, 31512
- Alco 31390
- AMC 31077
- Amphion Media Works 31563, 31615
- AMW 31563, 31615
- Anam 31609, 31074
- Apex Digital 31257, 31430, 31774
- Arcam 31189
- Audiotronic 31189
- Audiovox 31390, 31627
- B & K 30701, 30702, 30820, 30840
- BK 30702
- Bose 31229, 30639, 31253, 31841, 31933
- Brix 31602
- Cairn 30189
- Cambridge Soundworks 31370
- Capetronic 30531
- Carver 31189, 30189, 30121, 31289
- Classic 31352
- Coby 31389
- Criterion 31420
- Curtis Mathes 30014
- Daewoo 31250
- Delphi 31414
- Denon 31360, 30121, 30771, 31142, 31306
- Emerson 30531
- Fisher 31801
- Garrard 30463
- Gateway 31517
- Go Video 31532
- Grundig 30189
- Harman/Kardon 30110, 30189, 30891, 31289, 31304, 31306
- Hitachi 31273, 31801
- Initial 31426
- Inkel 30491
- Insignia 31030
- Integra 30135, 30842, 31298, 31320
- JBL 30110, 31306
- JVC 31058, 30074, 31374, 31495, 31811
- Kawasaki 31390
- Kenwood 31313, 31570, 31569, 301
- KLH 31390, 31412, 31428
- Koss 31366, 31497
- Lasonic 31798
- Lenoxx 31437
- Lexicon 31076
- LG 31293
- Linn 30189
- Liquid Video 31497
- Magnavox 31189, 31269, 30189, 30391, 30531, 31266, 31514
- Marantz 31189, 31269, 30189, 30891, 31289
- McIntosh 31289
- Micromega 31189, 30189
- Mitsubishi 31393
- Myryad 31189
- Nakamichi 31313, 30097
- New Castle 30502
- Norcent 31389
- Nova 31389
- Onkyo 30135, 30380, 30842, 31298, 31320, 31531
- Optimus 31023, 30074, 30014, 30121, 30186, 30502, 30531, 30670, 31074
- Oritron 31366, 31497
- Outlaw 30391
- Panasonic 31308, 31518, 30309, 30367, 31288, 31316, 31548, 31633, 31763, 31764
- Philips 31189, 31269, 30189, 30391, 30891, 31266
- Pioneer 31023, 30014, 30150, 30244, 30531, 30630, 31384
- Polaroid 31508
- Polk Audio 30189, 31289, 31414
- Proscan 31254
- RadioShack 31609
- RCA 31023, 31609, 31254, 30531, 31074, 31390, 31511
- Realistic 31609, 30121, 30186
- Regent 31437
- Revox 30189
- Rio 31869
- Saba 31519
- Samsung 31295, 31304, 31500
- Sansui 31189, 30189, 31764
- Sanyo 31251, 31469, 31801
- Sharp 30186, 30771, 31286
- Sharper Image 31556
- Sherwood 30491, 30502, 31077, 31423, 31517, 31653
- Shinsonic 31426
- Sirius 31602, 31627, 31811, 31987
- Sonic Blue 31532, 31869
- Sony 31058, 31441, 31258, 31759, 31622, 30168, 30474, 31406,
- 31558, 31658, 31758, 31858
- Soundesign 30670
- Stereophonics 31023
- Sunfire 31313
- Teac 30463, 31074, 31390, 31528
- Technics 31308, 31518, 30309, 31384, 31633
- Thorens 31189
- Toshiba 30135, 30842, 31788
- Venturer 31390
- Victor 30074
- Waitec 31352
- Wards 30189, 30014
- XM 31406, 31414
- Yamaha 31023, 30176, 30186, 31176, 31276, 31331, 31375, 31476
- Zenith 30857, 31293
Setup Codes for Cable/PVR Combos
- Americast 00899
- Amino 01822
- Digeo 01187
- General Instrument 00810
- Jerrold 00810
- Motorola 01376, 00810, 01187, 01106
- Myrio 01822
- Pace 01877, 00237
- Pioneer 01877, 00877
- RCA 01256
- Scientific Atlanta 01877, 00877
- Sony 01006
- Supercable 00276
- Thomson 01256
- Zenith 00899
Controlled by the VCR
- Emerson 20000
- RCA 20880
- Sylvania 20000
- Toshiba 21008, 21996
Setup Codes for Home Automation
- Accutek 31215
- Amana 31716
- Bionaire 30846, 31215
- Frigidaire 31333
- GE 3024
- GoldStar 31537
- Holmes 31215
- Kenmore 31537
- Lasko 30846
- LG 31537
- Lightolier 30184
- Lutron 30597, 30318, 31239, 3159
- Marmitek 30167
- One For All 3016
- PCS 30184
- RadioShack 30240
- Royal Sovereign 31651
- Security System 30167
- Sharper Image 30846
- SmartLinc 30184
- Universal 30167
- Universal X10 3016
- Whirlpool 31332
- Windermere 31215
- X10 30167
Setup Codes for DVR/PVR Systems Controlled by the Satellite
- DirecTV 01377, 00392, 00639, 01142, 01076, 00099, 01392, 01442,
- 01443, 01444, 01640
- Dish Network System 01505, 00775
- Dishpro 01505, 00775
- Echostar 01505, 00775, 01170
- Express 00775
- Hughes Network Systems 01142, 01442, 01443, 01444
- JVC 01170
- Motorola 00869
- Philips 01142, 01442
- Proscan 00392
- RCA 01392
- Samsung 01442
- Sharp 01489
- Sony 00639, 01640
- Star Choice 00869
Controlled by the VCR
- Hughes Network Systems 20739
- Philips 20739
- Samsung 20739
Controlled by the TV
- Advent 11933
- Akai 11935
- Apex Digital 11943
- Audiovox 11937, 11951, 1195
- Axion 11937
- Broksonic 11935
- Hitachi 11960
- Jensen 11933
- Panasonic 11941
- Prima 11933
- RCA 11948, 11958
- Samsung 11903
- Sansui 11935
- Sova 11952
- Toshiba 11935
TROUBLESHOOTING OF Home Systems Remote
- PROBLEM: LED does not blink when you press a key.
SOLUTION: Try pressing different keys. Replace the batteries with 2 new AA batteries - PROBLEM: LED blinks when you press a key, but device does not respond.
SOLUTION: Make sure the remote is aimed at your device and is not more than 40 feet away. - PROBLEM: LED blinks one long blink while in SETUP mode.
SOLUTION: An entry error has occurred (for example, wrong key). Try entering the sequence again. - PROBLEM: Remote does not control devices or commands are not working properly.
SOLUTION: Try all listed codes for the device. Make sure the device operates with an infrared remote control. - PROBLEM: CH+ , CH- , and LAST do not work for your RCA TV.
SOLUTION: Due to RCA design from 1983 to 1987, only the original remote control will operate these functions. - PROBLEM: No volume on a device
SOLUTION: See “Changing Volume Lock” and make sure the volume is not locked to a different mode already. - PROBLEM:Channels do not change properly when directly entering digits to change channels.
SOLUTION: If the original remote control required you to press Enter to change channels, press Enter on this remote after entering the channel number.
Pros and Cons of On-Q Home Systems Remote
Pros
- All-in-one solution for controlling home automation and entertainment systems
- 2.4" color LCD touchscreen display for easy navigation
- Integrated IR, RF, and Wi-Fi connectivity for compatibility with a wide range of devices
- Customizable buttons and macros for added convenience
- Programmable lighting and climate control
Cons
- Higher price point compared to other home automation remotes
- May be overwhelming for users who are new to home automation technology
- Requires regular charging or battery replacement
Customer Reviews about On-Q Home Systems Remote 1060
Customers have praised the On-Q Home Systems Remote for its versatility and a convenient all-in-one solution for controlling home automation and entertainment systems. However, some users have noted that the remote can be overwhelming for those who are new to home automation technology, and that the higher price point may be a drawback for some. The most common complaints include issues with connectivity and compatibility with certain devices.
Faqs
What is the On-Q Home Systems Remote 1060?
What distinguishing qualities does the On-Q Home Systems Remote 1060 offer?
How is the On-Q Home Systems Remote 1060 configured?
Which gadgets are compatible with the On-Q Home Systems Remote 1060?
How long does the battery last on the On-Q Home Systems Remote 1060?
Can I customize the buttons on the On-Q Home Systems Remote 1060?
Does the On-Q Home Systems Remote 1060 offer programmable lighting and climate control?
Is it possible to utilise my tablet or smartphone with the On-Q Home Systems Remote 1060?
Is it simple to put the On-Q Home Systems Remote 1060 into operation?
Exactly how much does it cost to purchase the On-Q Home Systems Remote 1060?
Leave a Comment
