Oneplus 8 Pro Mobile Phone User Manual

Content
Introduction
The OnePlus 8 Pro Mobile Phone is a high-end smartphone that offers top-of-the-line features and performance. This device is perfect for those who want a premium mobile experience with a large, high-resolution display, fast processing power, and advanced camera capabilities. The OnePlus 8 Pro is expected to be launched in April 2020 with an estimated price of around $900.
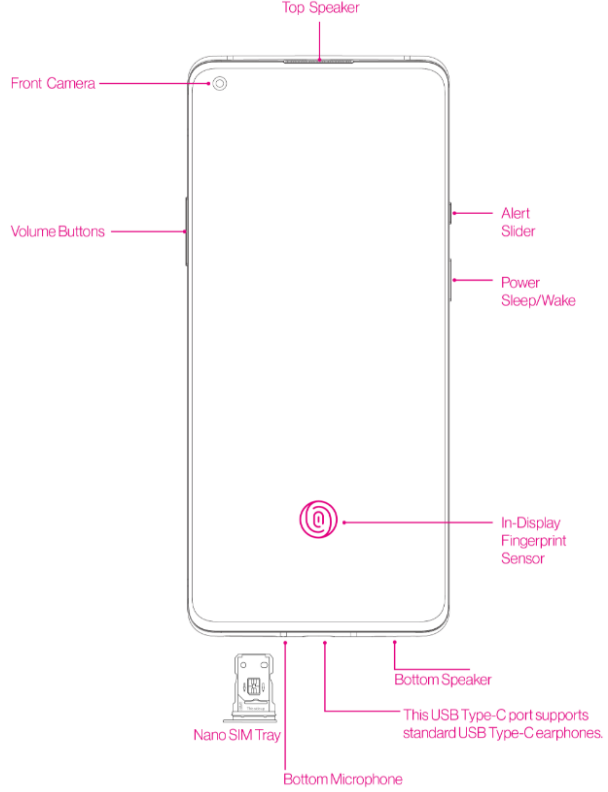
Front view
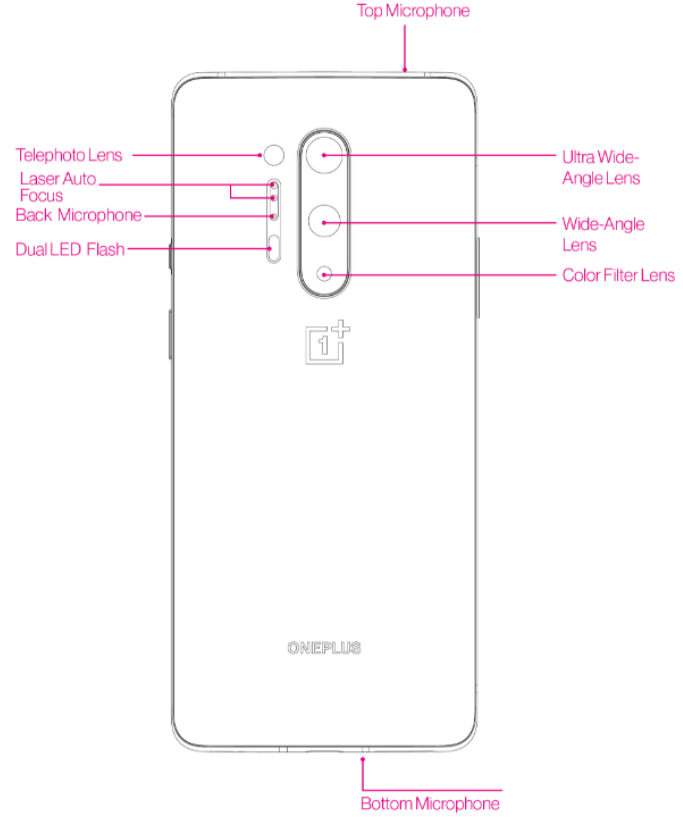
Back view
Setting up your device
Insert SIM card
- Insert the SIM Tray Ejector into the small hole on the SIM card holder. Press the ejector firmly into the hole to push the SIM card tray out.
- Slowly pull the SIM card tray out of the tray slot.
- Place the SIM card into the SIM card tray.
- Plug the SIM card tray back into your device.
* Use the original Nano-SIM card. Non-original cards may cause damage.
Booting up your OnePlus 8 Pro
Press and hold the power button for a few seconds to boot up the phone. If your phone does not power on, you may need to charge it.
Setup Wizard
When you first boot up the phone (or after a factory reset), the Setup Wizard lets you customize all features, including language, software buttons, gestures, fingerprint unlock, and other features. If you want to change these later, you can do so after setting up the phone in the Settings app.
Battery and charging
You will need to charge the phone when you first get it or if you have not used it for a long time.
Safety Information
- To ensure your safety and avoid damaging the device, only use the official charger and USB cable.
- OnePlus 8 Pro supports the USB Type-C cable.
- Unplug the charger after you finish charging to avoid wasting electricity.
- Do not place anything on your phone while it is charging.
Charge the battery
- Connect the USB cable to the adapter;
- Plug the USB cable into the phone's USB port.
- Plug the adapter into a power socket.
- After charging, unplug the USB cable from the phone and unplug the adapter from the socket.
Save power and extend battery life
Reduce power consumption by doing the following:
- Turn off the screen when the device is not in use.
- Turn on Battery Saver mode when the battery is low.
- Disable Bluetooth and Wi-Fi when you are not using them.
- Dim screen brightness and shorten sleep time in Settings.
- Delete apps that you do not use.
Warp Charge 30T
When you use the OnePlus charger and USB cable for charging, you can charge your phone safely (5V/6A) and quickly.
When the temperature is lower than 12° C or higher than 45 ° C, the phone will stop fast charging to protect the battery.
Warp Charge 30 Wireless
OnePlus 8 Pro supports up to 30 watts wireless charging, charge up from 1% to 50% in just half an hour with OnePlus Warp Charge 30 Wireless Charger. In addition, OnePlus 8 Pro also supports reverse wireless charging, which allows your OnePlus 8 Pro to charge other devices which supported wireless charging, such as phones and TWS earphones.
Physical buttons
Power button
The power button is located on the right side of the phone.
- Press and hold the power button to turn on the device when the device is off.
- Press and hold the power button for Voice Assistant when the device is on.
- Press power button and volume up button simultaneously to power off.
- Click power button to turn on/off the screen.
Volume button
The volume button is located on the left side of the phone.
- When playing music or video, press the volume button to adjust the media volume.
- Press the volume button during a call to adjust the call volume.
- Press the volume button to silence the ringtone when you get an incoming call.
Alert Slider
Alert Slider is on the right side of the phone. You can adjust the system ringtone status (silent, vibrate, ring) by toggling the alert slider
- Silent: Calls and notifications will be silenced with no vibration, except for alarms.
- Vibrate: Calls and notifications will be silenced, except for alarms.
- Ring: Calls, alarms and notifications will function normally.
NOTE: If the phone is in Do Not Disturb mode, the ringtone and vibration will be turned off.
Shortcut keys
You can perform quick actions using the shortcut keys.
- Press and hold the power button and volume up button simultaneously to turn off the device.
- Press and hold the power button and volume down button simultaneously to take a screenshot.
- Press and hold the power button and volume down button simultaneously to access recovery mode when the device is powered off.
- Long press the power button and volume up for 10 seconds to force a power off.
Transfer data to OnePlus 8 Pro
OnePlus Switch can quickly transfer all your data, including contacts, messages and photos, from your old device to your new OnePlus device.
If the old device is OnePlus or other Android devices:
- Open the OnePlus Switch app. Select I'm a new phone, then select your old phone's type.
- Follow the prompts on the new phone screen. Download and install the OnePlus Switch on your old phone.
- Tap Continue on your new phone.
- Open the OnePlus Switch in your old phone, select I'm an old phone, and scan the QR code on your new phone to connect the two phones.
- After connecting the two phones, select the data you want to migrate from your old phone. Tap to start. Then wait until the transfer is completed.
If the old device is an iPhone:
- Sync the data of your iOS device to iCloud.
- Open the OnePlus Switch app.
- Choose I'm a new phone and then tap on "iPhone".
- Sign in to your iCloud account and start importing data.
- It's recommended to complete the whole data transfer process while connected to a Wi-Fi network, and the OnePlus Switch should always stay on the screen. If you ever get disconnected from the iCloud server, please try logging into iCloud again and pick up with the data transmission. Please note that only certain format of data can be transferred due to compatibility issues.
Detailed Specifications
The OnePlus 8 Pro Mobile Phone features a 6.78-inch Fluid AMOLED display with a resolution of 1440 x 3168 pixels and a 120Hz refresh rate. It is powered by the Qualcomm Snapdragon 865 processor and comes with up to 12GB of RAM and 256GB of internal storage. The device runs on OxygenOS, which is based on Android 10.
The OnePlus 8 Pro has a quad-camera setup on the back, which includes a 48-megapixel primary sensor, a 48-megapixel ultra-wide-angle sensor, an 8-megapixel telephoto sensor, and a 5-megapixel color filter sensor. On the front, there is a 16-megapixel selfie camera. The device is equipped with a 4510mAh battery and supports Warp Charge 30T and wireless charging.
Description
The OnePlus 8 Pro Mobile Phone is a sleek and stylish smartphone that is designed to deliver a premium mobile experience. The device features a large, high-resolution display that offers vibrant colors and smooth graphics. The 120Hz refresh rate ensures that everything on the screen moves smoothly, whether you're scrolling through social media or playing games.
Under the hood, the OnePlus 8 Pro is powered by the latest Qualcomm Snapdragon 865 processor, which provides fast and smooth performance. The device comes with up to 12GB of RAM and 256GB of internal storage, which means that you can store all of your files and apps without any issues. The device runs on OxygenOS, which is based on Android 10, and offers a clean and intuitive user interface.
The OnePlus 8 Pro has a quad-camera setup on the back, which allows you to take stunning photos and videos. The 48-megapixel primary sensor captures detailed and sharp images, while the ultra-wide-angle sensor lets you fit more into the frame. The telephoto sensor provides 3x optical zoom, while the color filter sensor adds some creative possibilities to your photography.
Apps
Phone
- Dialing
- Method 1: Tap the keypad (dialpad) button, enter the contact number, and press the call button to dial the number.
- Method 2: Browse your contacts or call logs, and tap the number to dial it.
- Answer or refuse incoming calls: Swipe down to accept a call or swipe up to reject it
- Incoming call during normal use: The green button is to accept the call and the red is to reject it.
Call screen
After accepting a call, the interface functions are as follows:
- Speaker: Enables loudspeaker mode during call.
- Keypad: Opens the dial pad.
- Mute: Mutes the microphone.
- Record: Records the calling content. Enter Recorder to browse the recording files. (Currently available for SIM cards issued and used in India, United Kingdom, Netherlands, Bangladesh and France).
- Add call: Adds multiple calls.
- Hold: Allows you to answer a new call by putting the current call on hold and then resume the current call when the new call ends.
Contacts
Contacts have the following functions: Edit, delete, search, input/output, manage and backup contacts, and blacklist.
Add a contact
- Enter Contacts;
- Tap
- Enter contact information;
- Tap
.png) to save it.
to save it.
Search contacts
- Method 1: Enter the contact number/name on the dial pad.
- Method 2: Tap
 and then search for a Contact by name
 - Method 3: Switch to the contacts list and tap or scroll through the letters on the right side for quick search.
Contacts Manager
Enter Contacts, tap the menu button in the upper right corner, and then click “Contacts Manager”.
- Contacts display: To set “Contacts to display”, “Name sorting rules” and “Hide contacts without numbers”.
- Contacts organizing: To set “Favorite contacts”, “Contacts groups”, “Account contacts” and “SIM card contacts”.
Contacts operations
- Import/export: You can import a VCF file exported from another device into this device, or export your device’s contacts into a VCF format.
- Merge contacts: Merge contacts that have the same name or number.
Spam
Browse the messages/calls that were blocked.
Settings
- Quick responses: Respond to an incoming call with a text message.
- Merge call history: If enabled, call history from the same number will be merged and displayed as a single card.
- Call settings: Set voicemail, call waiting and others.
- Assisted dialing: To enable or disable “Add country/region code automatically” while roaming, and “Default country/region code”
- Swipe up to answer: Enable or disable reverse the swipe direction for answering an incoming call.
- Sounds and vibration: Set the sound and vibration.
Blocking settings:
- Block by keyword: Message including specified keyword will be blocked.
- Blocking notifications: You will be notified notification panel after blocking calls or messages if enabled.
- Blocked numbers: You will not receive calls and messages from blocked numbers. Tap “+” and then enter the number to add to the blacklist. Tap “X” to remove the number from the block list.
File Manager
In File Manager you can quickly access and manage a variety of files. Enter the application drawer and open the File Manager application.
- Categories: Check files by file category, including Documents, Downloads, Recent, Images, Videos, Audio and so on.
- Storage: View and manage folders and documents stored on your phone.
- FileDash: Fast and free to share files with nearby devices.
More operations:
- Search file: Tap
 and then enter key words to find your files.
 - Lockbox: Long press the file, tap the menu button in the upper right corner, then choose Move to Lockbox. You can assign a password to files in Lockbox.
Messages
Send, receive, and view Messages through the Messages app.
Send message
- Open the Messages application.
- Tap the floating button in the lower right corner.
- Select recipient.
- Enter SMS content.
- Tap the send icon in the lower right corner to send a message.
View and reply message
Messages are sorted by time.
- Open the Messages app.
- Select the message you want to view from the list.
- If you want to reply to a message, enter the message in the text box at the bottom of the screen, and then tap the send icon on the right to send it.
Message settings
Message settings include Default SMS app setting, Blocking settings, Automatically retrieve MMS when roaming and more. To set SMS preferences, tap the menu button in the upper right corner and select Settings.
Blacklist/interception
- View the interception record: Tap the menu button in the upper right corner of the main message interface and select Spam to view blocked records.
- Add blacklist: Tap the menu button in the upper right corner of the spam message screen and select Blocked number.
Weather
Provides the weather forecast and early warning function.
- Check the weather: Open the app drawer and open the Weather app Provides information on weather, temperature, the last six days of weather, the last 24 hours of weather, wind direction, body temperature, humidity, visibility, pressure and more.
- Add city: Tap , tap the "+" button, enter the city name to search, and select the city to add.
- Switch city: Swipe left and right to switch between cities.
Settings
Tap the menu button in the upper right corner and select Settings.
- Temperature: Select the temperature unit – Celsius or Fahrenheit.
- Wind: Select the wind unit, like Meters per second – m/s, Kilometers per hour – km/h, Feet per second ft/s,Miles per hour- mph, Nautical miles per hour – kts.
- Precipitation: Select units of precipitation, Millimeters – mm,Inches – in.
- Visibility: Select units of visibility, Kilometers – km/ Miles – mi.
- Pressure: Choose the unit of pressure, Hectopascals – hPa, Millimeters of mercury -mmHg Inches of mercury – inHg.
- Weather alert: Enable this to receive weather notifications.
Calculator
The calculator provides common calculator functions.
Enter the application drawer and open the Calculator app.
- Basic Calculator: The calculator provides a basic calculation mode by default, which can perform simple addition, subtraction, multiplication and division calculations.
- Scientific Calculator: Swipe up on the horizontal line to display the scientific calculator.
- View history: Tap the “view history” button in the upper right corner to view it, and tap the CLEAR button in the upper right corner to clear it.
Recorder
The recorder provides recording and playback functions. Enter the application drawer and open the Recorder app.
Record:
- Start recording: Tap
 to start recording.
 - Pause the recording: Tap
 to pause a recording.
 - Insert tags: Tap
 to insert tags.
Set the recording format: You can set the recording format (aac / wav) by selecting the settings in the upper right corner of the main interface.
Recording playback and management:
Swipe left to enter the recording file list.
- Play recording: Tap the recording to play.
- Delete recording: Long press the recording that needs to be deleted and tap the delete button.
Notes App
Sticky notes let you to take quick notes and edit text and pictures.
- Add a note: Tap
 to add a note. Supports text, album pictures, photos, lists, to-do items. Allows to delete notes, set reminders, etc.
 - Search notes: Tap
 and enter the keywords to search.
 - Delete a note: Long press the note that you want to delete and tap the “delete”
- Share a note: Open the note you want to share, tap the menu button in the upper right corner, select the sharing method, and then press the page prompt to complete the sharing.
- Add reminders to your notes : Open the note and tap the "alarm" icon in the top bar to set the date and time for the reminder.
Camera
The OnePlus 8 Pro camera offers powerful photo and video capabilities, including portrait mode, pro mode, slow-motion video, panorama mode, and more.
PHOTO
According to the number shown in the figure, the main interface functions of the camera are as follows:
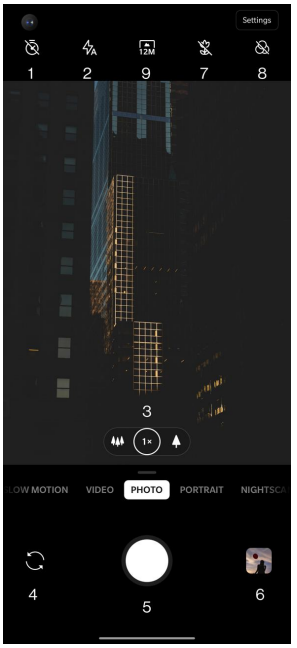
- Timer: Set timer (optional: 3S, 5S, 10S).
- Flash: Tap on/off/auto flash.
- Zoom: Tap or drag the icon to zoom.
- Switch camera: Tap to switch the front/rear camera.
- Photo button: Single tap to take a photo and long press to take multiple photos (burst mode).
- Gallery: Tap to view the latest photos in Gallery.
- Super macro: Get closer to the object to take macro photos.
- Filter: Tap to switch to None / Matte / Vivid /B&W / Photochrom.
- 48M/12M: Tap to switch between 48 mega pixel and 12 mega pixel (default) photo resolution.
VIDEO
Go to the camera app and tap VIDEO. The video interface features are as follows:
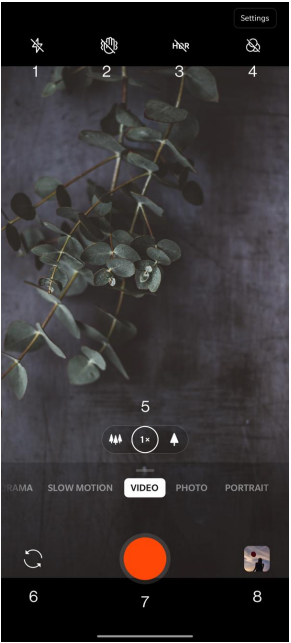
- Flash: Tap the flash on/off.
- Super steady: With OnePlus 8’s advanced image stabilization system, you can record clearer, smoother handheld videos without having to lug around extra equipment.
- HDR: Enable to shoot Dynamic Video.
- Filter: Tap to apply Landscape/ Portrait/Food/ Night/ B&W/ infrared filters to the original picture.
- Zoom: Tap or drag the icon to zoom.
- Switch camera: Tap to switch the front/rear camera.
- Video: Tap to start/end video.
- Gallery: Tap to view the latest photo in Gallery.
Model selection
Slide up to enter the camera mode selection interface, or swipe left and right to switch between different modes.
- Video: Video shooting function.
- Photo: Simple photo-taking function.
- Portrait: Portrait (depth effect) photo function. The professional portrait lighting effect makes portrait photos easy.
- Nightscape: Suitable for shooting city night scenes.
- Pro: Photo mode with more professional settings.
- Time-lapse: Records videos at a high frame rate. When played, the video appears to be moving faster.
- Panorama: Allows you to take images with a wide aspect ratio.
- Slow motion: Records videos at a high frame rate. When played in a normal frame rate, movements are slower.
Gallery
All images and videos are saved by default in the Gallery app, which includes albums, recently deleted photos, and photo editing functions.
- Photos: Photos and videos are displayed in a timeline list view.
- Collections: This includes commonly used albums, recently deleted albums, and other albums. Tap albums to view specific lists and photos.
- Explore: This includes the Smart category feature and Story function. The smart category will categorize photos by “people”, “places” and “things” and other standards. Story feature will create personal videos automatically based on specific photos.
Clock
Includes alarm clock, world clock, timer, and stopwatch.
Alarm
- Add alarm clock: Tap the "+" button below to add and set a new alarm.
- Alarm clock time: Drag the blue dot in the dial to set the hours. Drag it again to set the minutes. Tap AM/PM to select the time period.
- Tap the keyboard icon on the middle right to switch to the numeric keyboard to input the time.
- Repeat: You can choose Monday to Sunday. tap the downward arrow on the right to enter the calendar for custom selection.
- Alarm Ringtone: Select the alarm clock ringtone from system ringtones or local storage, or disable the ringtone.
- Vibrate: When the alarm clock rings, the phone will vibrate at the same time.
- Label: An alarm note will be displayed on the screen when it rings.
- Delete alarm: Long press the alarm you want to delete and tap the delete icon on the top right of the screen.
World clock
- Add region: Tap the globe icon at the bottom of the screen to check and select the cities from the list.
- Comparison time: Drag the dot on the dial to see the time of the city you added.
- Weather: The weather will be shown when you tap on the city name.
Timer
- Add countdown: After entering the minutes and seconds, press the start button to start the countdown.
After starting a countdown, you can select the button in the lower right corner to add another countdown. - Delete countdown: Tap
 to delete a specific countdown time.
 - Pause: Tap to pause a countdown.
- Label: Tap the word Label on top of the countdown timer, input whatever you want to rename it.
Stopwatch
- Start : Tap
 to start the timer.
 - Pause : Tap
 to pause the
 - Mark: Tap
 to mark.
 - Share: Tap
 to share the timer.
Zen Mode
Zen Mode allows you to put the phone down and enjoy your life. Once started, it can’t be canceled and incoming notifications will be temporarily muted. Applications except the camera will be locked, but you can still receive phone calls and use the emergency call.
Turn on Zen Mode
- Pull the notification panel down > tap Zen Mode
- In Zen Mode > set the duration > tap the button below to start
Set Zen Mode: Enter Zen Mode > tap the settings icon in the top right corner. Set the default duration, daily reminder, notification, and more.
OnePlus Switch
“OnePlus Switch” allows you to quickly migrate contacts, call logs, text messages, pictures, audio, video, notes, apps, downloads, documents, and other data from your previous phone to your new phone. OnePlus Switch also provides local backup and recovery.
- Use OnePlus Switch to migrate your data
Use OnePlus Switch to quickly migrate data from an older phone to your new OnePlus phone. - Use OnePlus Switch for local data backup and recovery
Use the “backup and restore” function to create a backup for subsequent recovery. You can also copy the backup to the computer and transfer it to another phone for recovery.
Back up data
- Open the OnePlus Switch app
- Select Backup and Restore > New Backup
- Select the data that you want to back up
- Tap BACKUP NOW to start backup
Recovery data
- Open the OnePlus Switch app.
- Select Backup and Restore > Restore Backup.
- Select the data to be restored.
- Tap RESTORE NOW and wait until the recovery process completes.
Google Apps
Enjoy applications powered by Google. Visit Google.com to learn more.
- Google
Find online content with tools that learn what you are interested in. Turn on your personalized feed to receive customized content. - Chrome
Browse the Internet with Chrome and bring your open tabs, bookmarks, and address bar data from your computer to your mobile device. - Gmail
Send and receive email with Google's web-based email service. - Maps
Get directions and other location-based information. You must enable location services to use Google Maps. - YouTube
Watch and upload videos from your device. - Drive
Open, view, and share files saved to your Google Drive cloud account. - Duo
A video calling app that allows you to connect with the people who matters most. - Photos
Store and back up your photos and videos automatically to your Google Account with Google Photos. - Google One
All your photos, contacts, messages, and more are automatically backed up with Google One. Allow you to connect with Google experts via chat, call, or email for help with all Google products and services. Enjoy extra benefits like Google Play credits and discounts on Google products.
Setup Guide
Setting up the OnePlus 8 Pro Mobile Phone is easy.
- Simply turn on the device and follow the on-screen instructions to set up your account and transfer your data.
- To connect to Wi-Fi, go to Settings > Wi-Fi and select your network.
- To pair with a Bluetooth device, go to Settings > Bluetooth and select the device you want to pair with.
Care and Maintenance
The following suggestions will help you maintain and prolong the life of your device.
- Only qualified and authorized personnel should make repairs to this product.
- Disabling features such as Bluetooth and Wi Wi-Fi when not in use and dimming the screen can help you save energy and extend battery life.
- Clean your phone and charger with a soft, clean, dry cloth. If the screen comes into contact with liquid or dust, please clean it immediately.
- Do not use alcohol or irritating chemicals to clean the device.
- Touching the screen with a sharp object may cause the screen to be scratched.
- Please do not touch the connection port of the phone, as static electricity may harm components in the device.
- Ideal operating temperatures are 0°C to 35°C, Ideal storage temperatures are 20°C to +45 °C.
- Only operate your phone between 35% to 85% humidity.
- Do not place the phone on uneven or stable surfaces.
- Do not hit, press, shake or drop the phone to avoid damage and injury.
- The charger is not waterproof. Please do not use these devices in the bathroom, areas of high temperature, humidity or dust; please avoid rain.
- When the phone is transmitting data or saving information, do not remove the SIM card.
- Please keep the phone out of reach of children in order to prevent injuries or property damage.
OnePlus Device Warranty Information
OnePlus devices purchased on https://oneplus.com or authorized sales channels come with a limited warranty. The duration of this warranty is dependent on the original country or region of purchase and is only redeemable within the original country or region. Unless otherwise specified, this warranty covers the hardware components of the product as original supplied and does not cover, or partially covers, software, consumable items, or accessories, even if packaged or sold together with the product. The limited warranty only covers functional defects of products caused by workmanship or build materials. For more details, please contact OnePlus Customer Support by visiting oneplus.com/support.
Troubleshooting
- If you're having trouble with your OnePlus 8 Pro Mobile Phone, there are a few things you can try.
- If the device is frozen, try pressing and holding the power button for 10 seconds to restart it.
- If you're having trouble with the camera, try clearing the app data or resetting the camera settings.
- If you're experiencing issues with the battery, try turning off unnecessary features and reducing the screen brightness.
Pros & Cons
Pros
- Large, high-resolution display
- Fast and smooth performance
- Advanced camera capabilities
- Long battery life
- Sleek and stylish design
Cons
- Expensive
- No microSD card slot
- No 3.5mm headphone jack
- No IP rating for water and dust resistance
Customer Reviews
Customers love the OnePlus 8 Pro Mobile Phone for its large, high-resolution display, fast and smooth performance, and advanced camera capabilities. However, some have criticized the device for its high price tag and lack of features like a microSD card slot and a 3.5mm headphone jack. The device has received an average rating of 4.5 out of 5 stars.
Faqs
What is the screen size of the OnePlus 8 Pro?
What processor does the OnePlus 8 Pro use?
How many cameras does the OnePlus 8 Pro have?
Does the OnePlus support wireless charging?
What is the battery capacity of the OnePlus 8 Pro?
What operating system does the run on?
What is the price of the OnePlus 8 Pro?
Leave a Comment
