Instant Pot 112-0170-01 DUO Multi-Use Pressure Cooker User Manual
Content
Instant Pot 112-0170-01 DUO Multi-Use Pressure Cooker Introduction
The Instant Pot 112-0170-01 DUO Multi-Use Pressure Cooker is a multifunctional kitchen tool that makes meal preparation easier. We will learn more about it in this article. The DUO model is a single device that performs many cooking operations such as pressure cooking, slow cooking, steaming, sautéing, and yogurt production. It is the perfect option for both inexperienced and seasoned cooks because to its user-friendly interface, programmable settings, and safety features. Whether you're cooking a sophisticated gourmet dish or a fast weeknight supper, the Instant Pot DUO guarantees wonderful results with little work.
Detailed Specifications
| Brand | Instant Pot |
|---|---|
| Capacity | 5.68 Liters |
| Material | Stainless steel |
| Color | Stainless Steel/Black |
| Finish Type | Stainless Steel |
| Product Dimensions | 12.2"D x 13.38"W x 12.48"H |
| Special Feature | Programmable |
| Wattage | 1000 watts |
| Item Weight | 11.8 Pounds |
| Control Method | Touch |
| Controller Type | Push Button |
| Operation Mode | Automatic |
| Is Dishwasher Safe | Yes |
Product, parts and accessories
Represents all Duo Mini, 5.7 and 8 litre models. See Care, cleaning and storage: Removing and installing parts to find out how everything fits together.

Stand the lid up in the multicooker base to keep it off your countertop! Insert the left or right lid fin into the corresponding slot in the multicooker base handles to stand it up and save some space.

Illustrations in this document are for reference only and may differ from the actual product. Always refer to the actual product.

Description
Made of premium stainless steel, the Instant Pot DUO has a three-ply bottom for durability and even heat distribution. Depending on the model, the inner pot can hold 3 quarts, 6 quarts, or 8 quarts and is dishwasher safe. The cooker has two functions: one is keep warm, which keeps meals warm for up to 10 hours, and the other is delay start, which lets you specify the cooking time up to 24 hours in advance. Additionally, the DUO features a yogurt-making feature that makes it simple to prepare Greek yogurt, homemade yogurt, and recipes that call for yogurt.
Get started
Initial set up (It won't bite!)
You — yes, you — can do this!
“This is my invariable advice to people: Learn how to cook — try new recipes, learn from your mistakes, be fearless, and above all have fun!” – Julia Child
- Take that Duo out of the box!
- Remove all packaging material and accessories from in and around the multicooker. Check under the inner pot!
- Wash the inner pot in a dishwasher or with hot water and washing up liquid. Rinse with warm, clear water and use a soft cloth to thoroughly dry the outside of the inner pot.
- Wipe the heating element with a soft, dry cloth to make sure there are no stray packaging particles left in the multicooker base. Do not remove the safety warning stickers from the lid or the rating label from the back of the multicooker base.
- You may be tempted to put the Duo on your hob — but don’t do it! Place the multicooker base on a stable, level surface, away from combustible material and external heat sources.
WARNING
- Read the Important safeguards before using the appliance. Failure to read and follow those instructions for safe use may result in damage to the appliance, property damage or personal injury.
- Do not place the appliance on a hob or on another appliance. Heat from an external source will damage the appliance.
- Do not place anything on top of the appliance, and do not cover or block the steam release handle or anti-block shield, located on the appliance lid.
Initial test run
(water test)
Do you have to do the water test? No — but getting to know the ins and outs of your Duo prepares you for success in the kitchen! Take a few minutes to get to know how this baby works.
Stage 1: Setting up the Duo for pressure cooking
- Remove the inner pot from the multicooker base and add 3 cups (750 mL) of water to the inner pot, then place it back inside the multicooker base.
- Secure the power lead to the base power socket at the back of the multicooker base. Make sure the connection is tight. Connect the power lead to a 220–240V power source. The display shows OFF.
- Place and close the lid as described in Pressure control features: Pressure cooking lid.
- Turn the steam release handle to the Sealing position.
Stage 2: "Cooking" (...hot water à la king, anyone?)
- Select Pressure Cook.
- Use the − / + buttons to adjust the cooking time to 5 minutes (00:05). Adjustments are saved when a Smart Programme starts, so the next time you use Pressure Cook, it will default to 5 minutes.
- Press Keep Warm to turn the automatic Keep Warm setting off.
- The multicooker beeps after 10 seconds and the display shows On. While the multicooker does its thing, read Pressure cooking 101 on the next page to find out how the magic happens.
- When the Smart Programme is complete, the display shows End.
Stage 3: Releasing pressure
- Follow instructions for a Quick Release in Releasing pressure: Venting methods.
- Wait for the float valve to drop, then carefully open and remove the lid as described in Pressure control features: Pressure cooking lid.
- Using proper hand protection, remove the inner pot from the multicooker base, discard the water and thoroughly dry the inner pot.
That's it! You're good to go :)
CAUTION
Pressurized steam is released through the top of the steam release handle. Keep exposed skin away from the steam release handle.
DANGER
DO NOT attempt to remove the lid while the float valve is up and NEVER attempt to force the lid open. Contents are under extreme pressure. Float valve must be down before attempting to remove the lid. Failure to follow these instructions may result in serious personal injury and/or property damage.
CAUTION
The inner pot will be hot after cooking. Always use appropriate heat protection when handling a hot inner pot.
Pressure cooking 101
Pressure cooking uses steam to raise the boiling point of water above 100ºC/212ºF. These high temperatures allow you to cook food much faster than normal.
Behind the magic curtain
When pressure cooking, the Instant Pot goes through 3 stages:
Pre-heating
What you see | What you don’t see | Tips |
The display shows On. |
While the multicooker pre-heats, it vaporises liquid to create steam. Once enoughsteam has built up, the floatvalve pops up and locks the lid in place. | The timeit takes forthe multicooker to pressurise depends on thingslike food and liquid temperature and volume. Frozen foods havethe longest pre- heating time. Forthe fastest results, thaw your foodbefore cooking it. No need tohang around during this stage — trust thatIP magic! |
Cooking
What you see | What you don’t see | Tips |
The float valve bobs up and down from all the steam, then pops up and stays flush with the lid. The display switches to the cooking countdown timer. |
When it reaches the required pressure level, cooking begins. The Instant Pot automatically maintains the cooking pressure at High or Low pressure. |
A higher pressure means ahigher temperature. Smart Programme settings (e.g., cooking time, pressure level, etc.) can beadjusted at anytime during cooking. |
Releasing pressure
What you see | What you don’t see | Tips |
If Keep Warm is on after cooking, the timer counts up from 00:00. If not, the multicooker goes back to standby and the display shows End. The float valveis still popped up. | Although food has finished cooking, the multicooker is still pressurised and hot, which iswhy the floatvalve is up. Releasing pressure lowers the temperature inside the multicooker, which allows you to safely remove the lid once the float valve has dropped. | See Releasing pressure for information on safe venting techniques andwhat they’re usedfor. Follow your recipe instructions to choose the best venting method for your meal.
The Instant Pot coolsfaster if KeepWarm is turnedoff. |
You must release pressure after pressure cooking before attempting to open the lid. Follow your recipe’s instructions to choose a venting method, and always wait until the float valve drops into the lid before opening.
Venting methods
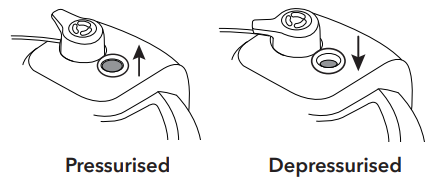
- Natural Release (NR or NPR)
- Quick Release (QR or QPR)
- Timed Natural Release
WARNING
Steam ejected from the steam release handle is hot. DO NOT place hands, face or any exposed skin over the steam release handle when releasing pressure. DO NOT cover the steam release handle.
DANGER
DO NOT attempt to remove the lid while the float valve is up and NEVER attempt to force the lid open. Contents are under extreme pressure. Float valve must be down before attempting to remove the lid. Failure to follow these instructions may result in serious personal injury and/or property damage.
Natural Release (NR or NPR)
Cooking stops gradually. As the temperature within the multicooker drops, the Instant Pot depressurises naturally over time.
What to do What to expect | |
Once cooking is finished, leave the steam releasehandle in theSealing position until all pressure is released. 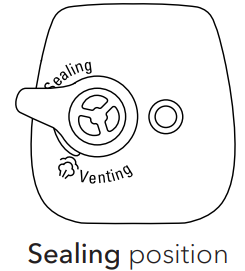 Sealing position | Your meal continues to cook even afterthe Smart Programme has ended. This is called“carryover cooking” or “resting”, and it’s great for large cutsof meat. The depressurisation timemay vary basedon the volume, type andtemperature of foodand liquid. It can takeup to 40 minutes with some dishes, so plan ahead— it’s wellworth the wait! When the pressure has been fullyreleased, the floatvalve drops into the lid. |
NOTICE
Use NR to depressurise the multicooker after cooking high-starch foods (e.g., soups, stews, chilis, pasta, oatmeal and congee) or after cooking foods that expand when cooked (e.g., beans and grains).
Quick Release (QR or QPR)
Stops cooking quickly and prevents overcooking. Perfect for quick-cooking vegetables and delicate seafood!
What to do What to expect | |
Carefully, quickly and confidently, turn the steam release handle to Venting and wait for all pressure inside the multicooker to be released 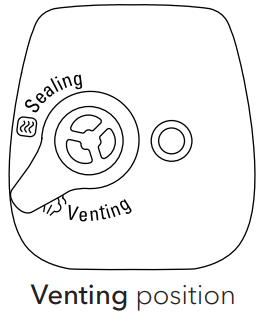 Venting position | A jetof steam isejected through thetop of thesteam release handle. This isnormal! When the pressure has been fully released, the float valve drops into the lid. 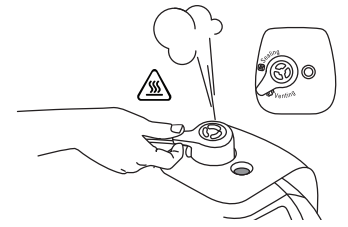
|
Timed natural release
The carryover cooking continues for a specific amount of time, then stops quickly when you release the remaining pressure. Perfect for finishing rice and grains.
If there is substantial spatter while venting, turn the steam release handle back to Sealing. Wait a few minutes before trying to release pressure again. If spatter continues, use NR to safely release the remaining pressure.
Illustrations in this document are for reference only and may differ from the actual product. Always refer to the actual product.
CAUTION
Steam ejected from the steam release handle is hot. DO NOT place hands, face or any exposed skin over the steam release handle when releasing pressure.
NOTICE
Do not use QR when cooking fatty, oily, thick or high-starch foods (e.g., stews, chilis, pasta and congee) or when cooking foods that expand when cooked (e.g., beans and grains).
Control panel
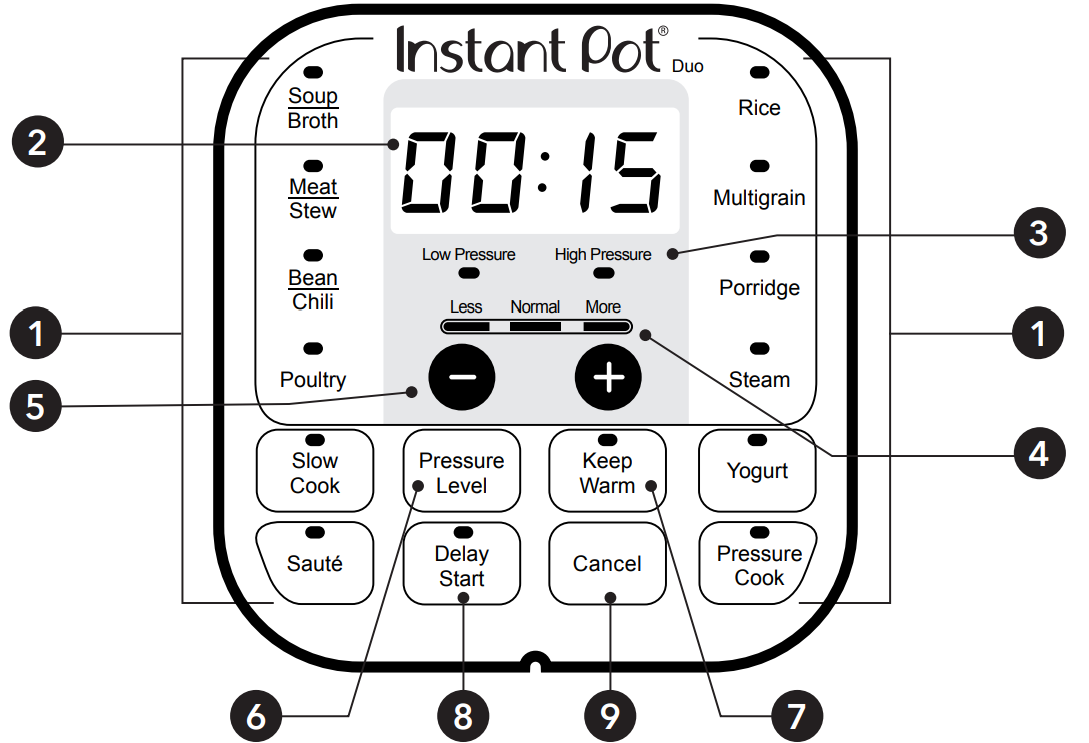
1 |
Smart Programmes | Pressure cooking
| Non-pressure cooking
|
2 | Time display | Shows thetime in HH:MMformat. Counts upor down, depending on the Smart Programme. | |
3 | Pressure fields | LEDs show if the multicooker is using Low or Highpressure during pressure cooking. | |
4 | Less / Normal / More | Pre-set cooking timeor temperature levels,depending on theSmart Programme. | |
5 | − / + buttons | Adjust time for cooking, Delay Start and Keep Warm. | |
6 | Pressure level | Toggle between Low Pressure and High Pressure. | |
7 | Keep Warm | Turns the Keep Warm setting on or off. | |
8 | Delay Start | Delay the start of cooking. | |
9 | Cancel | Stop a Smart Programme at any time. | |
Settings
Setting Description | |
Turn sound on | When instandby, press andhold the + button until the display shows S On. |
Turn sound off. | When instandby, press andhold the − button until the display shows SOFF. Audible safety and error message alerts cannot be turned off. |
Adjust and save custom cooking times and temperatures. | Once a SmartProgramme has beenselected, changes to thecooking time, temperature and pressure levelare saved oncethe Smart Programme begins. See Cooking for details. |
Reheat or warm for long periods. | Keep Warm can be usedfor up to a maximum of 10 hours (10:00).
When cooking thickor starchy foods,heat may notdissipate evenly. To ensurefood safety, stir the contents of thicker dishesevery 40 to 60 minutes. When Keep Warm is complete, the display shows End. |
Set a Delay Start timer. | Delay Start can be set from between 10 minutes (00:10) and 24 hours (24:00).
− / + buttons to adjust the hours.
When Delay Startends, the SmartProgramme begins and the display shows On.
|
Reset anindividual smart programme. | When instandby, press andhold one Smart Programme button until the multicooker returns to Standbyand displays OFF. The Smart Programme’s pressure level, cooking time andtemperature are restored to the factory default setting. |
Reset all smart programmes. | When in standby, press and hold Cancel until the multicooker beeps. All Smart Programme pressure levels, cooking times and temperatures are restored to the factory default setting. |
Status messages

Pressure cooking
Whether you’re a whiz in the kitchen or a complete newbie, these Smart Programmes help you get cooking at the touch of a button.
- Soup/Broth
- Meat/Stew
- Bean/Chili
- Poultry*
- Rice
- Multigrain*
- Porridge
- Steam
- Pressure Cook
*Not available on 3 Litre model. Use Pressure Cook instead.
Using pressurised steam guarantees your dish is cooked evenly and deeply, for the delicious results you expect every time.
Pressure level Suggested Notes use | ||
Low Pressure 5.8 – 7.2 psi (35–55 kPa) | Fish and seafood, soft vegetables and rice. |
The pressure level controls the temperature, so a higher pressure results in a higher cooking temperature. |
High Pressure 10.2 – 11.6 psi (65–85 kPa) | Eggs, meat, poultry, root vegetables, oats, beans, grains, bone broth, stew, chili. | |
CAUTION
- To avoid scorching or scalding injuries, be cautious when cooking with more than 60 mL of oil, oil-based sauces, condensed cream-based soups and thick sauces. Add suitable liquid to thin sauces. Avoid recipes that call for more than 60 mL of oil or fat content.
WARNING
- Always cook with the inner pot in place. Food must be placed in the inner pot. DO NOT pour food or liquid into the multicooker base.
- To avoid risk of personal injury and/or property damage, place food and liquid ingredients in the inner pot, then insert the inner pot into the multicooker base.
- Do not fill inner pot higher than the PC MAX — 2/3 (Pressure Cooking Maximum) line as indicated on the inner pot. When cooking foods that foam or froth (e.g., stewed apples, cranberries or split peas) or expand (e.g., oats, rice, beans, pasta) do not fill the inner pot higher than the — 1/2 line as indicated on the inner pot.
CAUTION
Always inspect the lid and inner pot carefully to make sure they are clean and in good working order before use.
- To avoid personal injury or damage to the appliance, replace the inner pot if it is dented, distorted or damaged.
- Use only authorised Instant Pot inner pots made for this model when cooking. Always make sure the inner pot and heating element are clean and dry before inserting the inner pot into the multicooker base.
Setup Guide
To use the Instant Pot 112-0170-01 DUO Multi-Use Pressure Cooker,
- First, make sure to read and follow the user manual for proper setup and operation.
- Place the inner pot inside the cooker and add your ingredients. Close the lid and make sure the steam release handle is in the sealing position.
- Select the cooking program, adjust the cooking time and pressure level, and press the start button.
- Once the cooking is complete, let the pressure release naturally or use the quick-release method. After cooking, wait for the cooker to cool down before cleaning the inner pot and the lid.
Pressure cooking
To create steam, pressure cooking liquids should be water-based, such as broth, stock, soup or juice. If using tinned, condensed or cream-based soup, add water as directed below.
Instant pot size Minimum liquidfor pressure cooking | |
3 Litres | 250 mL |
5.7 Litres | 375 mL |
8 Litres | 500 mL |
*Unless otherwise specified by your recipe.
Jumpstart magic!
Stage 1: Setting up the Duo for pressure cooking
- Remove the inner pot from the multicooker base. Add food and liquid ingredients to the inner pot, as directed by your recipe. Use the steam rack to keep foods out of the cooking liquid. This helps to distribute heat, prevents nutrients from leeching into the cooking liquid and stops food items from sticking to the bottom of the inner pot. Insert the inner pot back into the multicooker base.
- Secure the power lead to the base power socket at the back of the multicooker base. Make sure the connection is tight. Connect the power lead to a 220–240V power source. The display shows OFF.
- Place and close the lid as described in Pressure control features: pressure cooking lid.
- Turn the steam release handle to the Sealing position.
Stage 2: Pressure cooking
- Select the Smart Programme you want to use.
- Press the same Smart Programme button again to cycle through the pre-set time options in Less, Normal and More.
- Use the − / + buttons to adjust the cooking time. Adjustments are saved to the Smart Programme when cooking begins.
- Press Pressure Level to toggle between Low Pressure and High Pressure.
- Leave the automatic Keep Warm setting on, or press Keep Warm to turn it off.
- The multicooker beeps after 10 seconds and the display shows On as the multicooker preheats.
- When the Smart Programme is complete, follow your recipe to select the appropriate venting method. See Releasing pressure: Venting methods for safe venting techniques.
DANGER
DO NOT attempt to remove the lid while the float valve is up and NEVER attempt to force the lid open. Contents are under extreme pressure. Float valve must be down before attempting to remove the lid. Failure to follow these instructions may result in serious personal injury and/or property damage.
Pressure cooking
Smart programme breakdown
Smart Programmes Settings and defaults | ||||
Soup/Broth | Pressure | Low (35–55 kPa / 5–8 psi) High (65–85 kPa / 9.4–12.3 psi) | ||
Setting | Less | Normal | More | |
Default cooking time (adjustable) | 20 minutes (00:20) | 30 minutes (00:30) | 4hours (04:00) | |
Cooking time range | 1 minute to 4 hours (00:01–04:00) | |||
Meat/Stew | Pressure | Low (35–55 kPa / 5–8 psi) High (65–85 kPa / 9.4–12.3 psi) | ||
Setting | Less | Normal | More | |
Default cooking time (adjustable) | 20 minutes (00:20) | 35 minutes (00:35) | 45 minutes (00:45) | |
Cooking time range | 1 minute to 4 hours (00:01–04:00) | |||
Bean/Chili | Pressure | Low (35–55 kPa / 5–8 psi) High (65–85 kPa / 9.4–12.3 psi) | ||
Setting | Less | Normal | More | |
Default cooking time (adjustable) | 25 minutes (00:25) | 30 minutes (00:30) | 40 minutes (00:40) | |
Cooking time range | 1 minute to 4 hours (00:01–04:00) | |||
Poultry* | Pressure | Low (35–55 kPa / 5–8 psi) High (65–85 kPa / 9.4–12.3 psi) | ||
Setting | Less | Normal | More | |
Default cooking time (adjustable) | 5 minutes (00:05) | 15 minutes (00:15) | 30 minutes (00:30) | |
Cooking time range | 1 minute to 4 hours (00:01–04:00) | |||
Rice | Pressure | Low (35–55 kPa / 5–8 psi) High (65–85 kPa / 9.4–12.3 psi) | ||
Setting | Less | Normal | More | |
Default cooking time (adjustable) | 8 minutes (00:08) | 12 minutes (00:12) | 15 minutes (00:15) | |
Cooking time range | The cooking time adjusts automatically depending on the volume of rice: 8 to 15 minutes. Display shows Auto. | |||
Multigrain* | Pressure | Low (35–55 kPa / 5–8 psi) High (65–85 kPa / 9.4–12.3 psi) | ||
Setting | Less | Normal | More | |
Default cooking time (adjustable) |
20 minutes (00:20) |
40 minutes (00:40) | 1 hour (01:00) + 45 minutes soaking time | |
Cooking time range | 1 minute to 4 hours (00:01–04:00) | |||
Porridge | Pressure | Low (35–55 kPa / 5–8 psi) High (65–85 kPa / 9.4–12.3 psi) | ||
Setting | Less | Normal | More | |
Default cooking time (adjustable) | 5 minutes (00:05) | 20 minutes (00:20) | 30 minutes (00:30) | |
Cooking time range | 1 minute to 4 hours (00:01–04:00) | |||
Steam | Pressure | Low (35–55 kPa / 5–8 psi) High (65–85 kPa / 9.4–12.3 psi) | ||
Setting | Less | Normal | More | |
Default cooking time (adjustable) | 3 minutes (00:03) | 10 minutes (00:10) | 15 minutes (00:15) | |
Cooking time range | 1 minute to 4 hours (00:01–04:00) | |||
Pressure Cook | Pressure | Low (35–55 kPa / 5–8 psi) High (65–85 kPa / 9.4–12.3 psi) | ||
Setting | Less | Normal | More | |
Default cooking time (adjustable) | 20 minutes (00:20) | 35 minutes (00:35) | 45 minutes (00:45) | |
Cooking time range | 1 minute to 4 hours (00:01–04:00) | |||
Pressure cooking tips
Smart Programme |
Setting |
What it's for |
Tips |
Soup/Broth | Less | Soup without meat. | Liquid remains clear due to lack of boiling motion. Always use NR to release pressure when cooking soup with a high starch content. |
Normal | Soup with meat. | ||
More | Rich bone broth. | ||
Meat/Stew | Less | Soft texture. | Choose setting based on meat texture desired, or adjust cooking time manually. Allow meatto “rest” for5–30 minutes, depending onsize. It willretain cooking juices fortender, succulent meat. |
Normal | Very soft texture. | ||
More |
Fall-off-the-bone texture. | ||
Bean/Chili | Less | Firmer texture. | Choose setting based on desired bean texture, or adjust cooking time manually. When cooking beansor legumes, always useNR to release pressure. Make sure drybeans are completely submerged in water. |
Normal | Soft texture. | ||
More |
Very soft texture. | ||
Poultry* | Less | Soft texture. | Choose setting based on poultry texture desired or adjust cooking time manually. Allow poultry to“rest” for 5–30minutes, depending on size.It will retain cooking juices for tender, succulent meat. |
Normal | Very soft texture. | ||
More |
Fall-off-the-bone texture. |
Rice | Less | Tender but firm to bite. | For cooking medium and long-grain white rice. Depending onthe volume ofrice, cooking time may rangefrom 8–15 minutes. Use a 10-minute Natural Release after cooking for perfect results. |
Normal | Normal texture white rice. | ||
More |
Softer texture white rice. | ||
Multigrain* |
Less | Brown rice, wild rice, black beans, chickpeas, etc. |
Select Less or Normal based on type of grain and desired texture. More beginswith 45 minutes of warm water soaking time prior to 60 minutes of pressure cooking. |
Normal | Brown rice, wild rice, mung beans, etc. | ||
More | Tough grains or a mixture ofgrains and beans. | ||
Porridge | Less | Oatmeal—coarse or rolled. |
Adjust time as directed in recipe. Always useNR to release pressure when cooking foods that expand. |
Normal | White rice, porridge or congee. | ||
More | Rice, porridge or congee with a mixture of various grains. |
Steam | Less | Vegetables. | Use steam rack provided to elevate food from cooking liquid. Use QRto release pressure and prevent food from overcooking. |
Normal | Fish and Seafood. | ||
More | Meat. | ||
Pressure Cook |
NA |
Manual programming. | Press Pressure Levelto toggle between High and Low pressure. Use − / + buttons to adjust cooking time Adjust according torecipe or desired results. |
*Not available on 3 Litre model. Use Pressure Cook instead.
Pressure cooking grains
Check out the cooking timetables for guidance or visit our recipe site for fun, easy-to-follow recipes with big crunch. You can also download the free Instant Pot app to search recipes, save favourites, make notes and more!
Rice and grain Grain to water ratio | |
White or brown rice | 1: 1 |
Quinoa | 1: 3/4 |
Oatmeal | 1: 3 |
Risotto | 1: 2 Add additional wine to taste |
Porridge | 1: 10 |
CAUTION
Use a meat thermometer to ensure meat reaches a safe minimum internal temperature. Refer to the WHO (World Health Organization) website and/or review your local government’s food safety recommendations for more information.
Care, cleaning and storage
Clean your Duo and its parts after each use. Failure to follow these cleaning instructions may result in catastrophic failure, which may lead to property damage and/or severe personal injury. Always unplug your multicooker and allow it to cool to room temperature before cleaning. Never use metal scouring pads, abrasive powders or harsh chemical detergents on any of the Instant Pot’s parts or accessories. Allow all surfaces to dry thoroughly before use and before storage.
Parts | Cleaning methods and instructions |
Accessories
|
Dishwasher safe if placed on the top rack. |
Dishwasher safe if placed on the top rack. | |
Lid and parts
| Remove all the parts fromthe lid beforecleaning. See Care, cleaning and storage: Removing and installingparts.
|
Inner pot | Dishwasher safe.
|
Power lead Detachable power lead | Hand wash only. Do not wash in a dishwasher.
|
Multicooker base | Hand wash only. Do not wash in a dishwasher.
|
WARNING
The Instant Pot multicooker base contains electrical components. To avoid fire, electrical leakage or personal injury, make sure the multicooker base stays dry.
- DO NOT immerse the multicooker base in water or other liquid, or attempt to run it through a dishwasher.
- DO NOT rinse the heating element.
- DO NOT submerge or rinse the power lead or plug.
Removing and installing parts
Silicone sealing ring
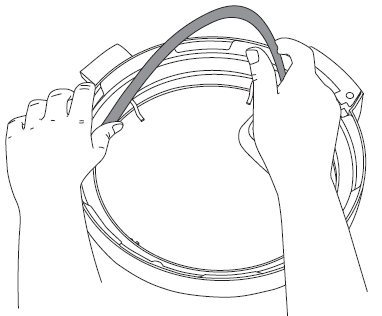
Remove the sealing ring
Grip the edge of the silicone and pull the sealing ring out from behind the circular stainless steel sealing ring rack. With the sealing ring removed, inspect the steel rack to make sure it is secured, centred and an even height all the way around the lid. Do not attempt to repair a deformed sealing ring rack.
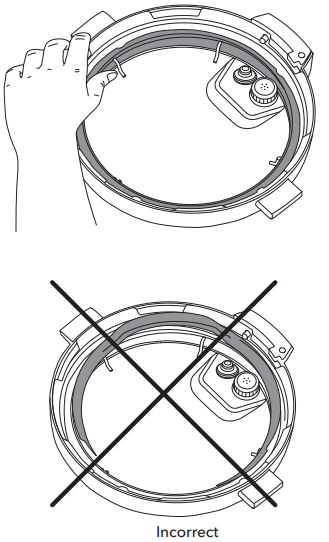
Install the sealing ring
Place the sealing ring over the sealing ring rack and press it into place. Press down firmly to prevent puckering. When installed properly, the sealing ring is snug behind the sealing ring rack and should not fall out when the lid is turned over.
Steam release handle
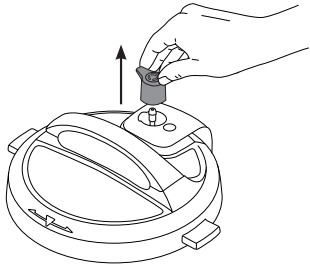
Remove the steam release handle
Pull the steam release handle up and off the steam release pipe. The steam release handle must be installed before using the multicooker.
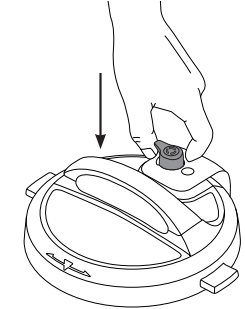
Install the steam release handle
Place the steam release handle on the steam release pipe and press down firmly. The steam release handle sits loosely on the steam release pipe when installed properly but should remain in place when the lid is turned over.
Anti-block shield
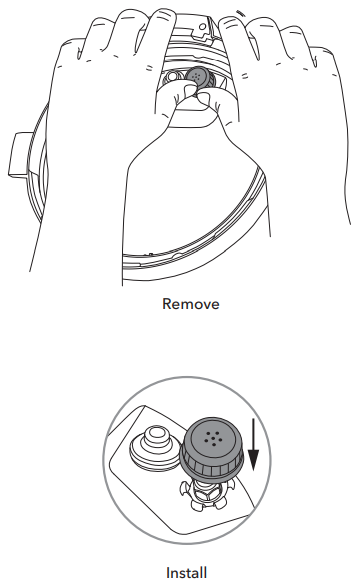
Remove the anti-block shield
Grip the lid like a steering wheel and use your thumbs to press firmly against the side of the anti-block shield (pressing towards the side of the lid and up) until it pops off the prongs underneath.
Install the anti-block shield
Place the anti-block shield over the prongs and press down until it snaps into position. Do not attempt to operate the pressure cooker without the anti-block shield installed.
Float valve and silicone cap
Remove the float valve
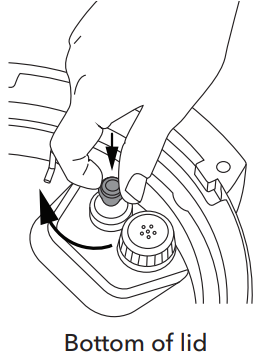
Place one finger on the flat top of the float valve, then turn the lid over. Detach the silicone cap from the bottom side of the float valve. Remove the float valve from the top of the lid. Do not discard the float valve or silicone cap.
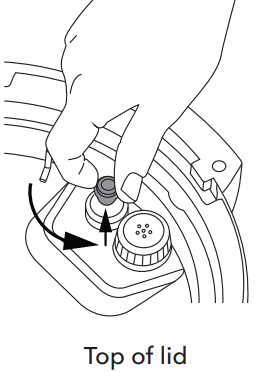
Install the float valve
Drop the narrow end of the float valve into the float valve hole on the top of the lid. Place one finger on the flat top of the float valve, then turn the lid over. Firmly attach the silicone cap to the bottom of the float valve. Do not attempt to operate the pressure cooker without having the float valve and/or silicone cap properly installed in the pressure cooking lid.
Condensation collector
The condensation collector sits at the back of the multicooker base and catches any overflow from the condensation rim. It should be installed before cooking, then emptied and rinsed out after each use.
Remove the condensation collector
Pull the condensation collector away from the multicooker base; do not pull down. Note the tabs on the multicooker base and the grooves on the condensation collector.
Install the condensation collector
Align the grooves on the condensation collector over the tabs on the back of the multicooker base and slide the condensation collector into place.

Troubleshooting
Problem Possible reason Try this | ||
Occasional clicking or light cracking sound. | The sound of power switching and the pressure board expanding when changing temperatures. |
This is normal; no action needed. |
Bottom of the inner pot is wet. | Wipe exterior surfaces of theinner pot. Make surethe heating element is dry before inserting the inner potback into the multicooker base. | |
Difficulty closing the lid. |
Sealing ring is notproperly installed. | Reposition the sealing ring.Make sure it is snugbehind the sealingring rack. |
Float valve is in the popped-up position. | Gently press the float valvedownward with a long utensil. | |
Contents in multicooker are still hot. | Turn the steam release handle to the Venting position, then lower the lid onto the multicooker base slowly, allowing heat to dissipate. | |
Difficulty opening the lid. |
Pressure inside the multicooker. | Release pressure according to recipe. Only open thelid after thefloat valve has dropped down. |
Float valve stuck in the popped-up position due to food debris or residue. | Make suresteam is completely released by quick-releasingpressure, then pressthe float valve gently witha long utensil. | |
Open the lid carefully, then thoroughly clean the float valve, surrounding area and lid before next use. | ||
Contents may beunder pressure. To avoidscalding injury, DO NOT attempt to force the lid open. | ||
The inner pot is stuck to the lid when the multicooker is opened. | Cooling of the inner pot may create suction, causing the inner pot to adhere to the lid. |
To release the vacuum, turn the steam release handle to the Venting position. |
Steam gushes from the steam release handle when it is in the Sealing position. |
Not enough liquid in the inner pot. | Add thin, water-based liquid to the inner pot according to its size. 3 L: 250 mL 5.7 L: 375 mL 8 L: 500 mL |
Pressure sensor control failure. | Contact Customer Care. | |
Steam release handle is not seated properly. | Turn the steam release handle to the Sealing position. | |
Steam leaks from side of lid. | No sealing ring in the lid. | Fit a sealing ring. |
The sealing ring is damaged or not properly fitted. |
Replace the sealing ring. | |
Food debris attached to the sealing ring. | Remove the sealing ring and clean it thoroughly. | |
The lid is not closed properly. | Open, then close the lid. | |
The sealing ring rack is warped or off-centre. | Remove thesealing ring fromthe lid, then check the sealing ring rack forbends or warps. Contact Customer Care. | |
The inner pot rimmay be misshapen. | Check for deformation and contact Customer Care. | |
The float valve does not rise. |
Food debris on the floatvalve or floatvalve silicone cap. | Remove the floatvalve from the lid and clean it thoroughly. Perform the Initial test run to check operation andrecord your findings. Contact Customer Care. |
Too little liquid in the inner pot. | Check for scorching on the bottom of the inner pot. Add thin, water-based liquid to the inner pot according to its size. 3 L: 250 mL 5.7 L: 375 mL 8 L: 500 mL | |
Float valve silicone cap damaged or missing. | Fit or replace the float valveand/or silicone cap. | |
Float valve obstructed by lid-locking mechanism. | Tap the floatvalve with a long utensil. If the float valvedoes not drop,turn the multicooker off. Contact Customer Care. | |
No heat in the inner pot. | Perform theInitial test run tocheck operation and record your findings. Contact Customer Care. | |
Inner pot base may be damaged. | Perform theInitial test run tocheck operation and record your findings. Contact Customer Care. | |
Small amount of steam leaking/hissing from the steam release handle during the cooking cycle. | Steam release handle is not in the Sealing position. | Turn the steam release handle to the Sealing position. |
Multicooker is regulating excess pressure. |
This is normal; no action required. |
The display remains blank after connecting the power lead. |
Bad power connection or no power. | Inspect power leadfor damage. Ifdamage is noticed, contact CustomerCare. Check socket to make sure it is powered. | |
Cooker’s electrical fuse has blown. | Contact Customer Care. | ||
Error code appears on thedisplay and the multicooker beeps continuously. | C1 C2 C6 C6H C6L |
Faulty sensor. |
Contact Customer Care. |
C5 | Temperature is too high because the inner pot has not been placed in the multicooker base. | Press Cancel and waitfor heating element to cool; makesure there are no foreign objects in multicooker base; insert or reposition innerpot in multicooker base and re-enter commands. | |
Temperature is too high. | Check forscorching on bottomof inner pot. Add thin, water-based liquidto the innerpot according to its size. 3 L: 250 mL 5.7 L: 375 mL 8 L: 500 mL | ||
C7 or NoPr | Heat element has failed. | Contact Customer Care. | |
Not enough liquid. | Add thin, water-based liquid to the inner pot according to its size. 3 L: 250 mL 5.7 L: 375 mL 8 L: 500 mL | ||
Steam release handle is in the Venting position. | Turn the steam release handle to the Sealing position. | ||
Lid | Lid is not in the correct position for the selected programme. | Open and close the lid. | |
Do not use a lid when using Sauté. | |||
Error code appears on thedisplay and the multicooker beeps continuously. |
Food burn | High temperature detected at bottom of inner pot; multicooker automatically reduces the temperature to avoid overheating. | Starch deposits at the bottom of the inner pot may haveblocked heat dissipation. Turn themulticooker off, release pressure according to therecipe, and inspect the bottom of the inner pot. |
PrSE | Pressure has accumulated during a non-pressure cooking programme. |
Turn the steam release handle to the Venting position. | |
Register your Instant Pot today!
Warranty Registration
Please visit https://www.instantpot.co.uk/support/register-your-product/ to register your appliance. You will be asked to provide your name, your email address, the store name, date of purchase, model number and serial number (both of which are found on the appliance). This registration will enable us to keep you up-to-date with product developments and recipes, and contact you in the unlikely event of a product safety notification. By registering, you acknowledge that you have read and understood the instructions for use and warnings accompanying the appliance.
Pros & Cons
Pros
- 7-in-1 design
- 14 smart built-in programs
- 10 safety mechanisms
- Delay start and keep warm functions
- Yogurt-making function
Cons
- May take time to learn and master the functions
- May not fit under some cabinets when in use
- May produce loud noises during operation
- May require additional accessories for some functions
Customer Reviews
Customers generally love the Instant Pot 112-0170-01 DUO Multi-Use Pressure Cooker for its versatility, convenience, and safety features. They appreciate the time-saving and space-saving benefits and enjoy making various dishes with ease. However, some customers complain about the learning curve and the size of the cooker, which may not be suitable for small kitchens or families. Overall, the Instant Pot DUO is a popular and highly-rated pressure cooker that can be a great addition to any kitchen.
Faqs
What is the difference between Instant Pot DUO and Instant Pot Duo Plus?
How do I clean the Instant Instant Pressure Cooker?
How long does it take for the Multi-Use Pressure Cooker to reach pressure?
What is the warranty for the Instant Pot Multi-Use Pressure Cooker?
How much electricity does the Instant Pot DUO consume?
Leave a Comment
