Ortur Laser Master 2 Laser Engraver User Manual | Assembly Procedure

Content
Introduction
The Ortur Laser Master 2 Laser Engraver is a powerful and versatile laser engraving machine designed for precision cutting and engraving on a wide range of materials. With a 2100mW output power, 0.07x0.06mm ultra-fine compression spot, and engraving speeds up to 5000 mm/min, this 32-bit motherboard-powered engraver offers unparalleled speed and accuracy. The Ortur Laser Master 2 comes equipped with advanced safety features and is compatible with various materials and software. It is priced at approximately $151.99.
Warning: Non-professionals, DO NOT Operate This Laser Engraver! Please Observe Safety Instructions!
Brief introduction
- This Laser Master 2 laser engraver is a desktop laser engraver, for PROFESSIONAL USE only, by skilled workers.
- There is a G-sensor on the motherboard for active position protection. If the machine detects unauthorized movement, the laser beam will stop.
- Laser Beam Safety Guard, if your computer system halted or USB cable disconnected, led to that the laser engraver stop moving, the laser beam will stop, to prevent fire.
- Exposure Duration Detection and Limitation, if laser engraver under control, but user forget to operate and keep the laser beam working, extra safety will cut off in case motor stopped moving, to prevent fire.
- This laser engraver supports PWM mode.
- The Laser Master 7W is especially good at picture engraving.
- The Laser Master 15W is most cost effective, available for both of engraving and cutting.
- The Laser Master 20W is higher power and supports a faster engraving and cutting.
Attention
- Do NOT operate laser without eye protection (Laser goggles)
- Please set up laser engraver in the fireproofing area, with good ventilation.
- Please keep minors (especially kids younger than 14 yours old) away from this laser engraver. Minors of any age should not use this laser without direct Adult supervision and proper eye protection
- Please avoid strongly impact on the machine.
- Please do not touch the laser beam with your hands or any other objects you do not wish to engrave/burn/cut. Serious physical harm is possible if used improperly.
- Please do not touch the heat sink, when the laser engraver just stop working, it may scald your hands.
Please take care the laser engraver when it is working.
Detailed Specifications
- Increases the maximum speed to 15000mm/min.
- Aluminum profile frame, solid structure, smooth operation.
- 4 Safety protection: Active position protection, sloping position protection, flame detector and buzzer alarm and emergency stop switch for an emergency.
- Ship from Oversea warehouses located in Belgium and US.
- Tariff (VAT) is free for all customers.
- The Laser Master series laser engraving machine enjoys a 30-day return guarantee and a one-year warranty.
Description
The Ortur Laser Master 2 is built with durability and user convenience in mind. Its robust aluminum frame ensures stability during operation, while its modular design makes it easy to assemble and disassemble. The engraver comes with a detailed manual and online support resources, making it accessible even for beginners. The device is also equipped with safety features such as an emergency stop button and a protective cover to prevent accidental exposure to the laser beam.
Ortur Laser Master 2 Laser Engraver Assembly Procedure
- Take out 1 piece of aluminum profile with length of 540mm and put 2 corner connectors into the groove. Pay attention to the installation direction.
Take out 2 pieces of aluminum profile with length of 460mm, fixed with 2 pieces of M5*25.
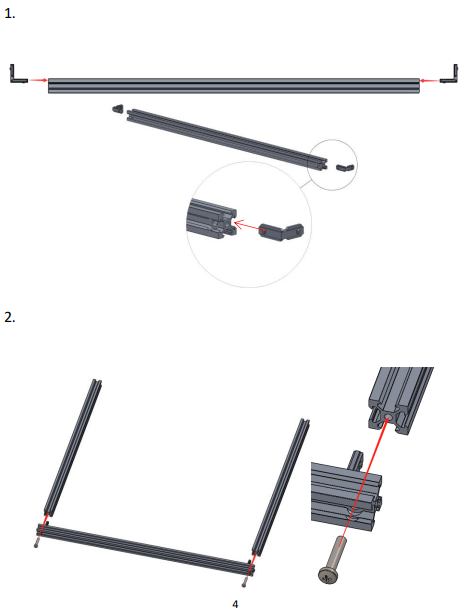
- First lock the 4 screws on the corner connectors, then take out 4 pieces of M5 nuts and put 2 in the groove of each side of the frame.
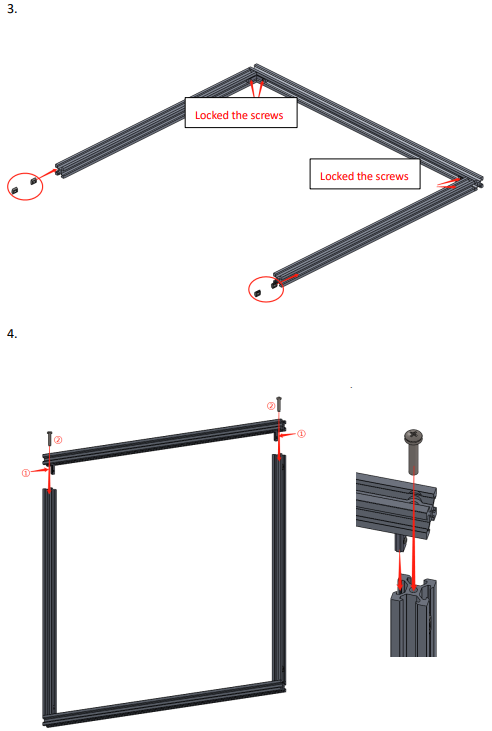
First, take out 2 pieces of corner connectors and 1 pieces of aluminum profile with length of 540mm, load the corner connectors into the aluminum profile, and then take out 2 pieces of M5*25 screws to fix the aluminum profile.
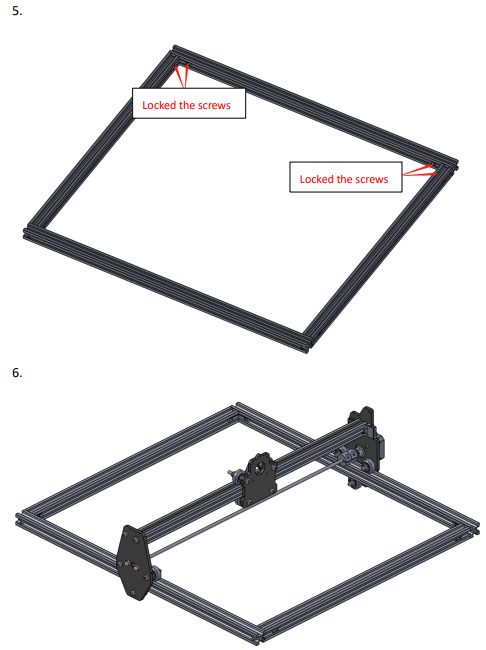
- Lock the 4 screws on the corner connectors, then installation of the bottom frame is done.
Take out the X-axis assembly and load it into the bottom frame.
- Take out 2 timing belts, 2 base anchors, 2 spacers, 4 M5*10 screws to assemble the base anchors on both sides and secure one end of the timing belt.
First, pass the timing belt through the rollers and timing pulley along the arrow in picture below, then take out 1 base anchor, 1 spacer, 2 M5*10 screws to assemble the base anchors and secure the other end of the timing belt.
First, pass the timing belt through the rollers and timing pulley along the arrow in picture below, then take out the Y limit switch, 1 M5*10 screw and 1 M5 nut, to assemble the limit switch and secure the other end of the timing belt. (Please tighten the timing belt when lock screws)
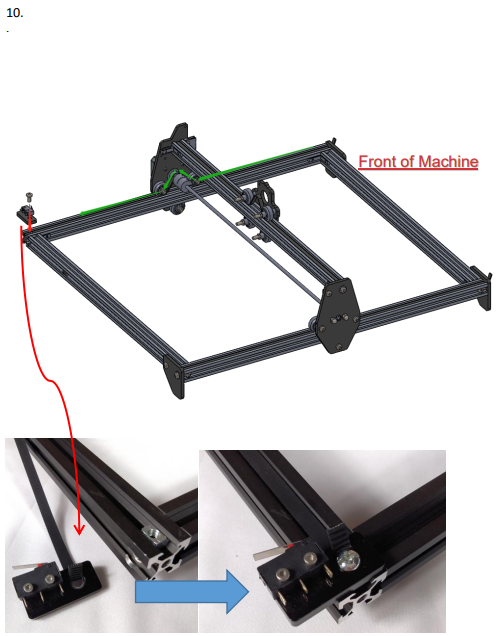
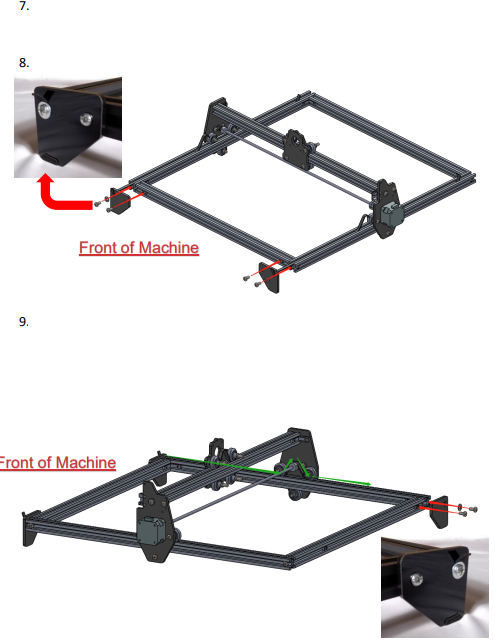
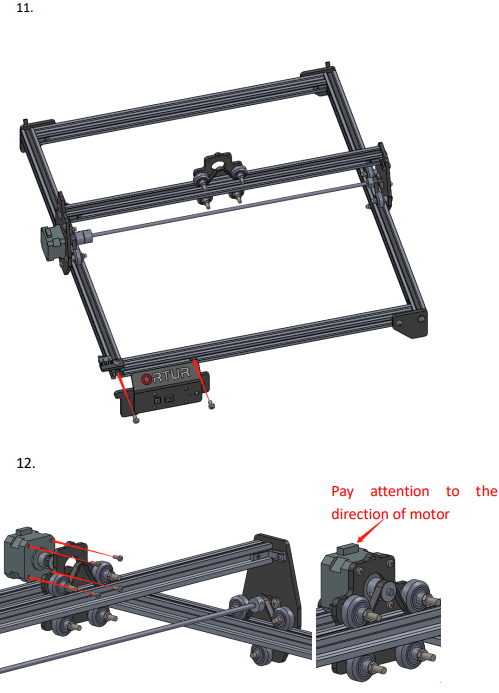
- Please assemble the mainboard assembly on frame by 2 pieces of M5*10 screws.
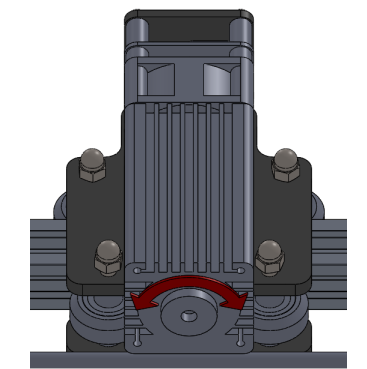
Please assemble the X motor by 4 pieces of M3*8 screws.
- Please connect laser module and the backboard by 2 pieces of M3*8 screws.
Please assemble the laser assembly by 4 M5 cap nuts.

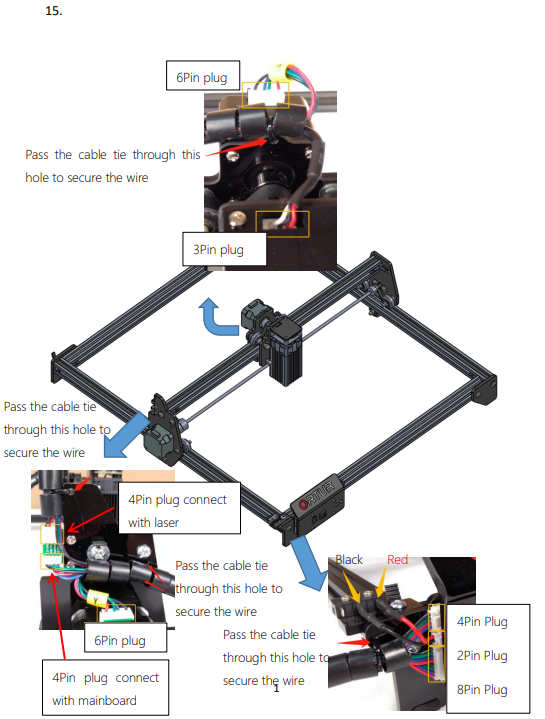
Connect all the wires, and secured by cable tie. PS. For Ortur Laser Master 2 - 7W laser module version, it need to use the Split wire loom insertion tool to insert the laser module cables into the wiring tube. The extra tutorial video link: https://www.youtube.com/watch?v=P1rwg8zTS4I
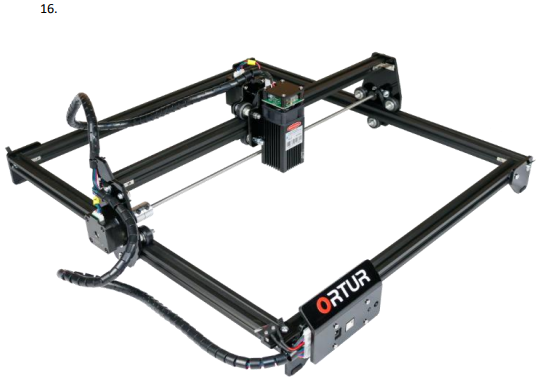
Assembly finished.
Installation Program of Ortur Laser Master 2 Laser Engraver
- Please download the Host Control Software ”LaserGrbl” and the Drivers at: https://www.dropbox.com/s/1o76v7d1rkqcb2j/LaserMaster2.zip?dl=0 Or: https://tinyurl.com/rutsacm
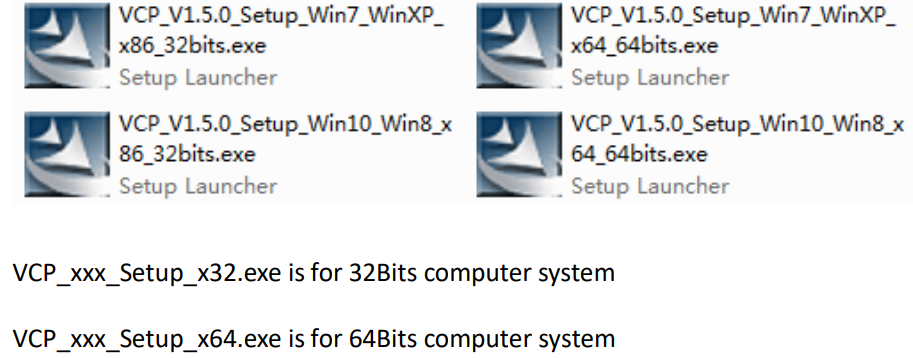
Please install the appropriate driver for your Windows system
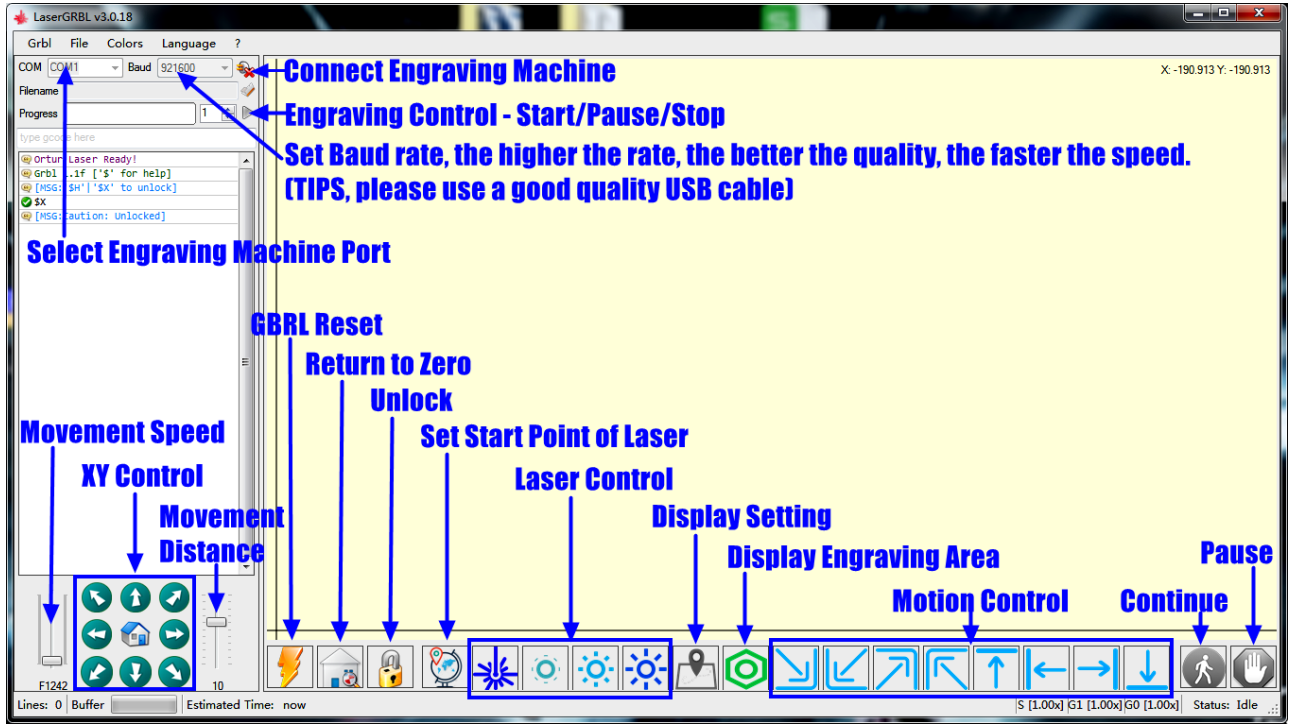
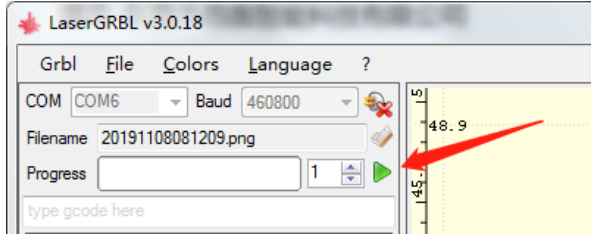
Please install the host control software, the Control Software “LaserGRBL” in your Windows computer.
Please plug the cable of power adapter into the Power Adapter Interface, press the Power Switch button, and connect the laser engraver and computer via USB cable.
PS. Press the Power button, 0.5 second to power on, and press 2 seconds to power off. Press Reset Button for emergency stop.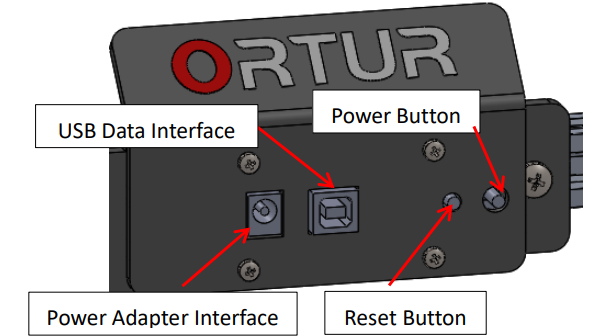
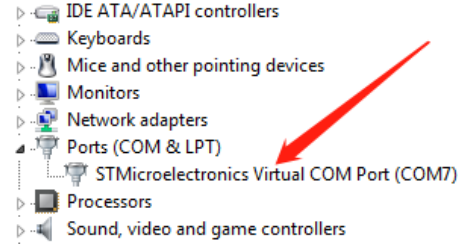
Go to “Device Manager”, If there is the STMicroelectronics Virtual COM Port, It means the laser engraver is connected with the computer successfully.
Please run the host control software “LaserGRBL”, and right click in the blank area of this lower section to get menu, then click ”Import custom buttons”, and select the profile file ”CustomButtons.gz” for advanced settings.
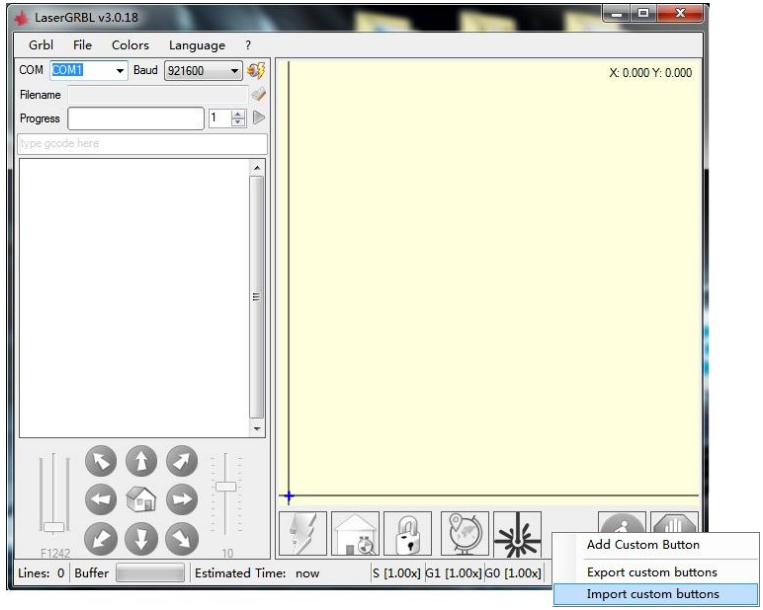
TIPS: When the profile file ”CustomButtons.gz” imported, you could use LaserGRBL directly for this Laser Engraver.
Advanced Settings Introduction
Setting Procedure:
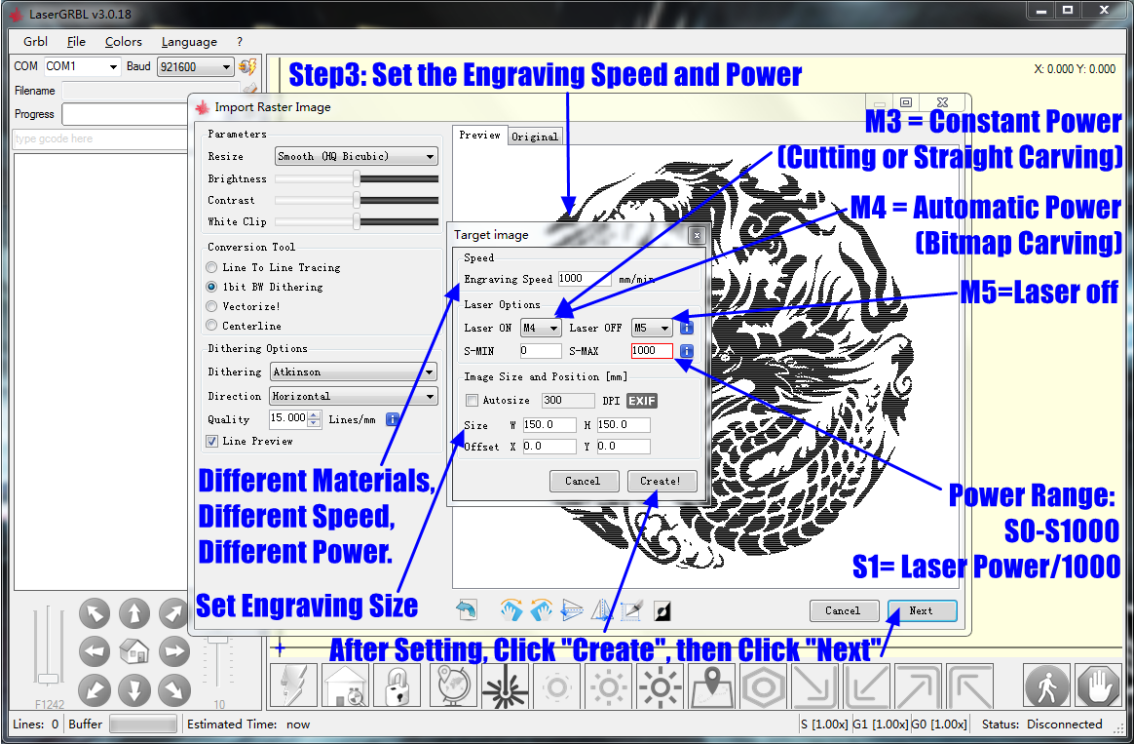
- Please adjust the laser focus.
For your information:- 1st Please wear the safety goggles, then put the object under the laser lens.
- 2nd The best distance, from the upside of object to the bottom of heat sink (not lens), is 55mm. You could adjust the laser unit height at the acrylic holder plate.
- 3rd Click this icon,
 the laser unit would give a faint light beam (This faint light beam is safe, neither offending to the eye, nor burn the skin. But if the light beam is very dazzling, and could burn the objective, please stop any more operation, and contact with your vendor).
 4th If need, you could adjust the lens focus ring to adjust the laser focus to be the smallest light spot.
- Please start the engraving.
For your information:- 1st Please click this icon
 , to home X,Y axis.
 - 2nd Please click these icons
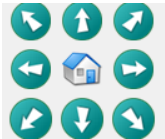 , to move the laser unit to be the correct position you want.
 - 3rd Please click this icon
 , to set up the current position as the starting point of the engraving.
 4th Please click this icon to start engraving.
- 1st Please click this icon
LaserBurn
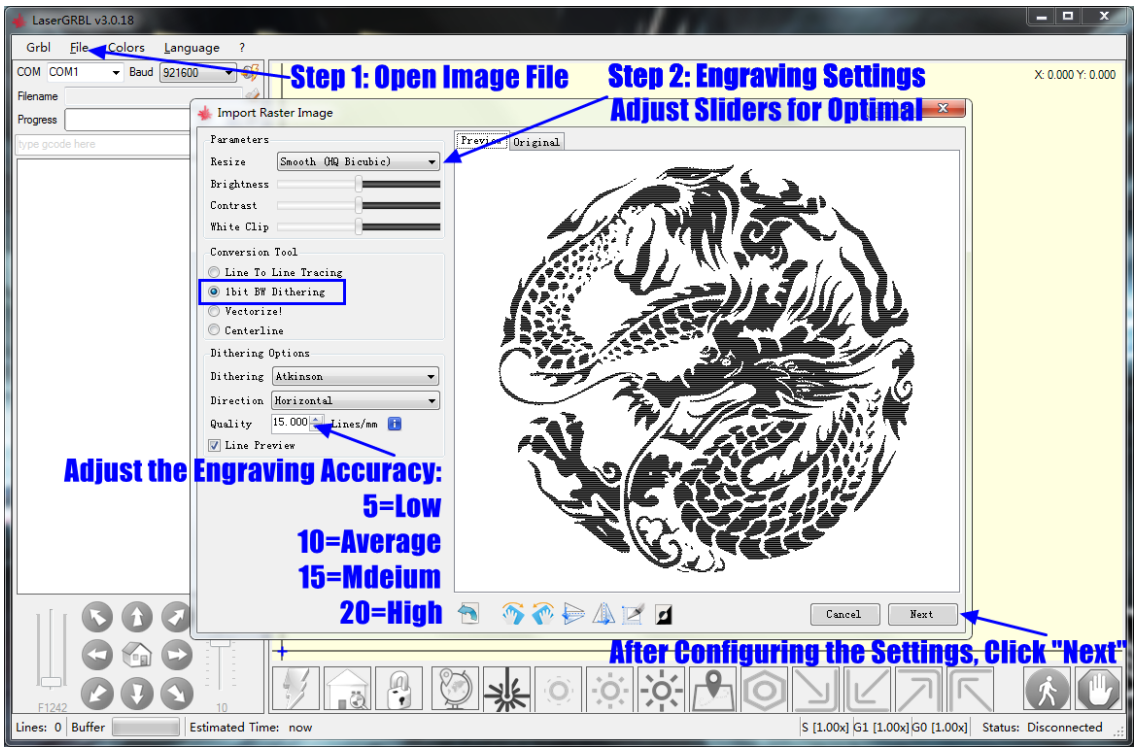
- Please download the aproproiate trial version of Laserburn from: https://lightburnsoftware.com/pages/trial-version-try-before-you-buy PS. If you think the trial version is good, you could pay for it.
- Install the software in your computer and run it.
- Launch the application from your computer (Windows, MAC, Linux).
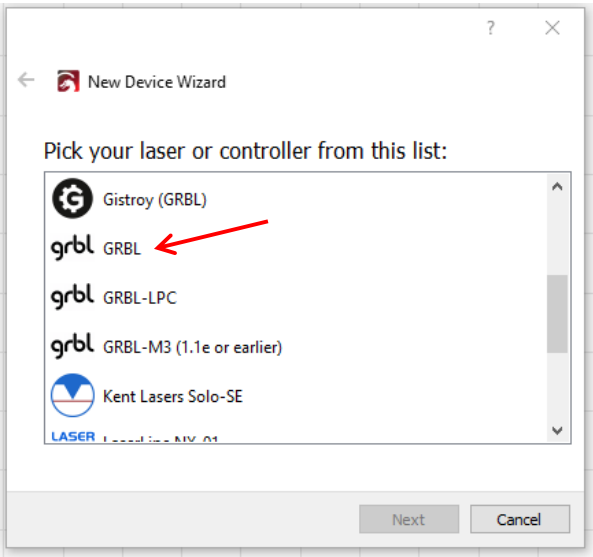
- If it’s the first time you lauch LightBurn you will be prompted for the New Device Wizard.
Select GRBL and press Next Button.
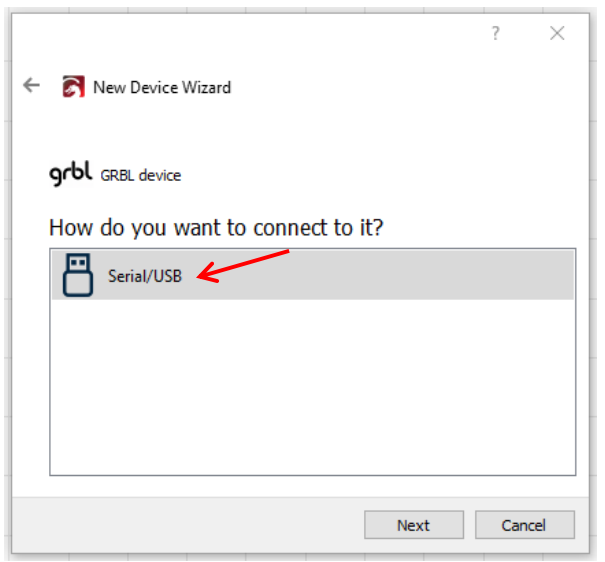
Select Serial/USB and press Next.
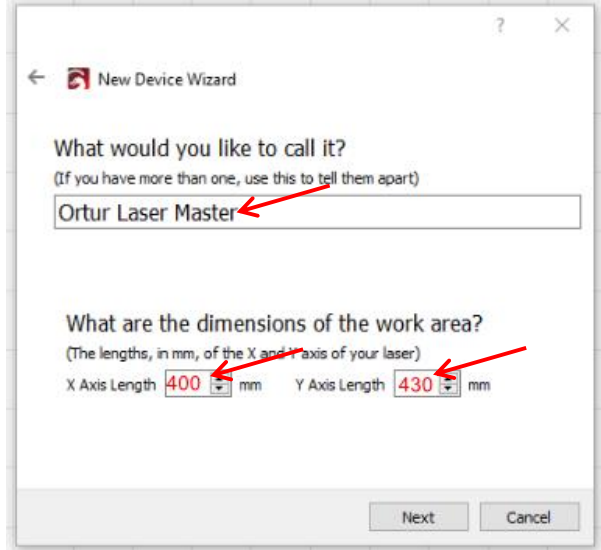
- Fill your Device Name, as well as X and Y axis and press Enter
- Ortur Laser Master
- X = 400
Y = 430
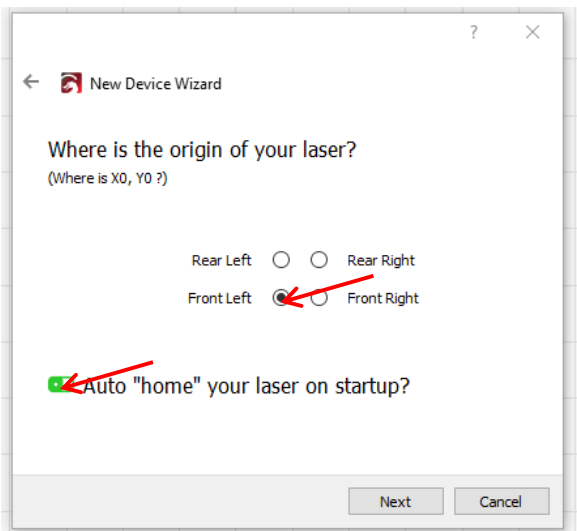
Select Front Left as your Origin X,Y and activate Auto “Home”, then press Next.
- Click Finish.
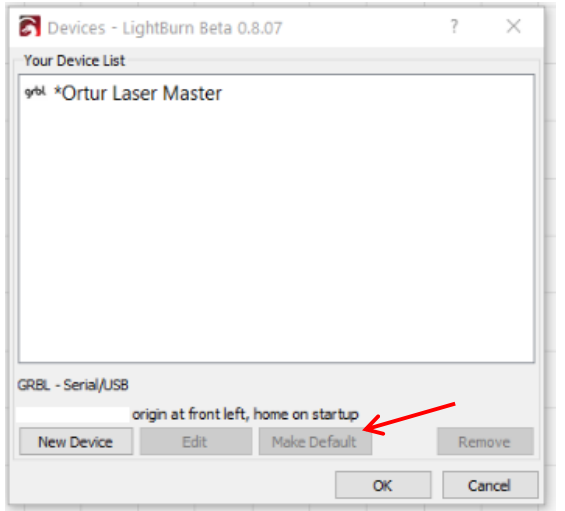
Select Ortur Laser Master and press Make Default.
Your Ortur Laser Master is ready to be used in LightBurn software.
Setup Guide
To set up the Ortur Laser Master 2, start by carefully unpacking and inspecting all components.
- Follow the provided manual to assemble the frame and install the laser module.
- Connect the device to your computer via USB or Wi-Fi and install the necessary software.
- Calibrate the laser beam according to the instructions to ensure accurate engraving.
- Finally, configure any additional settings such as resolution and speed based on your material and project requirements.
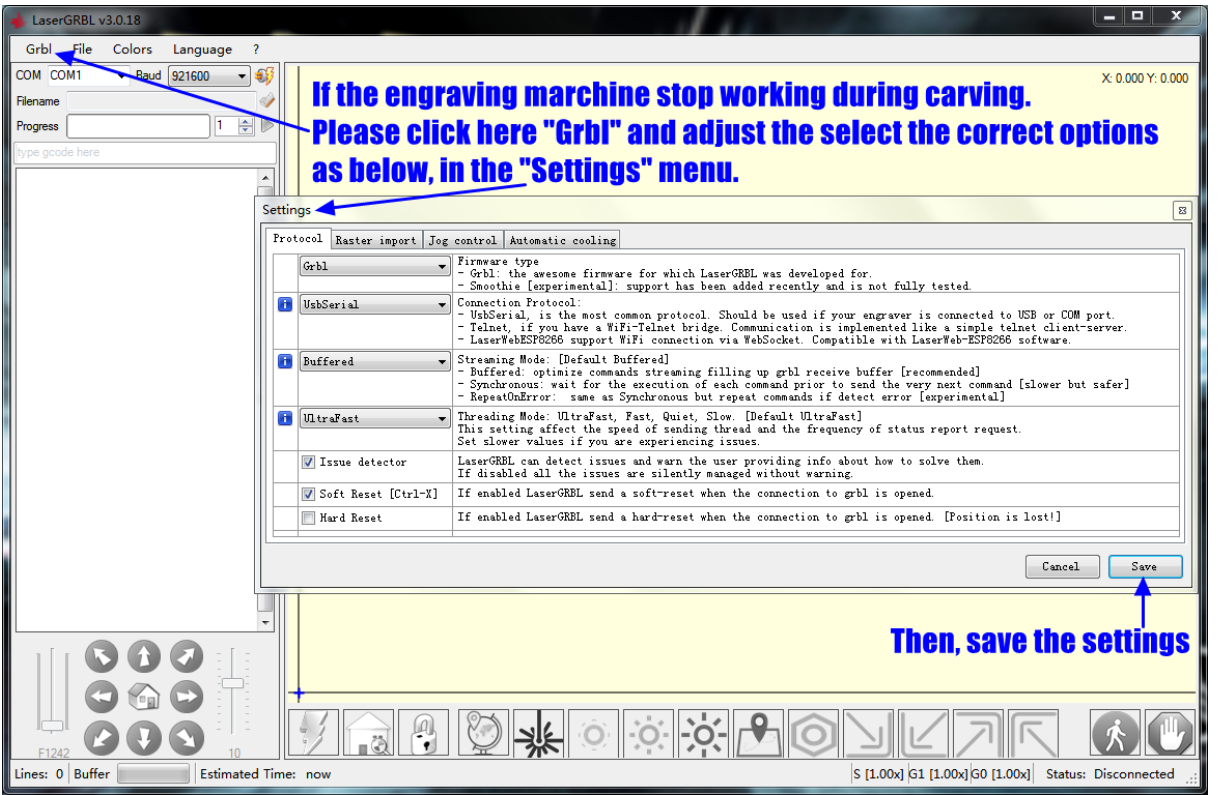
Troubleshooting
Common issues with the Ortur Laser Master 2 include misaligned laser beams and connectivity problems.
- To address misalignment, recalibrate the laser beam following the manual's instructions.
- For connectivity issues, ensure that your device is properly connected to your computer and that the software is updated.
- Always follow safety guidelines to avoid injury; never look directly at the laser beam and keep children away from the device during operation.
Ortur Laser Master 2 Laser Engraver Pros & Cons
Pros
- Precision and Accuracy: Delivers high-quality engravings with precise control.
- Ease of Use: User-friendly interface and easy assembly.
- Versatility: Supports a wide range of materials and input formats.
- Cost-Effective: Affordable price without compromising on quality.
Cons
- Limited Power Output: 7W power may not be sufficient for thicker materials or complex projects.
- No Built-in Air Assist: Requires an external air assist system for optimal performance.
- Software Compatibility Issues: Some users report compatibility issues with certain operating systems or software versions.
Customer Reviews
Customer reviews of the Ortur Laser Master 2 are generally positive, with many users praising its ease of use, precision, and value for money. However, some users have reported issues with software compatibility and the need for an external air assist system. Common complaints include limited power output for thicker materials and occasional calibration problems.
Faqs
What is the power output of the Ortur Laser Master 2?
What materials can be engraved with the Ortur Laser Master 2?
Is the Ortur Laser Master 2 compatible with both Windows and macOS?
How do I calibrate the laser beam on the Engraver?
What are some common issues with the Laser Master 2?
Can I expand the engraving area of the Ortur Laser Master 2 Laser Engraver?
Does the Ortur Laser Master 2 come with safety features?
What input formats are supported by the Ortur Laser Master 2 Laser Engraver?
Is an external air assist system required for optimal performance?
Leave a Comment