Oster Osterizer Classic Blender User Manual | Usage
Content
Introduction
The Oster Expressbake BreadMaker CKSTBRTW20 is a convenient kitchen appliance designed for baking fresh, homemade bread with ease. It features a user-friendly control panel with 12 settings, allowing you to customize your baking experience for various types of bread, including gluten-free options. With a capacity of up to 2 pounds, it is perfect for families. The Expressbake cycle can bake a loaf in under an hour, making it a practical choice. The cost of the Oster CKSTBRTW20 is approximately $79.99.
Detailed Specifications
- Motor Power: 600 watts
- Speed Settings: 10 variable speed settings
- Blender Capacity: 6-cup (48 oz) glass jar
- Materials: Durable stainless steel blades and a BPA-free glass jar
- Dimensions: 10 x 7 x 13 inches
- Weight: 9 pounds
- Additional Features: Pulse function, ice-crushing capability, secure-fit lid
IMPORTANT SAFEGUARDS
When using electrical appliances, basic safety precautions should be followed, including the following:
READ ALL INSTRUCTIONS BEFORE USE
- Unplug cord from outlet when not in use or before cleaning.
- To protect against risk of electrical shock, do not immerse the cord, plug or motor base in water other liquids.
- Do not let cord hang over edge of table or counter or touch hot surfaces.
- Never leave appliance unattended when in use.
- Close supervision is necessary when used near children.
- Avoid contact with moving parts. Keep hands and utensils out of jar while blending to prevent personal injury or damage to the blender. A rubber spatula may be used only when the blender is not running.
- The blade is sharp. Handle with care.
- Always put the lid on the jar before operating the blender.
- Do not operate any appliance with a damaged cord or plug or after the appliance malfunctions or is dropped or damaged in any manner. Return the appliance to the nearest Authorized Sunbeam Appliance Service center for examination, repair or electrical or mechanical adjustment.
- Do not use outdoors or for commercial purposes; this appliance is for household use only.
- Use this appliance for its intended use as described in this manual.
- When blending hot liquids, remove center piece of two-piece cover.
- To reduce the risk of injury, never place cutter-assembly blades on base without jar properly attached.
- Always operate on a flat surface.
- Unplug the blender when it is not in use, before taking off or putting on parts and before cleaning.
- The use of attachments, not made by manufacturer, including canning or ordinary jar and processing assembly parts, is not recommended by Sunbeam Products, Inc. and may cause risk of injury to persons.
THIS PRODUCT IS FOR HOUSEHOLD USE ONLY
The maximum rating marked on the product is based on the attachment that draws the greatest load. Other attachments may draw less power.
POWER CORD INSTRUCTIONS
Please follow the instructions below to ensure the safe use of the power cord.
This appliance is equipped with a polarized plug. This type of plug has one blade that is wider than the other. This plug will fit in a polarized outlet only one way. This is a safety feature intended to help reduce the risk of electrical shock. If you are unable to insert the plug into the outlet, contact a qualified electrician to replace the obsolete outlet. Do not attempt to defeat the safety purpose of the polarized plug by modifying the plug in any way.
You may use an extension cord, if necessary, but be certain to follow these guidelines:
- The marked electrical rating of the extension cord must be at least 120/127 Volt, 60 Hz, 10A.
- The extension must be arranged so that it will not drape over the countertop or tabletop, will not be within the reach of children and will not be tripped over.
- Do not pull, twist, or otherwise abuse the power cord.
LEARNING ABOUT YOUR BLENDER
Description
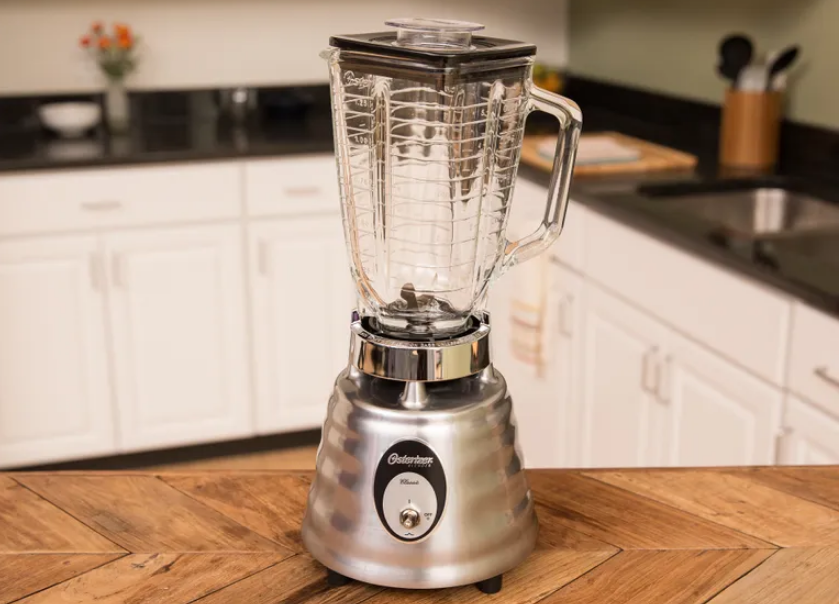
The Oster Osterizer Classic Blender is designed to last, featuring a heavy-duty build and high-quality components. Its 6-cup glass jar is dishwasher safe and thermal shock-resistant, making it suitable for both hot soups and frozen drinks. The 600-watt motor ensures enough power to blend tough ingredients, while the 10 variable speed settings provide precise control. The durable stainless steel blades are engineered for efficiency, offering consistent performance over time.
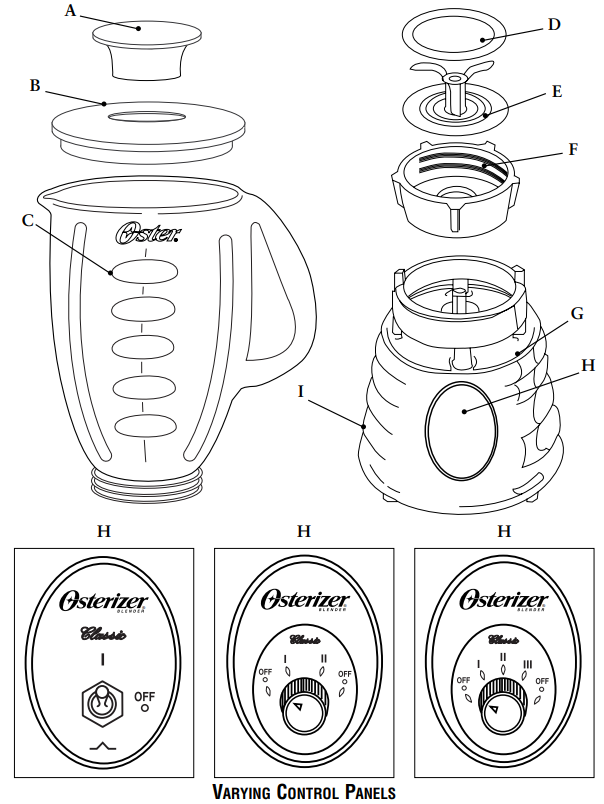
FEATURES OF YOUR OSTERIZER CLASSIC BLENDER
- Feeder cap for adding ingredients while blending
- Leak Proof Lid
- Jar – Your OSTER Blender includes one of the following:
- 5-cup Dishwasher Safe/Scratch Resistant Glass Jar
- 6-cup Break-Resistant Jar
- 5-cup Double-Walled, Insulated Thermal Jar – keeps frozen drinks, smoothies and milkshakes cold for hours
- Sealing Ring for tight seal
- Ice Crush Blade pulverizes ice for smooth frozen drinks
- Threaded Bottom Cap
- Powerful Motor with exclusive ALL-METAL DRIVE™ system for extra durability
- Control Panel
- Convenient Cord Storage (select models only)
USING YOUR BLENDER
Clean blender according to the instructions in the “Cleaning and Storing Your Blender” section.
Jar Assembly
- Turn jar upside down so the small opening is at the top. (Figure 1) Place sealing ring over jar opening. (Figure 2)
Place blade into jar. (Figure 3)
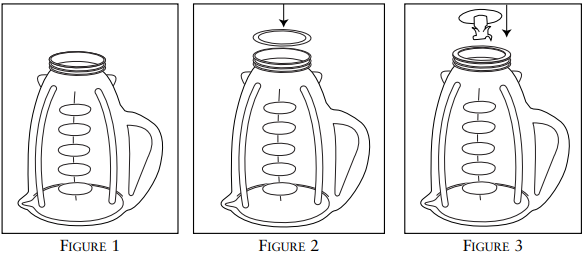
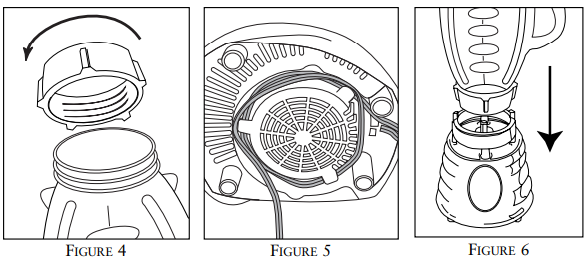
- Place threaded bottom cap over blade and turn clockwise to tighten. (Figure 4)
- Wrap the power cord from the cord storage area on the base of the blender until the cord is the length you desire. (Figure 5)
Place jar assembly onto base. (Figure 6)
- Place ingredients into jar.
- Place lid with feeder cap on jar.
- Plug the power cord into a 120 Volt AC electrical outlet.
TOGGLE MODELS
- Push switch up and blend ingredients to desired consistency.
- Push switch to OFF to stop the blender and turn blender off.
- To use PULSE, push switch down for desired length of time.
- Release PULSE and allow blade to stop. Repeat cycle as desired.
DIAL MODELS
- Turn dial to desired speed and blend ingredients to desired consistency. Turn dial to OFF to stop the blender and turn blender off.
- To use PULSE, turn dial to PULSE or speed I for desired length of time. Turn dial back to OFF and allow blade to stop. Repeat cycle as desired.
BLENDING TIPS
- Put liquids in the jar first, unless a recipe says otherwise.
- Crushing ice: Crush 6 ice cubes or approximately 2 cups of ice at a time.
Do not remove the lid while in use. Remove feeder cap to add smaller ingredients. (Figure 7)
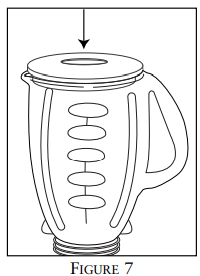
- Hot Foods: Open the feeder cap to vent steam. Tilt feeder cap away from you. Keep hands away from the cover opening to prevent possible burns. When working with hot liquids, remove feeder cap and start blending at a low speed. Then move to a faster speed. Do not add liquid over the 4 cup (1 Liter) level.
- Cut all firm fruits and vegetables, cooked meats, fish and seafood into pieces no larger than 3/4 inch (1.8 cm) to 1 inch (2.5 cm). Cut all kinds of cheeses into pieces no larger than 3/4 inch (1.8 cm).
This blender will not mash potatoes, whip egg whites or substitute dairy toppings, mix stiff dough or grind raw meat.
Setup Guide
- Assembly: Place the blender base on a flat, stable surface. Align the tabs of the glass jar with the base and twist it clockwise until it clicks into place.
- Configuration: Use the control dial to select the desired speed setting.
- Operation: Add ingredients to the jar, ensuring it's not overfilled. Secure the lid tightly. Press the pulse button for bursts of power or use continuous blending for extended tasks.
- Pairing: No additional device is needed for operation.
CLEANING AND STORING YOUR BLENDER
IMPORTANT: UNPLUG BEFORE CLEANING BASE and DO NOT IMMERSE THE BLENDER BASE IN WATER OR ANY OTHER LIQUIDS. Use a damp, soft sponge with mild detergent to clean the outside of the blender base. All parts except for the blender base are dishwasher safe. Place sealing ring in bottom basket of the dishwasher. You can also wash the parts in warm, soapy water. Rinse and dry.
EASY CLEAN
- Pour 3 cups of warm water in the blender jar. Add 1 – 2 drops of liquid dishwashing detergent.
- Blend detergent for 10 –15 seconds. Empty jar of soapy water into sink.
- Rinse jar thoroughly with clean water.
NOTE: Easy Clean is not a substitute for regular cleaning described above. It is especially important to disassemble and thoroughly clean your blender when processing milk, dairy products, meats, seafood and eggs.
STORING YOUR BLENDER
After cleaning, reassemble the blade to the jar with a sealing ring and collar. Store blender with cover ajar to prevent container odor.
PROCESSING FOODS IN BLENDER | |||
FOOD | PROCESSED QUANTITY | UNPROCESSED QUANTITY | SPECIAL INSTRUCTIONS |
Apples | 3/4 cup (200 mL) | 1 cup (250 mL) of 1 inch (2.5 cm) pieces | Pulse 2 times |
Apple Juice | 1-1/2 cups (375 mL) | 1 medium, peeled,cored, cut into eighths + 1 cup (250 mL) liquid | Liquefy continuously |
Breadcrumbs | 1/2 cup (125 mL) | 1 slice, torn in 8 pieces | Pulse 1 – 4 times |
Cabbages, Red & White | 1-1/2 cups (375 mL) | 3 cups (750 mL) of 1 inch (2.5 cm) pieces | Chop continuously in 2 – 4 cups water. Drain. |
Carrots |
|
| Pulse 2 times Pulse 4 times in 2-4 cups water. Drain. |
Celery | 3/4 cup (200 mL) | 1 cup (250 mL) of 1 inch (2.5 cm) pieces | Pulse 2 – 3 times |
Cheese, Cheddar | 1 cup (250 mL) | 1 cup (250 mL) of 1 inch (2.5 cm) pieces | Pulse 2 times |
Cheese, Swiss | 1 cup (250 mL) | 1 cup (250 mL) of 1 inch (2.5 cm) pieces | Pulse 5 times |
Cheese, Hard or Semi-Hard | 1 cup (250 mL) | 1 cup (250 mL) of 1 inch (2.5 cm) pieces | Grate continuously |
Coconut | 1 cup (250 mL) | 1 cup (250 mL) of 1 inch (2.5 cm) pieces | Grate continuously |
Coffee Beans | 1 cup (250 mL) | 1 cup (250 mL) | Grind 45 seconds for percolators & 60 seconds for drip. |
Cookies, Wafer | 1/2 cup (125 mL) | 10 wafers | Pulse 3 times |
Crackers, Graham | 1/2 cup (125 mL) | 8 crackers | Pulse 3 times |
Cranberries, Fresh | 3/4 cup (200 mL) | 1 cup (250 mL) | Pulse 2 times |
Dried Fruit | Scant 1/2 cup (125mL) + 1/2 cup flour | 1/2 cup (125 mL) | Chop continuously for 15 seconds |
Eggs, Hard Cooked | 3/4 cup (200 mL) | 2 eggs of 1 inch (2.5 cm) pieces | Chop continuously for 30 seconds |
Meat, Boneless, Cooked | 1 cup (250 mL) | 1 cup (250 mL) of 1 inch (2.5 cm) pieces | Chop continuously |
Nuts, Almonds, Peanuts, Pecans, Walnuts |
1 cup (250 mL) |
1 cup(250mL) |
Pulse 2 – 4 times |
Onions | 1-1/2 cups (375 mL) | 3 cups (750 mL) of 1 inch (2.5 cm) pieces | Pulse 1 time in 2-4 cups of water. Drain. |
Peppers | 2/3 cup (150 mL) | 1 cup (250 mL) | Pulse 1 time |
Peppercorns | 1/2 cup (125 mL) | 1/2 cup (125 mL) | Grind continuously |
Nutmeg | 1 Tablespoon (15 mL) | 3 nuts, shell removed | Grind continuously |
Ginger Root | 1/4 cup (50 mL) | 2 – 3 pieces 1 inch (2.5cm)each | Grind continuously |
Note: Since foodsvary in size,consistency and freshness, you may need to add or subtract a processing time from the number stated in this chart or the recipes that follow to obtain the results you desire. | |||
Troubleshooting
| Problem | Solution |
|---|---|
| Blender not turning on | Ensure the blender is plugged in properly and check for blockages in the blades. |
| Loud noise during blending | Clean the blades to remove any debris. If the noise continues, contact support. |
| Leakage | Verify the lid is properly secured or check for cracks in the glass jar. |
1-Year Limited Warranty
Sunbeam Products, Inc, or if in Canada, Sunbeam Corporation (Canada) Limited (collectively “Sunbeam”) warrants that for a period of one year from the date of purchase, this product will be free from defects in material and workmanship. Sunbeam, at its option, will repair or replace this product or any component of the product found to be defective during the warranty period. Replacement will be made with a new or remanufactured product or component. If the product is no longer available, replacement may be made with a similar product of equal or greater value. This is your exclusive warranty.
Pros & Cons
Pros
- Durable Construction: Heavy-duty materials ensure long-lasting performance.
- Versatile: Efficiently handles a wide range of blending tasks.
- Easy to Clean: Dishwasher-safe jar and removable parts for easy cleanup.
- Powerful Motor: 600-watt motor can blend tough ingredients like ice.
- Variable Speed Control: Precise control with 10 speed settings.
Cons
- Bulkier Design: May take up more counter space than smaller models.
- Noise: Can be loud during operation.
- Limited Features: Lacks advanced settings or smart features.
Customer Reviews
Customers have praised the Oster Osterizer Classic Blender for its reliability and durability, especially for handling tough ingredients like ice and frozen fruits. However, some users have pointed out that it can be noisy and larger compared to other blenders.
Most Common Complaints
- Noise Level: Some users report that the blender is too loud during operation.
- Size: Its bulkier design can take up more space on the kitchen counter.
Faqs
What is the motor power of the Oster Osterizer Classic Blender?
Is the glass jar of the Oster Osterizer Classic Blender dishwasher safe?
How many speed settings does the Oster Osterizer Classic Blender have?
Can the Oster Osterizer Classic Blender crush ice?
What materials are used in the construction of the Oster Osterizer Classic Blender?
Does the Oster Osterizer Classic Blender come with any additional features?
How do I assemble and configure my Oster Osterizer Classic Blender?
Why might my Oster Osterizer Classic Blender not be turning on?
What should I do if my Oster Osterizer Classic Blender is leaking?
Is the Oster Osterizer Classic Blender easy to clean?
Leave a Comment
