Otc Service Jack Locking Handle 520770 User Guide

Content
Introducing the OTC Service Jack Locking Handle 520770
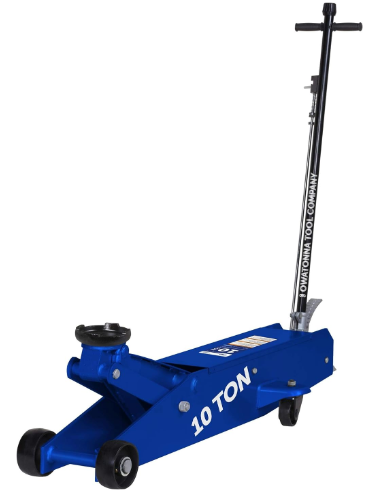
The OTC Service Jack Locking Handle 520770 is a must-have tool for any car owner or professional mechanic. This high-quality locking handle offers a safe and secure way to lift and hold your vehicle in place during maintenance or repair work. With an estimated price of $50 and a launching date set for early next month, this product is a worthwhile investment for any garage.
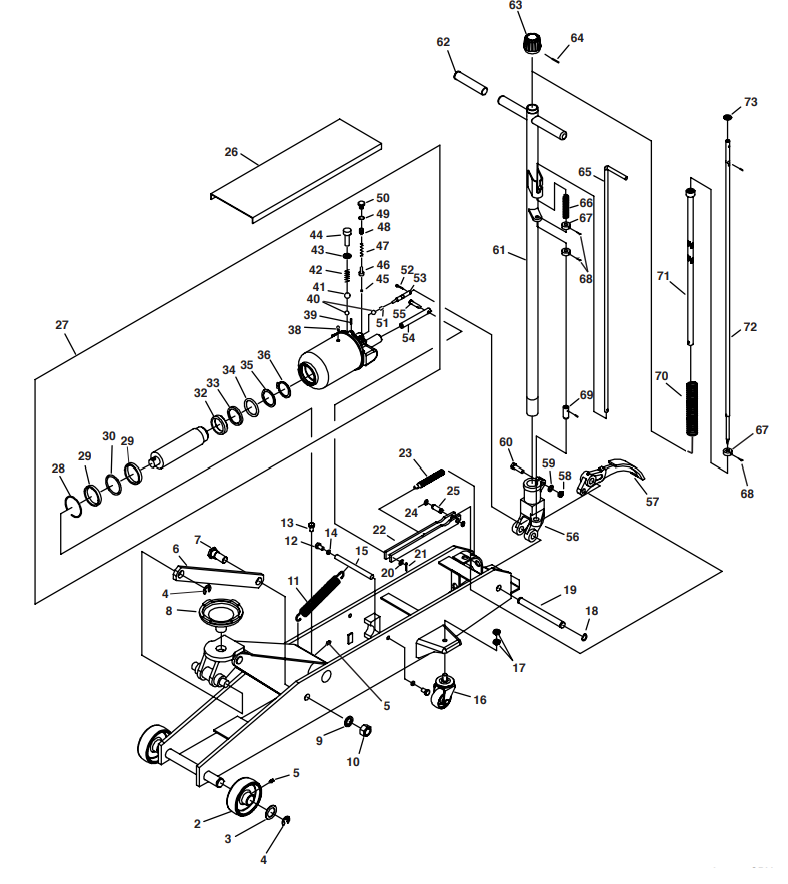
Parts List

| Item No. | Quantity | Description |
|---|---|---|
| 2 | 2 | Front Wheel |
| 3 | 2 | Washer |
| 4 | 4 | Snap Ring |
| 5 | 3 | Grease Nipple |
| 6 | 2 | Rod Link |
| 7 | 2 | Bolt |
| 8 | 1 | Saddle |
| 9 | 2 | Snap Ring |
| 10 | 2 | Nut |
| 11 | 1 | Spring |
| 12 | 2 | Bolt |
| 13 | 1 | Bolt |
| 14 | 2 | Snap Ring |
| 15 | 1 | Shaft |
| 16 | 2 | Rear Wheel |
| 17 | 4 | Nut |
| 18 | 2 | Snap Ring |
| 19 | 1 | Shaft |
| 20 | 1 | Washer |
| 21 | 1 | Pin |
| 22 | 1 | Connecting Bar |
| 23 | 1 | Spring |
| 24 | 2 | Snap Ring |
| 25 | 1 | Shaft |
| 26 | 1 | Inspection Plate |
| 27 | 1 | Cylinder Pump Assembly |
| 28 | 1 | Snap Ring |
| 29 | 2 | Washer |
| 30 | 1 | O-ring |
| 32 | 1 | Piston Ring |
| 33 | 1 | Sealing Washer |
| 34 | 1 | O-ring |
| 35 | 1 | O-ring Retainer |
| 36 | 1 | Snap Ring |
| 38 | 1 | Oil Filler Plug |
| 39 | 3 | Pin |
| 40 | 2 | Steel Ball |
| 41 | 1 | Steel Ball |
| 42 | 1 | Spring |
| 43 | 1 | Copper Washer |
| 44 | 1 | Bolt |
| 45 | 1 | Steel Ball |
| 46 | 1 | Ball Seat |
| 47 | 1 | Spring |
| 48 | 1 | Screw |
| 49 | 1 | Sealing Washer |
| 50 | 1 | Bolt |
| 51 | 1 | Sealing Washer |
| 52 | 1 | Pin |
| 53 | 1 | Release Valve Rod |
| 54 | 1 | Cylinder Pump Plunger |
| 55 | 1 | Pin |
| 56 | 1 | Handle Socket |
| 57 | 1 | Pedal |
| 58 | 1 | Nut |
| 59 | 1 | Washer |
| 60 | 1 | Bolt |
| 61 | 1 | Handle |
| 62 | 2 | Sleeve |
| 63 | 1 | Knob |
| 64 | 1 | Pin |
| 65 | 1 | Control Rod |
| 66 | 1 | Spring |
| 67 | 3 | Washer |
| 68 | 3 | Screw |
| 69 | 1 | Rod Joint |
| 70 | 1 | Spring |
| 71 | 1 | Universal Joint Assembly |
| 72 | 1 | Convey Rod |
| 73 | 1 | Washer |
Replacement Kits
Numbers followed by an asterisk (*) are kits used on 1505B units. Numbers followed by this symbol (†) are kits used on 1510B units.
No. 520771* and 520772† Seal Kits includes
| Item No. | Quantity | Description |
|---|---|---|
| 28 | 1 | Snap Ring |
| 29 | 2 | Washer |
| 30 | 1 | O-ring |
| 32 | 1 | Piston Ring |
| 33 | 1 | Sealing Washer |
| 34 | 1 | O-ring |
| 35 | 1 | O-ring Retainer |
| 38 | 1 | Oil Filler Plug |
| 43 | 1 | Copper Washer |
| 49 | 1 | Sealing Washer |
No. 520773* and 520774† Power Units include
| Item No. | Quantity | Description |
|---|---|---|
| 13 | 1 | Bolt |
| 27 | 1 | Power Unit |
No. 520775* and 520776† Caster Kits include
| Item No. | Quantity | Description |
|---|---|---|
| 16 | 1 | Rear Wheel |
| 17 | 2 | Nut |
No. 520777* and 520778† Wheel Kits include
| Item No. | Quantity | Description |
|---|---|---|
| 2 | 1 | Front Wheel |
| 3 | 1 | Washer |
| 4 | 1 | Snap Ring |
| 5 | 1 | Grease Nipple |
No. 520779* and 520780† Saddle Kits include
| Item No. | Quantity | Description |
|---|---|---|
| 8 | 1 | Saddle |
No. 520781* and 520782† Lift Arm Spring Kits include
| Item No. | Quantity | Description |
|---|---|---|
| 11 | 1 | Spring |
| 12 | 2 | Bolt |
| 14 | 2 | Snap Ring |
| 15 | 1 | Shaft |
No. 520783* and 520784† Pump Plunger/Connect Bar Kits include
| Item No. | Quantity | Description |
|---|---|---|
| 20 | 1 | Washer |
| 21 | 1 | Pin |
| 22 | 1 | Connecting Bar |
| 24 | 2 | Snap Ring |
| 25 | 1 | Shaft |
| 54 | 1 | Cylinder Pump Plunger |
| 55 | 1 | Pin |
No. 520785* and 520786† Level Link Arm Kits include
| Item No. | Quantity | Description |
|---|---|---|
| 4 | 2 | Snap Ring |
| 6 | 2 | Rod Link |
| 7 | 2 | Bolt |
| 9 | 2 | Lock Washer |
| 10 | 2 | Nut |
No. 520787* and 520788† Inspection Plate Kits include
| Item No. | Quantity | Description |
|---|---|---|
| 26 | 1 | Inspection Plate |
No. 520789 Handle Assembly Kit includes
| Item No. | Quantity | Description |
|---|---|---|
| 61 | 1 | Handle |
| 62 | 2 | Sleeve |
| 63 | 1 | Knob |
| 64 | 1 | Pin |
| 65 | 1 | Control Rod |
| 66 | 1 | Spring |
| 67 | 3 | Washer |
| 68 | 3 | Screw |
| 69 | 1 | Rod Joint |
| 70 | 1 | Spring |
| 71 | 1 | Universal Joint Assembly |
| 72 | 1 | Convey Rod |
| 73 | 1 | Washer |
No. 520790 Handle Pivot Kit includes
| Item No. | Quantity | Description |
|---|---|---|
| 18 | 2 | Snap Ring |
| 19 | 1 | Shaft |
| 56 | 1 | Handle Socket |
No. 520791 Foot Pedal Kit includes
| Item No. | Quantity | Description |
|---|---|---|
| 57 | 1 | Pedal |
No. 520792 Handle Retaining Bolt Kit includes
| Item No. | Quantity | Description |
|---|---|---|
| 58 | 1 | Nut |
| 59 | 1 | Washer |
| 60 | 1 | Bolt |
No. 520793 Handle Return Spring Kit includes
| Item No. | Quantity | Description |
|---|---|---|
| 23 | 1 | Spring |
No. 520794 Release Valve Kit includes
| Item No. | Quantity | Description |
|---|---|---|
| 40 | 1 | Steel Ball |
| 51 | 1 | Sealing Washer |
| 52 | 1 | Pin |
| 53 | 1 | Release Valve Rod |
No. 520795 Pump Hardware Kit includes
| Item No. | Quantity | Description |
|---|---|---|
| 36 | 1 | Snap Ring |
| 39 | 3 | Pin |
| 40 | 2 | Steel Ball |
| 41 | 1 | Steel Ball |
| 42 | 1 | Spring |
| 43 | 1 | Copper Washer |
| 44 | 1 | Bolt |
| 45 | 1 | Steel Ball |
| 46 | 1 | Ball Seat |
| 47 | 1 | Spring |
| 48 | 1 | Screw |
| 49 | 1 | Sealing Washer |
| 50 | 1 | Bolt |
No. 520796 Grease Nipple Kit includes
| Item No. | Quantity | Description |
|---|---|---|
| 5 | 1 | Grease Nipple |
OTC Service Jack Detailed Specifications
The OTC Service Jack Locking Handle 520770 boasts several key features that make it a standout product in its category. These specifications include:
- Constructed with durable steel for long-lasting use
- Ergonomic handle for comfortable grip and easy operation
- Universal fit for use with most service jacks
- Ratchet design for precise height adjustment
- Easy-to-read height indicators for accurate positioning
Detailed Description
The OTC Service Jack Locking Handle 520770 is a versatile and reliable tool that provides a safe and secure way to lift and hold your vehicle in place. The durable steel construction ensures long-lasting use, while the ergonomic handle offers a comfortable grip for easy operation. The universal fit allows for use with most service jacks, and the ratchet design enables precise height adjustment. Additionally, the easy-to-read height indicators ensure accurate positioning for your convenience.
Locking Handle 520770 Setup Guide
Setting up the OTC Service Jack Locking Handle 520770 is a straightforward process. Simply attach the locking handle to the service jack using the included hardware. Once attached, use the ratchet design to adjust the height to your desired position. The locking mechanism will engage, securing the handle in place. To release, simply use the ratchet design to adjust the height back down and disengage the locking mechanism.
Explanation of Safety Signal Words
The safety signal word designates the degree or level of hazard seriousness.
- Danger: Indicates an imminently hazardous situation which, if not avoided, will result in death or serious injury.
- Warning: Indicates a potentially hazardous situation which, if not avoided, could result in death or serious injury.
- Caution: Indicates a potentially hazardous situation which, if not avoided, may result in minor or moderate injury.
- Caution: Used without the safety alert symbol indicates a potentially hazardous situation which, if not avoided, may result in property damage.
Setup
Assemble the Handle
- Loosen the bolt on the handle socket.
- Insert the handle.
- Tighten the bolt.
Bleed Air from the Service Jack
Air can accumulate within a hydraulic system during shipment or after prolonged use. This entrapped air causes the jack to respond slowly or feel “spongy.”

To remove the air
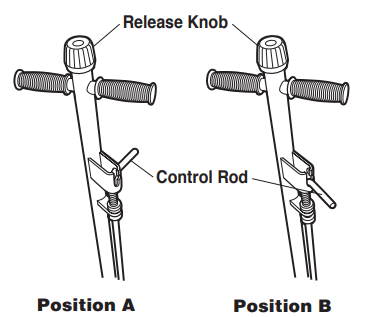
- Open the release valve by turning the release knob counterclockwise (CCW).
- Pump the jack handle six full strokes.
- Close the release valve by turning the release knob clockwise (CW).
- Pump the jack handle or foot pedal until the lift arm is fully extended.
- Lower the lift arm by turning the release knob CCW. If the jack does not immediately respond, repeat Steps 2–4.
Operating Instructions of OTC Service Jack Locking Handle 520770
Note: Before each use, remove any air that has accumulated in the jack system. Refer to the Setup section of these instructions for this procedure.
Lifting Operation
- Turn release knob clockwise (CW) fully.
- Position the jack under the vehicle.
CAUTION: Use the vehicle manufacturer’s recommended lifting points on the chassis. - Pump the jack handle or the foot pedal until the saddle touches the vehicle. Check the placement of the saddle lugs. Finish lifting the vehicle.
- Place approved support stands under the vehicle at points that will provide stable support. Before working on the vehicle, SLOWLY lower the vehicle onto the suport stands.
Lowering Operation
CAUTION: To prevent personal injury, before lowering a vehicle ensure that no person or any obstacles are under the vehicle.
- Lift the vehicle just far enough to remove the support stands from under the vehicle.
- SLOWLY turn release knob counterclockwise (CCW) to lower the vehicle completely.
Preventive Maintenance
CAUTION: Only qualified operators may install, operate, adjust, maintain, clean, repair, inspect, or transport this service jack.
CAUTION: Dirt is the greatest single cause of failure in hydraulic units. Keep the service jack clean and well lubricated to prevent foreign matter from entering the system. If the jack is exposed to rain, snow, sand, or grit, it must be cleaned before it is used.
Inspections
Before each use
- A thorough inspection of the jack must be done by an approved inspector for any of the following conditions:
- Cracked or damaged housing.
- Excessive wear, bending, or other damage.
- Leaking hydraulic fluid.
- Scored or damaged piston rod.
- Malfunctioning swivel heads or adjusting screw.
- Loose hardware
- Modified or altered equipment.
NOTE: If any of these conditions are found, discontinue use of the jack until corrective action is taken to fix the jack.
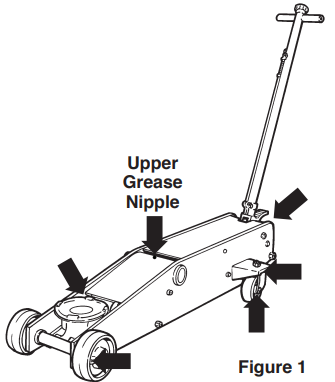
A minimum of once a month, lubricate the moving parts of the jack (indicated by arrows in Figure 1).

- Every three months, add grease to the upper grease nipple.
- A minimum of once a year, drain, flush, and replace the oil in the jack reservoir.
Only use type HL or HM hydraulic oil with an ISO grade of kinematic viscosity of 30 cSt at 40° Celsius, or any approved anti-wear hydraulic jack oil. Do not overfill the jack reservoir with oil. Figure 1
To check the oil level: Place the service jack on level ground and lower the lift arm completely. Remove the filler plug located under the top shroud. The oil level should be within 10 mm (3/8 inch) of the filler plug hole. If needed, add approved anti-wear hydraulic jack oil, and reinstall the filler plug.
CAUTION: The use of alcohol, hydraulic brake fluid, detergent motor oil, or transmission oil could damage the jack seals and result in jack failure.
Locking Handle 520770 Safety Precautions
CAUTION: To prevent personal injury and/ or property damage,
- Study, understand, and follow all safety precautions and operating instructions before using this service jack. If the operator cannot read instructions, operating instructions and safety precautions must be read and discussed in the operator’s native language.
- Only qualified operators may install, operate, adjust, maintain, clean, repair, inspect, or transport this service jack.
- Wear eye protection that meets ANSI Z87.1, CE EN166, AS/NZS 1337, and OSHA standards.
- This jack is designed to elevate cars and light trucks. Any other use of this service jack will be considered inappropriate.
- Before using the service jack to lift a vehicle, refer to the vehicle service manual for recommended lifting surfaces on the vehicle chassis.
- Do not exceed the rated capacity shown on the service jack.
- Use the service jack only on a hard, level surface. The jack must be free to roll without any obstructions while lifting or lowering the vehicle. The wheels of the vehicle must be in the straight-ahead position and the hand brake must be released.
- Center the load on the jack saddle. Off-center loads can damage seals and cause jack failure.
- Use approved vehicle support stands to support the vehicle before working on the vehicle.
- Stay out from underneath a load that is being lifted or lowered.
- Never position any part of your body near the moveable elements of the jack.
- Lift only dead weight. Do not move jack while it is supporting a vehicle.
- Lower the jack slowly and carefully while watching the position of the jack saddle.
- Inspect the condition of the service jack before each use. Do not use if damaged, altered, or in poor condition.
- An overload valve on this service jack is set at the factory and must not be adjusted.
- No alterations shall be made to this product.
- Only repair parts supplied by the manufacturer may be used for unit repair.
Troubleshooting Guide
CAUTION: Service jack repairs must be done in a dirt-free environment by qualified personnel who are familiar with this equipment.
| Trouble | Cause | Solution |
|---|---|---|
| Jack does not lift | 1. Release valve is open. | 1. Close release valve. |
| 2. Low/no oil in system. | 2. Fill with oil and bleed system. | |
| 3. Air-locked system. | 3. Bleed system. | |
| 4. Load is above capacity of jack. | 4. Use correct equipment. | |
| 5. Delivery valve and/or bypass valve not working correctly. | 5. Clean to remove dirt or foreign matter. Replace oil. | |
| 6. Packing worn out or defective. | 6. Install seal kit. | |
| Jack lifts only partially | 1. Too much or not enough oil. | 1. Check oil level. |
| Jack advances slowly | 1. Pump not working correctly. | 1. Install seal kit or replace power unit. |
| 2. Leaking seals. | 2. Install seal kit. | |
| Jack lifts load, but doesn't hold | 1. Cylinder packing is leaking. | 1. Install seal kit. |
| 2. Valve not working correctly (suction, delivery, release, or bypass). | 2. Inspect valves. Clean and repair seat surfaces. | |
| 3. Air-locked system. | 3. Bleed system. | |
| Jack leaks oil | 1. Worn or damaged seals. | 1. Install seal kit. |
| Jack will not retract | 1. Release valve is closed. | 1. Open or clean release valve. |
| Jack retracts slowly | 1. Cylinder damaged internally. | 1. Send jack to OTC authorized service center for repair. |
| 2. Link section is binding. | 2. Lubricate link section. |
OTC Service Jack Locking Handle 520770 Pros & Cons
Pros
- Durable steel construction for long-lasting use
- Ergonomic handle for comfortable grip and easy operation
- Universal fit for use with most service jacks
- Ratchet design for precise height adjustment
- Easy-to-read height indicators for accurate positioning
Cons
- May not fit all service jacks
- Locking mechanism may require some force to engage and disengage
Customer Reviews about OTC Service Jack Locking Handle 520770
Customers have raved about the OTC Service Jack Locking Handle 520770, praising its durability, ease of use, and precision. However, some have noted that it may not fit all service jacks and that the locking mechanism can require some force to engage and disengage.
Faqs
What is the OTC Service Jack Locking Handle 520770?
Can the OTC Service Jack Locking Handle 520770 be used with any service jack?
How do I set up the OTC Service Jack Locking Handle 520770?
How does the ratchet design of the OTC Service Jack Locking Handle 520770 work?
What do customers have to say about the OTC Service Jack Locking Handle 520770?
What is the estimated price of the OTC Service Jack Locking Handle 520770?
When is the launching date of the OTC Service Jack Locking Handle 520770?
What are the pros and cons of the OTC Service Jack Locking Handle 520770?
What is the material of the OTC Service Jack Locking Handle 520770?
What are the key features of the OTC Service Jack Locking Handle 520770?
Leave a Comment
