Panasonic 65-inch OLED Smart TV TX-65JZ1000B User Guide
Content
Introduction
The Panasonic 65-inch OLED Smart TV TX-65JZ1000B offers an exceptional viewing experience with its 4K Ultra HD resolution and Master OLED panel, providing deep blacks and vibrant colors. Powered by the HCX Pro AI Processor, it enhances picture quality for cinematic clarity. This smart TV is equipped with Google Assistant and Amazon Alexa, allowing for seamless voice control. The price for this model is approximately $1,999.
Specifications
| Model | Dimensions (W × H × D) | Mass | Power Source | Panel Type | Speaker Output |
|---|---|---|---|---|---|
| TX-48JZ1000B | 1,069 mm × 660 mm × 270 mm (With Pedestal) | 17.5 kg (With Pedestal) | AC 220-240 V, 50/60 Hz | OLED | 30 W (15 W × 2) |
| 1,069 mm × 690 mm × 270 mm (With Pedestal OUT) | 16.0 kg (TV only) | ||||
| 1,069 mm × 622 mm × 67 mm (TV only) | |||||
| TX-55JZ1000B | 1,227 mm × 771 mm × 348 mm (With Pedestal) | 19.5 kg (With Pedestal) | AC 220-240 V, 50/60 Hz | OLED | 30 W (15 W × 2) |
| 1,227 mm × 711 mm × 69 mm (TV only) | 14.5 kg (TV only) | ||||
| TX-65JZ1000B | 1,448 mm × 895 mm × 348 mm (With Pedestal) | 22.0 kg (With Pedestal) | AC 220-240 V, 50/60 Hz | OLED | 30 W (15 W × 2) |
| 1,448 mm × 835 mm × 69 mm (TV only) | 17.0 kg (TV only) |
Connection Terminals
HDMI Inputs:
HDMI 1: Supports features like VRR, AMD FreeSync™ Premium.
HDMI 2: Supports eARC/ARC.
HDMI 3 /4: Standard HDMI features.
USB Ports: Three ports available with varying power outputs.
Ethernet Port: RJ45 for wired internet connection.
Card Slot: Common Interface slot for CI Plus.
Broadcasting Systems
Satellite: DVB-S/S2
Digital: DVB-T/T2
Analogue: PAL I
Wireless Connectivity
Wi-Fi Standards: IEEE802.11a/n/ac for dual-band connectivity.
Bluetooth: Bluetooth version 5.0 supports up to five devices simultaneously.
Operating Conditions
Temperature Range: Operates between 0°C0°C to 35°C35°C.
Humidity Range: Between 20%20% to 80%80% RH (non-condensing).
Energy Efficiency
Rated Power Consumption: Up to 480W480W.
Standby Power Consumption: 0.5W0.5W.
This comprehensive overview provides essential specifications and features of the Panasonic TX series OLED Smart TVs, showcasing their advanced technology and design.
Installing the TV
48-inch model
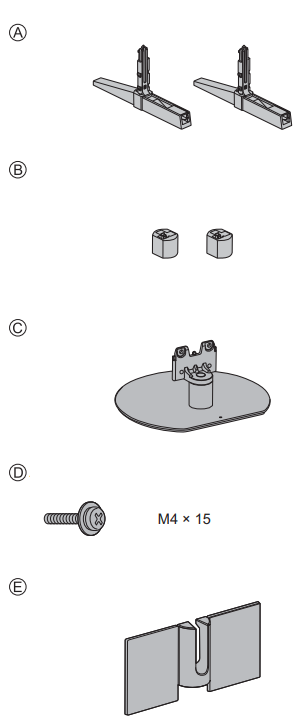
- Pedestal (2)
- Cover (2)
The covers are used only with the “With Pedestal (OUT)” style.
55-inch model 65-inch model - Pedestal
- Assembly screw (4)
- Cable cover
Preparations
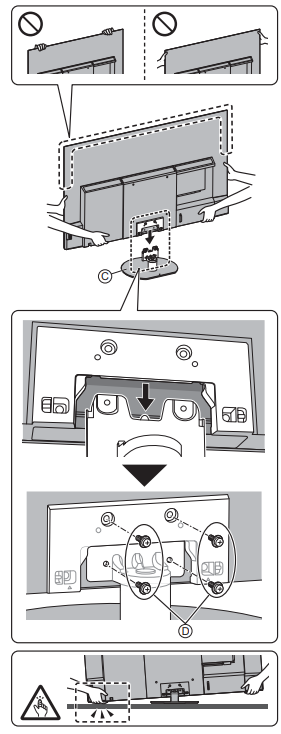
- Do not hold the screen panel part.
- Make sure not to scratch or break the TV.
55-inch model 65-inch model
- Do not place the TV temporarily on the floor or desk.
Assembling the pedestal
- Insert the pedestal firmly, otherwise it may come off when setting up the TV.
- Do not assemble the pedestal by any method other than those specified below.
- Cable arrangement (p. 19)
55-inch model 65-inch model
Attaching the cable cover
55-inch model 65-inch model
- Be careful not to nip the cables between the TV and the cable cover.
- Do not apply load to the cable cover.
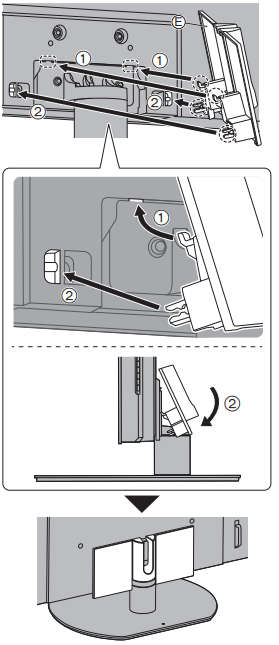
To remove from the TV:
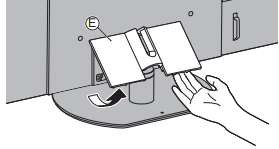
Adjusting the panel to your desired angle
55-inch model 65-inch model
Do not place any objects within the full rotation range.

Removing the pedestal
Be sure to remove the pedestal in the following procedures when you use the wall-hanging bracket or repack the TV.
55-inch model 65-inch model
- Remove the cable cover .
- Remove the assembly screws from the pedestal.
- Pull out the pedestal from the TV.
Installing the wall-hanging bracket
Please contact your local Panasonic dealer to purchase the recommended wall-hanging bracket.
- Holes for wall-hanging bracket installation
Rear of the TV
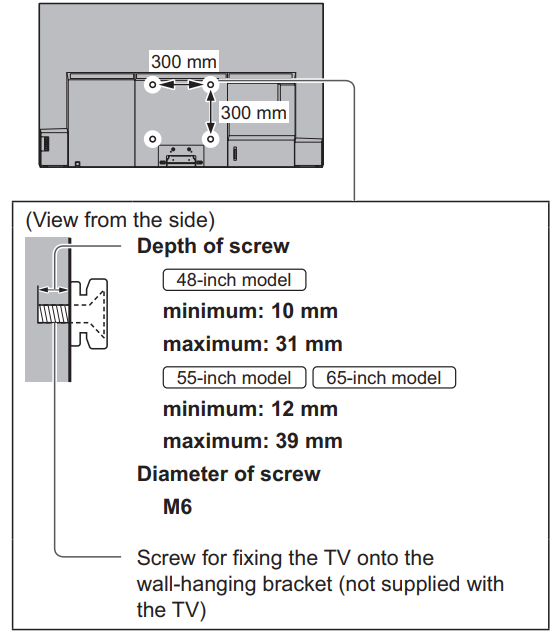
WARNING
- Using other wall-hanging brackets, or installing a wall-hanging bracket by yourself have the risk of personal injury and product damage. In order to maintain the unit’s performance and safety, be absolutely sure to ask your dealer or a licensed contractor to secure the wall-hanging brackets. Any damage caused by installing without a qualified installer will void your warranty.
- Carefully read the instructions accompanying optional accessories, and be absolutely sure to take steps to prevent the TV from falling off.
- Handle the TV carefully during installation since subjecting it to impact or other forces may cause product damage
- Take care when fixing wall brackets to the wall. Always ensure that there are no electrical cables or pipes in the wall before hanging bracket.
- To prevent fall and injury, remove the TV from its fixed wall position when it is no longer in use.
Connections
- External equipment and cables shown are not supplied with this TV.
- Please ensure that the unit is disconnected from the mains socket before attaching or disconnecting any cables.
- Check the terminal type and cable plugs are correct for connection.
- Use a fully wired HDMI compliant cable.
- Keep the TV away from electronic equipment (video equipment, etc.) or equipment with an infrared sensor, otherwise distortion of image / sound may occur or operation of other equipment may be affected.
- Please also read the manual of the equipment being connected.
Terminals
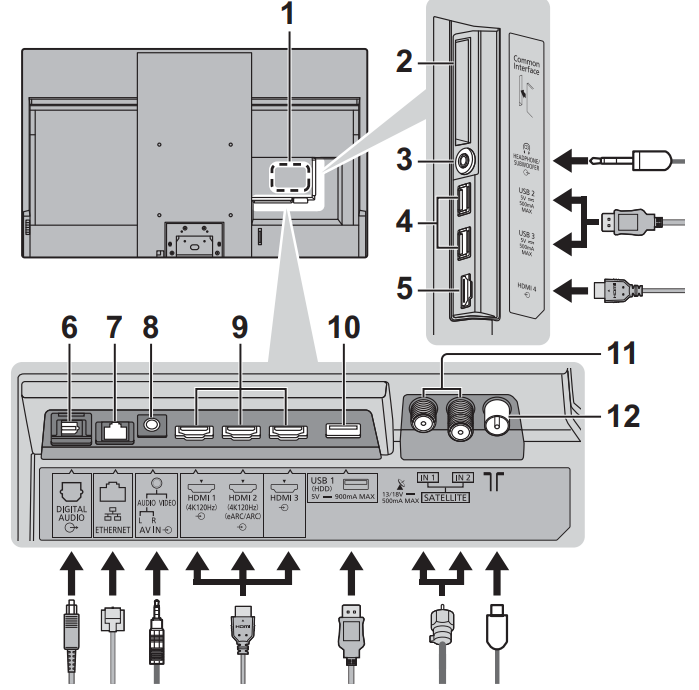
- Model nameplate
- CI slot
- Headphone / Subwoofer jack (3.5 mm stereo mini plug)
- USB 2 - 3 port
This symbol indicates DC operation. - HDMI 4
- DIGITAL AUDIO
- ETHERNET terminal
Use Shielded Twist Pair (STP) LAN cable. - AV IN
- HDMI 1 - 3
- USB 1 port
This symbol indicates DC operation. - Satellite terminal
- Terrestrial terminal
Basic connections
AV devices
(DVD Recorder / Blu-ray Recorder, Cable TV box, etc)
For details, refer to [eHELP] (Search by Purpose > Watching > Basic > Basic connection).
Aerial
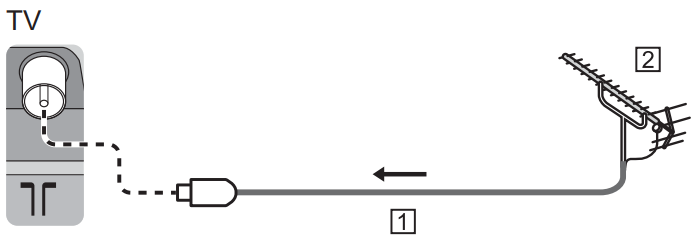
- RF cable
- Terrestrial aerial
For Digital, Analogue
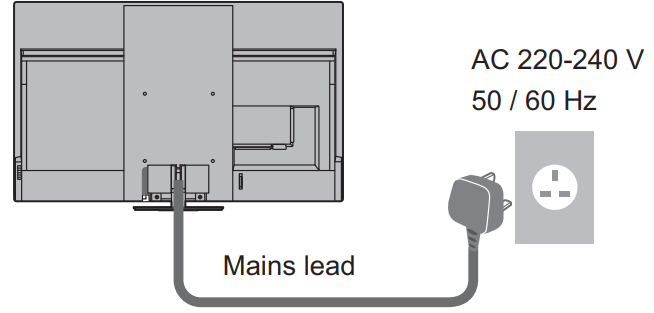
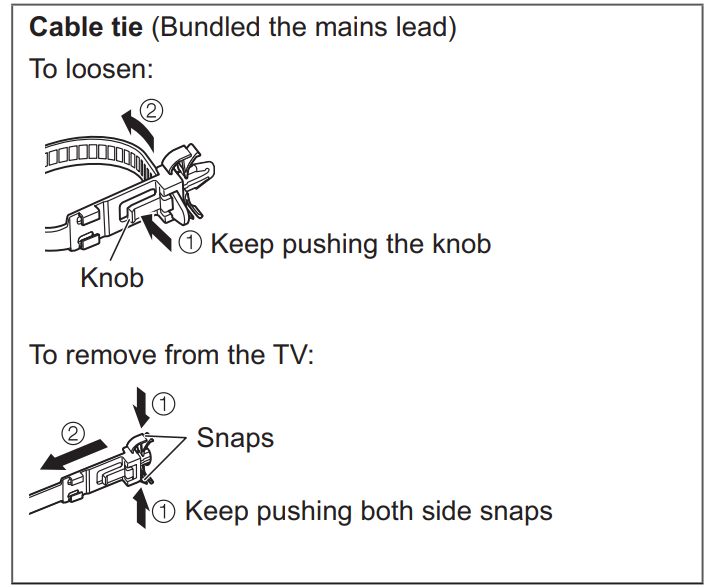
Mains lead
Satellite connection
- To ensure your satellite dish is correctly installed, please consult your local dealer. Also consult the received satellite broadcasting companies for details.
- For details, refer to [eHELP] (Search by Purpose > Watching > Basic > Satellite connection/Basic connection).
Network
A broadband network environment is required to be able to use internet services.
- If you do not have any broadband network services, please consult your retailer for assistance.
- Prepare the internet environment for wired connection or wireless connection.
- Setup of the network connection will start when first using the TV. (p. 22)
- For details, refer to [eHELP] (Search by Purpose > Network > Network connections).
Connections for 4K / HDR compatible equipment

- HDMI cable
- 4K / HDR compatible equipment
- Reproduces the image more precisely with the expanded colour gamut and more smoothly with the high frame rate when connecting the 4K compatible equipment. [Mode2] is a mode that supports higher definition signals than [Mode1]. [Mode3] is a mode that supports higher frame rate signals than [Mode2]. Set to [Mode1] when the image or sound in HDMI input is not played properly.
- Connect the 4K compatible equipment to HDMI terminal using a 4K compatible cable and you can watch content in 4K format.
- Supporting HDR does not increase the peak brightness capabilities of the TV panel.
Other connections
DVD Player / Camcorder / Game equipment
(VIDEO equipment)
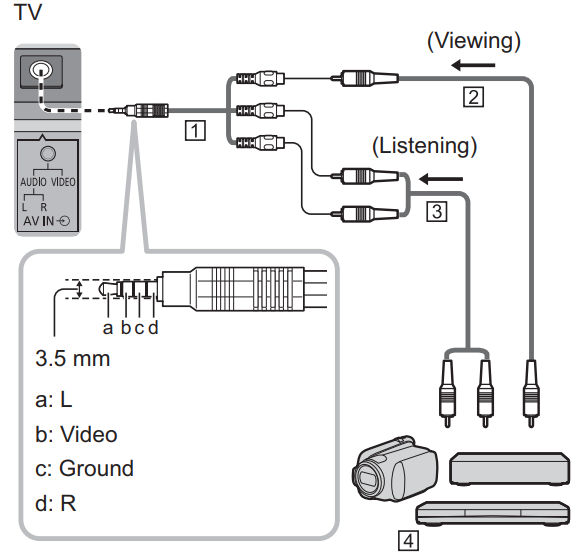
- AV adaptor (Shielded / not supplied)
- Composite video cable (Shielded)
Use shielded composite cable. - Audio cable (Shielded)
Use shielded audio cables. - DVD Player / Camcorder / Game equipment
Amplifier (listening with external speakers)
- To enjoy multi-channel sound from external equipment (e.g. Dolby Digital 5.1ch), connect the equipment to the amplifier. For information about the connections, read the manuals of the equipment and amplifier.
- For details, refer to [eHELP] (Search by Purpose > Watching > External equipment > External connection).
Headphones / Subwoofer
- To use headphones, set [Headphone Terminal Output] in the Sound menu to [Headphone].
- To use the subwoofer, set [Headphone Terminal Output] in the Sound menu to [Sub Woofer]. (The subwoofer output from the TV is the same for both L and R.)
For information about the headphone terminal output settings, refer to [eHELP] (Search by Purpose > Settings > Sound).
USB HDD (for recording)
- Use USB 1 port for connecting the USB HDD.
- For details, refer to [eHELP] (Search by Purpose > Recording).
VIERA Link
- Use HDMI 1 - 4 for VIERA Link connection.
- For details, refer to [eHELP] (Search by Purpose > Functions > VIERA Link “HDAVI Control™”).
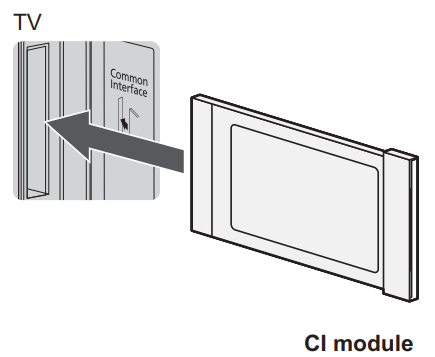
Common Interface
- Turn the TV off with Mains Power On / Off switch whenever inserting or removing the CI module.
- If a smart card and a CI module come as a set, first insert the CI module, then insert the smart card into the CI module.
- Insert or remove the CI module completely in the correct direction as shown.
- Normally encrypted channels will appear. (Viewable channels and their features depend on the CI module.)
If encrypted channels do not appear
[Common Interface] in [System Menu] ([Setup] menu) - There might be some CI modules in the market with older firmware versions that do not work fully interoperable with this new CI+ v1.4 TV. In this case, please contact your content provider.
- For details, refer to [eHELP] (Search by Purpose > Functions > Common Interface), read the manual of the CI module, or check with the content provider.
Be sure to remove the CI module card, etc. before repairing, transferring or discarding.
Cable arrangement
Fixing the cables using the cable clamp


- Fix cables as necessary.
- When using the optional accessory, follow the option’s assembly manual to fix cables.
Connecting Bluetooth devices
Registering Bluetooth devices
This TV supports Bluetooth communications. Bluetooth devices that have been registered (paired) with this TV can connect to (communicate with) this TV.
- When registering (pairing) a Bluetooth device with this TV, move the device within 50 cm of the TV.
- It is not possible to register (pair) Bluetooth devices that are not compatible with this TV.
- If a Bluetooth-enabled device that you have registered (paired) with this TV is then registered and used on another device, it may then be made unavailable for use with this TV. Register the device on this TV again if this occurs.
- You can register Bluetooth audio devices that support A2DP on this TV. Due to the characteristics of wireless technology, there will be some delay between the playback of video and audio.
- A maximum of 2 audio devices that support A2DP can be used simultaneously. To use 2 devices, set [Dual Audio] (Setup > Bluetooth Setup > Bluetooth Audio Settings) to [On], and then connect the second device.
- For details, refer to [eHELP] (Search by Purpose > Functions > Bluetooth devices).
Registering the remote control (supplied)
Either Bluetooth wireless technology or the infrared communication function can be used for the transmissions between the TV and the remote control. Since voice controls (p. 20) use Bluetooth wireless technology, the remote control needs to be registered (paired) with the TV.
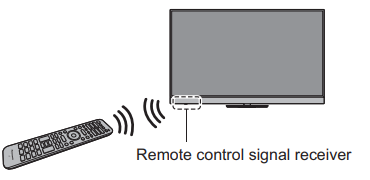
- When using the remote control for the first time after purchase, when you press any button while pointing the remote control at the remote control signal receiver with batteries inserted, the remote control is automatically registered (paired).
- When registering, face the remote control at the remote control signal receiver on the TV, within about 50 cm.
Registration may not be completed correctly if the batteries in the remote control are running low.
If registration fails
If registration (pairing) is not completed properly, try registering again.
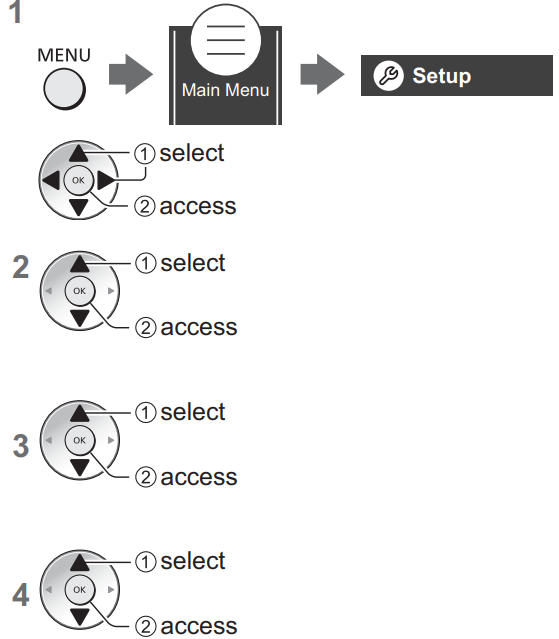
- Display the menu bar and select [Main Menu], and then select [Setup]
- Select the remote control setting menu in [System Menu]
Select [Pairing]
The registration screen is displayed, so follow the on-screen instructions to register.
For details, refer to [eHELP] (Search by Purpose > Functions > Voice Control > Settings).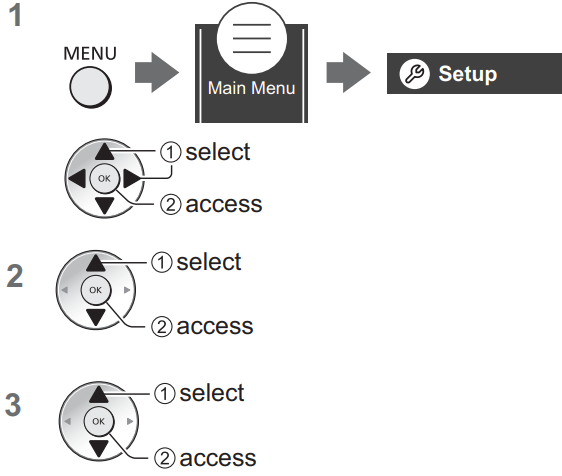
Note
- If the remote control is not registered (paired) with the TV, they communicate via infrared. Face the remote control at the TV’s remote control signal receiver for operation when infrared communication is used. Please note that voice controls will not be available.
- If the remote control is registered (paired) with the TV, they communicate via Bluetooth. You will not need to face the remote control at the TV’s remote control signal receiver when Bluetooth® communication is used. Please note, however, that you will need to face the remote control at the remote control signal receiver for operation when turning on or off the TV.
Identifying Controls
Remote Control
Remote Control
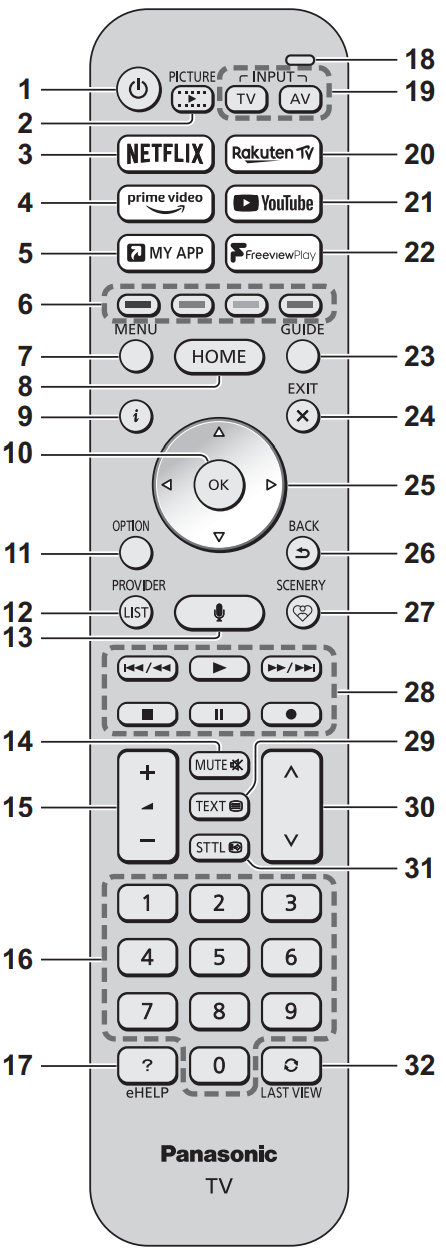
- [
 ]: Switches TV On or Off (Standby)
 - PICTURE
Changes the viewing mode. - NETFLIX
Accesses NETFLIX service directly. - Prime Video
Accesses Prime Video service directly. - MY APP
Assigns a favourite application. After setting, starts the application easily by pressing this button.
For details, refer to [eHELP] (Search by Purpose > Home > Apps). - Coloured buttons (red-green-yellow-blue)
Used for the selection, navigation and operation of various functions. - MENU
Displays the menu bar.
It is possible to access menus such as Picture, Sound, Network, Timer, Setup and Help by selecting [Main Menu] on the menu bar. - HOME
Displays [Home].
For details, refer to [eHELP] (Search by Purpose > Read first > Features > Home). - Information
Displays channel and programme information. - OK
Confirms selections and choices.
Press after selecting channel positions to quickly change channel. - Option menu
Displays optional settings. - PROVIDER/LIST
Starts operator application or displays channel list. - Voice control button
Used for the voice control function. - Sound Mute On / Off
- Volume Up / Down
- Numeric buttons
Changes channel and teletext pages.
When in Standby mode, switches TV on. - [eHELP]
Displays [eHELP] (Built-in Operating Instructions). - Microphone
Operates with the voice control microphone. - Input mode selection
TV - switches to Freeview / DVB / Analogue / Satellite.
AV - switches to AV input mode from the input selection list. - Rakuten TV
Accesses Rakuten TV service directly. - YouTube
Accesses YouTube service directly. - Freeview Play
Accesses Freeview Play service directly. - TV Guide
Displays Electronic Programme Guide. - EXIT
Returns to the normal viewing screen. - Cursor buttons
Makes selections and adjustments. - BACK
Returns to the previous menu / page. - SCENERY
Displays the currently selected scenery.
For details, refer to [eHELP] (Search by Purpose > Home > My Scenery). - Operations for contents, connected equipment, etc.
- Text service button
- Channel Up / Down
- Subtitles
Displays subtitles. - Last view
Switches to previously viewed channel or input mode.
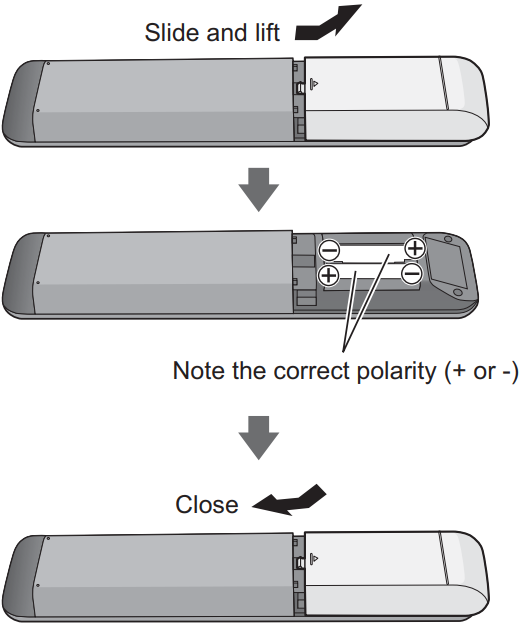
Installing / Removing batteries
Remote Control Mode setting
If another Panasonic TV is near the TV, the other TV may be operated when you use the remote control with infrared. Change the TV’s remote control mode to avoid simultaneous operation.
Remote control mode 1 is the default setting.
- Display the menu bar and select [Main Menu], and then select [Setup]
- Select the remote control setting menu in [System Menu]
- Select the remote control mode in [Mode Setting]
Select [Mode2]
- Press and hold [OK]/[MUTE]/[2]* (numeric buttons) buttons for at least 3 seconds, then press the OK button.
To set to [Mode1], set to “1”, to set to [Mode3], set to “3”, to set to [Mode4], set to “4”. - When using the remote control mode 1, set the TV and the remote control to mode 1 respectively.
Remote Control Mode Error
When the TV receives a signal with a different remote control mode to the mode that is set on the TV five times, Remote Control Mode Error is displayed.
- Follow the on-screen instructions.
- When all settings are initialised by performing [Shipping Condition], the TV’s remote control mode is reset to mode 1. If you cannot operate the TV with your remote control, press and hold [OK]/[MUTE]/[1] buttons for at least 3 seconds to set the remote control to mode 1.
Remote Control Mode Reset
You can make a forced reset of the TV’s remote control mode to change to mode 1.
- Get another Panasonic remote control whose remote control mode has been set to 1
- Point the remote control at the TV, then press the MUTE button for about 15 seconds
- When a screen asking you to confirm the forced reset of the remote control mode is displayed, press the MUTE button again for about 3 seconds
Voice controls
The TV recognizes speech when you talk into the voice control microphone, enabling you to perform operations such as changing TV channels, adjusting the volume, searching for programmes, and doing internet searches.
- If the remote control is not registered (paired) with the TV, register (pair) the remote control.
- The Google Assistant function may be in preparation and the function will be available after the preparation is complete. The Google Assistant function may not be available depending on the country, area or broadcaster.
- The TV needs to be connected to the internet in order to perform searches, etc.
- The effective range for voice controls depends on the viewing environment.
- The operation may not be correct depending on the type of voice the person has and the way they speak, as well as the surrounding environment and conditions.
- When other Bluetooth devices are connected at the same time, voice controls may not work properly depending on the connected devices.
Selecting the voice service (when it is not selected)
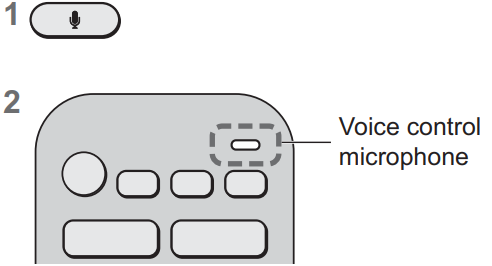
- Press
 the voice control button
 Select the voice service for voice control function.
- Only one voice service can be used with the TV.
- The voice service selection screen can also be displayed via [Voice Control] on the menu bar.
Controlling with your voice
- Press the voice control button
- Speak into the voice control microphone
- For information about settings and operations for voice controls, refer to [eHELP] (Search by Purpose > Functions > Voice Control).
- Functions of voice control and voice services are subject to change without notice.
Indicator / Control panel
When pressing 4, 5, 6 buttons, the control panel guide appears on the right side of the screen for 3 seconds to highlight which button has been pressed.
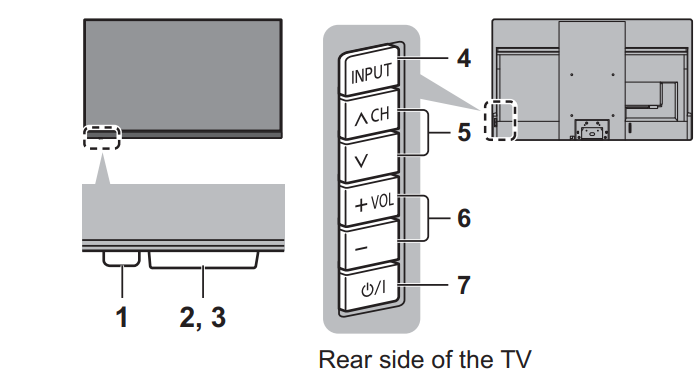
- Power LED
Red: Standby
Green: On
Depending on the ambient brightness, adjusts the brightness of LED to easy-to-view levels automatically.
Orange: Standby with some functions (recording, etc.) active or panel maintenance in progress- The LED blinks when an infrared signal is received from the remote control.
- Ambient sensor
- Senses brightness to adjust picture quality when [Ambient Sensor] in the Picture menu is set to [On].
- Remote control signal receiver (for infrared communication)
- Do not place any objects between the TV remote control signal receiver and remote control.
- Input mode selection
- Press repeatedly until you reach the desired mode.
Menu - Press and hold for about 3 seconds to display the menu bar.
- OK (when in the menu system)
- Press repeatedly until you reach the desired mode.
- Channel Up / Down
- Cursor Up / Down (when in the menu system)
- Volume Up / Down
- Cursor Left / Right (when in the menu system)
- Mains power On / Off switch
- Use to switch the mains power.
- To turn Off the apparatus completely, you must pull the mains plug out of the mains socket.
- [
 ]: Standby / On
Panel maintenance
Be sure to turn the TV off with the remote control to perform the panel maintenance. During the panel maintenance, the LED turns to orange. During panel maintenance, avoid touching and exerting any pressure on the screen. (e.g. wiping the screen, etc.)
There are two types of the maintenance as follows.
- Normal maintenance automatically starts, and it takes approx. 10 minutes.
- Regular maintenance takes approx. 80 minutes.
- When regular maintenance is necessary, the message appears on the screen after turning the TV off with the remote control. Follow the on-screen instructions.
- During the panel maintenance, a white horizontal line appears on the screen for a while. This is not a malfunction.
For information about panel maintenance, refer to [eHELP] (Search by Purpose > Watching > For best picture > Screen Settings)
Description
The Panasonic 65-inch OLED Smart TV TX-65JZ1000B offers a cinematic experience with its OLED panel, which delivers perfect blacks and infinite contrast. The TV supports multiple HDR formats, including HDR10+ and Dolby Vision, ensuring that you get the best possible picture quality. The sound system, powered by Dolby Atmos, provides an immersive audio experience that complements the visuals perfectly. With its sleek design and slim profile, this TV is not only a technological marvel but also a stylish addition to any room.
Setup Guide
To set up your Panasonic,
- Start by carefully unpacking the TV and placing it on a sturdy TV stand or mounting it on the wall using the provided mounting kit.
- Connect the power cord and turn on the TV. Follow the on-screen instructions to select your language and country.
- Connect to your Wi-Fi network to access smart features. Use the HDMI ports to connect your devices such as Blu-ray players, gaming consoles, or soundbars.
- Finally, configure your preferred settings and start enjoying your new TV.
First-time Auto Setup
When the TV is turned on for the first time, it will automatically search for available TV channels and give options to set up the TV.
- These steps are not necessary if the setup has been completed by your local dealer.
- Please complete connections (p. 13 - 16) and settings (if necessary) of the connected equipment before starting Auto Setup. For information about the settings for the connected equipment, read the manual of the equipment.
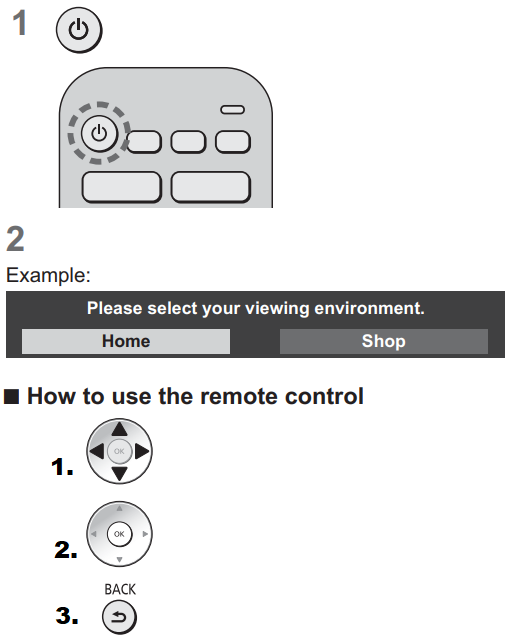
- Plug the TV into a live mains socket and turn the power on
Takes a few seconds to be displayed. Select the following items
Set up each item by following the on-screen instructions.
Example:
How to use the remote control- Move the cursor
- Access the item / store the settin
- Return to the previous item (if available)
Select your country
Select [Home]
Select [Home] for use in a home viewing environment.- [Shop] is for shop display.
- To change the viewing environment later on, the set will need to have all settings initialised by accessing [Shipping Condition].
Set up the network connection
Tick the TV signal mode to tune, and then select [Start Auto Setup]
[Satellite Antenna Setup]
Ensure the satellite connections are completed (p. 14) and select the tuner mode ([Dual Tuner] / [Single Tuner]).
Select your region (UK ONLY)
Space Tune Adjustment
Auto Setup is now complete and the TV is ready for viewing. If tuning has failed check the Satellite cable, RF cable, and the network connection, and then follow the on-screen instructions.
Note
- The TV goes into Standby mode when no operation is performed for 4 hours if [Auto Standby] in the Timer menu is set to [On] (factory setting).
- The TV goes into Standby mode when no signal is received and no operation is performed for 10 minutes if [No signal Power off] in the Timer menu is set to [On] (factory setting).
- To retune all channels
[Auto Setup] in [Tuning Menu] ([Setup] menu) - To add the available TV signal mode later
[Add TV Signal] in [Tuning Menu] ([Setup] menu) - To initialise all settings
[Shipping Condition] in [System Menu] ([Setup] menu)
Watching TV Panasonic
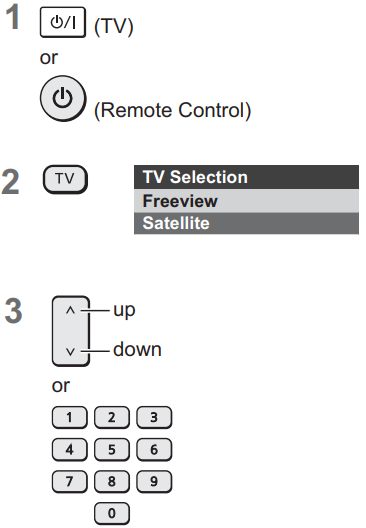
- Turn power on
- Select the mode
Selectable modes vary depending on the stored channels and selected country. - Select a channel
DVB and Satellite channel position begin from number 1 upward. Analogue channel position numbers are in the 0 - 99 range.
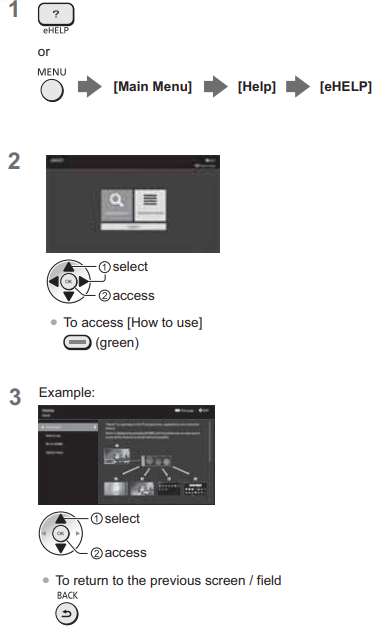
How to Use eHELP
[eHELP] is the detailed operating instructions built into the TV, and gives a more detailed explanation for a better understanding of the operation of each feature.
- Display [eHELP]
If the [eHELP] has been accessed previously since the TV was turned on, the confirmation screen is displayed to select whether to go to the [First page] or to the [Last viewed page]. - Select the menu
- Select the item
Maintenance
First, remove the mains plug from the mains socket.
Display panel, Cabinet, Pedestal
Regular care:
Gently wipe the surface of the display panel, cabinet, or pedestal by using a soft cloth to remove dirt or fingerprints.
For stubborn dirt:
- First, clean the dust from the surface.
- Dampen a soft cloth with clean water or diluted neutral detergent (1 part detergent to 100 parts water).
- Wring out the cloth firmly. (Please note, do not let the liquid enter the TV inside as it may lead to product failure.)
- Carefully wipe moisten and wipe away the stubborn dirt.
- Finally, wipe away all the moisture.
Caution
- Do not use a hard cloth or rub the surface too hard, otherwise this may cause scratches on the surface.
- Take care not to subject the surfaces to insect repellent, solvent, thinner, or other volatile substances. This may degrade surface quality or cause peeling of the paint.
- The surface of the display panel is specially treated and may be easily damaged. Take care not to tap or scratch the surface with your fingernail or other hard objects.
- Do not allow the cabinet and pedestal to make contact with a rubber or PVC substance for a long time. This may degrade surface quality.
Mains plug
Wipe the mains plug with a dry cloth at regular intervals. Moisture and dust may cause fire or electrical shock.
Troubleshooting
Before requesting service or assistance, please follow these simple guides to solve the problem.
It takes several seconds to display the image after turning the TV on
- When turning the TV on, the panel adjustment is performed. This is not a malfunction.
The TV does not switch on
- Check that the mains lead is plugged into the TV and the mains socket.
- The fuse in the mains plug may have blown. Replace it with one of an identical rating.
The TV goes into Standby mode
- Auto power standby function is activated.
The remote control does not work or is intermittent
- Are the batteries installed correctly?
- Has the TV been switched on?
- The batteries may be running low. Replace them with new ones.
- Point the remote control directly at the TV’s remote control signal receiver (within about 7 m and a 30-degree angle of the signal receiver).*
- Situate the TV away from sunlight or other sources of bright light so they do not shine on the TV’s remote control signal receiver.*
- Is the remote control mode wrong?
- If you are trying to use voice controls, ensure the remote control is registered (paired) with the TV.
No image is displayed
- Check that the TV is turned on.
- Check that the mains lead is plugged into the TV and the mains socket.
- Check that the correct input mode is selected.
- Is [Luminance Level], [Contrast], [Brightness], or [Colour] in the Picture menu set to the minimum?
- Check all required cables and connections are firmly in place.
An unusual image is displayed
- This TV has a built-in Self Test to diagnose picture or sound problems.
[TV Self Test] ([Help] menu) - Turn the TV off with the Mains power On/Off switch, then turn it on again.
- If the problem persists, initialise all settings.
[Shipping Condition] in [System Menu] ([Setup] menu)
The image or sound from external equipment is unusual when the equipment is connected via HDMI
- Set [HDMI Auto Setting] ([Setup] menu) to [Mode1].
No sound is produced from the connected HDMI equipment
- Set the audio output format of the connected HDMI equipment to PCM.
The voice control function does not work
- If the remote control is not registered (paired) with the TV, register (pair) the remote control.
- Check the network connections and settings.
Parts of the TV become hot
- Parts of the TV may become hot. These temperature rises do not pose any problems in terms of performance or quality.
When pushed with a finger, the display panel moves slightly and makes a noise
- There is a small gap around the panel to prevent damage to the panel. This is not a malfunction.
About the inquiry
- Please contact your local Panasonic dealer for assistance.
- If you make an inquiry from a place where this TV is not present, we cannot answer questions that require visual confirmation of connections, phenomena, etc., of the TV itself.
LED turns to orange
- Panel maintenance may be in progress.
- The LED turns to orange again in standby mode if the TV is turned on/off before the panel maintenance is completed.
(Be sure to turn the TV off with the remote control to perform the panel maintenance.) - During panel maintenance, avoid touching and exerting any pressure on the screen (e.g., wiping the screen).
The panel maintenance notification is displayed when turning the TV off with the Standby On/Off switch of the TV’s remote control
- Perform the panel maintenance. Select [Turn the TV off now] and press the OK button to start the panel maintenance.
- The panel maintenance is interrupted when selecting [Don’t start panel maintenance this time] or turning the TV off while the notification is displayed.
- The notification is displayed again when turning the TV off with the Standby On/Off switch of the TV’s remote control next time.
A white horizontal line appears in Standby mode
- A white horizontal line may appear on the screen for a while to adjust the panel. This is not a malfunction.
How do I re-tune my Freeview TV?
To get the most up-to-date service from Freeview, customers need to retune from time to time. Re-tuning only takes a few minutes. If you have any problems, check the Operating Instructions, ask a friend or family member to help, or visit your local electrical retailer, contact your local Panasonic dealer, or visit http://www.freeview.co.uk/retune
Re-tuning Steps
- Press the TV button to select DVB mode.
- Press the MENU button to display the menu bar.
- [Main Menu] > [Setup] > [DVB Tuning Menu] > [Auto Setup]
Please note: Most digital TV recorders will keep your original recordings after a re-tune, but you will need to reset any future recordings.
Panasonic 65-inch OLED Pros & Cons
Pros
- Excellent picture quality with OLED panel
- Support for multiple HDR formats
- Immersive audio with Dolby Atmos
- Smart features with easy access to streaming services
- Sleek and slim design
- High refresh rate for smooth motion
Cons
- High price point compared to other TVs in the market
- Limited availability of certain smart features in some regions
- No built-in gaming console
- May require periodic software updates
Customer Reviews
Customers have praised the Panasonic 65-inch OLED for its outstanding picture quality and immersive sound. Many have noted that the TV's design is both elegant and durable. However, some users have mentioned that the price is steep and that the smart features could be more intuitive. Common complaints include occasional software glitches and the need for frequent updates.
Faqs
What is the refresh rate of the Panasonic 65-inch OLED?
Does the Panasonic support voice control?
What HDR formats does the Smart TV support?
How do I connect my devices to the Smart TV?
How do I troubleshoot common issues with my Panasonic 65-inch?
Does the Panasonic TV come with built-in speakers?
Is the Smart TV compatible with gaming consoles?
How do I update the software on my Panasonic TV?
What is the power consumption of the 65-inch OLED Smart TV?
Leave a Comment
