Panasonic Sound Slayer Speaker HTB01 | Operating Instructions
Content
Introducing the Panasonic Sound Slayer Speaker HTB01
The Panasonic Sound Slayer Speaker HTB01 is a game-changer in the world of audio technology. Designed especially for gamers, this speaker promises to deliver a sound experience that will make you feel like you're in the middle of the action. With a sleek and compact design, this speaker is perfect for any gaming setup. The estimated price of the Panasonic Sound Slayer Speaker HTB01 is around $250, and it is set to launch in the market in the second quarter of 2023.
Accessories
Check the supplied accessory before using this system.
1 Remote control (with a battery)
(N2QAYC000133)1 AC power supply cord
(K2CA2CA00025)1 AC adaptor
(TXH0016AA)
Specifications
GENERAL
Power supply
DC 19.5 V 3.34 A(AC adaptor)
AC 100 V to 240 V, T1.4 A, 50/60 HzPower consumption
Approx. 24 WPower consumption in standby mode When “Network Standby”* is “OFF”
Approx. 0.22 WWhen “Network Standby”* is “ON”
Approx. 0.25 WDimensions (WkHkD)
Approx. 430 mm (16 15/16″) k 52 mm (2 1/16″) k 130 mm (5 1/8″)(Including protrusion)
Approx. 431 mm (17″) k 52 mm (2 1/16″) k 132 mm (5 1/4″) Mass (Weight) Approx. 1.8 kg (4.0 lbs)Operating Condition
Operating temperature range
0 C to r 40 degree C (r32 oF to r104 oF)Operating humidity range
35 % to 80 % RH (no condensation)
AMPLIFIER SECTION
RMS OUTPUT POWER (non-simultaneous drive)
Total RMS OUTPUT POWER
80 WFRONT SPEAKER (L/R)
25 Wi25 W (1 kHz, T.H.D. 10.0 %, 6 ≠, 20 kHz LPF)SUBWOOFER
30 W (100 Hz, T.H.D. 10.0 %, 3 ≠, 20 kHz LPF)
FTC OUTPUT POWER
FRONT SPEAKER (L/R)
4 Wi4 W (1 kHz, T.H.D. 1.0 %, 6 ≠, 20 kHz LPF)SUBWOOFER
21 W (100 Hz, T.H.D. 1.0 %, 3 ≠, 20 kHz LPF)
Bluetooth SECTION
Version Bluetooth Ver. 2.1+EDR
Wireless Equipment Classification Class 1
Supported Profile A2DP
Supported Codec SBC
Frequency Band 2.4 GHz band FH-SS
Operating Distance Approx. 10 m (33 ft) Line of sight
FORMAT SECTION
HDMI [GAME/AV]
LPCM (Max 7.1 ch)
Dolby Digital, Dolby TrueHD,
Dolby Digital Plus, Dolby Atmos,
DTS, DTS® Digital Surround
DTS Digital Surround™ | ES Discrete 6.1,
DTS Digital Surround™ | ES Matrix 6.1,
DTS 96/24,
DTS-HD High-Resolution Audio,
DTS-HD Master Audio, DTS® Express,
DTS:X
[TV (ARC)] LPCM (2 ch)
Dolby Digital, Dolby Digital Plus,
Dolby Atmos (Dolby Digital Plus),
DTS, DTS Digital Surround,
DTS Digital Surround | ES Discrete 6.1,
DTS Digital Surround | ES Matrix 6.1,
DTS 96/24
Optical digital input
LPCM (2 ch)
Dolby Digital,
DTS, DTS Digital Surround,
DTS Digital Surround | ES Discrete 6.1,
DTS Digital Surround | ES Matrix 6.1,
DTS 96/24
Sampling frequency HDMI [GAME/AV]
32 kHz, 44.1 kHz, 48 kHz, 88.2 kHz, 96 kHz,
176.4 kHz, 192 kHz
[TV (ARC)]
32 kHz, 44.1 kHz, 48 kHz, 88.2 kHz, 96 kHz
Optical digital input
32 kHz, 44.1 kHz, 48 kHz, 88.2 kHz, 96 kHz
“Network Standby” means “Bluetooth” and “VIERA Link” (Control for HDMI function). When the other connected devices are turned off.
Design and specifications are subject to change without notice.
Mass and dimensions are approximate.
Total harmonic distortion is measured by a digital spectrum analyzer.
This unit supports “HDAVI Control 5” function
Panasonic Sound Slayer Speaker HTB01 Control Reference
This system (Front / Sides)
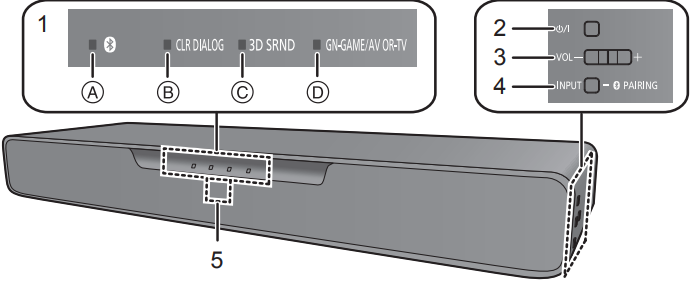
LED indicators
The currently-selected device is indicated by the lighting of the corresponding indicator.
(A) (Bluetooth) indicator (lights up blue)
(B) CLR DIALOG indicator (lights up green)
(C) 3D SRND indicator (lights up green)
(D) GN-GAME/AV OR-TV indicatorTV: lights up orange (OR)
GAME/AV: lights up green (GN)
Standby/on switch (
 )
)
Press to switch the unit from on to standby mode or vice versa. In standby mode, the unit is still consuming a small amount of power.Adjust the volume of this system (→ 5)
[INPUT / –
PAIRING] buttonSelects the connected device (The device changes each time this button is pressed)
Registers Bluetooth devices
Remote control signal sensor
Distance: Within approx. 7 m (23 ft) directly in front
Angle: Approx. 20e up and down and approx. 30e left and right
This system (Rear)
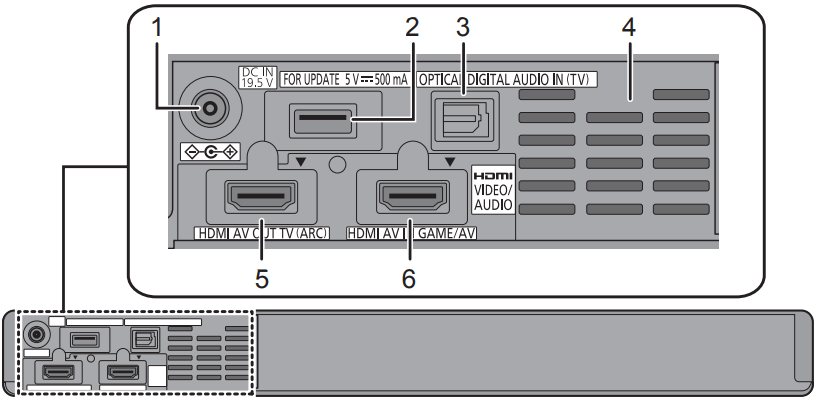
DC IN (19.5 V) terminal
Firmware update (FOR UPDATE 5 V 500 mA) terminal*
OPTICAL DIGITAL AUDIO IN (TV) terminal
Ventilation holes
HDMI AV OUT (TV (ARC)) terminal
HDMI AV IN (GAME/AV) terminal
Note about firmware updates
Use the firmware update terminal to update the version of this system through a USB memory device. (Not used for normal operations.) For more details about version updates, refer to the support site below. https://panasonic.jp/support/global/cs/ (This site is in English only.)
Remote control
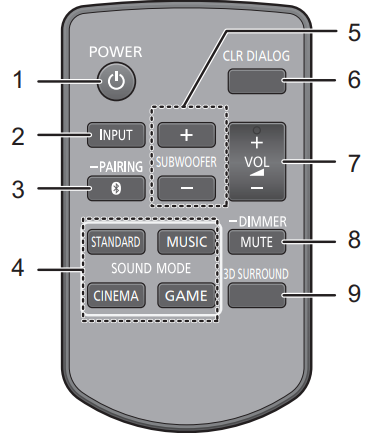
- Turn this system on or off
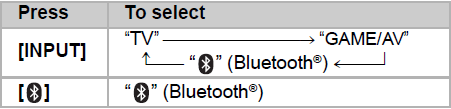
- Select the input source “TV” -------------------------------------# “GAME/AV” ^----------- “ ” (Bluetooth®) !--------}
- Select the Bluetooth device as the source
- Select the sound mode
Adjust the bass (adjustable in four steps)
- Turn CLR DIALOG (CLEAR-MODE DIALOG) function on or off
- Adjust the volume of this system
- Mute the sound
- If press and hold this button, switch the brightness of the LED indicators (Dimmer)
- Turn 3D SRND (3D SURROUND) function on or off
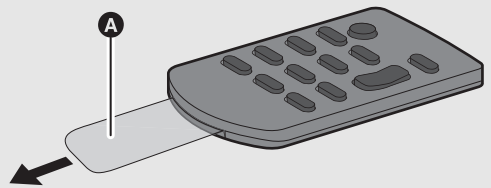
Before using for the first time
Remove the insulation sheet (A).
To replace a button-type battery
Battery type: CR2025 (Lithium battery)
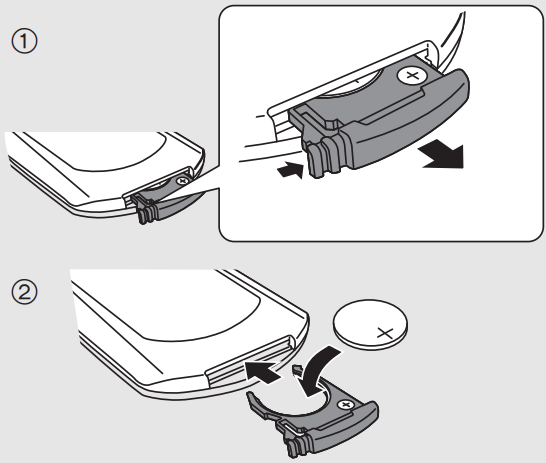
Set the button-type battery with its (i) mark facing upward.
The symbols on the supplied remote control represent the following:
Warning (refer to Operating Instructions for the button cell battery)
Connections
Turn off all equipment before connection and read the appropriate operating instructions.
Do not connect the AC power supply cord for this system to the socket outlet until all connections have been completed.
Purchase an HDMI cable rated as “High-Speed HDMI Cable”. Operation is not possible with a cable that does not meet the HDMI standards.
This system supports HDR (High Dynamic Range) pass-through of 4K (50p/60p) signals.
An HDMI cable that supports 18 Gbps is required to enjoy 4K (50p/60p) HDR content.
This system supports 3D content.
When selecting this system from a PC, etc., select “SOUNDSLAYER” as the audio output device.
Do not place this system directly on top of another device, such as a Blu-ray disc recorder.
Keep magnetized items away. Magnetized cards, watches, etc., can be damaged if placed too close to this system.
When connecting with a PC monitor that has a resolution other than Full HD or 4K (WQHD, etc.), connect directly to the PC using a DP cable (A) (optional).
The unit is in the standby condition when the AC adaptor is connected. The primary circuit is always “live” as long as the AC adaptor is connected to an electrical outlet.
This system consumes a small amount of AC power (? 9) even when it is turned off. In the interest of power conservation, if you will not be using this system for a long time, unplug it from the household power socket.
If there is no signal for 20 minutes, this system automatically switches to standby. (Auto Power Down) This function can be turned off. For details, refer to the “Owner’s Manual (PDF format)”.
The symbols on the supplied AC adaptor represent the following:

Basic connection
When connecting with a PC monitor that has a resolution other than Full HD or 4K (WQHD, etc.), connect directly to the PC using a DP cable (A) (optional).
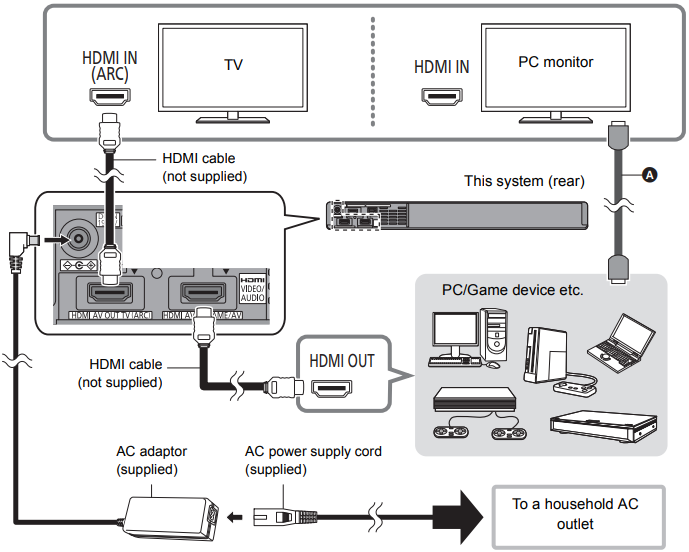
Connection with the TV
Verify if the TV’s HDMI terminal is labelled “HDMI (ARC)”.
What is ARC?
ARC is an abbreviation of “Audio Return Channel”, also known as HDMI ARC. It refers to one of the HDMI functions. When you connect the terminal labelled “ARC” and this system, TV pictures and sound can be enjoyed with a single HDMI cable.
Labelled “HDMI (ARC)”
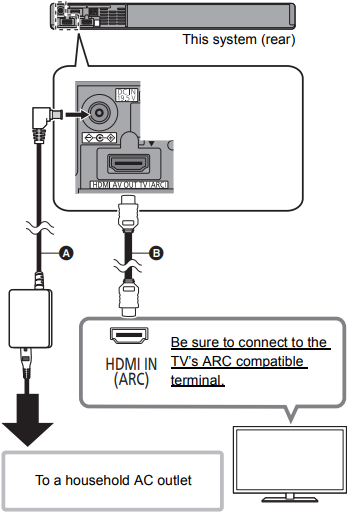
- A AC adaptor (supplied)
- B HDMI cable (not supplied)
Not Labelled “HDMI (ARC)”
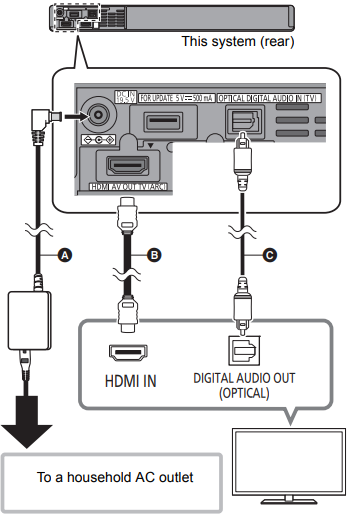
- A AC adaptor (supplied)
- B HDMI cable (not supplied)
- C Optical digital audio cable (not supplied)
Connection with players, etc., supporting HDR10+ and Dolby Vision
This system does not support HDR10+ and Dolby Vision. When connecting to a player, TV, etc., that supports HDR10+ or Dolby Vision, use the following connection.
- The name of the terminal may be different depending on the device that supports HDR10+. Refer to the operating instructions of the supporting device for details.
- If you connect this system and are then unable to view Netflix, use the following connection.
VIERA Link does not work when you use this connection.
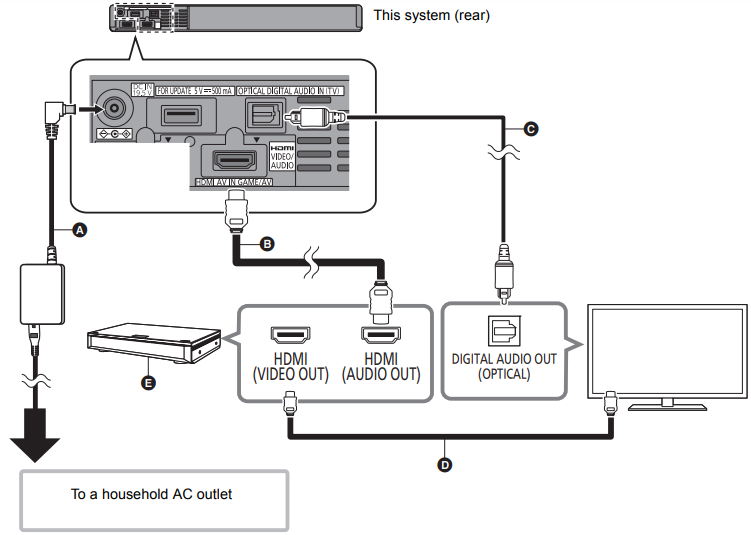
- A AC adaptor (supplied)
- B HDMI cable (not supplied)
- C Optical digital audio cable (not supplied)
- D HDMI cable (not supplied)
- E Player, etc., supporting HDR10+
Using this system
Preparation
Turn on the TV and/or connected device.
Press [
 ] to turn on this system.
Select the source.
When “![]() ” is selected as the source
” is selected as the source
On the Bluetooth device
- Select this system as the output source of the connected Bluetooth® device and start the playback.
- When “GAME/AV” is selected as the source On the TV and the connected device:
- Select the TV’s input for this system and start the playback on the connected device.
To mute the sound
Press [MUTE].
- While muting, the CLR DIALOG indicator, 3D SRND indicator, and GN-GAME/AV OR-TV indicator blink simultaneously.
- To cancel, press the button again or adjust the volume.
- Muting is canceled if this system is turned off.
To adjust the volume of this system
Press [ +VOL -].
- Volume range: 0 to 100
- Each input mode retains a separate volume setting.
- When adjusting the volume, the LED indicators blink from left to right (i) or from right to left (j).
- When you reach either the maximum level or the minimum level, the CLR DIALOG indicator, 3D SRND indicator, and GN-GAME/AV OR-TV indicator blink 3 times.
If this system does not operate as expected, returning the settings to the factory preset may solve the problem. (20, “To return to the factory defaults.”)
- If there is sound coming out of the TV’s speakers, reduce the volume of the TV to its minimum.
- The maximum volume levels of the TV and this system may differ.
- Switch the TV’s input to the TV tuner to select the TV as the video and audio source while playing the device connected to the HDMI AV OUT (TV (ARC)) terminal. In addition, when VIERA Link (HDMI) is turned off, switch the input of this system to TV mode.
- To select the TV as the audio source while playing the device connected to the OPTICAL DIGITAL AUDIO IN (TV) terminal, switch the input of the TV to the TV tuner.
- When playing back equipment connected to the HDMI AV IN terminal, to switch audio/video to the TV, switch input on the TV to the TV tuner. If VIERA Link (HDMI) (13) is not enabled, also switch the input of this system to TV.
Bluetooth Connection
By using the Bluetooth connection, you can listen to the sound from the Bluetooth audio device from this system wirelessly. Refer to the operating instructions of the Bluetooth device for further instruction on how to connect a Bluetooth device.
Preparation
Turn on the Bluetooth feature of the device and place the device near this system.
Bluetooth pairing
Press [
] to select “”.If the “
” indicator flashes quickly, go to step 3.
Press and hold [
] until the “” indicator flashes quickly.If the “
” indicator flashes slowly, repeat step 2.
Select “SOUNDSLAYER” from the Bluetooth device’s Bluetooth menu.
If prompted for the passkey on the Bluetooth device, enter “0000”.
Once the Bluetooth device is connected, the “
” indicator stops flashing and lights up.
You can register up to 8 devices with this system. If a 9th device is paired, the device that has not been used for the longest time will be replaced.
Connecting a paired Bluetooth device
Press [
] to select “”.If the “
” indicator lights, a Bluetooth device is already connected with this system. Disconnect it. (→ below)
Select “SOUNDSLAYER” from the
Bluetooth device’s Bluetooth menu.
Disconnecting a Bluetooth device
Press and hold [![]() ] until the “
] until the “![]() ” indicator flashes.
” indicator flashes.
This system can only be connected to one device at a time.
Linked operations with the TV (VIERA Link “HDAVI ControlTM”)
What is VIERA Link “HDAVI Control”?
VIERA Link “HDAVI Control” is a convenient function that offers linked operations of this system, and a Panasonic TV (VIERA) under “HDAVI Control”. You can use this function by connecting the equipment with an HDMI cable. See the operating instructions for connected equipment for operational details.
What you can do with VIERA Link “HDAVI Control”
To make sure that the audio is output from this system, turn this system on by using the TV’s remote control and selecting home theater from the speaker menu of VIERA Link menu. The availability and function of the settings may vary depending on the TV. Refer to the operating instructions for the TV for details.
Speaker control
You can select whether audio output is from this system or the TV speakers by using the TV menu settings.
Home theater
This system is active.
- When this system is in standby mode, changing the TV speakers to this system in the VIERA Link menu will automatically turn this system on.
- You can control the volume setting of this system using the volume or mute button on the TV remote control.
- If you turn off this system, TV speakers will be automatically activated.
- Audio will automatically be output from this system if the TV is compatible to VIERA Link “HDAVI Control 4” or later.
TV
TV speakers are active.
Automatic input switching
When the following operations are performed, this system will automatically change the input to the corresponding source.
- When play starts on an HDMI connected device.*
- When the TV input is changed..
* If the speaker output setting on the TV is set to this system, the TV and this system turn on automatically (Power on link).
Power off link
When the TV is turned off, this system also turns off automatically. (This function does not work when Bluetooth® is the source.)
Automatic lip-sync function
(for HDAVI Control 3 or later)
Delay between audio and video is automatically adjusted by adding time-lag to the audio output, enabling you to enjoy smooth audio for the picture. The delay information is automatically set if the TV is compatible to VIERA Link “HDAVI Control 3” or later and the VIERA Link is set to on.
- VIERA Link “HDAVI Control”, based on the control functions provided by HDMI which is an industry standard known as HDMI CEC (Consumer Electronics Control), is a unique function that we have developed and added. As such, its operation with other manufacturers’ equipment that supports HDMI CEC cannot be guaranteed.
- This unit supports “HDAVI Control 5” function.
“HDAVI Control 5” is the standard for Panasonic’s HDAVI Control compatible equipment. This standard is compatible with Panasonic’s conventional HDAVI equipment. - Please refer to individual manuals for other manufacturers’ equipment supporting VIERA Link function.
Sound menu of Panasonic Sound Slayer Speaker HTB01
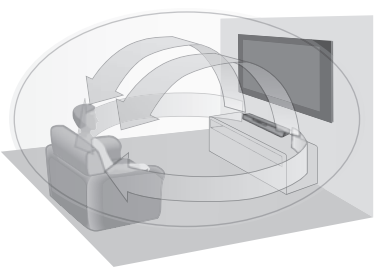
3D SURROUND
This system not only pushes the sound field out to the left and right, but also upwardly to help realise an immersive sound effect. e.g., Impression of the 3D surround effect
Press [3D SURROUND].

- The GN-GAME/AV OR-TV indicator (green) blinks twice and the 3D SURROUND function turns off.
- To turn the 3D SURROUND function on Press [3D SURROUND].
- After the CLR DIALOG indicator and GN-GAME/AV OR-TV indicator (green) blink twice, the 3D SRND indicator§ lights and the 3D SURROUND function turns on.
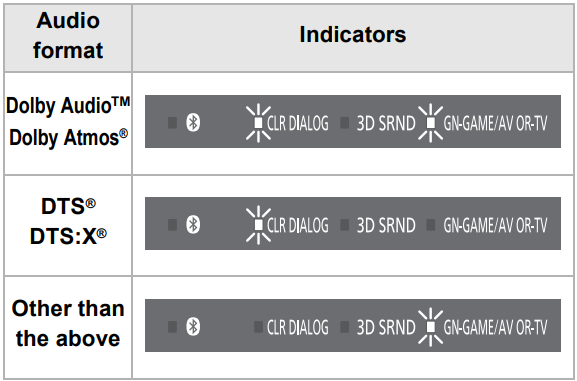
- The indicator lights green when playing back object-based audio format content with Dolby Atmos or DTS:X. The indicator lights orange when playing back with 3D SURROUND effects added to content other than the above, including TV broadcasts, using Dolby Atmos or DTS Virtual: XTM technology.
NOTE
- The surround effect depends on the source.
- 3D SURROUND effects do not work on high-resolution sources of 88.2 kHz or greater. You can play back the source as is.
(When you press [3D SURROUND], the CLR DIALOG indicator (orange) and the GN-GAME/AV OR-TV indicator (orange) blink twice. - When the 3D SRND indicator does not light green even when playing back object-based audio format content with Dolby Atmos or DTS:X, check whether the digital audio output setting of the connected device is “Auto” or “Bitstream”. (When using a Panasonic Blu-ray Disc recorder/player)
CLEAR-MODE DIALOG
You can listen to audio with a sense of coherence with the video because the audio is heard from the direction of the TV screen for sources such as dialogue from dramas and commentary from sports broadcasts. You can also make the dialogue easier to hear when enjoying at a low volume, such as late at night when you are concerned about disturbing others with noise, not just at normal volume levels.
(Factory default: Off)
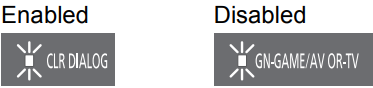
Press [CLR DIALOG].

- The CLR DIALOG indicator and the GN-GAME/AV OR-TV indicator (green) blink twice and CLEAR-MODE DIALOG turns on.
- To turn CLEAR-MODE DIALOG off Press [CLR DIALOG].
- The GN-GAME/AV OR-TV indicator (green) blinks twice and CLEAR-MODE DIALOG turns off.
SOUND MODE
Select the sound mode to suit the TV program or connected equipment.
To select a sound mode
You can change the sound mode by pressing the appropriate button.
Confirm that the 3D SRND indicator and the GN-GAME/AV OR-TV indicator (green) blink twice.

STANDARD
Best suited for dramas and comedy shows.MUSIC
Enhances the sound of musical instruments and songs.
This mode is best for high-resolution sound sources.
CINEMA
Produces three-dimensional sound unique to movies.
GAME
Provides a sound field that matches gaming in a personal environment.
Offers three different modes tailored to game genres.
Switching the [GAME] mode
When you press [GAME], the LED indicators blink and the current mode is displayed. When you press [GAME] again during the setting, the 3D SRND and GN-GAME/AV OR-TV indicators blink twice and the setting changes in the following order:
GAME1 # GAME2 # GAME3 # GAME1 (repeats)
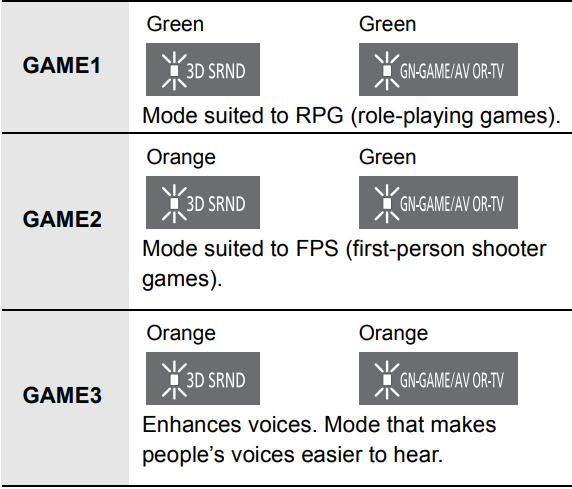
The setting is maintained until it is changed again.
Audio format
Other settings that may be needed
The following operations are not usually required to enjoy the TV, films, and music when using this system. Change the settings as required by the way this system is used. When using the remote control, face it at the remote control signal sensor.
Remote control code
(Factory default: Remote control code 1)
If other Panasonic audio products are operated inadvertently by the remote control of this system, set this system and the remote control to “Remote control code 2” with the following procedure.
- Turn off the other Panasonic audio product.
- Press and hold [VOL j] and [MUTE] on the remote control at the same time for 4 or more seconds.
Confirm that all the LED indicators blink once (about 10 seconds).

The remote control code switches to 2.
To return the remote control code to 1
- Press and hold [VOL + ] and [MUTE] on the remote control at the same time for 4 or more seconds.
- All the LED indicators blink once (about 10 seconds) and the remote control code switches to 1.
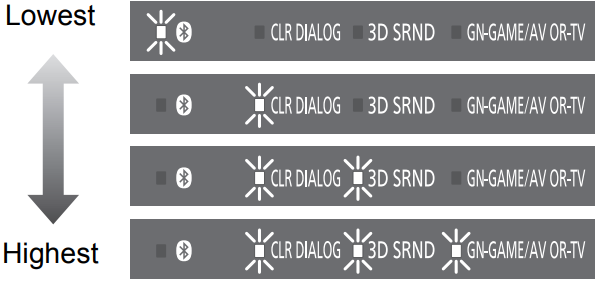
Automatic power off function (Auto Power Down)
(Factory default: Enabled)
This function turns off this system automatically when it has been left for 20 minutes or more without an input signal and without any operations being performed. Use the following procedure to switch between enable and disable.
Press and hold [VOL j] on this system and [ + SUBWOOFER] on the remote control at the same time for 4 or more seconds. (The LED indicators indicate the current mode)

- Press [+ SUBWOOFER ] again while the current status is being indicated (about 20 seconds).
The setting changes each time you press the button. The display returns to the normal one about 20 seconds after the operation.
Turning off the VIERA Link (HDMI) (HDAVI Control) function
(Factory default: On)
When operations become unstable when HDMI compatible devices from other manufacturers are connected, use the following procedure to make settings so that VIERA Link (HDMI) (13) is not used.
- Press and hold [VOL j] on this system and [MUTE] on the remote control at the same time for 4 or more seconds.
Confirm that all the LED indicators blink once.

- The ARC function no longer works when you make the settings so that VIERA Link (HDMI) is not used. Make sure you connect with an optical digital audio cable (optional) to listen to the audio from the TV in this case.
- To make the VIERA Link (HDMI) function to work again, return the settings of this system to the factory defaults.
Bluetooth Standby
(Factory default: Enabled)
When this function is enabled, this system automatically turns on when a Bluetooth connection is established from a paired Bluetooth® device.
Press and hold [VOL -] on this system and [SUBWOOFER -] on the remote control at the same time for 4 or more seconds.
(The LED indicators indicate the current mode)
- Press [SUBWOOFER -] again while the current status is being indicated (about 20 seconds).
The setting changes each time you press the button. The display returns to the normal one about 20 seconds after the operation.
Switching the Bluetooth communication mode
(Factory default: Mode 2)
You can switch the Bluetooth communication mode. Using the following procedure, you can switch between the default Mode 2 (priority given to sound quality) and Mode 1 (priority given to connectivity).
- Set the input of this system to “ ” (Cancel connection of the device.)
- Press and hold [VOL -] on this system and [STANDARD] on the remote control at the same time for 4 or more seconds.
(The LED indicators indicate the current mode.) - Press [STANDARD] again while the current status is being indicated (about 10 seconds).
The setting changes each time you press the button. The display returns to the normal one about 10 seconds after the operation.
Switching dual audio broadcasts
Use the following procedure to switch dual audio broadcasts between the primary audio channel and the secondary audio channel.
- Confirm that the audio output of the connected device is set to bitstream (AAC).
Press and hold [MUSIC] on the remote control for 4 or more seconds. (The LED indicators indicate the current mode.)
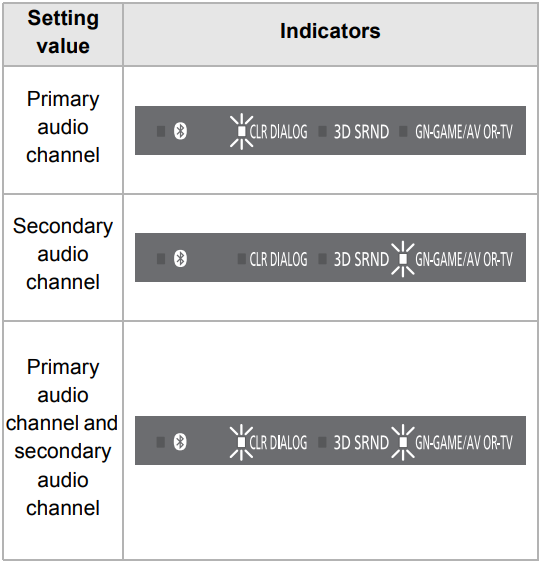
- Press [MUSIC] again while the current status is being indicated (about 20 seconds).
The setting changes in the following order each time you press [MUSIC].- “Primary audio channel”
- “Secondary audio channel”
- “Primary audio channel and secondary audio channel”
- “Primary audio channel” (repeats)
Adjusting the difference between images and audio (Audio delay function)
(Factory default: Auto)
This function delays the output of audio when you can perceive a difference between the images and audio when playing back a connected device. Adjust the level while checking whether the images and audio match. The delay time will not get shorter if you select a setting value that is shorter than the time required to process the audio signal. The time required for processing signals depends on the audio format.
- Press and hold [CLR DIALOG] on the remote control for 4 or more seconds. (The LED indicators indicate the current mode.)
- Press [CLR DIALOG] while the current status is being indicated (about 10 seconds).
Switch to a status where you can select a setting other than “Not Auto(Minimum to 300 msec)”.
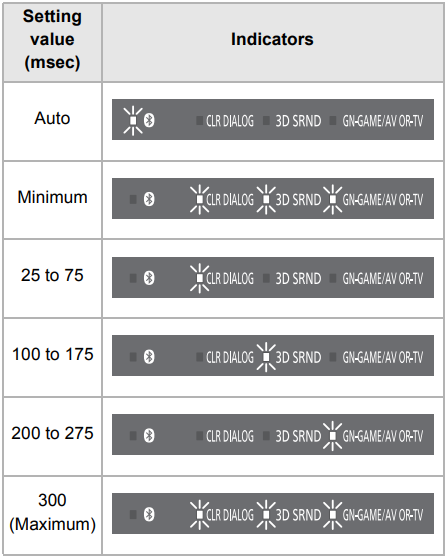
- Press either [i SUBWOOFER] or [SUBWOOFER j] while the current status is being indicated. The setting changes in the following order each time you press [i SUBWOOFER]. (The setting changes in the reverse order if you press [SUBWOOFER j].) “Minimum” →”25 m sec” → “50 m sec” → “75 m sec” → … → “300 m sec” (Maximum) The display returns to the normal one about 10 seconds after the operation. To return the audio delay to “Auto” Press [CLR DIALOG] in step 2.
The (Bluetooth) indicator lights and the setting switches to “Auto”. When set to “Auto”, if a Panasonic TV (VIERA) that supports VIERA Link (HDMI) Ver.3 or later is connected, the audio is automatically delayed to bring it closer to the images. This operation is not available when input is “ (Bluetooth)”.
Turning off the volume limitation
(Factory default: Enabled)
This function limits the excessive output of volume. When this function is used, if the volume exceeds 50 when this system is turned off, then the volume is set to 50 when it is turned on again. You can set this system not to use the function using the following procedure
- Press and hold [VOL i] on this system and [MUTE] on the remote control at the same time for 4 or more seconds.
Confirm that all the LED indicators blink once.

- To enable the volume limiting function again, return the settings of this system to the factory defaults.
Dynamic range compression
(Factory default: On)
This function compresses the differences in volume between the lowest sound that is not lost to noise and the highest sound where there is no distortion, allowing small sounds to remain perceivable even when there are effects that involve high volume levels. (Dynamic range compression)
- Press and hold the following buttons on the remote control for 4 or more seconds.
- [CINEMA]: “Auto” is set. The dynamic range of the audio is compressed automatically. (only for Dolby® TrueHD audio)
- [GAME]: “On” is set. The dynamic range of the audio is compressed according to the intentions of the content.
- [3D SURROUND]: “Off” is set. The dynamic range of the audio is not compressed.
Confirm that the 3D SRND indicator and the GNGAME/ AV OR-TV indicator blink twice.

Dialogue control
(Factory default: Off)
When playing back content compatible with DTS:X, you can adjust the dialogue in films and the vocals in music to a level of your liking. (8 steps: Off, 1 to 7
- Press and hold [INPUT] on the remote control for 4 or more seconds. (The LED indicators indicate the current mode.)
Press [i SUBWOOFER] or [SUBWOOFER j] while the current status is being indicated (about 10 seconds).
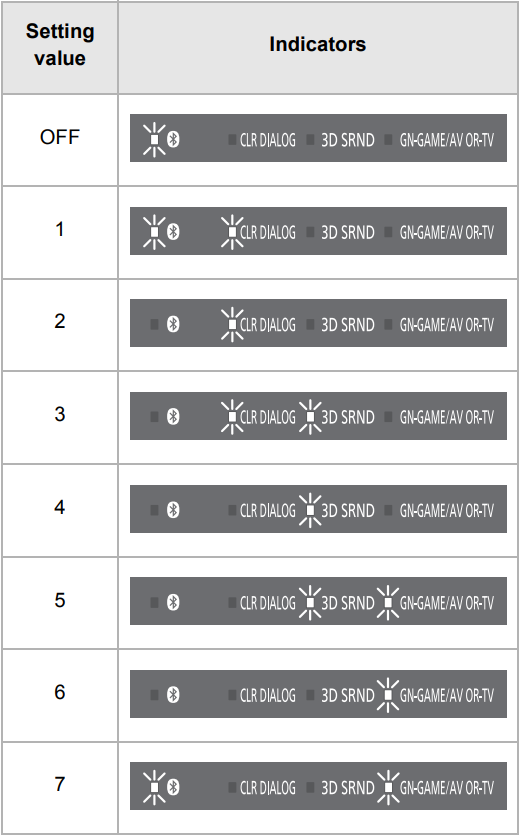
The setting changes in the following order each time you press [+ SUBWOOFER]. (The setting changes in the reverse order if you press [SUBWOOFER j].) “Off” → “1” → “2” → … → “7” (Maximum) The display returns to the normal one about 10 seconds after the operation. This setting works only on content that is compatible with DTS:X dialogue control.
Description
The Panasonic Sound Slayer Speaker HTB01 is a 2.1 channel speaker system that delivers powerful and dynamic sound. It features two speakers and one subwoofer, providing a full range of sound that will bring your games to life. The speaker also has built-in Bluetooth connectivity, allowing you to connect it to your gaming console, PC, or mobile device with ease. Additionally, the Sound Slayer Speaker HTB01 has customizable sound modes, allowing you to tailor the audio to your specific gaming needs. With its stylish and compact design, this speaker is an excellent addition to any gaming setup.
Panasonic Sound Slayer Speaker HTB01 Setup Guide
Setting up the Panasonic Sound Slayer Speaker HTB01 is a straightforward process. Start by placing the speaker in your desired location and plugging it into a power source. Next, turn on the speaker and put it into pairing mode by pressing the Bluetooth button on the back of the speaker. On your gaming console or PC, go to the Bluetooth settings and select the Sound Slayer Speaker HTB01 from the list of available devices. Once connected, you can start enjoying your games with enhanced sound quality.
Safety precautions
Unit
To reduce the risk of fire, electric shock or product damage,
Do not expose this unit to rain, moisture, dripping or splashing.
Do not place objects filled with liquids, such as vases, on this unit.
Use the recommended accessories.
Do not remove covers.
Do not repair this unit by yourself. Refer servicing to qualified service personnel.
AC power supply cord
To reduce the risk of fire, electric shock or product damage,
Ensure that the power supply voltage corresponds to the voltage printed on AC adaptor.
Insert the power plug fully into the socket outlet.
Do not pull, bend, or place heavy items on the lead.
Do not handle the plug with wet hands.
Hold onto the power plug body when disconnecting the plug.
Do not use a damaged power plug or socket outlet.
The power plug is the disconnecting device.
Install this unit so that the power plug can be unplugged from the socket outlet immediately.
Button-type battery
Risk of fire, explosion and burns. Do not recharge, disassemble, heat above 60 o C (140 o F) or incinerate.
WARNING: DO NOT INGEST BATTERY, CHEMICAL BURN HAZARD
The remote control supplied with this product contains a coin/button cell battery. If the coin/button cell battery is swallowed, it can cause severe internal burns in just 2 hours and can lead to death. Keep new and used batteries away from children. If the battery compartment does not close securely, stop using the remote control and keep it away from children. If you think batteries might have been swallowed or placed inside any part of the body, seek immediate medical attention.
Avoid the use in the following conditions
High or low extreme temperatures during use, storage or transportation.
Replacement of a battery with an incorrect type.
Disposal of a battery into fire or a hot oven, or mechanically crushing or cutting of a battery, that can result in an explosion.
Extremely high temperature and/or extremely low air pressure that can result in an explosion or the leakage of flammable liquid or gas.
The illustrations shown may differ from your unit.
Operations in this owner’s manual are described mainly with the remote control, but you can perform the operations on this system if the controls are the same.
Unit
Do not place sources of naked flames, such as lighted candles, on this unit.
This unit may receive radio interference caused by mobile telephones during use. If such interference occurs, please increase separation between this unit and the mobile telephone.
This unit is intended for use in moderate climates.
Product Identification Marking is located on the rear of the unit.
Placement
Place this unit on an even surface.
To reduce the risk of fire, electric shock or product damage,
Do not install or place this unit in a bookcase, built-in cabinet or in another confined space. Ensure this unit
is well ventilated.Do not obstruct this unit’s ventilation openings with newspapers, tablecloths, curtains, and similar items.
Do not expose this unit to direct sunlight, high temperatures, high humidity, and excessive vibration.
Do not place this unit and other devices (Blu-ray disc recorder, external HDD, etc.) directly on top of each other, as this may cause HDD failure or data damage.
Button-type battery
Danger of explosion if battery is incorrectly replaced. Replace only with the type recommended by the manufacturer.
Insert with poles aligned.
Do not touch the terminals (i and j) with metal objects.
Do not recharge, disassemble, remodel, heat or throw into fire.
Keep out of reach of children.
If any electrolyte should come into contact with your hands or clothes, wash it off thoroughly with water.
If any electrolyte should come into contact with your eyes, never rub the eyes.
Rinse eyes thoroughly with water, and then consult a doctor.
Mishandling of batteries can cause electrolyte leakage and may cause a fire.
Remove the battery if you do not intend to use the remote control for a long period of time. Store in a cool, dark place.
Do not heat or expose to flame.
Do not leave the battery (ies) in a car exposed to direct sunlight for a long period of time with doors and windows closed.
When disposing of the batteries, please contact your local authorities or dealer and ask for the correct method of disposal.
AC adaptor
The AC adaptor operates on AC between 100 V and 240 V. But
In the U.S.A. and Canada, the AC adaptor must be connected to a 120 V AC power supply only.
When connecting to an AC supply outside of the U.S.A. or Canada, use a plug adaptor to suit the AC outlet configuration.
When connecting to a supply of greater than AC 125 V, ensure the cord you use is suited to the voltage of the AC supply and the rated current of the AC adaptor.
Contact an electrical parts distributor for assistance in selecting a suitable AC plug adaptor or AC cord set.
Unit care
Clean this system with a soft, dry cloth
When dirt is heavy, wring a cloth moistened in water tightly to wipe the dirt, and then wipe it with a dry cloth.
Never use alcohol, paint thinner or benzine to clean this system.
Before using chemically-treated cloth, carefully read the instructions that came with the cloth.
Panasonic Sound Slayer Speaker HTB01 Troubleshooting
Before requesting service, make the following checks. If you are in doubt about some of the check points, or if the solutions indicated in the following guide do not solve the problem, consult your dealer for instructions.
To return to the factory defaults. If this system does not operate as expected, returning the settings to the factory preset may solve the problem. While this system is on, press and hold [![]() /I] on this system for more than 4 sec. (All the indicators will blink twice when this system is reset.) The remote control code will return to “1” when this system is returned to the factory preset. To change the remote control code, refer to page 16.
/I] on this system for more than 4 sec. (All the indicators will blink twice when this system is reset.) The remote control code will return to “1” when this system is returned to the factory preset. To change the remote control code, refer to page 16.
- The remote control does not work properly.
- It may be necessary to set the code of the remote control again after changing the battery of the remote control.
- Other Panasonic audio products are operated inadvertently by the remote control of this system.
- Set this system and the remote control to “Mode 2”.
- This system is automatically switched to standby mode.
- There is a function that turns off this system The TV’s sound is not heard from this system.
- This system does not operate correctly.
- Is the HDMI cable connected to the IN and OUT terminals the other way around?
Turn off this system, and disconnect the AC power supply cord and reconnect the HDMI cable. - The remote control code is different on this system and the remote control if the GN-GAME/AV OR-TV indicator repeats a pattern of blinking twice and turning off three times. Set the remote control code again.
- Is the HDMI cable connected to the IN and OUT terminals the other way around?
- The TV’s sound is not heard from this system. No sound (or image) is output even after the connected device starts playback.
- Check the connections to the other device.
- Turn this system off and then on again.
- If this system is connected to a TV with an HDMI cable, check that the TV’s HDMI terminal is labelled “HDMI (ARC)”. If not, TV sound cannot be output from this system. When using a TV with an HDMI terminal that is not labelled “ARC”, connect the DIGITAL AUDIO OUT (OPTICAL) of the TV and the OPTICAL DIGITAL AUDIO IN (TV) terminal using an optical digital audio cable (not supplied).
- If this system is connected to a Panasonic TV (VIERA), when you turn on this system by operating it directly, sound may not be output from it. In this case, turn on this system via VIERA Link by operating the remote control of the TV (VIERA)
- If the connections are correct, there might be a problemwith the cables. Redo the connections with different cables.
- Check the audio output settings on the connected device.
Use the following procedure to check for the input signal from the connected device.
- Press [INPUT] to switch to the input source for the input signal you want to check.
- Press and hold [VOL j] on this system and [CINEMA] on the remote control at the same time for 4 or more seconds.
The CLR DIALOG indicator blinks and the 3D SRND indicator lights.
- Lights orange: There is an audio signal being input.
- Lights green: There is no audio signal being input.
The selected input source lights.
- If there is no audio signal being input, it is possible that there is a problem with the connection cable. Try connecting with another cable if you have one. If sound is still not output, there is either a problem with the settings on the connected device or there is a malfunction. Refer to the operating instructions for the connected device
- If there is an audio signal being input, it is possible that this system is malfunctioning. Turn this system off, unplug the AC adaptor, and then consult your dealer.
- This operation is not available when input is “ (Bluetooth)”.
VIERA Link (HDMI) related operations no longer function properly.
- This may occur when the HDMI connections are changed, after a power failure or after the AC power supply cord has been removed. Try the following:
- After connecting the TV (VIERA) and this system with an HDMI cable and turning on the TV (VIERA), disconnect the AC power supply cord of this system while leaving the system turned on, and reconnect the AC power supply cord.
Images and sounds cease. There are interruptions to the audio. The power of this system turns off automatically. (When this system detects a problem, a safety measure is activated and this system automatically switches to standby mode.)
- Turn down the volume and try turning this system off and on again. If you are unable to turn this system off and on again, try unplugging the AC adaptor then plugging it in again.
- Is the volume extremely high? If so, lower the volume.
- Is this system placed in an extremely hot place? If so, move this system to a cooler place and wait a few moments and then try to turn it on again.
- Reduce the volume and take other steps to solve the issue, then wait a while before turning this system on again. (The protection circuitry will be released.)
- Depending on the combination of the TV and the connected device used, when the TV is turned off and on or the input is switched, audio may be temporarily disabled.
- If the CLR DIALOG indicator and the 3D SRND indicator light up and the GN-GAME/AV OR-TV indicator keeps blinking, HDCP 2.2 is not supported by the HDMI terminal or setup of the TV. Refer to the operating instructions of the TV for details
- If you connect this system and are then unable to view Netflix content, connect the playback device and the TV directly.
Warranty
| Product or Part Name | Parts | Labor |
| Speaker System | 1 Year | 1 Year |
| All included Accessories (Except Non-Rechargeable Batteries) |
90 Days |
Not Applicable |
| Only Non-Rechargeable Batteries | 10 Days | Not Applicable |
Customer Reviews about Panasonic Sound Slayer Speaker HTB01
Customers who have purchased the Panasonic Sound Slayer Speaker HTB01 have praised its high-quality sound and stylish design. Many have noted that the speaker significantly enhances their gaming experience, making it feel more immersive and exciting. However, some have criticized the speaker for its high price point and lack of customization options.
Faqs
What is the Panasonic Sound Slayer Speaker HTB01?
What is the price of the Panasonic Sound Slayer Speaker HTB01?
What is the connectivity of the Panasonic Sound Slayer Speaker HTB01?
How many channels does the Panasonic Sound Slayer Speaker HTB01 have?
Can you customize the sound modes on the Panasonic Sound Slayer Speaker HTB01?
How do you connect the Panasonic Sound Slayer Speaker HTB01 to a device?
What is the design of the Panasonic Sound Slayer Speaker HTB01?
What is the launch date of the Panasonic Sound Slayer Speaker HTB01?
What is the warranty of the Panasonic Sound Slayer Speaker HTB01?
What are the common complaints about the Panasonic Sound Slayer Speaker HTB01?
Leave a Comment