Pentair Clean and Clear Plus Cartridge Filter User Guide | Installation

Content
Introduction the Pentair Clean and Clear Plus Cartridge Filter
The Pentair Clean and Clear Plus Cartridge Filter is a reliable and efficient solution for keeping your pool water clean and clear. This filter features a durable, corrosion-proof tank and a large filter area for superior filtration. It is easy to use, clean, and maintain, making it a popular choice for pool owners. The estimated price of the Pentair Clean and Clear Plus Cartridge Filter is around $700 to $900, and it has been available in the market since 2015.
REPLACEMENT PARTS
ILLUSTRATED PARTS VIEW
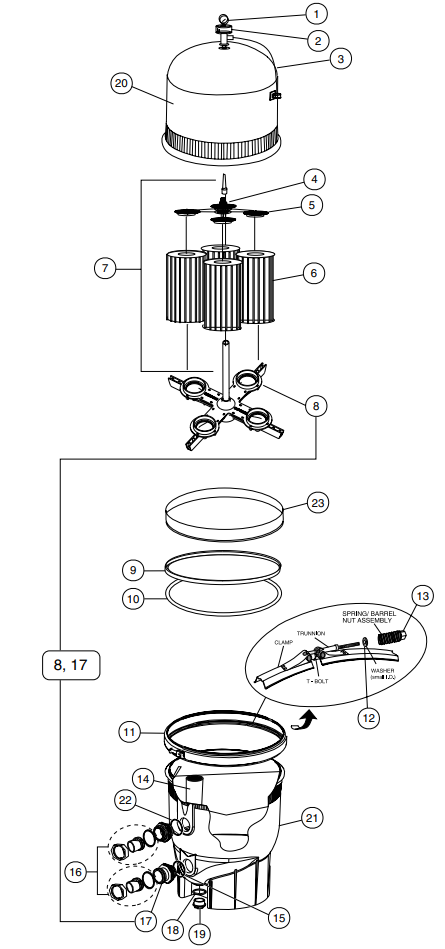
| Item No. | Part No. | Description |
|---|---|---|
| 1 | 90058 | Gauge, pressure, ¼ in. |
| 2 | 98200980 | High flow manual air relief valve (HFMARV) |
| 3 | 56636900 | Spring, compression |
| 4 | 178616 | Spring, compression |
| 5 | 59071006 | Manifold, top assembly |
| 6 | 7071000 | Manifold, top assembly, 240 sq. ft. |
| 7 | R173572 | Cartridge Element, 240 sq. ft., req. 4 |
| 8 | R173573 | Cartridge Element, 320 sq. ft., req. 4 |
| 9 | R173574 | Cartridge Element, 360 sq. ft., req. 4 |
| 10 | R173575 | Cartridge Element, 420 sq. ft., req. 4 |
| 11 | R173576 | Cartridge Element, 520 sq. ft., req. 4 |
| 12 | R173577 | Cartridge Element, 520 sq. ft., req. 4 |
| 13 | 7070378 | Air bleed tube assembly, 240 sq. ft. |
| 14 | 7070350 | Air bleed tube assembly, 320 sq. ft. |
| 15 | 7070280 | Air bleed tube assembly, 420 sq. ft. |
| 16 | 7070248 | Air bleed tube assembly, 520 sq. ft. |
| 17 | 58202800 | Manifold, bottom, 240 sq. ft. |
| 18 | 58206738 | Manifold, bottom, 320 sq. ft. |
| 19 | 7070243 | Manifold, bottom, 420 sq. ft. |
| 20 | 7070400 | Manifold, bottom |
| 21 | 59000200 | O-ring, tank clamp (4.470 O.D.) |
| 22 | 19130000 | Clamp kit, tension |
| 23 | 195610 | Washer, small I.D. |
| 24 | 195511 | Washer, large I.D. |
| 25 | 194997 | Nut, machined |
| 13a | 195612 | Spring |
| 14 | 98200990 | Baffle, bulkhead assembly |
| 15 | 190039 | O-ring, bulkhead assembly |
| 16 | 98960311 | Bulkhead union, (set) |
| 17 | 2770046 | Bulkhead adapter kit, 2 in. O.D., white |
| 18 | 270004 | Bulkhead adapter kit, 2 in. I.D., black |
| 19 | 274426 | Bulkhead adapter kit, 2 in. x 2 in. I.D., white |
| 20 | 59071900 | Pipe assembly, outlet |
| 21 | 170035 | Pipe assembly, outlet/manifold, bottom |
| 22 | 51002500 | Plug, 1/2 in. drain with O-ring |
| 23 | 98200980 | O-ring for drain plug |
| 24 | 170024 | Tank lid, assay, 240 sq. ft. |
| 25 | 178551 | Tank lid, assay, 320 sq. ft. |
| 26 | 178552 | Tank lid, assay, 420 sq. ft. |
| 27 | 178550 | Tank lid, assay, 520 sq. ft. |
| 28 | 51002801 | Tank, lid lock, 240 sq. ft. |
| 29 | 51002800 | Tank, lid lock, 320 sq. ft. |
| 30 | 51002600 | Tank, lid lock, 420 sq. ft. |
| 31 | 51002500 | Tank, lid lock, 520 sq. ft. |
Specifications of Pentair Clean
The Pentair Clean and Clear Plus Cartridge Filter has the following key features:
- Corrosion-proof tank made of durable reinforced thermoplastic
- Filter area of 50 square feet for superior filtration
- Easy-to-replace cartridges that provide long filter cycle and easy maintenance
- See-through diffuser for even water distribution and easy inspection
- Integral air relief for easy start-up and servicing
- 1/2 horsepower pump allows for easy priming and dependable operation
- Union connection for quick and easy installation
- One-year limited warranty
TECHNICAL DATA
FLOW RATES
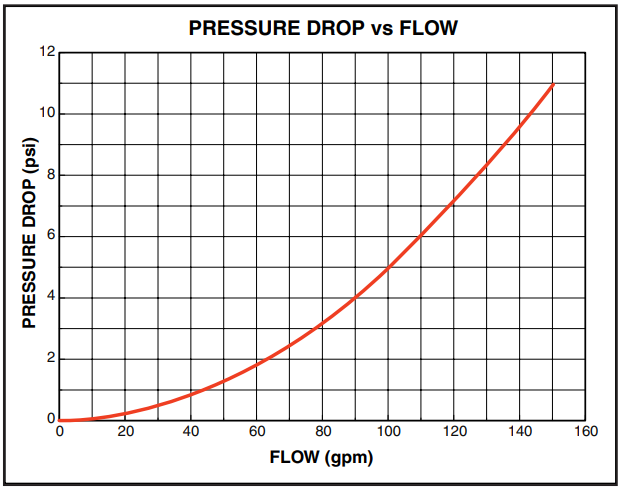
Clean and Clear® Plus Cartridge Filters | ||||||||
Recommended Flow Rate | ||||||||
Product # | Model # | Filter Area sq. ft. | Vertical* Clearance | Flow Rate GPM | Turnover Capacity in Gallons | |||
Res. | Comm. | 6 Hours | 8 Hours | 12 Hours | ||||
160310 | CCP240 | 240 | 56 in. | 90 | 90 | 31,400 | 43,200 | 64,800 |
160340 | CCP320 | 320 | 62 in. | 120 | 120 | 43,200 | 57,600 | 86,400 |
160301 | CCP420 | 420 | 68 in. | 150 | 150 | 54,000 | 72,000 | 108,000 |
160332 | CCP520 | 520 | 74 in. | 150 | 150 | 54,000 | 72,000 | 108,000 |
NOTE: Actual system flow will depend on plumbing size and other system components. Required Clearance to remove filter elements.
FILTER INSTALLATION

GENERAL INFORMATION
- The Clean and Clear Plus Cartridge Filter should be mounted on a level concrete slab. Position the filter so that instructions, warnings and the pressure gauge are visible to the operator. It also should be positioned so that the piping connections, control valve and drain port are convenient and accessible for servicing and winterizing.
- Be certain to install electrical controls (e.g., on/off switches, timers, control systems, etc.) at least five (5) feet from the filter. This permits one to stand clear of the filter during system start up.
- Allow sufficient clearance around the filter to permit visual verification that the clamp is properly installed around the tank flanges. Tap the clamp with a mallet or similar tool to ensure uniform loading during clamp tightening.
- Allow sufficient space above the filter to remove the filter lid for cleaning and servicing. This distance will vary with the model of filter you are using. See Table 1 for the required vertical clearance.
- Position the filter to safely direct water drainage. Rotate the High Flow™ Manual Air Relief Valve to safely direct purged air or water. Water discharged from an improperly positioned filter or valve can create an electrical hazard as well as damage property.
WARNING: Risk of electrical shock or electrocution. Position the filter and manual air relief valve to safely direct water drainage and purged air or water. Water discharged from an improperly positioned filter or valve can create an electrical hazard that can cause severe personal injury as well as damage property. - Make all plumbing connections in accordance with local plumbing and building codes. Filter plumbing connections are provided with an O-ring seal. If needed, use only a silicone base lubricant on the O-rings. Do not use pipe joint compound, glue or solvent on the bulkhead connections.
Note: To seal the valve connections, use thread seal tape, thread sealant or plumbing paste (non-petroleum base). - Remove the plug from the top of the filter lid and install the pressure gauge before use.
- The maximum working pressure of this filter is 50 p.s.i. Never subject this filter to pressure in excess of this amount, even when conducting hydrostatic pressure tests.
When performing hydrostatic pressure tests or when testing for external leaks of the completed filtration and plumbing system, insure that the MAXIMUM PRESSURE that the filtration system will be subjected to DOES NOT EXCEED THE MAXIMUM WORKING PRESSURE OF ANY OF THE COMPONENTS CONTAINED WITHIN THE SYSTEM. In most cases, the maximum pressure will be stated on each component of the system.
If doubt exists as to the pressure to which the system will be subjected, install an ASME approved automatic Pressure Relief or Pressure Regulator in the circulation system for the lowest working pressure of any of the components in the system.
FILTER OPERATION AND CLEANING
WARNING: THIS FILTER OPERATES UNDER HIGH PRESSURE. WHEN ANY PART OF THE CIRCULATING SYSTEM (e.g., FILTER LID, PUMP, FILTER, VALVES, ETC.) IS SERVICED, AIR CAN ENTER THE SYSTEM AND BECOME PRESSURIZED. PRESSURIZED AIR CAN CAUSE THE LID TO SEPARATE FROM THE TANK BOTTOM WHICH CAN RESULT IN SEVERE INJURY, DEATH, OR PROPERTY DAMAGE. TO AVOID THIS POTENTIAL HAZARD, FOLLOW THESE INSTRUCTIONS.
- BEFORE REPOSITIONING VALVES AND BEFORE BEGINNING THE ASSEMBLY, DISASSEMBLY, OR ADJUSTMENT OF THE CLAMP OR ANY OTHER SERVICE OF THE CIRCULATING SYSTEM: (A) TURN THE PUMP OFF AND SHUT OFF ANY AUTOMATIC CONTROLS TO ASSURE THE SYSTEM IS NOT INADVERTENTLY STARTED DURING THE SERVICING. (B) OPEN AIR RELIEF VALVE, AND (C) WAIT UNTIL ALL PRESSURE IS RELIEVED - PRESSURE GAUGE MUST READ ZERO (0 psi).
- WHENEVER INSTALLING OR REMOVING THE FILTER CLAMP, FOLLOW THE FILTER CLAMP INSTALLATION AND REMOVAL INSTRUCTIONS EXACTLY.
- ONCE SERVICE ON THE CIRCULATING SYSTEM IS COMPLETE, FOLLOW START-UP INSTRUCTIONS EXACTLY.
- MAINTAIN CIRCULATION SYSTEM PROPERLY. REPLACE WORN OR DAMAGED PARTS IMMEDIATELY (e.g., but not limited to, lid, knob, pressure gauge, clamping assembly, relief valve, O-rings, etc.)
- BE SURE THAT THE FILTER IS PROPERLY MOUNTED AND POSITIONED ACCORDING TO INSTRUCTIONS PROVIDED.
GENERAL INFORMATION
- This filter operates under pressure. When clamped properly and operated without air in the circulating system, this filter will operate in a safe manner.
- The maximum working pressure of this filter is 50 p.s.i. Never subject this filter to pressure in excess of this amount - even when conducting hydrostatic pressure tests.
- 3. The pressure gauge is the primary indicator of how the filter is operating. Maintain your pressure gauge in good working order.
WARNING: Your filter is a piece of machinery, do not tamper with it, attempt to disassemble it or otherwise adjust it unless you fully understand it's operation. Serious injury or death can occur if the equipment is improperly handled. Consult a pool service professional for maintenance and service assistance. - Clean your filter when pressure reads between 8-10 p.s.i. higher than the original starting pressure. Your filter pressure reading will increase as it removes dirt from your pool. However, this buildup of pressure will vary due to different bathing loads, temperature, weather conditions, etc.
- MY ORIGINAL STARTING PRESSURE IS ___________ psi (pounds per square inch). I SHOULD CLEAN THE FILTER CARTRIDGE ELEMENT AT __________ psi
CLAMP INSTALLATION INSTRUCTIONS
These instructions MUST BE FOLLOWED EXACTLY to prevent the lid from blowing off during system restart or later operation:
- Perform the following procedures before working on any part of the circulating system (e.g., clamp, pump, filter, valves, etc.).
- Turn the pump off and shut off any automatic controls to ensure that the system is not inadvertently started during servicing.
- Open the High Flow™ Manual Air Relief Valve.
- Wait until all pressure is relieved. Never attempt to assemble, disassemble or adjust the filter clamp while there is any pressure in the filter.
- Be certain the O-ring is in position in the lower tank half. Place the filter lid over the lower tank half sandwiching the O -ring in between.
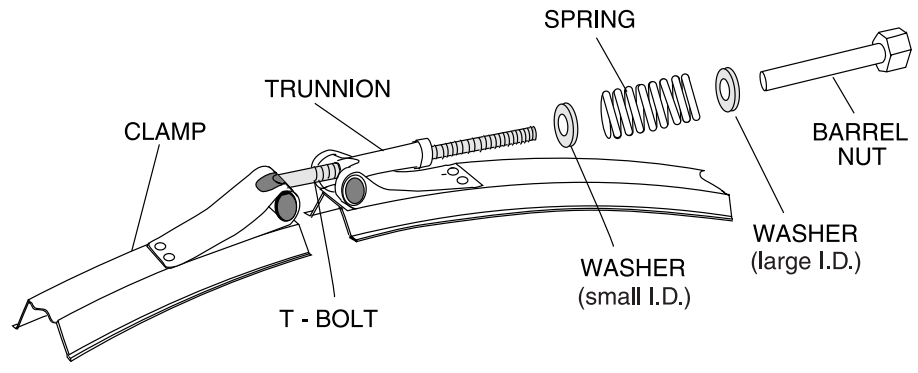
- Holding the ends of the filter clamp apart, position the center segment of the filter clamp over both upper and lower tank flanges. Bring the ends of the filter clamp together and insert the T-Bolt into the trunnion
- Using as a guide, place washer (large I.D.) and tension-indicating spring on the barrel nut. Place the second washer (small I.D.) on T-Bolt. Hand-tighten nut. Recheck filter clamp for proper seating on tank flanges.
- Begin to tighten nut using a 7/8" wrench. Then tap around the outside of the filter clamp with a mallet (or similar tool) to insure uniform loading and proper seating of the clamp. Continue tapping and tightening until the spring coils touch each other. Do not tighten beyond this point.
- Follow the procedures in Section C, System Restart Instructions.
- The spring coils should be checked at least once per month to ensure that they continue to touch each other, indicating that the clamp is under sufficient tension.
SYSTEM RESTART INSTRUCTIONS
- Open the High Flow™ Manual Air Relief Valve until it snaps into the full open position (this only requires a quarter turn counter-clockwise). Opening this valve rapidly releases air trapped in the filter.
- Stand clear of the filter tank, then start the pump.
- Close the manual air relief valve after a steady stream of water appears.
- The system is not working properly if either of the following conditions occur.
- A solid stream of water does not appear within 30 seconds after the pump's inlet basket fills with water.
- The pressure gauge indicates pressure before water outflow appears.
If either condition exists, shut off the pump immediately, open valves in the water return line to relieve pressure, and clean the air relief valve, see Section F, Cleaning the manual air relief valve.
CLEANING FILTER
WARNING: Operating the filter system without filter internal components installed can allow air to accumulate within the filter. Pressurized air can cause the lid to blow off which can result in severe injury, death or property damage. Always operate filter system with filter internal components installed.
CAUTION: The following information should be read carefully since it outlines the proper manner of care and operation for your filter system. As a result of following these instructions and taking the necessary preventative care, you can expect maximum efficiency and life from your filtration system.
- Turn the pump off, shut off any automatic controls to ensure that the system is not inadvertently started during servicing.
- Open the filter High Flow™ Manual Air Relief Valve (and the waste drain valve or plug, if your system has one).
- Remove hair and lint strainer pot lid and clean basket. Replace basket and secure lid.
- Disconnect air relief valve drain hose if installed.
- Release tank clamp assembly and remove tank lid.
- Remove top manifold and cartridge element separately.
- Using a garden hose without a nozzle, direct water spray at cartridge element to dislodge and wash away accumulated foreign matter. Flush each cartridge inside and out.
CAUTION: Please heed all manufacturers' posted instructions, warnings and cautions when using poly hexa methylene biguanide sanitizers or other cartridge filter cleaner solutions.
CAUTION: Failure to remove all oils and cleaning solutions before acid soaking will result in permanent restriction of water flow through the filter and will cause premature cartridge failure. - Lift bottom manifold out of the tank and flush off any debris.
- Direct water spray to wash out the inside of the tank body. Water and debris will drain out through the open drain port.
- Check gasket around outer lip of bottom plate. Gasket must be firmly and evenly set in place. Do not use petroleum base lubricants to avoid damage to the gasket.
- Place bottom manifold, 4 cartridges, top manifold and air relief tube in place. Make sure the spring and standpipe assembly are retained on the top manifold. Ensure the air relief tube stays in an upright position. This is essential for the maximum air removal from inside the tank.
- Be certain the O-ring is in position in the lower tank half. Press the filter lid over the lower tank half and sandwich the O -ring in between.
- Replace tank top and carefully follow instructions in Section B, Clamp Installation Instructions.
- Replace drain plug and reinstall air relief valve drain hose if used.
CLEANING AIR RELIEF VALVE
- Turn the pump off and shut off any automatic controls to ensure that the system is not inadvertently started during servicing.
- OPEN THE HIGH FLOW™ MANUAL AIR RELIEF VALVE UNTIL IT SNAPS INTO THE FULL OPEN POSITION, THEN WAIT UNTIL ALL PRESSURE IS RELIEVED.
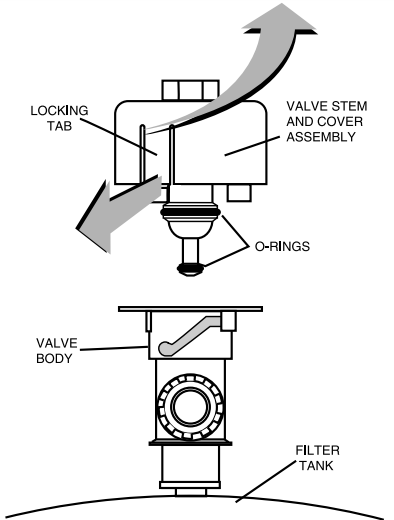
- With the relief valve attached to the filter tank, pull out the locking tabs and remove the valve stem and cover assembly with a counter-clockwise and lifting motion, see Figure 3.
- Clean debris from the valve stem and body. Verify that the filter tank's air passage is open by inserting a 5/16" drill bit through the valve body. Verify that the O-rings are in good condition, properly positioned, and lubricated with a silicone base lubricant.
- Reinstall the valve stem and cover assembly with a downward and clockwise motion until it snaps into position.
Description of Pentair Clean and Clear Plus Cartridge Filter
The Pentair Clean and Clear Plus Cartridge Filter is designed to provide efficient and reliable pool water filtration. Its corrosion-proof tank is built to last, while the large filter area ensures thorough filtration of even the smallest debris. The easy-to-replace cartridges make maintenance a breeze, and the integral air relief makes start-up and servicing simple. The filter's one-piece base and top domes ensure a strong and secure installation, while the union connection allows for quick and easy installation. With its one-year limited warranty, you can be confident in the performance and durability of the Pentair Clean and Clear Plus Cartridge Filter.
Setup Guide
Setting up the Pentair Clean and Clear Plus Cartridge Filter is a straightforward process:
- Connect the filter to the pool pump using the union connection.
- Prime the pump and turn it on.
- Check for any leaks or air bubbles, and tighten connections as necessary.
- Inspect the filter cartridge and clean or replace as needed.
- Monitor the pressure gauge and clean or replace the cartridge as necessary to maintain optimal filtration.
Pentair Clean and Clear Plus Cartridge Filter Troubleshooting
Air entering your filter is dangerous and can cause the lid to blow off. Correct any conditions in your filtration system that allow air to enter the system.
- Some common ways to identify air entering the system:
- Low water level in pool or spa - skimmer is starving for water with pump running. Add water to pool or spa.
- Air bubbles or low water level in pump hair and lint pot are caused by: low water level, clogged skimmer basket, split suction cleaner hose, leak in pump hair and lint pot lid, or leak in pump suction line.
- Air bubbles coming out of water return lines into pool or spa with pump running, see items 1. a and 1.b of this section.
- Air is discharged from the air relief valve on top of the filter when the valve is opened with the pump running, see items 1.a and 1.b of this section, above.
- Until the water initially put into the pool has been completely filtered, short filter cycles in between cleanings are normal. In most cases pool owners are dismayed by the undesirable color and appearance of water in a newly filled pool. Plaster dust can be responsible for short filter cycles, requiring frequent cleaning.
- If pressure drops on gauge, check skimmer basket and pump basket first for debris. If the baskets are clean, shut off power to pump and turn off any automatic controls. Then turn motor shaft with your fingers. If it turns freely then the pump must be disassembled and the impeller checked to see if it is clogged. If it is not frozen or clogged then there is an obstruction in the line between the pool and the pump.
- The pressure gauge is an important part of the filter system. It is your primary indicator of how the system is operating. Maintain your pressure gauge in good working order. Check the operation of your pressure gauge in the following manner:
- The pressure gauge should go to zero (0) when the system is turned off and pressure is relieved.
- The pressure gauge should indicate pressure when the system is operating.
- The pressure gauge should be readable and not damaged in any way.
- Replace the pressure gauge if it is not meeting the requirements of items D.1 through D.2 of this section.
Pros & Cons
Pros
- Corrosion-proof tank for durability
- Large filter area for superior filtration
- Easy-to-replace cartridges for easy maintenance
- Integral air relief for easy start-up and servicing
- Union connection for quick and easy installation
Cons
- Higher price point compared to other filters
- May require more frequent cartridge replacement compared to other filter types
Customer Reviews about Cartridge Filter
Customers report high satisfaction with the Pentair Clean and Clear Plus Cartridge Filter, citing its durability, ease of maintenance, and superior filtration as key benefits. Some common complaints include higher than expected pricing and the need for more frequent cartridge replacement compared to other filter types.
Faqs
What is the Pentair Clean and Clear Plus Cartridge Filter?
What is the warranty period for the Pentair Clean and Clear Plus Cartridge Filter?
How does the Pentair Clean and Clear Plus Cartridge Filter work?
What are the key features of the Pentair Clean and Clear Plus Cartridge Filter?
What are the advantages of using the Pentair Clean and Clear Plus Cartridge Filter?
What sizes are available for the Pentair Clean and Clear Plus Cartridge Filter?
How do I choose the right size Pentair Clean and Clear Plus Cartridge Filter for my pool?
What type of maintenance does the Pentair Clean and Clear Plus Cartridge Filter require?
How often should I clean the cartridges in the Pentair Clean and Clear Plus Cartridge Filter?
Can the Pentair Clean and Clear Plus Cartridge Filter handle large debris?
Leave a Comment