Perlesmith TV Wall Mount PSLFK5 User Guide | Installation
Content
Perlesmith TV Wall Mount PSLFK5 Introduction
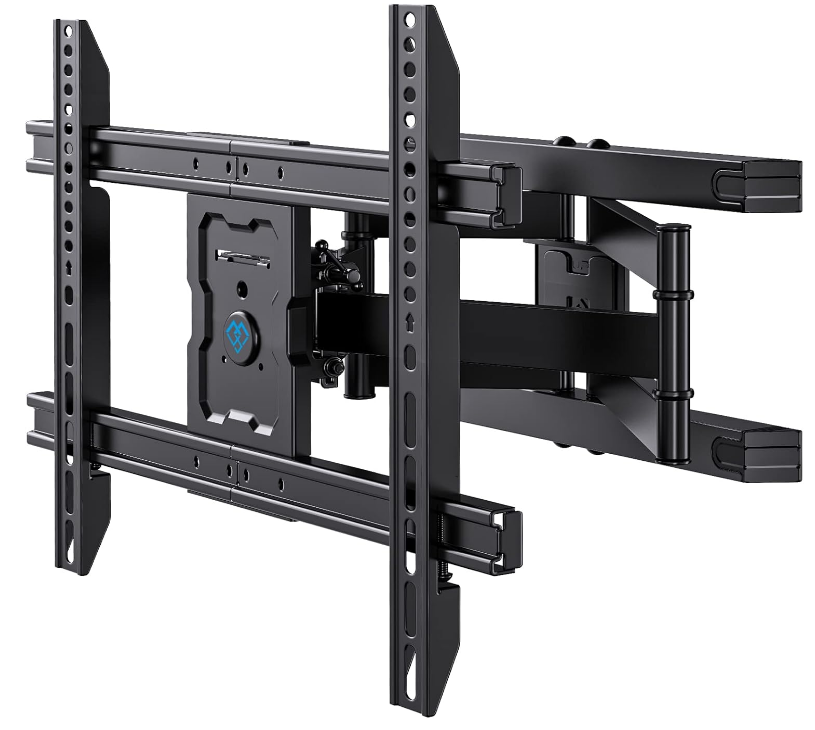
The Perlesmith TV Wall Mount PSLFK5 is a sturdy and versatile solution for securely mounting your television to the wall. Designed to accommodate most flat-screen TVs ranging from 32 to 70 inches, it supports a weight capacity of up to 132 lbs. This mount features a tilting design that allows for optimal viewing angles while reducing glare. With easy installation and adjustable brackets, it ensures a secure fit for various TV models. The sleek, low-profile design enhances your room's aesthetics while saving valuable floor space. The Perlesmith PSLFK5 is priced at approximately $49.99.
Tools Needed
(Not included)
_titan_attachments_2_ton_gantry_crane.png)
Supplied Parts
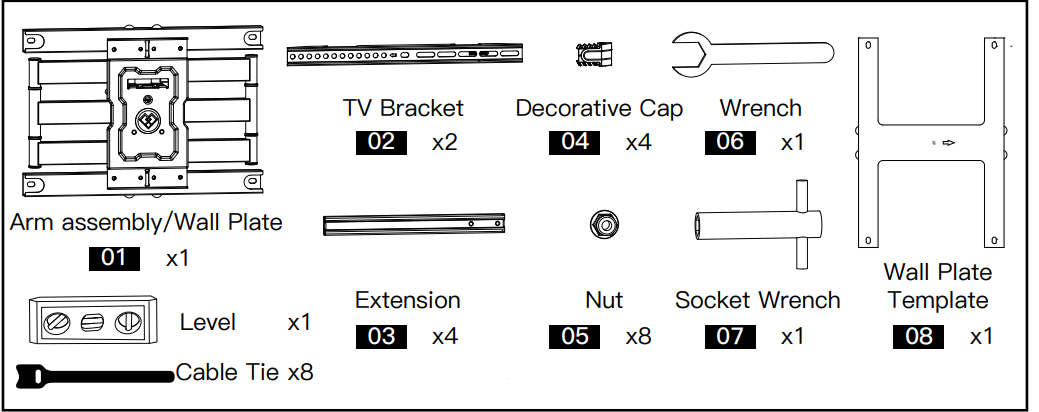
Supplied Hardware
Hardware for Attaching TV Bracket to TV

Hardware for Attaching Arm Assembly/Wall Plate to Wall

CAUTION!
These anchors are for concrete or brick walls ONLY. DO NOT use them in drywall or wood studs.
Detailed Specifications
The Perlesmith TV Wall Mount PSLFK5 boasts several key features that make it a standout product in its category. Here are some of the detailed specifications:
- Compatibility: Fits TVs from 37 inches to 70 inches.
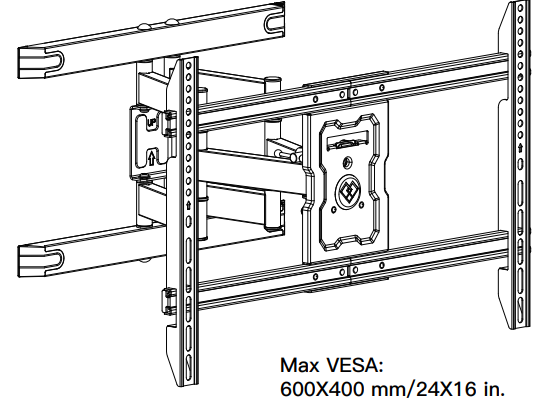
- VESA Pattern: Supports VESA 600x400mm, 800x400mm, and other common patterns.
- Tilt Angle: Adjustable tilt from -15° to +15°.
- Sway Angle: Swivels left and right up to 180°.
- Material: Made from heavy-duty steel for durability.
- Weight Capacity: Holds up to 99 lbs.
Description
The Perlesmith TV Wall Mount PSLFK5 is engineered with both functionality and aesthetics in mind. Its sleek design ensures that it blends seamlessly into any decor while providing robust support for your television. The mount features a sturdy steel construction that guarantees the safety and stability of your TV. The adjustable tilt and swivel mechanisms allow for optimal viewing angles, making it perfect for family gatherings or office meetings.
Additionally, the mount includes cable management options to keep your setup organized and clutter-free. This ensures a clean look that enhances the overall visual appeal of your room.
Installation Instruction of Perlesmith TV Wall Mount PSLFK5
Step 1
Install the Extensions [03] to Arm Assembly/Wall Plate[01]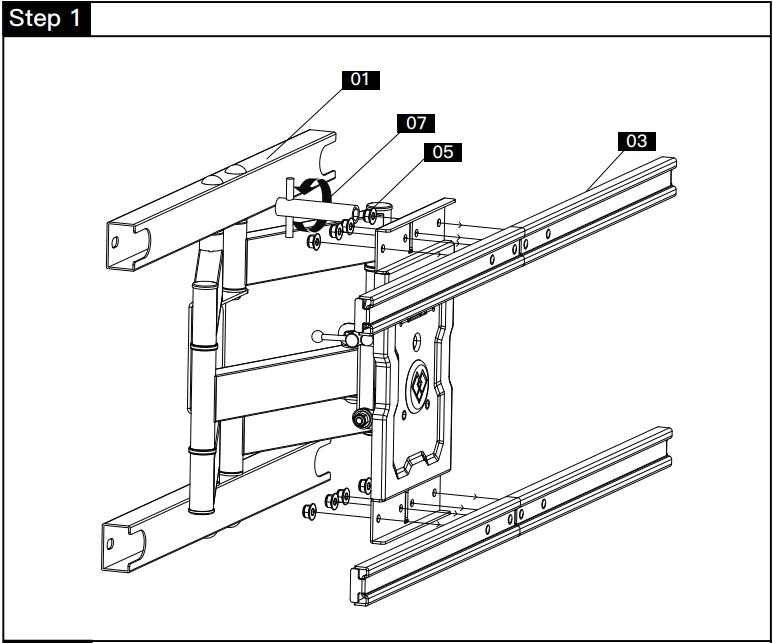
Step 2
Attach the Arm Assembly/Wall Plate [01] to Wall For wood stud installation, follow STEP 2A For concrete installation, follow STEP 2B
Step 2A Wood Stud Option
WARNING:- Avoid potential personal injury or property damage! DO NOT over-tighten the lag bolts [A1]. Tighten the lag bolts [A1] only until the washers [A2] are pulled firmly against the wall plate [01].
- DONOT USE ANCHOR [A3] FOR THIS STEP!
- Ensure the arm assembly/wall plate[01] is securely fastened to the wall before continuing on to the next step.
- Any material covering the wall must not exceed 5/8 in. (16 mm).
- Nominal wood stud size: common 2 x 4 in. (51 x 102 mm) minimum 1½ x 3½ in. (38 x 89 mm).
The stud center must be verified.

2A-1
Use a stud finder(not included) to locate wood studs. Mark the edge and center locations.
2A-2
Position the wall plate template[08] at your desired height and line up the holes with your stud center line. Level the template and mark the holes.
2A-3
Drill 4 pilot holes using a 5 mm diameter drill bit. Make sure the depth is not less than 60mm.
2A-4
Install the arm assembly/wall plate using lag bolts [A1] and washer [A2]. Tighten the lag bolts [A1] only until the washers [A2] are pulled firmly against the wall plate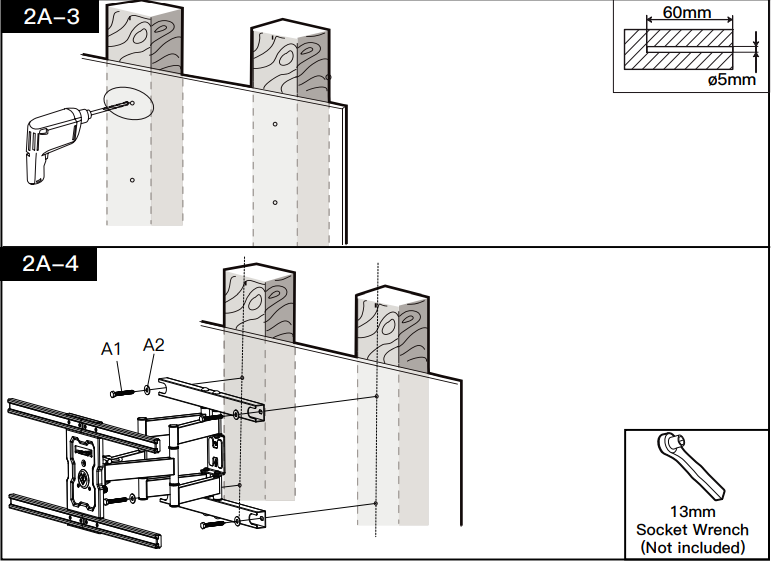
Step 2B Solid Concrete or Concrete Block Option

WARNING:- Avoid potential personal injury or property damage! DO NOT over-tighten the lag bolts [A1]. Tighten the lag bolts [A1] only until the washers [A2] are pulled firmly against the wall plate.
- Ensure the arm assembly/wall plate[01] is securely fastened to the wall before continuing on to the next step.
- Any material covering the wall must not exceed 5/8 in. (16 mm).
- Mount the arm assembly/wall plate [01] directly onto the concrete surface.
- Minimum solid concrete thickness: 203 mm (8 in.).
- Minimum concrete block size: 203 x 203 x 406 mm (8 x 8 x 16 in.).
2B-1
Position the wall plate template [08] at your desired height, level the template and mark the pilot hole locations.
2B-2
Drill 4 pilot holes using a 10mm diameter drill bit. Make sure the depth is not less than 65mm. Never drill into the mortar between blocks.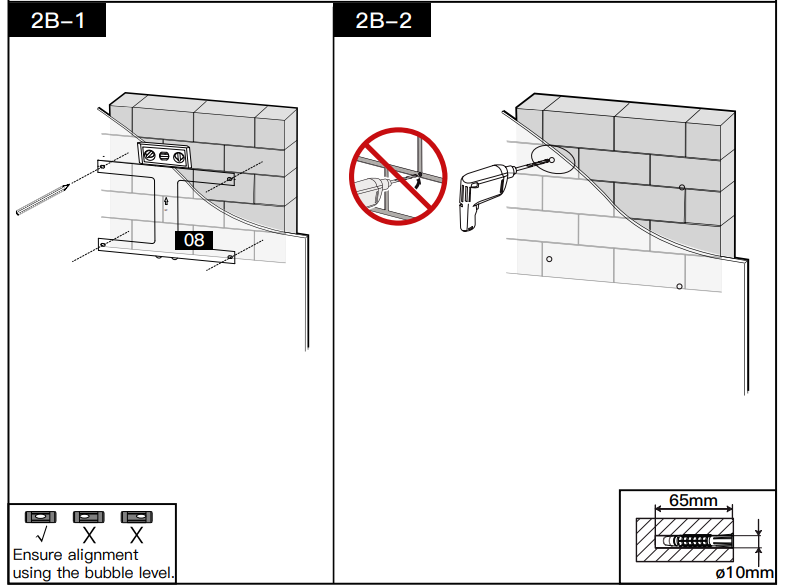
2B-3
Use the hammer to knock anchors [A3] into the wall.
Install the arm assembly/wall plate [01] using lag bolts [A1], washers [A2] and anchors [A3]. Be sure the anchors [A3] are seated flush with the concrete surface. Tighten the lag bolts [A1] only until the washers [A2] are pulled firmly against the wall plate. DO NOT over-tighten the lag bolts [A1].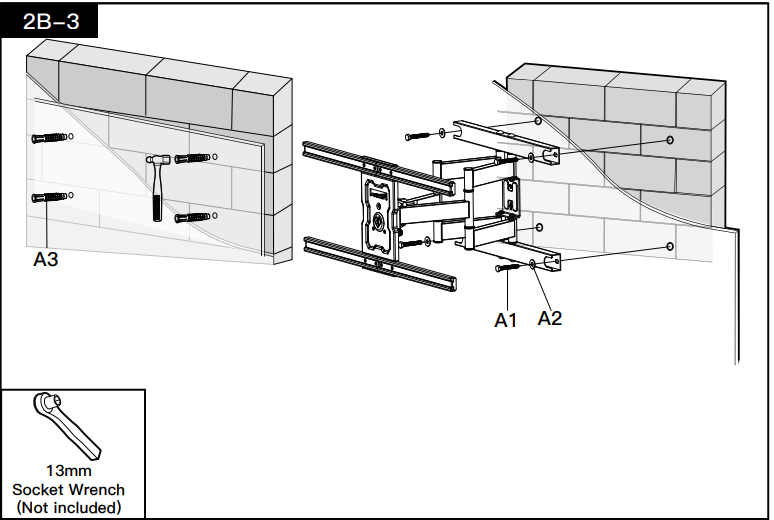
Step 3
Add the Decorative Cap [04] to the Arm Assembly/Wall Plate[01]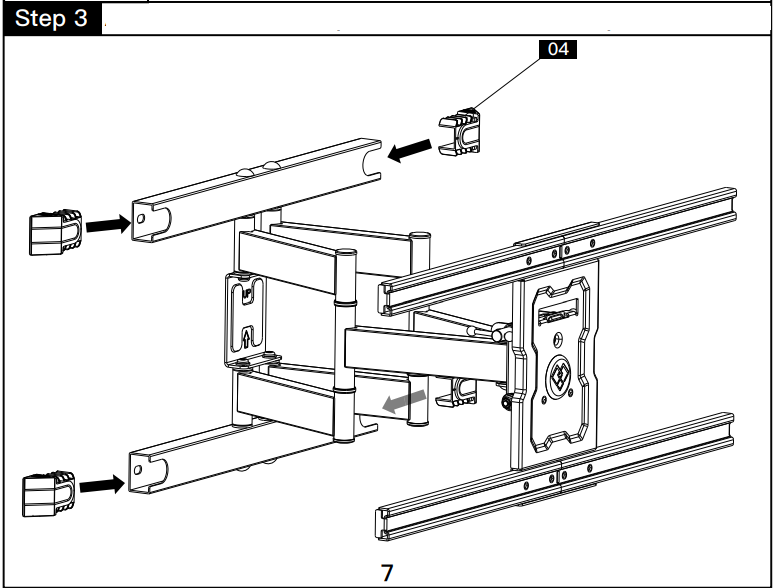
Step 4
Check TV Hole Pattern and Select TV Screws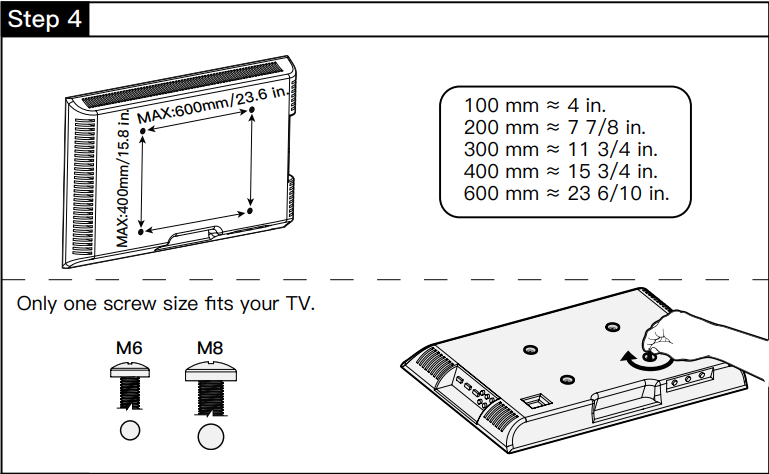
Step 5
Select Spacers (if needed)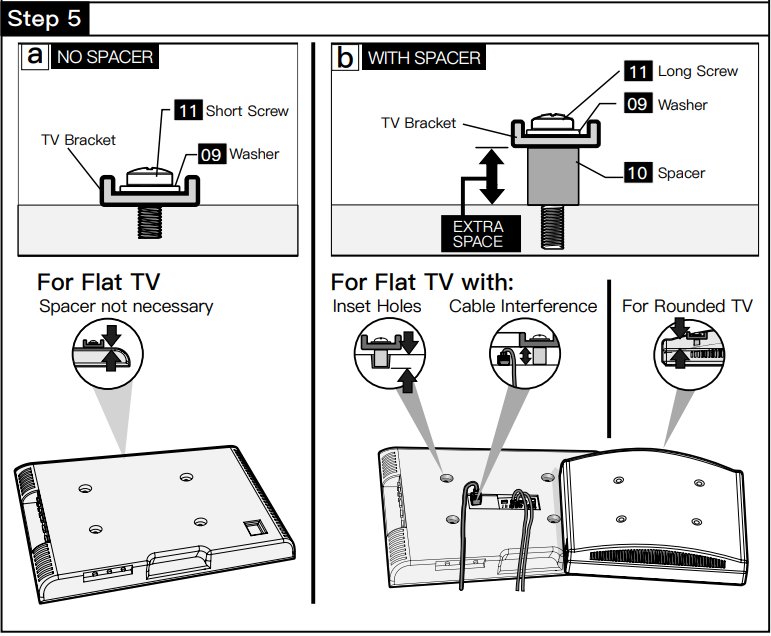

Step 6
Secure the TV Brackets [02] to Your TV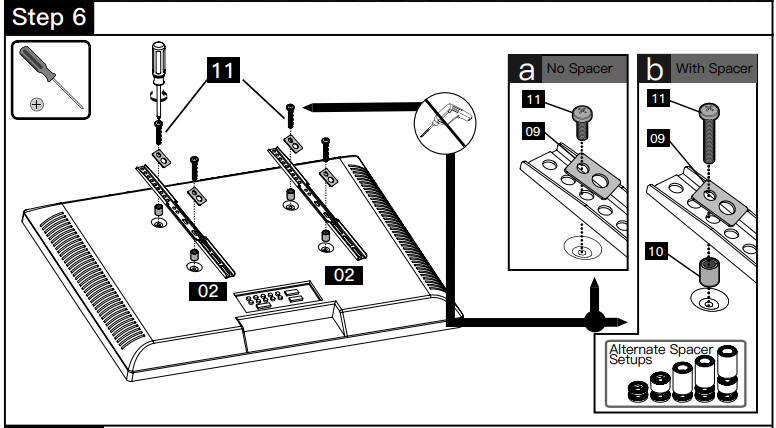
Step 7
Hang the TV onto the Arm Assembly/Wall Plate [01]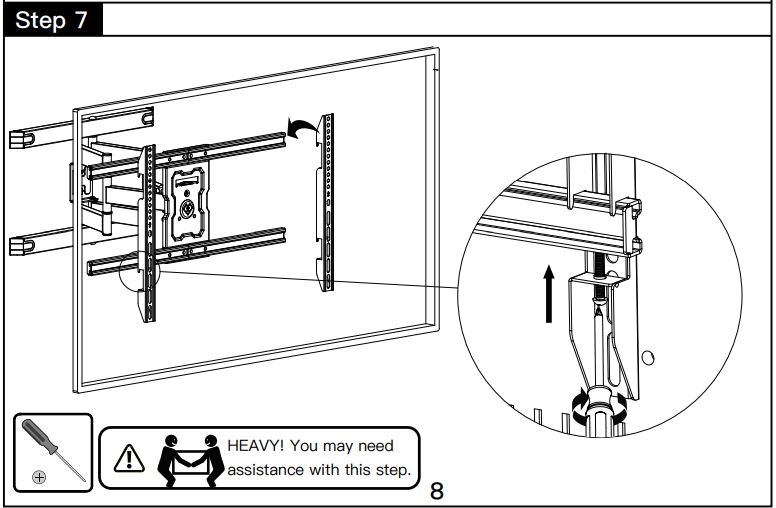
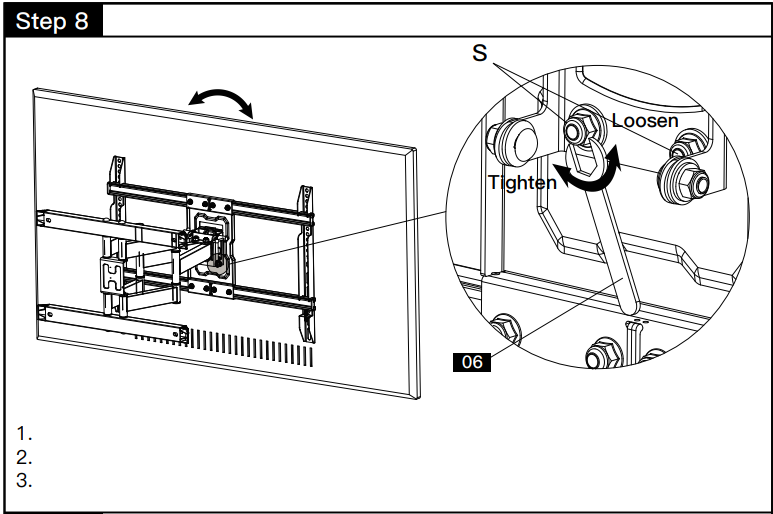
- Step 8
Level Adjustment- Loosen the two screws [S] on the rear of arm plate [01] , using the hex key.
- Level your TV.
Retighten screws [S] to secure in place.
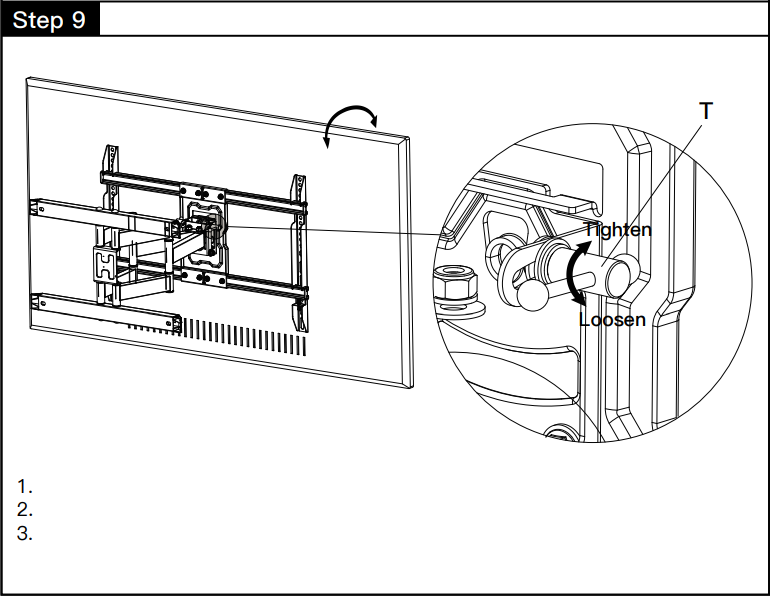
- Step 9
Tilt Adjustment- Loosen the tilt lever [T] on both sides.
- Adjust the TV tilt position.
Tighten tilt lever [T] to secure the TV in place at your desired tilt angle.
Step 10
Manage Cables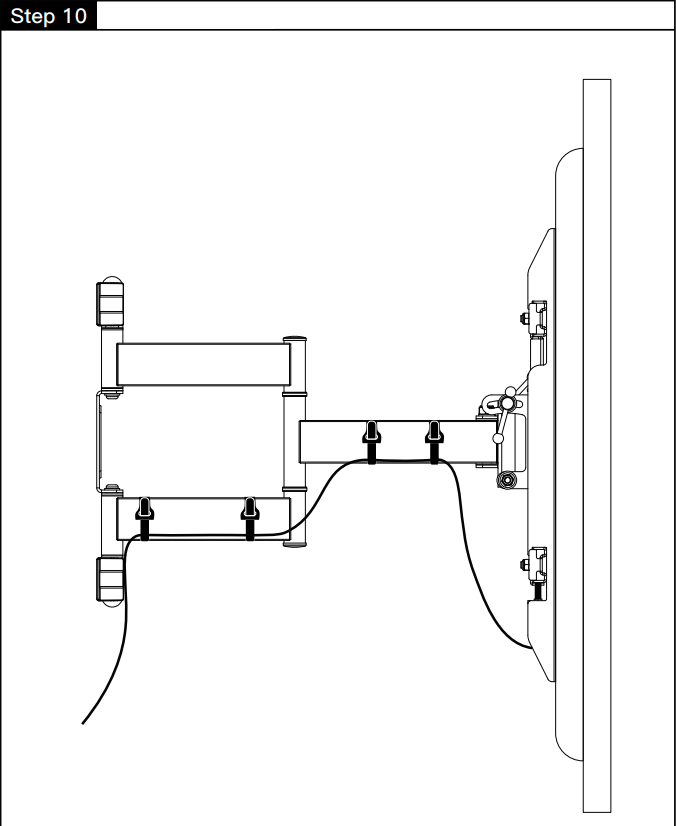
Setup Guide
Setting up the Perlesmith TV Wall Mount PSLFK5 is a straightforward process that can be completed with minimal tools. Here’s a brief guide:
- Locate the wall studs using a stud finder to ensure secure mounting.
- Mark the wall with a pencil where you intend to drill holes for the mount.
- Drill pilot holes and insert wall anchors if necessary.
- Hang the mount on the wall using screws provided in the package.
- Attach your TV to the mount by aligning it with the VESA pattern on the back of your television.
- Tighten all screws securely but avoid over-tightening.
IMPORTANT SAFETY INFORMATION
- Check package contents against Supplied Parts and Hardware Lists to assure that all components were received undamaged. Do not use damaged or defective parts. lf you require replacement parts, contact customer service at [email protected]
- Not all parts and hardware included will be used.
- Carefully read all instructions before attempting installation. If you do not understand the instructions or have any concerns or questions, please contact customer service at [email protected]
- This product may contain moving parts. Use with caution.
- Do not use this product for any purpose or in any configuration not explicitly specified in this instruction. We hereby disclaim any liability for injury or damage arising from incorrect assembly, incorrect mounting, or incorrect use of this product.
- DO NOT INSTALL INTO DRYWALL ALONE.
- Please check www.perlesmith.com for more products and company information.
Troubleshooting
If you encounter any issues during or after installation, here are some common problems and solutions:
- TV Not Level: Check if all screws are tightened evenly and adjust as needed.
- Cables Visible: Use cable ties or clips provided with the mount to manage cables effectively.
- Mount Not Sturdy: Ensure wall anchors are used if you're mounting into drywall or plaster.
- Always follow safety guidelines; avoid overloading beyond weight capacity.
Perlesmith TV Wall Mount PSLFK5 Pros & Cons
Pros
- Durable Construction: Heavy-duty steel ensures long-lasting support.
- Adjustable Viewing Angles: Tilt and swivel mechanisms provide optimal viewing experiences.
- Cable Management: Keeps cables organized for a clutter-free setup.
- Easy Installation: Comprehensive guide and tools make installation straightforward.
Cons
- Weight Limitation: Maximum weight capacity may not be sufficient for larger TVs.
- No Additional Tools Included: Some users might need additional tools not provided in the package.
Customer Reviews
Customers have praised the Perlesmith TV Wall Mount PSLFK5 for its ease of installation and sturdy build quality. Many have noted that it provides excellent support for their TVs while allowing for flexible viewing angles. However, some users have mentioned that it could benefit from additional tools in the package and clearer instructions for beginners. Overall, it's well-regarded as a reliable choice in its category.
Faqs
What is the weight capacity of the Perlesmith TV Wall Mount PSLFK5?
Is the Perlesmith TV Wall Mount PSLFK5 compatible with all TV sizes?
Does the Perlesmith TV Wall Mount PSLFK5 come with all necessary tools for installation?
Can I adjust the viewing angle on the Perlesmith TV Wall Mount PSLFK5?
How do I ensure my TV is level on the Perlesmith TV Wall Mount PSLFK5?
What type of walls is the Perlesmith TV Wall Mount PSLFK5 suitable for?
Does the Perlesmith TV Wall Mount PSLFK5 come with cable management options?
How do I troubleshoot if my TV is not securely attached to the Perlesmith TV Wall Mount PSLFK5?
Can I use the Perlesmith TV Wall Mount PSLFK5 for outdoor use?
What is the estimated price range of the Perlesmith TV Wall Mount PSLFK5?
Leave a Comment
